


三星浏览器vr
Let’s start with the basics. A-Frame because it makes it easy for me with what I already know of HTML5 and JavaScript. Is it WebXR compatible? Yes, it is in its current release 1.0.4.
让我们从基础开始。 A框架,因为它使我对HTML5和JavaScript的了解变得容易。 WebXR兼容吗? 是的,它在当前版本1.0.4中。
<!DOCTYPE html>
<html>
<head>
<meta charset="utf-8">
<title>Hello World A-Frame</title>
<meta name="description" content="Hello World, WebXR! in A-Frame">
<script src="https://aframe.io/releases/1.0.4/aframe.min.js"></script>
</head>
<body>
<a-scene background="color: #FAFAFA">
<a-box position="-1 0.5 -3" rotation="0 45 0" color="#4CC3D9" shadow></a-box>
<a-sphere position="0 1.25 -5" radius="1.25" color="#EF2D5E" shadow></a-sphere>
<a-cylinder position="1 0.75 -3" radius="0.5" height="1.5" color="#FFC65D" shadow></a-cylinder>
<a-plane position="0 0 -4" rotation="-90 0 0" width="4" height="4" color="#7BC8A4" shadow></a-plane>
</a-scene>
</body>
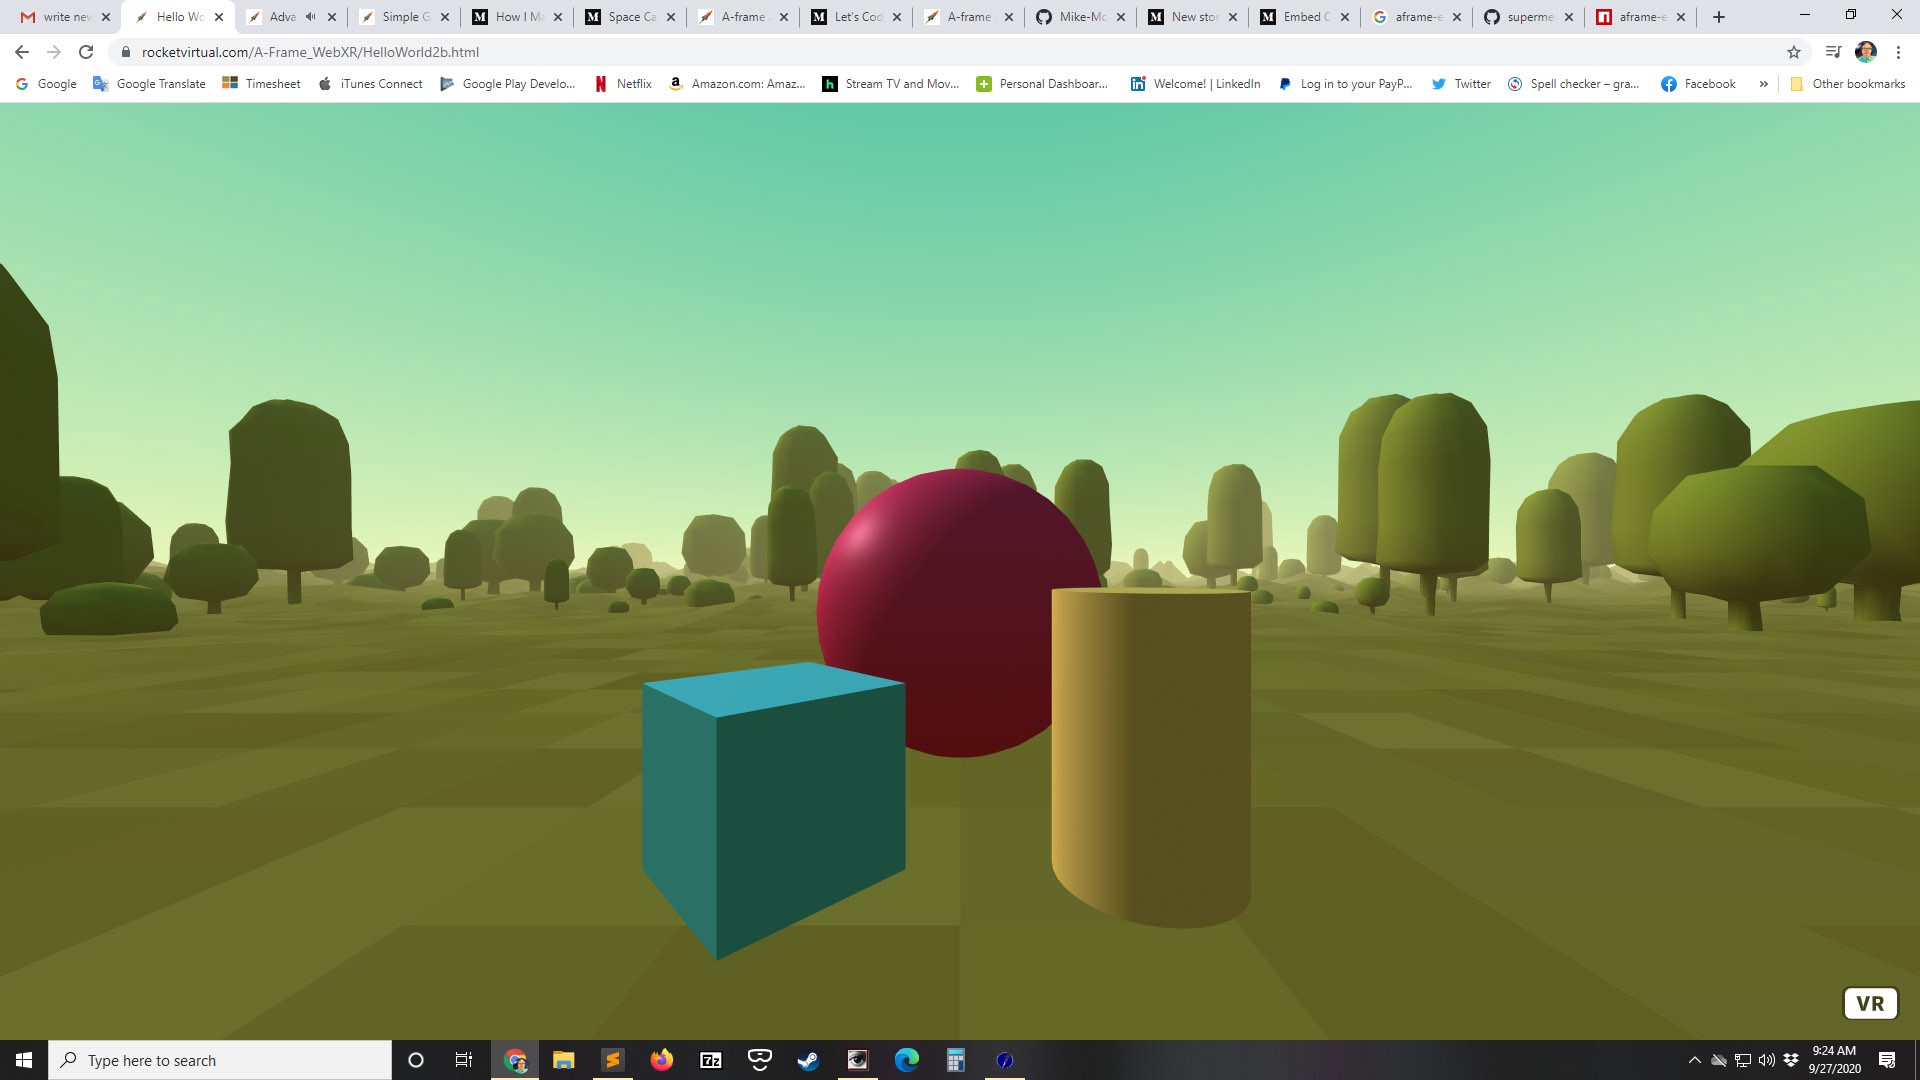
</html>So what does A-Frame give us to begin with? The Hello World example. Well that’s cool, but I want more. Like an environment around the geometric shapes and the ability to move around in VR. So let’s do that!
那么A-Frame给我们什么呢? Hello World示例。 很好,但是我想要更多。 就像围绕几何形状的环境以及在VR中移动的能力一样。 因此,让我们开始吧!
The best way to add an environment is with the a-frame-environment-component. I found it on GitHub here:
添加环境的最佳方法是使用aframe-environment组件。 我在GitHub上找到了它:
https://github.com/supermedium/aframe-environment-component
https://github.com/supermedium/aframe-environment-component
So add that and we get:
因此添加,我们得到:
In the code we have:
在代码中,我们有:
<!DOCTYPE html>
<html>
  <head>
    <meta charset="utf-8">
    <title>Hello World A-Frame</title>
    <meta name="description" content="Hello World, WebXR! in A-Frame">
    <script src="https://aframe.io/releases/1.0.4/aframe.min.js"></script>
    <script src="https://unpkg.com/aframe-environment-component@1.1.0/dist/aframe-environment-component.min.js"></script>
  </head>
  <body>
    <a-scene background="color: #FAFAFA">
      <a-box position="-1 0.5 -3" rotation="0 45 0" color="#4CC3D9" shadow></a-box>
      <a-sphere position="0 1.25 -5" radius="1.25" color="#EF2D5E" shadow></a-sphere>
      <a-cylinder position="1 0.75 -3" radius="0.5" height="1.5" color="#FFC65D" shadow></a-cylinder>
      <a-plane position="0 0 -4" rotation="-90 0 0" width="4" height="4" color="#7BC8A4" shadow></a-plane><a-entity environment="preset: forest"></a-entity></a-scene>
  </body>
</html>
But we lost the plane and shadowing at the bottom of the geometric shapes? Well it’s still there, just below the environment, buried. Let’s fix that. There is a way to edit the appearance of the scene inside an “Inspector” with the keys ctrl-alt-i giving you this:
但是我们在几何形状的底部丢失了平面和阴影吗? 好吧,它仍然在那里,就在环境之下,被掩埋了。 让我们修复它。 有一种方法可以使用ctrl-alt-i键在“检查器”中编辑场景的外观:
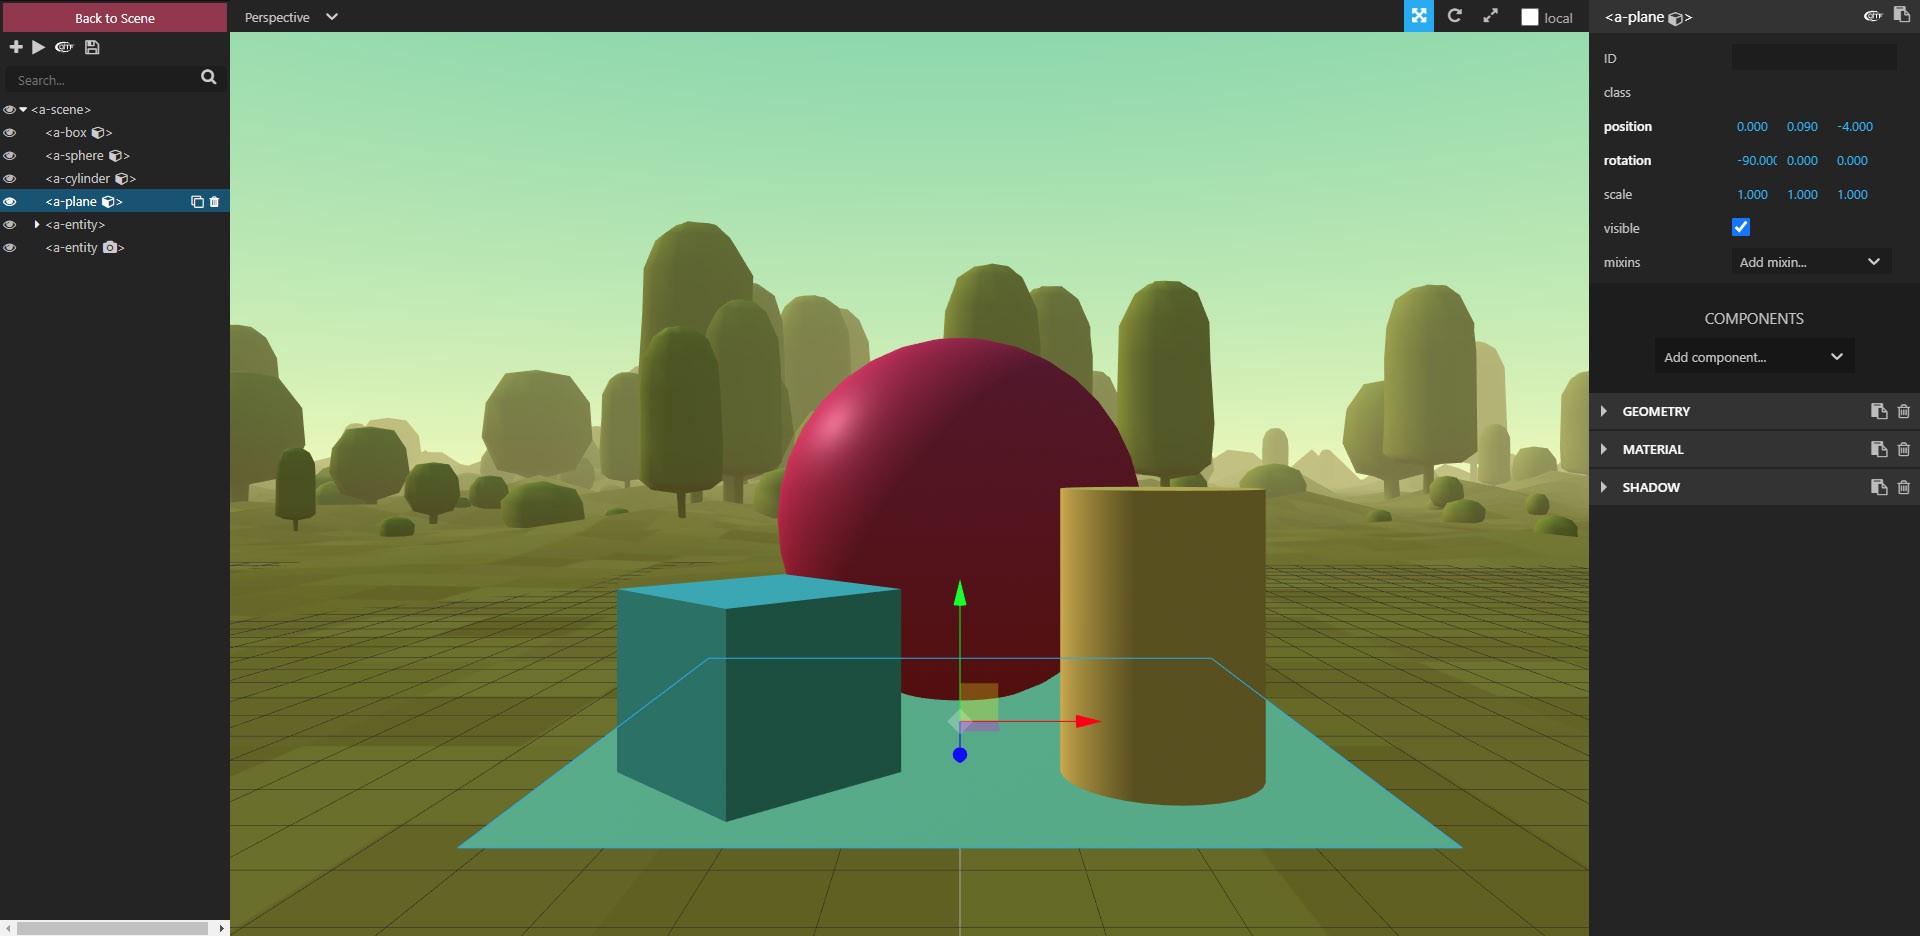
Notice that you can now select the plane on the upper left and move it by dragging with the green arrow upward into the scene in the middle of the screen. The x, y and z “position” of the plane will be visible in the upper right of the screen and will change accordingly. You can now adjust the positions of the sphere, cube and cylinder upwards as well, correcting them now that the plane has been moved up. Just select the appropriate entities on the upper left.
请注意,您现在可以选择左上角的平面,并通过将绿色箭头向上拖动到屏幕中间的场景中来移动它。 平面的x,y和z“位置”将在屏幕的右上方可见,并将相应地更改。 现在,您还可以向上调整球体,立方体和圆柱体的位置,并在平面向上移动后对其进行校正。 只需在左上角选择适当的实体。
Ok, let’s do more, let’s change the environment parameters. Select <a-entity> just below <a-plane> on the upper left.
好的,让我们做更多的事情,让我们更改环境参数。 选择左上方<a-plane>下方的<a-entity>。
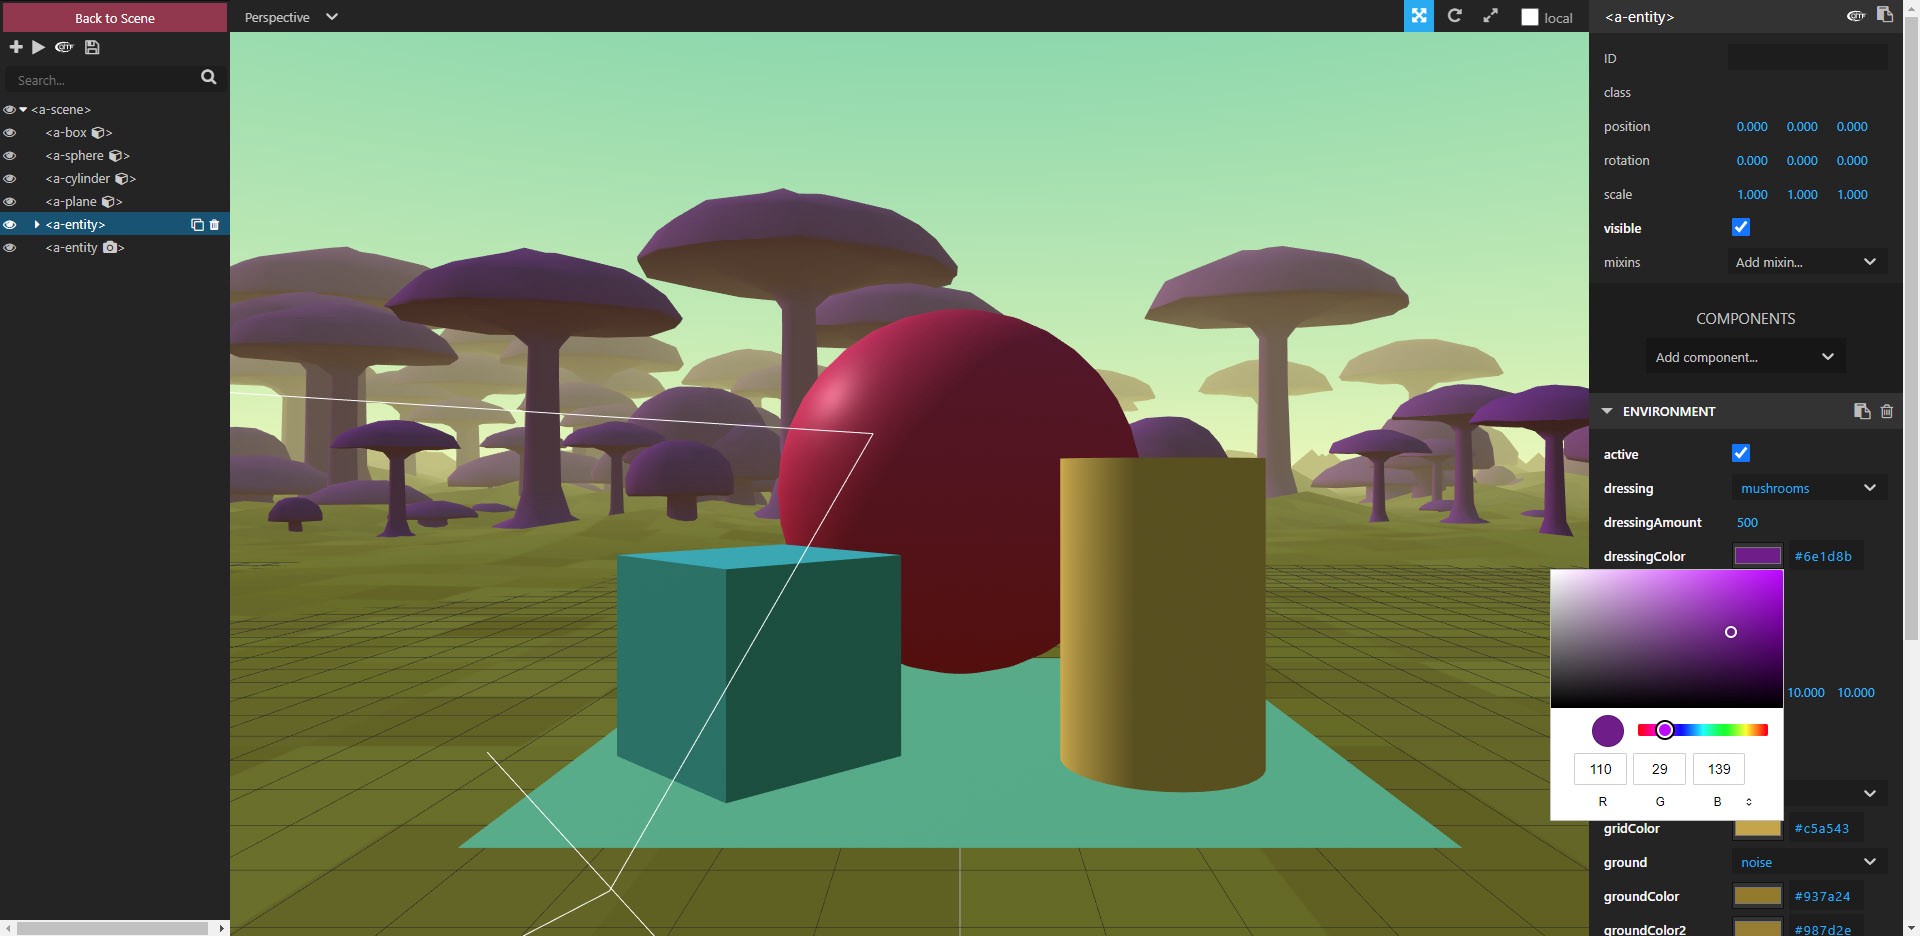
On the right you will see ENVIRONMENT and under it dressing and dressingColor. I selected mushroom and a purple dressing color, just to be different. Now you might think that these changes will stay if you leave the page, but you would be disappointed; they don’t!
在右侧,您将看到环境及其下的dressing和dressingColor。 我选择了蘑菇和紫色的敷料颜色,只是有所不同。 现在,您可能会认为,如果离开页面,这些更改将保留下来,但是您会感到失望。 他们不!
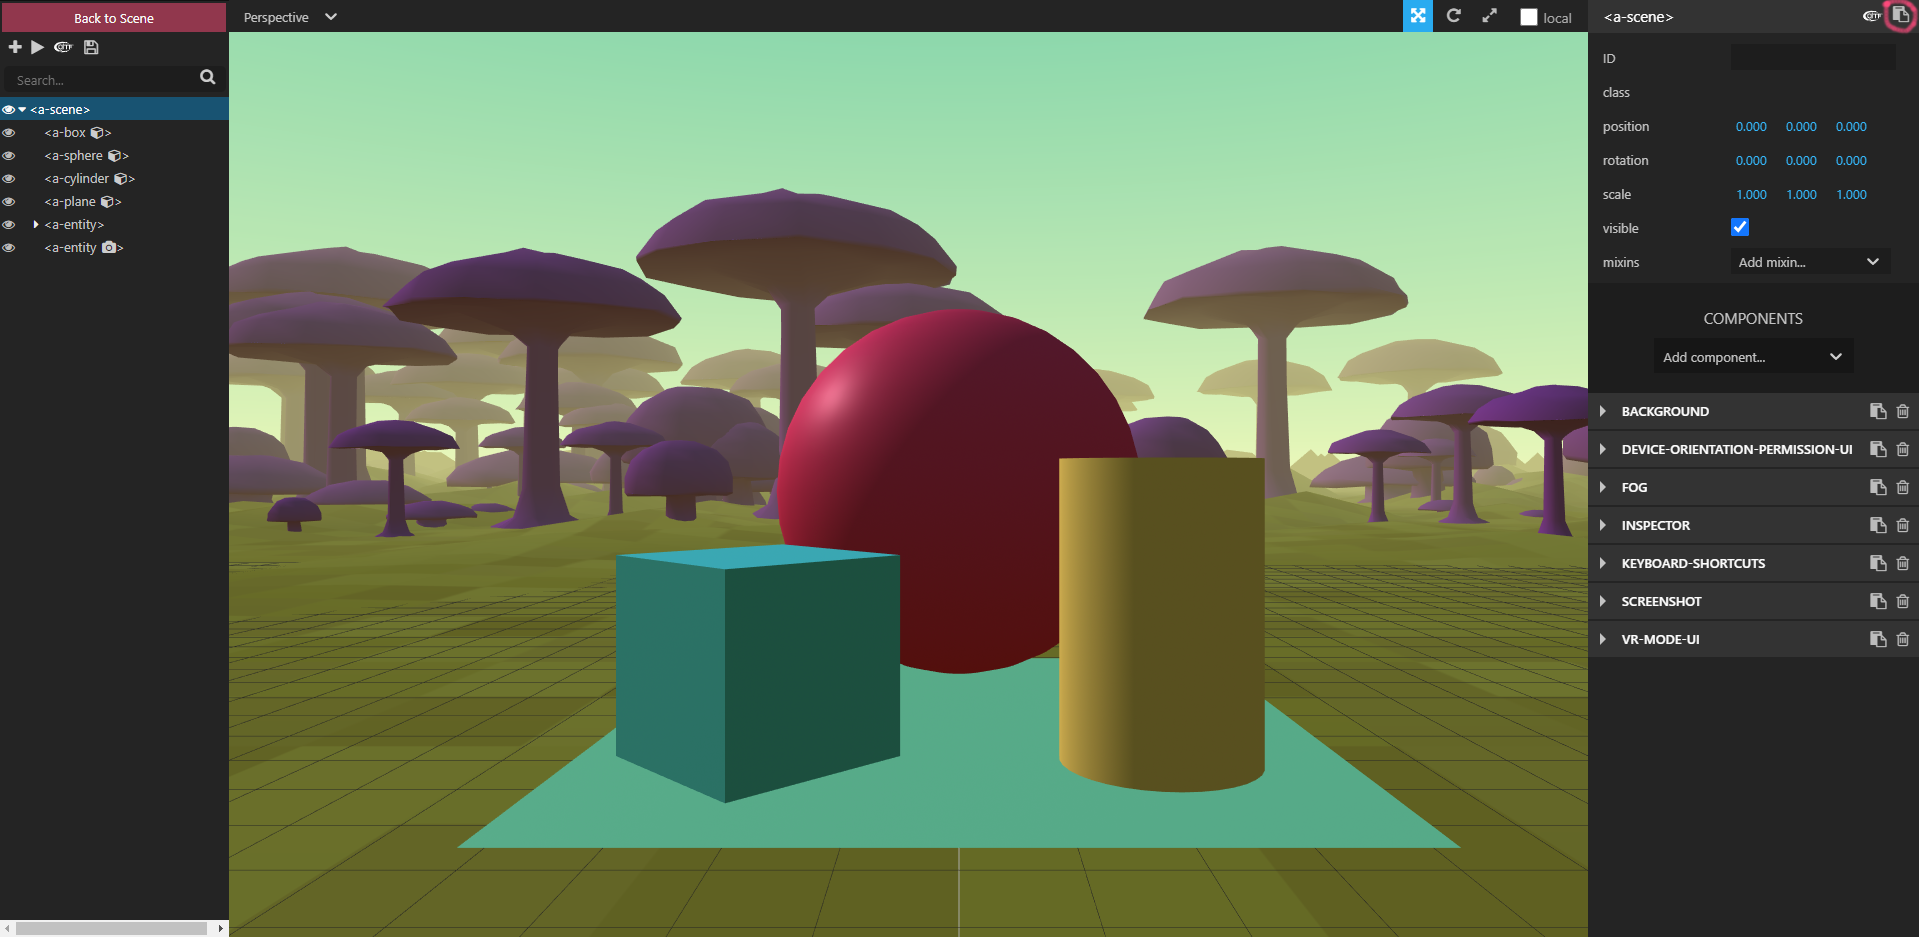
So we have to save them in a way. Select <a-scene> on the upper right. Then click on the “copy entity HTML to clip board” button which is a small icon to the right of gltf icon in the top upper right corner of the screen (I’ve circled it in red in the image above). Paste the clip board below your HTML into your editor of choice and you should get something like this:
因此,我们必须以某种方式保存它们。 选择右上方的<a-scene>。 然后,单击“将实体HTML复制到剪贴板”按钮,该按钮是屏幕右上角的gltf图标右侧的小图标(我在上图中用红色圈出了它)。 将HTML下方的剪贴板粘贴到您选择的编辑器中,您将得到如下内容:
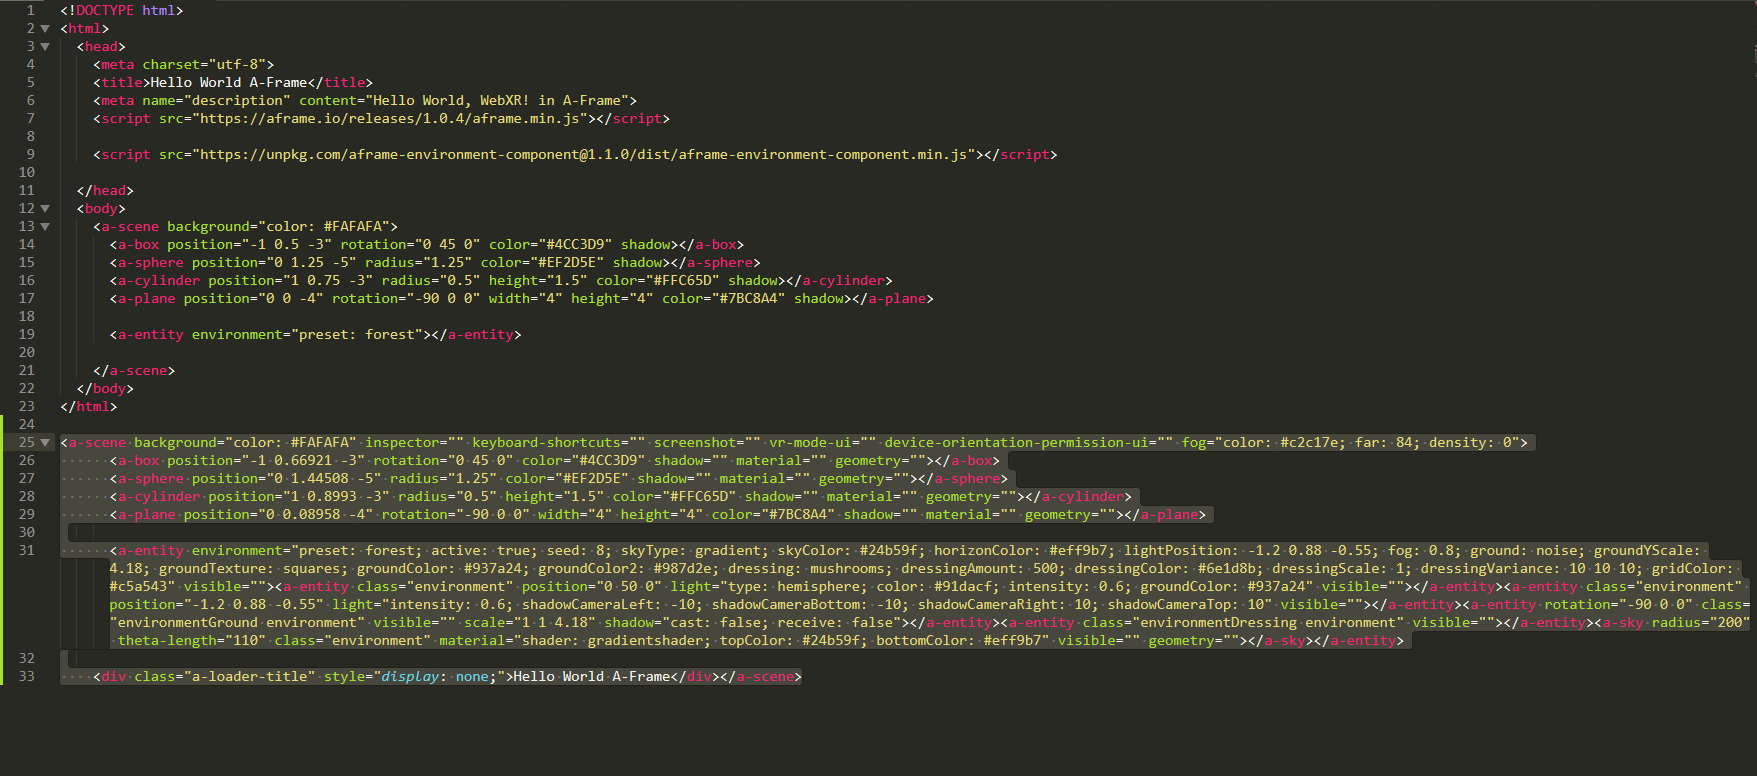
Now notice that the <a-scene>, its entities, <a-box>, <a-sphere>, <a-cylinder>, <a-plane> are all there with their x, y, z positions as changed inside the Inspector. Copy these new positions over your corresponding entity positions above. Also notice the <a-entity environment=”preset: forest; active: true; seed: 8; skyType: gradient; skyColor: #24b59f; . . . is literally full of parameters. Too many in fact for our purposes. So let me clean that up for you, we only need the dressing and dressingColor we modified earlier. So modifying and deleting out the not needed code parameters, we get something like this:
现在请注意<a-scene>,其实体,<a-box>,<a-sphere>,<a-cylinder>,<a-plane>都在其中,其x,y,z位置在内部已更改检查员。 将这些新职位复制到您上面相应的实体职位上。 还要注意<a-entity environment =“”预设:森林; 活动:真实; 种子:8; skyType:渐变; skyColor:#24b59f; 。 。 。 字面上充满了参数。 实际上,出于我们的目的,太多了。 因此,让我为您整理一下,我们只需要我们之前修改过的dressing和dressingColor即可。 因此,修改和删除不需要的代码参数,我们得到如下信息:
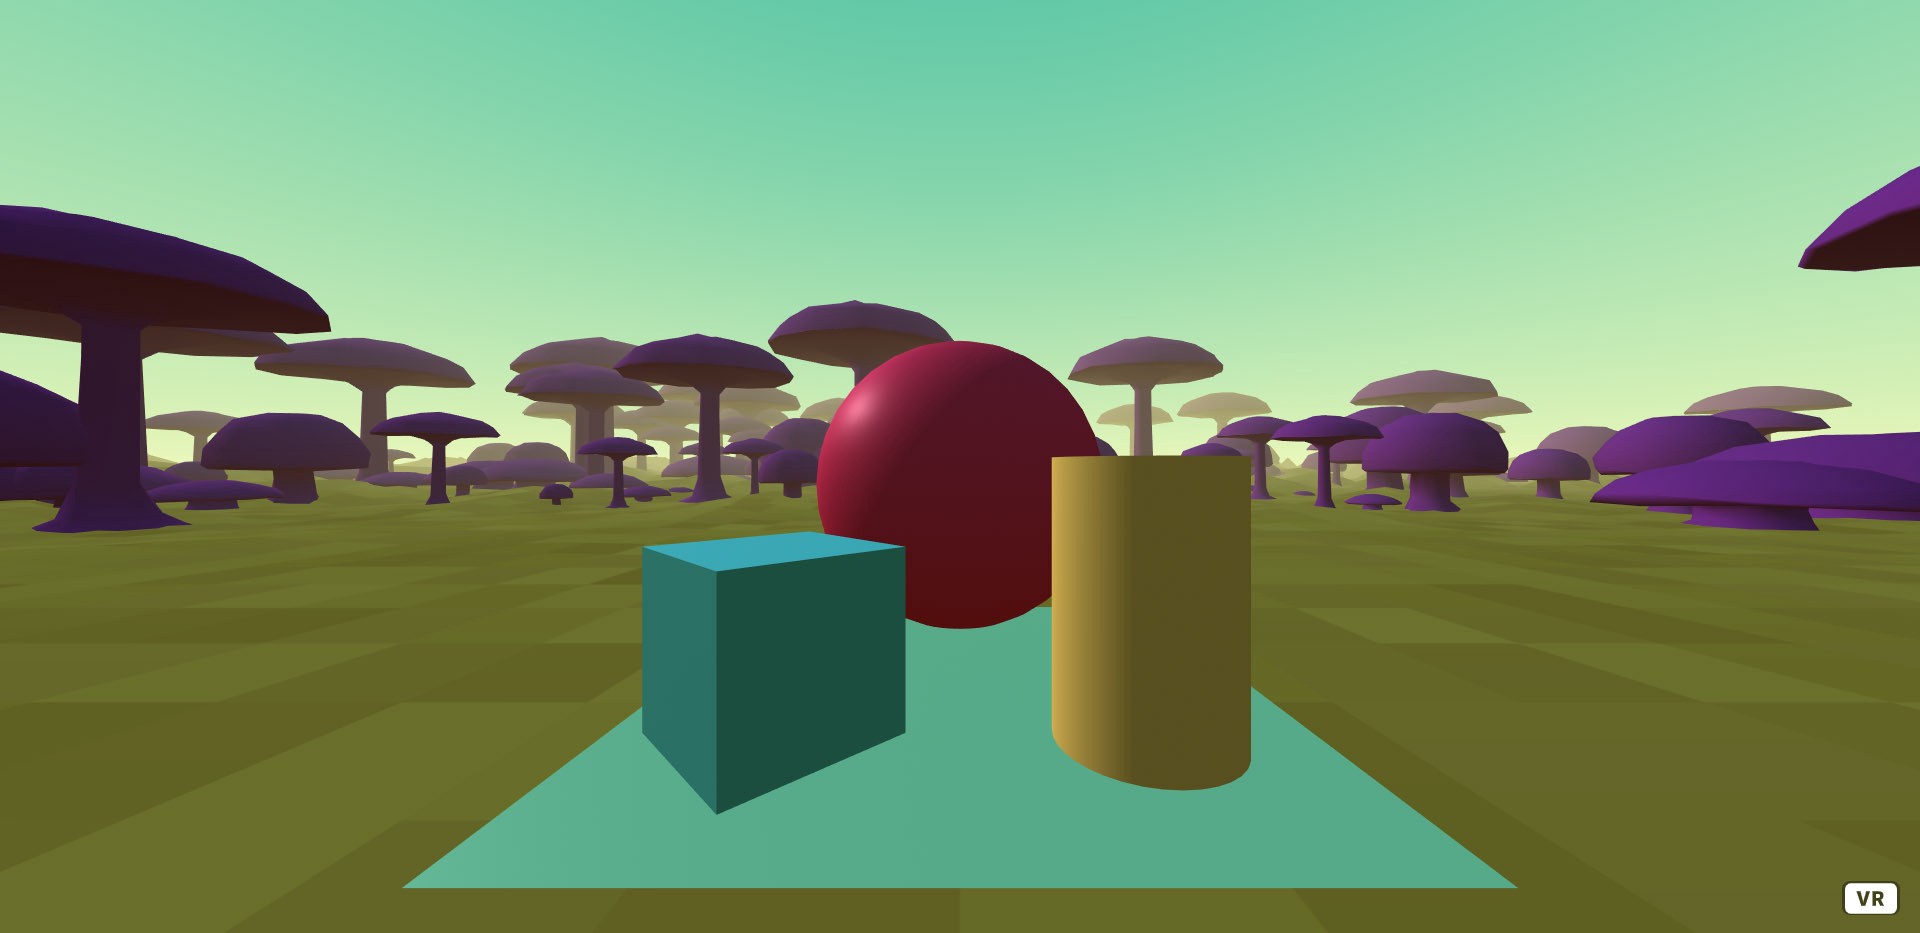
We did lose our shadowing, but we will correct that in a bit. Notice we have everything from the original Hello World including a new environment with a ground landscape, sky and purple mushrooms surrounding us! Here is the code for that:
我们确实失去了阴影,但是稍后我们将对其进行纠正。 请注意,我们拥有原始Hello World的一切,包括一个新环境,周围有地面景观,天空和紫色的蘑菇! 这是该代码:
<!DOCTYPE html>
<html>
  <head>
    <meta charset="utf-8">
    <title>Hello World A-Frame</title>
    <meta name="description" content="Hello World, WebXR! in A-Frame">
    <script src="https://aframe.io/releases/1.0.4/aframe.min.js"></script><script src="https://unpkg.com/aframe-environment-component@1.1.0/dist/aframe-environment-component.min.js"></script></head>
  <body>
    <a-scene background="color: #FAFAFA">
      <a-box position="-1 0.66921 -3" rotation="0 45 0" color="#4CC3D9" shadow="" material="" geometry=""></a-box>
      <a-sphere position="0 1.44508 -5" radius="1.25" color="#EF2D5E" shadow="" material="" geometry=""></a-sphere>
      <a-cylinder position="1 0.8993 -3" radius="0.5" height="1.5" color="#FFC65D" shadow="" material="" geometry=""></a-cylinder>
      <a-plane position="0 0.08958 -4" rotation="-90 0 0" width="4" height="4" color="#7BC8A4" shadow="" material="" geometry=""></a-plane><a-entity environment="preset: forest; dressing: mushrooms; dressingColor: #6e1d8b;"></a-entity></a-scene>
  </body>
</html>
Not bad really, pretty tight code for everything we get! That’s A-Frame for you. Now let’s take a look at the documentation on shadowing. It can be found in the A-Frame master documentation here:
真的还不错,对于我们得到的一切来说,代码都很紧凑! 那是您的A框架。 现在,让我们看一下有关阴影的文档。 可以在A-Frame主文档中找到:
See if you can figure out how to do it? Here is what I got:
看看您是否能知道该怎么做? 这是我得到的:
Wow, look at that! I got shadows on the plane and on the sphere by adding <a-entity light=…> to the scene and casting and receiving shadows on the <a-plane> entity. Here is the code:
哇,看那个! 通过在场景中添加<a-entity light = ...>并在<a-plane>实体上投射和接收阴影,可以在平面和球体上获得阴影。 这是代码:
<!DOCTYPE html>
<html>
  <head>
    <meta charset="utf-8">
    <title>Hello World A-Frame</title>
    <meta name="description" content="Hello World, WebXR! in A-Frame">
    <script src="https://aframe.io/releases/1.0.4/aframe.min.js"></script><script src="https://unpkg.com/aframe-environment-component@1.1.0/dist/aframe-environment-component.min.js"></script></head>
  <body>
    <a-scene background="color: #FAFAFA">
      <a-box position="-1 0.66921 -3" rotation="0 45 0" color="#4CC3D9" shadow="" material="" geometry=""></a-box>
      <a-sphere position="0 1.44508 -5" radius="1.25" color="#EF2D5E" shadow="" material="" geometry=""></a-sphere>
      <a-cylinder position="1 0.8993 -3" radius="0.5" height="1.5" color="#FFC65D" shadow="" material="" geometry=""></a-cylinder>
      <a-plane position="0 0.08958 -4" rotation="-90 0 0" width="4" height="4" color="#7BC8A4" shadow="recieve: true" material="" geometry=""></a-plane><a-entity environment="preset: forest; dressing: mushrooms; dressingColor: #6e1d8b;"></a-entity><a-entity light="type:directional; castShadow:true;" position="1 1 1"></a-entity></a-scene>
  </body>
</html>
If you wanted to change the directional casting of the shadows, you would just change the position of the light inside of the Inspector. Easy really given what you already know. I’ll leave mine unchanged for now. We have to get on to what I promised. Being able to move around in VR. This next stuff should require a VR Headset. This is where you lose most people, because they just don’t have the hardware or want to purchase it.
如果要更改阴影的方向投射,只需更改灯光在检查器内部的位置即可。 真的很容易,因为您已经知道了。 我暂时保持不变。 我们必须遵守我的承诺。 能够在VR中移动。 接下来的这些应该需要一个VR耳机。 这是您失去大多数人的地方,因为他们只是没有硬件或想购买它。
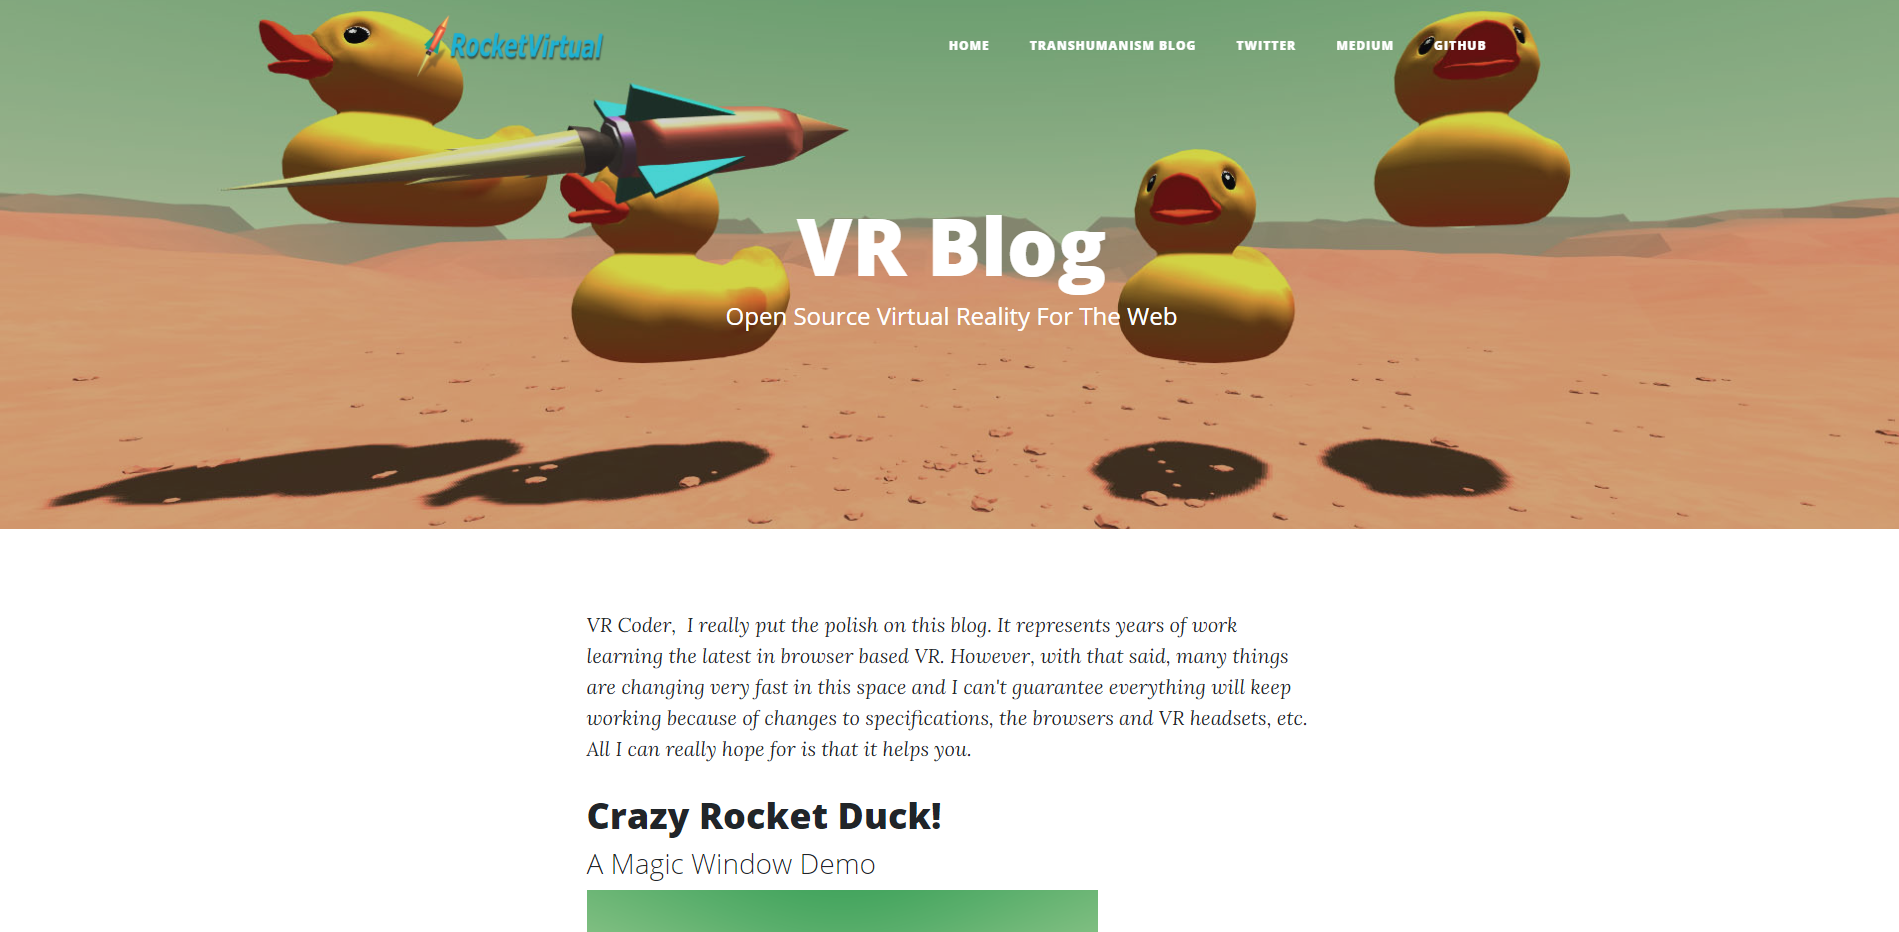
Time for a plug: you can find out more on my VR Blog at: https://rocketvirtual.com
插拔时间:您可以在我的VR博客上找到更多信息,网址为: https : //rocketvirtual.com
Now moving around. That can be done multiple ways. The trick here is to do it in such a way that multiple vendor VR headsets and controllers all work in multiple browser versions. That can be a really big challenge! With all the new VR headset gear coming out, changes to the browser specs and changes to your code base, it’s sort of like trying to hit multiple moving targets with one single arrow! Therefore, it’s not so amazing that code breaks over time, until things settle down, if they ever do. Ok, I’ll stop complaining now.
现在四处走动。 这可以通过多种方式完成。 这样做的技巧是,使多个供应商VR头戴式耳机和控制器都可以在多个浏览器版本中工作。 这可能是一个很大的挑战! 随着所有新的VR头盔设备问世,浏览器规格的更改以及代码库的更改,这就像试图用一个箭头击中多个移动目标一样! 因此,如果事情能够解决,代码会随着时间的推移而中断,直到事情解决为止,这并不令人惊讶。 好吧,我现在不再抱怨。
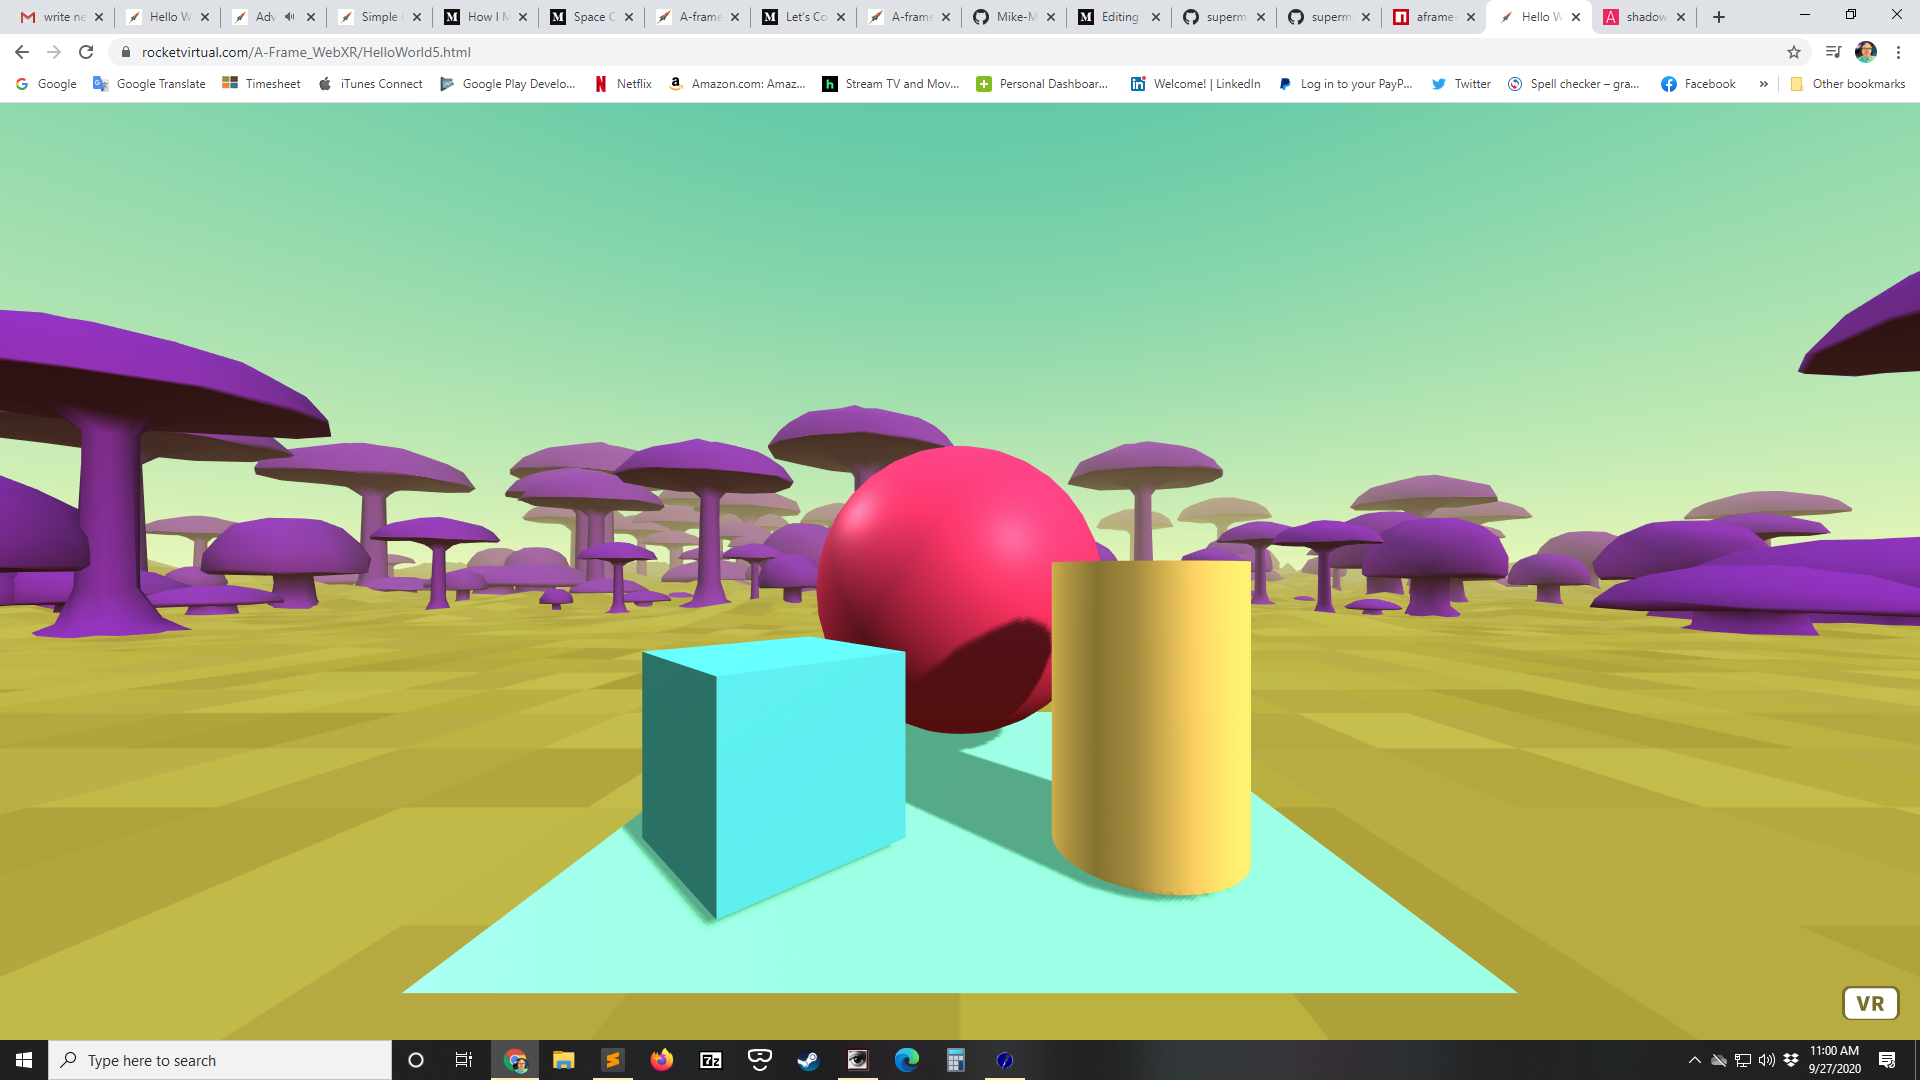
Before we begin, everything should look “something” like this link:
在开始之前,所有内容都应类似于此链接的“内容”:
Also, you should be aware of inspect in the browser console:
另外,您应该注意在浏览器控制台中进行检查:
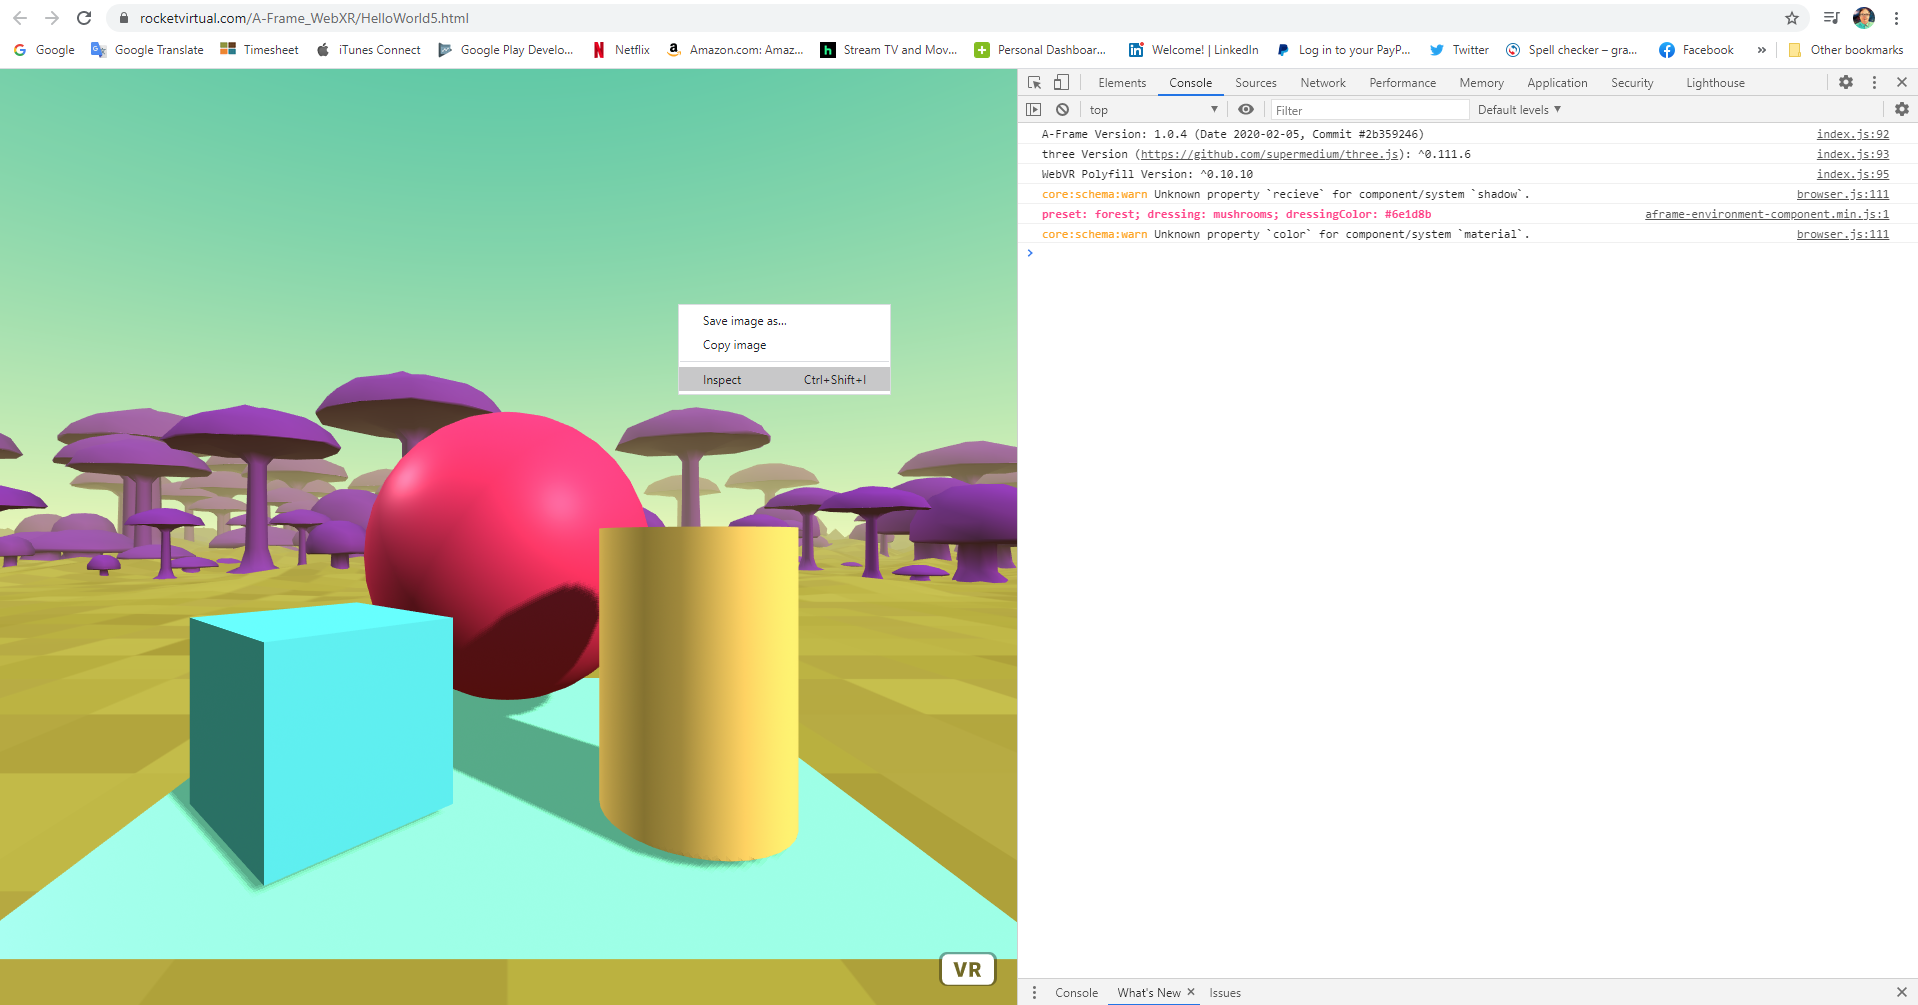
On a PC you right mouse button click and select down to inspect. Now select the tab labeled Console. As you can see above you get the A-Frame version, the Three.js version and other information which can be useful in debugging. I won’t go into detail about that here, but I wanted you to be aware of this in case in the future you run into bugs. Everyone eventually will. Now close the inspect with the X and let’s move on.
在PC上,右键单击并选择向下进行检查。 现在,选择标记为控制台的选项卡。 如上所示,您将获得A-Frame版本, Three.js版本以及其他对调试有用的信息。 我在这里不做详细介绍,但是我希望您对此有所了解,以防将来您遇到错误。 每个人最终都会。 现在用X关闭检查,让我们继续。

Moving around within VR can be done multiple ways. The way I choose is via the thumb stick and teleportation with the following code:
在VR中移动可以通过多种方式完成。 我选择的方式是通过指尖并使用以下代码传送:
<!DOCTYPE html>
<html>
  <head>
    <meta charset="utf-8">
    <title>Advanced Hello World A-Frame</title>
    <meta name="description" content="Advanced Hello World, WebXR! in A-Frame"><!-- *** CHANGE THESE TO COMPONENTS ON YOUR SERVER *** -->
    <script src="aframe-master/dist/aframe-v1.0.4.min.js"></script>
    <script src="aframe-environment-component-master/dist/aframe-environment-component.min.js"></script>
    <script src="aframe-extras-master/dist/aframe-extras.min.js"></script>
    <script src="aframe-teleport-controls-master/dist/aframe-teleport-controls.js"></script>
    <script src="superframe-master/components/thumb-controls/dist/aframe-thumb-controls-component.min.js"></script>
  </head>
  <body>
    <a-scene background="color: #FAFAFA"><!-- Basic movement and teleportation  -->
      <a-entity id="cameraRig" movement-controls="constrainToNavMesh: true;" navigator="cameraRig: #cameraRig; cameraHead: #head; collisionEntities: .collision; ignoreEntities: .clickable" position="0 0 0" rotation="0 0 0">
        <!-- camera -->
        <a-entity id="head" camera="active: true" position="0 1.6 0" look-controls="pointerLockEnabled: true; reverseMouseDrag: true" ></a-entity>
              <!-- Left Controller  -->
              <a-entity class="leftController" hand-controls="hand: left; handModelStyle: lowPoly; color: #15ACCF" tracked-controls vive-controls="hand: left" oculus-touch-controls="hand: left" windows-motion-controls="hand: left" teleport-controls="cameraRig: #cameraRig; teleportOrigin: #head; button: trigger; curveShootingSpeed: 18; landingMaxAngle: 60" visible="true"></a-entity>
              <!-- Right Controller  -->
              <a-entity class="rightController" hand-controls="hand: right; handModelStyle: lowPoly; color: #15ACCF" tracked-controls vive-controls="hand: right" oculus-touch-controls="hand: right" windows-motion-controls="hand: right" laser-controls raycaster="showLine: true; far: 10; interval: 0; objects: .clickable, a-link;" line="color: lawngreen; opacity: 0.5" visible="true"></a-entity>
      </a-entity><a-box position="-1 0.66921 -3" rotation="0 45 0" color="#4CC3D9" shadow="" material="" geometry=""></a-box>
      <a-sphere position="0 1.44508 -5" radius="1.25" color="#EF2D5E" shadow="" material="" geometry=""></a-sphere>
      <a-cylinder position="1 0.8993 -3" radius="0.5" height="1.5" color="#FFC65D" shadow="" material="" geometry=""></a-cylinder>
      <a-plane position="0 0.08958 -4" rotation="-90 0 0" width="4" height="4" color="#7BC8A4" shadow="recieve: true" material="" geometry=""></a-plane><a-entity environment="preset: forest; dressing: mushrooms; dressingColor: #6e1d8b;"></a-entity><a-entity light="type:directional; castShadow:true;" position="1 1 1"></a-entity></a-scene>
  </body>
</html>
Here is a working example using just such code:
这是一个使用此类代码的工作示例:
You may have notice I changed the A-Frame components to those stored on my server in the <script scr= . . . > lines. This is because A-Frame is developing further as I write this article and I wanted to make sure I showed you a working copy. I’m sorry but you must change those for yourself now to the latest code based. Here is a list of used framework components and where they can be found (copy these to your server and reference them directly):
您可能已经注意到,我将A框架组件更改为存储在服务器上<script scr =的那些组件。 。 。 >行。 这是因为在撰写本文时,A-Frame正在进一步发展,并且我想确保向您展示了有效的副本。 抱歉,您现在必须自行将其更改为基于最新代码的代码。 以下是使用的框架组件的列表以及在哪里可以找到它们(将它们复制到您的服务器并直接引用它们):
So how do I get this code to a web server? I answered that question in another article older than this one https://medium.com/@Michael_Blade/lets-code-a-simple-webvr-game-a9c5854a6446
那么如何将这段代码发送到Web服务器? 我在另一篇比该文章更早的文章中回答了这个问题https://medium.com/@Michael_Blade/lets-code-a-simple-webvr-game-a9c5854a6446
The basic principles are there, simply FTP, there is nothing secret here.
那里的基本原理,只是FTP ,这里没有什么秘密。
The alternative to this approach is to use Node.js which is outside the scope of this article, but you can find out how here. Ultimately you’ll probably want your own server to host your VR code. Then you’ll be able to do cool things like have a magic window.
这种方法的替代方法是使用Node.js,这不在本文讨论范围之内,但是您可以在此处找到方法。 最终,您可能希望自己的服务器托管您的VR代码。 然后,您将可以做一些很酷的事情,例如拥有一个魔术窗。
Now again, If you’d like to see some more of my latest examples, check me out at my VR Blog and please subscribe to my newsletter for updates.
再说一次,如果您想查看更多我的最新示例,请在我的VR博客中查看我,然后订阅我的新闻通讯以获取更新。
翻译自: https://medium.com/@Michael_Blade/where-to-begin-with-vr-in-a-browser-d818f713a8a8
三星浏览器vr


 被折叠的 条评论
为什么被折叠?
被折叠的 条评论
为什么被折叠?
 到【灌水乐园】发言


