


沥青配合比怎么计算
Lane detection and control has become a common feature in many vehicles today. Additionally it is a basic starting point for anyone going in the direction of Autonomous Driving. But for most people who are not working on autonomous driving or computer vision, starting with it might appear much more of a daunting task than it actually is.
大号 ANE检测和控制已成为当今许多车辆的共同特点。 此外,它是任何朝着自动驾驶方向发展的人的基本起点。 但是对于大多数不从事自动驾驶或计算机视觉工作的人来说,从它开始似乎比实际要艰巨得多。
There is a lot of technical research involved in doing actual lane detection. In this case, we see a practical perspective so that anyone interested can try it out without much hassle. The detailed links to the theory are still there in the relevant sections for the curious ones: those of you who do not get satiated with just practical applications and like to get their teeth to sink deeper into the subject matter.
进行实际车道检测涉及很多技术研究。 在这种情况下,我们看到了一个实用的观点,以便任何有兴趣的人都可以尝试而无需麻烦。 与该理论相关的详细链接仍在相关章节中,为那些好奇的人所用:那些不仅仅满足于实际应用并且喜欢让自己的牙齿更深入主题的人们。
Here is everything you need to start:
这是您需要开始的所有内容:
Asphalt 8 Airborne: If you are a Windows 10 user, you can download it free from the Windows Store: https://www.microsoft.com/en-us/p/asphalt-8-airborne/9wzdncrfj12h?activetab=pivot:overviewtab
空中8号沥青:如果您是Windows 10用户,则可以从Windows应用商店免费下载: https://www.microsoft.com/zh-cn/p/asphalt-8-airborne/9wzdncrfj12h?activetab=pivot:概述标签
Python 3.7: You could install the latest version of Anaconda, most of the required package will be already bundled and ready to use. Here is the link to download the latest version: https://www.anaconda.com/products/individual
Python 3.7:您可以安装最新版本的Anaconda,大多数必需的软件包已经捆绑在一起并可以使用。 这是下载最新版本的链接: https : //www.anaconda.com/products/individual
OpenCV: It is a library mainly aimed at real time computer vision. You can find the documentation about how to install and use it here: https://www.learnopencv.com/install-opencv3-on-windows/
OpenCV:这是一个主要针对实时计算机视觉的库。 您可以在此处找到有关如何安装和使用它的文档: https : //www.learnopencv.com/install-opencv3-on-windows/
Now that we have all we need, let’s cut to the chase!
现在我们有了所需的一切,让我们开始追逐吧!
Step 1: Find a way to access the game screen
第1步:找到访问游戏屏幕的方法
This one is easy enough. I did a quick google search to check out python codes that can be used to access the screen. Here is a really great tutorial, from which I used the basic code and adapted it for this case:
这很容易。 我做了一个快速的谷歌搜索,以检查可用于访问屏幕的python代码。 这是一个非常不错的教程,我从中使用了基本代码并对这种情况进行了调整:
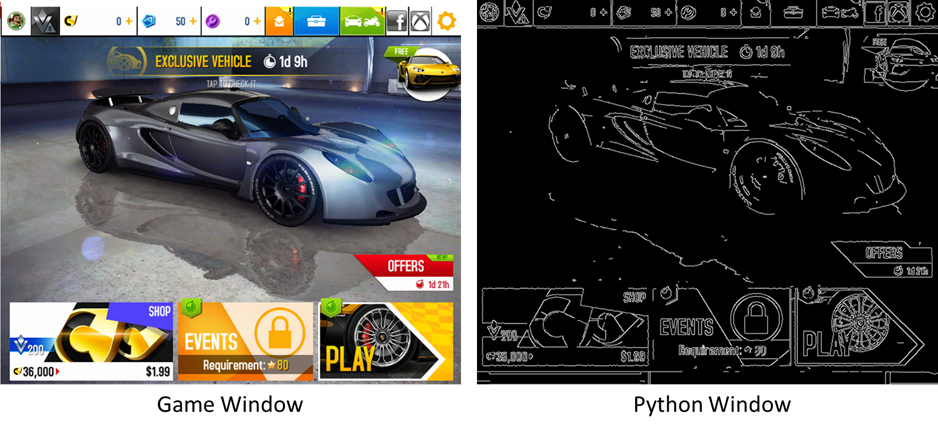
If we run the code directly, you would see a similar result as seen below in a random game level. You will notice that the colors are a bit different, and the screen rate results in some lag (which is OK for our purpose).
如果我们直接运行代码,您将在随机游戏级别中看到类似的结果,如下所示。 您会注意到颜色略有不同,并且屏幕显示速度会导致一些滞后(对于我们的目的这是可以的)。

Let’s correct the color part with some help from the OpenCV documentation. There is a argument in cv2 that makes the screen recording look like the actual color (or at least as far as my vision allows) which is COLOR_BGR2RGB, that is what I used for the correction here. Also, the time function is used to get the screen rate, which comes to around 10 fps, not bad at all! The modified code looks as follows:
让我们在OpenCV文档的一些帮助下更正颜色部分。 cv2中有一个参数,使屏幕记录看起来像实际的颜色(或至少在我的视野允许的范围内),即COLOR_BGR2RGB,这就是我在此处进行的校正。 另外,时间功能用于获取屏幕速率,约为10 fps,这一点都不差! 修改后的代码如下所示:
# import libraries
from PIL import ImageGrab
import cv2
import numpy as np
import time# for timing
last_time = time.time()# screen capture loop
while True:
    screen = np.array(ImageGrab.grab(bbox=(0,40,800,700)))
    print(f'the screen rate is {(1/(time.time()-last_time))}')
    last_time = time.time()
    cv2.imshow('Python Window', cv2.cvtColor(screen, \
               cv2.COLOR_BGR2RGB))    if cv2.waitKey(25) & 0xFF == ord('q'):
        cv2.destroyAllWindows()
        break
For the above code to correctly capture screen, I have minimized the game window to the top left corner of my primary monitor, with the dimensions as 800 x 700. You could adjust it appropriately in your code (by changing bbox in the ImageGrab above), especially if you are using multiple monitors.
为了使上面的代码正确捕获屏幕,我将游戏窗口最小化到了主显示器的左上角,尺寸为800 x700 。您可以在代码中进行适当调整(通过更改上方 ImageGrab中的 bbox ) ,尤其是在使用多台显示器的情况下。
Once you run this, you get the screen capture as follows:
运行此命令后,将获得以下屏幕截图:

This method of screen capture is extremely handy, particularly when we need to generate images for machine learning use cases.
这种屏幕捕获方法非常方便,尤其是当我们需要为机器学习用例生成图像时。
Now that we can capture the game window, we can move on to the next step.
现在我们可以捕获游戏窗口了,我们可以继续下一步了。
Step 2: Image processing for edge detection
步骤2:边缘检测的图像处理
Since lane detection is basically an edge identification from image, you would have to process the image to actually get the main outlines. One of the most popular method used in computational vision processing is the Canny algorithm for edge detection. It basically extracts and retains the useful structural information from images, all the while drastically reducing its size.
由于车道检测基本上是图像的边缘识别,因此您必须处理图像才能真正获得主要轮廓。 在计算视觉处理中使用的最流行的方法之一是用于边缘检测的Canny算法 。 它基本上从图像中提取并保留有用的结构信息,同时极大地减小了图像的大小。
Open CV has a neat little implementation of the Canny edge detection. This reduces the complexity of the image much further and we get the edges of the image in the screen with pretty much a three line code.
Open CV几乎没有Canny边缘检测的实现 。 这进一步降低了图像的复杂性,并且我们在屏幕上几乎用三行代码获得了图像的边缘。
Let’s create a small function for processing the image using the Canny implementation in cv2. You can experiment with various values of thresholds by looking into the documentation, the code looks like this:
让我们创建一个小函数,使用cv2中的Canny实现来处理图像。 您可以通过查看文档来尝试各种阈值值,代码如下所示:
# canny image processing for detecting edgesdef edgeprocessed(image):
    gray_image = cv2.cvtColor(image, cv2.COLOR_BGR2GRAY)
    edgeprocessed_img = cv2.Canny(gray_image,               \
                        threshold1 = 200, threshold2 = 300)    return edgeprocessed_img
We have to run the processed image again in the image capture loop, so it makes more sense to define this loop as a function to take into consideration the processing as the input. I will get a bit ahead of myself here and modify it to general function taking the inputs as list, which will make more sense further down in the analysis.
我们必须在图像捕获循环中再次运行处理后的图像,因此将这个循环定义为一个函数以考虑处理作为输入是更有意义的。 我将在这里稍占上风,并以输入作为列表将其修改为通用函数,这将在分析中进一步发挥作用。
def screen_capture(processing = None):
    # takes in a list for type of processing
    # [processing_function, masking_function]
    last_time = time.time()
    while True:
        screen = np.array(ImageGrab.grab(bbox=(0,40,800,700)))
        count = 0
        if processing is not None:
            for i in processing:
                count += 1
            processed_screen = processing[0](screen)                if count > 1:
                    masked_screen = processing[1] \
                                    (processed_screen,[vertices])                    screen_1 = masked_screen
                else:
                    screen_1 = processed_screen
        else:
            screen_1 = screen
        cv2.imshow('Python Window 2', screen_1)
        cv2.imshow('Python Window', cv2.cvtColor(screen, \
                    cv2.COLOR_BGR2RGB))
        print(f'the screen rate is {(1/(time.time()-last_time))}')
        last_time = time.time()
        if cv2.waitKey(25) & 0xFF == ord('q'):
            cv2.destroyAllWindows()
            break
Makes it much better to use the function now. You will see why I structured the function this way in the next section. Till then, let us check out the result with the edge processing.
使现在更好地使用该功能。 在下一部分中,您将看到为什么我以这种方式构造函数。 到那时,让我们通过边缘处理检查出结果。
screen_capture([edgeprocessed])This is what you will see:
这是您将看到的:
We pretty much get the edges of the objects from the game screen. This is how it looks like when I tried it in a test track in the game:
我们几乎从游戏屏幕上获得了对象的边缘。 这是我在游戏的测试轨道中尝试的样子:

As you notice, there is still too much unwanted information in the image. The trees, rocks, electricity lines, basically everything above the horizon of the road. Not to mention the overlay controls display from the game itself. If we want to focus on the lanes, we have to find a way to somehow filter out or mask the rest of the image lines.
如您所见,图像中仍然有太多不需要的信息。 树木,岩石,电线基本上是道路上方的所有物体。 更不用说游戏本身的叠加控件显示了。 如果我们要专注于车道,我们必须找到一种方法以某种方式过滤掉或掩盖其余的图像线。
Step 3: Masking additional information from the image
步骤3:遮盖图片中的其他信息
For this, let’s define a masking function. What we need is to define a polygon shape that masks all the information from the image, except the region that lets us focus on the lanes. This is a very basic method used, in this case I defined the vertices of the exact region I need with a bit of trial and error, as seen in the image below:
为此,让我们定义一个屏蔽函数。 我们需要定义一个多边形形状,该形状会遮盖图像中的所有信息,但让我们专注于车道的区域除外。 这是一种非常基本的方法,在这种情况下,我通过反复试验定义了我需要的确切区域的顶点,如下图所示:

The required region function uses a masked frame and a polygon with vertices. The intersection of the masked and the polygon gives us only the required section of the image. The function and the vertices (defined above) are as you see here:
所需的区域功能使用蒙版框架和具有顶点的多边形。 蒙版和多边形的交集仅给我们提供图像的所需部分。 函数和顶点(如上定义)如下所示:
def required_region(image, vertices):
    mask = np.zeros_like(image) # black image
    cv2.fillPoly(mask, vertices, 255) # fill within vertices
    masked = cv2.bitwise_and(image, mask) # intersection
    return maskedvertices = np.array([[120,500],[120,400],[150,330],[650,330], \
                     [680,400],[680,500],[260,500],[260,450], \
                     [325,370],[475,370],[540,450][540,500]], \
                      np.int32)
Now, we can run the screen capture function with these inputs as well.
现在,我们也可以使用这些输入来运行屏幕捕获功能。
screen_capture([edgeprocessed, required_region])And, the result is as follows:
并且,结果如下:

As you notice now, I have opaqued out all the unnecessary information except for the lanes. For a rudimentary level code, I’d say that this is pretty neat!
就像您现在注意到的那样,我已经弄清了除车道以外的所有不必要的信息。 对于基本的代码,我会说这很整洁!
But we are not quite there yet.
但是我们还没有到那儿。
Step 4: Finding lines with Hough Lines
第4步:用高难度线找到线
Finding the actual geometric lines, we need to do some kind of transformation on the edge processed image. In this case, I used the Hough Transform implementation in Open CV. For this to work properly, the image has to be blurred a bit before giving as the input for Hough transform. I used the Gaussian Blur from Open CV for this case.
找到实际的几何线,我们需要对边缘处理后的图像进行某种转换。 在这种情况下,我在Open CV中使用了Hough变换实现。 为了使其正常工作,必须在将图像用作霍夫变换的输入之前将图像模糊一点。 在这种情况下,我使用了来自Open CV的高斯模糊 。
Additionally, there is a need to draw the detected lines on the image frames. So I defined one more function overlay the detected lines on the frames.
另外,需要在图像帧上绘制检测到的线。 因此,我定义了另一个功能,将检测到的线条叠加在框架上。
The modified overlay line and the edge processing codes are:
修改后的覆盖线和边缘处理代码为:
def overlay_lines(image, lines):
    for line in lines:
        coordinates = line[0]
        cv2.line(image,(coordinates[0],coordinates[1]), \
                (coordinates[2],coordinates[3]),[255,255,255],3)def edgeprocessed(image):
    gray_image = cv2.cvtColor(image, cv2.COLOR_BGR2GRAY)
    edgeprocessed_img = cv2.Canny(gray_image, threshold1 = 200,\
                                  threshold2 = 300)
    edgeprocessed_img = cv2.GaussianBlur(edgeprocessed_img,(5,5),0)
    lines = cv2.HoughLinesP(edgeprocessed_img, 1, np.pi/180, \
                            180, np.array([]), 100, 5)
    overlay_lines(edgeprocessed_img, lines)
    return edgeprocessed_img
As you can see, that is not bad at all, and with just a few lines of code! We are almost there.
如您所见,仅需几行代码,这一点都还不错! 我们就快到了。
Step 5: Get Lanes
步骤5:取得车道
There are a variety of lines detected in the previous step. We have to find a way to merge them in some way so that we can get the actual lanes. This is a bit more complex and I checked out several resources online to see if there is a simpler way that it could be done. I found a great draw lanes function in the Github project here which I used here directly (code not added below as it is too long, but you can refer my project notebook in Github, linked at the end). All that was needed to be done then was to modify the edge processing function as follows:
在上一步中检测到各种线。 我们必须找到一种以某种方式合并它们的方法,以便获得实际的车道。 这有点复杂,我在线检查了一些资源,看是否有一种更简单的方法可以完成。 我在这里的Github项目中发现了一个很棒的绘图通道功能,我在这里直接使用了它(代码太长了,下面没有添加代码,但是您可以在Github中引用我的项目笔记本,最后链接)。 然后需要做的就是修改边缘处理功能,如下所示:
def edgeprocessed(image):
    original_image = image
    gray_image = cv2.cvtColor(original_image, cv2.COLOR_BGR2GRAY)
    edgeprocessed_img = cv2.Canny(gray_image, threshold1 = 200, \
                                  threshold2 = 300)
    edgeprocessed_img = cv2.GaussianBlur(edgeprocessed_img,(5,5),0)
    edgeprocessed_img = required_region(edgeprocessed_img, \
                                        [vertices])
    lines = cv2.HoughLinesP(edgeprocessed_img, 1, np.pi/180, 180, \
                            np.array([]), 100, 5)
    #overlay_lines(edgeprocessed_img, lines)
    m1 = 0
    m2 = 0
    try:
        l1, l2, m1, m2 = draw_lines(original_image,lines)
        cv2.line(original_image, (l1[0], l1[1]), \
                 (l1[2], l1[3]), [0,255,0], 30)
        cv2.line(original_image, (l2[0], l2[1]), \
                 (l2[2], l2[3]), [0,255,0], 30)
    except Exception as e:
        pass    try:
        for coords in lines:
            coords = coords[0]
            try:
                cv2.line(edgeprocessed_img,
                         (coords[0], coords[1]),
                         (coords[2], coords[3]), [255,0,0], 2)
            except Exception as e:
                print(str(e))
    except Exception as e:
        passreturn edgeprocessed_img,original_image, m1, m2
And accordingly a few tweaks in the capture function:
因此,对捕获功能进行了一些调整:
def screen_capture(processing = None):
    # takes in a list for type of processing
    # [processing_function, masking_function]
    last_time = time.time()
    while True:
        screen = np.array(ImageGrab.grab(bbox=(0,40,800,700)))
        count = 0
        if processing is not None:
            for i in processing:
                count += 1
            processed_screen ,original_image, m1, m2 = \
                                           processing[0](screen)                if count > 1:
                    masked_screen = processing[1] \
                                    (processed_screen,[vertices])                    screen_1 = masked_screen
                else:
                    screen_1 = processed_screen
        else:
            screen_1 = screen
        cv2.imshow('Python Window 2', screen_1)
        cv2.imshow('Python Window', cv2.cvtColor(screen, \
                    cv2.COLOR_BGR2RGB))
        print(f'the screen rate is {(1/(time.time()-last_time))}')
        last_time = time.time()
        if cv2.waitKey(25) & 0xFF == ord('q'):
            cv2.destroyAllWindows()
            break
And voila!
瞧!
screen_capture([edgeprocessed])
As you see, there are still more tweaks and fine tuning that can be done. But it is an awesome application as an introductory learning project!
如您所见,还有更多的调整和微调可以完成。 但这是一个很棒的入门学习项目。
The fun part is, the entire thing works live! You can play the game and detect lanes simultaneously as you keep the code running. This gives us a host of possibilities, like saving images for ML, game controls etc. which I will explore in future posts.
有趣的是,整个过程都是实时的! 在保持代码运行的同时,您可以玩游戏并同时检测车道。 这为我们提供了许多可能性,例如为ML保存图像,游戏控件等,我将在以后的文章中进行探讨。
That’s it, folks! I hope you managed to implement lane detection in these 5 simple steps. The Jupyter notebook can be found in this link.
就是这样,伙计们! 我希望您可以通过以下5个简单步骤来实现车道检测。 可以在此链接中找到Jupyter笔记本。
Feel free use and adapt the code and let me know if you have any interesting tweaks, results or ideas. Happy learning!
随意使用并修改代码,如果您有任何有趣的调整,结果或想法,请告诉我。 学习愉快!
翻译自: https://towardsdatascience.com/how-i-learned-lane-detection-using-asphalt-8-airborne-bae4d0982134
沥青配合比怎么计算


 196
196

 被折叠的 条评论
为什么被折叠?
被折叠的 条评论
为什么被折叠?
 到【灌水乐园】发言


