


cached_network_image is a popular package to handle network images in a Flutter application, it provides:
cached_network_image是一个流行的软件包,用于在Flutter应用程序中处理网络图像,它提供:
- Cache on iOS, Android, and recently macOS, 在iOS,Android和最近的macOS上缓存,
- Placeholder widget and nice fade-out transition to the image, 占位符小部件和良好的淡入淡出过渡到图像,
- Progress download indicator for large images, 大图片进度下载指示器,
- Offline support (cached images can be displayed without an active connection). 脱机支持(可以在没有活动连接的情况下显示缓存的图像)。
Using it on my Flutter projects has greatly improved the user experience. On the first launch, the app displays the placeholders sized as close as possible to the final images to smoothen the transition when the images are loaded. Then, the subsequent launches are blazing-fast, thanks to the cache (no network requests).
在我的Flutter项目中使用它可以极大地改善用户体验。 在首次启动时,该应用程序会显示占位符,其大小应尽可能接近最终图像,以在加载图像时使过渡更加平滑。 然后,由于有了缓存(没有网络请求),因此随后的启动非常快。
However, such improvement doesn’t come for free, and this package introduces a slight technical overhead: the cached_network_image package relies on the popular flutter_cache_manager package (by the same author), which, in turn, relies on the yet-another-popular package (and Flutter Favorite) sqflite.
但是,这种改进并不是免费的,并且此软件包引入了一些技术开销: cached_network_image软件包依赖于流行的flutter_cache_manager软件包(由同一作者撰写),而flutter_cache_manager软件包又依赖于另一个受欢迎的软件包。 (和Flutter最喜欢的 ) sqflite 。
This is usually not a problem since this machinery is abstracted by the straight-forward API of the CachedNetworkImage widget… except when it comes to testing:
这通常不是问题,因为此机制是由CachedNetworkImage小部件的直接API CachedNetworkImage ……除了进行测试时:
The MissingPluginException is the classic exception thrown when accessing to a native library (in our case, sqflite) in a unit test or widget test that doesn’t build any native counterparts.
该MissingPluginException是访问到本地库时抛出(在我们的情况下,经典的例外sqflite在单元测试或Widget测试不建立任何天然对应)。
Let’s see how to configure our test environment to correctly mock the cache mechanism used by the CachedNetworkImage widget and, as a bonus, configure some stubbing to return a test asset in place of the expected image, so we can generate a golden image of a widget that uses CachedNetworkImage.
让我们看看如何配置测试环境以正确模拟CachedNetworkImage小部件使用的缓存机制,以及作为奖励,配置一些桩以返回测试资产代替预期的图像,以便我们可以生成小部件的金色图像使用CachedNetworkImage 。
Golden testing (a.k.a. visual regression testing) consists of rendering a widget into an image (the golden) and compared this image to the existing one for each subsequent test execution. Check this other article from Flutter Community for more info about golden testing:
黄金测试(又名视觉回归测试)包括将小部件渲染到图像(黄金)中,并将此图像与现有图像进行比较,以进行后续的每次测试。 查看Flutter社区的另一篇文章,以获得有关黄金测试的更多信息:
沙箱应用 (Sandbox application)

This application is a mono-page application listing some services such as https://placekitten.com that deliver images in any resolution declared in the URL itself:
此应用程序是一个单页应用程序,列出了一些服务,例如https://placekitten.com ,这些服务以URL本身声明的任何分辨率提供图像:

The source code is available here.
源代码可在此处获得 。
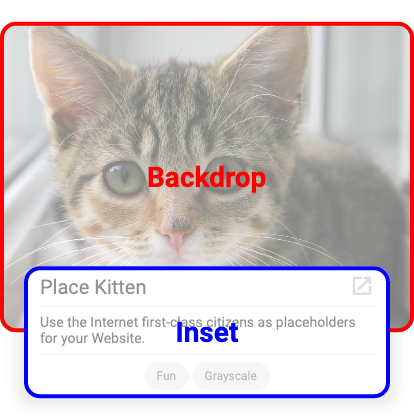
The main widget is InsetCard: it is responsible for displaying the characteristics of the service as well as an example image. Moreover, its implementation is tricky and requires a double build cycle:
主要的小部件是InsetCard :它负责显示服务的特征以及示例图像。 而且,它的实现非常棘手,需要一个双重构建周期:
the first one to get the intrinsic height of the
Insetwidget,第一个获取
Inset小部件的固有高度的对象,the second one to center this widget at the bottom edge of the
Backdropimage.第二个将小部件置于
Backdrop图片底部边缘的中央。
Finally, this widget has to be flexible and renders correctly with data of different lengths (short or long name/description, various amount of tags, …). Therefore it’s the perfect candidate for a widget test.
最后,此小部件必须具有灵活性,并可以使用不同长度的数据(简短的名称或长的名称/说明,不同数量的标签等)正确呈现。 因此,它是小部件测试的理想选择。
InsetCard widget
InsetCard小部件的剖析
The code of this widget is no interest here but can be found on the app repository. The only thing we need to be aware of is the usage of CachedNetworkImage within the Backdrop widget.
此小部件的代码在这里没有意义,但可以在应用程序存储库中找到。 我们唯一需要了解的是Backdrop小部件中CachedNetworkImage的用法。
As we already know, the most basic golden test as below is failing because of the sqflite plugin.
我们已经知道,由于sqflite插件,以下最基本的黄金测试失败了。
提高可测试性 (Improve testability)
Some native packages provide a stubbing API for usage in unit tests or widget tests (like shared_preferences) but this is not the case for sqflite. The cached_network_image package doesn’t provide anything either, however, it does allow injecting a custom BaseCacheManager via the cacheManager property! This class is responsible for the caching mechanism and the default implementation is the one who relies on sqflite, see DefaultCacheManager.
一些本机软件包提供了存根API以便在单元测试或窗口小部件测试中使用(例如shared_preferences ),但sqflite并非如此。 cached_network_image包也不提供任何内容,但是,它允许通过cacheManager属性注入自定义BaseCacheManager ! 此类负责缓存机制,默认实现是依赖sqflite ,请参见DefaultCacheManager 。
The first step then is to use a custom BaseCacheManager when running tests while the app still normally uses the DefaultCacheManager. This can be accomplished with get_it. This simple package is basically a singleton registry. It may don’t seem useful at first sight (after all, we can create plain Dart singletons) but it quickly becomes indispensable if you’d like to bring the test coverage to a decent level in your project.
然后,第一步是在运行测试时使用自定义BaseCacheManager ,而应用程序通常仍使用DefaultCacheManager 。 这可以通过get_it完成。 这个简单的程序包基本上是一个单例注册表。 乍看起来它似乎没有用(毕竟,我们可以创建普通的Dart单例 ),但是如果您想将测试覆盖率提高到项目中的一个不错的水平,它很快就变得不可或缺。
We use get_it to register an instance of DefaultCacheManager in the project main.dart:
我们使用get_it在项目main.dart注册DefaultCacheManager的实例:
Then we can inject this singleton in the CachedNetworkImage widget:
然后,我们可以在CachedNetworkImage小部件中注入此单例:
By doing this (see the complete diff), the app works exactly the same, we haven’t changed how the CachedNetworkImage works, however, we now have the possibility to declare our own implementation of BaseCacheManager for the widget test, in its main function:
通过执行此操作(请参阅完整的diff ),该应用程序的工作原理完全相同,我们没有更改CachedNetworkImage工作方式,但是,现在我们可以在其main功能中为小部件测试声明我们自己的BaseCacheManager实现。 :
编写TestCacheManager (Writing the TestCacheManager)
We follow the plan by creating a class that extends BaseCacheManager. This class needs a concrete implementation for the method getFilePath as well as a mandatory positional argument in the constructor. By using the IDE quick fixes, we can write the following without too much hassle:
我们通过创建扩展BaseCacheManager的类来遵循该计划。 此类需要getFilePath方法的具体实现以及构造函数中的强制性位置参数。 通过使用IDE快速修复,我们可以轻松编写以下代码:
This, however, leads to another error when executing the test. If not provided, the BaseCacheManager creates a CacheStore object used to wrap a CacheInfoRepository:
但是,这会在执行测试时导致另一个错误。 如果未提供, BaseCacheManager创建一个用于包装CacheInfoRepository的CacheStore对象:
This abstract class is the interface between the BaseCacheManager and the storage. The default implementation is using sqflite and is responsible for the MissingPluginException. It means that we can finally get rid of this dependency by providing a dummy implementation of CacheInfoRepository.
这个抽象类是BaseCacheManager和存储之间的接口。 默认实现使用sqflite并负责MissingPluginException 。 这意味着我们最终可以通过提供CacheInfoRepository的虚拟实现摆脱这种依赖性。
Good news, this implementation already exists! Its name is NonStoringObjectProvider. It’s the one used to ensure flutter_cache_manager compatibility for Flutter Web. This library on the Web is basically a no-op (image caching on the Web is mostly handled by the browser) but most importantly: it doesn’t crash.
好消息,此实现已经存在! 它的名称是NonStoringObjectProvider 。 它是用来确保Flutter Web的flutter_cache_manager兼容性的一种。 Web上的该库基本上是无操作的(Web上的图像缓存主要由浏览器处理),但最重要的是:它不会崩溃。
We can enhance the TestCacheManager to provide an instance of CacheStore which is, in turn, initialized with an instance of NonStoringObjectProvider :
我们可以增强TestCacheManager来提供CacheStore的实例,该实例又用NonStoringObjectProvider的实例进行NonStoringObjectProvider :
Important note: During this step, we have imported files that are not exposed by the flutter_cache_manager package. By doing that, we introduced a coupling with the internals of the package, and therefore expose ourselves to breaking changes in future versions (changes that could not be considered as “breaking” in the version changelog or documentation since they don’t concern public API).
重要说明:在此步骤中,我们导入了flutter_cache_manager包未公开的文件。 通过这样做,我们引入了与包内部的耦合,因此使自己暴露于未来版本的重大更改(由于更改与公共API不相关,因此更改在版本更改日志或文档中不能被视为“重大”更改) )。
The last barrier that separates us from the green test result is an error due to an undisposed Timer:
将我们与绿色测试结果区分开的最后一个障碍是由于Timer而导致的错误:
A Timer is still pending even after the widget tree was disposed.
即使在放置小部件树之后,计时器仍然处于挂起状态。
This is caused by the CacheStore that performs an asynchronous cache clean at some point in the test execution. By default, the WidgetTester asserts that all asynchronous resources must be properly closed at the end of the test. Because we don’t have control over this Timer, we can’t close it manually. We have to wrap the pumpWidget method with a runAsync method:
这是由CacheStore引起的,该CacheStore在测试执行的某个时刻执行异步缓存清除。 默认情况下, WidgetTester断言必须在测试结束时正确关闭所有异步资源。 由于我们无法控制此Timer ,因此无法手动将其关闭。 我们必须使用pumpWidget方法包装runAsync方法:
We finally have a successful test and a generated golden image!
我们终于有了成功的测试,并生成了黄金形象!

改善黄金形象 (Improve the golden image)
There are indeed some aspects that require an inevitable amount of boilerplate when running golden tests. Let’s tackle them one by one:
实际上,在进行黄金测试时,确实有些方面需要不可避免的样板。 让我们一一解决它们:
画布的尺寸 (Canvas size)
The default canvas used to render the widget is 800x600. It is, by sheer coincidence, the same aspect ratio as the Backdrop widget. Therefore, the CachedNetworkImage placeholder takes the whole canvas.
用于渲染窗口小部件的默认画布为800x600。 巧合的是,它与Backdrop小部件的纵横比相同。 因此, CachedNetworkImage占位符占用整个画布。
We can configure a more real realistic value by running the following code on a device: print(MediaQuery.of(context).size);. In the case of the iPhone 11 simulator, it gives a resolution of 414x896.
我们可以通过一个设备上运行下面的代码配置一个更真实的现实价值: print(MediaQuery. of (context).size); 。 对于iPhone 11模拟器,其分辨率为414x896。
Then we can write a utility method to configure the WidgetTester to use this resolution:
然后,我们可以编写一个实用程序方法来配置WidgetTester以使用此分辨率:
字体文件 (Font files)
The most noticeable difference is the text lines. By default in widget tests, all the fonts are replaced by a test font named Ahem which renders all characters as a plain square. In the case of visual regression testing, it doesn’t suit our interest.
最明显的区别是文本行。 默认情况下,在窗口小部件测试中,所有字体都替换为名为Ahem的测试字体,该字体将所有字符呈现为一个普通的正方形。 在视觉回归测试中,这不符合我们的兴趣。
When using the MaterialApp widget, the default font is Roboto. We have to load it manually, as well as the Material icon font (the icon in the top right corner of the Inset):
使用MaterialApp小部件时,默认字体为Roboto 。 我们必须手动加载它,以及Material图标字体( Inset右上角的图标):
插图版面 (Inset layout)
Remember how the Inset widget is supposed to be centered around the bottom edge of the Backdrop? The golden image reveals it’s just aligned at the bottom.
还记得“ Inset小部件应如何位于“ Backdrop ”底部边缘的中心吗? 金色的图像显示出它正好位于底部。
This is because of an implementation detail of the InsetCard widget: it requires 2 layout passes to be correctly positioned: the first one to get the height of the Inset, and the second to add a margin equal to half the height on the Backdrop, to obtain the expected layout. Check the repository for the full implementation.
这是因为InsetCard小部件的实现细节:它需要进行2次布局传递才能正确放置:第一个布局获取Inset的高度,第二个添加等于Backdrop高度一半的边距,以获得预期的布局。 检查存储库中的完整实施。
When calling pumpWidget, only the first pass is performed. For the second one, we have to call pump to trigger a second frame. To be less dependant of implementation details like this one (and more frequently used: animations), we can use pumpAndSettle, which actually means “trigger new frames until the app is idle”.
调用pumpWidget ,仅执行第一遍。 对于第二个帧,我们必须调用pump来触发第二个帧。 为了减少对此类实现细节的依赖(并且更频繁地使用:动画),我们可以使用pumpAndSettle ,这实际上意味着“触发新帧,直到应用程序空闲”。
Let’s run the test command for another try:
让我们运行test命令进行另一次尝试:

This is the corresponding updated test, using the 2 methods previously implemented:
这是相应的更新测试,使用之前实现的2种方法:
The golden image starts to look like the real widget. In addition to the missing backdrop image, we can notice another difference: the grey border below the Inset.
金色图像开始看起来像真实的小部件。 除了缺少的背景图片,我们还可以注意到另一个区别: Inset下方的灰色边框。
This is because of the Inset shadow: shadows are not guaranteed to be pixel-perfect every time they are rendered. So they are disabled by default in golden tests and replaced by solid borders, otherwise, it could lead to false positives when running the golden tests.
这是因为有Inset阴影:不能保证阴影在每次渲染时都是像素完美的。 因此,默认情况下,它们在黄金测试中处于禁用状态,并由实线边框替代,否则,在运行黄金测试时可能导致误报。
Note: it’s technically possible to force the activation of the shadows (for documentation purpose for instance) by doing:
注意:从技术上讲,可以通过以下方式强制激活阴影(例如,出于文档目的):
模拟图像资产 (Mock image asset)
This leads us to the final problem we have to take care of: the backdrop image. In widget tests, we don’t want to be dependent on any remote server, that’s why the low-level Dart HttpClient is configured by default to return an error 400 on every request (the reason why our image is not loaded). It’s possible to mock this client and stub a custom response for a given request however it is highly verbose and cumbersome to set up.
这导致我们不得不解决的最后一个问题:背景图像。 在小部件测试中,我们不想依赖任何远程服务器,这就是为什么默认情况下将低级Dart HttpClient配置为在每个请求上返回错误400(未加载图像的原因)的原因。 可以模拟此客户端并为给定请求添加自定义响应,但是设置起来非常冗长且繁琐。
By chance, we are already using a package, cached_network_image, whose sole purpose is to spare a network request when the image is found in the cache. In addition to that, it already implements the logic to fetch an image from the filesystem (sqflite is used to store the cached URLs and associated metadata, but the image file itself is stored in the device’s temporary folder).
偶然地,我们已经在使用包cached_network_image ,它的唯一目的是在缓存中找到映像时cached_network_image网络请求。 除此之外,它已经实现了从文件系统中获取图像的逻辑( sqflite用于存储缓存的URL和关联的元数据,但是图像文件本身存储在设备的临时文件夹中)。
It would be neat then if we could trick the BaseCacheManager by faking a cache hit and configuring it to return an image file from the test/assets directory!
如果我们可以通过伪造缓存命中并将其配置为从test/assets目录返回图像文件来欺骗BaseCacheManager , BaseCacheManager了!
Let’s start by saving an image in the test/assets folder:
首先,将图像保存在test/assets文件夹中:

By looking at the internal of the CachedNetworkImage component, we can see a call to the method getFileStream of the BaseCacheManager class.
通过查看内部的的CachedNetworkImage组成部分,我们可以看到该方法的调用getFileStream中的BaseCacheManager类。
If the returned Stream emits a valid FileResponse object, then the widget builds the Image and starts the fade-out transition from the placeholder.
如果返回的Stream发出有效的FileResponse对象,则该小部件将生成Image并从占位符开始淡出过渡。
In BaseCacheManager, this method contains the cache logic (look into the cache, then download the file if not found). We can bypass that logic by overriding the method in our TestCacheManager:
在BaseCacheManager ,此方法包含缓存逻辑(查看缓存,如果找不到,则下载文件)。 我们可以通过重写TestCacheManager的方法来绕过该逻辑:
That’s it! The Stream emits an event and the CachedImageWidget interprets as a ready-to-use image and build the Image widget.
而已! Stream发出一个事件,并且CachedImageWidget解释为即用型图像并构建Image小部件。
If you re-run the test now, unfortunately, the image is still missing. That’s because the Image widget loads the image in an asynchronous task and the WidgetTester can’t know when the loading is complete.
不幸的是,如果您现在重新运行测试,该图像仍然丢失。 这是因为Image小部件在异步任务中加载了图像,而WidgetTester无法知道加载何时完成。
But thanks to Chun-Heng Tai from the Flutter team, a workaround exists, based on precacheImage method:
但是感谢Flutter团队的Chun-Heng Tai,基于precacheImage方法, 存在一种解决方法:
And voilà!
和瞧 !

结语 (Wrap up)
We now have a test to guarantee the UI will never change unintentionally. In addition to that, once the moderated amount of boilerplate has been written, we can multiply the test cases endlessly for different screen sizes, text factors, landscape mode (it doesn’t look good…), different lengths of data, etc.
现在,我们进行了一项测试,以确保UI不会意外更改。 除此之外,一旦编写了适当数量的样板,我们就可以针对不同的屏幕尺寸,文本因素,横向模式(看起来不太好……),不同的数据长度等无限地增加测试用例。
If you’d like to know more about golden testing in production, eBay has used it extensively for their app eBay Motors and wrote interesting feedback in this blog post:
如果您想进一步了解生产中的黄金测试,eBay已将其广泛用于其应用程序eBay Motors,并在此博客文章中写了有趣的反馈:
Feel free to share any suggestions or feedback in the comments and… happy testing!
欢迎在评论中分享任何建议或反馈,并…祝您测试愉快!
Thank you to Rene Floor @FloorRene, main contributor of cached_network_image, for his review of this article.
谢谢刘若英楼@FloorRene的主要贡献者cached_network_image ,他这篇文章的审查。
翻译自: https://medium.com/flutter-community/golden-testing-using-cachednetworkimage-1b488c653af3


 4806
4806


 被折叠的 条评论
为什么被折叠?
被折叠的 条评论
为什么被折叠?
 到【灌水乐园】发言


