


So you have heard about Docker or Kubernetes but you have not really used them or do not know how they work. In this series, we will be exploring these tools and their features individually based on practical examples and projects.
因此,您听说过Docker或Kubernetes,但您并未真正使用它们或不知道它们如何工作。 在本系列中,我们将根据实际示例和项目分别探索这些工具及其功能。
The first part of this series will give you practical insight into Docker by understanding what containers and images are and how they work. We will learn how to interact with containers, and create our own custom image using a Dockerfile. We will also examine and understand the process that Docker follows to build the image.
本系列的第一部分将通过了解什么是容器和映像以及它们如何工作,为您提供对Docker的实用见解。 我们将学习如何与容器交互,以及如何使用Dockerfile创建我们自己的自定义映像。 我们还将检查并了解Docker遵循的构建映像的过程。
什么是Docker? (What is Docker?)
First released in 2013, Docker revolutionized container technology by providing a cohesive toolset for developing, shipping, and running any application via containers. Docker is a Client-Server application consisting of three main components:
Docker于2013年首次发布,它通过提供用于通过容器开发,运输和运行任何应用程序的内聚工具集,彻底改变了容器技术。 Docker是一个Client-Server应用程序,包含三个主要组件:
1- Docker command-line tool (CLI): The client. It interacts with Docker daemon through scripting or direct CLI commands. Docker CLI is one of many clients that are able to communicate with Docker Daemon.2- Rest API: The interface through which to communicate with Docker Daemon.3- Docker daemon (dockerd): The server which manages containers, images, volumes, networks, and more. The deamon also accesses the Registry which is a storage for public/or private Docker images.
1- Docker命令行工具(CLI):客户端。 它通过脚本或直接的CLI命令与Docker守护程序进行交互。 Docker CLI是能够与Docker Daemon进行通信的众多客户端之一.2- Rest API:与Docker Daemon进行通信的接口.3- Docker daemon(dockerd):管理容器,图像,卷,网络的服务器, 和更多。 守护进程还会访问注册表 ,该注册表是公共/或私有Docker映像的存储。
安装Docker Engine (Installing Docker Engine)
Easy peasy! Just follow these steps and download the whole deal in no time.
十分简单! 只需按照以下步骤操作 ,即可立即下载整个交易。
容器和图像 (Containers and Images)
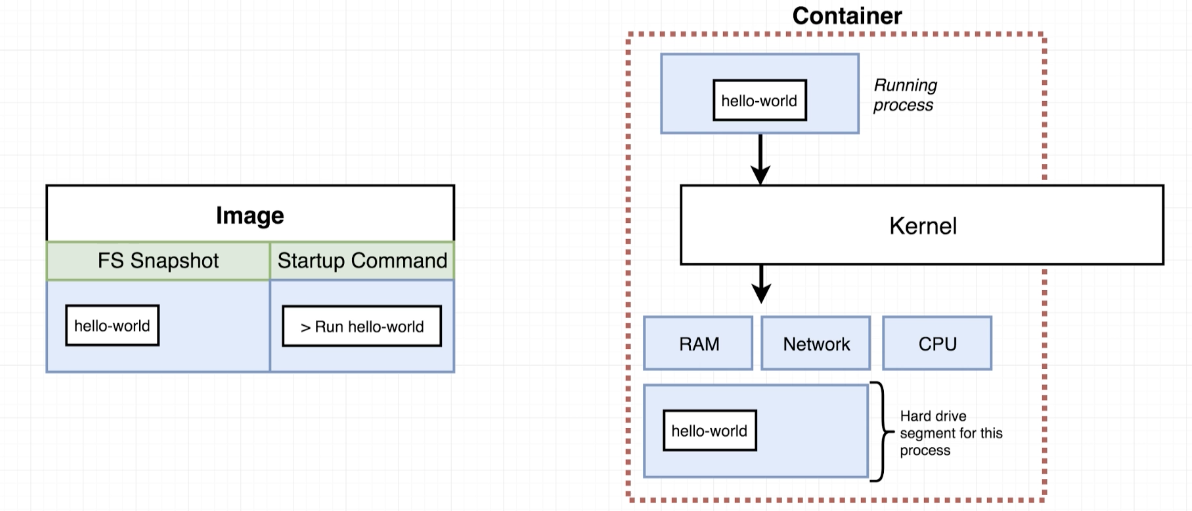
The container and image are two key Docker objects that we are going to look at. A container is a loosely isolated environment in which an application is run. I say “loosely” because containers can be made to communicate with other containers or simply emit their output directly to your terminals. The isolation and security allow you to run many containers simultaneously on a given host, directly within the Linux Kernel without the overhead of a hypervisor.
容器和映像是我们要研究的两个关键Docker对象。 容器是在其中运行应用程序的松散隔离的环境。 我之所以说是“松散的”,是因为可以使容器与其他容器通信或直接将其输出发送到终端。 隔离和安全性使您可以直接在Linux内核中在给定主机上同时运行许多容器,而无需管理程序的开销。
A running container is a set of isolated processes that started using a Docker image. The term “isolated”, central to the idea of containers, is achieved through the following two approaches:
正在运行的容器是使用Docker 映像开始的一组隔离进程。 以容器的概念为中心的术语“隔离”是通过以下两种方法实现的:
- Namespacing: Isolates one or more processes to restrict access to hard-drive, network, users, hostnames, interprocess communication, or other processes. 命名空间:隔离一个或多个进程以限制对硬盘驱动器,网络,用户,主机名,进程间通信或其他进程的访问。
- Control Groups: Limits the amount of resource bandwidth such as memory, CPU usage, HD I/O or network used by a single process. 控制组:限制单个进程使用的资源带宽量,例如内存,CPU使用率,HD I / O或网络。
A Docker image is a file system snapshot of all the resources needed to create the containers out of. An image also has a startup command for the container to be initialized. In an object-oriented sense, a docker image is a class (the blueprint) and a docker container is the instantiated object.
Docker映像是创建容器所需的所有资源的文件系统快照。 映像还具有用于初始化容器的启动命令。 在面向对象的意义上,泊坞窗映像是类(蓝图),泊坞窗容器是实例化的对象。
Docker, as a deployment tool, handles images and containers for you. You have two ways to interact with Docker, namely using the Docker command-line tool directly or indirectly through configuration files. In complex applications, you use configuration files to create images, form networks of containers, and manage volumes. We will tackle all of these in this series, but let us start by growing more comfortable with the idea of images and containers using the CLI directly.
Docker作为一种部署工具,可以为您处理映像和容器。 您可以通过两种方式与Docker进行交互,即直接或通过配置文件间接使用Docker命令行工具。 在复杂的应用程序中,您可以使用配置文件来创建映像,形成容器网络以及管理卷。 我们将在本系列文章中解决所有这些问题,但是让我们首先直接使用CLI逐渐熟悉映像和容器的想法。
And now the example…
现在的例子
In our first example, we want to download the latest image of Redis (a popular in-memory data store) found on Dockerhub and use it. Dockerhub hosts public or private image repositories, much similar to how Github hosts code repositories. You can push your private images to your private repositories on the registry like you push or pull code to or from Github.
在我们的第一个示例中,我们要下载Dockerhub上的Redis(流行的内存数据存储)的最新映像并使用它。 Dockerhub托管公共或私有映像存储库,与Github托管代码存储库的方式非常相似。 您可以将私有映像推送到注册表上的私有存储库,就像在Github中推送或提取代码一样。

You do not need to know more about Redis or Dockerhub to understand this example. Also, feel free to consult Dockerhub to see if a public image of your favorite software exists.
您无需了解有关Redis或Dockerhub的更多信息即可了解此示例。 另外,请随时咨询Dockerhub,以查看是否存在您喜欢的软件的公共映像。
docker run redis
In a separate console (because the current one is attached to the container and terminating it will cause the container to stop), I run the following to see the details about the image that we ran just now.
在单独的控制台中(因为当前控制台已附加到容器上,终止该控制台将导致容器停止运行),我运行以下命令以查看有关我们刚才运行的映像的详细信息。

In the first two lines in the first figure, Docker daemon fails to find the redis:latest image locally, so it proceeds to download it. Once downloaded, the “run” command causes the container to be created based on the image. We can confirm that the container is running on port 6379:
在第一个图中的前两行中,Docker守护程序无法在本地找到redis:latest映像,因此它继续下载它。 下载完成后,“运行”命令将根据映像创建容器。 我们可以确认容器在端口6379上运行:
The container id ca95… is now “up”. Let us see what happens when we try to access Redis server through its CLI on our local machine in a separate terminal (while keeping the original terminal window alive):
容器ID ca95…现在为“ up”。 让我们看看当尝试在单独的终端中通过本地计算机上的CLI访问Redis服务器时发生的情况(同时保持原始终端窗口处于活动状态):

Oops! What happened? Well, Redis is in fact running. However, we cannot use the container because the port at which Redis is running is internal to the Docker container and has no “port mapping” to our local machine (I will explain port mapping later). Here we are experiencing the isolated nature of containers. Instead, in order to use Redis we must execute the redis-cli command directly inside the running container itself:
糟糕! 发生了什么? 好吧,Redis实际上正在运行。 但是,我们不能使用该容器,因为运行Redis的端口是Docker容器的内部端口,并且没有到本地计算机的“端口映射”(我将在后面解释端口映射)。 在这里,我们正在体验容器的孤立性。 相反,为了使用Redis,我们必须直接在运行容器本身内部执行redis-cli命令:
docker exec -it <REDIS-CONTAINER-ID> redis-cli
Voila. Now we can use Redis through the container. Beware that Redis will store this information inside the container itself, and once I delete the container, everything with that including the data I inputted will be gone.
瞧 现在我们可以通过容器使用Redis了。 请注意,Redis会将这些信息存储在容器本身内,一旦删除容器,包含我输入的数据在内的所有内容都将消失。
Docker的用途是什么? (What is Docker used for?)
Docker streamlines the development lifecycle by allowing developers to work in standardized environments using local containers which provide your applications and services. Containers are great for continuous integration and continuous delivery (CI/CD) workflows.
Docker通过允许开发人员使用提供您的应用程序和服务的本地容器在标准化环境中工作,从而简化了开发生命周期。 容器非常适合持续集成和持续交付(CI / CD)工作流程。
— From Docker’s Official Docs
—来自Docker的官方文档
构建Docker映像(通过Dockerfiles) (Building Docker Images (via Dockerfiles))
To containerize your application, you need to create images of your application first. Since containers are loosely isolated, they need to have proper access to one another in order for the application to run smoothly.
要容器化您的应用程序,您需要首先创建应用程序的映像。 由于容器是松散隔离的,因此它们需要相互之间有适当的访问权限才能使应用程序平稳运行。
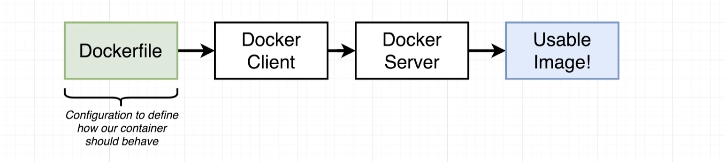
You can create a docker image by writing a Dockerfile. A Dockerfile is a series of instructions that Docker server uses to create a runnable container. The following depicts a flow of a Dockerfile
您可以通过编写Dockerfile来创建Docker映像。 Dockerfile是Docker服务器用来创建可运行容器的一系列指令。 以下描述了Dockerfile的流程

We then pass this file to the Docker server via the CLI to build the image:
然后,我们通过CLI将这个文件传递给Docker服务器以构建映像:
In the previous section, we downloaded and used Redis via the already available Redis image found on Dockerhub. But what if there was no such image and we had to create our own? To get our feet wet with Dockerfiles, let us create our very custom image of Redis.
在上一部分中,我们通过Dockerhub上已经可用的Redis映像下载并使用了Redis。 但是,如果没有这样的图像,而我们必须创建自己的图像,该怎么办? 为了使我们熟悉Dockerfile,让我们创建非常自定义的Redis映像。
Creating such a file is very simple; we need three instructions:
创建这样的文件非常简单; 我们需要三个指令:
First things first, we need a base image. A base image is essentially the file system snapshot of an operating system on top of which we can install the Redis software.
首先,我们需要一个基础图像 。 基本映像本质上是操作系统的文件系统快照,我们可以在其上安装Redis软件。
- Then, we use the apk package manager to install Redis. 然后,我们使用apk软件包管理器安装Redis。
- Finally, run the Redis server. 最后,运行Redis服务器。

The final file looking like so:
最终文件如下所示:
We shall now build the corresponding image. We can achieve this using Docker CLI. I am going to put this script in a folder, navigate to the folder, and run the following command:
现在我们将建立相应的图像。 我们可以使用Docker CLI实现这一目标。 我将把此脚本放在一个文件夹中,导航到该文件夹,然后运行以下命令:
docker build .Note that the “.” in the above command depicts the build context, which is the folder we are in.
请注意,“。” 上面的命令中描述了构建上下文 ,它是我们所在的文件夹。
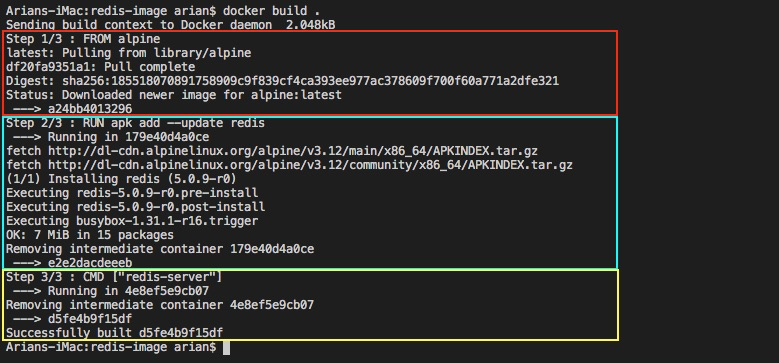
Docker took 3 steps to build the image, one for each line of code written. At each step, a transitory container is created in which to run a specific line of instruction (except the starting step). Once a particular step has been reached, Docker creates a file system snapshot (i.e. image) of the resulting changes (the last line of each colored box) and moves on to the next step. Notice the id of the image in the final step starting with d5f:
Docker采取了3个步骤来构建映像,每编写一行代码就要执行一次。 在每个步骤中,都会创建一个临时容器,在其中运行特定的指令行(起始步骤除外)。 到达特定步骤后,Docker会创建一个文件系统快照(即映像),其中包含更改的结果(每个彩色框的最后一行),并继续进行下一步。 请注意,以d5f开头的最后一步中的图像ID :
We have successfully created our custom image.
我们已经成功创建了自定义图像。
修改Dockerfile后重建映像 (Rebuilding an Image After Dockerfile Modifications)
How does Docker re-create images after modifications made to the Dockerfile? Let us go ahead and test this by adding a random extra line of code below the second line and rebuild the image:
对Dockerfile进行修改后,Docker如何重新创建映像? 让我们继续进行测试,方法是在第二行下面添加一条随机的额外代码行,然后重建图像:
RUN apk add --update gcc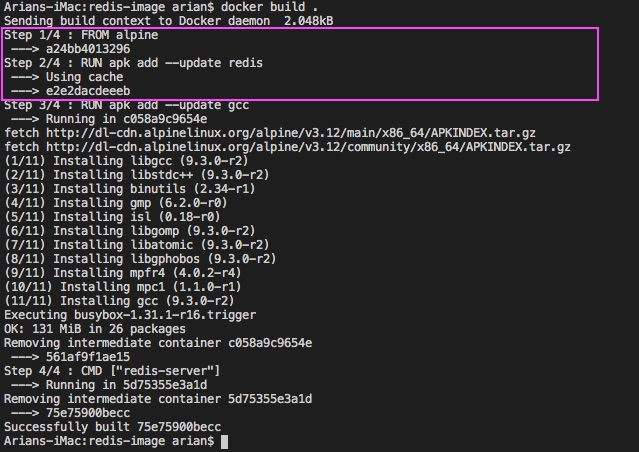
Lucky for us, Docker is smart enough to detect that the earlier lines of Dockerfile have not changed, hence there is no need to rebuild snapshots of them. Docker cache to the rescue!
对于我们来说幸运的是,Docker足够聪明,可以检测到Dockerfile的早期行没有发生变化,因此无需重建它们的快照。 Docker抢救!
IMPORTANT NOTE: Had we put the extra line of code above the Redis installation line (line #5) in our Dockerfile, Docker would not have used cache beyond step 1. This is because as soon as Docker detects a change in the Dockerfile, it will treat the rest of the file as new and hence it will not use the cache at all. For demanding builds, it is useful to keep that in mind and place the changes as far down as possible.
重要说明 :如果我们在Dockerfile中的Redis安装行(第5行) 上方放置了额外的代码行,则Docker将不会在步骤1之后使用缓存。这是因为,一旦Docker在Dockerfile中检测到更改, 它就会会将文件的其余部分视为新文件 ,因此将完全不使用缓存。 对于要求苛刻的构建,记住这一点并尽可能减少更改是很有用的。
标记图像 (Tagging an Image)
We build an image without a name and a tag. It is important to know how to do so to publish, manage, and version your images. To do so, use the t flag in the build command:
我们构建的图像没有名称和标签。 重要的是要知道如何发布,管理和版本化图像。 为此,请在build命令中使用t标志:
docker build -t <username>/<image-name>:<tag>I used “latest” as the tag. To run the image, simply run the image using the full name (including the username).
我使用“最新”作为标签。 要运行映像,只需使用全名(包括用户名)运行映像。
我们做到了! (We did it!)
That’s it! We have successfully used Docker to install and use Redis, the popular in-memory datastore, without touching our own file system! We learned how containers are created using Docker images, and how they can be interacted with. In the end, we managed to create our own image using a Dockerfile. With that, we can move on to more real-life examples in the subsequent sections of this exciting series.
而已! 我们已经成功地使用Docker来安装和使用流行的内存数据存储Redis,而没有涉及我们自己的文件系统! 我们了解了如何使用Docker映像创建容器以及如何与它们进行交互。 最后,我们设法使用Dockerfile创建了自己的映像。 这样,我们可以在这个令人兴奋的系列的后续部分中继续介绍更多真实的示例。
Of course, always keep an eye on the official documentation. Not to worry though, we will explore more functionalities and features in the subsequent sections of this series, as our example becomes more real and complex.
当然,请始终注意官方文档 。 不用担心,随着示例变得更加真实和复杂,我们将在本系列的后续部分中探索更多的功能和特性。
翻译自: https://medium.com/@arianseyedi/docker-and-kubernetes-guide-pt-1-docker-container-basics-adb24932c27


 被折叠的 条评论
为什么被折叠?
被折叠的 条评论
为什么被折叠?
 到【灌水乐园】发言


