


After lovingly crafting my portfolio site, I was beyond excited to share my work with the world. The only thing standing in my way was deploying the site and adding a very professional, custom domain purchased from GoDaddy. Deploying wasn’t so much an issue as I had deployed projects in the past, however, configuring my custom domain name was a new challenge. The internet is rife with tutorials outlining how to deploy with hosting services like Heroku, Netlify, and GitHub Pages. And there are equally as many resources providing instructions on adding custom domain names with numerous domain providers. As a result, I wanted to create an all-in-one guide for those deploying with the specific combination of GitHub Pages and GoDaddy.
在精心制作了自己的作品集网站之后,我很高兴与世界分享我的作品。 阻碍我前进的唯一一件事就是部署网站并添加一个非常专业的自定义域,该域是从GoDaddy购买的。 部署已不再是我过去部署项目时遇到的问题,但是,配置自定义域名是一个新的挑战。 互联网上充斥着各种教程,这些教程概述了如何使用托管服务(如Heroku,Netlify和GitHub Pages)进行部署。 同样,也有同样多的资源提供有关向众多域名提供商添加自定义域名的说明。 因此,我想为那些使用GitHub Pages和GoDaddy的特定组合进行部署的人创建一个多合一指南。
使用GitHub Pages进行部署 (Deploying With GitHub Pages)
Before diving into the deploying process, we must first briefly investigate what is going on under the hood when deploying. As our application currently stands, it cannot be read by GitHub Pages. When we deploy, it is converted to a readable format which lives in a branch commonly called gh-pages. This branch will look very different from your original file tree, but not to worry, we will largely be leaving this branch alone.
在深入研究部署过程之前,我们必须首先简要调查一下部署时幕后的情况。 就我们的应用程序而言,它无法被GitHub Pages读取。 部署时,它将转换为可读格式,该格式位于通常称为gh-pages的分支中。 该分支看起来与原始文件树非常不同,但是不用担心,我们很大程度上将不理会这个分支。
安装 (Installation)
For the purpose of this blog, it is assumed a completed React app is already present and pushed to a GitHub repository. To begin, we will install the package for GitHub Pages which is essentially responsible for converting our project to the readable branch mentioned above. While in the root directory of the project, run the following terminal command:
就本博客而言,假定已经存在完整的React应用程序并将其推送到GitHub存储库。 首先,我们将为GitHub Pages安装软件包,该软件包主要负责将我们的项目转换为上述可读分支。 在项目的根目录中,运行以下终端命令:
npm install gh-pages --save-dev重新组织我们的分支机构 (Re-Organizing Our Branches)
We’re going to slightly reorganize our branches to ensure the branches we develop on and deploy on are clearly identified and kept separate. When deploying ‘project sites’ from GitHub Pages, this step is not necessary, however, I found it helpful. Each user is provided with one ‘user site’, this is “username.github.io”, and an unlimited number of project sites under “username.github.io/repository-name”. The same goes for organizations using GitHub Pages. User and organization sites must be deployed from the master branch, however, project sites can be deployed from either master or gh-pages.
我们将对分支机构进行稍微重组,以确保明确标识我们开发和部署的分支机构并将它们分开。 从GitHub Pages部署“项目站点”时,此步骤不是必需的,但是,我发现它很有帮助。 每个用户都有一个“用户站点”,即“ username.github.io”,在“ username.github.io/repository-name”下有无限数量的项目站点。 使用GitHub Pages的组织也是如此。 用户和组织站点必须从master分支部署,但是项目站点可以从master或gh-pages部署。
By default, GitHub Pages pushes to and deploys from gh-pages, leaving our file tree untouched. We are going to structure our repository so that the master branch we develop on becomes the dev branch and the gh-pages branch that we deploy from becomes the master branch. To do this, enter the following terminal commands from your project directory:
默认情况下,GitHub Pages推送到gh-pages并从gh-pages部署,而我们的文件树保持不变。 我们将构建存储库的结构,以便在其上开发的master分支成为dev分支,而从其部署的gh-pages分支成为master分支。 为此,请在项目目录中输入以下终端命令:
git status
git add .
git commit -m "creating dev branch to keep development branch and deploying branch separate"
git checkout -b "dev"
git push
Switching over to our project’s GitHub repository, we now have a master and dev branch. We are going to switch our default branch to the dev branch. This way as we continue to work on our site and push changes, they automatically are pushed to the dev branch and NOT the master branch we deploy from. To do this, navigate to the settings tab in the project repository and click on ‘Branches’ in the left-hand menu. Under the ‘Default Branch’ section, click the drop-down and select dev. Click ‘update’ to finish.
切换到项目的GitHub存储库,我们现在有了master和dev分支。 我们将把默认分支切换到dev分支。 这样,当我们继续在网站上工作并推送更改时,它们会自动推送到dev分支,而不是推送到我们从其部署的master分支。 为此,请导航至项目存储库中的设置选项卡,然后单击左侧菜单中的“分支”。 在“默认分支”部分下,点击下拉菜单,然后选择dev 。 点击“更新”完成。

编辑“ package.json” (Editing “package.json”)
We now need to include a couple of additions to the package.json file in our project. Open your application in your text editor and add the following to the highest level of the object, right above "name": "project-name" :
现在,我们需要在项目中为package.json文件添加一些附加内容。 在文本编辑器中打开应用程序,然后将以下内容添加到对象的最高级别,即"name": "project-name"上方"name": "project-name" :
"homepage": "https://username.github.io/repository-name",Replace username with your GitHub username and repository-name with the name of the repository in which your project lives. Next, in the "scripts" object we will add:
将username替换为GitHub用户名,将repository-name替换为项目所在的repository-name 。 接下来,在"scripts"对象中,我们将添加:
"predeploy": "npm run build",
"deploy": "gh-pages -b master -d build",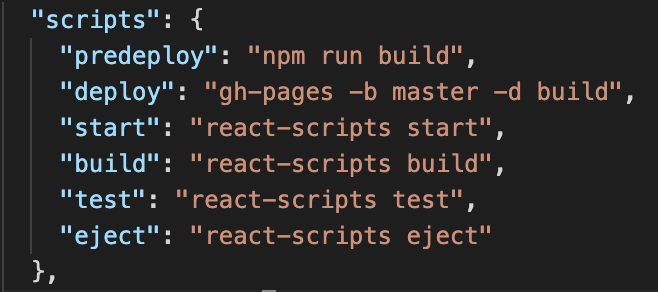
In other tutorials, you may see "deploy": "gh-pages -d build". The -b master included in our code specifies that we are deploying from the master branch and not the default gh-pages branch.
在其他教程中,您可能会看到"deploy": "gh-pages -d build" 。 代码中包含的-b master表示我们是从master分支而不是默认的gh-pages分支进行部署。
部署中 (Deploying)
We are now ready to deploy! To deploy, simply run the following terminal command:
我们现在可以部署了! 要部署,只需运行以下终端命令:
npm run deployIt is important to note that you should not carry out a pull request on GitHub at this time! This will merge the dev and master branches, creating a horrible mess.
重要的是要注意,此时您不应在GitHub上执行拉取请求! 这将合并dev和master分支,从而造成混乱。
To finish deploying, return to your project GitHub and navigate to the “Settings” tab. Scroll down to the “GitHub Pages” section. There, in the “Source” section, there will be a drop-down menu for you to specify the branch to deploy and you will select master. Shortly, the header at the top of the section will turn green and display a message that your site has been published. Click this link and feast your eyes on your freshly deployed site!
要完成部署,请返回项目GitHub并导航至“设置”选项卡。 向下滚动到“ GitHub页面”部分。 在“源”部分,将有一个下拉菜单供您指定要部署的分支,然后选择master 。 不久,该部分顶部的标题将变为绿色,并显示一条消息,表明您的网站已发布。 单击此链接,让您大吃一惊!

Anytime you want to update your deployed site, just push the changes to GitHub, merge with your dev branch, and then run npm run deploy. Refresh your website page and your changes should be implemented!
每当您想更新已部署的站点时,只需将更改推送到GitHub,与您的dev分支合并,然后运行npm run deploy 。 刷新您的网站页面,您的更改应已实施!
从GoDaddy添加自定义域 (Adding a Custom Domain from GoDaddy)
Currently, our site is up and running but has a horribly clunky URL. If you’re anything like me, you purchased a custom domain name (maybe your exact name was even available!) and you’re eager to use it. Adding custom domain involves a couple of steps on both the GitHub side and GoDaddy side. Let’s begin with GoDaddy.
目前,我们的网站已启动并正在运行,但是URL太笨拙了。 如果您像我一样,则购买了自定义域名(也许甚至可以使用您的确切名称!),并且您渴望使用它。 添加自定义域在GitHub端和GoDaddy端都涉及几个步骤。 让我们从GoDaddy开始。
管理DNS (Managing the DNS)
In the “My Products” homepage of your GoDaddy account, scroll down to “All Products and Services” where you will see “Domains”.
在GoDaddy帐户的“我的产品”主页中,向下滚动到“所有产品和服务”,您将在其中看到“域”。
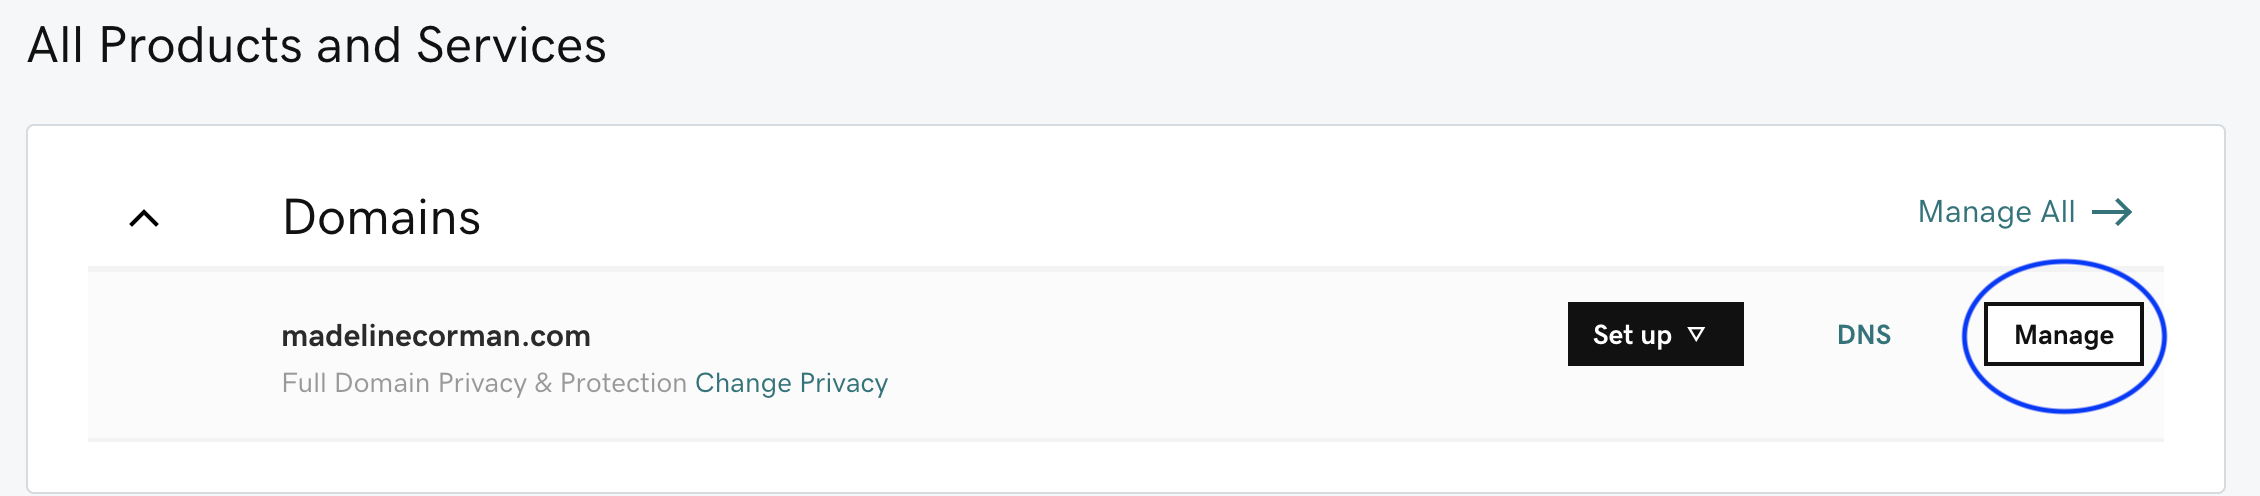
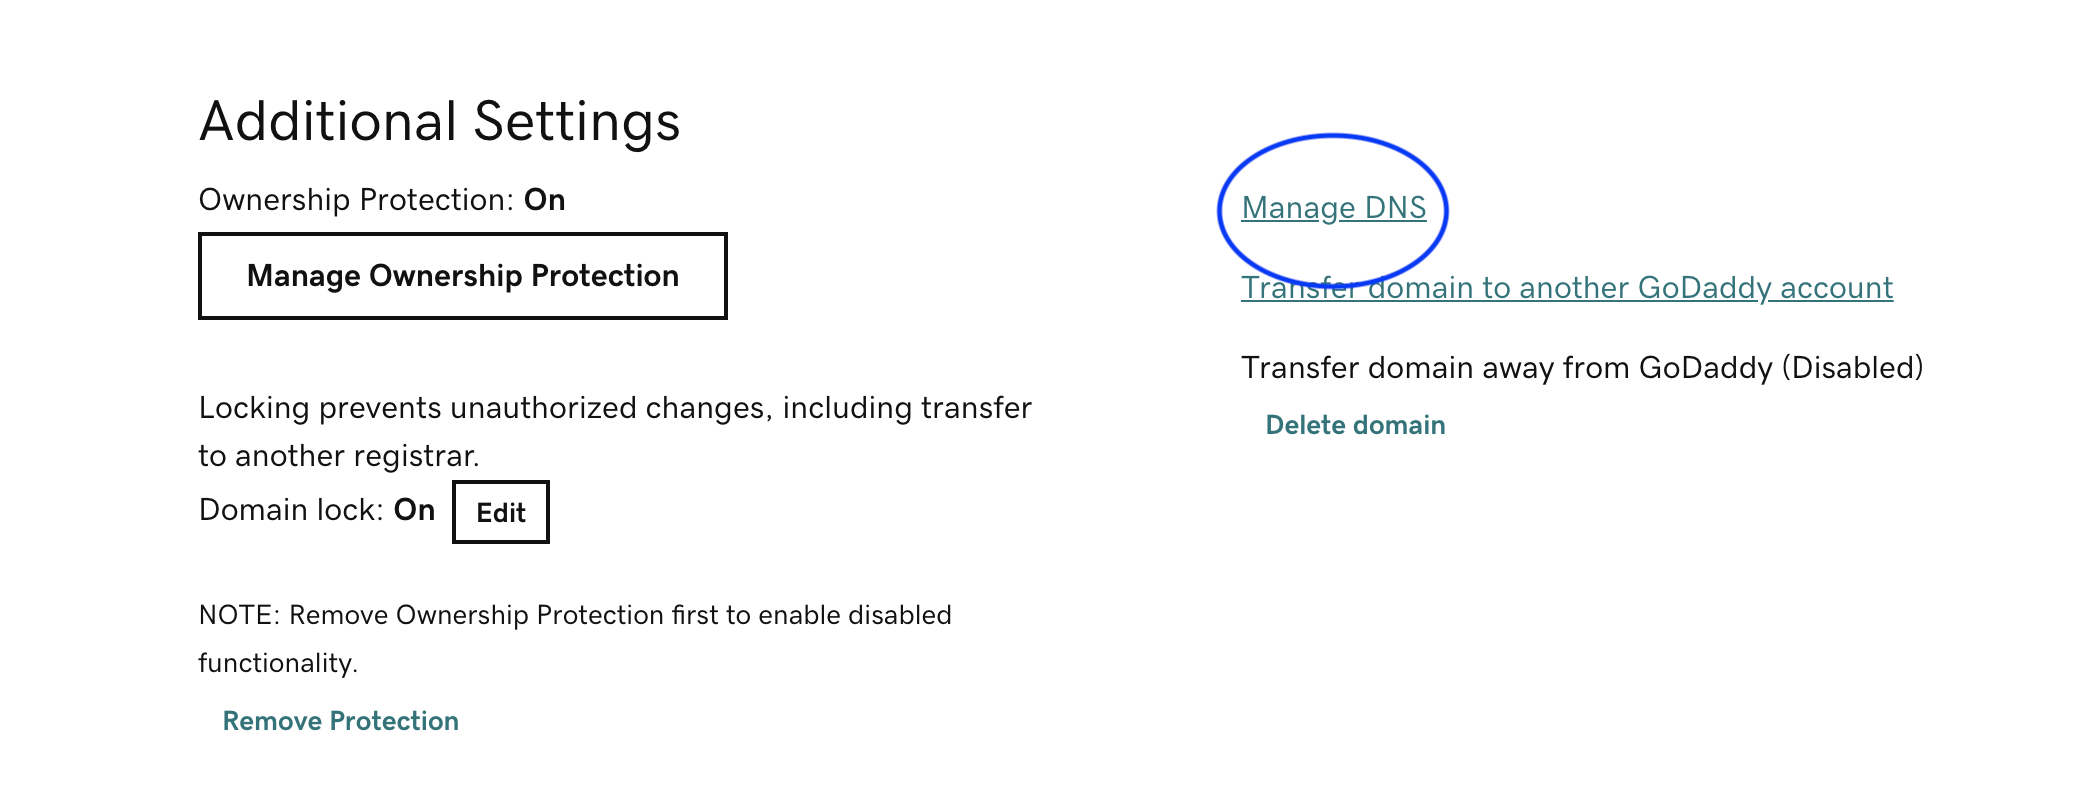
Click the “Manage” option on the right of your chosen domain. Scroll down to “Additional Settings” and click “Manage DNS”.
点击所选域右侧的“管理”选项。 向下滚动到“其他设置”,然后单击“管理DNS”。
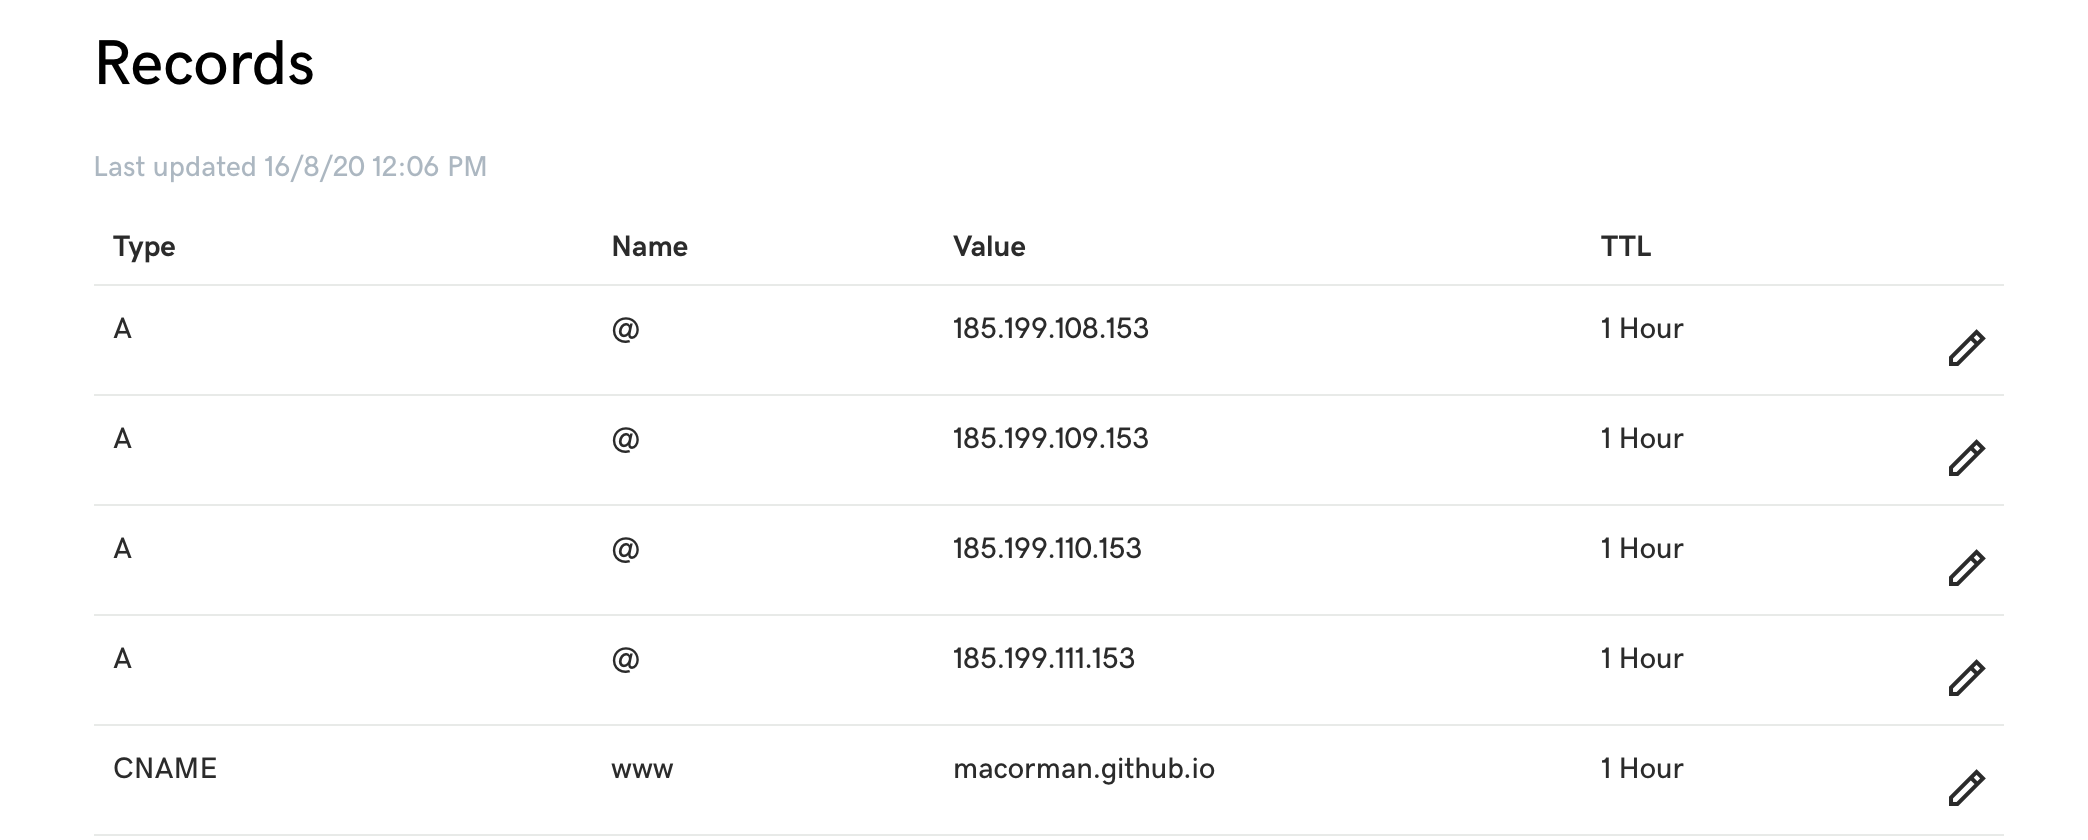
Here you will see a list of records. In the type “A” row, we need to update the IP address to point to the GitHub server. Edit the record and include 185.199.108.153 as the value. Additionally, we will create 3 more records of “A” type with a name of “@” and values of 185.199.109.153, 185.199.110.153, 185.199.111.153. We also need to edit the CNAME record so that name is “www” and the value is “username.github.io”.
在这里,您将看到记录列表。 在“ A”类型行中,我们需要更新IP地址以指向GitHub服务器。 编辑记录,并将185.199.108.153作为值。 此外,我们将再创建3个“ A”类型的记录,名称为“ @”,值分别为185.199.109.153、185.199.110.153、185.199.111.153。 我们还需要编辑CNAME记录,以使名称为“ www”,值为“ username.github.io”。
That’s it for GoDaddy — let’s move on.
GoDaddy就是这样-让我们继续。
将CNAME文件和自定义域添加到GitHub (Adding a CNAME File and Custom Domain to GitHub)
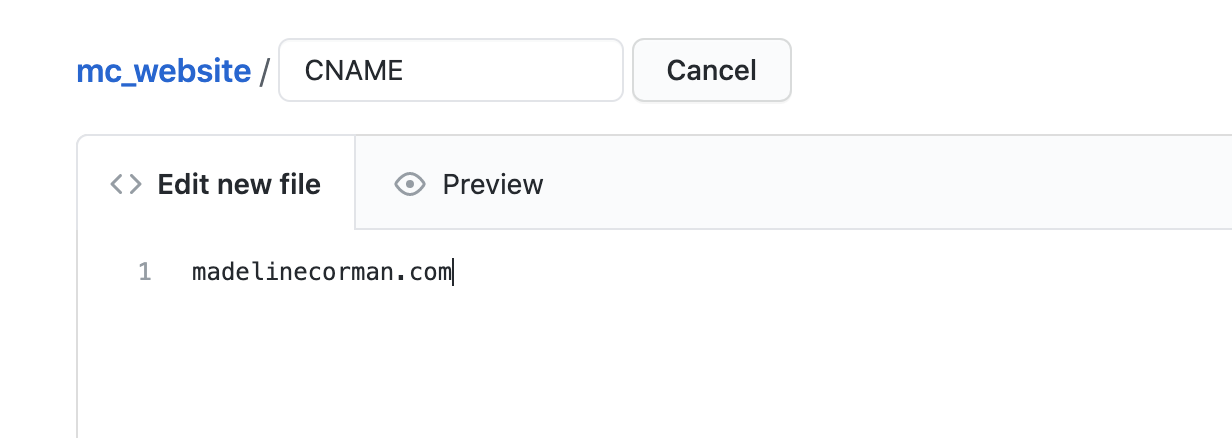
In your GitHub project repository, navigate to the root directory of your master branch (the branch we deploy from). Click the “Add file” button to the right and then “Create new file”. Title this new file “CNAME” and include your custom domain name in the contents of the file.
在您的GitHub项目存储库中,导航到您的master分支(我们从其部署的分支)的根目录。 单击右侧的“添加文件”按钮,然后单击“创建新文件”。 为此新文件命名为“ CNAME”,并在文件内容中包含您的自定义域名。
At the bottom of the page, click “Commit new file”.
在页面底部,单击“提交新文件”。
Next, navigate to the “Settings” tab of the repository and scroll down to the “GitHub Pages” section. In the “Custom domain” field, enter your custom domain and click “Save”. You should also check the “Enforce HTTPS” box. This option may not be immediately available, as the site certificate must be issued first, but be sure to enable this option when possible.
接下来,导航到存储库的“设置”选项卡,然后向下滚动到“ GitHub页面”部分。 在“自定义域”字段中,输入您的自定义域,然后单击“保存”。 您还应该选中“强制HTTPS”框。 该选项可能不会立即可用,因为必须首先颁发站点证书,但是请确保在可能的情况下启用此选项。

Shortly, your site should be published at your custom domain!
不久,您的网站应该在您的自定义域中发布!
For troubleshooting purposes, you can check that your DNS is correctly set up with the following terminal command:
为了进行故障排除,您可以使用以下终端命令检查DNS是否正确设置:
dig example.comWhere “example.com” is your custom domain name.
其中“ example.com”是您的自定义域名。

In my own experience, I had a bug in which my site was completely blank after implementing my custom domain. After some searching, I found the solution in this Stack Overflow thread to be a fix. If you experience similar, give that solution a try. If you experience any other problems, refer to the GitHub documentation around troubleshooting custom domains.
以我自己的经验,在实现自定义域后,我的网站完全空白,这是一个错误。 经过一番搜索后,我发现此 Stack Overflow线程中的解决方案已解决。 如果您遇到类似的情况,请尝试该解决方案。 如果您遇到任何其他问题,请参阅有关对自定义域进行故障排除的GitHub文档。


 被折叠的 条评论
为什么被折叠?
被折叠的 条评论
为什么被折叠?
 到【灌水乐园】发言


