


unix备份与恢复
I had to recover data from a broken external hard drive and my typical go to recovery software failed (TestDisk), because the disk’s hardware was severely damaged.
我必须从损坏的外部硬盘驱动器中恢复数据,而典型的恢复软件失败了( TestDisk ),因为磁盘的硬件严重受损。
Warranty: I am not a professional in data recovery. This is my take on recovering data from my friends broken hard drive. I take no responsibility for the loss of any data. Follow the steps below only if your data is not crucial to you.
保修:我不是数据恢复专家。 这是我从朋友损坏的硬盘中恢复数据的方法。 我对丢失任何数据概不负责。 仅当您的数据对您不重要时,才执行以下步骤。
病征 (Symptoms)
OMG! A friend dropped a 2 TB WD elements external harddrive while it was connected to the PC with active write operations.
我的天啊! 当一个朋友通过有效的写操作连接到PC时,他将2 TB WD元素的外部硬盘驱动器掉了。
Of course, Windows nor Ubuntu is able to mount the disk anymore and the Disk Manager displays the first primary partition as RAW, with Windows prompting:
当然,Windows或Ubuntu都无法再挂载磁盘,并且磁盘管理器在Windows提示下将第一个主分区显示为RAW :
“The drive is not formatted, do you want to format it now?”
“驱动器未格式化,您是否要立即对其进行格式化?”
The amount of possible lost data is approximately 40 GB of pictures/videos and 1 GB of documents like .docx, .ppt, and .pdf.
可能丢失的数据量约为40 GB的图片/视频和1 GB的文档,例如.docx,.ppt和.pdf。
安装必要的工具 (Installation of necessary tools)
Either you are using a bootable Live system like KNOPPIX that is shipped with all tools needed, or install them manually on your machine:
您正在使用随所需的所有工具一起提供的可启动Live系统(例如KNOPPIX) ,还是在计算机上手动安装它们:
TestDisk: If the issue is caused due to non-mechanical problems, like when you got a corrupted partition table, then TestDisk should be able to recover the trashed disk. This procedure is quite easy actually and well documented.
TestDisk :如果问题是由于非机械问题引起的,例如分区表损坏,则TestDisk应该能够恢复已损坏的磁盘。 实际上,此过程非常容易并且有据可查 。
ddrescue: Copies failing block devices like hard drives, CDs to file or other block devices.
ddrescue :将发生故障的块设备(例如硬盘驱动器,CD或文件)复制到文件或其他块设备。
丑陋-机械硬件故障 (The Ugly — Mechanical Hardware Failure)
For me TestDisk’s partition structure analysis algorithm failed because of too many corrupted sectors.
对我而言,TestDisk的分区结构分析算法由于扇区损坏太多而失败。
At the beginning the analysis on the failing device looked OK, but the process crashed each try without success. No partition found.
刚开始时,对故障设备的分析看起来还可以,但是每次尝试都失败了,该过程失败了。 找不到分区。
What now?
现在怎么办?
恢复尽可能多的数据! (Recover as much data as possible!)
使用ddrescue创建原始光盘映像副本 (Create a raw disc image copy with ddrescue)
ddrescue can be used to get low level access to the hard drive and perform a copy of the whole device.
ddrescue可用于低级访问硬盘驱动器并执行整个设备的复制。
Contrary to the well known dd command, it performs a smart copy algorithm that skips bad sectors and tries to copy all good sectors first.
与众所周知的dd命令相反,它执行智能复制算法,该算法将跳过坏扇区并尝试首先复制所有好扇区。
Information about detected bad sectors are stored in a log file that can be used to perform a re-read in a next run
有关检测到的坏扇区的信息存储在日志文件中,可用于在下一次运行中重新读取
警告 (Caution)
Do not continue if you are not comfortable with Unix and the terminal. You can easily destroy your whole system by misusing ddrescue, for example when you pass the wrong device name to ddrescue.
如果您对Unix和终端不满意,请不要继续。 您可以通过滥用ddrescue轻松破坏整个系统,例如,将错误的设备名称传递给ddrescue时 。
- Generally its a bad idea to perform too many IO operations on a mechanical corrupted hard-drive. A bad sector may be like a tiny whole first but the more you try to access the data there, that whole can get bigger and more data gets lost forever. 通常,在机械损坏的硬盘驱动器上执行太多IO操作是一个坏主意。 坏扇区可能首先就像一个很小的整体,但是您尝试访问那里的数据越多,整体可能变得更大,并且更多的数据永远丢失。
Never try to rescue a r/w mounted partition. The resulting copy may be useless. It is best that the device or partition to be rescued is not mounted at all, not even read-only.
切勿尝试抢救AR / W挂载的分区。 生成的副本可能无用。 最好根本不要挂载要抢救的设备或分区,甚至不要只读。
Never try to repair a file system on a drive with I/O errors; you will probably lose even more data.
切勿尝试修复具有I / O错误的驱动器上的文件系统; 您可能会丢失更多数据。
If you use a device or a partition as destination, any data stored there will be overwritten.
如果将设备或分区用作目标,存储在其中的所有数据将被覆盖。
Many paths exist to get your data back, like using the forensic data recovery tool foremost, but its a bad idea to apply a bunch of different recovery tools on the disc directly since that could worsen the disc’s state.
存在许多路径来取回数据,例如最重要的是使用取证数据恢复工具 ,但是直接在光盘上应用大量不同的恢复工具是一个坏主意,因为这可能会使光盘的状态恶化。
Create a raw disk image containing as much data as possible and start from there.
创建一个包含尽可能多数据的原始磁盘映像,然后从那里开始。
1. Understand your mounted devices
1.了解您安装的设备
You have to identify your corrupted device. Use lsblk to list all block devices attached to your system.
您必须识别损坏的设备。 使用lsblk列出连接到系统的所有块设备。
$ lsblk -o name,label,size,fstype,model
sda             119,2G          SAMSUNG SSD CM87
├─sda1            512M vfat
└─sda2          118,8G ext4
sdb               1,8T          Elements 10B8
└─sdb1 Elements   1,8T ntfs
In that example, sda is my operating system and sdb an external harddrive.
在该示例中, sda是我的操作系统, sdb是外部硬盘驱动器。
Its recommended to unmount the disc before applying ddrescue.
建议在应用ddrescue之前先卸载光盘。
$ sudo unmount /dev/sdb1
$ lsblk | grep sdb1
  sdb1   8:17   0   1,8T  0 part
2. ddrescue as a newbieI prefer storing the raw disk image to file instead of having to overwrite an actual additional hard disk.
2.作为新手,ddrescue我更喜欢将原始磁盘映像存储到文件中,而不必覆盖实际的其他硬盘。
First try with the most basic options:
首先尝试使用最基本的选项:
$ ddrescue -d -n /dev/sdc1 /path/to/backup/drive3.raw ddrescue.logwith options:
-d direct disc access, bypasses the kernel's IO cache
-n get most good areas by skipping the scraping phase; Avoid trying to rescue difficult parts;
Unfortunately the operation got stuck and I had to stop with “Control + C”. I got a disc image (drive3.raw) having about 20 GB — not bad for a start. Fortunately ddrescue can be stopped anytime and continued at a later time with different settings.
不幸的是,该操作卡住了,我不得不以“ Control + C”停止。 我得到了大约20 GB的光盘映像(drive3.raw)-不错。 幸运的是,ddrescue可以随时停止,并在以后的时间使用不同的设置继续。
$ ddrescue -e +2 -d -r1 -T 1s /dev/sdc1 /path/to/backup/drive3.raw ddrescue.logwith options:-e maximum number of bad areas allowed before giving up
-T interval, maximum time since last successful read allowed before giving
-r3 retry bad sectors (3 times) detected on a previous run
Since the copy process took hours and still froze arbitrarily, I wrote a small script to rerun ddrescue multiple times to extend the created backup.
由于复制过程耗时数小时且仍然任意冻结,因此我编写了一个小脚本多次重新运行ddrescue以扩展创建的备份。
$ ddresc-copy.sh /dev/sdc1 /path/to/backup/drive3.raw ddrescue.log// ddresc-copy.sh
#!/bin/shcounter=0while [ $counter -lt 5 ]
do
 OUTPUT=$(ddrescue -e +0 -d -r1 -T 1s $1 $2 $3)
 counter=$(( $counter + 1 ))echo "done: $OUTPUT"if [[ $OUTPUT == *"Finished"* ]]; then
  exit 0
 fiecho "new run $counter"
 sleep 3
done
Finally I had a copy with the size of 1 TB! Not the whole disc, but good enough to find some docs for sure.
最后,我得到了一个1 TB的副本! 不是整个光盘,但是足以找到一些文档。
3. Investigate the raw disk copy
3.调查原始磁盘副本
I suspected it already, but parted was not able to find anything nor was TestDisk able to recover the partition table.
我已经怀疑过了,但是parted找不到任何东西, TestDisk也无法恢复分区表。
Without a proper file system structure, there is no way to recreate the folder structure or read file names. However, the raw data with correct file extensions can still be found!
没有适当的文件系统结构,就无法重新创建文件夹结构或读取文件名。 但是,仍然可以找到带有正确文件扩展名的原始数据!
$ parted drive3.raw
Disk /media/christian/Elements/Backups/drive3.raw: 1000GB
Sector size (logical/physical): 512B/512B
Partition Table: msdos
Disk Flags:Number  Start  End  Size  Type  File system  Flags
A look into the log file presents some bad sectors.
查看日志文件会发现一些坏扇区。
# Mapfile. Created by GNU ddrescue version 1.22
# Command line: ddrescue -i8200MiB -s5GiB -e +0 -d -r1 -T 3s -n /dev/sdc1 /media/christian/Elements/Backups/backup.raw ddrescue.log
# Start time:   2020-05-14 08:52:58
# Current time: 2020-05-14 08:52:58
# current_pos  current_status  current_pass
0x00000000     ?               1
#      pos        size  status
0x00000000  0x200800000  ?
0x200800000  0x140000000  ?
0x340800000  0xE5A0238200  ?
从原始分区副本中恢复数据 (Recover data from raw partition copy)
光记录 (Photorec)
Photorec is from the same developer as TestDisk and can be used to extract data from raw images. If the original file-system format is known — the better. I used the latest Beta version 7.2.
Photorec与TestDisk来自同一开发商,可用于从原始图像提取数据。 如果已知原始文件系统格式,那就更好了。 我使用了最新的Beta版本7.2。
As expected the partition was not recognized.
不出所料,该分区未被识别。
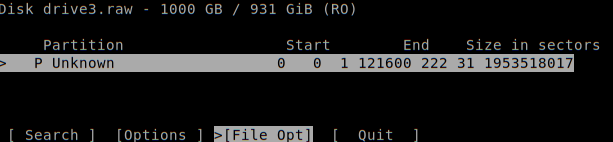
Navigate through the list and select file types.
浏览列表并选择文件类型。
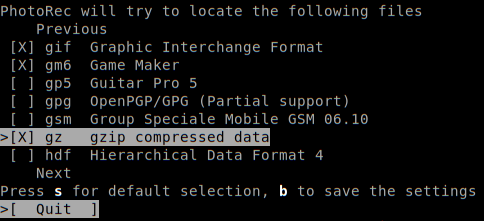
Even though the exact hard disks format is not recognizable, I know that it was FAT32.
即使无法识别确切的硬盘格式,我也知道它是FAT32。

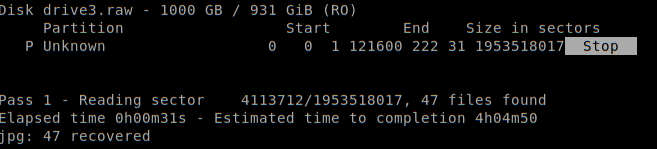
Photorec will output the amount of recovered files per type.
Photorec将输出每种类型的已恢复文件数量。
Recovered data
恢复的数据
Yes! Photorec retrieved 47 GB of actual non-corrupted files!
是! Photorec检索了47 GB的实际未损坏文件!
$ du -sh recovered_data
47G
However, the files are randomly named, have no structure and are appended to folders named recup_dir.X.Each recup_dir subfolder contains around 1000 files.
但是,这些文件是随机命名的,没有结构,并且会附加到名为recup_dir.X的文件夹中。每个recup_dir子文件夹包含大约1000个文件。
$ ll recovered_data
drwxrwxrwx 1 christian christian 232K Mai 14 16:22 recup_dir.1
drwxrwxrwx 1 christian christian 232K Mai 14 17:23 recup_dir.10
drwxrwxrwx 1 christian christian 228K Mai 14 17:28 recup_dir.11
drwxrwxrwx 1 christian christian 216K Mai 14 17:32 recup_dir.12
drwxrwxrwx 1 christian christian 160K Mai 14 17:33 recup_dir.13
drwxrwxrwx 1 christian christian 160K Mai 14 17:34 recup_dir.14
drwxrwxrwx 1 christian christian 164K Mai 14 17:34 recup_dir.15
drwxrwxrwx 1 christian christian 112K Mai 14 17:35 recup_dir.16
Some analysis and sorting is necessary to make the data usable.
为了使数据可用,必须进行一些分析和分类。
What’s inside the box?
盒子里有什么?
With that amount of unstructured files, I wanted to get an idea of what kind of data was found using only a find pipe.
有了这么多的非结构化文件,我想了解仅使用find pipe查找到哪种数据。
$ find recovered_data -type f | rev | cut -d. -f1 | rev  | tr '[:upper:]' '[:lower:]' | sort | uniq --count | sort -rn
  25276 jpg
   1204 docx
    612 png
    126 mp4
    124 doc
     73 pptx
     38 pdf
     20 mov
     19 ppt
     16 3gp
     11 xlsx
      6 zip
      6 avi
      3 wmv
      3 plist
      2 odt
      2 msg
      1 xml
      1 txt
      1 notebook
      1 lnk
Looks great!
看起来很棒!
|-type f : find all files within that directory
recovered_data/f0477104.JPG| rev : reverse file-path to capture file extension in front (“JPG.4017740f/1.rid_pucer/atad_derevocer”)| cut -d. : split string on the dot and keep first column (the extension)
“GPJ”| rev : reverse again
“JPG”| tr ‘[:upper:]’ ‘[:lower:]’: convert all upper cased characters to lower case
“jpg”| uniq --count : get all unique strings with their respective amount of files| sort -rn : sort file types in descending numeric order
排序恢复的数据 (Sorting Recovered Data)
The next step is to sort and organize the unstructured data on some criteria like file type and content.
下一步是根据某些标准(例如文件类型和内容)对非结构化数据进行排序和组织。
I have used and improved a Python script that does a great job in grouping files based on their extension.
我使用并改进了Python脚本 ,该脚本在根据文件扩展名对文件进行分组方面做得很好。
Further it distinguishes JPGs by year, month when they have been taken. Additionally it can detect events when photos have been taken across multiple days like on a weekend trip.
进一步,它可以按拍摄年,月来区分JPG。 此外,它可以检测多天(如周末旅行)拍摄的照片时发生的事件。
$ python recovery.py <path to files recovered_data by Photorec> <destination> -mNew folder structure
新文件夹结构
<destination>
|- DOC
|- PDF
|- PNG
|- JPG
  |- 2020   # Year
    |- 1    # Month January
        |- 2020-01-10__to__01_13 # event, trip 1
        |- 2020-01-23__to__01_24 # event, trip 2
结论 (Conclusion)
I was able to recover lost data from a broken external hard drive with free Unix tools only.
我只能使用免费的Unix工具从损坏的外部硬盘驱动器中恢复丢失的数据。
ddrescue was used to create a raw partition copy. First all undamaged sectors have been copied to file. In additional iterations ddrescue scraped data out of the bad sectors until I was satisfied with the resulting copy with the size of 1 TB.
ddrescue用于创建原始分区副本。 首先,所有未损坏的扇区都已复制到文件中。 在其他迭代中, ddrescue从坏扇区中抓取了数据,直到我对1 TB大小的结果副本感到满意为止。
Photorec did a great job in recovering well known data types. However, structure and file names are gone.
Photorec在恢复众所周知的数据类型方面做得很好。 但是,结构和文件名不见了。
Unstructured files got grouped by extension and JPG images are sorted and grouped by creation time.
按扩展名分组的非结构化文件和JPG图像按创建时间进行排序和分组。
In my next story I will cover the problem of finding proper file names for recovered text documents like .doc, .ppt or .pdf.
在我的下一个故事中,我将讨论为恢复的文本文档(例如.doc,.ppt或.pdf)找到合适的文件名的问题。
资源资源 (Resources)
Excellent video from Level1Linux
来自Level1Linux的出色视频
CGSecurity
CG安全
翻译自: https://levelup.gitconnected.com/introduction-to-data-recovery-with-free-unix-tools-8dd2bb9ace34
unix备份与恢复


 155
155

 被折叠的 条评论
为什么被折叠?
被折叠的 条评论
为什么被折叠?
 到【灌水乐园】发言


