flutter 填充_如何在您的Flutter应用中实现自动填充

flutter 填充

The developers at Flutter recently released version 1.20.0. This update features performance improvements, new widgets, added features, and more. For more specific information about the update, check out the official release notes here, here, and here.

Flutter的开发人员最近发布了1.20.0版本。 此更新具有性能改进,新的小部件,添加的功能等更多功能。 有关更新的更多特定信息,请在此处此处此处查看官方发行说明。

We’ll be talking about one newly added feature in this article: autofill. There’s a reason why autofill has been the most requested feature — forms are slow, annoying, and error-prone. Taking advantage of the autofill capabilities introduced in Flutter 1.20.0 will greatly improve user experience when using your app. This article will provide a comprehensive guide to implementing this feature along with detailed examples and sample code.

我们将在本文中讨论一个新添加的功能:自动填充。 自动填充一直是最需要的功能,这是有原因的-表单速度慢,烦人且容易出错。 利用Flutter 1.20.0中引入的自动填充功能,将在使用您的应用程序时极大地改善用户体验。 本文将提供有关实现此功能的全面指南,以及详细的示例和示例代码。

建立表格 (Creating a Form)

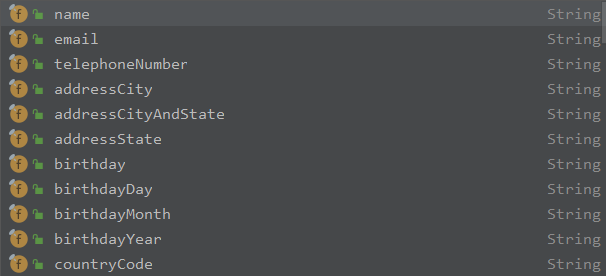
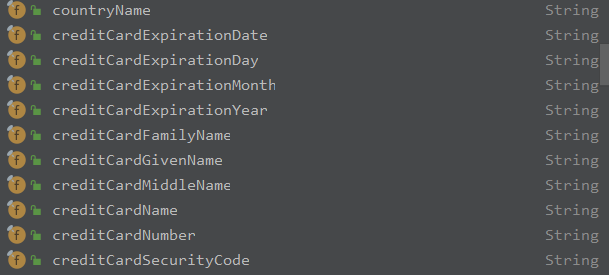
To begin adding this feature into your app, start by creating a simple form that asks for the user’s name, email address, and phone number (standard data that should be available on a user’s mobile device). Although the form we’ll be creating will be limited to these fields, the scope of autofill’s capabilities is much wider. Here’s a list of everything it supports:

要将此功能添加到您的应用中,请先创建一个简单的表格,询问用户的姓名,电子邮件地址和电话号码(用户移动设备上应提供的标准数据)。 尽管我们将要创建的表单将限于这些字段,但是自动填充功能的范围要广泛得多。 这是它支持的所有内容的列表:

Image for post
Image for post
Image for post
Image for post
Image for post
Image for post
These are all of the autofill fields that Flutter supports.
这些是Flutter支持的所有自动填充字段。

Here’s the code for the basic form that we’ll be using:

这是我们将要使用的基本表单的代码:

import 'package:flutter/material.dart';


void main() => runApp(MyApp());


class MyApp extends StatelessWidget {
  @override
  Widget build(BuildContext context) {
    final appTitle = 'AutoFill Demonstration';
    return MaterialApp(
      title: appTitle,
      home: Scaffold(
        appBar: AppBar(
          title: Text(appTitle),
        ),
        body: Container(
        margin: const EdgeInsets.only(left: 20.0, right: 20.0),
        child:MyCustomForm(),
        )
      ),
    );
  }
}


class MyCustomForm extends StatefulWidget {
  @override
  MyCustomFormState createState() {
    return MyCustomFormState();
  }
}


class MyCustomFormState extends State<MyCustomForm> {
  final _formKey = GlobalKey<FormState>();


  @override
  Widget build(BuildContext context) {
    return Form(
      key: _formKey,
      child: Column(
        crossAxisAlignment: CrossAxisAlignment.start,
        children: <Widget>[
          TextFormField(
            autofillHints: [AutofillHints.name],
            decoration: const InputDecoration(
              hintText: 'Name',
            ),
            validator: (value) {
              if (value.isEmpty) {
                return 'Please enter your name';
              }
              return null;
            },
            keyboardType: TextInputType.text,
          ),
          TextFormField(
            decoration: const InputDecoration(
              hintText: 'Email',
            ),
            keyboardType: TextInputType.emailAddress,
            autofillHints: [AutofillHints.email],
            validator: (value) {
              Pattern pattern =
                  r'^(([^<>()[\]\\.,;:\s@\"]+(\.[^<>()[\]\\.,;:\s@\"]+)*)|(\".+\"))@((\[[0-9]{1,3}\.[0-9]{1,3}\.[0-9]{1,3}\.[0-9]{1,3}\])|(([a-zA-Z\-0-9]+\.)+[a-zA-Z]{2,}))$';
              RegExp regex = new RegExp(pattern);
              if (!regex.hasMatch(value))
                return 'Enter a valid email';
              else
                return null;
            },
          ),
          TextFormField(
            autofillHints: [AutofillHints.telephoneNumber],
            decoration: const InputDecoration(
              hintText: 'Phone Number',
            ),
            keyboardType: TextInputType.phone,
            validator: (value) {
              Pattern pattern =
                  r'^(?:\+?1[-.●]?)?\(?([0-9]{3})\)?[-.●]?([0-9]{3})[-.●]?([0-9]{4})$';
              RegExp regex = new RegExp(pattern);
              if (!regex.hasMatch(value))
                return 'Enter a valid phone number';
              else
                return null;
            },
          ),
          Padding(
            padding: const EdgeInsets.symmetric(vertical: 16.0),
            child: RaisedButton(
              onPressed: () {
                if (_formKey.currentState.validate()) {
                  Scaffold.of(context)
                      .showSnackBar(SnackBar(content: Text('Processing Data')));
                }
              },
              child: Text('Submit Form'),
            ),
          ),
        ],
      ),
    );
  }
}
Image for post
Example form
范例表格

This is a standard form that asks for multiple basic data entries. To understand the form, let’s explore one TextFormField in detail:

这是一种标准形式,要求输入多个基本数据。 为了理解表单,让我们详细研究一个TextFormField:

TextFormField(
  decoration: const InputDecoration(
    hintText: 'Email',
  ),
  keyboardType: TextInputType.emailAddress,
  autofillHints: [AutofillHints.email],
  validator: (value) {
    Pattern pattern =
        r'^(([^<>()[\]\\.,;:\s@\"]+(\.[^<>()[\]\\.,;:\s@\"]+)*)|(\".+\"))@((\[[0-9]{1,3}\.[0-9]{1,3}\.[0-9]{1,3}\.[0-9]{1,3}\])|(([a-zA-Z\-0-9]+\.)+[a-zA-Z]{2,}))$';
    RegExp regex = new RegExp(pattern);
    if (!regex.hasMatch(value))
      return 'Enter a valid email';
    else
      return null;
  },
),

The hintText field controls what the user sees when they open the form. This information guides them to enter the right information in each field.

hintText字段控制用户打开表单时看到的内容。 此信息指导他们在每个字段中输入正确的信息。

The keyboardType is used to limit input into each field. For example, this can be used to prevent users from entering letters in a phone number field and saves you from having to account for unexpected submissions.

keyboardType用于限制每个字段的输入。 例如,这可用于防止用户在电话号码字段中输入字母,并避免您不得不考虑意外提交。

The autofillHints is used to control what autofill suggestion the user sees when they’re filling out the form. This is important; the user shouldn’t be prompted to enter their email when you are asking for their phone number.

autofillHints用于控制用户在填写表单时看到的自动填充建议。 这个很重要; 询问用户电话号码时,不会提示用户输入电子邮件。

The validator function is used to handle and process the user’s input. In this example, we’re using a comprehensive regex pattern to identify email addresses. If the user enters text that does not follow the email format, the form will return the error message that is specified (‘Enter a valid email’ in this case).

验证器功能用于处理和处理用户的输入。 在此示例中,我们使用全面的正则表达式模式来标识电子邮件地址。 如果用户输入的文本不遵循电子邮件格式,则表单将返回指定的错误消息(在这种情况下为“输入有效的电子邮件”)。

The code above is completely valid. However, if you start your emulator, launch the app, and begin filling out the form, you will not see any autofill suggestions. To see them while in the development phase, you will have to download an autofill service and optimize your app for autofill.

上面的代码是完全有效的。 但是,如果启动模拟器,启动应用程序并开始填写表单,则不会看到任何自动填充建议。 要在开发阶段看到它们,您将必须下载自动填充服务并优化您的应用程序以进行自动填充。

安装自动填充服务 (Installing the AutoFill Service)

Note: This step is only for testing on an emulator. If you have a physical device, you should be able to see autofill in action without having to follow these steps.

注意:此步骤仅用于在仿真器上进行测试。 如果您有物理设备,则无需遵循以下步骤即可看到自动填充功能。

Download the service by using this link or by cloning the repository from GitHub:

通过使用此链接或从GitHub克隆存储库下载服务:

$ git clone https://github.com/android/input-samples.git

Extract the downloaded zip file, navigate to AutofillFramework,and place it into C:\Users\name or the root folder. The extracted folder, AutofillFramework, contains the optimized autofill service.

解压缩下载的zip文件,导航到AutofillFramework,并将其放置在C:\Users\name或根文件夹中。 提取的文件夹AutofillFramework包含优化的自动填充服务。

Now, follow these steps:

现在,请按照下列步骤操作:

  1. Open Android Studio and click Import project (Gradle, Eclipse ADT, etc.)

    打开Android Studio,然后单击导入项目(Gradle,Eclipse ADT等)
  2. In the Select Eclipse or Gradle Project to Import dialog, choose the folder where you downloaded the autofill service sample. Click OK.

    在“选择要导入的Eclipse或Gradle项目”对话框中,选择下载自动填充服务示例的文件夹。 单击确定。
  3. Select afservice from the Run/Debug configuration dropdown and click the Run button.

    从“运行/调试”配置下拉列表中选择afservice,然后单击“运行”按钮。
  4. Select your device from the Select Deployment Target dialog.

    从“选择部署目标”对话框中选择您的设备。

When you run afservice, you should automatically see the following screen. If this screen isn’t visible, open Settings and search for autofill service.

运行afservice时,应自动看到以下屏幕。 如果看不到此屏幕,请打开“设置”并搜索自动填充服务。

Image for post

Once you’re on the screen above, follow these instructions:

在上面的屏幕上后,请按照以下说明进行操作:

  1. Scroll to the bottom and under the Enable/Disable section, toggle the “Set default Autofill service” to turn autofill on.

    滚动到底部,然后在“启用/禁用”部分下,切换“设置默认自动填充服务”以启用自动填充。
  2. On the following screen, choose “Debug Autofill Service”.

    在以下屏幕上,选择“调试自动填充服务”。
  3. Click OK in the Make sure you trust this app dialog.

    在确保您信任此应用程序对话框中单击确定。
  4. On the original screen, tap “Add fake Autofill data”. Select the number of datasets that you would like to use for testing.

    在原始屏幕上,点击“添加伪造的自动填充数据”。 选择您要用于测试的数据集数量。

That’s it! Close the afservice folder and return to your project, launch the emulator and you should see autofill suggestions on your app. The number of visible suggestions is based on the number of fake datasets you added in the fourth step.

而已! 关闭afservice文件夹并返回您的项目,启动仿真器,您应该在应用程序上看到自动填充建议。 可见建议的数量基于您在第四步中添加的伪数据集的数量。

Image for post

All the code used in this article (and other articles) can be found in my GitHub repo.

可以在我的GitHub repo中找到本文(和其他文章)中使用的所有代码。

If you found this article helpful, consider following me for more Flutter articles and leave any feedback or comments below!

如果您发现本文有帮助,请考虑关注我以获取更多Flutter文章,并在下面留下任何反馈或评论!

翻译自: https://medium.com/swlh/how-to-implement-autofill-in-your-flutter-app-b43bddab1a97

flutter 填充

  • 0
    点赞
  • 1
    收藏
    觉得还不错? 一键收藏
  • 0
    评论

“相关推荐”对你有帮助么?

  • 非常没帮助
  • 没帮助
  • 一般
  • 有帮助
  • 非常有帮助
提交
评论
添加红包

请填写红包祝福语或标题

红包个数最小为10个

红包金额最低5元

当前余额3.43前往充值 >
需支付:10.00
成就一亿技术人!
领取后你会自动成为博主和红包主的粉丝 规则
hope_wisdom
发出的红包
实付
使用余额支付
点击重新获取
扫码支付
钱包余额 0

抵扣说明:

1.余额是钱包充值的虚拟货币,按照1:1的比例进行支付金额的抵扣。
2.余额无法直接购买下载,可以购买VIP、付费专栏及课程。

余额充值