


aws 短信验证
Setting up authentication in a Flutter application is easy with the help of AWS Cognito, now available through Amplify Flutter. If you haven’t check out Part 1 of this series, I suggest you do that first.
借助AWS Cognito可以轻松在Flutter应用程序中设置身份验证,现在可以通过Amplify Flutter使用。 如果您还没有阅读本系列的第1部分 ,那么建议您先这样做。
我们在做什么? (What are we making?)
We will be making a simple registration and login system for a Flutter application that uses AWS Cognito as the authentication backend.
我们将为使用AWS Cognito作为身份验证后端的Flutter应用程序制作一个简单的注册和登录系统。
As always, you can find the code for this tutorial at our Github repo.
与往常一样,您可以在我们的Github存储库中找到本教程的代码。
我们需要什么? (What do we need?)
The only thing you need for this tutorial is the app you created in Part 1 of this tutorial series, which is just a sample app with amplify initialized.
本教程唯一需要的是您在本系列教程的第1部分中创建的应用程序,它只是一个带有放大初始化的示例应用程序。
If you don’t want to read part 1 and you are already familiar with Amplify Flutter, then simply create a new Flutter application and connect it to a cloud instance of Amplify.
如果您不想阅读第1部分,并且已经熟悉Amplify Flutter,那么只需创建一个新的Flutter应用程序并将其连接到Amplify的云实例即可。
让我们开始吧 (Let’s Get Started)
创建一个基本的扩增项目 (Create a Basic Amplify Project)
If you are using the app you created in Part 1, you can skip this step.
如果您使用的是在第1部分中创建的应用程序,则可以跳过此步骤。
Otherwise, create a new flutter project, and from the project directory run:
否则,创建一个新的flutter项目,然后从项目目录运行:
amplify init将AWS Cognito添加到我们的项目中 (Add AWS Cognito to our Project)
From the integrated terminal, run
从集成终端运行
amplify add authThis adds AWS Cognito to your project. After following the setup wizard, your terminal should look something like this:
这将添加AWS Cognito 到您的项目。 遵循设置向导后,您的终端应如下所示:
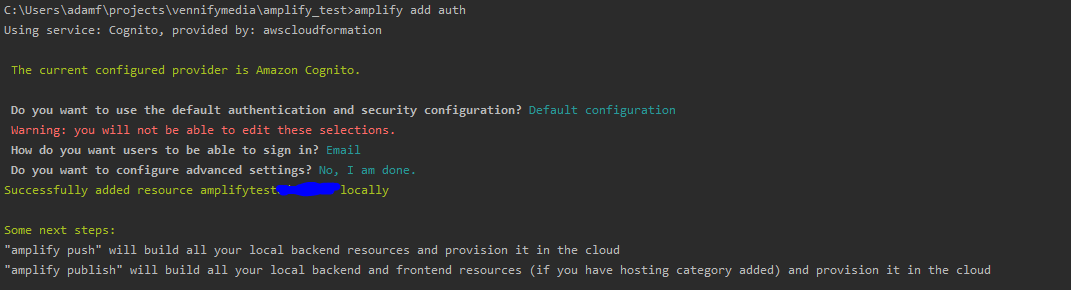
Note that we are going to be using emails as the authentication method. I will cover the other methods in future tutorials.
请注意,我们将使用电子邮件作为身份验证方法。 我将在以后的教程中介绍其他方法。
Next, follow the instructions given in the terminal and run amplify push to deploy authentication to your cloud project.y
接下来,按照终端中给出的说明进行操作,并运行amplify push将身份验证部署到您的云项目。
检查我们的资源状态 (Checking on the Status of our Resources)
You can check the status of your cloud resources by running amplify status.
您可以通过运行放大状态来检查云资源的状态 。
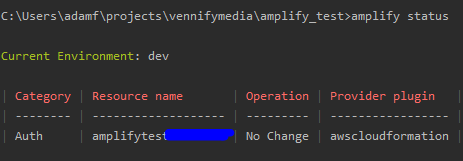
At this point, a user pool should have been created in the cloud for your AWS Cognito service. Go to your user pools (make sure you select your region) and you should see a new user pool.
此时,应该已经在云中为您的AWS Cognito服务创建了一个用户池。 转到您的用户池 (确保选择了您的区域),您应该看到一个新的用户池。

与云资源互动 (Interacting with Cloud Resources)
A few steps are needed to interact with the cloud, if you just want the final result and don’t care about the step-by-step, go here for a checkpoint commit.
与云进行交互需要一些步骤,如果您只是想要最终结果,而不关心分步操作,请转到此处进行检查点提交。
Many of these code snippets are derived from the AWS documentation. I will give explanations about what each logical component does, and provide you with a working example of a login form.
这些代码片段中的许多都是从AWS 文档派生的。 我将解释每个逻辑组件的作用,并为您提供登录表单的有效示例。
Add packages to pubspec.yaml
将软件包添加到pubspec.yaml
This gives us access to the dart packages for amplify.
这使我们可以使用dart包进行放大。
amplify_core: '<1.0.0'
amplify_auth_cognito: '<1.0.0'
2. Amplify Initialization
2. 放大初始化
This code snippet initializes our authentication plugin (and any other plugins we may have) and sets our apps flags so that we can handle an unsuccessful cloud connection in our app.
此代码段初始化了我们的身份验证插件(以及我们可能拥有的任何其他插件)并设置了应用程序标志,以便我们可以处理应用程序中不成功的云连接。
void _configureAmplify() async {
  if (!mounted) return;


  // add all of the plugins we are currently using
  // in our case... just one - Auth
  AmplifyAuthCognito authPlugin = AmplifyAuthCognito();
  amplifyInstance.addPlugin(authPlugins: [authPlugin]);


  await amplifyInstance.configure(amplifyconfig);
  try {
    setState(() {
      _amplifyConfigured = true;
    });
  } catch (e) {
    print(e);
  }
}
3. Register a User
3.注册用户
Registering a user makes use of text controllers (not shown here). Once again, state flags (isSignUpComplete in this case) are set based on the result of the SignUp operation.
注册用户将使用文本控制器(此处未显示)。 再次根据SignUp操作的结果设置状态标志(在这种情况下为isSignUpComplete )。
Future<String> _registerUser(LoginData data) async
  {
    try {
      Map<String, dynamic> userAttributes = {
        "email": emailController.text,
      };
      SignUpResult res = await Amplify.Auth.signUp(
          username: data.name,
          password: data.password,
          options: CognitoSignUpOptions(
              userAttributes: userAttributes
          )
      );
      setState(() {
        isSignUpComplete = res.isSignUpComplete;
        print("Sign up: " + (isSignUpComplete ? "Complete" : "Not Complete"));
      });
    } on AuthError catch (e) {
      print(e);
      return "Register Error: " + e.toString();
    }
  }
4. Sign In a User
4.登录用户
Future<String> _signIn(LoginData data) async {
try {
SignInResult res = await Amplify.Auth.signIn(
username: data.name,
password: data.password,
);
setState(() {
isSignedIn = res.isSignedIn;
});
if (isSignedIn)
Alert(context: context, type: AlertType.success, title: "Login Success").show();
} on AuthError catch (e) {
print(e);
Alert(context: context, type: AlertType.error, title: "Login Failed").show();
return 'Log In Error: ' + e.toString();
}
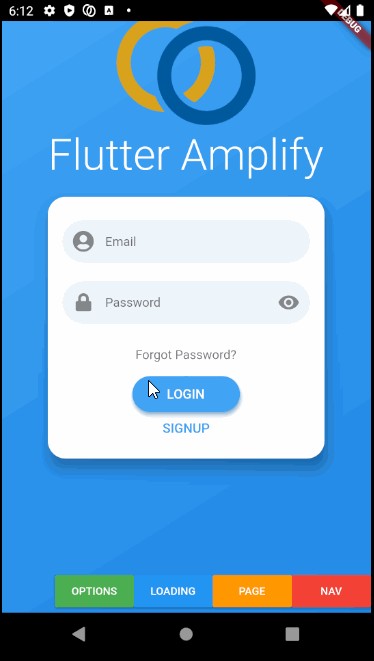
}And that’s it! Those are all of the logical building blocks that we will use to create a nice signup and login interface. The only thing left to do is integrate these components into a user interface, which we will do next.
就是这样! 这些都是我们用来创建漂亮的注册和登录界面的逻辑构建块。 剩下要做的唯一一件事就是将这些组件集成到用户界面中,我们接下来将要做。
颤振登录 (Flutter Login)
For convenience, we will use a flutter package called flutter_login to make our first integration quick and painless. As with all things in life, KISS.
为了方便起见,我们将使用一个名为flutter_login的flutter包来使我们的第一次集成变得快速而轻松。 就像生活中的一切一样,KISS。

main.dart (Main.dart)
import 'package:amplify_auth_cognito/amplify_auth_cognito.dart';
import 'package:amplify_core/amplify_core.dart';
import 'package:flutter/material.dart';
import 'package:flutter_login/flutter_login.dart';


import 'amplifyconfiguration.dart';


void main() {
  runApp(MaterialApp(
    home: MyApp(),
  ));
}


class MyApp extends StatefulWidget {
  @override
  _MyAppState createState() => _MyAppState();
}


class _MyAppState extends State<MyApp> {


  // gives our app awareness about whether we are succesfully connected to the cloud
  bool _amplifyConfigured = false;


  // Instantiate Amplify
  Amplify amplifyInstance = Amplify();


  // controllers for text input
  final emailController = TextEditingController();
  final passwordController = TextEditingController();


  bool isSignUpComplete = false;
  bool isSignedIn = false;


  @override
  void initState() {
    super.initState();


    // amplify is configured on startup
    _configureAmplify();
  }


  @override
  void dispose() {
    // Clean up the controller when the widget is removed from the
    // widget tree.
    emailController.dispose();
    passwordController.dispose();


    super.dispose();
  }


  void _configureAmplify() async {
    if (!mounted) return;


    // add all of the plugins we are currently using
    // in our case... just one - Auth
    AmplifyAuthCognito authPlugin = AmplifyAuthCognito();
    amplifyInstance.addPlugin(authPlugins: [authPlugin]);


    await amplifyInstance.configure(amplifyconfig);
    try {
      setState(() {
        _amplifyConfigured = true;
      });
    } catch (e) {
      print(e);
    }
  }


  Future<String> _registerUser(LoginData data) async
  {
    try {
      Map<String, dynamic> userAttributes = {
        "email": emailController.text,
      };
      SignUpResult res = await Amplify.Auth.signUp(
          username: data.name,
          password: data.password,
          options: CognitoSignUpOptions(
              userAttributes: userAttributes
          )
      );
      setState(() {
        isSignUpComplete = res.isSignUpComplete;
        print("Sign up: " + (isSignUpComplete ? "Complete" : "Not Complete"));
      });
    } on AuthError catch (e) {
      print(e);
      return "Register Error: " + e.toString();
    }
  }


  Future<String> _signIn(LoginData data) async {
    try {
      SignInResult res = await Amplify.Auth.signIn(
        username: data.name,
        password: data.password,
      );
      setState(() {
        isSignedIn = res.isSignedIn;
      });
    } on AuthError catch (e) {
      print(e);
      return 'Log In Error: ' + e.toString();
    }
  }


  @override
  Widget build(BuildContext context) {
    return SafeArea(
      child: FlutterLogin(
          logo: 'assets/vennify_media.png',
          onLogin: _signIn,
          onSignup: _registerUser,
          onRecoverPassword: (_) => null,
          title:'Flutter Amplify'
      ),
    );
  }
}
Of course, add the following lines to your pubspec.yaml to enable our new packages:
当然,请将以下行添加到pubspec.yaml中以启用我们的新软件包:
flutter_login: '<1.0.0'
rflutter_alert: '^1.0.3'
测试用户注册 (Testing User Registration)
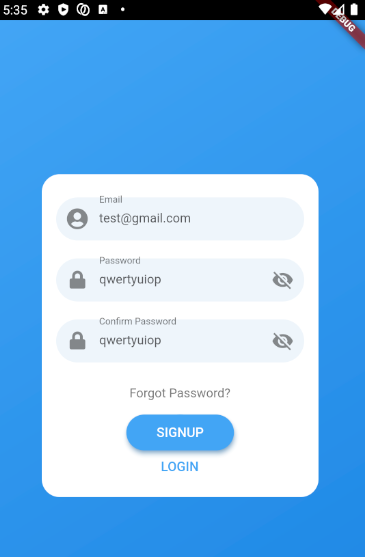
To register a new user, simply use the intuitive flutter_login interface to submit a new user request to Amplify Cognito.
要注册新用户,只需使用直观的flutter_login界面向Amplify Cognito提交新的用户请求。
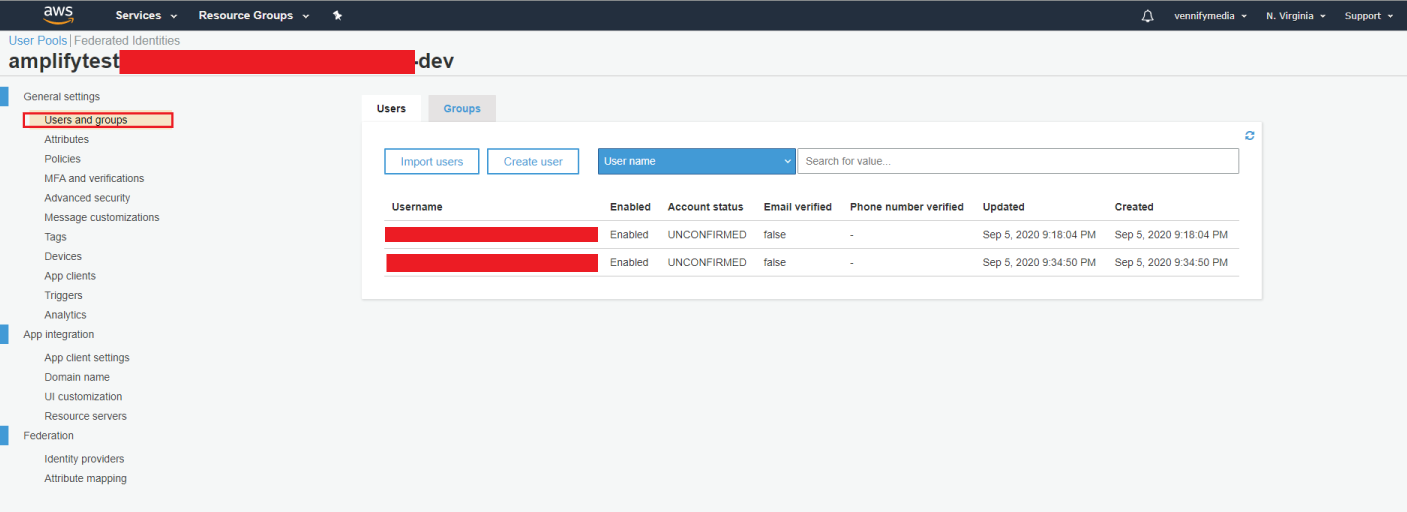
Navigate to your user pool and you should see a new user that was created:
导航到您的用户池 ,您应该看到已创建一个新用户:
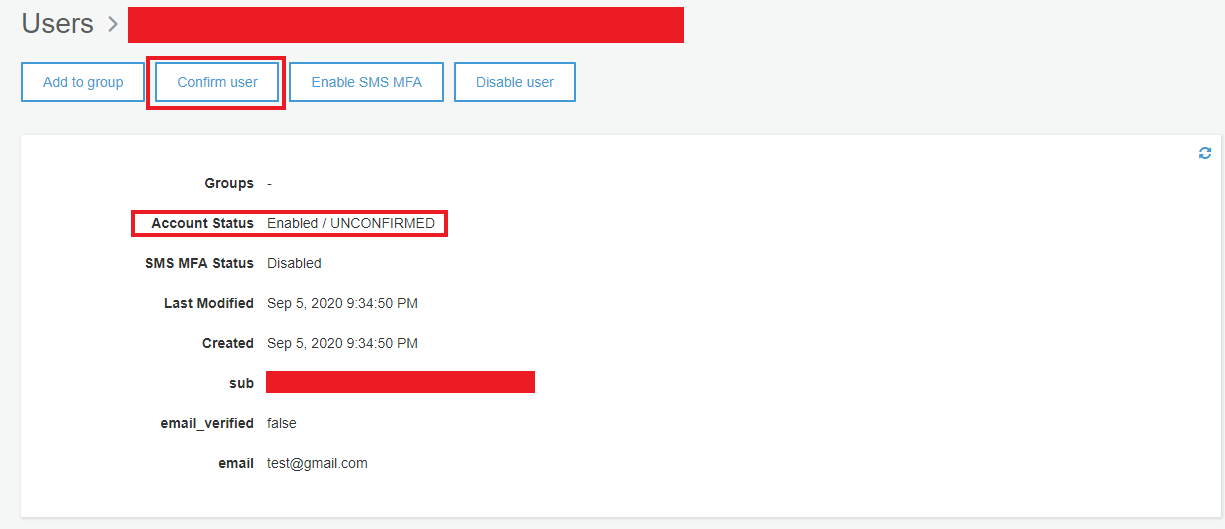
Select one of the users in your pool. Notice that the status is ‘UNCONFIRMED’. In this tutorial, we will be confirming our users manually simply by tapping on the ‘Confirm User’ button. In a future tutorial, I will demonstrate how to confirm users automatically using a verification code sent to their phone or email.
选择池中的用户之一。 请注意,状态为“ UNCONFIRMED”。 在本教程中,我们将简单地通过点击“确认用户”按钮来手动确认用户。 在以后的教程中,我将演示如何使用发送到手机或电子邮件的验证码自动确认用户。
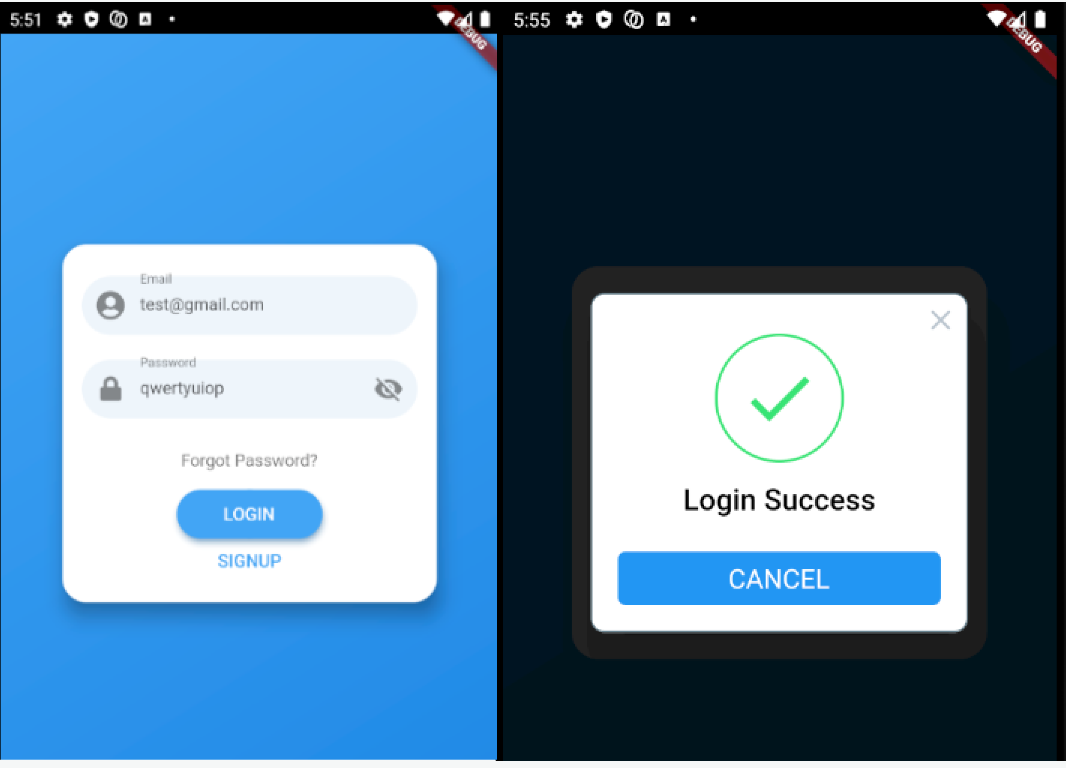
测试用户登录 (Testing User Login)
Let’s try to login using the user that we just created.
让我们尝试使用刚刚创建的用户登录。

结语 (Wrapping Up)
Still with me? At this point, we have a very basic authentication system for our app that leverages AWS Cognito. There are still several other topics to explore in regards to authentication, but they are beyond the scope of this tutorial. Some other challenges we need to tackle include:
还在我这儿? 至此,我们为应用程序建立了一个非常基本的身份验证系统,该系统利用了AWS Cognito。 关于身份验证,还有其他几个主题需要探讨,但它们不在本教程的讨论范围之内。 我们需要解决的其他一些挑战包括:
- Authentication based on different credential types 基于不同凭证类型的身份验证
- Automatic confirmation of users 自动确认用户
- 2FA and custom authentication processes 2FA和自定义身份验证过程
I hope to cover these topics in detail in a future article. Until then, let’s continue on our journey of nailing down the basics of AWS Amplify with Flutter. Next up — analytics.
我希望在以后的文章中详细介绍这些主题。 在此之前,让我们继续努力,确定带有Flutter的AWS Amplify的基础知识。 下一步- 分析 。
本系列 (This Series)
Part 1: Basic Setup
第1部分: 基本设置
Part 2: Authentication
第2部分: 身份验证
Part 3: Analytics
第3部分: 分析
Part 4: Storage
第4部分: 存储
翻译自: https://medium.com/swlh/flutter-apps-with-aws-backend-part-2-authentication-a66136f23995
aws 短信验证


 843
843

 被折叠的 条评论
为什么被折叠?
被折叠的 条评论
为什么被折叠?
 到【灌水乐园】发言


