数据eda
Till now I’ve not explained what’s EDA and those who have come so far, CONGRATULATIONS!!!, we will now start the EDA process. Heads up before we dive.
到目前为止,我还没有解释什么是EDA,到目前为止,我们尚未解释过,恭喜!!!我们现在将开始EDA流程。 在潜水之前先抬头。
• There are no thumb rules for EDA or not we would have a designated template

• It entirely depends on how your data is and the EDA will take up its on course based on your data
• Interrogate the data and it will speak
I’ll try my level best to explain you to get started and consider this as a kick start for any of your EDA.
我会尽力向您解释入门的水平,并将其视为您所有EDA的入门。
So, million-dollar question, What the heck is EDA? In a layman terms, it’s a process where you try to get meaningful insights from given data. EDA is process which gives you confidence on your data and you are in better position to build your model.
那么,百万美元的问题,到底什么是EDA? 用外行术语来说,这是您尝试从给定数据中获取有意义的见解的过程。 EDA是使您对数据充满信心的过程,并且可以更好地构建模型。
The “D” data in EDA is the broadly classified into Structured and Unstructured form. Structured data is basically your tabular data, which tells the literal meaning in its current form, like sales data, banking transaction etc.
EDA中的“ D”数据大致分为结构形式和非结构形式。 结构化数据基本上就是表格数据,它以当前形式告诉字面含义,例如销售数据,银行交易等。
Unstructured data would be your video files, image files and audio files.
非结构化数据将是您的视频文件,图像文件和音频文件。
We will be focusing on Structured data in this post to understand the EDA process. The structured data is further divided as shown below. (Source — Intellspot.com)
在本文中,我们将重点介绍结构化数据,以了解EDA流程。 如下所示,进一步划分了结构化数据。 (来源— Intellspot.com)

I will be using Kaggle’s Pulsar Star data to move ahead with EDA.
我将使用Kaggle的Pulsar Star数据推进EDA。
Please make a note that data wouldn’t be same as we have in Kaggle. Also, try to make visuals simple(2D) to understand. Fancy stuff looks good, but hard to grasp without explanation.
请注意,数据与Kaggle中的数据将不同。 另外,请尝试使视觉效果简单(2D)以便理解。 花哨的东西看起来不错,但是如果不加说明就很难掌握。
让我们开始吧 (LET’S GET STARTED)
一种。 导入Python库 (a. Importing Python Libraries)
# Importing required libraries.
import pandas as pd
import numpy as np
import matplotlib.pyplot as plt
import seaborn as sns

#magic line to get visuals on same notebook
%matplotlib inline
Use below code only if your using GoogleColab. You will get a choose file button using which you can upload the data.
仅当您使用GoogleColab时,才使用以下代码。 您将获得一个选择文件按钮,使用该按钮可以上传数据。
from google.colab import files
从google.colab导入文件
upload = files.upload()
上传= files.upload()
To check is the file has been uploaded properly, write the below code.
要检查文件是否已正确上传,请编写以下代码。
This will display all the file available in your current working directory.
这将显示当前工作目录中所有可用的文件。
!ls
!ls
b。 从Kaggle下载数据 (b. Download the data from Kaggle)
If you are going to use this notebook more than once, it is preferable that you delete the files that you are going to download and decompress, to avoid errors and problems. ! rm -f beer-recipes.zip ! rm -f recipeData.csv ! rm -f styleData.csv https://github.com/Kaggle/kaggle-api
如果要多次使用此笔记本,则最好删除要下载并解压缩的文件,以避免出现错误和问题。 ! rm -f beer-recipes.zip! rm -f配方数据.csv! rm -f styleData.csv https://github.com/Kaggle/kaggle-api
To download we are use Kaggle’s API ! kaggle datasets download -d jtrofe/beer-recipes Unzip the file downloaded ! unzip beer-recipes.zip
要下载,我们使用Kaggle的API! kaggle数据集下载-d jtrofe / beer-recipes解压缩下载的文件! 解压缩beer-recipes.zip
C。 加载数据 (c. Loading the data)
Now let’s load the file into pandas data frame using below code. Please make a note that, in this problem the data was provided in csv format, hence we have used “read_csv” method. However, in real world you would be provided with different format and you have to use different method based on file format. GOOGLE IT!!!!!!!!
现在,使用以下代码将文件加载到pandas数据框中。 请注意,在此问题中,数据是以csv格式提供的,因此我们使用了“ read_csv”方法。 但是,在现实世界中,将为您提供不同的格式,并且您必须基于文件格式使用不同的方法。 谷歌一下!!!!!!!!
raw_data = pd.read_csv("recipeData.csv", encoding='latin-1')Until here, you have just loaded the raw data, and you have no idea what’s there in this file. Let’s now peek into the data by using below codes. This will help you to get the gist of how data look like in the file provided. Numbers inside the bracket can be changed based on how many lines you want. By default, it will throw 5 lines. Head is for lines from top and Tail is for lines from bottom.
到这里为止,您仅加载了原始数据,并且不知道此文件中的内容。 现在,通过使用以下代码来窥视数据。 这将帮助您了解所提供文件中数据的外观要点。 括号内的数字可以根据所需的行数进行更改。 默认情况下,它将抛出5行。 Head是从顶部开始的行,而Tail是从底部开始的行。
raw_data.head()
raw_data.tail(2)
#provides the no. of rows/columns
raw_data.shape(73861, 23)# Select Categorical variables
raw_data.describe(include=np.object)
d。 检查数据类型 (d. Checking Data Types)
For now, looking at the 15 lines we can assume that all the columns are of float (with decimals) nature. Columns in Machine Learning are called as Features or Independent Variables and Target column or the column which we want to predict are called Labels/Dependent Variables. Let’s confirm our assumptions. Below code will let you know the data type of all the fields in your data.
现在,看一下15行,我们可以假设所有列都是浮点型(带小数)。 机器学习中的列称为功能或自变量,目标列或我们要预测的列称为标签/因变量。 让我们确认一下我们的假设。 下面的代码将让您知道数据中所有字段的数据类型。
raw_data.dtypesBeerID             int64
Name              object
URL               object
Style             object
StyleID            int64
Size(L)          float64
OG               float64
FG               float64
ABV              float64
IBU              float64
Color            float64
BoilSize         float64
BoilTime           int64
BoilGravity      float64
Efficiency       float64
MashThickness    float64
SugarScale        object
BrewMethod        object
PitchRate        float64
PrimaryTemp      float64
PrimingMethod     object
PrimingAmount     object
UserId           float64
dtype: object
With these two lines of code you now have a brief idea about what my data is and its structure. Please note that meaning of each column are domain specific and before starting EDA you should get hold of these meaning. Do lot of research to understand the implication of these features
通过这两行代码,您现在对我的数据是什么及其结构有了一个简短的了解。 请注意,每列的含义都是特定于域的,在开始EDA之前,您应该掌握这些含义。 进行大量研究以了解这些功能的含义
Let’s now run a code to check certain statistics on each feature/column.
现在,让我们运行一个代码来检查每个功能/列的某些统计信息。
raw_data.describe()
With this one line of code you get most of the statistics inference of your data
通过这一行代码,您可以获得数据的大部分统计推断
• Count – Number of items in that column
• Mean – Average of that column
• Std – Standard Deviation
• Min – Minimum value in that column
• Max – Maximum value in that column
• 25% - 25% of your data is below this value
• 50% - 50 % of your data is below this value
• 75% - 75% of your data is below this value
With this we can infer that not all the feature/columns have all the data. We have some missing values. And with percentile number and mean we can gauge the central tendency of the data.
这样我们可以推断出并非所有要素/列都具有所有数据。 我们缺少一些价值。 利用百分位数和均值,我们可以衡量数据的集中趋势。
Please note that describe will only provide data for Quantitative data and for categorical you need to mention include = “all” in the brackets. raw_data.describe(include = ‘all’).
请注意,describe只提供定量数据,对于分类,您需要在方括号中提及include =“ all”。 raw_data.describe(include ='all')。
Now, we know this is a classification problem, where we need to predict based on the features whether it’s a pulsar star or not. So, 1 in target column means it’s a pulsar star and 0 means it’s not a pulsar star.
现在,我们知道这是一个分类问题,我们需要根据这些特征预测它是否是脉冲星。 因此,目标栏中的1表示它是脉冲星,而0表示它不是脉冲星。
In real world you normally get entire set of data and you divide the set into Training, Validation and Test. In this problem, Kaggle has provided 2 sets Training which we loaded and Test set where we need to test our model.
在现实世界中,您通常会获得完整的数据集,然后将其分为训练,验证和测试。 在此问题中,Kaggle提供了2套我们加载的训练和需要测试模型的测试集。
In this post we are doing EDA only on train set to keep things simple. But make sure if you are making any changes to train data, like changing column name or converting the values of the column, make sure you are changing the same on test data.
在本文中,我们仅在火车上进行EDA,以使事情变得简单。 但是,请确保对训练数据进行任何更改(例如更改列名称或转换列的值),请确保对测试数据进行更改。
Now, let check our target variable, how many are “All Grain”,”extract”,”BIAB” or “Partial Mash”. Also, if we have any more category in our target variable.
现在,让我们检查目标变量,“全谷物”,“提取”,“ BIAB”或“部分饲料”是多少。 另外,如果我们的目标变量中还有其他类别。
sns.catplot(x ="BrewMethod", kind ="count", data =raw_data)
raw_data.BrewMethod.value_counts(1)*100All Grain       67.277724
BIAB            16.268396
extract         11.678694
Partial Mash     4.775186
Name: BrewMethod, dtype: float64
It’s now evident that we only have four class in our target variable (“All Grain”,”extract”,”BIAB” and “Partial Mash”), however, we have 67% of data with “All Grain”, 16% “BIAB”, 11% “extract” and only 4% are “Partial Mash”. It’s highly imbalance data. When I say it’s an imbalance data, it means any one category is dominant and when we build the model, its most likely to predict that category. Ideally, anything which is above 80:20 proportion is not an imbalance data. And in real world you will always get imbalance data. How to treat this imbalance data is not in scope of this post.
现在很明显,我们的目标变量中只有四个类别(“全谷物”,“提取物”,“ BIAB”和“部分饲料”),但是,我们有67%的数据具有“全谷物”,16%“ BIAB”,“提取物”占11%,“部分饲料”仅占4%。 这是高度不平衡的数据。 当我说这是一个不平衡数据时,这意味着任何一个类别都是主导的,而当我们构建模型时,它最有可能预测该类别。 理想情况下,任何比例超过80:20的都不是不平衡数据。 在现实世界中,您将始终获得不平衡数据。 如何处理这种不平衡数据不在本文的讨论范围之内。
e。 下降列 (e. Dropping Columns)
At times you get data where not all columns are relevant, though we don’t have any irrelevant column as of now but I’ll let you know how to remove the columns. Below axis = 1 means columns and axis = 0 means row
有时您会获得并非所有列都相关的数据,尽管到目前为止我们没有任何不相关的列,但我会让您知道如何删除这些列。 轴以下= 1表示列,轴= 0表示行
raw_data = raw_data.drop(["BeerID"], axis=1)F。 更改列名 (f. Changing Column Name)
When you pull data from different system, there are always chances of some wired column name so to change the column name we can use below code and its always best practice to have some meaningful name. I’ll show you how to change the name of the output column in this case.
当您从不同的系统中提取数据时,总是有一些有线列名的机会,因此要更改列名,我们可以使用下面的代码及其最佳实践来使用一些有意义的名称。 在这种情况下,我将向您展示如何更改输出列的名称。
raw_data = raw_data.rename(columns={"StyleID":"ID"})
raw_data.head()
G.检查重复的行 (G. Checking Duplicate Rows)
Most of the time when we pull data, there are high probability of duplicate entries and identifying those at the start would be beneficial.
在大多数情况下,当我们提取数据时,重复条目的可能性很高,一开始就识别出重复条目将是有益的。
duplicate_rows_raw = raw_data[raw_data.duplicated()]
print("Duplicate rows: ", duplicate_rows_raw.shape)Duplicate rows:  (0, 22)duplicate_rows_raw
H。 检查缺失值 (h. Checking Missing Values)
Missing value in a field may be because of incorrect data entry or data is not mandatory in that case. To get good model accuracy, we need to treat this missing value. Either to drop or replace it with mean, median or mode based on scenario.
字段中的值缺失可能是由于错误的数据输入或在这种情况下数据不是强制性的。 为了获得良好的模型精度,我们需要处理此缺失值。 根据情景,将其删除或替换为均值,中位数或众数。
sns.heatmap(raw_data.isnull(), yticklabels=False, cbar=False, cmap='viridis')<matplotlib.axes._subplots.AxesSubplot at 0x7f8cf3be92d0>
# Drop data column
raw_data = raw_data.drop(["Name","URL","ID","PrimingMethod","PrimingAmount","UserId","MashThickness","PitchRate","PrimaryTemp"], axis=1)# Finding the null values.
total =raw_data.isnull().sum().sort_values(ascending=False)
print(total)BoilGravity    2990
Style           596
BrewMethod        0
SugarScale        0
Efficiency        0
BoilTime          0
BoilSize          0
Color             0
IBU               0
ABV               0
FG                0
OG                0
Size(L)           0
dtype: int64# Drop null values

raw_data = raw_data.dropna()
total =raw_data.isnull().sum().sort_values(ascending=False)
print(total)BrewMethod     0
SugarScale     0
Efficiency     0
BoilGravity    0
BoilTime       0
BoilSize       0
Color          0
IBU            0
ABV            0
FG             0
OG             0
Size(L)        0
Style          0
dtype: int64raw_data.info()<class 'pandas.core.frame.DataFrame'>
Int64Index: 70517 entries, 0 to 73860
Data columns (total 13 columns):
 #   Column       Non-Null Count  Dtype
---  ------       --------------  -----
 0   Style        70517 non-null  object
 1   Size(L)      70517 non-null  float64
 2   OG           70517 non-null  float64
 3   FG           70517 non-null  float64
 4   ABV          70517 non-null  float64
 5   IBU          70517 non-null  float64
 6   Color        70517 non-null  float64
 7   BoilSize     70517 non-null  float64
 8   BoilTime     70517 non-null  int64
 9   BoilGravity  70517 non-null  float64
 10  Efficiency   70517 non-null  float64
 11  SugarScale   70517 non-null  object
 12  BrewMethod   70517 non-null  object
dtypes: float64(9), int64(1), object(3)
memory usage: 7.5+ MB# Convert columns dtype object to factor
raw_data['SugarScale'] = raw_data['SugarScale'].astype('category')
raw_data['BrewMethod'] = raw_data['BrewMethod'].astype('category')
We can clearly observe that there are 3 columns which have missing values. Now it’s a call you have to make, should we impute the columns which have missing values or replace it with come constant value or random value. It’s altogether different topic and will come up with a post that will tackle this problem.
我们可以清楚地观察到3列的值缺失。 现在,这是您必须进行的调用,如果我们估算出缺少值的列或将其替换为常数或随机值。 这是一个完全不同的主题,将提出解决该问题的文章。
Please note at times the above code will show zero missing values, but there may be some garbage values in the field which python with consider it as a valid entry, if this is the case you need to meet the domain expert to check this value.
请注意,上面的代码有时会显示零缺失值,但是python会将其视为有效条目的字段中可能会有一些垃圾值,如果是这种情况,则需要与领域专家联系以检查该值。
一世。 检测异常值 (i. Detecting Outliers)
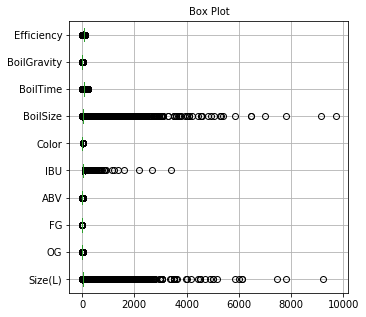
Outliers are basically data points or set of points that are not in sync with other data sets. With this task we need to identify the outliers and check with domain expert on how treat this, is it because of error or its one of a case. Treating outliers help in simplifying the data. Below code will let us know visually how each variable stands in terms of Outlier.
离群值基本上是数据点或与其他数据集不同步的点集。 完成此任务后,我们需要确定异常值,并与领域专家联系,以了解如何处理该错误,是由于错误还是其中一种情况。 处理离群值有助于简化数据。 下面的代码将使我们直观地了解每个变量在异常值方面的表现。
plt.figure(figsize=(5,5))
plt.title('Box Plot',fontsize=10)
raw_data.boxplot(vert=0)<matplotlib.axes._subplots.AxesSubplot at 0x7f8cf5982910>
Its quite evident that all the variables have outliers and this would be the case in real world. However, we can see that “Skewness of the DM-SNR curve” and “Mean of the DM-SNR curve” are major contributors in outlier.
显而易见,所有变量都有异常值,在现实世界中就是这种情况。 但是,我们可以看到“ DM-SNR曲线的偏度”和“ DM-SNR曲线的均值”是异常值的主要贡献者。
j。 检查分配 (j. Checking Distribution)
The process of standardizing corresponds to equalizing the information in its same scale. We are going to use skearn library
标准化过程对应于以相同的比例均衡信息。 我们将使用skearn库
from sklearn import preprocessing
# select numeric columns
numerics = ['int16', 'int32', 'int64', 'float16', 'float32', 'float64']

newdf = raw_data.select_dtypes(include=numerics)
newdf.head()
x = newdf.values #returns a numpy array
xarray([[21.77 ,  1.055,  1.013, ..., 75.   ,  1.038, 70.   ],
       [20.82 ,  1.083,  1.021, ..., 60.   ,  1.07 , 70.   ],
       [50.   ,  1.06 ,  1.01 , ..., 90.   ,  1.05 , 72.   ],
       ...,
       [10.   ,  1.059,  1.01 , ..., 60.   ,  1.034, 60.   ],
       [24.   ,  1.051,  1.014, ..., 60.   ,  1.043, 72.   ],
       [20.   ,  1.06 ,  1.01 , ..., 60.   ,  1.056, 70.   ]])min_max_scaler = preprocessing.MinMaxScaler()
x_scaled = min_max_scaler.fit_transform(newdf)data_scale = pd.DataFrame(x_scaled)
data_scale.columns= ['Size(L)' ,'OG' ,'FG','ABV','IBU','Color' ,'BoilSize' ,'BoilTime' ,'BoilGravity' ,'Efficiency']
data_scale
# Now check outliers
plt.figure(figsize=(5,5))
plt.title('Box Plot',fontsize=10)
data_scale.boxplot(vert=0)<matplotlib.axes._subplots.AxesSubplot at 0x7f8cf57df350>
k。 检查分配 (k. Checking Distribution)
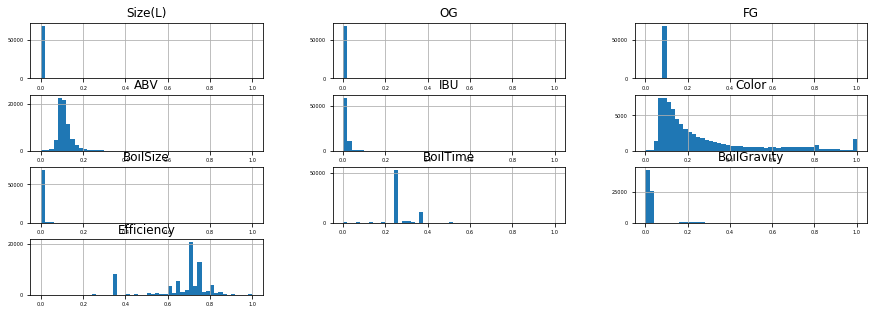
Distribution again is one of the methods to check how your dependent variable is distributed and if we can treat to simplify the data sets.
再次分布是检查因变量如何分布以及是否可以简化数据集的一种方法。
raw_data.hist(figsize=(15, 5), bins=50,
xlabelsize=5, ylabelsize=5)array([[<matplotlib.axes._subplots.AxesSubplot object at 0x7f8cf584edd0>,
        <matplotlib.axes._subplots.AxesSubplot object at 0x7f8cf56f3a90>,
        <matplotlib.axes._subplots.AxesSubplot object at 0x7f8cf5680e10>],
       [<matplotlib.axes._subplots.AxesSubplot object at 0x7f8cf5641650>,
        <matplotlib.axes._subplots.AxesSubplot object at 0x7f8cf55f7e50>,
        <matplotlib.axes._subplots.AxesSubplot object at 0x7f8cf55b8690>],
       [<matplotlib.axes._subplots.AxesSubplot object at 0x7f8cf556de90>,
        <matplotlib.axes._subplots.AxesSubplot object at 0x7f8cf552d6d0>,
        <matplotlib.axes._subplots.AxesSubplot object at 0x7f8cf5538250>],
       [<matplotlib.axes._subplots.AxesSubplot object at 0x7f8cf54ecbd0>,
        <matplotlib.axes._subplots.AxesSubplot object at 0x7f8cf5456f10>,
        <matplotlib.axes._subplots.AxesSubplot object at 0x7f8cf5419750>]],
      dtype=object)
Now, looking at the above plot, its evident that there is bit of skewness in every variable, but Mean & SD of DM-SM curve are heavily right skewed.
现在,从上面的图可以看出,每个变量都有一定的偏斜度,但是DM-SM曲线的均值和SD偏右度很高。
data_scale.hist(figsize=(15, 5), bins=50,
xlabelsize=5, ylabelsize=5)array([[<matplotlib.axes._subplots.AxesSubplot object at 0x7f8cf56fbed0>,
        <matplotlib.axes._subplots.AxesSubplot object at 0x7f8cfa692b90>,
        <matplotlib.axes._subplots.AxesSubplot object at 0x7f8cfa4d9e50>],
       [<matplotlib.axes._subplots.AxesSubplot object at 0x7f8cfa3057d0>,
        <matplotlib.axes._subplots.AxesSubplot object at 0x7f8cfaac5890>,
        <matplotlib.axes._subplots.AxesSubplot object at 0x7f8d0abfef50>],
       [<matplotlib.axes._subplots.AxesSubplot object at 0x7f8d0a5a2950>,
        <matplotlib.axes._subplots.AxesSubplot object at 0x7f8cf60e4dd0>,
        <matplotlib.axes._subplots.AxesSubplot object at 0x7f8cf59e9950>],
       [<matplotlib.axes._subplots.AxesSubplot object at 0x7f8cfa699310>,
        <matplotlib.axes._subplots.AxesSubplot object at 0x7f8cfa2f2650>,
        <matplotlib.axes._subplots.AxesSubplot object at 0x7f8cfa4cce50>]],
      dtype=object)
As you can see the distribution in data with or without scaling are the same
如您所见,无论有无缩放,数据的分布都是相同的
l。 寻找相关性 (l. Finding Correlation)
Major weightage of EDA is on correlations, and often correlations are really interesting and used to find the features which are highly correlated with our dependent variable, but not always.
EDA的主要权重是相关性,通常相关性确实很有趣,并用于查找与我们的因变量高度相关的特征,但并非总是如此。
# Get the n most frequent values,
n = 5
list_top=raw_data['Style'].value_counts()[:n].index.tolist()
list_top['American IPA',
 'American Pale Ale',
 'Saison',
 'American Light Lager',
 'American Amber Ale']sns.catplot(x ="Style", kind ="count", data =raw_data)
raw_data.Style.value_counts(1)*100American IPA              16.370521
American Pale Ale         10.391820
Saison                     3.584951
American Light Lager       3.229009
American Amber Ale         2.746855
                            ...
Lichtenhainer              0.008509
Apple Wine                 0.008509
Pyment (Grape Melomel)     0.005672
Traditional Perry          0.002836
French Cider               0.001418
Name: Style, Length: 175, dtype: float64
data = raw_data[raw_data['Style'].isin(list_top)]sns.catplot(x ="Style", kind ="count", data =data)
data.Style.value_counts(1)*100American IPA            45.069103
American Pale Ale       28.609354
Saison                   9.869603
American Light Lager     8.889670
American Amber Ale       7.562271
Name: Style, dtype: float64
# Select Categorical variables
data.describe(include=np.object)
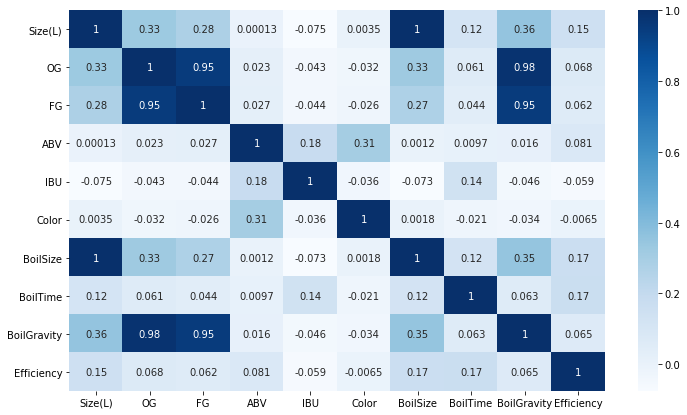
Also, below visual will clearly indicate how independent variable are corelated, and if, we have independent variables which are highly corelated, we can drop those columns/features as one of them is sufficient.
同样,在视觉下方可以清楚地表明自变量是如何相互关联的,如果我们具有高度相关的自变量,则可以删除这些列/功能,因为其中之一就足够了。
# reduce dataset size
data_sample=data.sample(n=1000, random_state=1)
data_sample
plt.figure(figsize=(12,7))
sns.heatmap(data_sample.corr(), annot=True, cmap='Blues')<matplotlib.axes._subplots.AxesSubplot at 0x7f8cf5836910>
Also, below visual will clearly indicate how independent variable are corelated, and if, we have independent variables which are highly corelated, we can drop those columns/features as one of them is sufficient.
同样,在视觉下方可以清楚地表明自变量是如何相互关联的,如果我们具有高度相关的自变量,则可以删除这些列/功能,因为其中之一就足够了。
# Drop data column
data_sample = data_sample.drop(["OG","FG","Size(L)","SugarScale","BrewMethod","BoilTime","BoilGravity","Efficiency"], axis=1)data_sample.info()<class 'pandas.core.frame.DataFrame'>
Int64Index: 1000 entries, 25893 to 44807
Data columns (total 5 columns):
 #   Column    Non-Null Count  Dtype
---  ------    --------------  -----
 0   Style     1000 non-null   object
 1   ABV       1000 non-null   float64
 2   IBU       1000 non-null   float64
 3   Color     1000 non-null   float64
 4   BoilSize  1000 non-null   float64
dtypes: float64(4), object(1)
memory usage: 46.9+ KBsns.pairplot(data_sample, hue="Style")<seaborn.axisgrid.PairGrid at 0x7f8cf44fc4d0>
The image is not clearly visible, you can check it on the colab which I’ve shared at the end of this module. From this graph, we can clearly figure out relation between two variables and how it impacts the output.
该图像不清晰可见,您可以在本模块末尾共享的colab上进行检查。 从该图可以清楚地看出两个变量之间的关系以及它如何影响输出。
Also, below visual will clearly indicate how independent variable are corelated, and if, we have independent variables which are highly corelated, we can drop those columns/features as one of them is sufficient.
同样,在视觉下方可以清楚地表明自变量是如何相互关联的,如果我们具有高度相关的自变量,则可以删除这些列/功能,因为其中之一就足够了。
plt.figure(figsize=(12,7))
sns.heatmap(data_sample.corr(), annot=True, cmap='Blues')<matplotlib.axes._subplots.AxesSubplot at 0x7f8cf0940c10>
It’s evident that, “Excess kurtosis of the integrated profile” and “Skewness of the integrated profile” are highly corelated with dependent variable. Darker the blue higher is the positive correlation and vice versa.
显而易见的是,“综合资料的峰度过大”和“综合资料的偏度”与因变量高度相关。 正相关值越高,蓝色越高,反之亦然。
结论 (Conclusion)
If you have come so far, Congratulations!!! and you would have got a gist that — there is no one size fits all for EDA. In this article, I have tried to give you basic idea on how to start, so that you don’t think to much on where and how to go about this EDA process Out there all datasets would always have missing values, errors in the data, unbalanced data, and biased data. EDA is the first step in tackling a data science project to learn what data we have and evaluate its validity. Before I sign-off, do check on Pandas Profiling and SweetViz as an alternative for what I’ve done above.
如果您走到现在了,恭喜!!! 并且您将有一个要点,那就是-没有一种适合所有EDA的尺寸。 在本文中,我尝试为您提供有关如何开始的基本想法,这样您就不必考虑在什么地方以及如何进行此EDA流程了,在那里,所有数据集总是会缺少值,数据中会出现错误。 ,不平衡数据和偏差数据。 EDA是解决数据科学项目的第一步,以了解我们拥有的数据并评估其有效性。 在我注销之前,请检查Pandas Profiling和SweetViz作为我上面所做的替代方案。
I hope you like it.
我希望你喜欢它。
No matter what books or blogs or courses or videos one learns from, when it comes to implementation everything can look like “Outside the Curriculum”.
无论从中学到什么书,博客,课程或视频,到实施时,一切都可能看起来像“课程外”。
The best way to learn is by doing! The best way to learn is by teaching what you have learned!
最好的学习方法就是做事! 最好的学习方法是通过教你学到的东西!
永不放弃! (Never give up!)
See you on Linkedin!
在Linkedin上见!
数据eda


 1022
1022

 被折叠的 条评论
为什么被折叠?


