


ios 个推 apn 推送
This article is also available on my personal blog
我的个人博客中 也提供了这篇文章
This article is part of a series that aims to build a system to send notifications of relevant articles of Twitter, with the purpose of being easily retweeted. Here is the complete article.
本文是该系列文章的一部分,旨在构建一个系统来发送Twitter相关文章的通知,以使其易于被转发。 这是完整的文章。
In this opportunity, we’re going to see how to send push notifications from a Node.js API to an iOS device. To do that, we’re going to use the apn node package.
借此机会,我们将了解如何将推送通知从Node.js API发送到iOS设备。 为此,我们将使用apn节点包。
要求 (Requirements)
To continue with the article, we’ll need to have the following:
要继续阅读本文,我们需要具备以下条件:
- a physical iOS device, that’s because pushes don’t work on simulator 物理iOS设备,这是因为推送在模拟器上不起作用
an Apple Developer Program Membership account. We know that we can build the app on device without it, but to be able to setup the push notifications we would need to have one, in order to create a Push Notification Certificate.
苹果开发人员计划会员帐户。 我们知道,我们可以在不具有该应用程序的设备上构建该应用程序,但是要能够设置推送通知,我们需要一个推送通知 ,以便创建“ 推送通知证书” 。
苹果推送通知服务 (Apple Push Notification Service)
Apple Push Notification service (APNs) is the main actor in remote notifications feature. It’s a remote, robust and secure service which allows developers send information to iOS (and also indirectly to watchOS), tvOS and macOS devices.
苹果推送通知服务 (APN)是远程通知功能的主要参与者。 它是一项远程,强大且安全的服务,允许开发人员将信息发送到iOS(以及间接发送到watchOS),tvOS和macOS设备。
When an iOS app starts on a device, the system automatically establishes an accredited, encrypted and persistent IP connection between the app and APNs. This connection allows the app to setup and enable the device to receive notifications. You can read more about this topic on Configuring Remote Notification Support.
当iOS应用在设备上启动时,系统会自动在应用与APN之间建立经过认可的,加密的持久IP连接。 此连接允许该应用设置并启用设备以接收通知。 您可以在配置远程通知支持上阅读有关此主题的更多信息。
Another part of the connection (the persistent and secure channel between a provider server and APNs) requires configuration on the developer account and the use of provided certificates by Apple. The provider is a server, where the developer implements and manages, to work with APNs.
连接的另一部分(提供商服务器和APN之间的持久和安全通道)要求在开发人员帐户上进行配置,并需要Apple使用提供的证书。 提供程序是服务器,开发人员可以在其中实现和管理APN。
More information about APNs in Apple official documentation.
Apple官方文档中有关APN的更多信息。
关于APN节点包 (About apn node package)
To be able to interact with APNs we’ll need to do all the connections and configurations on our server in Node.js. To do that, we have the apn package, which is a Node.js module to easily send notifications with APN service. It’s ready to use on production and includes some features to make easier the notifications implementation. Some of its characteristics are:
为了能够与APN进行交互,我们需要在Node.js中的服务器上进行所有连接和配置。 为此,我们有apn软件包,它是一个Node.js模块,可通过APN服务轻松发送通知。 它已经可以在生产环境中使用,并且包括一些使通知实现更容易的功能。 它的一些特征是:
- It’s based on a provider HTTP/2 API 它基于提供程序HTTP / 2 API
- Maintains a connection between server to maximize the processing and notifications delivery 保持服务器之间的连接以最大程度地处理和发送通知
- Automatically send not sent notifications if an error occurred. 如果发生错误,自动发送未发送的通知。
You can see the official repository here: https://github.com/node-apn/node-apn
您可以在此处查看官方存储库: https : //github.com/node-apn/node-apn
证书创建 (Certificates creation)
In order to send notifications from our server, we need to tell APN that we have permissions to do so for our app. That’s why we need to create an SSL certificate to establish a secure connection with APNs. We will have to do the following:
为了从我们的服务器发送通知,我们需要告诉APN我们有权对我们的应用程序进行发送。 这就是为什么我们需要创建SSL证书来与APN建立安全连接的原因。 我们将必须执行以下操作:
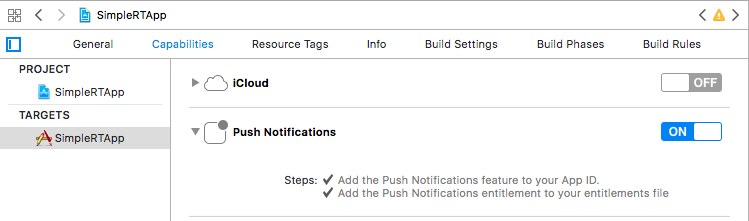
- From Xcode, we open our project and select the Target -> Capabilities tab. There we enable the Push Notifications switch. We wait a bit the automatic configuration to be done 在Xcode中,我们打开我们的项目,然后选择Target-> Capabilities选项卡。 在那里,我们启用了“推送通知”开关。 我们稍等一下自动配置
2. Once enabled, we go to Developer Center, enter to our account, Certificates, Identifiers & Profiles, Identifiers, App IDs and look for our app (in our case, SimpleRTApp). Let’s tap on Edit.
2.启用后,我们进入开发人员中心,输入我们的帐户,证书,标识符和配置文件,标识符,应用程序ID,然后寻找我们的应用程序(在本例中为SimpleRTApp)。 让我们点击编辑。
3. On that screen, we open the Push Notifications section, and where it says Development SSL Certificate, we open Create Certificate…
3.在该屏幕上,我们打开“推送通知”部分,并在其中显示“开发SSL证书”的位置,打开“创建证书...”。

Right there it tells us the steps we must take, but I will also transcribe them here to make it easier.
就在那儿,它告诉我们我们必须采取的步骤,但是我也会在这里抄录它们,以简化操作。
4. We open Keychain Access app on our Mac and tap on Keychain Access -> Certificate Assistant -> Request a Certificate from a Certificate Authority. There we tap on “Save on disk” and we place the CertificateSigningRequest.certSigningRequest file in a safe location.5. After creating this file, we go back to the Developer Center page and we tap on Continue. We select the file .certSigningRequest and we click on Continue agin. We should be on the following
4.我们在Mac上打开Keychain Access应用程序,然后点击Keychain Access->证书助手->向证书颁发机构申请证书。 在此处点击“保存在磁盘上”,然后将CertificateSigningRequest.certSigningRequest文件放置在安全的位置。5。 创建此文件后,我们返回到“开发人员中心”页面,然后点击“继续”。 我们选择文件.certSigningRequest ,然后单击Continue agin。 我们应该在以下
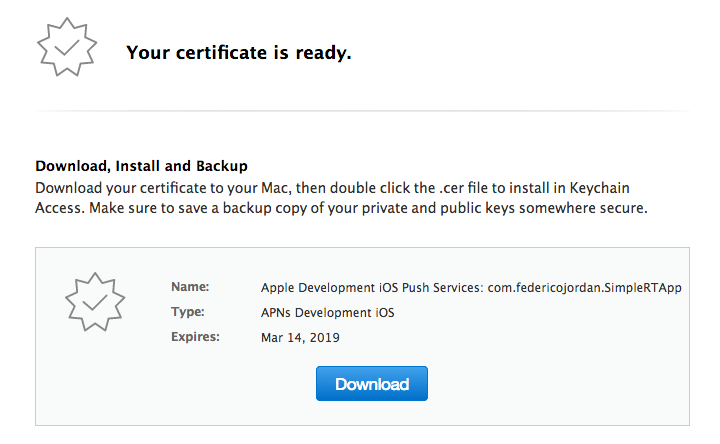
We have ready our file aps_development.cer for download.
我们已经准备好文件aps_development.cer可供下载。
6. From Finder app, we do double click on the downloaded file and we see how the Keychain Access app is open, with the new certificate just added.
6.在Finder应用程序中,我们双击下载的文件,然后看到Keychain Access应用程序是如何打开的,并且刚刚添加了新证书。
We select the certificate and the private key from the list together, to export a p12 file:
我们从列表中一起选择证书和私钥,以导出p12文件:

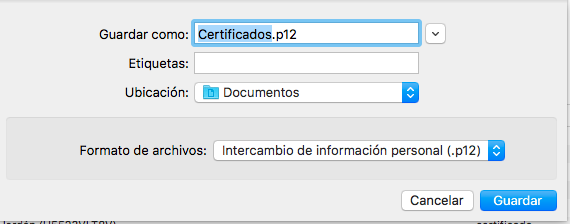
We have to ensure that we export these files as a p12 one. The app will ask us for a password, we type one and save the file on disk.
我们必须确保将这些文件导出为p12文件。 该应用程序将要求我们提供密码,我们输入一个密码并将文件保存在磁盘上。
With all of these we generated the needed p12 file to do the communication between our server and APNs.
通过所有这些,我们生成了所需的p12文件来进行服务器与APN之间的通信。
It’s important to not forgot the password, because it’s required by Apple to send push notifications
不要忘记密码,这一点很重要,因为Apple要求它发送推送通知
在iOS上获取设备令牌 (Obtaining device token on iOS)
To be able to test our notifications, we’ll need a device token from a physical device.
为了测试我们的通知,我们需要来自物理设备的设备令牌。
We can easily find ours, simply requesting push notifications permissions on our app SimpleRTApp. To do that, we have to add the following methods on our AppDelegate.swift :
我们可以轻松找到我们的应用程序,只需在我们的应用程序SimpleRTApp上请求推送通知权限即可。 为此,我们必须在AppDelegate.swift上添加以下方法:
import UIKit
import TwitterKit
import UserNotifications


@UIApplicationMain
class AppDelegate: UIResponder, UIApplicationDelegate {


    var window: UIWindow?


    func application(_ application: UIApplication, didFinishLaunchingWithOptions launchOptions: [UIApplicationLaunchOptionsKey: Any]?) -> Bool {
        TWTRTwitter.sharedInstance().start(withConsumerKey: "<consumer-key>", consumerSecret: "<consumer-secret>")
        registerForPushNotifications()
        return true
    }

    func application(_ app: UIApplication, open url: URL, options: [UIApplicationOpenURLOptionsKey : Any] = [:]) -> Bool {
        return TWTRTwitter.sharedInstance().application(app, open: url, options: options)
    }


    func application(_ application: UIApplication,
                     didRegisterForRemoteNotificationsWithDeviceToken deviceToken: Data) {
        let tokenParts = deviceToken.map { data -> String in
            return String(format: "%02.2hhx", data)
        }

        let token = tokenParts.joined()
        print("Device Token: \(token)")
    }

    func application(_ application: UIApplication,
                     didFailToRegisterForRemoteNotificationsWithError error: Error) {
        print("Failed to register: \(error)")
    }

    // MARK:- Push notifications

    func registerForPushNotifications() {
        UNUserNotificationCenter.current().requestAuthorization(options: [.alert, .sound, .badge]) {
            (granted, error) in
            print("Permission granted: \(granted)")

            guard granted else { return }
            self.getNotificationSettings()
        }
    }


    func getNotificationSettings() {
        UNUserNotificationCenter.current().getNotificationSettings { (settings) in
            print("Notification settings: \(settings)")
            guard settings.authorizationStatus == .authorized else { return }
            UIApplication.shared.registerForRemoteNotifications()
        }
    }


}
To consider:
要考虑:
With the
UserNotificationsSDK, we useUNUserNotificationCenter.current().requestAuthorization()to ask permissions to the user通过
UserNotificationsSDK,我们使用UNUserNotificationCenter.current().requestAuthorization()向用户询问权限Once we get the permissions, we register with
UIApplication.shared.registerForRemoteNotifications()一旦获得许可,
UIApplication.shared.registerForRemoteNotifications()注册If the app could register correcty, iOS will call
application(_ application: UIApplication, didRegisterForRemoteNotificationsWithDeviceToken deviceToken: Data), where we will get the device token value on console如果应用程序可以正确注册,iOS会调用
application(_ application: UIApplication, didRegisterForRemoteNotificationsWithDeviceToken deviceToken: Data),我们将在控制台上获取设备令牌值
With all of this, the app will be ready to receive push notifications and we’ll get the testing device token to use from the server.
有了这些,应用程序就可以接收推送通知了,我们将从服务器上获取要使用的测试设备令牌。
You can follow the final app code on https://github.com/fedejordan/SimpleRTApp, tag push_notifications_setup
您可以在https://github.com/fedejordan/SimpleRTApp上遵循最终的应用程序代码,标记push_notifications_setup
在Node.js上创建脚本 (Script creation on Node.js)
So we have:
因此,我们有:
- A p12 file, which we’ll use to have a secure connection with APNs 一个p12文件,我们将使用它来与APN建立安全连接
- The device token, which will help us to send push notifications to this physical device. 设备令牌,这将帮助我们向该物理设备发送推送通知。
So we’re ready to create our program on Node.js to send push notifications:
因此,我们准备在Node.js上创建程序以发送推送通知:
We open terminal app and type
npm install apn. This will install the needed module in charge of managing all the stuff related with APNs connection.我们打开终端应用程序,然后输入
npm install apn。 这将安装所需的模块,以管理与APNs连接有关的所有工作。We copy the p12 file (in my case
simpleapprt-certificates.p12) to the same folder of our Node.js script我们将p12文件(在我的情况下为
simpleapprt-certificates.p12)复制到Node.js脚本的同一文件夹中- We create the script with the following content: 我们创建具有以下内容的脚本:
var deviceToken = '<device-token>';
var apn = require('apn');
var join = require('path').join,
    pfx = join(__dirname, '/simplertapp-certificates.p12');


var options = {
  pfx: pfx,
  passphrase: '<p12-password>',
  production: false
};


var apnProvider = new apn.Provider(options);


let notification = new apn.Notification();
notification.alert = "¡Hola, soy una push notification";


apnProvider.send(notification, [deviceToken]).then( (response) => {
  process.exit();
});
Where we replace <device-token> and <p12-password> by our own device token and the password that we used on the p12 file previously.
我们用自己的设备令牌和以前在p12文件上使用的密码替换<device-token>和<p12-password>的位置。
Basically, on the script, we set the options to stablish the connection (in out case it’ll be with the certificates, because of that we set the path of our p12 file and the passphrase), we instantiate the Provider object, create the Notification one and we send with the send() method. When we have the response (also for an error), we finish the execution.
基本上,在脚本上,我们设置用于稳定连接的选项(在这种情况下,它将与证书一起使用,因为我们设置了p12文件的路径和密码),我们实例化了Provider对象,创建了Notification一,我们使用send()方法send() 。 当我们收到响应(也有错误)时,我们完成执行。
To test all of this we go to the terminal, we type node send_push.js and we wait so the push can arrive to our device:
为了测试所有这些,我们去终端,输入node send_push.js然后等待,以便推送可以到达我们的设备:
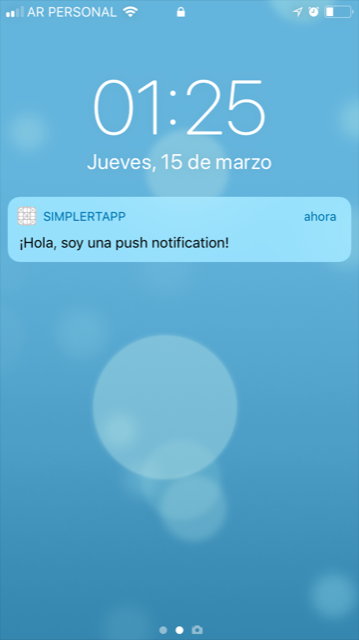
Congratulations! We’re done with our first push notification on a iOS device.
恭喜你! 我们已经在iOS设备上完成了第一个推送通知。
You can see the final script on https://github.com/fedejordan/SimpleRTAppAPI, tag send_push_script.
您可以在https://github.com/fedejordan/SimpleRTAppAPI上看到最终脚本,标记为send_push_script 。
自定义动作的用法 (Custom actions usage)
For our SimpleRTApp project, we said that we want to have the option for retweeting from the push notification. This can be achivied also sending the information to show a custom action.
对于我们的SimpleRTApp项目,我们说我们希望可以选择从推送通知中转推。 还可以通过发送信息以显示自定义操作来实现。
What’s a custom action? They are actions or events that the user has available to do on a specific push notification. In our case we’re going to send an action with the name “Retweet”
什么是自定义操作? 它们是用户可以对特定的推送通知执行的操作或事件。 在我们的案例中,我们将发送名称为“转推”的操作
To do this, we have to send more information on the push notification. In our script send_push.js we add the following when we set the notification object:
为此,我们必须发送有关推送通知的更多信息。 在我们的脚本send_push.js我们在设置notification对象时添加了以下内容:
notification.category = “RETWEET”;By this way we indicate that we want to show a custom action with the RETWEET category id.
通过这种方式,我们表明我们要显示一个具有RETWEET类别ID的自定义操作。
To be able to show the action on the notification, we have to indicate to the iOS app that it’s a allowed action. We have to register the action with the following code:
为了能够在通知上显示操作,我们必须向iOS应用指示这是允许的操作。 我们必须使用以下代码注册操作:
let retweetAction = UNNotificationAction(identifier: “retweet_action_identifier”, title: “Retweet”, options: [.foreground])
 let retweetCategory = UNNotificationCategory(identifier: “RETWEET”, actions: [retweetAction], intentIdentifiers: [], options: [])
 UNUserNotificationCenter.current().setNotificationCategories([retweetCategory])
We instantiate a UNNotificationAction called retweetAction , which will help us to know what to do if the user tap the action. This action will be associated to a UNNotificationCategory type, which will have a id with the same value we sent from the server. Finally, we tell UNUserNotificationCenter the allowed categories for the pushes (it can be more than one)
我们实例化一个UNNotificationAction称为retweetAction ,这将有助于我们知道,如果用户水龙头做什么动作。 该操作将与UNNotificationCategory类型相关联,该类型的ID与我们从服务器发送的值相同。 最后,我们告诉UNUserNotificationCenter的允许类别(可以是多个类别)
The code on the iOS app will be something like this, for our AppDelegate.swift :
对于我们的AppDelegate.swift ,iOS应用程序上的代码将类似于以下内容:
import UIKit
import TwitterKit
import UserNotifications


@UIApplicationMain
class AppDelegate: UIResponder, UIApplicationDelegate {


    var window: UIWindow?


    func application(_ application: UIApplication, didFinishLaunchingWithOptions launchOptions: [UIApplicationLaunchOptionsKey: Any]?) -> Bool {
        TWTRTwitter.sharedInstance().start(withConsumerKey: "ConsumerKey", consumerSecret: "ConsumerSecret")
        let networkManager = NetworkManager()
        networkManager.getTweetRequest(byId: "4") { (tweetRequest) in
            print(tweetRequest)
        }
        registerForPushNotifications()
        return true
    }

    func application(_ app: UIApplication, open url: URL, options: [UIApplicationOpenURLOptionsKey : Any] = [:]) -> Bool {
        return TWTRTwitter.sharedInstance().application(app, open: url, options: options)
    }


    func application(_ application: UIApplication,
                     didRegisterForRemoteNotificationsWithDeviceToken deviceToken: Data) {
        let tokenParts = deviceToken.map { data -> String in
            return String(format: "%02.2hhx", data)
        }

        let token = tokenParts.joined()
        print("Device Token: \(token)")
    }

    func application(_ application: UIApplication,
                     didFailToRegisterForRemoteNotificationsWithError error: Error) {
        print("Failed to register: \(error)")
    }

    func application(
        _ application: UIApplication,
        didReceiveRemoteNotification userInfo: [AnyHashable : Any],
        fetchCompletionHandler completionHandler: @escaping (UIBackgroundFetchResult) -> Void) {

        let aps = userInfo["aps"] as! [String: AnyObject]
    }

    // MARK:- Push notifications

    func registerForPushNotifications() {
        UNUserNotificationCenter.current().requestAuthorization(options: [.alert, .sound, .badge]) {
            (granted, error) in
            print("Permission granted: \(granted)")

            guard granted else { return }

            let retweetAction = UNNotificationAction(identifier: "retweet_action_identifier", title: "Retweet", options: [.foreground])
            let retweetCategory = UNNotificationCategory(identifier: "RETWEET", actions: [retweetAction], intentIdentifiers: [], options: [])
            UNUserNotificationCenter.current().setNotificationCategories([retweetCategory])

            self.getNotificationSettings()
        }
    }


    func getNotificationSettings() {
        UNUserNotificationCenter.current().getNotificationSettings { (settings) in
            print("Notification settings: \(settings)")

            guard settings.authorizationStatus == .authorized else { return }
            UIApplication.shared.registerForRemoteNotifications()
        }
    }


}
We run node send_push.js on the terminal and check if a push notification is sent with a custom action:
我们在终端上运行node send_push.js ,并检查是否通过自定义操作发送了推送通知:
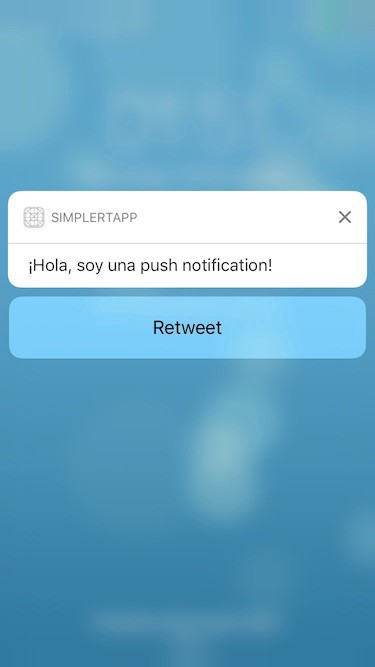
With all of this, we finally got how to send custom actions on push notifications
有了这些,我们终于了解了如何在推送通知上发送自定义操作
You can see the final iOS code on https://github.com/fedejordan/SimpleRTApp, tag apn_custom_actions.
您可以在https://github.com/fedejordan/SimpleRTApp上看到最终的iOS代码,标记为apn_custom_actions 。
结论 (Conclusion)
It was a bit large post, but we do all the needed setup to send push notifications from a Node.js app and the configuration that we need on the iOS app. Also we see all the setup to create the needed certificates to communicate with the APNs server.
这是一个很大的帖子,但是我们做了所有必要的设置,以从Node.js应用发送推送通知以及在iOS应用上需要的配置。 另外,我们看到了用于创建与APNs服务器进行通信所需的证书的所有设置。
In the next post we’ll see the final script that check all the device tokens, do the tweets request and send push notifications. Also we’ll see the logic on the iOS app to retweet if the user does a tap on the push notification custom action.
在下一篇文章中,我们将看到检查所有设备令牌,执行tweets请求并发送推送通知的最终脚本。 如果用户在推送通知自定义操作上轻按,我们还将在iOS应用程序上看到转发逻辑。
Thanks for reading! You can message me on fedejordan99@gmail.com
谢谢阅读! 您可以通过fedejordan99@gmail.com给我发消息
Twitter: www.twitter.com/fedejordan90
推特:www.twitter.com/fedejordan90
资料来源 (Sources)
翻译自: https://medium.com/swlh/simplertapp-using-apn-to-send-ios-pushes-from-a-node-js-api-c01fec726cc
ios 个推 apn 推送


 2462
2462

 被折叠的 条评论
为什么被折叠?
被折叠的 条评论
为什么被折叠?
 到【灌水乐园】发言


