


什么是Pytesseract,它的可靠性如何? (What is is Pytesseract and how reliable is it ?)
Pytesseract is a wrapper for Google’s OCR engine.
Pytesseract是Google OCR引擎的包装。
That one line should most probably leave you extremely pleased. I mean come on. Google? And OCR ? That’s the point when you know it’s good.
那一条线很可能会让您感到非常高兴。 我的意思是 谷歌? 和OCR? 这就是当您知道它很好的时候。
一切都很好,但是如何启动和运行它呢? (That’s nice and all, but how do I get it up and running ?)
Ok, time to start downloading stuff.
好的,该开始下载内容了。
I’m writing this article assuming you’re using Anaconda, and trust me it’s significantly easier setting things up using Anaconda instead of doing it manually using pip. There’s just so much that can go wrong.
我写这篇文章的前提是您正在使用Anaconda,并且相信我,使用Anaconda进行设置比使用pip手动进行设置要容易得多。 有太多可能出错的地方。
So first things first let’s get our hands on the OCR engine itself !
首先,让我们首先了解OCR引擎本身!
Head over to https://github.com/UB-Mannheim/tesseract/wiki and get the 32-bit or 64-bit version depending on your system architecture. If you don’t know which one to get, open your computer settings (windows key + I on windows) and type About.
转到https://github.com/UB-Mannheim/tesseract/wiki并获得32位或64位版本,具体取决于您的系统架构。 如果您不知道要获得哪一种,请打开计算机设置(Windows键+ Windows上的I),然后键入关于 。
After it’s done downloading just install it like a regular program (by double clicking and following the on-screen instructions). Now open up the folder where it’s downloaded and press Control + L. Now press Control + C. This should copy the path of the folder. We’re gonna be needing that.
下载完成后,只需像常规程序一样安装它即可(通过双击并按照屏幕上的说明进行操作)。 现在打开下载文件夹,然后按Control + L。 现在按Control + C。 这应该复制文件夹的路径。 我们会需要的。
Once that’s done , type system variables in the windows search box and hit enter when it says Edit the system environment variables.
完成后,在Windows搜索框中键入系统变量 ,并在显示编辑系统环境变量时按Enter 。
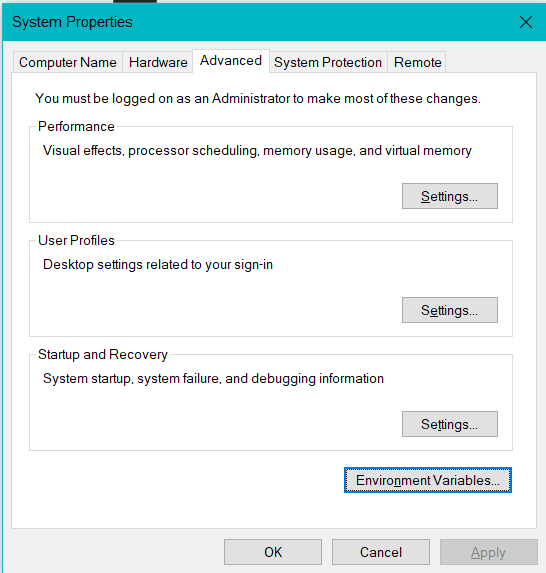
Now select Environment Variables.
现在选择环境变量 。
Please be extremely careful here. You’re going to be editing your System Variables and if you mess up your computer goes FUBAR. I’m not kidding. But no pressure ;)
请在这里非常小心。 您将要编辑系统变量,如果搞砸了,则计算机将变为FUBAR 。 我不是在开玩笑。 但是没有压力;)
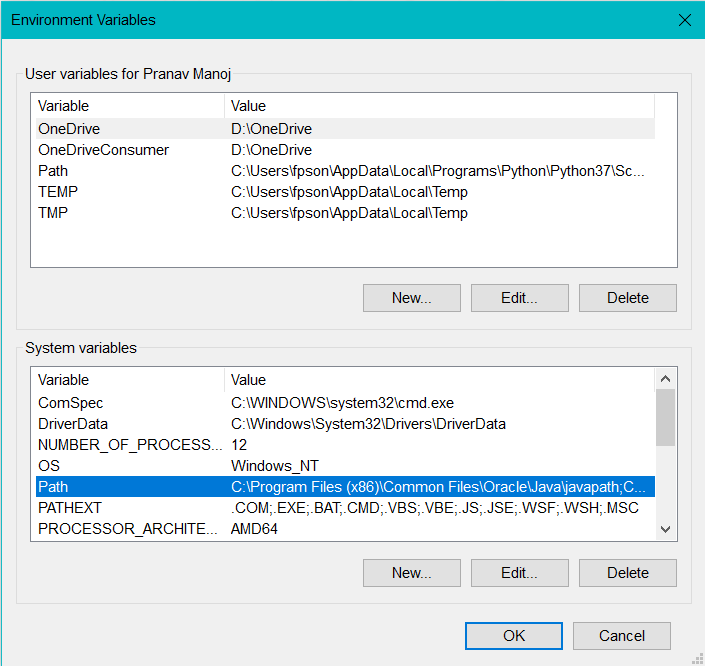
Select Path. Then click on Edit not New. If you select New then you can kiss your computer goodbye because I’ve no clue how to undo the damage done.
选择路径 。 然后单击Edit not New 。 如果选择“新建”,则可以与计算机道别,因为我不知道如何撤消造成的损害。
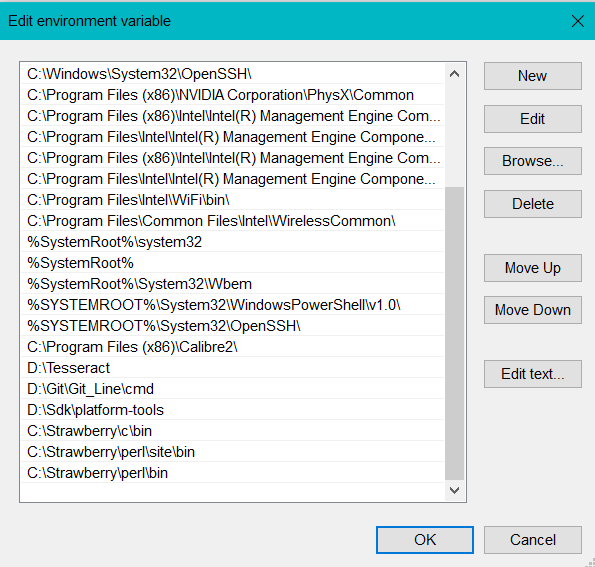
Now select New and paste in the path we copied earlier. Hit ok.
现在选择“ 新建”,然后粘贴我们先前复制的路径。 点击OK。
Yay, we’re done with the tricky part ! Good job !
是的,我们完成了棘手的部分! 做得好 !
从Anaconda获取依赖项 (Getting the dependencies from Anaconda)
Open up Anaconda Navigator and click on the Environments tab. Select Create and name it whatever you want, or just use whatever pre-existing environment you have, that’s up to you. However, if you create another environment remember to activate it using
打开Anaconda Navigator,然后单击“ 环境”选项卡。 选择创建并命名为任意名称, 或者只使用您现有的任何环境,这取决于您。 但是,如果创建另一个环境,请记住使用来激活它
conda activate your-environment-name before you run the code.
在运行代码之前。
Now, in the drop-down menu on the top left click on where it says Installed and change it to All.
现在,在左上角的下拉菜单中,单击显示已安装的位置,然后将其更改为All 。
Next, in the search box type in pytesseract, and tick the little box on it’s left. Do the same for tesseract, tesserocr and goslate.
接下来,在搜索框中输入pytesseract ,然后勾选左侧的小框。 对tesseract , tesserocr和goslate做同样的事情 。
If you look at the bottom of the page you should see a green box saying Apply. Click it and when it asks for confirmation say Yes.
如果您查看页面的底部,应该会看到一个绿色框,上面显示Apply(应用) 。 单击它,然后在要求确认时说“ 是” 。
最后,编码时间! (Finally, code time !)
Whew ! A little bit of setting up eh ? All worth it in the end I’ll tell you.
ew! 一点设置吧? 最后,所有这些都值得我告诉你。
Open up a new .py file and call it whatever you want. Paste in the following code:
打开一个新的.py文件,然后根据需要调用它。 粘贴以下代码:
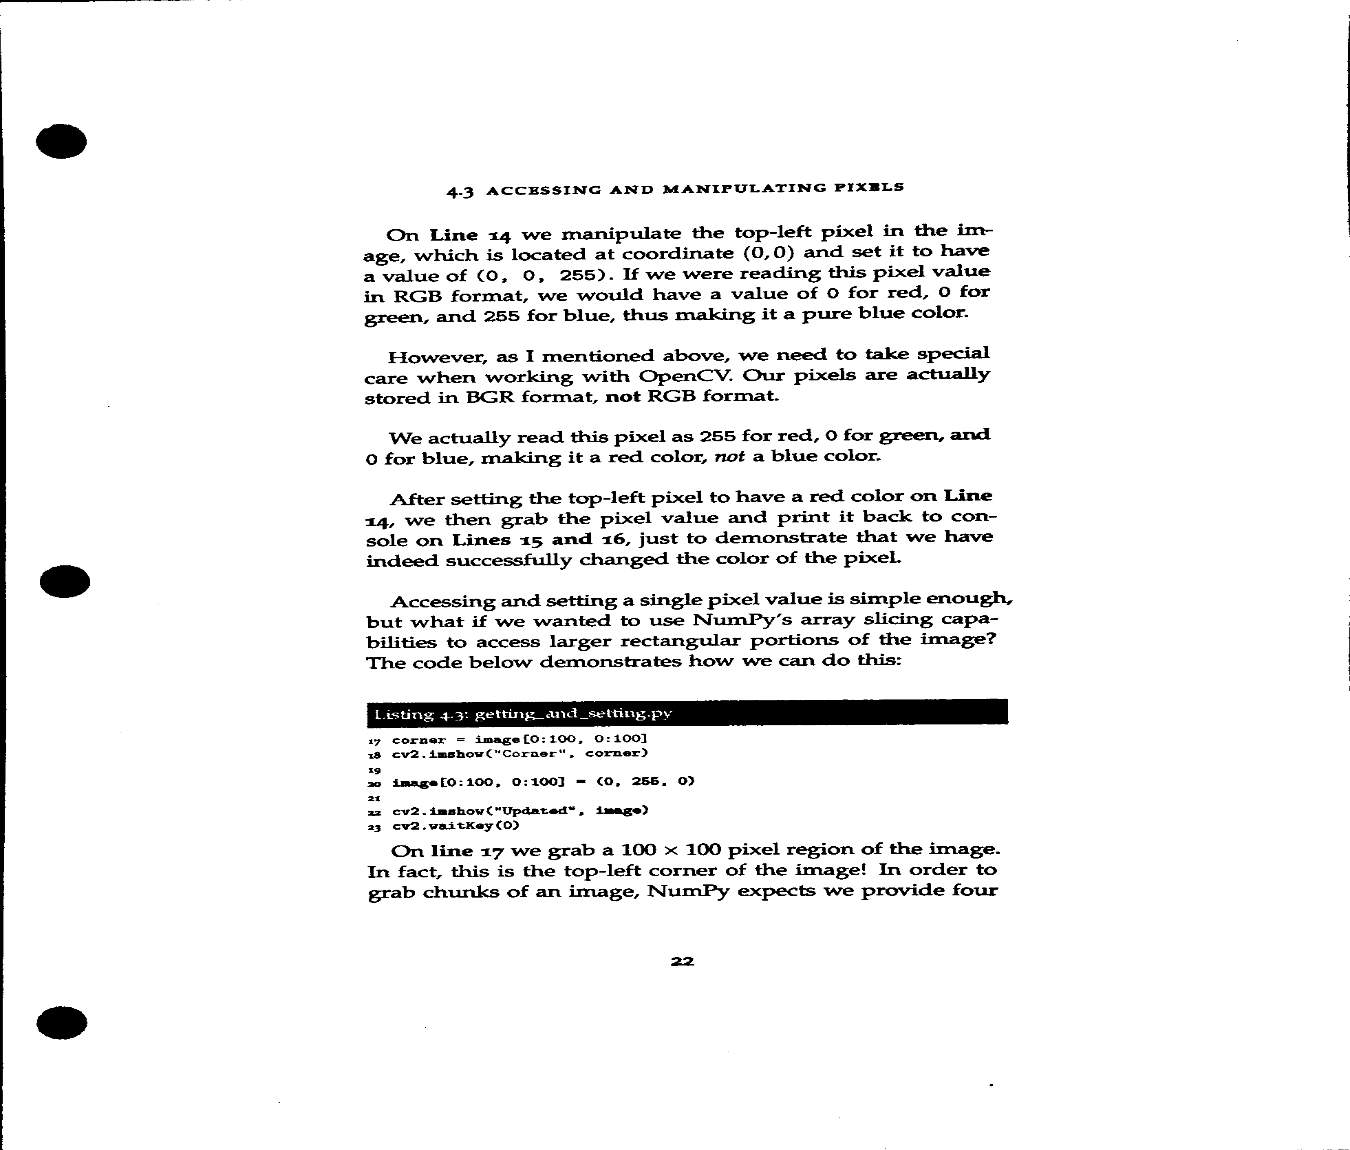
from PIL import Imageimport pytesseractpytesseract.pytesseract.tesseract_cmd = r”D:\Tesseract\tesseract.exe” # put in the path to tesseract.exe in your computer here.image = Image.open(‘new.png’) # take ingrabbed = pytesseract.image_to_string(image, lang=’eng’)print(grabbed)Here’s a sample image for you to try out. Save it as new.png in the same directory as the python file we wrote above.
这是供您试用的示例图像。 将其另存为与上面编写的python文件相同的目录中的new.png 。

Did you feel that was too easy for the engine ? Well, that’s exactly what I thought. Here’s a tougher one. Remember to save it as new.png to go along with the code I’ve written or change the code if you change the name of the file on downloading.
您觉得这对于引擎来说太容易了吗? 好吧,这正是我的想法。 这是一个更艰难的。 请记住,将其另存为new.png以便与我编写的代码一起使用, 如果您在下载时更改了文件名,请更改代码 。
Cool no ? But what else can you do with it ? How about some text translation ? :)
酷不? 但是您还能用它做什么? 文本翻译怎么样? :)
翻译 (Translation)
If you paid close attention to the downloads you’ll see we downloaded goslate, but didn’t use it in the code above. This happens to be another Google library which deals with translation. How convenient……what would we do without Google? Sigh.
如果您密切注意下载内容,您会看到我们下载了goslate ,但未在上面的代码中使用它。 这恰好是另一个处理翻译的Google图书馆 。 多么方便……如果没有Google,我们该怎么办? 感叹 。
Let’s write some code to implement translation.
让我们写一些代码来实现翻译。
from PIL import Imageimport pytesseractimport goslategs = goslate.Goslate()pytesseract.pytesseract.tesseract_cmd = r”D:\Tesseract\tesseract.exe” # put in the path to tesseract.exe in your computer here.image = Image.open(‘new.png’)grabbed = pytesseract.image_to_string(image, lang=’eng’)processed = gs.translate(grabbed, ‘en’)print(‘\n’)print(processed)Here’s an image to try the code on.
这是尝试代码的图像。

Mind you goslate only let’s you make around 5 requests, after which any requests made from your IP won’t be answered for a cooldown period of 10 minutes. So, it might be a good idea to use a VPN to make more requests.
请注意,仅让您发出约5个请求,此后10分钟的冷却时间内将不会回答您IP发出的任何请求。 因此,使用VPN发出更多请求可能是一个好主意。
To get around this, I’ve thought of using web scraping to scrape the translation directly off google but that seemed a little hacky and is a story for another day :)
为了解决这个问题,我想过要使用网络抓取功能直接将翻译内容从Google抓取到Google,但这似乎有点不客气,而且是另一回事了:)
A mod to improve the experience
一个改进体验的mod
Here’s another block of code which will write all the output to a text file instead of the terminal or wherever you run the code:
这是另一个代码块,它将所有输出写入文本文件,而不是终端或您在运行代码的任何地方:
from PIL import Imageimport pytesseractpytesseract.pytesseract.tesseract_cmd = r”D:\Tesseract\tesseract.exe” # put in the path to tesseract.exe in your computer here.image = Image.open(‘try.png’)image_to_text = pytesseract.image_to_string(image, lang=’eng’)print(image_to_text)doc = open(“extracted.txt”,”w”)doc.write(image_to_text)doc.close()wait = input(“Press Enter to exit”)结语 (Wrap up)
Well, that’s it for this time. If you have any doubts, feel free to ask away in the comments section, and I’ll be happy to help out. Peace.
好吧,这就是现在。 如果您有任何疑问,请随时在评论部分提出,我们将很乐意为您提供帮助。 和平。


 2874
2874

 被折叠的 条评论
为什么被折叠?
被折叠的 条评论
为什么被折叠?
 到【灌水乐园】发言


