


svg use
Link a la versión en español.
链接西班牙语 。
If you draw your own SVG files or if you download them from the internet, tools like this SVG-Editor or SVGOMG are your friends. Compressing the files with those tools takes only a few seconds and reduces your file size a lot. But if you need to use your SVG inline to animate or interact with the code, there’s still a lot you can do about code legibility.
如果您绘制自己的SVG文件,或者从Internet下载它们,那么像SVG-Editor或SVGOMG这样的工具就是您的朋友。 使用这些工具压缩文件仅需几秒钟,并且可以大大减少文件大小。 但是,如果您需要使用内联的SVG进行动画处理或与代码交互,则对于代码易读性您仍然可以做很多事情。
Reusing content with SVG’s <use> is not always an option, but when it is, you won’t regret taking a few extra minutes to put it in practice.
重复使用SVG的<use>内容并非总是一种选择,但是当它成为现实时,您不会后悔花了几分钟来付诸实践。
In this article, I’ll show an example where I was able to take a lot of advantage of this element — not only for keeping the file size down but also a clearer markup that became more legible and easy to maintain.
在本文中,我将展示一个示例,在该示例中,我可以充分利用此元素-不仅可以减小文件大小,而且可以使标记更清晰,更易于维护。
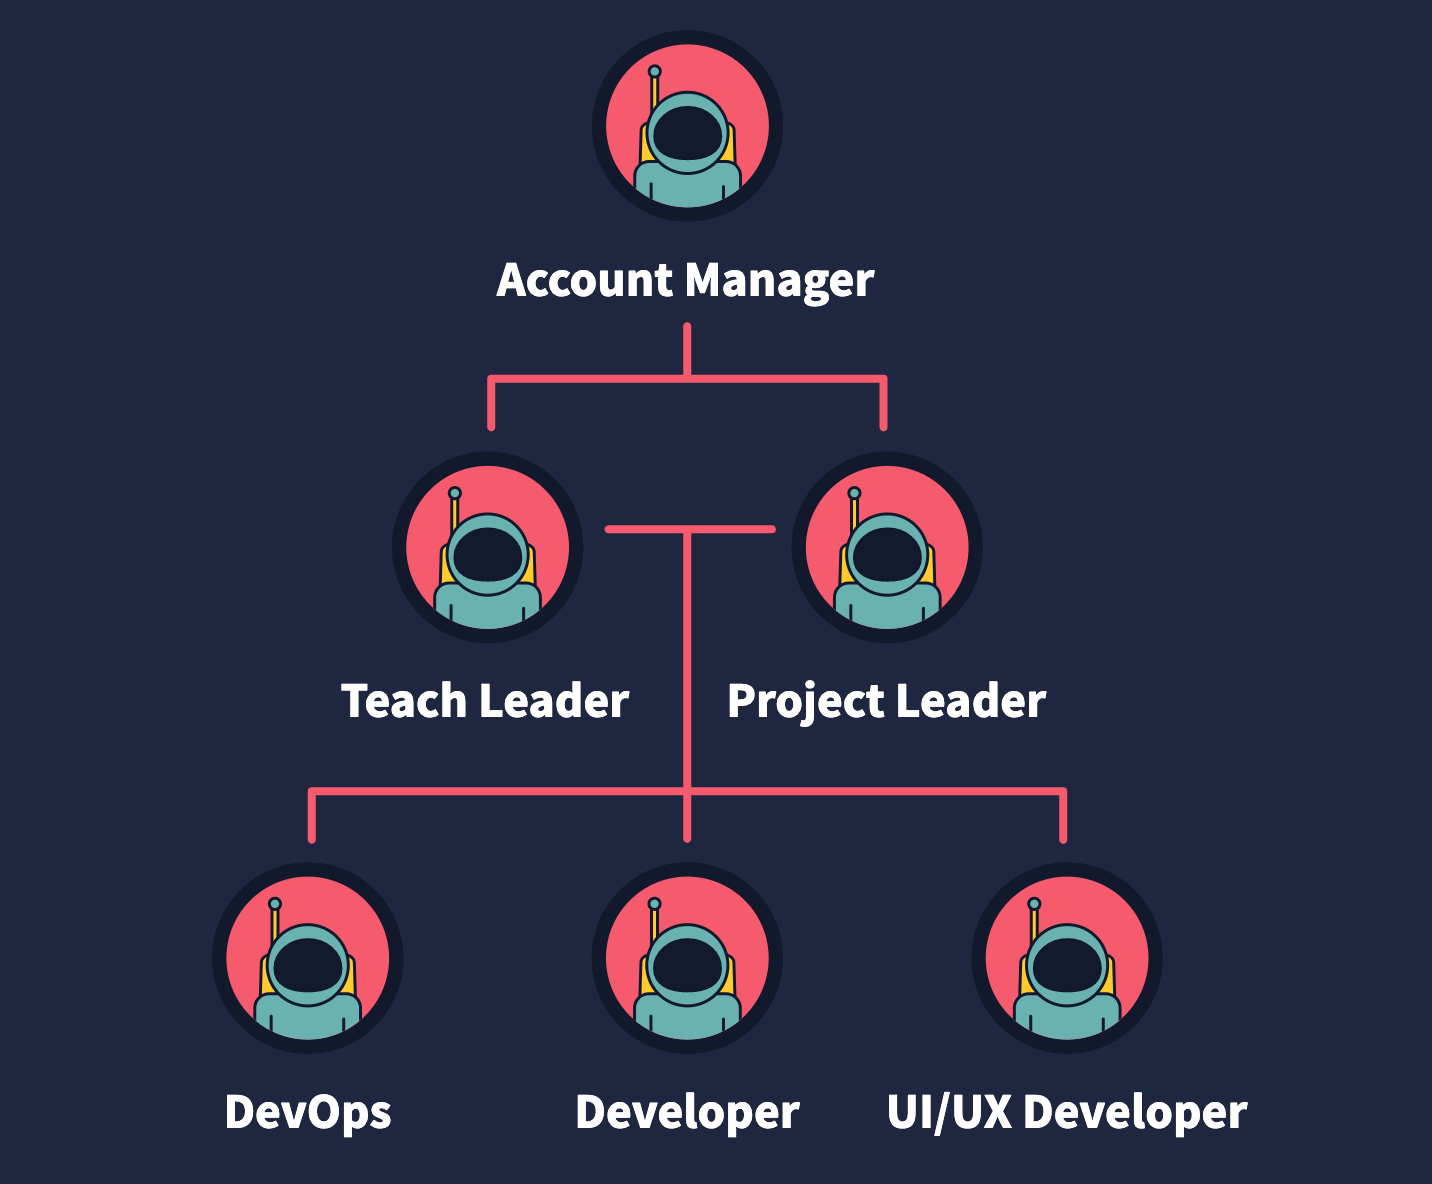
This is the first design that I needed to work with. It was originally created in Illustrator:
这是我需要使用的第一个设计。 它最初是在Illustrator中创建的:
Take a look at the following code, this is the original file exported directly from the software, weighs 2.05kb:
看一下下面的代码,这是直接从软件导出的原始文件,重2.05kb:
It’s not a heavy file at all. However, open it and you’ll find there are lots of empty tags, deprecated namespaces, unnecessary white space, commas and extra information applied by the software. This makes the code hard to work with, annoying to scan and creates a big scroll for those hundreds of lines in your document.
这根本不是一个沉重的文件。 但是,打开它,您会发现有很多空标签,已弃用的名称空间,不必要的空格,逗号和该软件应用的其他信息。 这使代码难以使用,烦人的扫描并为文档中的数百行创建了一个较大的滚动条。
You’ll also notice that the file is indeed using <use> and <defs> elements, but not in the best way it could. And that’s not the software’s fault! Each astronaut illustration in the original file has a clipping mask: an invisible circle that acts like a window through which we can see our character. Without it, the suit of the astronaut would be flooding outside the circle. There are a few ways to avoid this in Illustrator, like cropping those extra parts with a pathfinder option. That way we would gain a few bytes and avoid using an extra circle only for clipping information of the graphic that we won’t show. The compression of the file starts in the software. Still, there are a lot of things we’ll be able to improve on the code in case we don’t want to edit the original file.
您还会注意到,该文件确实在使用<use>和<defs>元素,但未尽其所能。 那不是软件的错! 原始文件中的每个宇航员插图都有一个剪贴蒙版:一个看不见的圆圈,就像一个窗口,通过它我们可以看到我们的角色。 没有它,宇航员的衣服就会泛滥成灾。 在Illustrator中有几种避免这种情况的方法,例如使用路径查找器选项裁剪那些多余的部分。 这样,我们将获得一些字节,并避免仅将多余的圆圈用于剪裁我们不会显示的图形的信息。 文件的压缩在软件中开始。 尽管如此,万一我们不想编辑原始文件,我们仍然可以对代码进行很多改进。
Compressing the SVG with SVGOMG and keeping the default options won’t take any effort and you’ll get a file that weighs 1.46kb. That is a reduction of 30% compared to the original size and the graphic will look exactly the same.
使用SVGOMG压缩SVG并保留默认选项不会花费任何精力,您将得到一个重1.46kb的文件。 与原始尺寸相比减少了30%,并且图形看起来完全一样。
重用内容 (Reusing content)
This will require going through the SVG and making some adjustments. I know this option takes more time regarding the previous example, but it’s not as hard as it seems.
这将需要通过SVG并进行一些调整。 我知道关于上一个示例,此选项需要花费更多时间,但是看起来并不那么困难。
We have one repeated element, which is the astronaut inside the circle. That’s the one we’ll compress on SVGOMG. The result will look something like this:
我们有一个重复的元素,就是圆圈内的宇航员。 那就是我们将在SVGOMG上压缩的那个。 结果将如下所示:
<svg xmlns="http://www.w3.org/2000/svg" xmlns:xlink="http://www.w3.org/1999/xlink" viewBox="0 0 95.8 95.8"> <style>.st3,.st4{fill:#ffcb2f;stroke:#12192c;stroke-width:1.4891;stroke-miterlimit:10}.st4{fill:#69b2b1}</style>
<circle cx="47.9" cy="47.9" r="47.9" fill="#12192c"/>
<circle cx="47.9" cy="47.9" r="40.7" fill="#f6a2a4"/>
<defs><circle id="SVGID_1_" cx="47.9" cy="47.9" r="40.7"/></defs>    <clipPath id="SVGID_2_"><use xlink:href="#SVGID_1_" overflow="visible"/></clipPath>
<g clip-path="url(#SVGID_2_)">
<path class="st3" d="M63.9 45.6H32c-4 0-7.2 1.9-7.3 4.3l-.8 26.6H72l-.8-26.6c-.2-2.5-3.4-4.3-7.3-4.3z"/>
<path class="st4" d="M74.3 86.9L66 88.2C53.8 90 41.4 90 29.1 88.1l-7.7-1.2v-14c0-4 3.2-7.2 7.2-7.2h38.5c4 0 7.2 3.2 7.2 7.2v14z"/>      <path class="st3" d="M31.8 47.3h-.6c-.7 0-1.2-.6-1.2-1.2V23.2c0-.7.6-1.2 1.2-1.2h.6c.7 0 1.2.6 1.2 1.2v22.9c0 .7-.6 1.2-1.2 1.2z"/>
<circle class="st4" cx="31.5" cy="20.7" r="2.8"/>
<circle class="st4" cx="47.9" cy="51.4" r="20.3"/>
<path d="M64.5 53.1c0 8-7.4 11.2-16.5 11.2S31.4 61 31.4 53.1s7.4-14.4 16.5-14.4 16.6 6.4 16.6 14.4z" fill="#13192d" stroke="#12192c" stroke-width="1.489" stroke-miterlimit="10"/>
<path fill="none" stroke="#12192c" stroke-width="1.489" stroke-linecap="round" stroke-linejoin="round" stroke-miterlimit="10" stroke-dasharray="9.6793,3.7228" d="M65.9 88V76.9"/>
<path fill="none" stroke="#12192c" stroke-width="1.489" stroke-linecap="round" stroke-linejoin="round" stroke-miterlimit="10" d="M29.6 87.9v-11"/>
</g>
</svg>
First recommendations:
首要建议:
Move the
<style>content to the CSS file (assuming you can use your SVG inline and that you have a stylesheet linked in your document).将
<style>内容移动到CSS文件(假设您可以内联使用SVG,并且文档中链接了样式表)。- Rename the IDs with something that makes sense to you. 用对您有意义的名称重命名ID。
Round those complicated numbers, like
stroke-width="1.489"tostroke-width="1.5". This is something that could happen if you resize your vectors in Illustrator with the option of scaling borders checked.将那些复杂的数字取
stroke-width="1.489",例如stroke-width="1.489"到stroke-width="1.5"。 如果您在Illustrator中选择了缩放边框选项来调整矢量大小,则可能会发生这种情况。Remove the
stroke-miterlimit="10"as we don’t need it since ourstroke-linejoinis round.删除
stroke-miterlimit="10",因为我们的stroke-linejoin是圆形的,所以我们不需要它。This code will be our astronaut template. We need to wrap everything in a group, add an ID to that group and place it inside a
<defs>tag. Notice that we already have a<defs>element with a circle inside it. We can remove that one as it will be part of a bigger<defs>tag.此代码将成为我们的宇航员模板。 我们需要将所有内容包装在一个组中,向该组添加一个ID并将其放置在
<defs>标记内。 请注意,我们已经有一个<defs>元素,其中带有一个圆圈。 我们可以删除它,因为它将成为更大的<defs>标签的一部分。
Notice that the first two circles are filled shapes with different radius and color. We can keep the smaller one and add a stroke big enough to achieve the same effect — again, something that we could avoid using a circle with border in Illustrator in the first place.
请注意,前两个圆是具有不同半径和颜色的填充形状。 我们可以保持较小的笔触,并添加足够大的笔触以达到相同的效果-同样,我们可以避免在Illustrator中首先使用带有边框的圆。
Another important thing is that our current viewBox is too small for what we want to build. Let’s make it bigger and add some negative space on the x-axis so we can start cloning our astronaut from the middle.
另一个重要的事情是,当前的viewBox对于我们要构建的视图来说太小了。 让我们做大一些,并在x轴上添加一些负空间,以便我们可以从中间开始克隆宇航员。
To learn more about viewBox, check out this beautiful guide to scaling SVG by Amelia Wattenberger.
要了解有关viewBox的更多信息,请查看Amelia Wattenberger撰写的有关缩放SVG的精美指南 。
We will end with something like this:
我们将以这样的结尾:
<svg xmlns="http://www.w3.org/2000/svg" xmlns:xlink="http://www.w3.org/1999/xlink" viewBox="-400 0 1000 5000">
<defs>
<g id="astronaut">
<circle cx="94.5" cy="48" r="44" fill="currentColor" stroke="#12192c" stroke-width="8"/><clipPath id="a"><circle cx="94.5" cy="47.9" r="40"/></clipPath>
<g clip-path="url(#a)"><path class="st3" d="M110.5 45.6H78.6c-4 0-7.2 1.9-7.3 4.3l-.8 26.6h48.1l-.8-26.6c-.1-2.5-3.4-4.3-7.3-4.3z"/><path class="st4" d="M121 86.9l-8.3 1.3C100.4 90 88 90 75.8 88.1l-7.7-1.2v-14c0-4 3.2-7.2 7.2-7.2h38.5c4 0 7.2 3.2 7.2 7.2v14z"/><path class="st3" d="M78.4 47.3h-.6c-.7 0-1.2-.6-1.2-1.2V23.2c0-.7.6-1.2 1.2-1.2h.6c.7 0 1.2.6 1.2 1.2v22.9c0 .7-.5 1.2-1.2 1.2z"/><circle class="st4" cx="78.1" cy="20.7" r="2.8"/><circle class="st4" cx="94.5" cy="51.4" r="20.3"/><path d="M111.1 53.1c0 8-7.4 11.2-16.5 11.2S78 61 78 53.1s7.4-14.4 16.5-14.4 16.6 6.4 16.6 14.4z" fill="#13192d" /><path fill="none" stroke="#12192c" stroke-width="1.5" stroke-linecap="round" d="M112.5 88V76.9"/><path fill="none" stroke="#12192c" stroke-width="1.5" stroke-linecap="round" d="M76.3 87.9v-11"/></g>
<g>
</defs>
</svg>
What goes inside the <defs> won’t render anywhere. To start cloning our astronaut, we need to link its ID inside a <use> element like this:
<defs>内部的内容不会在任何地方渲染。 要开始克隆我们的宇航员,我们需要在<use>元素内链接其ID,如下所示:
<use xlink:href="#astronaut"/>
xlink:hrefis deprecated since SVG2, but is better to use it for compatibility purposes. You can use href in modern browsers, but I tested it on Safari and it wasn’t working as of this writing. If you usexlink:href,make sure you include this namespace in your SVG tag:xmlns:xlink="http://www.w3.org/1999/xlink(you won’t need it if you decide to usehref).从SVG2开始不推荐使用
xlink:href,但最好将其用于兼容性目的。 您可以在现代浏览器中使用href,但是我已经在Safari上对其进行了测试,在撰写本文时,它尚不起作用。 如果您使用xlink:href,请确保在SVG标签中包含以下名称空间:xmlns:xlink="http://www.w3.org/1999/xlink(如果决定使用href,则将不需要它)。
Now we can add the corresponding text to this first figure and align it with the transform attribute. We better place both elements inside a group so in the future instances we’ll be able to translate the whole group to the position we want:
现在,我们可以将相应的文本添加到第一个图形中,并将其与transform属性对齐。 我们最好将两个元素都放在一个组中,这样在将来的实例中,我们就可以将整个组转换到我们想要的位置:
<g transform="translate(-95 210)">
 <use xlink:href="#astronaut"/>
 <text transform="translate(25 130)">Tech Leader</text>
</g>
The connecting lines are simple shapes that can be drawn directly with <path>. Paths look scary but, for rect lines, there is not much to worry about. I’ll explain this code:
连接线是简单的形状,可以使用<path>直接绘制。 路径看上去很吓人,但是对于直线而言,不必担心太多。 我将解释以下代码:
<path class="line" d="M-4 200v-25h200"/>d="" is for data and that’s where we’ll place our commands. M is to move our hand to the place where we’ll start drawing (but it’s not drawing anything). -4 200 means we place our pencil four units to the left and 200 to the bottom of our viewBox (following the orientation of the SVG coordinate system). v is the command to start drawing a vertical line that will go from this place to -25 units up. h is for horizontal, so we’re drawing a line from there to 200 to the right. It feels like logo writer.
d=""用于数据,这是我们放置命令的地方。 M是将我们的手移到我们将开始绘制的位置(但是它没有绘制任何内容)。 -4 200表示我们将铅笔放在viewBox的左边四个单位,并将其放置在viewBox的底部200个单位(遵循SVG坐标系的方向)。 v是开始绘制一条垂直线的命令,该垂直线将从该位置上升到-25个单位。 h是水平的,因此我们要从那里到右边的200画一条线。 感觉像徽标作家。
I separated the lines in three paths, but we can use just one with the M value after a series of commands to move our hand and start drawing from a new point in the coordinate system.
我将线分为三个路径,但是在执行一系列命令来移动手并从坐标系中的新点开始绘制之后,我们只能使用一个带有M值的线。
Take a look at the final document. Now the file weighs 779 bytes and has 12 lines of legible and scalable code:
看一下最终文件。 现在,该文件重779字节,并具有12行清晰且可扩展的代码:
If we declare any value in the attributes we defined in the <defs> then it won’t be possible to change it in their clones because of the nature of the <use> element. That’s why in the example above the fill of the main circle was replaced with a value of currentColor to have control of the backgrounds of all the replications. currentColor will inherit the CSS color value of the element (or any element above it). In the SVG, I’m adding a class to some replicated astronauts and adding a color value in CSS to those classes. This way, I’ll be able to change all instances of the <use> element with that class. To understand more about <use> and how to style its content, this post by Sara Soueidan has everything you need to know.
如果我们在<defs>定义的属性中声明任何值,则由于<use>元素的性质,将无法在其克隆中对其进行更改。 这就是为什么在上面的示例中,将主圆圈的填充替换为currentColor的值以控制所有复制的背景的原因。 currentColor将继承该元素(或其上方的任何元素)CSS颜色值。 在SVG中,我向一些复制的宇航员添加了一个类,并向这些类添加了CSS中的颜色值。 这样,我将能够<use>该类更改<use>元素的所有实例。 要了解有关<use>以及如何设置其内容样式的更多信息, Sara Soueidan的 这篇文章提供了您需要了解的所有内容。
With this code ready, we’ll be able to scale the graphic to something like this much more easily:
准备好这段代码之后,我们将能够更轻松地将图形缩放到类似以下内容:

This is the complete code:
这是完整的代码:
Here are the three examples side by side to compare legibility and amount of code, we went from 241 to 12 neat lines:
这是并排比较代码的易读性和代码量的三个示例,我们从241到12条简洁的行:

This article was first published on CSS-Tricks with edits from Chris Coyier and Geoff Graham
这篇文章首先在CSS-Tricks上发表,作者是Chris Coyier和Geoff Graham
翻译自: https://uxdesign.cc/going-beyond-automatic-svg-compression-with-the-use-element-c6ecf35bc4f
svg use


 7525
7525

 被折叠的 条评论
为什么被折叠?
被折叠的 条评论
为什么被折叠?
 到【灌水乐园】发言


