svg 素描
Have you ever created an icon in Sketch and after exporting it, one of the developers on your team sends you a screenshot of a strange, distorted version of this icon? I feel like a lot of designers are struggling with this, at least I have. I have also tried out many ways to setup icons in Sketch for different projects, some of them making it necessary that I prepare the icons every time the developers needed something.
您是否曾经在Sketch中创建过一个图标,并将其导出后,团队中的一名开发人员向您发送了该图标的奇怪变形版本的屏幕截图? 我觉得很多设计师都在为此而挣扎,至少我有。 我还尝试了许多方法来为不同的项目在Sketch中设置图标,其中有些方法使得我需要在开发人员每次需要的时候准备图标。
In this article I want to share my experiences and show you, what I consider the best way for me to create icon symbols and libraries. I arrived there by constantly adapting to the feedback from the developers and educating myself about the SVG specification itself and the way the Sketch export works. This setup will allow you to
在本文中,我想分享我的经验并向您展示我认为是我创建图标符号和库的最佳方法。 通过不断适应开发人员的反馈,并使自己了解SVG规范本身以及Sketch导出的工作方式,我到达了那里。 此设置将使您能够
- have icon symbols with color overrides using shared styles 具有使用共享样式覆盖颜色的图标符号
- export icons directly to SVG without having to clean them up 将图标直接导出到SVG,而无需清理它们
- maintain the original path for future reference 保持原始路径以备将来参考
All this is possible using only Sketch with the official Sketch plugin “SVGO compressor”. No jumping between Illustrator and Sketch, no extra preparation for export — once the library stands, you do not need to touch it, except for design reasons.
仅使用带有官方Sketch插件“ SVGO压缩机”的Sketch即可实现所有这一切。 无需在Illustrator和Sketch之间跳动,也无需进行额外的导出准备工作-一旦库站立,您就无需动手,除非出于设计原因。
什么是SVG? (What is SVG?)
SVG stands for „Scalable Vector Graphics“. It is a way to describe vector information in XML format, so every SVG is a readable text file. Vector graphics can be scaled without loosing quality and since they are code, they can dynamically be manipulated and animated. This is perfect for the use of icons and illustration in the web — and this is what SVG is made for.
SVG代表“可缩放矢量图形”。 这是一种以XML格式描述矢量信息的方法,因此每个SVG都是可读的文本文件。 矢量图形可以缩放而不会降低质量,并且由于它们是代码,因此可以动态地对其进行操纵和设置动画。 这非常适合在Web中使用图标和插图-这就是SVG的目的。
If you want to learn more about SVG, you can start at w3schools.com, they have a great beginner friendly documentation of all relevant web technologies, like HTML, JS, CSS and SVG as well.
如果您想了解有关SVG的更多信息,可以从w3schools.com开始,他们提供了有关所有相关Web技术(例如HTML,JS,CSS和SVG)的入门指南,非常友好。
Sketch如何导出SVG (How Sketch exports SVGs)
SVG files are different from bitmap image files like .png or .jpg. The are described in a markup text you can view by opening SVG files in any text editor. This markup will be integrated in the code that defines the application and rendered by the browser. This means, that during export, what we see in Sketch will be translated to a text representation of path and style information. Since the Sketch vector tools give us slightly other options than the SVG markup provides, Sketch has to recalculate information, and the result might not always be right.
SVG文件与位图图像文件(如.png或.jpg)不同。 标记文本中有描述,您可以通过在任何文本编辑器中打开SVG文件来查看它们。 该标记将集成在定义应用程序的代码中,并由浏览器呈现。 这意味着,在导出期间,我们在Sketch中看到的内容将转换为路径和样式信息的文本表示。 由于Sketch矢量工具为我们提供了SVG标记所不提供的其他选项,因此Sketch必须重新计算信息,结果可能并不总是正确的。
Additionally, SVGs can sometimes depend on other files, like fonts or bitmap images, if they are integrated in the design. Those files will be referenced in the markup and if the path of the file location changes, they can not be displayed.
此外,如果将SVG集成在设计中,则它们有时可能依赖于其他文件,例如字体或位图图像。 这些文件将在标记中引用,并且如果文件位置的路径更改,则将无法显示它们。
The next two examples show two very common issues I have experienced when exporting SVGs.
接下来的两个示例显示了导出SVG时遇到的两个非常常见的问题。
文字残破 (Broken Text)


When we use text in icons or illustrations, this text will not automatically be converted to outlines when exporting them. The text will be integrated in form of a text tag, which is provided with the necessary styling information and the name of the font to be used. If the font can not be found, like in the picture above, a standard system font is used. Leaving text information in an SVG might be beneficial, if the text will be changed dynamically later on, but this does not come up very often. In all other cases, the text should be converted to outlines.
当我们在图标或插图中使用文本时,导出文本时,该文本不会自动转换为轮廓。 文本将以文本标签的形式集成,该标签提供必要的样式信息和要使用的字体名称。 如果找不到字体,如上图所示,则使用标准系统字体。 如果稍后会动态更改文本,则将文本信息保留在SVG中可能会有所帮助,但是这种情况很少出现。 在所有其他情况下, 文本应转换为轮廓。
边界破损 (Broken Borders)


Of course SVG elements can have strokes in different widths. But Sketch allows us more than that — we can set the border to be centered, outside or inside the shape we created, and we can open up paths with the snipping tool. SVG does not know these options, so when exporting these shapes, Sketch has to recalculate those settings. This usually works fine for simple shapes, but if the element is more complex, it can break and look as shown above. To fix this, you can also use the “Convert to Outline” option.
当然,SVG元素可以具有不同宽度的笔触。 但Sketch不仅可以为我们提供更多功能-我们可以将边框设置为居中,在所创建形状的外部或内部,还可以使用剪切工具打开路径。 SVG不知道这些选项,因此在导出这些形状时,Sketch必须重新计算这些设置。 通常,这对于简单的形状效果很好,但是如果元素更复杂,则它可能会断裂并看起来如上所示。 要解决此问题,您还可以使用“转换为轮廓”选项。
TMI —太多信息 (TMI — Too Much Information)
The standard Sketch SVG export is very cluttered. It contains descriptions and comments and a lot of other information, that is not necessary for the SVG to be rendered correctly. Also, the description tag inside the SVG can falsely end up as the search engine description of you website. This stuff can be deleted manually, but it is very tedious. To prevent this you should use the SVGO plugin, which is described in a little more detail below.
标准的Sketch SVG导出非常混乱。 它包含描述和注释以及许多其他信息,对于正确呈现SVG来说不是必需的。 同样,SVG内部的描述标签可能错误地以您网站的搜索引擎描述结尾。 这些东西可以手动删除,但是非常繁琐。 为避免这种情况,您应该使用SVGO插件,下面将对此进行详细介绍。
In a nutshell — the problem is that Sketch vector tools work different from how the SVG markup describes them. Therefore, the vector data might be interpreted very differently in the browser form what we see in Sketch. In general, you can describe Text, Masking information, gradients, shadows and much more with SVG. But the more complex your element is, the more likely it gets that there will be an issue.
简而言之,问题在于草图矢量工具的工作方式与SVG标记描述它们的方式不同。 因此,矢量数据在浏览器中的解释方式可能与我们在Sketch中看到的完全不同。 通常,您可以使用SVG描述文本,蒙版信息,渐变,阴影等等。 但是,您的元素越复杂,就越有可能出现问题。
创建图标库 (Creating an Icon Library)
This proposition will give you icon symbols in Sketch, including color overrides and the possibility of directly being able to export the icons for the developers. Also, if your team uses Zeplin (which is a great tool for design handover), the developers will be able to download the icons directly from your design. Except for the SVGO plugin, which is maintained by Bohemian Coding itself, you do not need any extra plugins or tools.
该建议将为您提供Sketch中的图标符号,包括颜色覆盖以及直接为开发人员导出图标的可能性。 另外,如果您的团队使用Zeplin (这是设计移交的绝佳工具),则开发人员将能够直接从您的设计中下载图标。 除了由Bohemian Coding自己维护的SVGO插件之外,您不需要任何其他插件或工具。
第1步-SVGO Compressor插件 (Step 1 — The SVGO Compressor Plugin)
This is an official Sketch plugin that will Mari-Kondo your SVGs when you export them. Unnecessary information will automatically be deleted (they do not spark joy) and path information will be simplified. It is an implementation of the console application SVGO (SVG Optimizer). You can try it out by comparing an SVG Export with and without the Plugin. It should look something like this:
这是一个官方的Sketch插件,可以在您导出SVG时Mari-Kondo。 不必要的信息将被自动删除(它们不会引起喜悦),并且路径信息将得到简化。 它是控制台应用程序SVGO (SVG Optimizer)的实现。 您可以通过比较带有和不带有插件的SVG导出来进行尝试。 它看起来应该像这样:
As you can see, the resulting code has way less elements than the one we started out with. We merely kept information about the size of the icon and the path points — if the fill color of the icon would not have been black, we would see the hex code of the fill color as an attribute on the path tag. There is no room for false rendering or misplaced information.
如您所见,结果代码中的元素比起初的元素少。 我们仅保留有关图标大小和路径点的信息-如果图标的填充色不是黑色,我们将在路径标签上将填充色的十六进制代码视为属性。 没有空间提供错误的渲染或放置错误的信息。
Pro Tip: If your developers still are not happy — show them the settings file for the SVGO plugin — you have many options on how the plugin compresses the SVG, what information it deletes and what it leaves in.
专家提示:如果您的开发人员仍然不满意-向他们显示SVGO插件的设置文件-您可以选择许多有关插件如何压缩SVG,删除哪些信息以及保留在其中的信息。
第2步-在Sketch中设置图标 (Step 2 — Setup your Icons in Sketch)
1.每个图标一个画板 (1. One Artboard per Icon)
If you export an artboard instead of a slice or a single element, it gives the SVG the right height and width information for your „icon box“. So setup all your icons on single artboards and define an SVG export for all of them.
如果导出画板而不是切片或单个元素,它将为SVG提供“图标框”的正确高度和宽度信息。 因此,将所有图标设置在单个画板上,并为所有图标定义SVG导出。
2.保持未来的路径信息 (2. Keeping Path Information for The Future)

Converting borders to outlines and flattening shapes deletes path information you might need in the future, if you want to create similar icons or differently sized versions of this one. If you need to keep the path information for future reference, group all elements of the icon, copy them and set one of the folders to be invisible. You can keep it on the artboard — Sketch ignores invisible layers when exporting SVGs.
如果要创建类似的图标或此图标的不同尺寸的版本,则将边框转换为轮廓并展平形状会删除将来可能需要的路径信息。 如果您需要保留路径信息以备将来参考,请对图标的所有元素进行分组,复制它们并将其中一个文件夹设置为不可见。 您可以将其保留在画板上-导出SVG时,Sketch会忽略不可见的图层。
3.单一形状 (3. One Single Shape)
If you have your Icon designed and are happy with it, the next step is to simplify the shape.
如果您设计了Icon并对此感到满意,那么下一步就是简化形状。
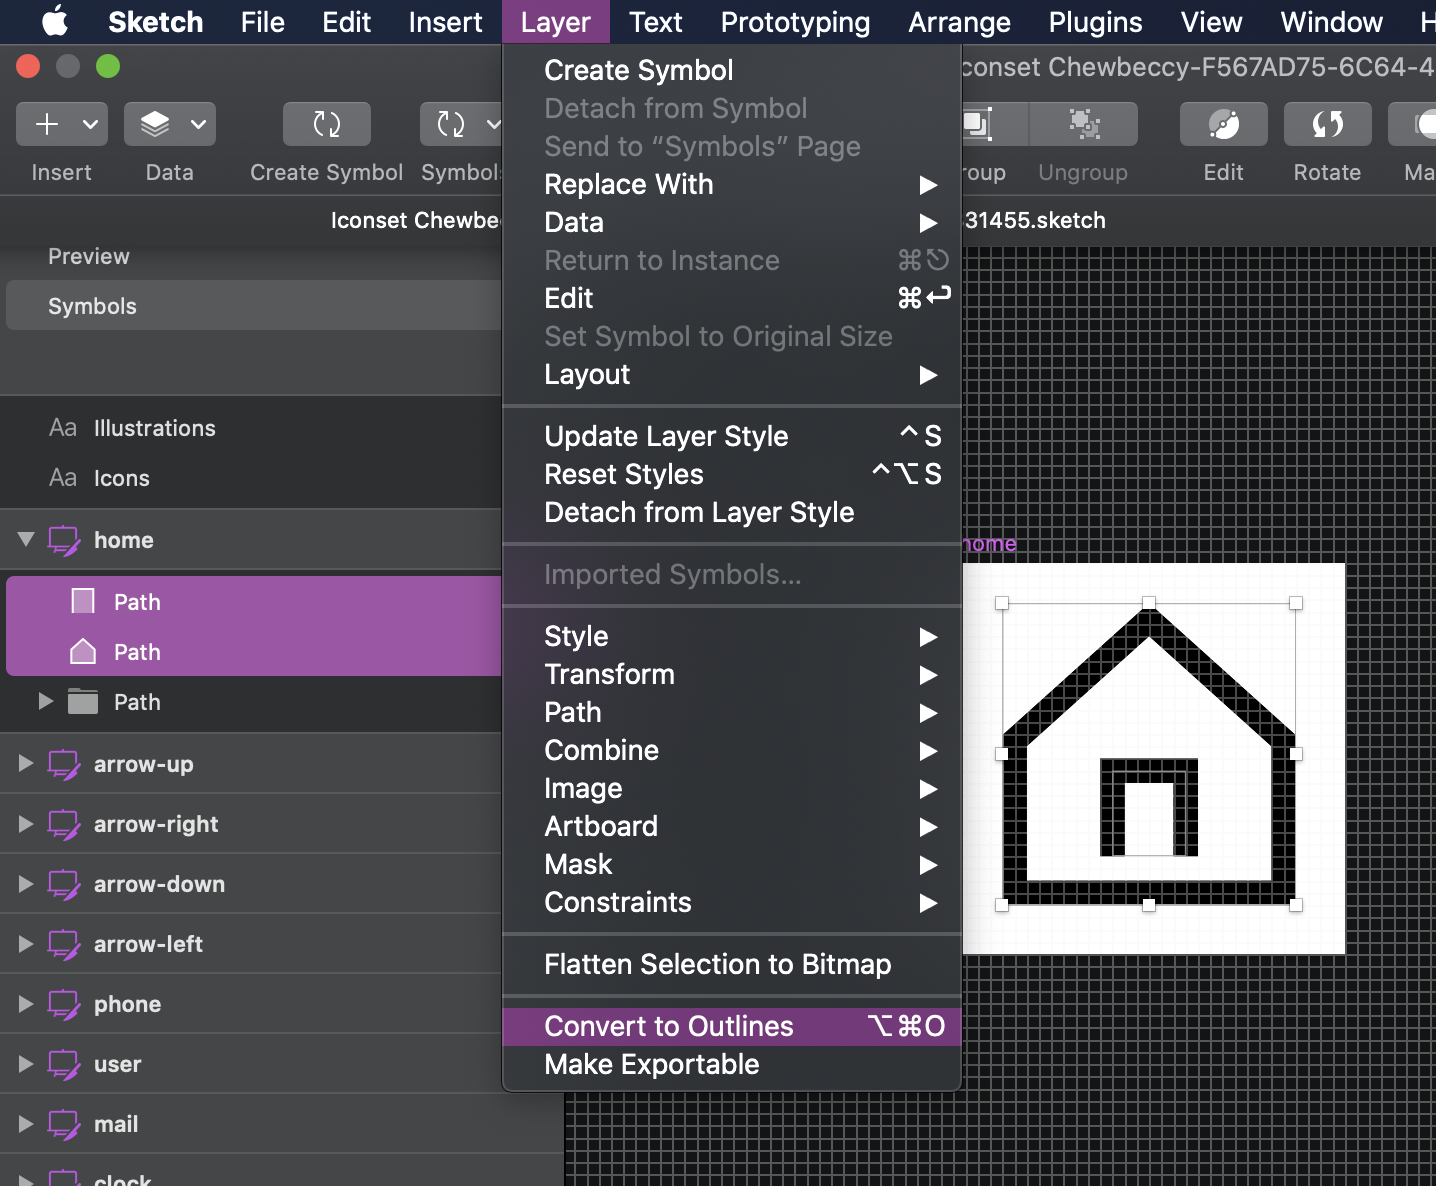
- Convert all shapes to outlines. 将所有形状转换为轮廓。
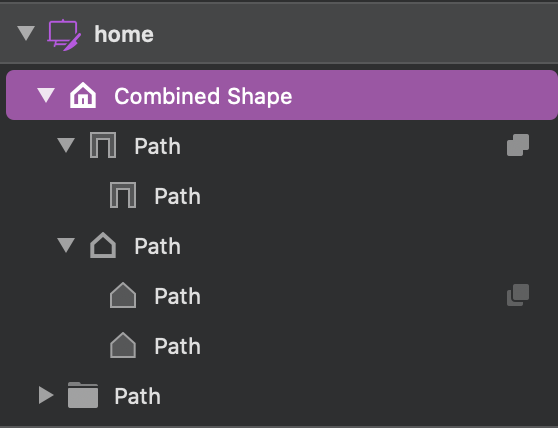
- Using boolean functions, combine them into one shape. Sometimes this is a little tricky. If it doesn’t look right I usually move the shape elements up and down and try out different combination modes. 使用布尔函数,将它们组合为一种形状。 有时这有点棘手。 如果看起来不合适,我通常会上下移动形状元素并尝试不同的组合模式。
- Use „Flatten“ to simplify the shape. Just hit the button until Sketch tells you the shape can’t be flattened any further. Not it should be the simplest possible representation of the desired shape. 使用“ Flatten”来简化形状。 只需按一下按钮,直到Sketch告诉您形状无法进一步展平即可。 不应该是所需形状的最简单的表示形式。


覆盖的共享图层样式 (Shared Layer Styles for Overrides)
Back when symbols did not provide the possibility to override layer styles, you had to create color symbols, add them to your icon artboard and mark the icon shape as “Mask”. This is not necessary anymore! You can easily define layer styles, the same way you define text styles and organize them in the same way. If you have not worked with layer styles yet, you can read about them in the Sketch documentation.
当符号不能覆盖图层样式时,您必须创建颜色符号,将其添加到图标画板上,然后将图标形状标记为“蒙版”。 不再需要了! 您可以使用定义文本样式的相同方法轻松地定义图层样式,并以相同的方式组织它们。 如果尚未使用图层样式,则可以在Sketch文档中阅读有关它们的信息 。
If you already have a default icon style, assign it to your simplified icon shape by selecting it from the Appearance-dropdown. If you do not have a dedicated style yet, select the desired color and create a new layer style by using the create button below the dropdown. You can now override the style with every layer style in your library or document.
如果您已经具有默认的图标样式,请从外观下拉列表中选择它,将其分配给简化的图标形状。 如果您还没有专用的样式,请选择所需的颜色,然后使用下拉菜单下方的“创建”按钮创建新的图层样式。 现在,您可以使用库或文档中的每个图层样式覆盖样式。
In the future, you will not even need to do this — there will be a tint option for symbols available soon, allowing you to tint the whole symbol with a color of your choice. I still recommend using layer styles though, since they can be part of your styleguide, they can be named and organized accordingly and be changed in one place if needed.
将来,您甚至不需要这样做-很快就会有一个用于符号的着色选项,使您可以用自己选择的颜色对整个符号进行着色。 不过,我仍然建议您使用图层样式,因为它们可以成为您的样式指南的一部分,因此可以对它们进行命名和组织,并且可以根据需要在一个位置进行更改。

结论 (Conclusion)
I am currently very happy with how my Icon setup works, it meets exactly the needs we currently have in our workflow. The best thing is, that the developers can download the icons form Zeplin directly, so I don’t even have to spend the time to select one or more artboards and click the export button. But I can also imagine, that there are different requirements for icons and illustrations that need another setup — I would love to hear what works for you and what experiences you made!
目前,我对Icon设置的工作方式非常满意,它完全可以满足我们当前在工作流程中的需求。 最好的事情是,开发人员可以直接从Zeplin下载图标,因此我什至不必花时间选择一个或多个画板并单击“导出”按钮。 但是我也可以想象,对图标和插图有不同的需求,需要另外的设置-我很想听听对您有用的东西以及您获得的经验!
Also, this is my first time publishing on medium (and anywhere else, for that matter…). So — hello world ☺️Looking forward to your feedback!
另外,这是我第一次在媒体上(以及其他任何地方……)发行。 因此,您好!世界☺️,期待您的反馈!
翻译自: https://uxdesign.cc/how-to-create-an-svg-ready-icon-library-in-sketch-a95e1a163a27
svg 素描


 3501
3501

 被折叠的 条评论
为什么被折叠?


