


 本文介绍了如何使用Figma插件来快速生成一套颜色系统,通过翻译自UXDesign的文章,读者将学习到Figma插件的安装步骤及其在设计中的应用。
figma 安装插件
In Figma, using defined styles (colors, type, effects, etc.) early and throughout a design project can have a lot of positive impact on your efficiency and output. I’m not necessarily here to sell you on using styles in Figma, but I would like to show you how to take a somewhat tedious process—setting up all the styles for a basic color system—and speed it up.
在 Figma中,在整个设计项目中及早使用定义的样式 (颜色,类型,效果等)可能会对您的效率和输出产生很多积极影响。 我不一定要在这里向您介绍在Figma中使用样式的情况,但我想向您展示如何进行一些乏味的过程-为基本颜色系统设置所有样式-并加快速度。
TL; DR (TL;DR)
This really is a simple process, but some of the steps require a fair amount of explanation. So, I wanted to include a brief TL;DR for those who don’t need all the additional detail.
这确实是一个简单的过程,但是其中一些步骤需要大量的解释。 因此,我想为那些不需要所有其他细节的人提供一个简短的TL; DR。
- Create a shape layer and duplicate it as many times as the colors needed in your color system. 创建一个形状图层,并根据颜色系统所需的颜色对其进行多次复制。
- Uniquely name each of the shapes. These names will determine the names of the color styles. 分别命名每个形状。 这些名称将确定颜色样式的名称。
- Set the color of each shape layer appropriately to the needs of your color system. 根据您的色彩系统的需要,适当设置每个形状图层的颜色。
- Select all those shapes and launch the Chroma Colors plugin to instantly generate the color styles. 选择所有这些形状并启动Chroma Colors插件以立即生成颜色样式。
Optional — select all the shapes and place them into an Auto Layout. With the shapes still selected, launch the Smart Text plugin to add a text label with the color name and hex values.
可选-选择所有形状并将其放入“自动布局”。 在仍然选择形状的情况下,启动“智能文本”插件以添加带有颜色名称和十六进制值的文本标签。
That’s pretty much it. Continue reading for a more in-depth description.
就是这样。 继续阅读以获得更深入的描述。
If you’d rather see how this is done via video, I recently posted a video on YouTube showing the same process.
如果您希望通过视频了解如何完成此操作,我最近在YouTube上发布了一个视频,展示了相同的过程。
Note: I’m on a Mac and some of the keyboard shortcuts mentioned are platform specific. If you are on Windows, I believe you can swap out “control” for “command”.
注意 :我使用的是Mac,提到的某些键盘快捷键是特定于平台的。 如果您使用Windows,我相信您可以将“控制”换成“命令”。
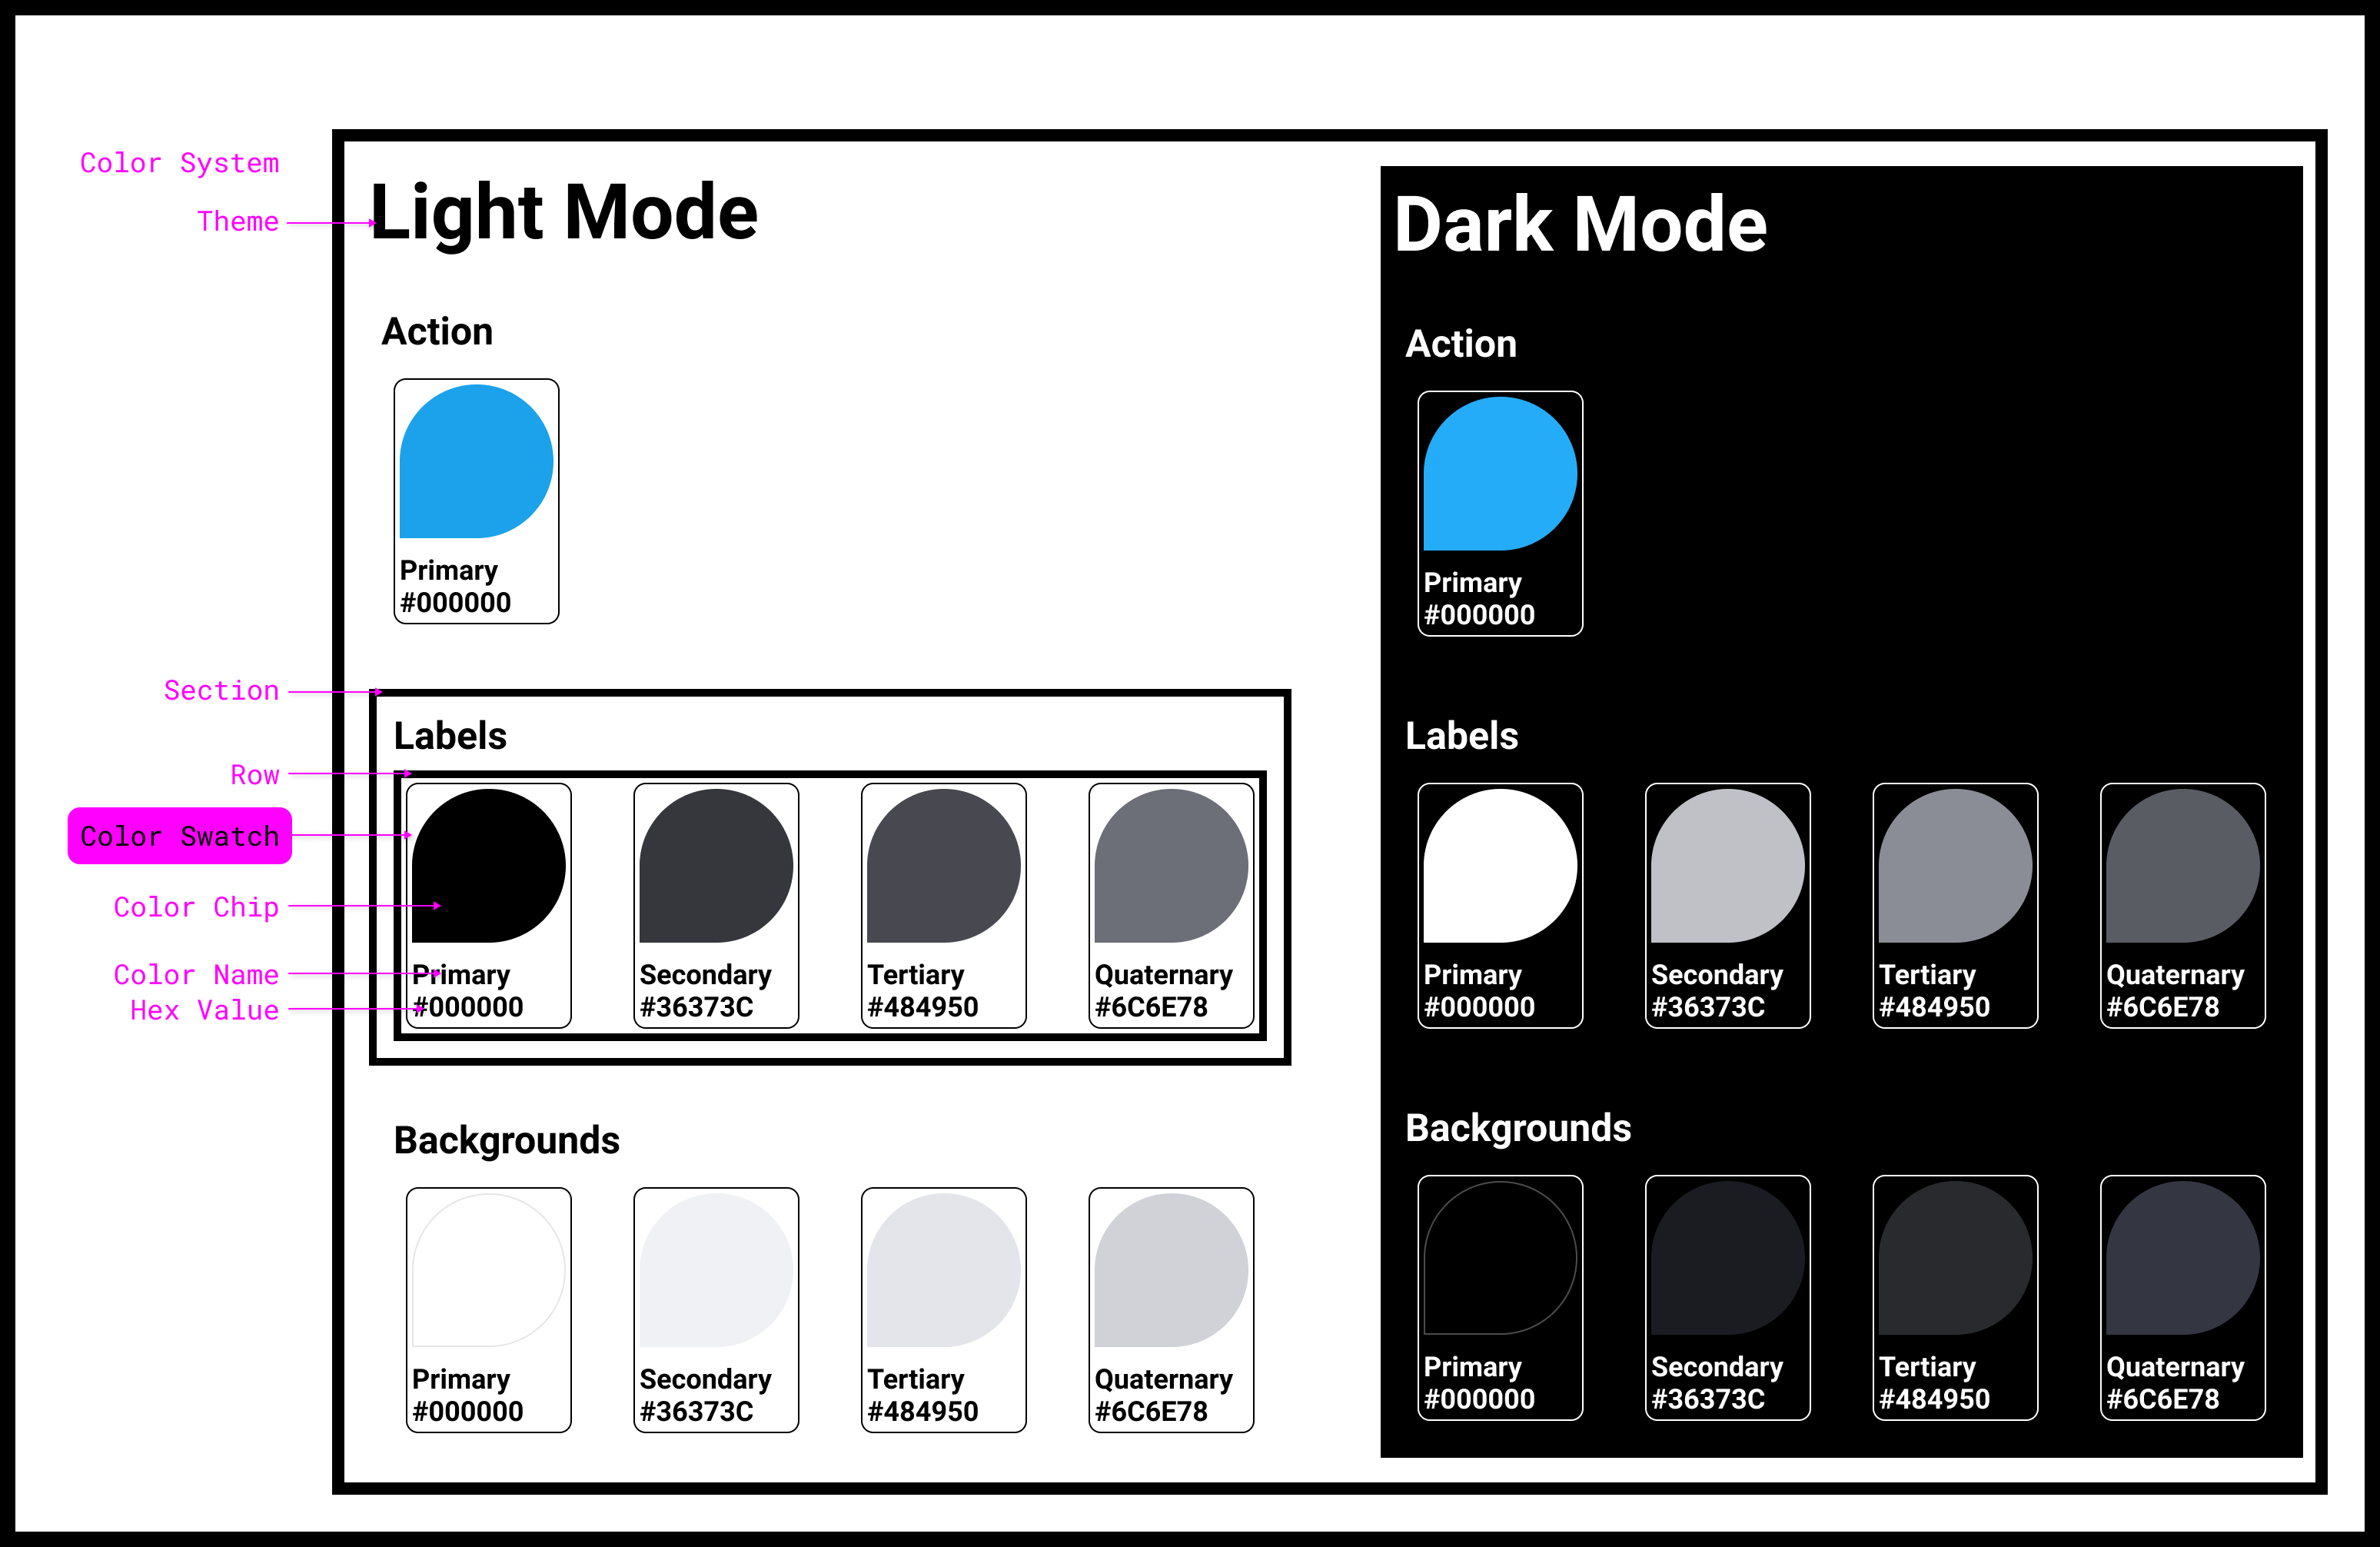
Not to overcomplicate things right out of the gate, but to clarify some terms I use throughout the article, you can refer to the graphic below to see what I mean by “Color Swatch” or “Color Chip”.
并不是为了使事情复杂化,而是要澄清我在整篇文章中使用的一些术语,您可以参考下图,了解“色板”或“色片”的含义。
OK. Still here? Let’s get started.
好。 还在? 让我们开始吧。
步骤0 —安装插件 (Step 0 — Install Plugins)
Make sure you have these Figma Plugins installed:
确保已安装以下Figma插件:
This plugin will allow us to generate dynamic text labels that describe our colors by name and hex values.
该插件将使我们能够生成动态文本标签,以按名称和十六进制值描述我们的颜色。
This plugin allows us to very quickly generate and name an entire set of color styles.
这个插件使我们能够非常快速地生成并命名整套颜色样式。
第1步-创建颜色芯片和颜色色板 (Step 1 — Create a Color Chip and Color Swatch)
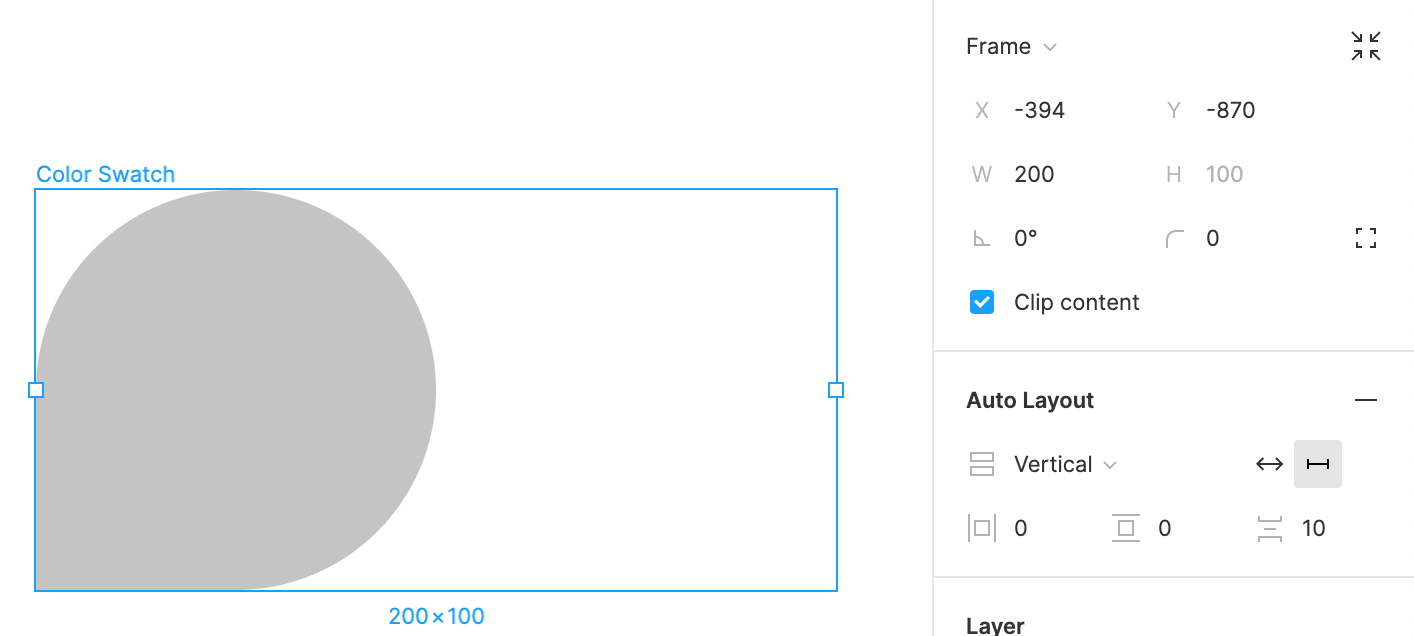
Create a shape for your Color Chip. It can be any shape you want. I’m going to use a square with 3 rounded corners.
为您的色卡创建形状。 可以是您想要的任何形状。 我将使用带有3个圆角的正方形。
While the shape is selected, place it into an Auto Layout frame (shift + A). Make sure the Auto Layout is set to vertical. This will allow us to later add our descriptive labels directly below the color chip without much fuss. Optionally, you can set a fixed width to about 200.
选择形状后,将其放置在“ 自动布局”框架中(Shift + A)。 确保自动版面设置为垂直。 这样一来,我们以后便可以在色卡下面直接添加描述性标签,而不必大惊小怪。 (可选)您可以将固定宽度设置为大约200。
Name this Auto Layout frame “Color Swatch”
将此自动版式框架命名为“ Color Swatch ”
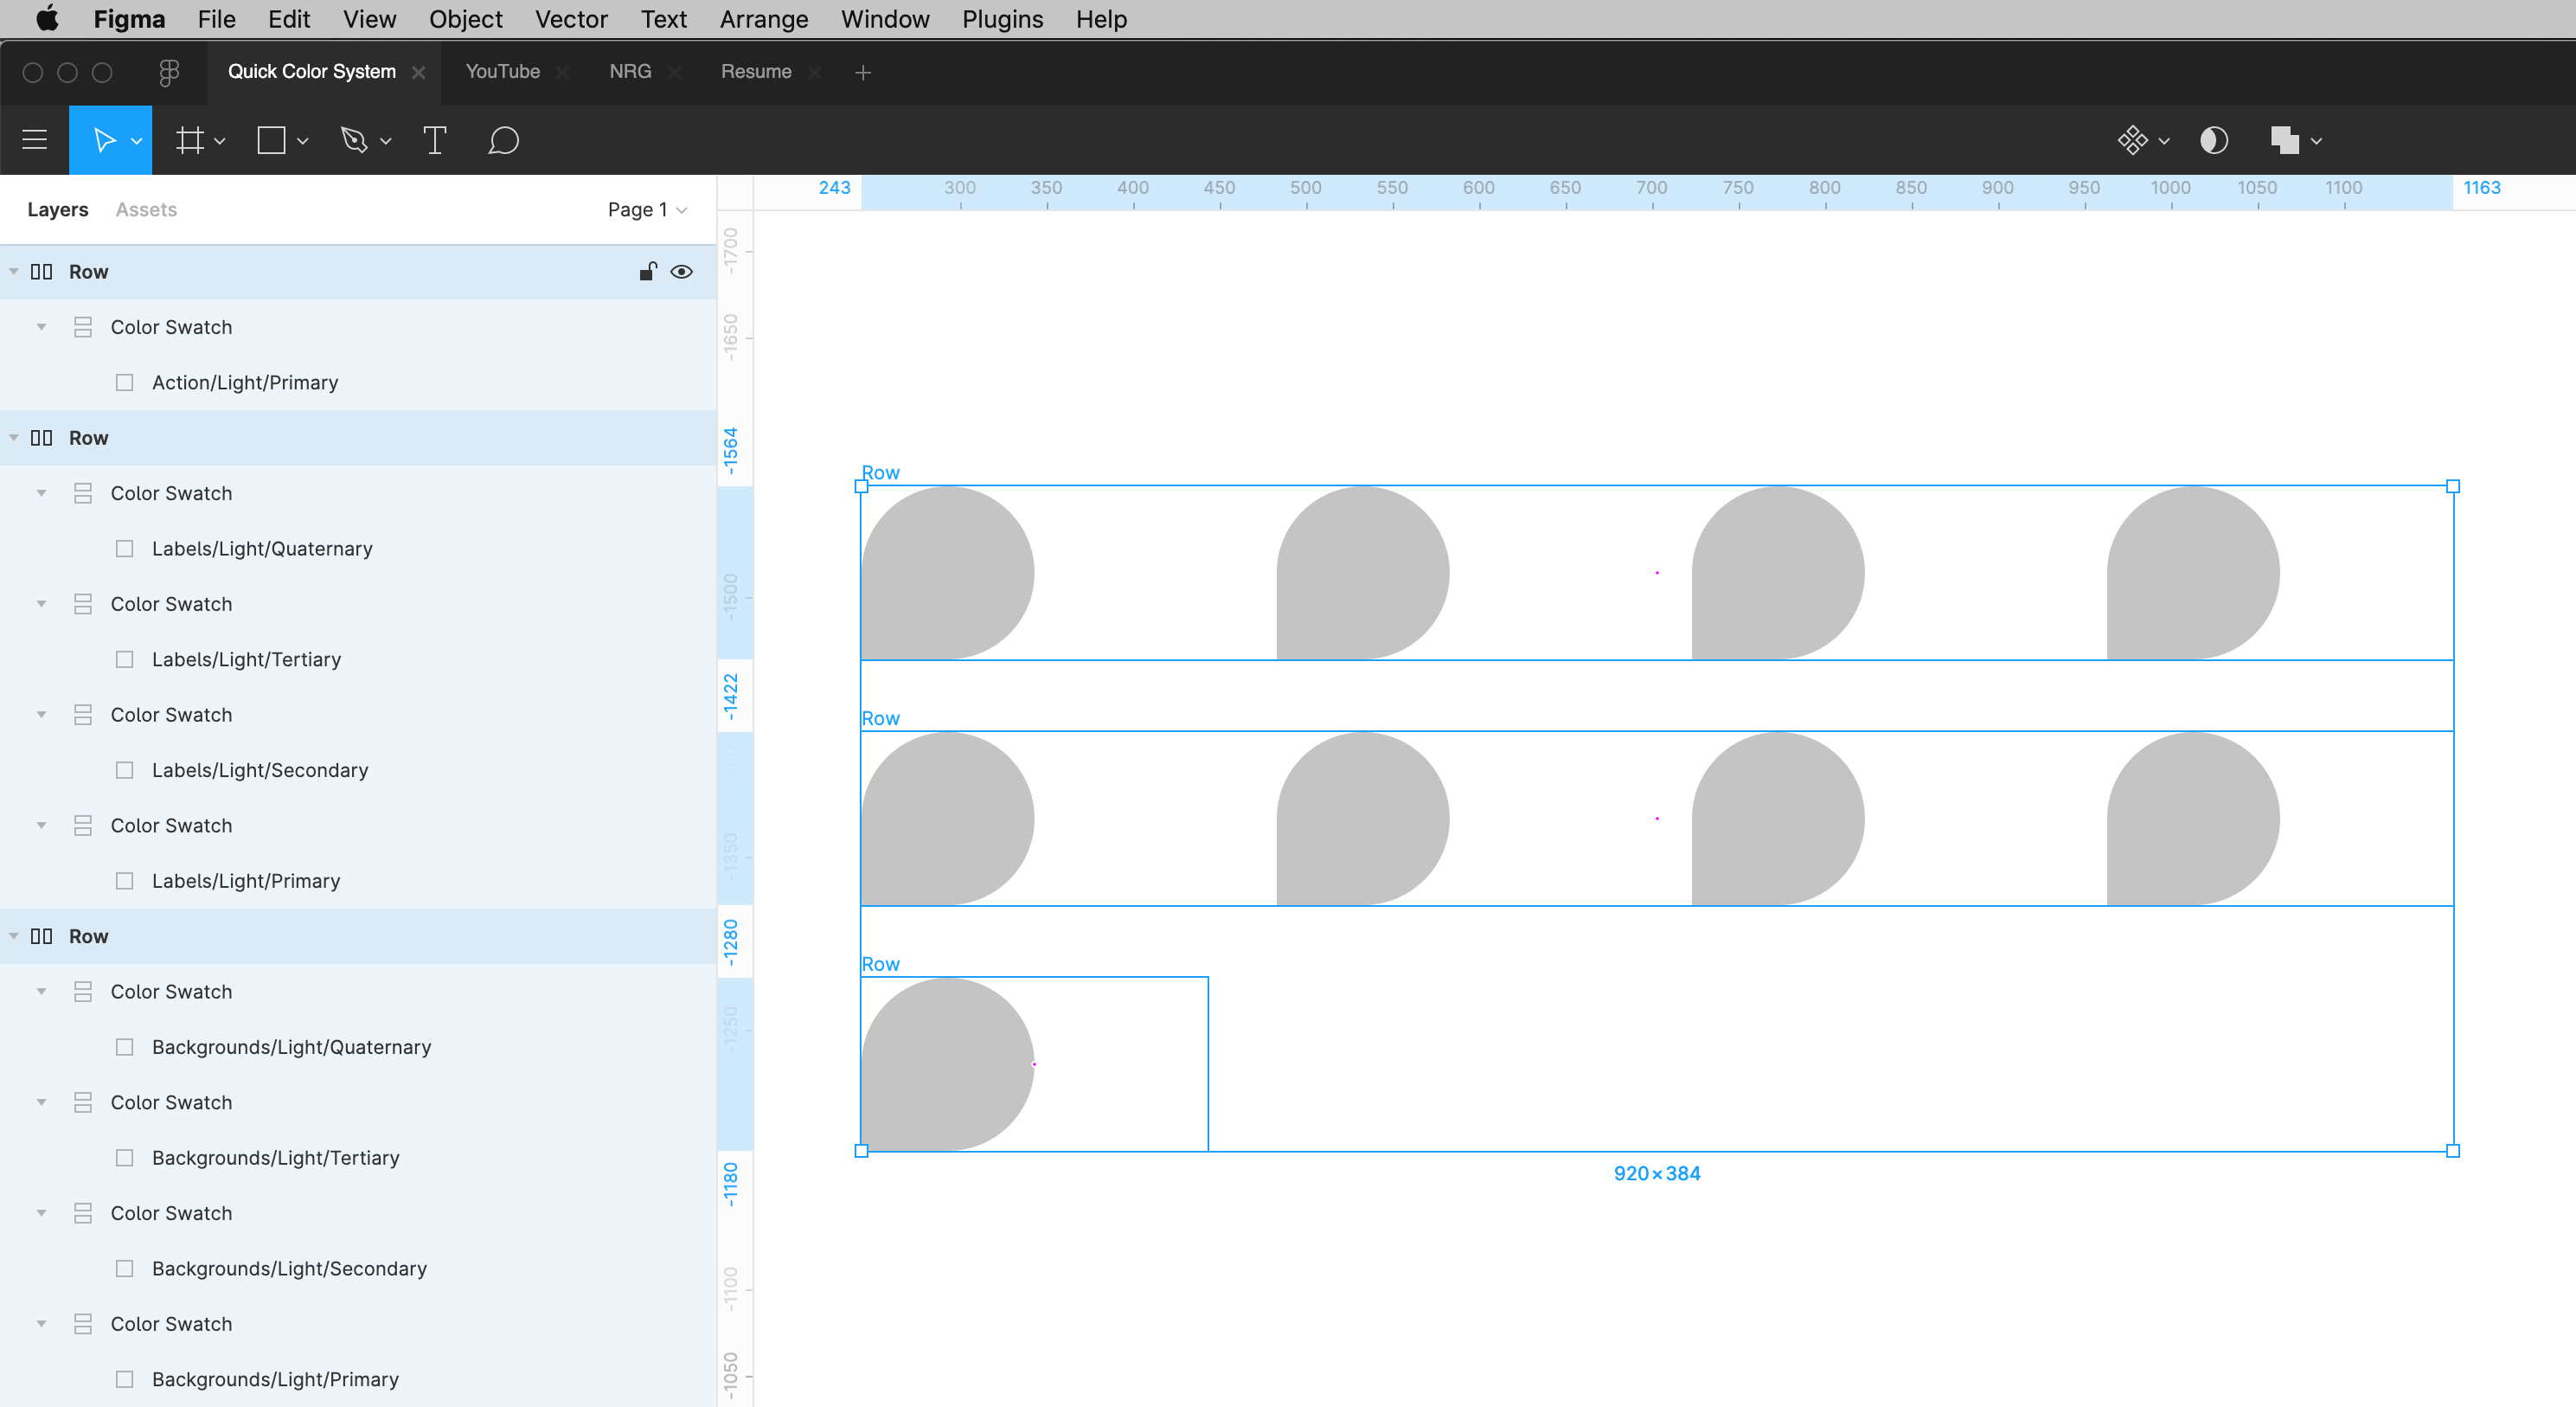
第2步-复制并重命名色板 (Step 2 — Duplicate and Rename Swatches)
Make 4 duplicates of the Color Swatch frame
制作4个颜色样本框的副本
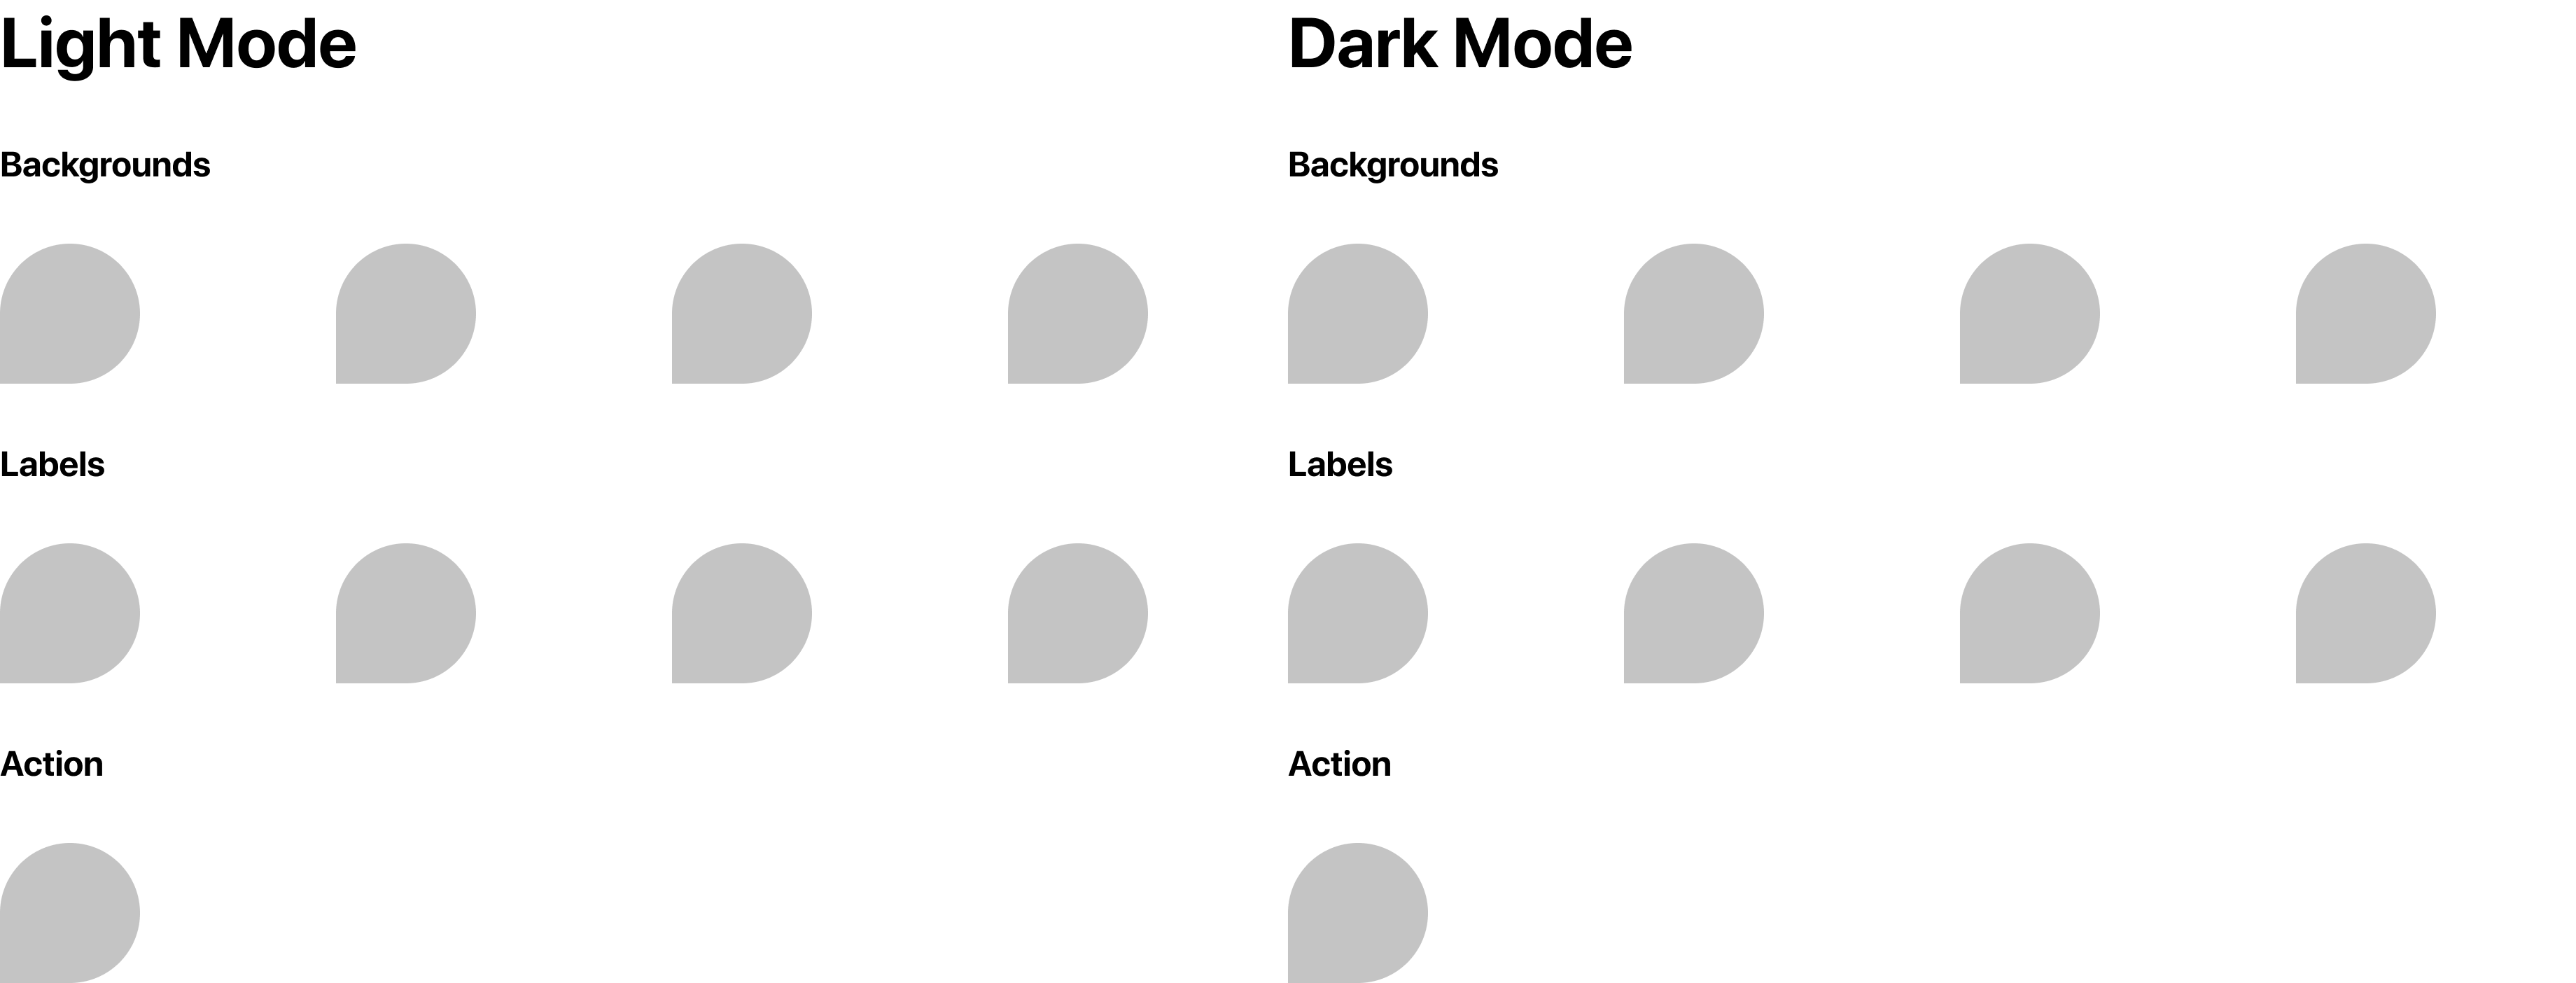
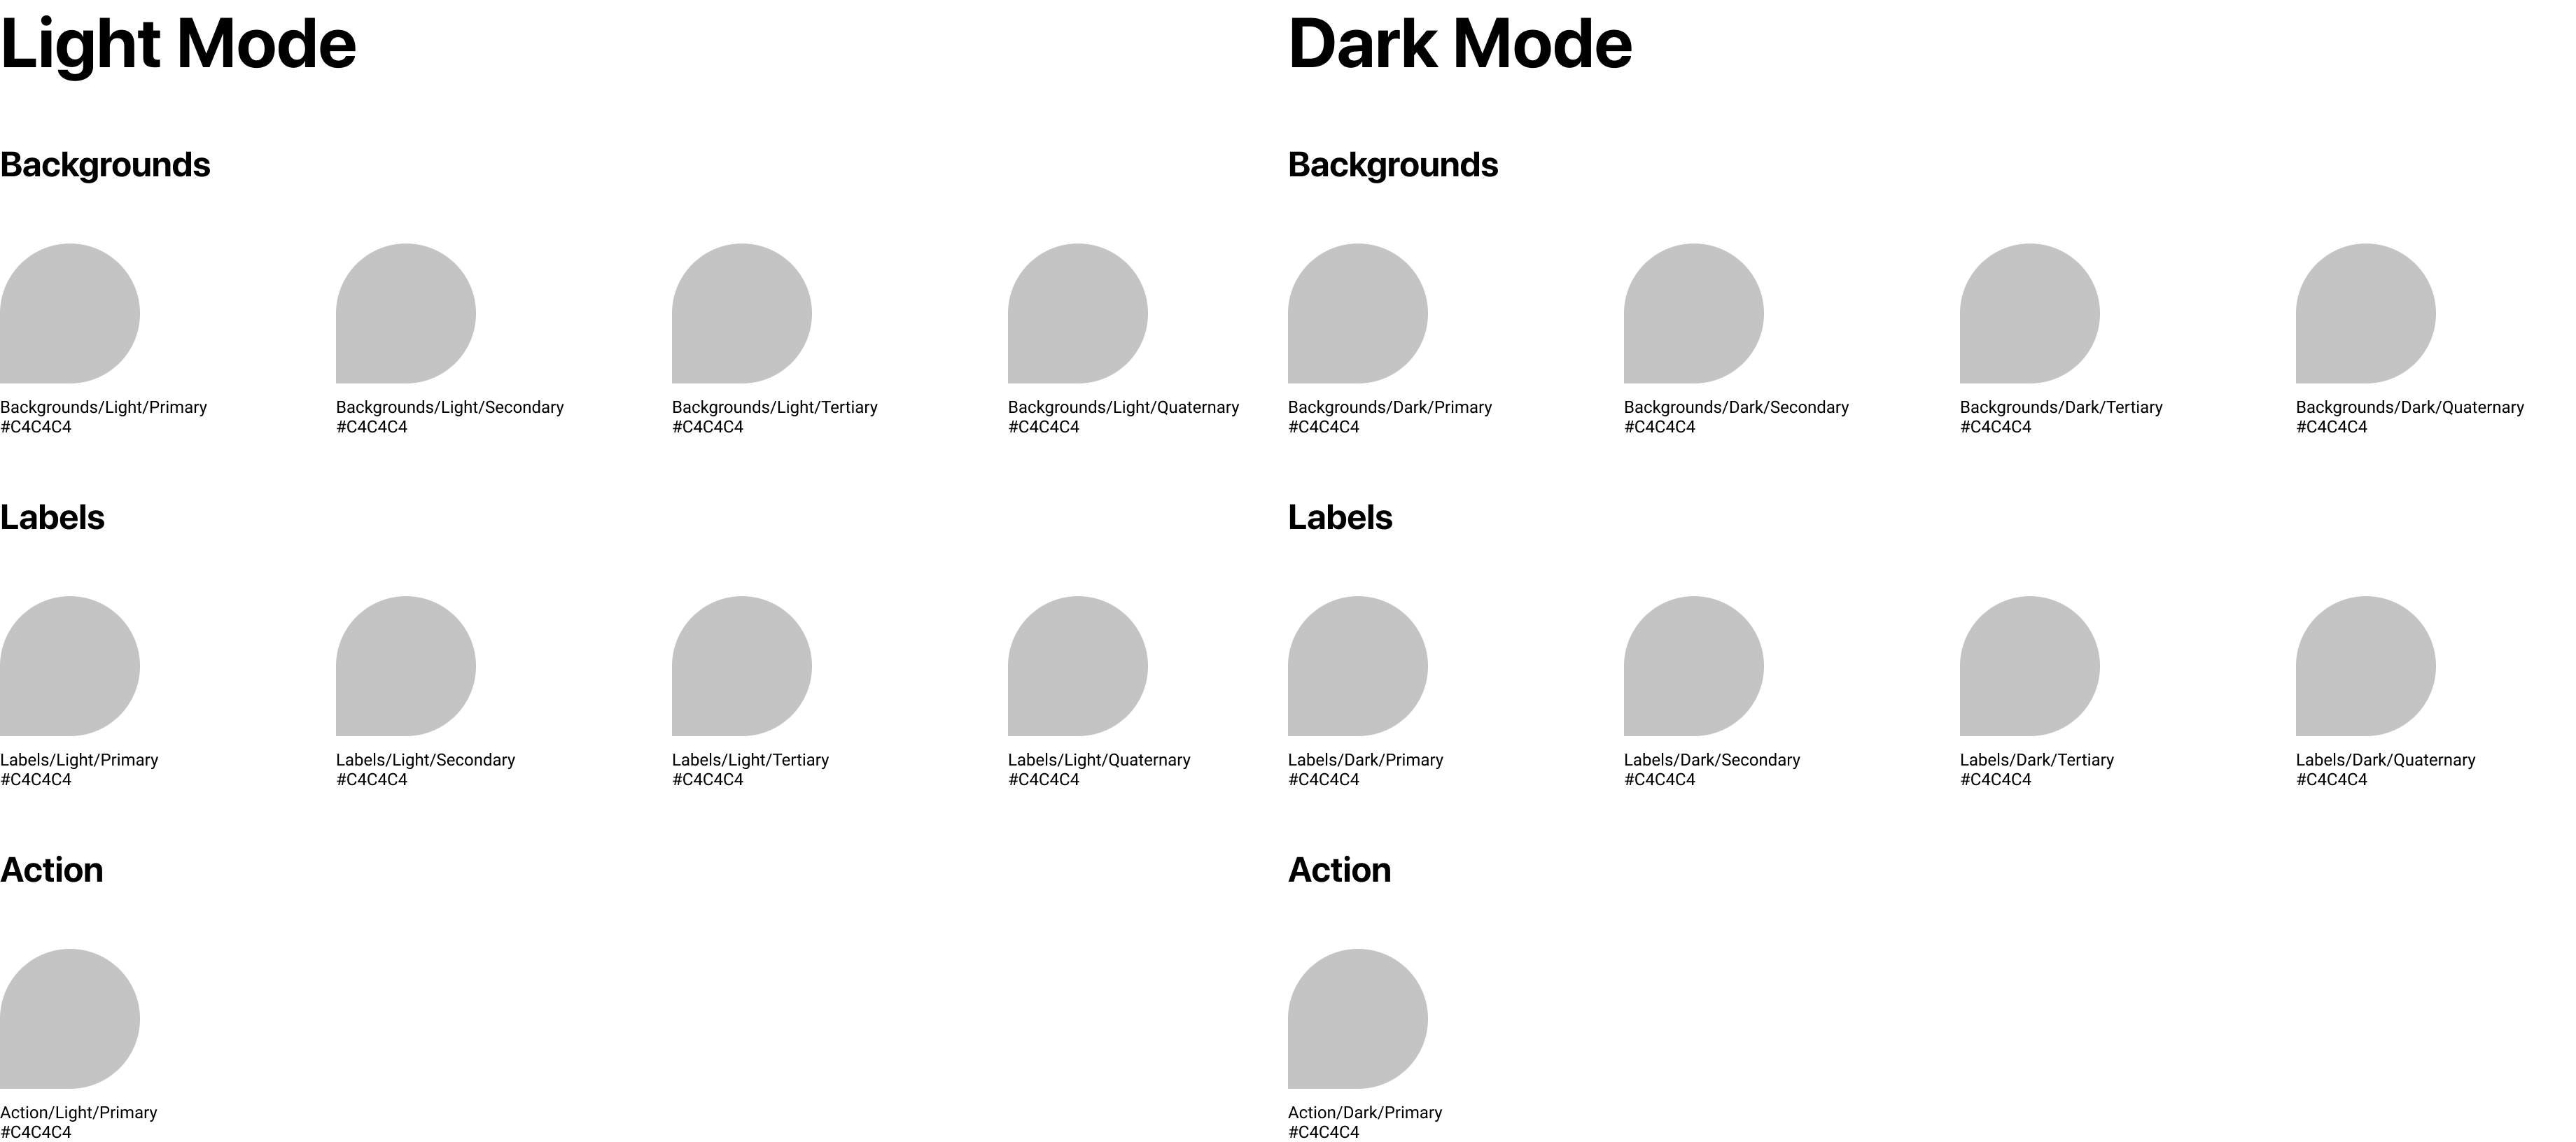
Inside each Color Swatch frame, starting from left to right, rename the Color Chip layers: “Primary”, “Secondary”, “Tertiary” and “Quaternary”
在每个色样框架内,从左到右,重命名颜色芯片图层:“主要”,“次要”,“第三”和“第四”

Make sure these 4 Color Swatch frames are grouped and aligned horizontally. You can easily do this by selecting all the frames and hitting command + A. This will create a new Auto Layout frame. Let’s name this new frame “Row”.
确保将这4个色板框架进行分组并水平对齐。 您可以通过选择所有框架并单击命令+ A轻松完成此操作。这将创建一个新的“自动布局”框架。 让我们将此新框架命名为“ Row ”。
Duplicate this Row 3 times.
将此行重复3次。
Now, let’s add some additional context to these Color Chip layer names. These descriptive names will be important when we use the Chroma Colors plugin to generate our color styles in Step 4. For each Color Chip layer name in the first Row, prefix them with “Backgrounds/Light/“. For the next Row, do the same but prefix them with “Labels/Light/“. For the last row, you can delete all but the first Color Swatch frames and rename it to “Action/Light/Primary”
现在,让我们为这些色卡图层名称添加一些其他上下文。 当我们在第4步中使用Chroma Colors插件生成我们的颜色样式时,这些描述性名称将非常重要。对于第一行中的每个Color Chip图层名称,请在它们前面添加“ Backgrounds / Light /”。 对于下一行,执行相同的操作,但在它们前面加上“ Labels / Light /”。 对于最后一行,您可以删除除第一个色样帧以外的所有帧,并将其重命名为“ Action / Light / Primary”
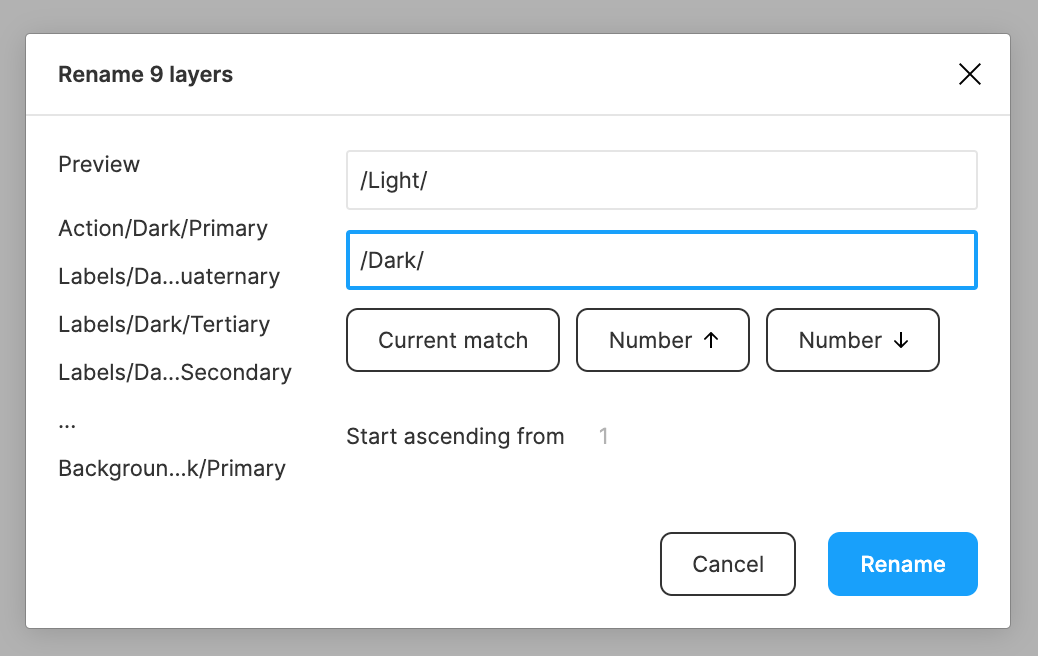
- We now have all of our layers created and named for our light mode theme. Let’s duplicate this entire set for our dark mode and with each Color Chip layer name, replace “dark” with “light”. 现在,我们已经创建了所有图层,并以灯光模式主题命名。 让我们将整个集合复制为暗模式,并使用每个颜色芯片图层名称,将“暗”替换为“亮”。
- Optional — I’m going to add some additional labels for further visual context 可选-我将添加一些其他标签以提供进一步的视觉环境
Tip: to quickly rename multiple layers at the same time, select more than one layer and hit command + R. You can click “Current Name” to include the current layer name as well.
提示 :要同时快速重命名多个图层,请选择多个图层并按Command +R。您也可以单击“当前名称”以包括当前图层名称。
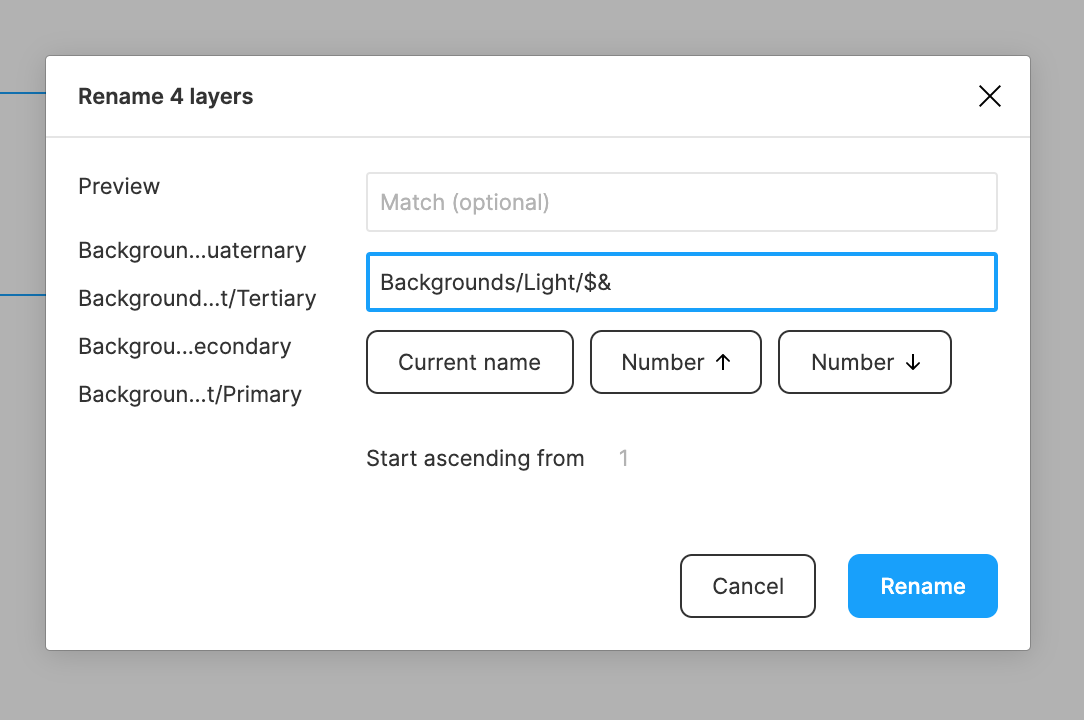
Tip: You can use the same rename dialog (command + R) to quickly ‘match’ and replace text.
提示 :您可以使用相同的重命名对话框(命令+ R)快速“匹配”并替换文本。
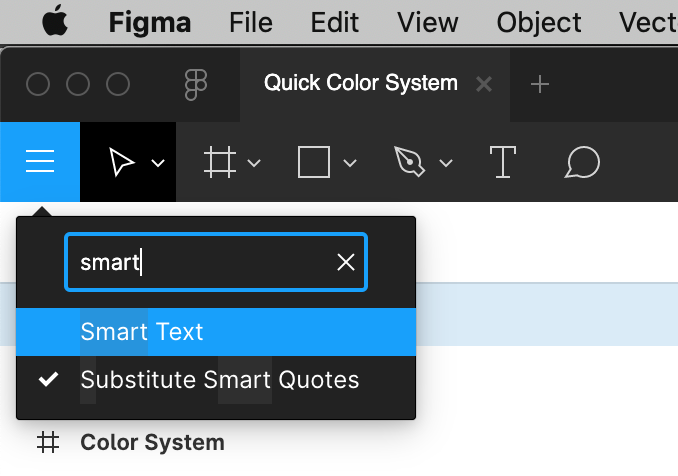
步骤3 —使用智能文本插件添加标签 (Step 3 — Add Labels with Smart Text Plugin)
- Make a selection of all the color chip layers 选择所有彩色芯片层
- Open the Smart Text plugin 打开智能文本插件
- Insert “Layer Name” and “Fill Color” 插入“图层名称”和“填充颜色”
- Make sure to include a line break for clarity 确保包含换行符以保持清晰
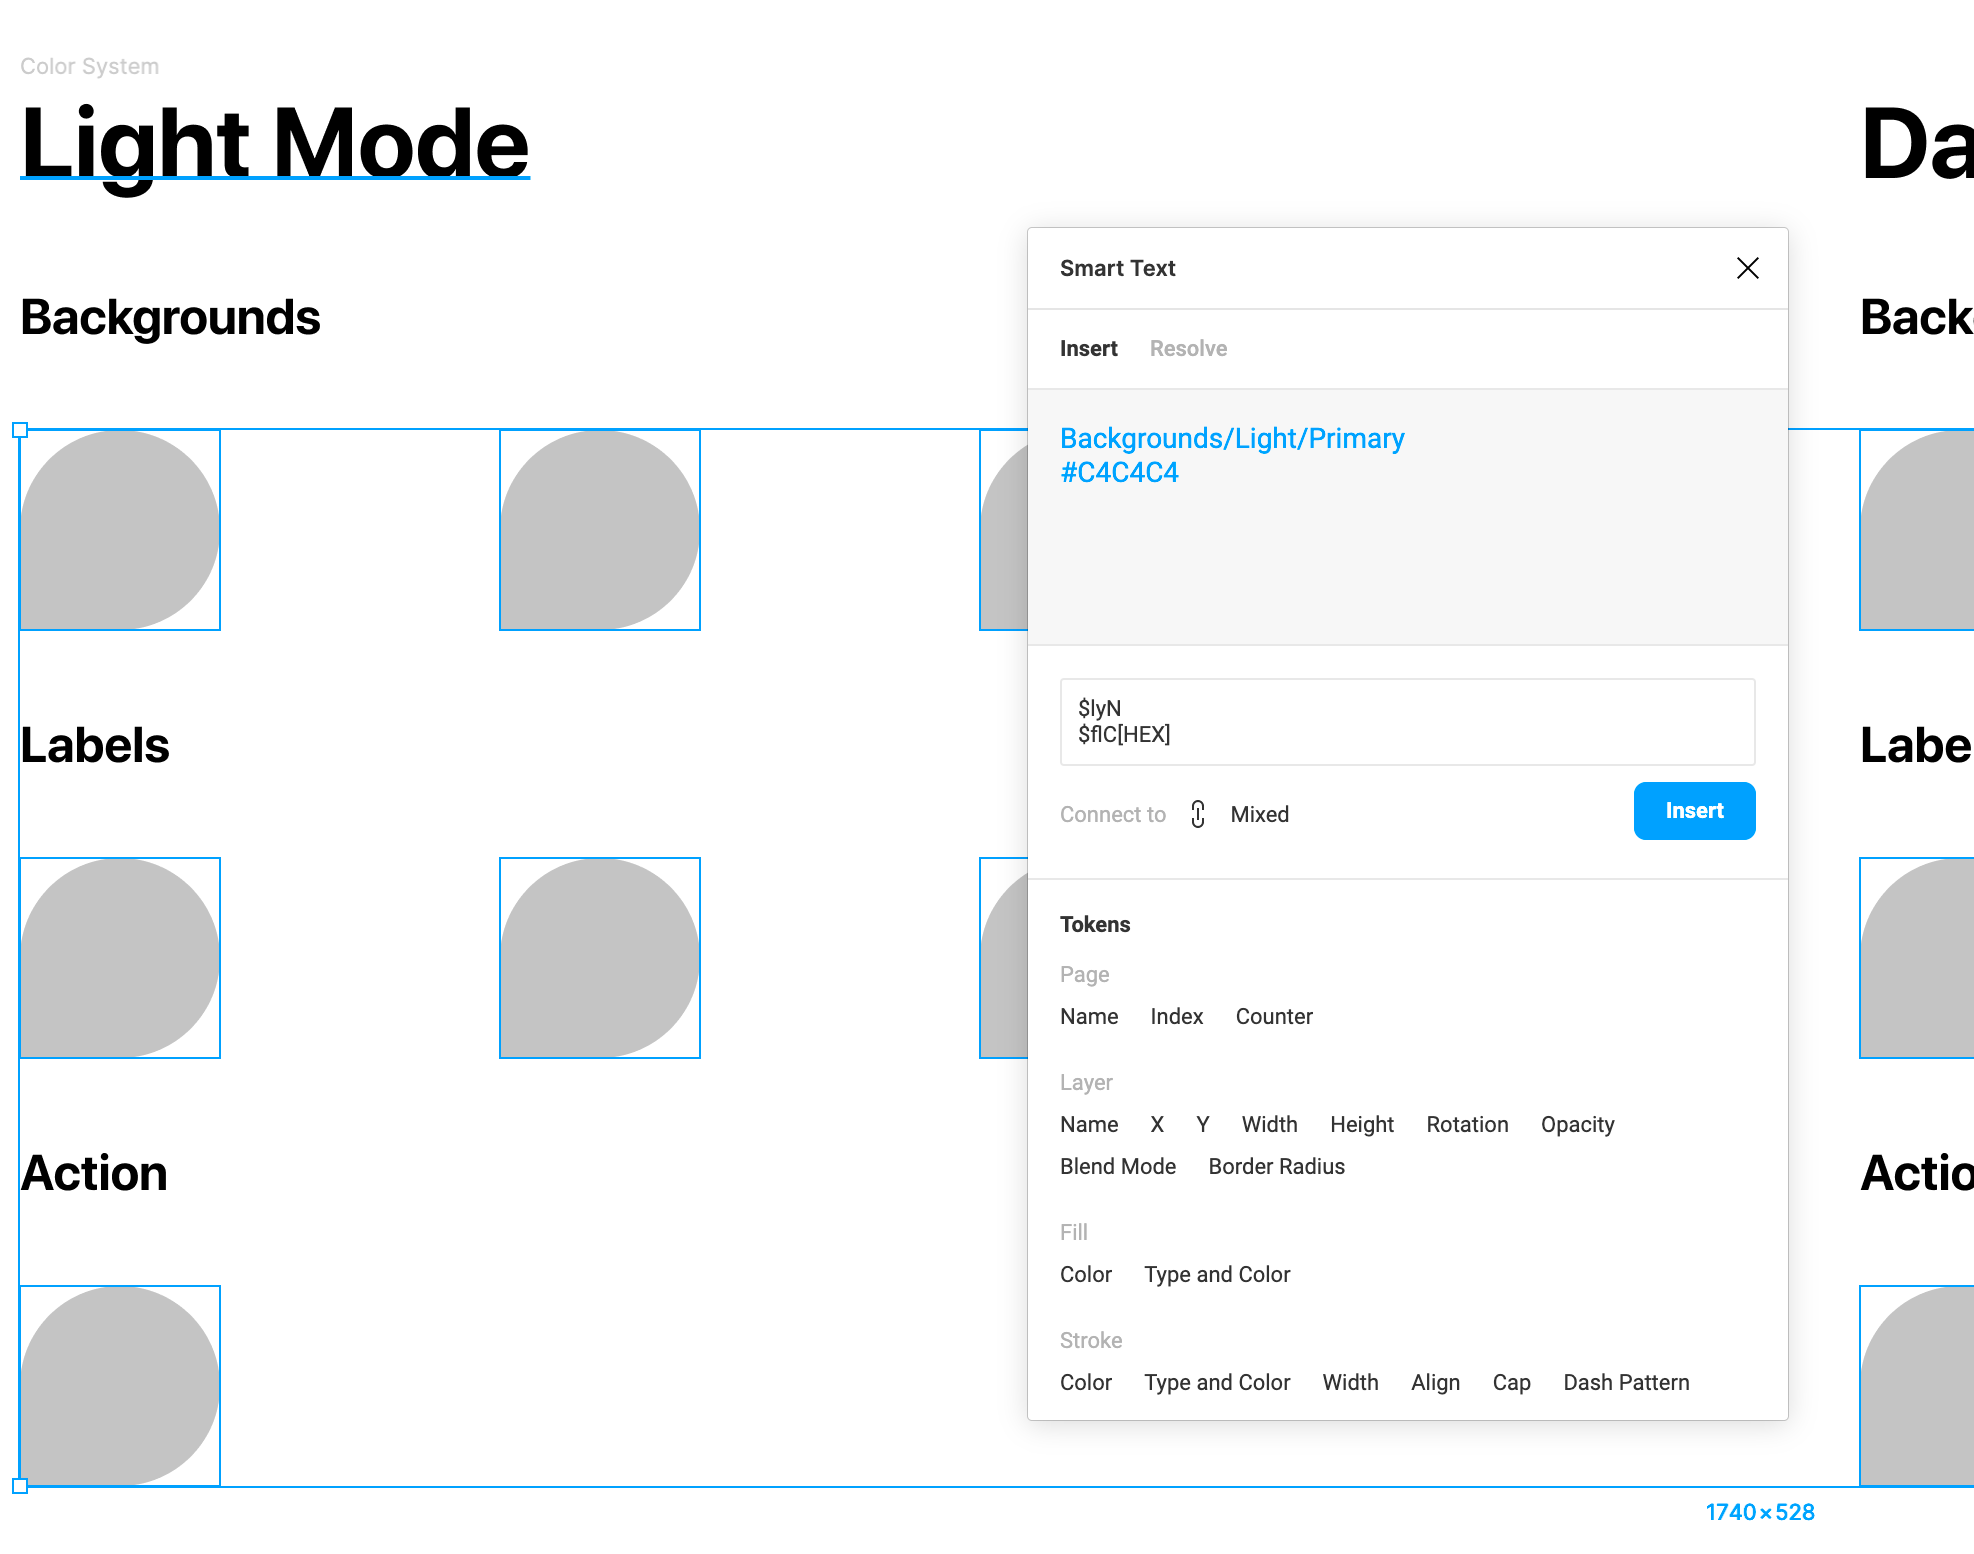
Tip: You can quickly access all of your plugins by hitting command + / and searching for the plugin by name
提示 :您可以通过按命令+ /并按名称搜索插件来快速访问所有插件
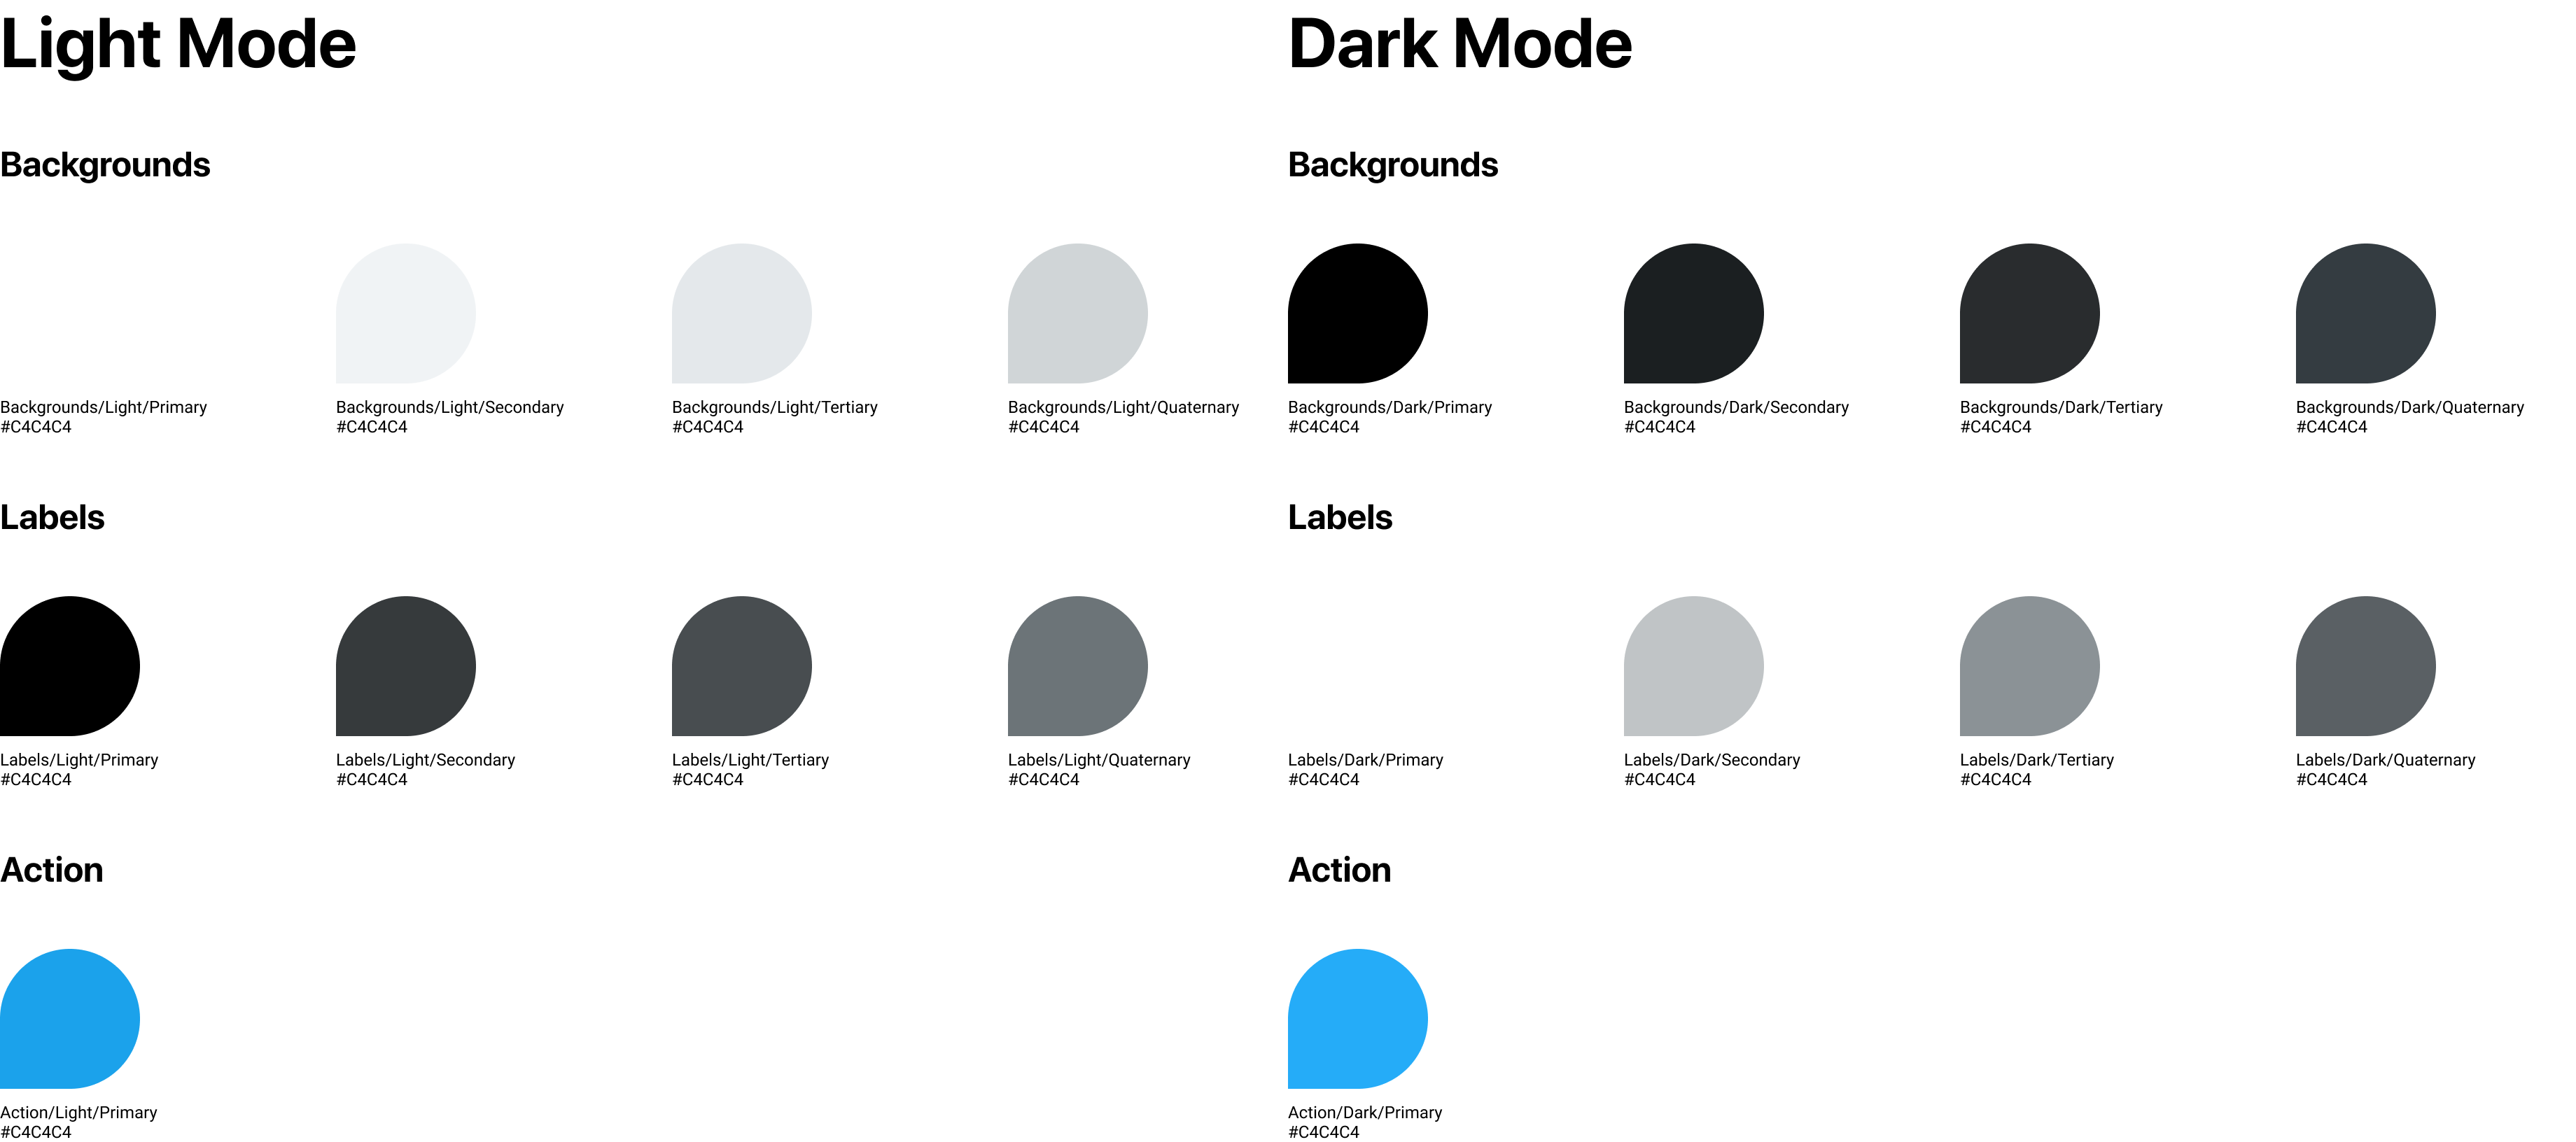
步骤4 —拨入颜色并创建样式 (Step 4 — Dial in the Colors and Create Styles)
We now have all of the necessary elements created for our Color System but all of our colors are still the same! Let’s fix that.
现在,我们已经为颜色系统创建了所有必要的元素,但是我们所有的颜色仍然相同! 让我们修复它。
- Adjust the color of each layer appropriately for your color system — including both the light and dark themes. 根据您的色彩系统调整每一层的颜色-包括浅色和深色主题。
Tip: You can quickly lighten or darken a color by hitting the up or down arrows (also, try with the shift key) while the hex value is highlighted.
提示 :在突出显示十六进制值的同时,您可以通过按向上或向下箭头(也请尝试使用Shift键)来快速变暗或变暗。
- Once we have have our chip colors dialed in, select each Color Chip and use the plugin Chroma Colors to generate all of your color styles. 一旦我们拨入了色块的颜色,请选择每个色块,然后使用插件Chroma Colors生成所有颜色样式。
Note: The Chroma Colors plugin has no UI. You simply select your colored layers, and launch the plugin. It will make a new color style with the same name and color of any layer you had selected when running the plugin. It’s pretty awesome.
注意 :Chroma Colors插件没有UI。 您只需选择您的彩色图层,然后启动插件。 它将使用与您在运行插件时选择的任何层相同的名称和颜色来创建新的颜色样式。 太棒了
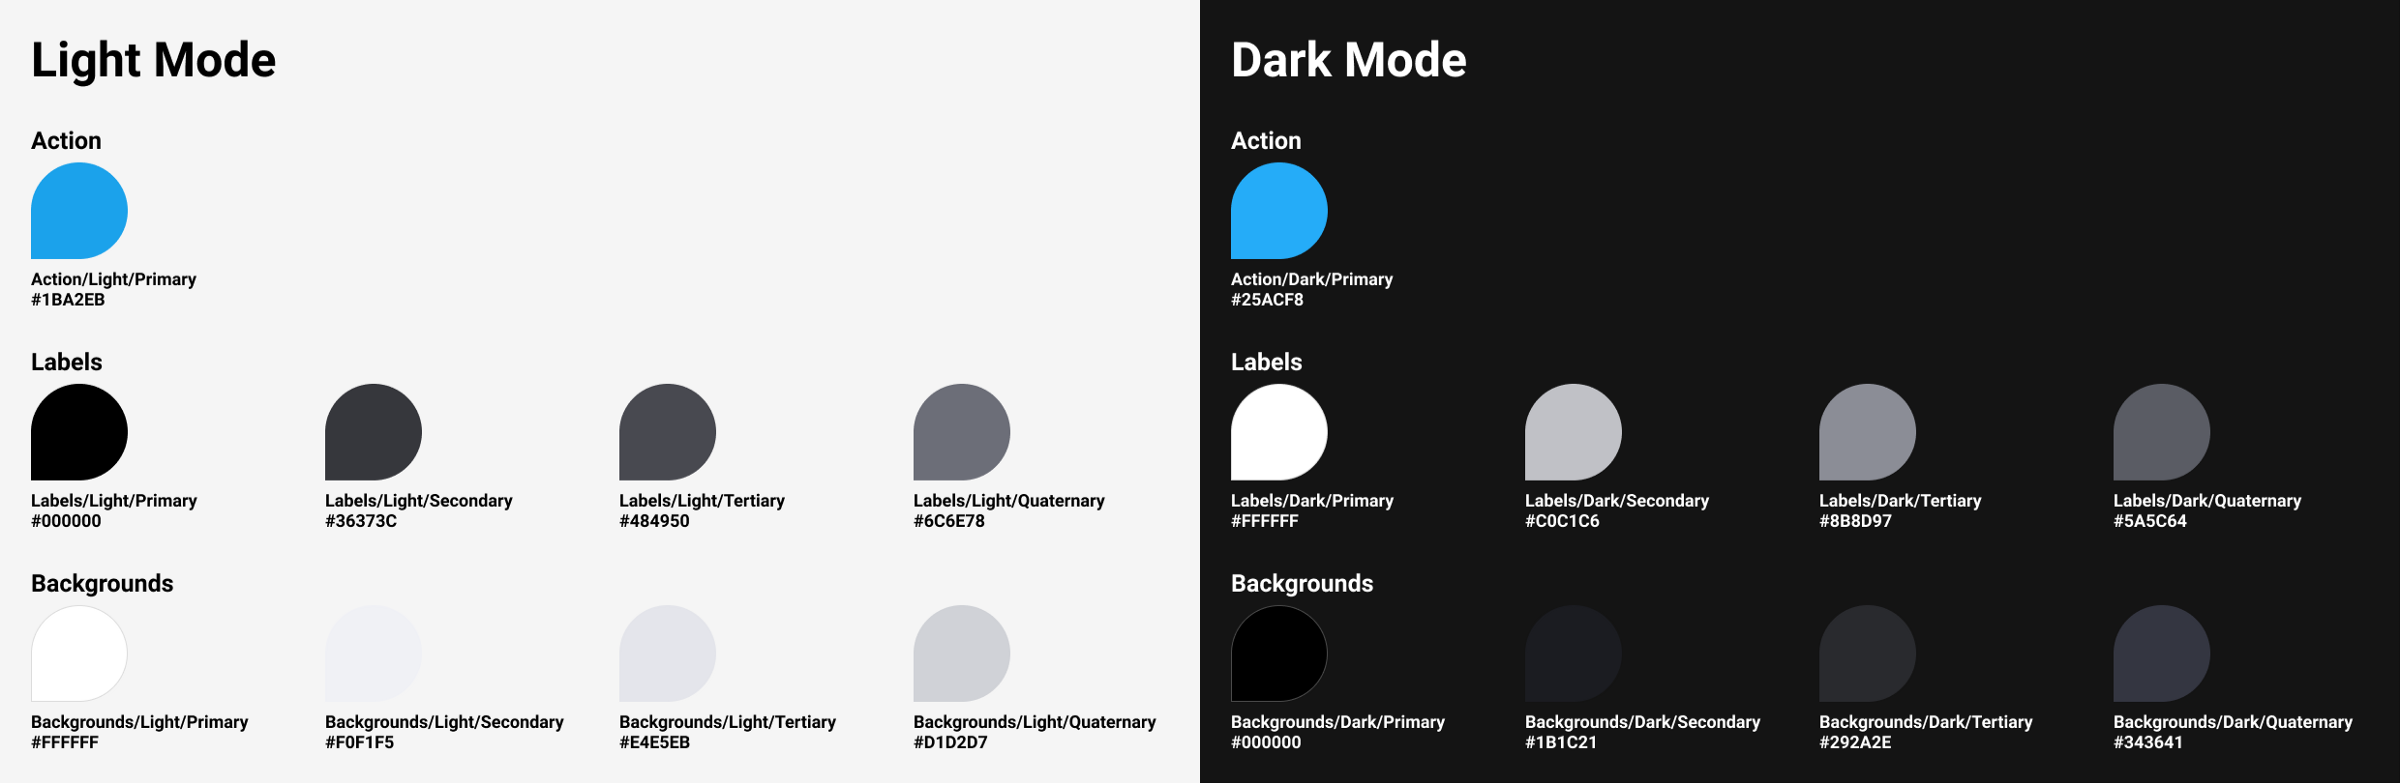
The color system that I’m creating here is pretty basic but can be extended as necessary. For the Light Mode theme, I’ll set the four background colors from white to increasingly darker grays and the label colors from black to increasingly lighter grays. For the Dark Mode theme, it will be the reverse. The action colors for both Light and Dark Modes are very similar blues.
我在这里创建的颜色系统非常基本,但是可以根据需要进行扩展。 对于“光模式”主题,我将四种背景颜色从白色设置为逐渐变深的灰色,将标签颜色从黑色设置为逐渐变浅的灰色。 对于黑暗模式主题,它将是相反的。 亮模式和暗模式的动作颜色都是非常相似的蓝色。
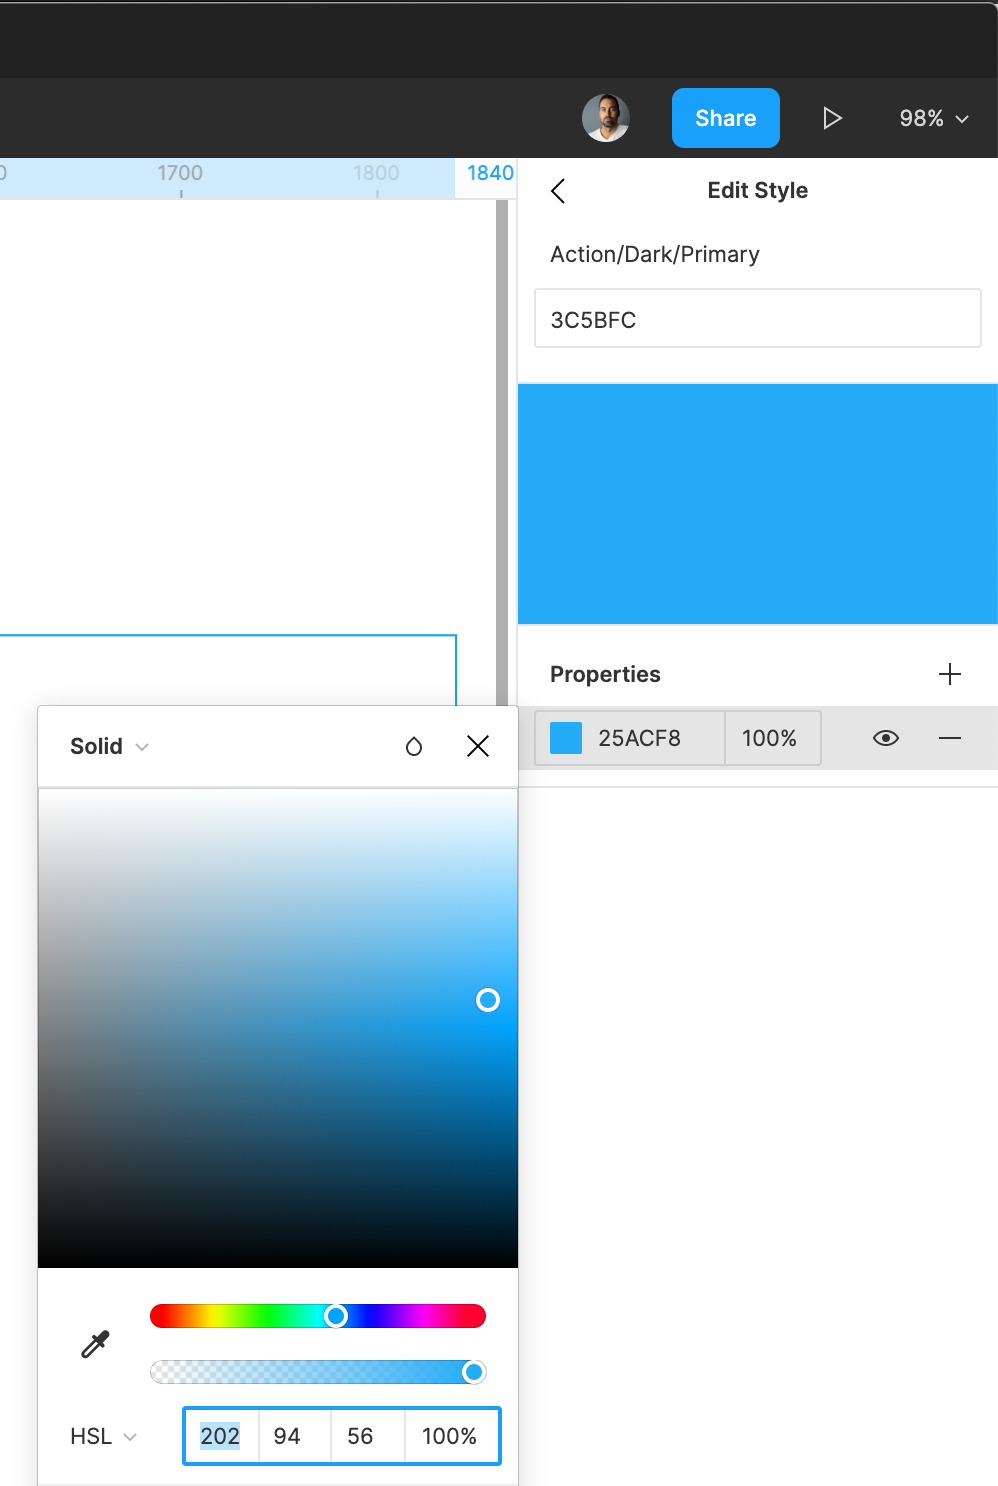
This article is not really about color theory, or helping you decide exactly what colors to choose for your system. That said, one thing I did that you may consider trying is bringing a bit of the hue from your action colors into the grays throughout your system.
本文的内容与颜色理论无关,也不是帮助您确定要为系统选择哪种颜色。 就是说,我做过的一件事,您可能会考虑尝试,是将整个操作系统中动作色的色调变成灰色。
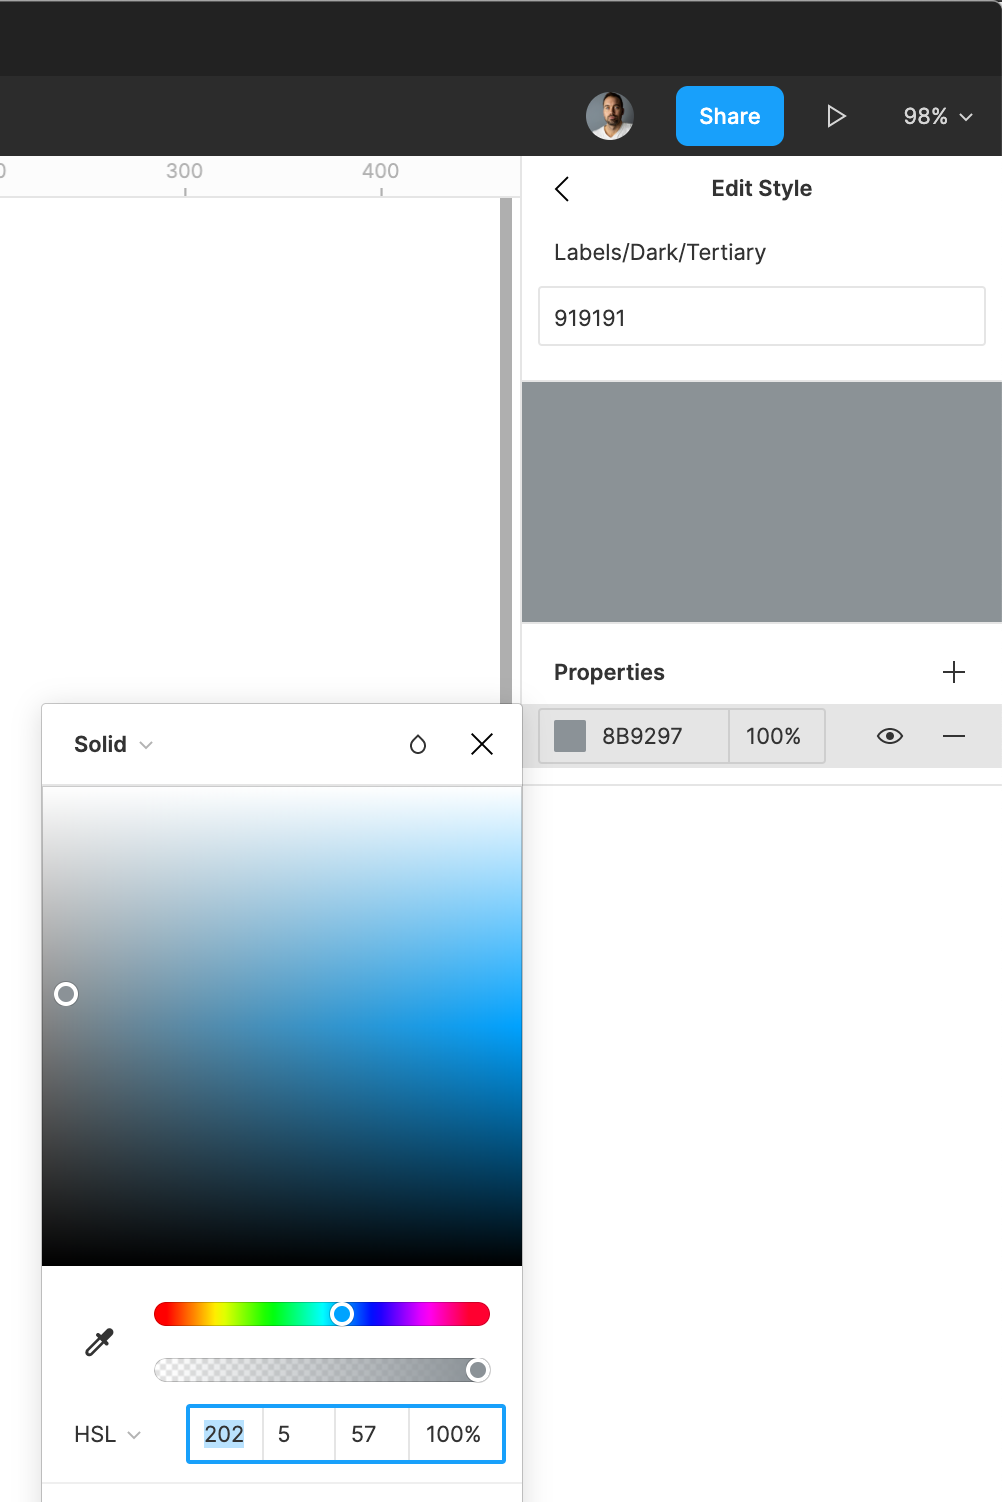
For example, the Hue (the H in HSL) of Action/Dark/Primary is 202. So in Labels/Dark/Tertiary I set the Hue to 202 as well and added just a bit (somewhere between 3% and 10%) of Saturation (the S in HSL).
例如,Action / Dark / Primary的Hue(HSL中的H)为202。因此,在Labels / Dark / Tertiary中,我也将Hue设置为202,并添加了一点(介于3%和10%之间)饱和度(HSL中的S)。
And that’s it. Hopefully my instructions were remotely clear and you now have a basic color system set up in Figma.
就是这样。 希望我的说明很清楚,现在您已经在Figma中建立了基本的色彩系统。
You can use these color styles in your layers, components, screens and pages. And if it turns out blue was not the right action color for this project, you now have a single place to make color adjustments and they will instantly propagate throughout your entire project.
您可以在图层,组件,屏幕和页面中使用这些颜色样式。 如果发现蓝色不是该项目的正确操作颜色,那么您现在可以在一个地方进行颜色调整,并且它们会立即传播到整个项目中。
Give it a shot and let me know what you think. Let me know if you have an even better way!
试一试,让我知道您的想法。 让我知道您是否有更好的方法!
翻译自: https://uxdesign.cc/use-figma-plugins-to-quickly-generate-a-color-system-7cd2d32bd18b
figma 安装插件


 6824
6824

 被折叠的 条评论
为什么被折叠?
被折叠的 条评论
为什么被折叠?
 到【灌水乐园】发言


