


在之前的博客文章中 ,我们已经使用twilio构建了一个用于视频通话的React Native Android应用。 这篇文章的主要目的是向您提供技巧和一些最佳的React Native实践,这将使您和您的团队受益于构建React Native项目。 在构建复杂的React Native应用程序时,其中一些技巧将非常有用。 (In our earlier blog post, we had built a React Native Android app for Video calls using twilio. The main objective of this post is to provide you with tips and some of the best React Native practices which will benefit you and your team in building your React Native projects. Some of these tips will be extremely helpful while building the complex React Native apps.)
Assuming that you have followed our earlier blog post and created the app, we will proceed further by improving the same app by suggesting 8 best practice tips for React Native Development.
假设您已经关注了我们先前的博客文章并创建了该应用程序,那么我们将通过为React Native Development提供8个最佳实践提示来改进同一个应用程序。
提示1:检查互联网连接 (Tip 1: Check internet connectivity)
When you are building your React Native app that needs to pull assets or data from a server, there is a possibility that some users may use the application in an offline environment i.e., without an internet connection. There is a chance that the app might crash. So, for better user experience, we can handle this by checking for an internet connection and notifying the user if not.
当您构建需要从服务器提取资产或数据的React Native应用程序时,某些用户可能会在离线环境(即,没有Internet连接)中使用该应用程序。 该应用可能会崩溃。 因此,为了获得更好的用户体验,我们可以通过检查互联网连接并通知用户是否连接来处理此问题。
This can be done using a package called react-native-offline. Make the following changes to use react-native-offline within your app.
可以使用称为react-native-offline的包来完成。 进行以下更改以在您的应用程序中使用react-native-offline。
Step-1: Create a file TwilioVideo.js within your app. Place the existing code for Video calls from App.js into TwilioVideo.js.
步骤1:在您的应用中创建一个文件TwilioVideo.js 。 将来自App.js的视频通话的现有代码放入TwilioVideo.js。
Step-2:Install the react-native-offline package using the npm package manager. For that execute the following commands within the project directory.
第2步:使用npm软件包管理器安装react-native-offline软件包。 为此,请在项目目录中执行以下命令。
npm install react-native-offline --save npm install @react-native-community/netinfo --save cd ios pod installThen modify the App.js file like shown below.
然后,如下所示修改App.js文件。
App.js:
App.js:
import React from 'react';
import TwilioVideo from "./TwilioVideo";
import { NetworkProvider } from 'react-native-offline';
const App = () => (
 <>
   <NetworkProvider>
     <TwilioVideo/>
   </NetworkProvider>
 </>
);
export default App;
In the App.js file, we are importing TwilioVideo component from TwilioVideo.js file.
在App.js文件中,我们将从TwilioVideo.js文件导入TwilioVideo组件。
We must also wrap the twilio component within NetworkProvider as shown.
如图所示,我们还必须将twilio组件包装在NetworkProvider中。
Step-3:We also need a presentable component which will be used to notify the user about the internet connection. For that create a file OfflineNotice.js and place the below code in it.
步骤3:我们还需要一个可展示的组件,该组件将用于通知用户有关Internet连接的信息。 为此,创建一个文件OfflineNotice.js并将下面的代码放入其中。
OfflineNotice.js:
OfflineNotice.js:
import React, { useEffect,useState } from 'react';
import { View, Text, Dimensions, StyleSheet, Platform } from 'react-native';
import { NetworkConsumer } from 'react-native-offline';
const { width } = Dimensions.get('window');
function OfflineNotice(params) {
 return (
   <>
   <NetworkConsumer>
         {({ isConnected }) => (
         isConnected ? (
           null
         ) : (
             <View style={[styles.offlineContainer,{backgroundColor: '#b52424'}]}>
                 <Text style={styles.offlineText}>No Internet Connection</Text>
             </View>
         )
         )}
     </NetworkConsumer>
   </>
 );
}
const styles = StyleSheet.create({
 offlineContainer: {
   height: 30,
   justifyContent: 'center',
   alignItems: 'center',
   flexDirection: 'row',
   width,
   position: 'absolute',
   zIndex:2,
 },
 offlineText: { color: '#fff' }
});
export default OfflineNotice;
Now we can use this component in our TwilioVideo component.Modify the TwilioVideo.js file as shown below.
现在我们可以在TwilioVideo组件中使用此组件。如下所示修改TwilioVideo.js文件。
TwilioVideo.js:
TwilioVideo.js:
import React, { Component } from "react";
import {
  StyleSheet,
  Text,
  View,
  TouchableOpacity,
  PermissionsAndroid,
  TouchableHighlight,
} from "react-native";
import {
  TwilioVideoLocalView,
  TwilioVideoParticipantView,
  TwilioVideo,
} from "react-native-twilio-video-webrtc";
import MIcon from "react-native-vector-icons/MaterialIcons";
import normalize from "react-native-normalize";
import MCIcon from "react-native-vector-icons/MaterialCommunityIcons";
import {
  widthPercentageToDP as wp,
  heightPercentageToDP as hp,
} from "react-native-responsive-screen";
import InputWithLabel from "./staticComponents/InputWithLabel";
import OfflineNotice from "./staticComponents/OfflineNotice";
export async function getAllPermissions() {
  try {
    const userResponse = await PermissionsAndroid.requestMultiple([
      PermissionsAndroid.PERMISSIONS.CAMERA,
      PermissionsAndroid.PERMISSIONS.RECORD_AUDIO,
      PermissionsAndroid.PERMISSIONS.WRITE_EXTERNAL_STORAGE,
    ]);
    return userResponse;
  } catch (err) {
    console.log(err);
  }
  return null;
}
export default class TwilioVideo extends Component {
  state = {
    isAudioEnabled: true,
    isVideoEnabled: true,
    isButtonDisplay: true,
    status: "disconnected",
    participants: new Map(),
    videoTracks: new Map(),
    roomName: "",
    token: "",
  };
  componentDidMount() {
    getAllPermissions();
  }
  _onConnectButtonPress = () => {
    this.refs.twilioVideo.connect({
      roomName: this.state.roomName,
      accessToken: this.state.token,
    });
    this.setState({ status: "connecting" });
  };
  _onEndButtonPress = () => {
    this.refs.twilioVideo.disconnect();
  };
  _onMuteButtonPress = () => {
    this.refs.twilioVideo
      .setLocalAudioEnabled(!this.state.isAudioEnabled)
      .then((isEnabled) => this.setState({ isAudioEnabled: isEnabled }));
  };
  _onFlipButtonPress = () => {
    this.refs.twilioVideo.flipCamera();
  };
  _onRoomDidConnect = () => {
    this.setState({ status: "connected" });
  };
  _onRoomDidDisconnect = ({ roomName, error }) => {
    this.setState({ status: "disconnected" });
  };
  _onRoomDidFailToConnect = (error) => {
    this.setState({ status: "disconnected" });
  };
  _onParticipantAddedVideoTrack = ({ participant, track }) => {
    this.setState({
      videoTracks: new Map([
        ...this.state.videoTracks,
        [
          track.trackSid,
          { participantSid: participant.sid, videoTrackSid: track.trackSid },
        ],
      ]),
    });
  };
  _onParticipantRemovedVideoTrack = ({ participant, track }) => {
    const videoTracks = this.state.videoTracks;
    videoTracks.delete(track.trackSid);
    this.setState({ videoTracks: { ...videoTracks } });
  };
  render() {
    return (
      <View style={styles.container}>
        <OfflineNotice />
        {this.state.status === "disconnected" && (
          <View>
            <Text style={styles.headerStyle}>React Native Twilio Video</Text>
            <InputWithLabel
              label="Room Name"
              placeholder="Room Name"
              defaultValue={this.state.roomName}
              onChangeText={(text) => this.setState({ roomName: text })}
            />
            <InputWithLabel
              label="Token"
              placeholder="Token"
              defaultValue={this.state.token}
              onChangeText={(text) => this.setState({ token: text })}
            />
            <TouchableHighlight
              style={[styles.buttonContainer, styles.loginButton]}
              onPress={this._onConnectButtonPress}
            >
              <Text style={styles.Buttontext}>Connect</Text>
            </TouchableHighlight>
          </View>
        )}
        {(this.state.status === "connected" ||
          this.state.status === "connecting") && (
          <View style={styles.callContainer}>
            {this.state.status === "connected" && (
              <View style={styles.remoteGrid}>
                <TouchableOpacity
                  style={styles.remoteVideo}
                  onPress={() => {
                    this.setState({
                      isButtonDisplay: !this.state.isButtonDisplay,
                    });
                  }}
                >
                  {Array.from(
                    this.state.videoTracks,
                    ([trackSid, trackIdentifier]) => {
                      return (
                        <TwilioVideoParticipantView
                          style={styles.remoteVideo}
                          key={trackSid}
                          trackIdentifier={trackIdentifier}
                        />
                      );
                    }
                  )}
                </TouchableOpacity>
                <TwilioVideoLocalView
                  enabled={true}
                  style={[
                    styles.localVideo,
                    { bottom: this.state.isButtonDisplay ? "40%" : "30%" },
                  ]}
                />
              </View>
            )}
            <View
              style={[
                styles.callScreenButtonContainer,
                {
                  display: this.state.isButtonDisplay ? "flex" : "none",
                  zIndex: this.state.isButtonDisplay ? 2 : 0,
                },
              ]}
            >
              <TouchableOpacity
                style={[
                  styles.buttonStyle,
                  { display: this.state.isButtonDisplay ? "flex" : "none" },
                ]}
                onPress={this._onMuteButtonPress}
              >
                <MIcon
                  name={this.state.isAudioEnabled ? "mic" : "mic-off"}
                  size={24}
                  color="#fff"
                />
              </TouchableOpacity>
              <TouchableOpacity
                style={[
                  styles.buttonStyle,
                  { display: this.state.isButtonDisplay ? "flex" : "none" },
                ]}
                onPress={this._onEndButtonPress}
              >
                <MIcon name="call-end" size={28} color="#fff" />
              </TouchableOpacity>
              <TouchableOpacity
                style={[
                  styles.buttonStyle,
                  { display: this.state.isButtonDisplay ? "flex" : "none" },
                ]}
                onPress={this._onFlipButtonPress}
              >
                <MCIcon name="rotate-3d" size={28} color="#fff" />
              </TouchableOpacity>
            </View>
          </View>
        )}
        <TwilioVideo
          ref="twilioVideo"
          onRoomDidConnect={this._onRoomDidConnect}
          onRoomDidDisconnect={this._onRoomDidDisconnect}
          onRoomDidFailToConnect={this._onRoomDidFailToConnect}
          onParticipantAddedVideoTrack={this._onParticipantAddedVideoTrack}
          onParticipantRemovedVideoTrack={this._onParticipantRemovedVideoTrack}
        />
      </View>
    );
  }
}
const styles = StyleSheet.create({
  container: {
    flex: 1,
    backgroundColor: "white",
  },
  buttonStyle: {
    width: 60,
    height: 60,
    marginLeft: 10,
    marginRight: 10,
    borderRadius: 100 / 2,
    backgroundColor: "grey",
    justifyContent: "center",
    alignItems: "center",
  },
  callContainer: {
    flex: 1,
    position: "absolute",
    bottom: 0,
    top: 0,
    left: 0,
    right: 0,
    minHeight: "100%",
  },
  headerStyle: {
    fontSize: 30,
    textAlign: "center",
    paddingTop: 40,
  },
  localVideo: {
    width: "35%",
    left: "64%",
    height: "25%",
    zIndex: 2,
  },
  remoteGrid: {
    flex: 1,
    flexDirection: "column",
  },
  remoteVideo: {
    width: wp("100%"),
    height: hp("100%"),
    zIndex: 1,
  },
  buttonContainer: {
    height: normalize(45),
    flexDirection: "row",
    justifyContent: "center",
    alignItems: "center",
    marginBottom: 20,
    width: wp("90%"),
    borderRadius: 30,
  },
  loginButton: {
    backgroundColor: "#1E3378",
    width: wp("90%"),
    justifyContent: "center",
    alignItems: "center",
    marginLeft: 20,
    marginTop: 10,
  },
  Buttontext: {
    color: "white",
    fontWeight: "500",
    fontSize: 18,
  },
  callScreenButtonContainer: {
    position: "absolute",
    left: 0,
    bottom: 0,
    right: 0,
    height: 100,
    flexDirection: "row",
    alignItems: "center",
    justifyContent: "space-evenly",
  },
});
Running the App:
运行应用程序:
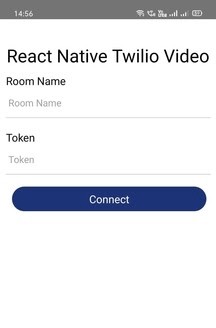
Run the application by executing the react-native run-android command from the terminal window.Below are the screenshots of the app running on an android device.
通过从终端窗口执行react-native run-android命令来运行应用程序。以下是在Android设备上运行的应用程序的屏幕截图。
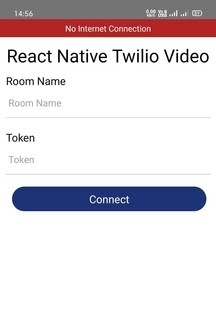
The above screenshot is when the device doesn’t have the internet connection. Once the internet connection is established the error message disappears like shown below.
上面的屏幕截图是当设备没有互联网连接时。 建立互联网连接后,错误消息消失,如下所示。
提示2:不要重复自己 (Tip 2: Don’t Repeat Yourself)
One of the basic principles of software development is Don’t Repeat Yourself.We must not write the same piece of code twice. Whenever you write the same piece of code twice, you must try to refactor it into something reusable, even if not completely. You can create your own reusable components. For example, if your app contains multiple input fields, you can create a reusable <TextInput> component and use it across any screen within your app. Not only input fields, if your app contains multiple buttons, but you can also create a reusable <Button> component and use it anywhere within your app. Likewise, you can create any number of reusable components based on your app architecture.
软件开发的基本原则之一是“ 不要重复自己” 。我们绝不能重复编写同一段代码。 每当您编写两次相同的代码时,都必须尝试将其重构为可重用的东西,即使不是完全可以重用。 您可以创建自己的可重用组件。 例如,如果您的应用程序包含多个输入字段,则可以创建可重用的<TextInput>组件,并在应用程序内的任何屏幕上使用它。 如果您的应用程序包含多个按钮,则不仅是输入字段,还可以创建可重用的<Button>组件,并在应用程序中的任何位置使用它。 同样,您可以根据应用程序架构创建任意数量的可重用组件。
Within our app, we have created a <TextInput> component which can be used at multiple places.
在我们的应用程序中,我们创建了一个<TextInput>组件,可以在多个地方使用它。
Create a file TextInputFieldWithLabel.js and place the below code in it.
创建一个文件TextInputFieldWithLabel.js并将下面的代码放入其中。
TextInputWithLabel.js:
TextInputWithLabel.js:
import React from 'react';
import {View, StyleSheet, Text, TextInput, Platform} from 'react-native';
import {
 widthPercentageToDP as wp,
 heightPercentageToDP as hp,
} from 'react-native-responsive-screen';
export default function InputFieldWithLabelComponent(props) {
 return (
   <View style={styles.spacing}>
       <Text style={styles.inputLabel}>{props.label}</Text>
       <TextInput style={styles.inputBox}
           placeholder={props.placeholder}
           defaultValue={props.defaultValue}
           onChangeText={props.onChangeText}
       />
   </View>
 );
}
const styles = StyleSheet.create({
   spacing: {
       padding: 10
   },
   inputLabel: {
       fontSize: 18
   },
   inputBox: {
       borderBottomColor: '#cccccc',
       fontSize: 16,
       width: wp("95%"),
       borderBottomWidth: 1
   },
});
Then we can import and use the above component within our app as shown below.
然后,我们可以在我们的应用程序中导入并使用上述组件,如下所示。
<InputWithLabel
   label = "Room Name"
   placeholder="Room Name"
   defaultValue={this.state.roomName}
   onChangeText={(text) => this.setState({roomName: text})}
/>
<InputWithLabel
   label = "Token"
   placeholder="Token"
   defaultValue={this.state.token}
   onChangeText={(text) => this.setState({token: text})}
/>
提示3:避免内联样式 (Tip 3: Avoid Inline Stylings)
Using inline stylings is much harder to maintain if a change is to be made there will be hundreds of places in the code you will have to search and change unless all stylings are clearly defined with unique class names in a CSS stylesheet. For any property you want to change, you would have to simply modify the corresponding class name properties in the stylesheet, all the divs that use the class name will be affected.
如果要进行更改,则使用内联样式很难维护,除非您在CSS样式表中使用唯一的类名明确定义了所有样式,否则您将不得不在代码中搜索和更改数百个位置。 对于您要更改的任何属性,您只需在样式表中修改相应的类名属性,使用该类名的所有div都会受到影响。
A well-defined stylesheet is extremely helpful while building complex React Native apps. Use React Native Stylesheet object to add stylings specific to a certain component.
定义复杂的样式表在构建复杂的React Native应用程序时非常有用。 使用React Native Stylesheet对象添加特定于特定组件的样式。
提示4:React Native Apps中的异常处理 (Tip 4: Exception Handling in React Native Apps)
One of the bad user experiences is using a mobile application that crashes with errors that aren’t handled gracefully. So, exception handling plays an important role in making your app run smoothly.
糟糕的用户体验之一是使用移动应用程序,该应用程序由于无法正常处理的错误而崩溃。 因此,异常处理在使应用程序平稳运行中起着重要作用。
We use the try and catch blocks to handle exceptions within a React Native app.
我们使用try和catch块来处理React Native应用程序中的异常。
The try…catch statement marks a block of statements to try, and specifies one or more responses should an exception be thrown. If an exception is thrown, the try…catch statement catches it.
try…catch语句标记了要尝试的语句块,并指定了引发异常时的一个或多个响应。 如果引发异常,则try…catch语句将捕获该异常。
The try…catch statement consists of a try block, which contains one or more statements, and a catch block, containing statements that specify what to do if an exception is thrown in the try block.
try…catch语句由一个try块(包含一个或多个语句)和一个catch块组成,该catch块包含指定在try块中引发异常时的处理方法的语句。
If your app consists of a block of code that may throw exceptions, you can handle that in a try-catch block like shown below.
如果您的应用程序包含可能引发异常的代码块,则可以在try-catch块中进行处理,如下所示。
try { throw new Error("Error"); } catch (error) { // handle Error }Not only these, there are other ways to handle exceptions. For those you can refer here.
不仅这些,还有其他处理异常的方法。 对于那些您可以参考这里 。
提示5:在componentDidMount()中执行API调用 (Tip 5: Perform the API Calls in componentDidMount())
In order to always have the correct flow of data and rendering the components, you must put all your API calls within the componentDidMount() life cycle method.
为了始终具有正确的数据流并呈现组件,必须将所有API调用放入componentDidMount()生命周期方法中。
Using componentDidMount() makes it clear that data won’t be loaded until after the initial render. This will assist you in setting up the initial state properly, so you don’t end up with an undefined state that results in errors.
使用componentDidMount()可以使您清楚,直到初始渲染之后才加载数据。 这将帮助您正确设置初始状态,因此您不会以未定义的状态结束而导致错误。
提示6:始终执行本地验证和服务器验证 (Tip 6: Always Perform Both Local and Server Validations)
Although, there are some validations or tests which only the server can validate, such as if the entered username or password exists in the database or if the entered email exists in the database. But it is a best practice that you always implement as much client validation as possible such as entering the proper email format, empty field validation and also minimum or maximum number of characters required. So, it is always preferable to perform both local and server validations.
虽然,有些验证或测试只有服务器可以验证,例如输入的用户名或密码是否存在于数据库中,或者输入的电子邮件是否存在于数据库中。 但是,最佳做法是始终实施尽可能多的客户端验证,例如输入正确的电子邮件格式,空字段验证以及所需的最少或最大字符数。 因此,总是最好同时执行本地和服务器验证。
提示7:确保您的应用程序具有响应能力 (Tip 7: Make Sure Your App is Responsive)
You must always make sure that the app you are building is responsive, meaning it is consistent across different devices and platforms.
您必须始终确保所构建的应用程序具有响应能力,这意味着它在不同的设备和平台之间保持一致。
There are many ways you can attain this behavior to your app. One such way is using the react-native-normalize package. It is a small and simple package that helps in making your React Native app responsive easily.
您可以通过多种方法来实现应用程序的这种行为。 一种这样的方法是使用react-native-normalize包。 它是一个小型且简单的软件包,有助于使您的React Native应用轻松响应。
技巧8:在获取数据或等待API响应时添加正在加载的微调器 (Tip 8: Add Loading spinners While Fetching The Data Or Waiting For an API Response)
This is something that is very easy to implement. Adding Loading Indicators makes your app look more responsive and professional to users.
这是很容易实现的事情。 添加加载指示器可使您的应用对用户的响应速度更快,更专业。
You can follow this example to add a loading spinner within your app.
您可以按照以下示例在应用程序中添加加载微调器。
That’s it folks! Thanks for the read.
就是这样! 感谢您的阅读。
This story is authored by Dheeraj Kumar and Santosh Kumar. Dheeraj is a software engineer specializing in React Native and React based frontend development. Santosh specializes in Cloud Services based development.
这个故事是由Dheeraj Kumar和Santosh Kumar撰写的。 Dheeraj是一位软件工程师,专门从事React Native和基于React的前端开发。 Santosh专门从事基于云服务的开发。
Originally published at http://blog.zenof.ai.
最初发布在 http://blog.zenof.ai上 。
翻译自: https://medium.com/zenofai/8-best-practices-for-your-react-native-app-1a8b48525643


 682
682


 被折叠的 条评论
为什么被折叠?
被折叠的 条评论
为什么被折叠?
 到【灌水乐园】发言


