


firebase教程
In one of my previous articles, I discussed how you can create a REST API using Firebase Functions. Since then, I have been asked how to authenticate requests and validate data on my YouTube channel. So, in this tutorial, we’re going to be looking at authentication for Firebase Functions. In my next article, I’ll cover data validation.
在我以前的文章中,我讨论了如何使用Firebase Functions创建REST API 。 从那时起,我被问到如何在YouTube频道上验证请求并验证数据。 因此,在本教程中,我们将研究Firebase Functions的身份验证。 在下一篇文章中,我将介绍数据验证。
Since this tutorial is going to build on a previous one, we’ll be using the code from it. If you’d like to follow along you can find it in this BitBucket Repo. So, clone the project and we’ll get right into it.
由于本教程将在上一个教程的基础上进行构建,因此我们将使用其中的代码。 如果您想继续,可以在此BitBucket存储库中找到它。 因此,克隆项目,我们将直接进行。
Firebase设定 (Firebase Setup)
In order to publish our functions, add users to our database, and use authentication, we’re going to have to set up a Firebase project. So, head over to https://firebase.google.com/ create an account and then click “Go to console”. Next, click on the “Add project” button and name it whatever you’d like. Click through the other options choosing the defaults.
为了发布我们的功能,将用户添加到我们的数据库并使用身份验证,我们将必须设置一个Firebase项目。 因此,转到https://firebase.google.com/创建一个帐户,然后单击“转到控制台”。 接下来,单击“添加项目”按钮,然后将其命名为任意名称。 单击其他选项以选择默认值。
Next click on “Database” in the left-hand menu.
接下来,单击左侧菜单中的“数据库”。
消防处 (Firestore)
Then, at the top of the screen click “Create database”.
然后,在屏幕顶部单击“创建数据库”。

For now, choose Start in test mode and pick the default server location.
现在,选择“以测试模式启动”并选择默认服务器位置。

Warning: This will leave your database open for anyone to read and write to it. If you are going to use this in a production setting, PLEASE familiarize yourself with Firestore rules.
警告 :这将使您的数据库处于打开状态,任何人都可以对其进行读写。 如果要在生产环境中使用此功能,请熟悉 Firestore规则 。
Firebase身份验证 (Firebase Authentication)
To authenticate our API calls, we’ll be using Firebase Authentication. To keep this tutorial short, we’ll just be using email and password authentication.
要对我们的API调用进行身份验证,我们将使用Firebase身份验证。 为了使本教程简短,我们将仅使用电子邮件和密码身份验证。
Click on Authentication in the left menu.
单击左侧菜单中的身份验证。

Navigate to the Sign-in method tab and enable Email/Password.
导航到“登录方法”选项卡,然后启用“电子邮件/密码”。

Firebase CLI (Firebase CLI)
Firebase makes it pretty simple to install their boilerplate functions in our project. In my previous article, we signed up for Firebase and added the config to our project, but for functions, we’ll need to install the Firebase CLI globally on our computer. To do this, open your terminal and run the following command:
Firebase使在我们的项目中安装其样板功能非常简单。 在上一篇文章中,我们注册了Firebase,并将配置添加到了项目中,但是对于功能,我们需要在计算机上全局安装Firebase CLI 。 为此,请打开您的终端并运行以下命令:
npm install -g firebase-toolsNow that we have it installed, we need to sync it to our account. Run the following in your command prompt and log in:
现在我们已经安装了它,我们需要将其同步到我们的帐户。 在命令提示符下运行以下命令并登录:
firebase login在克隆项目中初始化Firebase (Initializing Firebase in Cloned Project)
To sync the cloned project (from the beginning) with your Firebase account, we’re going to need to delete some files. Go ahead and delete the following files out of the project:
要将克隆的项目(从一开始)与您的Firebase帐户同步,我们将需要删除一些文件。 继续,然后从项目中删除以下文件:
- .firebaserc .firebaserc
- firebase.json firebase.json
- firestore.rules firestore.rules
- firestore.indexes.json firestore.indexes.json
Now, open a terminal at the root of the Firebase API project cloned in the beginning. Then run the following command:
现在,在开始克隆的Firebase API项目的根目录下打开一个终端。 然后运行以下命令:
firebase initProvide these answers to the following questions:
提供以下问题的答案:
Are you ready to proceed? — Y
您准备好继续了吗? — Y
Which Firebase CLI features do you want to set up for this folder? — Functions
您要为此文件夹设置哪些Firebase CLI功能? — 功能
Please select an option: — Use an existing project
请选择一个选项:— 使用现有项目
Select the firebase project you set up earlier
选择您之前设置的Firebase项目
What language would you like to use to write Cloud Functions? — JavaScript
您想使用哪种语言编写Cloud Functions? — JavaScript
Do you want to use ESLint to catch probable bugs and enforce style? — y
您是否想使用ESLint捕获可能的错误并实施样式? – y
File functions/package.json already exists. Overwrite? — n
文件functions / package.json已经存在。 覆盖? — n
File functions/.eslintrc.json already exists. Overwrite? — n
文件功能/.eslintrc.json已存在。 覆盖? — n
File functions/index.js already exists. Overwrite? — n
文件功能/index.js已经存在。 覆盖? — n
File functions/.gitignore already exists. Overwrite? — n
文件功能/.gitignore已存在。 覆盖? — n
Do you want to install dependencies with npm now? — Y
您是否要立即使用npm安装依赖项? — Y
Next, to make sure all previous dependencies are installed cd into the functions folder from the terminal and run the following command:
接下来,确保从终端将所有先前的依赖项CD安装到功能文件夹中,并运行以下命令:
npm i认证中间件 (Authentication Middleware)
Since we’re using Express.js for our REST API, it gives us the ability to write middleware for Authentication. Think of middleware as a function that fires between the request and response of our API. You can have middleware functions fire on specific API endpoints or all of them.
由于我们将Express.js用于REST API,因此它使我们能够编写用于身份验证的中间件 。 将中间件视为在API的请求和响应之间触发的函数。 您可以在特定的API端点或所有端点上触发中间件功能。
Firebase身份验证REST API (Firebase Authentication REST API)
In order to use our authentication middleware, we’ll need to get a token from Firebase. To do that we’ll need to create a user and have that user authenticate. To keep things framework and language agnostic we’ll be using the Firebase authentication REST API.
为了使用我们的身份验证中间件,我们需要从Firebase获取令牌。 为此,我们需要创建一个用户并对该用户进行身份验证。 为了使框架和语言不可知,我们将使用Firebase身份验证REST API 。
To use their REST API, we first have to get our API key from our newly created project. To get it, navigate to the project settings in the Firebase console.
要使用他们的REST API,我们首先必须从新创建的项目中获取API密钥。 要获取它,请导航到Firebase控制台中的项目设置。

From there, grab the Web API Key.
从那里获取Web API密钥。

创建一个用户 (Create a User)
Now we’re going to create a user using the REST API. In order to do this, I’ll be using an API testing tool called Postman. Postman allows you to make API calls without writing any code.
现在,我们将使用REST API创建用户。 为此,我将使用一个称为Postman的API测试工具。 Postman使您无需编写任何代码即可进行API调用。
To create our user, the Firebase REST API has the following API endpoint and request body payload:
为了创建我们的用户,Firebase REST API具有以下API端点和请求主体有效负载:

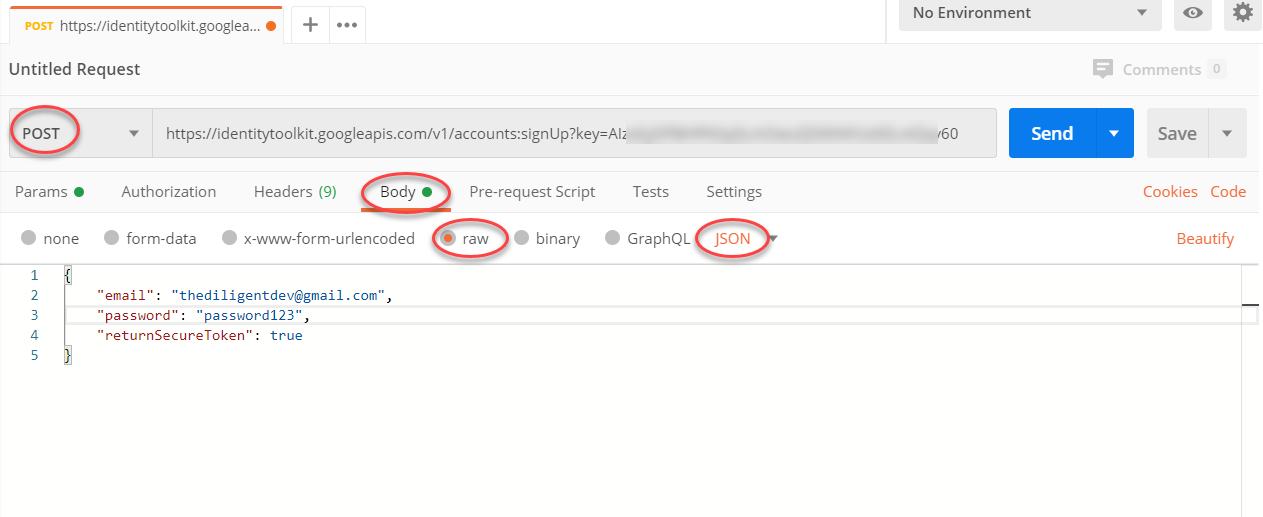
Postman RequestSo, let's open up Postman, switch the request type to POST, paste in the signup endpoint (don't forget to add your API key), go to body, switch body type to raw, choose the body type as JSON, and add the request body payload.
邮递员请求因此,让我们打开邮递员,将请求类型切换为POST,粘贴到注册端点(不要忘记添加API密钥),转到正文,将正文类型切换为raw,选择正文类型为JSON,并添加请求主体有效负载。
Firebase REST API Response PayloadIn the response payload, we’re going to get some information. What we’re going to be using to authenticate our API requests is the idToken. Copy this for later use.
Firebase REST API响应有效负载在响应有效负载中,我们将获得一些信息。 我们将用来验证我们的API请求的是idToken。 复制此内容以供以后使用。

It's important to know that this expires in 1 hour. After it expires, you’d have to use the refresh token to get a new idToken. But, if you’re using the firebase SDK in the frontend of your project, this is all done automatically.
据 了解 ,这1小时后到期 是 非常重要的 。 过期后,您必须使用刷新令牌来获取新的idToken。 但是,如果您在项目的前端使用firebase SDK,则所有操作都是自动完成的。
中间件功能 (Middleware Function)
Now that we have our idToken to authenticate requests we can write our middleware. At the root of the project, create a new file called authenticationMiddleware.js. Then paste in the following code that I pulled from here:
现在我们有了idToken可以对请求进行身份验证,我们可以编写中间件了。 在项目的根目录下,创建一个名为authenticationMiddleware.js的新文件。 然后粘贴以下我从此处提取的代码:
You’ll see that we pass a request, response, and next parameter into the function. The request allows us to access the request payload that was passed into the API. The response allows us to pass a response back if we don’t need to go any further than our middleware. And next allows us to continue on to our endpoint's main code if everything checks out.
您会看到我们将请求,响应和下一个参数传递给函数。 该请求使我们可以访问传递到API中的请求有效负载。 如果我们不需要中间件,那么响应允许我们将响应传递回去。 接下来,如果一切检查完毕,则允许我们继续执行端点的主代码。
In the first block, we’re checking to see if there is a Bearer token in the request. If we don't have a token, we return a 403 unauthorized response.
在第一个块中,我们正在检查请求中是否有Bearer令牌。 如果没有令牌,则会返回403未经授权的响应。
In the next block, we’re trying to parse the Bearer token. If we can't parse the token, we return a 403 unauthorized response.
在下一个块中,我们尝试解析Bearer令牌。 如果我们无法解析令牌,则会返回403未经授权的响应。
And, in the last block, we’re using the Firebase Admin SDK to verify the token. If we have a valid token we call next() to continue to the endpoint code. If we don’t have a valid token, we return a 403 unauthorized response.
并且,在最后一个块中,我们使用Firebase Admin SDK来验证令牌。 如果我们有一个有效的令牌,则调用next()继续执行端点代码。 如果没有有效的令牌,则会返回403未经授权的响应。
将中间件添加到我们的API (Adding the Middleware to Our API)
We can either add the middleware to all endpoints or specific ones. To apply it to all endpoints add this right after the app is initialized:
我们可以将中间件添加到所有端点或特定端点。 要将其应用于所有端点,请在应用初始化后立即添加以下内容:
app.use(authenticationMiddleware);To apply it to a specific endpoint, add it like
要将其应用于特定端点,请像添加它一样
app.post("/", authenticationMiddleware, async (req, res) => {
 const user = req.body;await admin.firestore().collection("users").add(user);res.status(201).send();
});
影片教学 (Video Tutorial)
结论 (Conclusion)
Using middleware in our application makes it extremely easy to authenticate our API. As we’ll see in my next tutorial on data validation, we can also tap into a large community and ecosystem. Until next time, Happy Coding!
在我们的应用程序中使用中间件使认证我们的API非常容易。 正如我们将在我的下一个有关数据验证的教程中看到的那样,我们还可以利用大型社区和生态系统。 直到下一次,快乐编码!
Bitbucket Repo: https://bitbucket.org/TheDiligentDev/firebase-functions-api-auth/src/master/
Bitbucket存储库: https : //bitbucket.org/TheDiligentDev/firebase-functions-api-auth/src/master/
翻译自: https://medium.com/the-innovation/firebase-functions-tutorial-authentication-1e39b97f448c
firebase教程


 1781
1781

 被折叠的 条评论
为什么被折叠?
被折叠的 条评论
为什么被折叠?
 到【灌水乐园】发言


