


aws docker
Have you ever thought about how the software developers continuously add or fix new features to the code and deploy the changes made as quickly as possible? When writing code, the developer team makes dozens of changes every single day and they ensure that nothing is broken. That’s where CI/CD comes into play.
您是否曾经考虑过软件开发人员如何不断向代码中添加或修复新功能,以及如何尽快部署所做的更改? 在编写代码时,开发人员团队每天都要进行数十次更改,并且确保没有任何问题。 这就是CI / CD发挥作用的地方。
In this blog post, I will show you how you can configure your .gitlab-ci.yml file to continuously integrate and deploy a Python-Django application to AWS EC2 with the help of AWS CodeDeploy service. Also to add an extra cream you will learn how to build docker images with GitLab CI/CD for your Python-Django application and push the image to the GitLab Container Registry.
在此博客文章中,我将向您展示如何配置.gitlab-ci.yml文件,以在AWS CodeDeploy服务的帮助下持续集成Python-Django应用程序并将其部署到AWS EC2。 另外,要添加额外的奶油,您还将学习如何使用GitLab CI / CD为您的Python-Django应用程序构建docker映像,并将该映像推送到GitLab容器注册表。
Note: This post is not intended to show how to dockerize a Python-Django application. For this please check out my other blog on Dockerizing Django Application with PM2 and Nginx.
注意:本文不旨在显示如何对Python-Django应用程序进行dockerize。 为此,请查看我的其他博客, 了解如何使用PM2和Nginx对Docker Application进行Django应用 。
Now too much-talking let’s get straight into the core concepts of continuous integration.
现在谈论太多,让我们直接进入持续集成的核心概念。

为什么要持续集成? (Why Continuous Integration?)
Continuous integration is a software development practice of frequently integrating the code changes from multiple contributors into a shared repository preferably several times a day. Each integration is verified by an automated build (including test) to detect integration errors as quickly as possible and later deploy the changes made.
持续集成是一种软件开发实践,经常将来自多个贡献者的代码更改频繁地集成到共享存储库中,最好每天进行几次。 每个集成都由自动构建(包括测试)进行验证,以尽快检测到集成错误,然后部署所做的更改。
Some of the benefits that continuous integration will bring to your organization are:
持续集成将为您的组织带来一些好处:
- Quickly fixing out the bug every time a new change is made. 每次进行新更改时,快速修复该错误。
- Reduce time in digging for bugs and spending more time writing awesome code. 减少挖掘错误的时间,并花费更多时间编写出色的代码。
- Speeding things with automated tests and build to deliver your software more quickly. 通过自动测试加快速度,并通过构建来更快地交付您的软件。
- Increase team transparency and collaboration. 提高团队透明度和协作能力。
- Faster deployments of new features to the majority of cloud providers. 向大多数云提供商更快地部署新功能。
先决条件 (Prerequisites)
Since this post shows how to configure your .gitlab-ci.yml file for CI/CD of your Python-Django application, it is assumed that you have:
由于这篇文章显示了如何为Python-Django应用程序的CI / CD配置.gitlab-ci.yml文件,因此假定您具有:
- Created an account on GitLab. 在GitLab上创建一个帐户。
- Installed and configured your GitLab runner (however we are going to make use of GitLab shared runners). 安装和配置您的GitLab运行程序(但是我们将使用GitLab共享运行程序)。
- An existing AWS account with its credentials stored securely. 现有AWS账户及其凭证已安全存储。
AWS EC2 instance as the target for each of the environments namely, development, staging, and production.
AWS EC2实例作为每种环境( 开发 , 登台和生产)的目标 。
- AWS S3 bucket for storing the application revisions and to use it with AWS CodeDeploy. AWS S3存储桶,用于存储应用程序修订并将其与AWS CodeDeploy一起使用。
AWS CodeDeploy application and group with deployment target as the EC2 instance (usually the recommendation is to create a CodeDeploy application with three groups for each environment such as development, staging, and production followed by an appropriate naming convention). For more information on getting started with CodeDeploy, click here.
AWS CodeDeploy应用程序和具有部署目标的组作为EC2实例(通常建议创建一个CodeDeploy应用程序,每个开发环境具有三个组,例如开发 , 登台和生产 ,以及适当的命名约定。 有关CodeDeploy入门的更多信息,请单击此处 。
and that’s it, this is all you need to set up GitLab CI/CD pipeline.
就是这样,这就是设置GitLab CI / CD管道所需的全部。
.gitlab-ci.yml文件 (The .gitlab-ci.yml file)
GitLab has a way to implement CI/CD for your project maintained in it. This can be achieved with the help of .gitlab-ci.yml file which is a YAML file that you need to create at the project’s root. This file defines the structure and the order of the pipelines. This also determines what action to take for a process when specific conditions are met.
manbetx客户端打不开有一种方法来实现CI / CD在其中维护您的项目。 这可以借助.gitlab-ci.yml文件来实现,该文件是您需要在项目根目录下创建的YAML文件。 该文件定义管道的结构和顺序。 这也决定了在满足特定条件时对流程采取什么措施。
This file automatically gets triggered whenever you push a commit to the GitLab depending on its configurations defined on which specific branch or tags to run. This feature allows the implementation of CI/CD easier in your organization where multiple developers are working on the same project and you can control when to trigger the CI/CD pipeline depending upon your use case.
每当您将提交推送到GitLab时,该文件都会自动触发,具体取决于在哪个特定分支或标签上定义的文件配置。 此功能使在多个开发人员正在同一个项目上的组织中更容易实现CI / CD,并且您可以根据用例控制何时触发CI / CD管道。
Create a .gitlab-ci.yml file at your project’s root with the following content:
在项目的根目录下创建一个.gitlab-ci.yml文件,其内容如下:
It seems there’s a lot going on here. Don’t freak out. Let me break down the snippet:
似乎这里发生了很多事情。 不要惊慌。 让我分解一下代码片段:
default:
  image:
    name: python:3.8
The image keyword is used as the name of the base image that the Docker executor will run to perform CI/CD tasks. The executor will grab the image from Docker Hub according to the specified name of the image. Since we are implementing this pipeline for the Python application we have to use python image. I recommend specifying a particular version for any image you’re going to use instead of the latest.
image关键字用作Docker执行程序将运行以执行CI / CD任务的基本映像的名称。 执行程序将根据指定的映像名称从Docker Hub抓取映像。 由于我们正在为Python应用程序实现此管道,因此我们必须使用python映像。 我建议为要使用的任何图像指定特定的版本,而不是最新的版本。
stages:
  - build
  - test
  - deploy
Stages are the keyword that defines the number of stages in which the CI/CD pipeline will run sequentially till it reaches the final stage. Typically a CI/CD pipeline has three stages namely build, test, and deploy. If any of the stages fails then no further stage is going to run.
阶段是关键字,用于定义CI / CD管道将连续运行直到到达最后阶段的阶段数。 通常,CI / CD管道具有三个阶段,即构建 , 测试和部署 。 如果任何一个阶段失败,则不会再运行任何阶段。
Like in the above first build stage is run, then test and at last deploy. If the build fails the test and the deploy stage will not be going to run.
就像在上面的第一个构建阶段中运行,然后测试并最后部署 。 如果构建未通过测试 ,则部署阶段将不会运行。
variables:
  CI_DEBUG_TRACE: "false"
  DOCKER_DRIVER: overlay2
  DOCKER_TLS_CERTDIR: "/certs"
GitLab CI/CD allows you to set your own custom environment variables so that you can make use of these later in the subsequent jobs to replace the variable name with the values that you have set. The variables are used by the runners anytime the pipeline runs.
GitLab CI / CD允许您设置自己的自定义环境变量,以便以后可以在后续作业中使用它们,以将变量名替换为您设置的值。 管道运行时,运行者可以使用变量。
CI_DEBUG_TRACE is set to false so that it does not show complete logs to avoid revealing secrets.
CI_DEBUG_TRACE设置为false,因此它不会显示完整的日志,以避免泄露机密。
DOCKER_DRIVER and DOCKER_TLS_CERTDIR are the variables that are used in building Docker images. Since in this blog we are also focussing on how to build a docker image and push the image to the GitLab registry we need to specify the docker driver which is overlay2. GitLab shared runners use the overlay2 driver by default. Also, we need to specify the path to the certificate that the docker will create automatically on boot.
DOCKER_DRIVER和DOCKER_TLS_CERTDIR是用于构建Docker映像的变量。 由于在此博客中,我们还专注于如何构建docker映像并将该映像推送到GitLab注册表,因此我们需要指定docker驱动程序,它是overlay2 。 GitLab共享运行程序默认情况下使用overlay2驱动程序。 另外,我们需要指定docker在启动时自动创建的证书的路径。
docker_build:
  image: docker:19.03.12
  stage: build
  services:
    - docker:19.03.12-dind
  variables:
    IMAGE_TAG: $CI_REGISTRY_IMAGE:$CI_COMMIT_TAG
  before_script:
    - echo $CI_REGISTRY_PASSWORD | docker login -u $CI_REGISTRY_USER --password-stdin $CI_REGISTRY
  script:
    - docker pull $CI_REGISTRY_IMAGE:latest || true
    - docker build --cache-from $CI_REGISTRY_IMAGE:latest --tag $IMAGE_TAG --tag $CI_REGISTRY_IMAGE:latest .
    - docker push $IMAGE_TAG
    - docker push $CI_REGISTRY_IMAGE:latest
  rules:
    - if: $CI_COMMIT_TAG
This section of the .gitlab-ci.yml file deals with building and pushing our Python-Django application to the GitLab Container Registry.
.gitlab-ci.yml文件的这一部分涉及如何构建我们的Python-Django应用并将其推送到GitLab容器注册表 。

The docker_build is the name of the job to be run on the build stage. Since we are using Docker-in-Docker on our runners, we need to specify services with docker:19.03.12-dind image. For authenticating with the container registry with the GitLab CI/CD you need to pass the registry username along with the password. These credentials are passed with the help of variables defined for GitLab CI/CD. The user-specified with this variable is created for you in order to push the image to the registry and its password is automatically set using CI_REGISTRY_PASSWORD variable.
docker_build是要在构建阶段运行的作业的名称。 由于我们正在使用Docker-in-Docker 在跑步者上,我们需要使用docker:19.03.12-dind image指定服务。 要使用GitLab CI / CD对容器注册表进行身份验证,您需要传递注册表用户名和密码。 这些凭证是在为GitLab CI / CD定义的变量的帮助下传递的。 为此变量创建了用户指定的用户,以便将映像推送到注册表,并使用CI_REGISTRY_PASSWORD变量自动设置其密码。
Note: For security reasons, the docker login asks for the password to be passed through stdin.
注意 :出于安全原因,docker登录名要求通过stdin传递密码。
script section is used to define docker related commands for building and pushing the image to the GitLab container registry. It is best practice to make use of docker caching in order to build faster on the next run. The latest image is pulled using docker pull command if it exists and then it is built from cache and tags the images. Since this blog is not intended to show how to dockerize a Python-Django application so you must create Docker related files in order to build the image. Lastly, the image is pushed to the GitLab Container Registry.
script部分用于定义与docker相关的命令,以构建映像并将其推送到GitLab容器注册表。 最佳实践是利用docker缓存,以便在下次运行时更快地构建。 如果存在最新映像,则使用docker pull命令将其提取,然后从缓存中构建并标记映像。 由于此博客无意于显示如何对Python-Django应用程序进行docker化,因此您必须创建与Docker相关的文件才能构建映像。 最后,将图像推送到GitLab容器注册表。
We do not want this job to run on every commit that is pushed to the GitLab, so we can specify rules stating the condition to only run whenever a new tag is created. Did you notice that we have specified so many variables inside this job? These variables help in keeping the names and tags of the images dynamic. Some of the variables are pre-defined by GitLab. For the complete list click here.
我们不希望此作业在推送到GitLab的每个提交上运行,因此我们可以指定规则来说明条件仅在创建新标签时才运行。 您是否注意到我们在这项工作中指定了太多变量? 这些变量有助于使图像的名称和标签保持动态。 一些变量是由GitLab预先定义的。 有关完整列表,请单击此处 。
test_app:
  stage: test
  script:
    - apt-get update -qy
    - apt-get install -y python-dev python-pip
    - pip install -r requirements.txt
    - python manage.py test
The test_app job tests our Python-Django application and if the jobs of this stage fail for any reason, the jobs of the deploy stage will eventually fail.
test_app作业会测试我们的Python-Django应用程序,并且如果此阶段的作业由于任何原因失败,那么部署阶段的作业最终将失败。
deploy_development:
  stage: deploy
  script:
    - echo "Deploy to development server"
    - python3.8 -m pip install awscli
    - /bin/bash ./scripts/deploy.sh
  environment:
    name: development
    url: https://$CI_ENVIRONMENT_SLUG.example.com
  rules:
    - if: '$CI_COMMIT_BRANCH == "dev"'
The deploy_development is the name of the job to be run on the deploy stage. This job is used to deploy our code to the AWS EC2 instance with the help of AWS CodeDeploy service. We need to install AWS CLI in order to run AWS commands. Additionally, we need to set AWS access key, secret key, and region for configuring AWS. Let’s leave this part here. Later in this post, I will show you how you can set the CI/CD variables from GitLab UI. Also, what’s with the deploy.sh script? Since our source code is maintained in GitLab and we want to send the complete source code from here to the AWS S3 bucket, so we need some way to execute AWS CLI commands. We can write all the AWS commands under the script section but it’s way more cleaner to create a bash script to do these kinds of stuff. Don’t worry I will discuss all the contents inside the bash script later in this post, also will show you the best practices to follow while writing bash scripts.
deploy_development是要在部署阶段运行的作业的名称。 该作业用于在AWS CodeDeploy服务的帮助下将代码部署到AWS EC2实例。 我们需要安装AWS CLI才能运行AWS命令。 此外,我们需要设置AWS 访问密钥 , 秘密密钥和区域以配置AWS。 让我们把这部分留在这里。 在本文的后面,我将向您展示如何从GitLab UI设置CI / CD变量。 另外, deploy.sh脚本是什么? 由于我们的源代码在GitLab中维护,并且我们希望将完整的源代码从此处发送到AWS S3存储桶,因此我们需要某种方式来执行AWS CLI命令。 我们可以在script部分下编写所有AWS命令,但是创建bash脚本来执行此类操作会更加简洁。 不用担心,我将在本文后面讨论bash脚本中的所有内容,还将向您展示编写bash脚本时应遵循的最佳实践。
It is very important to have a full history of your deployments for each environment and to keep track of your deployments, so you always know what is currently being deployed on your servers. In order to achieve this, we can make use of GitLab environments by setting its name and URL according to the environment you specify. In the URL you can pass the domain name of your’s or you can set CI_ENVIRONEMENT_SLUG, a simplified version of the environment name, to guarantee that we get a valid URL. Again we can specify rules stating the condition to only run when the commit branch is dev.
拥有每个环境的部署的完整历史记录并跟踪您的部署非常重要,因此您始终知道服务器上当前正在部署的内容。 为了实现这一点,我们可以通过根据您指定的环境设置其名称和URL来使用GitLab环境。 在URL中,您可以传递您域名的域名,也可以设置CI_ENVIRONEMENT_SLUG (环境名称的简化版本)来确保我们获得有效的URL。 同样,我们可以指定规则,说明条件仅在commit分支为dev时运行。

Following all the jobs after deploy_development are the same with different environments for staging and production. The only difference in the production environment is that we are using when keyword to turn off auto-deployment to the production environment and switch to manual deployment.
在部署和生产的不同环境下, deploy_development之后的所有作业都相同。 生产环境中的唯一区别是,我们使用when关键字来关闭自动部署到生产环境并切换为手动部署。
从GitLab部署到AWS的时间 (Time to deploy from GitLab to AWS)
Remember we have talked about the deploy.sh, file earlier. This is a bash script which is a plain text file containing a series of commands. Normally all the commands that you type in the command line can be put inside this one file and it would do the same stuff, but more elegantly for which you spent too much time by executing each command. Now again, the question is why would you need such a file? It’s simple. GitLab and AWS are two different tools and to connect them we need some way so that we can send our source code to AWS.
记住,我们之前已经讨论过deploy.sh文件。 这是一个bash脚本,它是包含一系列命令的纯文本文件。 通常,您在命令行中键入的所有命令都可以放在该文件中,并且可以执行相同的操作,但是更优雅的是,您通过执行每个命令花费了太多时间。 再一次,问题是为什么您需要这样的文件? 这很简单。 GitLab和AWS是两个不同的工具,要连接它们,我们需要某种方式,以便我们可以将源代码发送到AWS。
Create a scripts/ directory at your project’s root and inside that create a deploy.sh file. Populate the deploy.sh file with the following content:
在项目的根目录和内部创建一个scripts /目录,并在其中创建一个deploy.sh文件。 用以下内容填充deploy.sh文件:
Does this look mind-boggling to you? Let me break it down:
这对您来说令人难以置信吗? 让我分解一下:
set -eu
echo "Home=$HOME"
__dir="$(cd "$(dirname "${BASH_SOURCE[0]}")" && pwd)"
__file="${__dir}/$(basename "${BASH_SOURCE[0]}")"
__base="$(basename ${__file} .sh)"
Before start writing any bash script, it good to include set at the top with -e and -u options. This will ensure bash script to exit immediately when a command fails and also if there is any unset variable, this will throw an error and exit immediately. Again you can set up some variables which will return the full directory and file name of the script.
前开始写任何bash脚本,它好包括set在与顶部-e和-u选项。 这将确保bash脚本在命令失败时立即退出,并且如果有任何未设置的变量,这将引发错误并立即退出。 同样,您可以设置一些变量,这些变量将返回脚本的完整目录和文件名。
generate_revision_number() {
  echo $((1 + RANDOM % 100000))
}
build_id="${CI_PIPELINE_IID:-}"
if [[ -z "${build_id}" ]]; then
  build_id=$(generate_revision_number)
fi
In this, there are two functions defined. The first one will generate a random number from 1–100000. The second function uses a pre-defined GitLab variable CI_PIPELINE_IID which returns the unique ID of the current pipeline scoped to project. This would be helpful so that every time we upload a new project revision to AWS S3 it will have a unique name with the pipeline number attached to it.
在此定义了两个功能。 第一个将生成一个1-100000的随机数。 第二个函数使用预定义的GitLab变量CI_PIPELINE_IID ,该变量返回作用域为项目的当前管道的唯一ID。 这将很有帮助,因此每次我们将新的项目修订版本上载到AWS S3时,它都将具有唯一的名称,并附带管道编号。
codedeploy_application="${AWS_CODEDEPLOY_APPLICATION:-}"
deployment_environment="${CI_COMMIT_REF_NAME}"
if [[ $deployment_environment == "dev" ]]; then
  codedeploy_deployment_group="${AWS_CODEDEPLOY_DEPLOYMENT_GROUP_DEV:-}"
elif [[ $deployment_environment == "staging" ]]; then
  codedeploy_deployment_group="${AWS_CODEDEPLOY_DEPLOYMENT_GROUP_STAG:-}"
elif [[ $deployment_environment == v*.*.* ]]; then
  codedeploy_deployment_group="${AWS_CODEDEPLOY_DEPLOYMENT_GROUP_PROD:-}"
else
  codedeploy_deployment_group="${AWS_CODEDEPLOY_DEPLOYMENT_GROUP_DEV:-}"
fi
revision_bundle_type="zip"
revision_s3_bucket_name="${AWS_CODEDEPLOY_S3_BUCKET:-}"
revision_s3_key_prefix="${codedeploy_application}/${codedeploy_deployment_group}"
revision_s3_key="${revision_s3_key_prefix}/backend-code-apis-${build_id}.${revision_bundle_type}"
revision_s3_location="s3://${revision_s3_bucket_name}/${revision_s3_key}"
deployment_s3_location=""
project_dir="$(readlink -f ${__dir}/../../)"
We have to define certain variables so that we can use it with AWS S3 and AWS CodeDeploy. The variables related to AWS CodeDeploy is application name and group name that you must have already created in your AWS account. Notice how we have set the deployment group name according to the three working environments i.e., dev, staging, and production (production deployment can happen when a new tag is created). Some additional variables have to be set for the AWS S3 bucket which you must have already created in your AWS account. These variables will create a directory structure according to the CodeDeploy application and environments. I strongly recommend following this kind of directory structure pattern for your AWS S3 bucket as it will be really helpful in managing source code for each of the environments.
我们必须定义某些变量,以便我们可以将其与AWS S3和AWS CodeDeploy一起使用。 与AWS CodeDeploy相关的变量是您必须已经在AWS账户中创建的应用程序名称和组名称。 请注意,我们是如何根据三个工作环境(即dev,staging和production)设置部署组名称的(创建新标记时可以进行生产部署)。 必须为AWS S3存储桶设置一些其他变量,您必须已经在您的AWS账户中创建了这些变量。 这些变量将根据CodeDeploy应用程序和环境创建目录结构。 我强烈建议为您的AWS S3存储桶采用这种目录结构模式,因为它对于管理每种环境的源代码确实很有帮助。
You must be thinking where we are setting the values for each of the variables. Although you can hardcode the values of your defined variables inside this bash script, this is not a good approach. Remember we have talked about setting CI/CD variables from GitLab UI, we will make use of this instead of hardcoding all the values and you will see this in a minute.
您必须考虑我们在哪里为每个变量设置值。 尽管您可以在此bash脚本中对定义的变量的值进行硬编码,但这不是一个好方法。 记住,我们曾经讨论过从GitLab UI设置CI / CD变量,我们将使用它而不是对所有值进行硬编码,您将在一分钟内看到它。
generate_revision_description() {
  echo "This is a revision for the python-django application"
}
generate_deployment_description() {
  echo "This is a revision for the python-django application"
}
These function blocks are just to generate revision and deployment descriptions.
这些功能块仅用于生成修订和部署说明。
create_codedeploy_revision() {
  echo "Uploading revision to S3 ..."
  deployment_s3_location=$(aws deploy push \
    --application-name "${codedeploy_application}" \
    --description "$(generate_revision_description)" \
    --ignore-hidden-files \
    --s3-location "${revision_s3_location}" \
    --source . | grep -Po '\-\-s3-location \K[^ ]+')
  echo "Codedeploy revision for S3 location ${revision_s3_location} is created"
}
create_codedeploy_deployment() {
  if [[ "${deployment_s3_location}" == "" ]]; then
    echo "Please call 'create_codedeploy_revision' function first"
    return 1
  fi
  deployment_id=$(aws deploy create-deployment \
    --application-name "${codedeploy_application}" \
    --deployment-group-name "${codedeploy_deployment_group}" \
    --description "$(generate_deployment_description)" \
    --s3-location "${deployment_s3_location}" |
    grep -Po '"deploymentId": \K[^.]+"')
  echo "Codedeploy deployment ${deployment_id} is created"
}
In the create_codedeploy_revision() function we have to bundle and upload our application revision to the AWS S3 in a zip archive format. We want to grep the output S3 location into a variable deployment_s3_location by executing this function so that we can pass its value into the create_codedeploy_deployment() function. By calling this function we are creating a deployment that deploys our application revision through the specified deployment group. On successful execution of this command, it will output the deployment ID which can be very useful for monitoring the deployment.
在create_codedeploy_revision()函数中,我们必须将应用程序修订版本打包并以zip存档格式上传到AWS S3。 我们想通过执行此函数将输出S3位置grep到变量deployment_s3_location ,以便我们可以将其值传递给create_codedeploy_deployment()函数。 通过调用此函数,我们正在创建一个部署,该部署通过指定的部署组来部署我们的应用程序修订版。 成功执行此命令后,它将输出部署ID,这对于监视部署非常有用。
main() {
  echo "
Starting the deployment to codedeploy
-----------------------------------------------------------------
Codedeploy Application: ${codedeploy_application}
Codedeploy Deployment Group: ${codedeploy_deployment_group}
Revision S3 Location: ${revision_s3_location}
Source Location: ${project_dir}
------------------------------------------------------------------
  "
  create_codedeploy_revision
  create_codedeploy_deployment
}
main
Did you notice that we have wrapped all our commands in functions every single time? Functions help in making code reusable. Once we create a function, it can be used multiple times in the script. Other than this, functions make code more readable and easier for debugging. Our main() function also serves the same purpose. It invokes all the other functions which are mentioned inside it.
您是否注意到我们每次都将所有命令包装在函数中? 函数有助于使代码可重用。 创建函数后,可以在脚本中多次使用它。 除此之外,函数使代码更易读且更易于调试。 我们的main()函数也具有相同的目的。 它调用其中提到的所有其他功能。
GitLab CI / CD变量 (The GitLab CI/CD Variables)
Now we have arrived at this part of the post where I will show you how you can set up all your GitLab variables that have been used in above code snippets. These are also known as instance-level CI/CD environment variables and are available to all projects and groups on the instance.
现在我们到达了帖子的这一部分,我将向您展示如何设置以上代码片段中使用的所有GitLab变量。 这些也称为实例级CI / CD环境变量,可用于实例上的所有项目和组。
To add these variables for your GitLab project head over to the Settings > CI/CD and expand the Variables section. Enter all the variables and their values that we have used such as AWS access & secret keys, AWS CodeDeploy application and group name, AWS S3 bucket name, etc.
要为您的GitLab项目添加这些变量,请转到“ 设置”>“ CI / CD”,然后展开“ 变量”部分。 输入我们已使用的所有变量及其值,例如AWS访问和密钥,AWS CodeDeploy应用程序和组名称,AWS S3存储桶名称等。

Now that we have set all the variables and their values, we are all set to test out what we have done so far. Gear up, commit your file and push it to your GitLab instance. As soon as you push a commit you will notice a CI/CD pipeline has started.
现在我们已经设置了所有变量及其值,我们都准备测试到目前为止所做的事情。 做好准备,提交您的文件并将其推送到您的GitLab实例。 推送提交后,您会立即注意到CI / CD管道已启动。

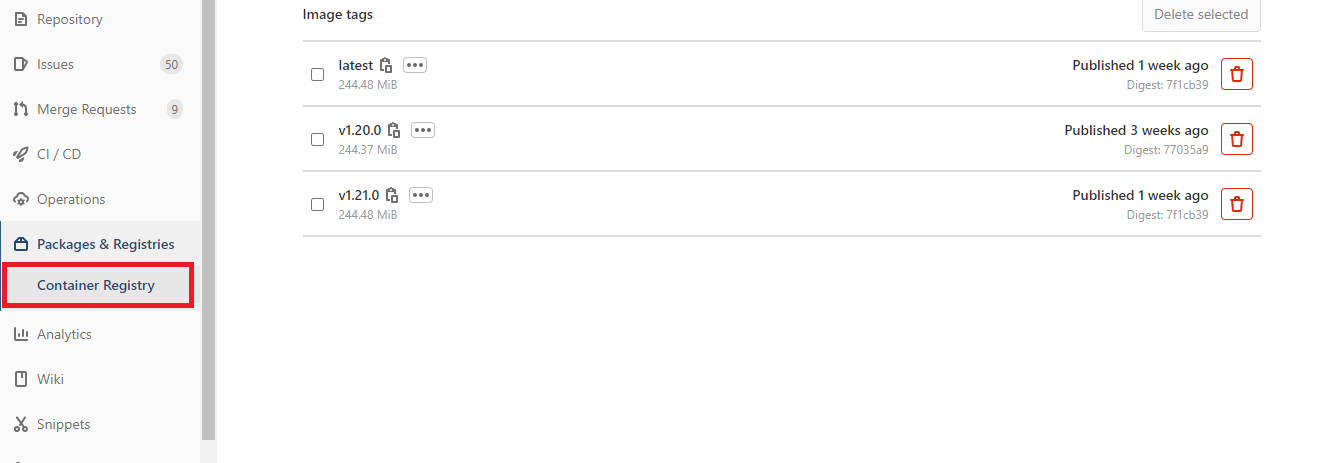
Similarly, if you have created Docker related files at your project’s root and created a new tag on GitLab with .gitlab-ci.yml in it, you will see the docker_build job running and it pushes the docker image with the assigned tag to the GitLab Container Registry.
同样,如果您在项目的根目录下创建了与Docker相关的文件,并在GitLab上创建了带有.gitlab-ci.yml的新标签,您将看到docker_build作业正在运行,并将带有已分配标签的docker_build映像推送到GitLab容器注册表。
Navigate to your AWS console and check the S3 bucket that you have created. It should contain your Python-Django application revision. Head over to the AWS CodeDeploy service and check in the deployment section, a deployment has started for your application to deploy it to the AWS EC2 instance.
导航到您的AWS控制台,然后检查您创建的S3存储桶。 它应该包含您的Python-Django应用程序修订版。 转到AWS CodeDeploy服务,并在“部署”部分中检查,已开始进行部署,以供您的应用程序将其部署到AWS EC2实例。

WOW! That’s a lot of stuff to digest but you made it to the end. To sum it up, you now have a fully working CI/CD solution that on every single new commit being pushed to your GitLab instance, will trigger a CI/CD pipeline which build, test and deploy your application on to the AWS EC2 instance. Now it’s your turn, apply the stuff what you’ve learned here.
哇! 有很多东西需要消化,但是你做到了最后。 综上所述,您现在拥有一个可以正常工作的CI / CD解决方案,该解决方案在将每次新提交提交到GitLab实例时,都会触发CI / CD管道,以构建 , 测试并将应用程序部署到AWS EC2实例。 现在轮到您了,将您在这里学到的东西应用到这里。
I hope you enjoyed it. Please check out my other blog on Dockerizing Django Application with PM2 and Nginx.
我希望你喜欢它。 请查看我的其他博客,了解如何使用PM2和Nginx对Django应用进行Dockerizing。
aws docker


 449
449

 被折叠的 条评论
为什么被折叠?
被折叠的 条评论
为什么被折叠?
 到【灌水乐园】发言


