


Sometimes, there are Node.js scripts that you may want to run on a regular basis without any interaction. Perhaps you want to ping a server every half-hour or download new data regularly from a news API. Whatever your use case, being able to automate those scripts would save you time and effort.
有时,您可能希望定期运行Node.js脚本而不进行任何交互。 也许您想每半小时对服务器进行一次ping或定期从新闻API下载新数据。 无论您使用哪种用例,都能自动执行这些脚本可以节省您的时间和精力。
If you’re working on a Mac, a great way of automating these scripts is using launchd to set an automated schedule. It can run asynchronous code, will run your tasks when the Mac wakes up, and most importantly, it’s already a part of macOS, meaning there’s no need to install new tools!
如果您在Mac上工作,则使launchd脚本自动化的一种好方法是使用launchd来设置自动化的时间表。 它可以运行异步代码,在Mac唤醒后将运行您的任务,最重要的是,它已经是macOS的一部分,这意味着无需安装新工具!
Let’s look at what it takes to get started with launchd and Node.js.
让我们看一下开始使用launchd和Node.js所需要的内容。
推出了什么? (What Is launchd?)
“launchd manages processes, both for the system as a whole and for individual users.” — Terminal launchd man page
“启动管理整个系统和单个用户的流程。” -终端启动手册页
launchd is a tool for running daemons and agents on macOS. If you aren’t familiar with these terms, a daemon is a system-wide service that is always running in the background, while agents are services that are executed on user-specific requests. As such, launchd is the preferred macOS automation tool for running scripts.
launchd是用于在macOS上运行守护程序和代理的工具。 如果您不熟悉这些术语,则守护程序是始终在后台运行的系统范围的服务,而代理是根据特定于用户的请求执行的服务。 因此, launchd是用于运行脚本的首选macOS自动化工具。
In this tutorial, we will be making user-specific requests to run a Node.js script, so we will make use of launch agents. These agents allow a user to define a task by using a property list (.plist) file that can be executed on a regular schedule as set by the user. launchd can automate tasks both periodically (using a set interval between executions) and on a calendar-based schedule, allowing for flexibility in the way you schedule your scripts to run.
在本教程中,我们将发出特定于用户的请求以运行Node.js脚本,因此我们将使用启动代理。 这些代理允许用户使用属性列表( .plist )文件定义任务,该文件可以按用户设置的常规时间表执行。 launchd可以定期(在执行之间使用设定的间隔)和基于日历的计划中自动执行任务,从而可以灵活地安排脚本的运行方式。
自动化Node.js脚本 (Automating Node.js Scripts)
Now that we know the basics of what launchd is, let’s put together a simple Node.js script to test it with. We’ll first set the agent to run it every minute, then change it to execute on a calendar-based schedule to demonstrate both ways we can define automated tasks.
既然我们已经知道了launchd的基础知识,那么我们就来组合一个简单的Node.js脚本进行测试。 我们将首先将代理设置为每分钟运行一次,然后将其更改为按照基于日历的时间表执行,以演示两种定义自动化任务的方式。
创建一个测试脚本 (Create a test script)
To begin, we will create a new folder on our desktop and place an empty JavaScript file inside:
首先,我们将在桌面上创建一个新文件夹,并将一个空JavaScript文件放入其中:
mkdir ~/Desktop/schedule-demo && touch ~/Desktop/schedule-demo/schedule.jsNote: Technically, this file can be called whatever you like and stored wherever you like as long as you update the path to the code in the remaining instructions.
注意:从技术上讲,只要您更新其余说明中代码的路径,就可以随心所欲地调用该文件并将其存储在任意位置。
Now that we have a file to use, let’s put a simple console.log timestamp inside by pasting the following into our new file:
现在我们有了文件可以使用,让我们通过将以下内容粘贴到新文件中来放置一个简单的console.log时间戳:
const now = new Date();const currentTime = `${now.getHours()}:${now.getMinutes()}`;console.log(`The time is ${currentTime}`);This console.log will output the current time when the script is run. We can test this script using Node and check whether we are getting a correct output in our Terminal:
运行脚本时,此console.log将输出当前时间。 我们可以使用Node测试此脚本,并检查我们是否在终端中获得了正确的输出:
node ~/Desktop/schedule-demo/schedule.js
创建一个plist文件 (Create a plist file)
Now that we have a script to run, we need to create a plist file launchd can use to automate the script. plist files are custom XML files used by Apple to set configurations, so they will allow us to assign our schedule as well as other key information about the automation.
现在我们有了要运行的脚本,我们需要创建一个launchd的plist文件,该文件可以用于使脚本自动化。 plist文件是Apple用于设置配置的自定义XML文件,因此它们将使我们能够分配时间表以及有关自动化的其他关键信息。
Run the following command to create an empty plist file in the correct location:
运行以下命令在正确的位置创建一个空的plist文件:
touch ~/Library/LaunchAgents/com.schedule-demo.daemon.plistOpen the file using your preferred code editor and paste the following code into it, updating {your directory} to the directory you are using:
使用您喜欢的代码编辑器打开文件,并将以下代码粘贴到其中,将{your directory}更新为您正在使用的目录:
<?xml version="1.0" encoding="UTF-8"?>
<!DOCTYPE plist PUBLIC "-//Apple//DTD PLIST 1.0//EN" "http://www.apple.com/DTDs/PropertyList-1.0.dtd">
<plist version="1.0">
    <dict>


        <key>Label</key>
        <string>com.demo.daemon.plist</string>


        <key>RunAtLoad</key>
        <true/>


        <key>StartInterval</key>
        <integer>60</integer>


        <key>StandardErrorPath</key>
        <string>{your directory}/stderr.log</string>


        <key>StandardOutPath</key>
        <string>{your directory}/stdout.log</string>


        <key>EnvironmentVariables</key>
        <dict>
            <key>PATH</key>
            <string><![CDATA[/usr/local/bin:/usr/local/sbin:/usr/bin:/bin:/usr/sbin:/sbin]]></string>
        </dict>


        <key>WorkingDirectory</key>
        <string>{your directory}</string>


        <key>ProgramArguments</key>
        <array>
            <string>/usr/local/bin/node</string>
            <string>schedule.js</string>
        </array>


    </dict>
</plist>
This configuration sets a few things:
此配置设置了一些内容:
- The name of the daemon. 守护程序的名称。
- The daemon will start whenever the user logs in. 每当用户登录时,守护程序就会启动。
- An interval of 60 seconds between executions. 两次执行之间的间隔为60秒。
Output errors and logs will be sent to
stderr.logandstdout.log.输出错误和日志将发送到
stderr.log和stdout.log。- The environment path is set (useful if your program uses other commands). 设置了环境路径(如果您的程序使用其他命令,则很有用)。
The agent will execute in the assigned
WorkingDirectory.代理将在分配的
WorkingDirectory执行。The script will run in Node by executing
/usr/local/bin/node schedule.js.该脚本将通过执行
/usr/local/bin/node schedule.js在Node中运行。
Note: This is just a simple configuration for this tutorial. For further configuration settings, check the launchd.plist man page in Terminal.
注意:这只是本教程的简单配置。 有关更多的配置设置,请查看 终端中 的 launchd.plist 手册页。
定期启动时间表 (Start the schedule periodically)
To begin the automation, run the following command in Terminal to load the plist into launchd:
要开始自动化,请在终端中运行以下命令以将plist加载到launchd :
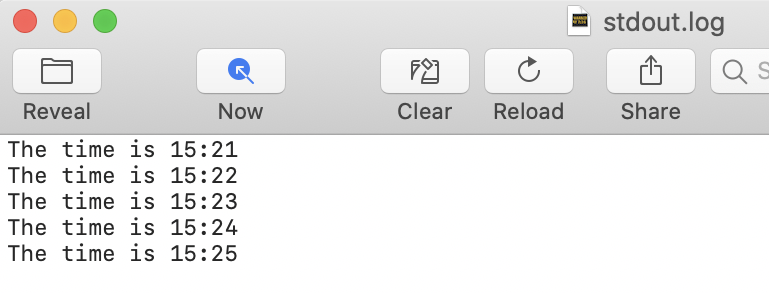
launchctl load ~/Library/LaunchAgents/com.schedule-demo.daemon.plistYou should now be able to see the script running every 60 seconds, outputting the console.log value into stdout.log:
现在,您应该能够看到脚本每60秒运行一次,将console.log值输出到stdout.log :
To stop the schedule, run the following command in Terminal:
要停止计划,请在终端中运行以下命令:
launchctl unload ~/Library/LaunchAgents/com.schedule-demo.daemon.plist设置基于日历的时间表以运行测试脚本 (Set a calendar-based schedule to run the test script)
We can now set the schedule to run on an interval, but what if we want it to run at a specific time? To do so, we can update our plist file to use StartCalendarInterval to define the schedule instead of StartInterval. As per the Apple Developer Docs, the calendar syntax works similarly to cron, so any values omitted from StartCalendarInterval will be treated as wildcards.
现在,我们可以将时间表设置为间隔运行,但是如果希望时间表在特定时间运行怎么办? 为此,我们可以更新plist文件以使用StartCalendarInterval而不是StartInterval来定义计划。 根据Apple Developer Docs ,日历语法的工作方式与cron相似,因此StartCalendarInterval省略的任何值都将被视为通配符。
So, let’s say we want to run the script every hour at 45 minutes past the hour. The syntax would be:
因此,假设我们要在每小时的45分钟之后每小时运行一次脚本。 语法为:
<key>StartCalendarInterval</key>
<dict>
    <key>Minute</key>
    <integer>45</integer>
</dict>
Alternatively, let’s say we only want to run the script each Monday at 11:30 a.m. The syntax for that would be:
另外,假设我们只想在每个星期一的上午11:30运行脚本,则其语法为:
<key>StartCalendarInterval</key>
<dict>
    <key>Minute</key>
    <integer>30</integer>
    <key>Hour</key>
    <integer>11</integer>
    <key>Weekday</key>
    <integer>1</integer>
</dict>
Further information on how to set the schedule can be found in the launchd.plist man file, but for this example, let’s run the script every hour at 45 minutes past the hour.
有关如何设置日程表的更多信息,可以在launchd.plist手册文件中找到,但是对于本示例,让我们在每小时凌晨45分钟的时间每小时运行一次脚本。
Paste the code below into your plist, again updating {your directory}:
将以下代码粘贴到您的plist ,再次更新{your directory} :
<?xml version="1.0" encoding="UTF-8"?>
<!DOCTYPE plist PUBLIC "-//Apple//DTD PLIST 1.0//EN" "http://www.apple.com/DTDs/PropertyList-1.0.dtd">
<plist version="1.0">
    <dict>


        <key>Label</key>
        <string>com.demo.daemon.plist</string>


        <key>RunAtLoad</key>
        <true/>


        <key>StartCalendarInterval</key>
        <dict>
            <key>Minute</key>
            <integer>45</integer>
        </dict>


        <key>StandardErrorPath</key>
        <string>{your directory}/stderr.log</string>


        <key>StandardOutPath</key>
        <string>{your directory}/stdout.log</string>


        <key>EnvironmentVariables</key>
        <dict>
            <key>PATH</key>
            <string><![CDATA[/usr/local/bin:/usr/local/sbin:/usr/bin:/bin:/usr/sbin:/sbin]]></string>
        </dict>


        <key>WorkingDirectory</key>
        <string>{your directory}</string>


        <key>ProgramArguments</key>
        <array>
            <string>/usr/local/bin/node</string>
            <string>schedule.js</string>
        </array>


    </dict>
</plist>
Now, as before, we can load the plist and it will begin to automate according to the schedule:
现在,像以前一样,我们可以加载plist ,它将根据时间表开始自动执行:
launchctl load ~/Library/LaunchAgents/com.schedule-demo.daemon.plist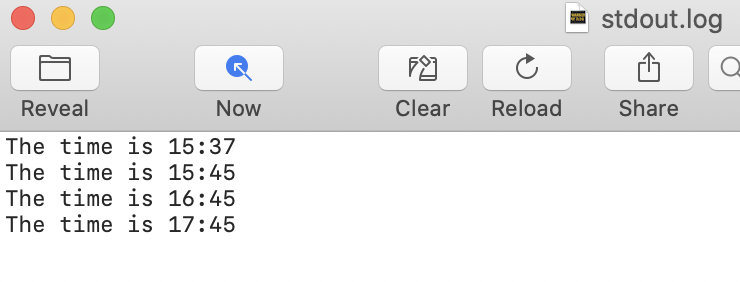
plist. And yes, this screenshot took a while.
plist. And yes, this screenshot took a while.时,它也会运行一次
plist. And yes, this screenshot took a while.
plist. And yes, this screenshot took a while.
And there you go: You can now schedule a specific time for a task to be executed using Node.js!
随您去:现在您可以安排一个特定的时间来使用Node.js执行任务!
Note: If you want to see the results of the following sections more quickly, you should unload the calendar-based schedule and replace it with the previous interval-based one so you don’t have to wait an hour between logs.
注意:如果要更快地查看以下各节的结果,则应卸载基于日历的计划,并将其替换为以前的基于间隔的计划,这样就不必在两个日志之间等待一个小时。
自动化异步脚本 (Automating Async Scripts)
Now that we’ve seen that simple, synchronous tasks can be automated, you might be wondering “But what about asynchronous scripts?” Well, good news: launchd is simply running an instance of Node on a scheduled basis, so asynchronous scripts will run as well. Let’s update the code to include an asynchronous call to an API to test this out.
既然我们已经看到简单,同步的任务可以自动化,那么您可能会想:“但是异步脚本呢?” 好吧,好消息: launchd只是按计划运行Node的实例,因此异步脚本也将运行。 让我们更新代码以包括对API的异步调用以进行测试。
Let’s start by creating an npm package in our folder and installing axios for our API calls:
让我们开始在文件夹中创建一个npm软件包,并为API调用安装axios :
npm init -y && npm install axiosNow, add the following code to the end of your schedule.js file to make a call to the Chuck Norris API (an external API that provides random Chuck Norris jokes):
现在,将以下代码添加到schedule.js文件的末尾以调用Chuck Norris API(提供随机Chuck Norris笑话的外部API):
const apiCall = async () => {
const { data: { value }, } = await axios.get("https://api.chucknorris.io/jokes/random");
console.log(value);
};
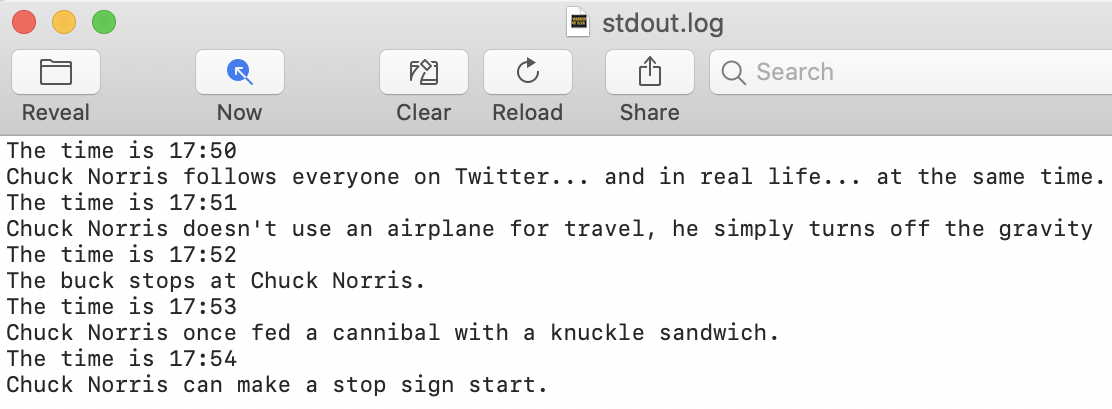
apiCall();There’s no need to reload the plist. The scheduled task will use the new version of the script automatically as long as the path of the file has not changed. Now when the script runs, we can see it is not only logging the time as before but also getting information from the API!
无需重新加载plist 。 只要文件的路径没有更改,计划任务将自动使用脚本的新版本。 现在,当脚本运行时,我们可以看到它不仅像以前一样记录时间,而且还可以从API获取信息!
睡眠后运行任务 (Running Tasks After Sleep)
We’ve seen that launchd is capable of running tasks on a schedule when your Mac is awake, but what happens if you are using a MacBook and you close the lid or your desktop Mac has power saving features enabled and it falls asleep? The answer will depend on whether you’re using StartInterval to set a periodic schedule or StartCalendarInterval to set a calendar-based one.
我们已经看到,当Mac醒着时, launchd能够按计划运行任务,但是如果您使用MacBook并合上盖子或台式机Mac启用了节能功能并且它进入睡眠状态,会发生什么情况? 答案将取决于您是使用StartInterval设置定期计划还是使用StartCalendarInterval设置基于日历的计划。
使用StartInterval时 (When using StartInterval)
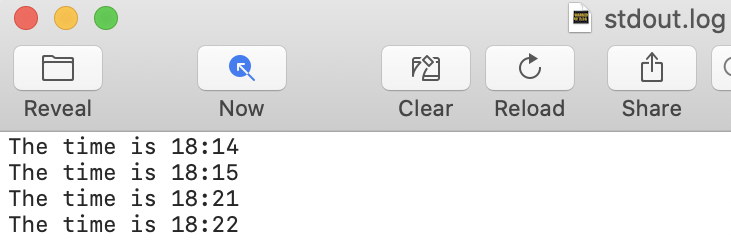
As you can see above, the Mac was put to sleep at 18:15 and then woken up at 18:21. The schedule automatically continued on once the Mac was awake, but while it was asleep, the tasks were not running.
如上所示,Mac在18:15进入睡眠状态,然后在18:21醒来。 Mac唤醒后,日程表会自动继续,但是在睡眠状态下,任务没有运行。
使用StartCalendarInterval时 (When using StartCalendarInterval)
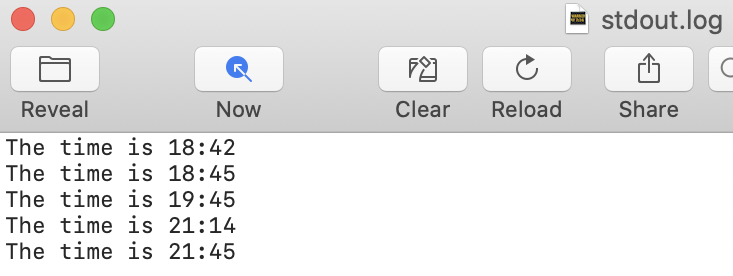
As you can see, the schedule is followed while the Mac is awake. When it was put to sleep after 19:45, it skipped the 20:45 scheduled task but completed it automatically on wakeup at 21:14. Then it resumed the regular schedule.
如您所见,Mac处于唤醒状态时,将遵循时间表。 当它在19:45之后进入睡眠状态时,它跳过了20:45安排的任务,但在21:14唤醒后自动完成了它。 然后,它恢复了常规计划。
As such, the Mac does need to be awake at its scheduled time, but it is possible to automatically wake your Mac to ensure that the automation occurs. Additionally, if the exact timing of the task is not important, the schedule does automatically perform the task when the Mac is awoken.
因此,Mac确实需要按计划的时间唤醒,但是可以自动唤醒Mac以确保自动进行。 此外,如果任务的确切时间并不重要,则Mac唤醒时,日程表将自动执行任务。
结论 (Conclusion)
launchd is an incredibly powerful tool for automation in macOS. It isn’t limited to just Node either. It can be used to automatically run any script on your Mac, perhaps even sending emails from Terminal. You can use it to run synchronous or asynchronous code, and it can catch up after your Mac has fallen asleep.
launchd是用于macOS自动化的功能强大的工具。 它也不仅限于Node。 它可以用来在Mac上自动运行任何脚本,甚至可以从Terminal发送电子邮件 。 您可以使用它来运行同步或异步代码,并且在Mac进入睡眠状态后可以赶上它。
With the power it wields, you’ll easily be able to schedule whatever you need to automate.
凭借其强大的功能,您可以轻松地调度任何需要自动化的内容。
资源资源 (Resources)
launchdman page in Terminal在终端
launchd手册页Apple Support — Script management with launchd in Terminal on Mac
Apple支持- 脚本管理在Mac的Terminal中启动
Apple Developer Docs — Creating Launch Daemons and Agents
Apple Developer Docs- 创建启动守护程序和代理
翻译自: https://medium.com/better-programming/schedule-node-js-scripts-on-your-mac-with-launchd-a7fca82fbf02


 7121
7121


 被折叠的 条评论
为什么被折叠?
被折叠的 条评论
为什么被折叠?
 到【灌水乐园】发言


