


react优化
React is one of (if not the most) popular JavaScript library. There are good reasons why React is so beloved among Javascript developers. For one, it prioritizes the UI (User Interface) part of a website; this includes any aspect that a user interacts with, such as on-screen menus, buttons, and search bars.
[R EACT是(如果不是最)流行JavaScript库之一。 有充分的理由使React在Javascript开发人员中如此受欢迎。 首先,它优先考虑网站的UI(用户界面)部分; 这包括用户与之互动的任何方面,例如屏幕上的菜单,按钮和搜索栏。
React solves many performance issues involving manipulation of the DOM(Document Object Model). It achieves this via the process of reconciliation, in which it builds a copy of the DOM called the current tree on initial render. As updates on the DOM are made, they are rendered on a second tree called a workInProgress tree; it is on this tree that all changes are accumulated. Finally, when updates are processed, the workInProgress tree is used to update the actual DOM, and the current tree becomes updated to represent the most up-to-date DOM.
React解决了许多涉及DOM( 文档对象模型 )操纵的性能问题。 它通过协调过程实现了这一点,在该过程中,它在初始渲染时构建了称为当前树的DOM副本。 在对DOM进行更新时,将它们渲染在称为workInProgress树的第二棵树上。 正是在这棵树上累积了所有更改。 最后,在处理更新时,将使用workInProgress树来更新实际的DOM,而当前树将被更新以表示最新的DOM。
Additional information regarding React’s best practices could be found via the very well-written and succinct React documentation. To guide you on improving your workflow, this blog post comprises overviews of popular tools that when paired with React will give you the most optimal coding experience.
有关React最佳实践的其他信息,可以通过编写得非常简洁的React文档找到 。 为了指导您改善工作流程,此博客文章概述了流行的工具,这些工具与React搭配使用将为您提供最佳的编码体验。
创建React应用 (Create React App)
Create React App is a build pack; it offers a modern build setup with no configuration. It’s the easiest and the most comfortable way to start learning React. It provides you with an optimized starting point by setting up a preconfigured development environment so you can use the latest features of JavaScript. There are a lot of things that Create React App is doing under the hood, explaining everything that it does would take a whole article, so we’re just going to include some of the most important parts of it.
Create React App是一个构建包; 它提供了无需配置的现代化构建设置。 这是开始学习React的最简单,最舒适的方法。 通过设置预配置的开发环境,它为您提供了一个优化的起点,因此您可以使用JavaScript的最新功能。 Create React App在幕后做了很多事情,解释了它所做的一切都需要整篇文章,因此我们将包括其中的一些最重要部分。
It’s important to state that in order to run Create React App you need to have Node v8.10 or higher on your local development machine.
必须声明要运行 Create React App, 您需要在本地开发机器上安装Node v8.10或更高版本。
Create React App provides you with a few methods to create a React Application Build. Navigate to the directory you would like to house your new React app, then run any of the commands below:
Create React App为您提供了一些创建React Application Build的方法。 导航到您想要容纳新React应用程序的目录,然后运行以下任何命令:
npx create-react-app my-app(npx is available in npm v5.2 or higher)npm init react-app my-app(npm init is available in npm v6 or higher)yarn create react-app my-app(yarn create is available in yarn v0.25 or higher)These are the only steps you need to take, Create React App does the rest. Pretty cool, right.
这些仅是您需要采取的步骤,其余部分则由Create React App完成。 很酷,对。
Create React App toolchain consists mainly of three tools: Package Manager, Bundler, and a Compiler.
Create React App工具链主要由三个工具组成:Package Manager,Bundler和Compiler。
A package manager, as the name suggests, is a tool that helps you manage the dependencies that your project needs to work correctly. It lets you take advantage of a broad ecosystem of third-party packages and efficiently install or update them. There are two main package managers: Yarn and npm. Both yarn and npm offer similar features.
顾名思义, 程序包管理器是一种工具,可帮助您管理项目正常运行所需的依赖项。 它使您可以利用广泛的第三方软件包生态系统并有效地安装或更新它们。 主要有两个软件包管理器: Yarn和npm 。 yarn和npm都提供类似的功能。
A bundler which lets you write modular code and bundle it together in small packages for usage in a browser. The two most popular bundlers are Webpack and Parcel. It’s worth mentioning that Parcel is much easier to configure than Webpack. Create React App uses Webpack as its default bundler and it’s already preconfigured for you.
捆扎机 它使您可以编写模块化代码并将其打包为小包装,以供浏览器使用。 两种最受欢迎的捆绑器是Webpack和Parcel 。 值得一提的是,Parcel的配置比Webpack容易得多。 Create React App使用Webpack作为其默认捆绑程序,并且已经为您进行了预配置。
A JavaScript compiler that converts modern javascript code (ES6+) into a backward-compatible version of JavaScript that can be run by older JS engines. The most popular compiler is Babel which uses the latest features of JavaScript and it comes by default with Create React App.
一个JavaScript 编译器 ,它将现代javascript代码(ES6 +)转换为可以由较旧的JS引擎运行JavaScript的向后兼容版本。 最受欢迎的编译器是Babel ,它使用JavaScript的最新功能,并且默认情况下包含在Create React App中。
There are two very important tools that Create React App includes in your build, which are going to be an important part of this article: A linter (ESLint) and a formatted (Prettier).
Create React App包含在您的构建中有两个非常重要的工具,它们将成为本文的重要组成部分:linter(ESLint)和格式化的(Prettier)。
更漂亮 (Prettier)
(Code Formatter)
(代码格式化程序)

Prettier is an amazing code style formatter that makes formatting a no-brainer. Using Prettier within a team helps with style consistency, as well as saves you time from disagreements regarding formatting. This allows you to put the emphasis on code content and important ideas rather than trivial formatting.
Prettier是一种了不起的代码样式格式化程序,它使格式化工作变得轻而易举。 在团队中使用Prettier有助于样式的一致性,并节省您在格式化方面的分歧。 这使您可以将重点放在代码内容和重要思想上,而不是琐碎的格式设置。
How does Prettier work? I’m glad you asked!
漂亮的作品如何运作? 我很高兴你问!
Prettier takes the code that you write and breaks it down into an abstract syntax tree, which is simply a representation of your code. After that, it takes that abstract syntax tree, throws away your whole formatting style, and then replaces it with its predefined style. That’s all.
Prettier将您编写的代码分解为一个抽象的语法树,该语法树只是您的代码的一种表示形式。 之后,它将采用该抽象语法树,丢弃整个格式化样式,然后将其替换为其预定义样式。 就这样。
Prettier was built by the talented James Long, who aimed to minimize the struggle that developers go through when it comes to formatting. Let’s get started on making your code Prettier!
Prettier由才华横溢的詹姆斯·朗 ( James Long )打造,他的目标是最大程度地减少开发人员在格式化方面的努力。 让我们开始使代码更漂亮!
安装更漂亮 (Installing Prettier)
In order to install Prettier in your project, navigate to your project root directory in your Terminal and run the following command:
为了在您的项目中安装Prettier,请在终端中导航到项目根目录并运行以下命令:
npm install -D prettierThis will install prettier as a developer dependency by adding it to your package.json file. The reason why we want it to be a developer dependency is so that when we deploy our code to production, “Prettier” doesn’t go with it.
通过将其添加到package.json文件中,可以将其作为开发人员依赖项安装。 我们之所以希望它成为开发人员依赖项,是因为当我们将代码部署到生产环境时,“ Prettier”就不适用了。
If you go to your package.json file you should see something like this:
如果转到package.json文件,应该会看到类似以下内容的内容:

Congrats! Now you have Prettier installed in your project.
恭喜! 现在,您的项目中已经安装了Prettier。
In order to use Prettier from your Terminal, we can create a npm/yarn script that we’re going to add inside our package.json file.
为了在您的终端中使用Prettier,我们可以创建一个npm / yarn脚本,并将其添加到package.json文件中。
Copy the following line and add it under “scripts” in your package.json file.
复制以下行并将其添加到package.json文件中的“ scripts”下。
"format": "prettier --write \"src/**/*.{js,jsx}\""This creates a script which we’re going to call “ format” that runs prettier in any file with the extension “.js” or “.jsx” that lives inside the “src” directory of our project. If your project’s structure is different, you can always change it. If you follow conventions, however, all your js and jsx files should be inside a directory named “src”.
这将创建一个脚本,我们将其称为“ format ”, 该脚本 在任何扩展名为“ .js ”或“ .jsx ”的 文件中运行,该文件 位于项目的“ src ”目录中。 如果项目的结构不同,则可以随时进行更改。 但是,如果遵循约定,则所有js和jsx文件都应位于名为“ src”的目录内。
--write allows prettier to write the files instead of just reading them, if we would omit "--write", prettier would just display the formatted code in our Terminal.This is it, now every time we run “npm run format” or “yarn run format”, Prettier formats all of our js, jsx files.
就是这样,现在每次我们运行“ npm run format”或“ yarn run format”时,Prettier都会格式化我们所有的js,jsx文件。
Alternatively, you can also run Prettier by installing it globally with the command:
另外,您还可以通过以下命令全局安装Prettier:
npm install --global prettierand running it with the command:
并使用以下命令运行它:
prettier --write src/script-name.js//change "script-name.js" to any file name you want to format.Now, this whole process is helpful enough, but what if we could make it even easier for us.
现在,这整个过程已经足够有用,但是如果我们可以简化它的话,该怎么办。
If you’re using Visual Studio Code, you can download “Prettier” extension
如果您使用的是Visual Studio Code,则可以下载“更漂亮”的扩展程序
I’ll show you how to configure it so that every time we save a file, “Prettier” formats it
我将向您展示如何配置它,以便每次我们保存文件时,“漂亮”都会对其进行格式化
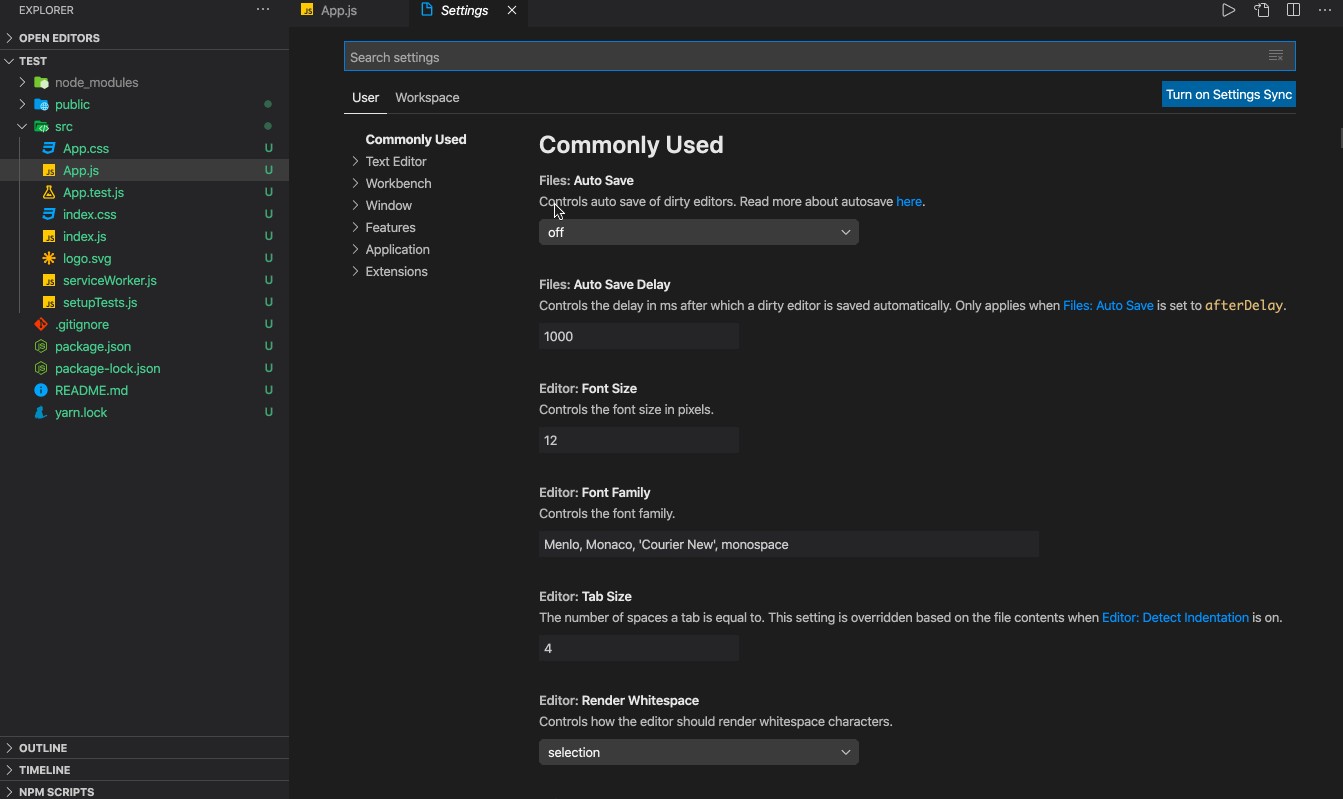
Go to Settings by using the keyboard shortcut:
使用键盘快捷键转到“设置”:
"cmd+," on macOS or "Ctrl+," on Windowsor by navigating manually through:
或通过以下方式手动导航:
Code>Preferences>Settings //macOSFile>Preferences>Settings //WindowsWhile in settings, search for “Format on save” and check the corresponding checkbox. This configures VS Code so that every time you save a file it formats it with Prettier.
在设置中,搜索“ 保存时格式化 ”并选中相应的复选框。 这将配置VS Code,以便每次保存文件时都会使用Prettier对其进行格式化。
However, say we don’t want to use Prettier format-on-save feature in every project. We can require that in order for Prettier to Format on save, we would need a config file in our project. Follow the below steps to do so:
但是,请说我们不想在每个项目中都使用保存时保存的Prettier格式功能。 我们可以要求为了使“漂亮的东西”在保存时格式化,我们在项目中需要一个配置文件。 请按照以下步骤操作:
Navigate to VS Code Settings, search for “Prettier: Require Config”, and check the corresponding checkbox. Next, create a file named “.prettierrc” in the project’s root directory and inside that file add empty curly brackets “{}”. Doing so will specify to VS Code to use the predefined config for Prettier.
导航到“ VS代码设置”,搜索“ Prettier:Require Config ”,然后选中相应的复选框。 接下来,在项目的根目录中创建一个名为“ .prettierrc ”的文件,并在该文件内部添加空大括号“ {} ”。 这样做将指定VS Code使用Prettier的预定义配置。
Hurray! Now you can take formatting out of your list of things to worry about!
欢呼! 现在,您可以将格式从需要担心的事情中排除!
ESLint (ESLint)

(A JavaScript Linter)
(一个JavaScript Linter)
JS Linters are tools that guide you on the debugging process.
JS Linters是指导您进行调试过程的工具。
They scan your code for errors and give you feedback with specified line numbers where suspecting errors occur. Inside a code editor like VS Code, with the ESLint extension enabled, errors get highlighted. ESLint also displays a list of errors on your console. There are few Linters out there, and the most popular one is ESLint. ESLint is extremely configurable, and the most important part that concerns us is that it supports JSX. There are multiple preset configs we can use, such as the one from Airbnb, which is quite popular. However, we’re going to use the same configuration that React guru Brian Holt uses.
他们会扫描您的代码中是否有错误,并在发生可疑错误的地方为您提供指定行号的反馈。 在VS Code之类的代码编辑器内部,启用了ESLint扩展,突出显示了错误。 ESLint还会在控制台上显示错误列表。 那里的Linter很少,最受欢迎的是ESLint。 ESLint具有极高的可配置性,与我们有关的最重要的部分是它支持JSX。 我们可以使用多种预设配置,例如来自Airbnb的一种非常流行。 但是,我们将使用与React大师Brian Holt相同的配置。
安装ESLint (Installing ESLint)
We install ESLint by navigating to the project root directory and running the following command:
我们通过导航到项目根目录并运行以下命令来安装ESLint:
npm install -D eslint eslint-config-prettierAs you can see above, we also include eslint-config-prettier, which tells ESLint not to worry about styling because Prettier does that already.
从上面可以看到,我们还包括eslint-config- prettier ,它告诉ESLint不必担心样式,因为Prettier已经做到了。
The next step will be to create the config file for ESLint in your root directory. Create a new file and name it “.eslintrc.json”. Inside that file will add a bunch of stuff.
下一步将在您的根目录中为ESLint创建配置文件。 创建一个新文件,并将其命名为“ .eslintrc.json ”。 在该文件内将添加一堆东西。
{
  "extends": ["eslint:recommended", "prettier", "prettier/react"],
  "plugins": [],
  "parserOptions": {
    "ecmaVersion": 2020,
    "sourceType": "module",
    "ecmaFeatures": {
      "jsx": true
    }
  },
  "env": {
    "es6": true,
    "browser": true,
    "node": true
  }
}
Now we need to configure ESLint so it recognizes React.
现在我们需要配置ESLint以便它可以识别React。
Go back to your console and run the following command:
返回控制台并运行以下命令:
npm install -D babel-eslint eslint-plugin-import eslint-plugin-jsx-a11y eslint-plugin-reactAfter the installation is finished you need to update your .eslintrc.json file with the following configuration:
安装完成后,您需要使用以下配置更新.eslintrc.json文件:
{
  "extends": [
    "eslint:recommended",
    "plugin:import/errors",
    "plugin:react/recommended",
    "plugin:jsx-a11y/recommended",
    "prettier",
    "prettier/react"
  ],
  "rules": {
    "react/prop-types": 0
  },
  "plugins": ["react", "import", "jsx-a11y"],
  "parserOptions": {
    "ecmaVersion": 2020,
    "sourceType": "module",
    "ecmaFeatures": {
      "jsx": true
    }
  },
  "env": {
    "es6": true,
    "browser": true,
    "node": true
  },
  "settings": {
    "react": {
      "version": "detect"
    }
  }
}
Up to this point, ESLint is configured for React. Now we need to add config for Hooks as well.
到目前为止,已为React配置ESLint。 现在,我们还需要为Hooks添加配置。
In your console, run the following command:
在控制台中,运行以下命令:
npm install -D eslint-plugin-react-hooksafter that we’ll go back to our .eslintrc.json and update it with the following:
之后,我们将返回到.eslintrc.json并使用以下内容对其进行更新:
{
  "extends": [
    "eslint:recommended",
    "plugin:import/errors",
    "plugin:react/recommended",
    "plugin:jsx-a11y/recommended",
    "prettier",
    "prettier/react"
  ],
  "rules": {
    "react/prop-types": 0,
    "no-console": 1,
    "react-hooks/exhaustive-deps": 1
  "plugins": ["react", "import", "jsx-a11y","react-hooks"],
  "parserOptions": {
    "ecmaVersion": 2020,
    "sourceType": "module",
    "ecmaFeatures": {
      "jsx": true
    }
  },
  "env": {
    "es6": true,
    "browser": true,
    "node": true
  },
  "settings": {
    "react": {
      "version": "detect"
    }
  }
}
This is how your .eslintrc.json file should look like in the end.
最后,这就是您的.eslintrc.json文件的外观。
The last step we have to take is to create a new script inside our package.json file and also install ESLint extension inside our VS Code environment.
我们要做的最后一步是在package.json文件中创建一个新脚本,并在VS Code环境中安装ESLint扩展。
Go to your package.json and add the following script:
转到您的package.json并添加以下脚本:
"lint": "eslint \"src/**/*.{js,jsx}\" --quiet",Now you have access to the “npm run lint” or “yarn run lint” command.
现在,您可以访问“ npm run lint”或“ yarn run lint”命令。
To finish it, let’s install the ESLint extension for VS Code.
为了完成它,让我们为VS Code安装ESLint扩展。
And you’re done.
这样就完成了。
Having ESLint in your arsenal of tools will help keep your React code concise and free of pesky avoidable bugs!
在您的工具库中拥有ESLint将有助于保持您的React代码简洁明了,并且没有讨厌的可避免错误!
Emmet (Emmet)

Emmet is an extension that comes pre-installed in popular code editors such as VS Code, which makes programming more efficient via keyboard shortcuts and code snippets. Its syntax is inspired by CSS Selectors, making it quite easy to pick up.
Emmet是VS Code等流行的代码编辑器中预先安装的扩展,可通过键盘快捷键和代码段使编程更高效。 它的语法受CSS Selectors的启发,使其很容易使用。
Emmet already supports JSX out of the box; no lengthy installation is required! To make sure that Emmet is enabled in React files, go to VS Code settings, search for “Emmet: Preferences” and select “Edit in settings.json.”Inside settings.json make sure there’s “javascript”:“javascriptreact” included as part of “emmet.includeLanguages”, like so:
Emmet已经开箱即用地支持JSX。 无需冗长的安装! 为了确保在React文件中启用Emmet,请转到VS Code设置,搜索“ Emmet:首选项”,然后选择“在settings.json中编辑”。在settings.json内部,请确保其中包含“ javascript”:“ javascriptreact ” “ emmet.includeLanguages ”的一部分,如下所示:
"emmet.includeLanguages": {
    "javascript": "javascriptreact"
}
That’s all there is to it! To help you get acquainted with Emmet syntax, included is a reference to Emmet’s official cheat-sheet:
这里的所有都是它的! 为了帮助您熟悉Emmet语法,其中包括对Emmet官方备忘单的引用:
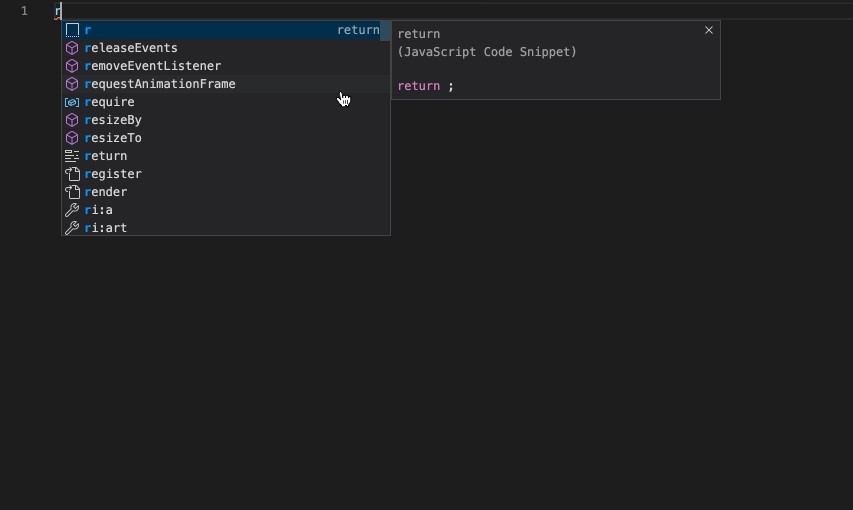
Let’s see it in action!
让我们看看它的作用!
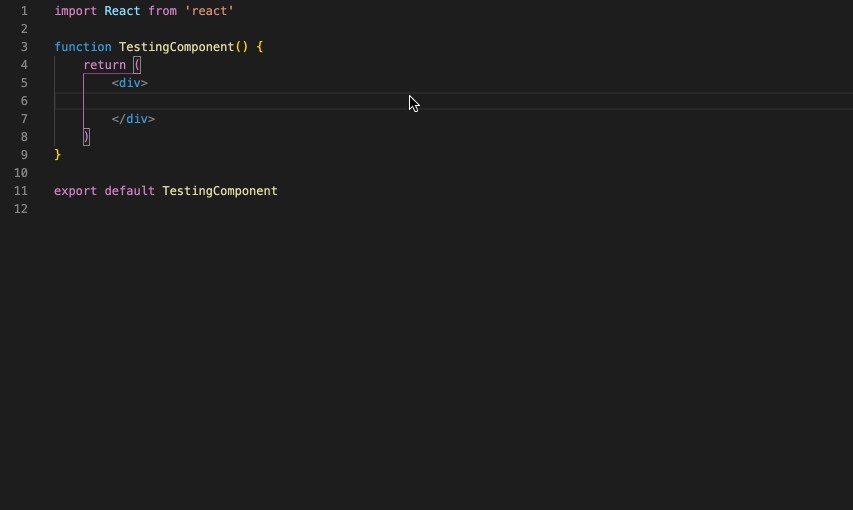
Combined with other snippets such as:
结合其他片段,例如:
We can generate code much faster, without even trying.
我们可以更快地生成代码,而无需尝试。
As developers, we forever strive for the goal of writing clean, clear, and efficient code. However, carry the load ourselves we need not, when tools such as Emmet, ESLint, and Prettier already exist to make our lives easier! Learn to utilize them, and your future self will surely thank you a million.
作为开发人员,我们永远为编写干净,清晰和高效的代码而奋斗。 但是,当已有Emmet,ESLint和Prettier之类的工具使我们的生活更轻松时,我们就不需要自己承担负载了! 学会利用它们,您的未来自我一定会感谢您一百万。
Resources
资源资源
翻译自: https://medium.com/swlh/optimizing-your-react-experience-d20f1d81716e
react优化


 275
275

 被折叠的 条评论
为什么被折叠?
被折叠的 条评论
为什么被折叠?
 到【灌水乐园】发言


