


创建react应用程序
Hello readers!
各位读者好!
Today in this article we will see how to create a travel list app using React, Gatsby, Leaflet and GraphCMS.
今天,在本文中,我们将看到如何使用React,Gatsby,Leaflet和GraphCMS创建旅行清单应用程序。
Actually travelling is always fun and we want to travel to many different places but we didn’t have enough time to do. So we have decided to create a bucket list that contains custom mapping app that shows our all destination in the bucket list.
其实旅行总是很有趣,我们想去很多不同的地方,但是我们没有足够的时间做。 因此,我们决定创建一个包含自定义映射应用程序的存储区列表,该应用程序在存储区列表中显示我们的所有目的地。
Before getting into the topic, let’s see what are the steps we are going to follow to build this app:
在进入主题之前,让我们看看构建此应用程序要遵循的步骤:
- Create a new app with Leaflet. 使用Leaflet创建一个新应用。
- Managing a list of travel location in GraphCMS. 在GraphCMS中管理旅行位置列表。
- Querying our data location with GraphQL. 用GraphQL查询我们的数据位置。
- Create a bucket list for destination and adding to our map. 为目的地创建一个存储区列表,并将其添加到我们的地图中。
Let’s get into the topic, we are going to build a mapping app using Gatsby and CMS that will display markers on a map and shows our locations in a simple bucket list locations.
让我们进入主题,我们将使用Gatsby和CMS构建一个映射应用程序,该应用程序将在地图上显示标记并在简单的存储桶列表位置中显示我们的位置。
使用Leaflet创建一个新应用 (Create a new app with Leaflet)
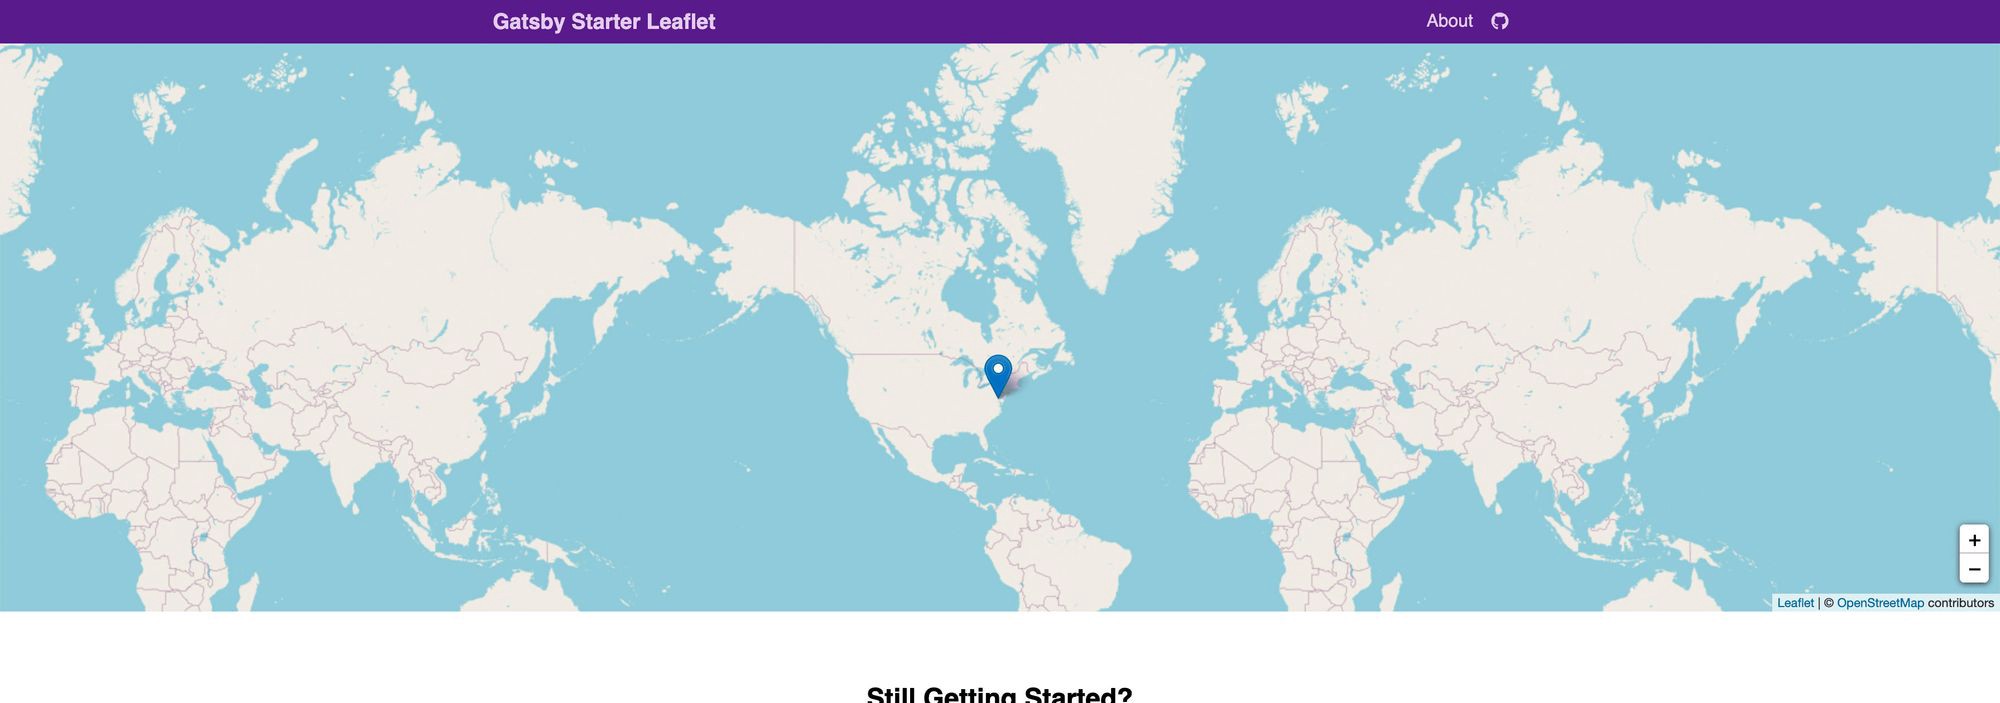
We are going create a basic React application with mapping tools. To get started, go to your local directory where you want to create your new app and run.
我们将使用映射工具创建一个基本的React应用程序。 首先,请转到您要在其中创建新应用并运行的本地目录。
gatsby new my-travel-bucket-list https://github.com/colbyfayock/gatsby-starter-leafletNow replace your my-travel-bucket-list with your convenient name you want. This is used to create the new folder for the app.
现在,用您想要的方便名称替换my-travel-bucket-list 。 这用于为应用程序创建新文件夹。
After you run that command, Gatsby will Started and install all the dependencies we want. And then go to that directory and run the development command:
运行该命令后,Gatsby将启动并安装我们想要的所有依赖项。 然后转到该目录并运行开发命令:
cd my-travel-bucket-list
yarn develop
# or
npm run develop
Now your app should be ready.
现在您的应用程序应该已经准备好了。
Now go to src/pages/index.js file. And then remove the first line inside of mapEffect for leafletElement to map:
现在转到src / pages / index.js文件。 然后删除mapEffect内的第一行以使leafletElement映射:
async function mapEffect({ leafletElement: map } = {}) {
  if ( !map ) return;
}
And then remove the markerRef at the top of the IndexPage component. And then remove the ref={markerRef} prop from our <Marker> component, and the useRef import next to React.
然后删除IndexPage组件顶部的markerRef。 然后从<Marker>组件中删除ref = {markerRef}道具,并在React旁边删除useRef导入。
Finally we have to remove all the variables that start with popup and time, including:
最后,我们必须删除所有以弹出窗口和时间开头的变量,包括:
- timeToZoom timeToZoom
- timeToOpenPopupAfterZoom timeToOpenPopupAfterZoom
- timeToUpdatePopupAfterZoom timeToUpdatePopupAfterZoom
- popupContentHello popupContentHello
- popupContentGatsby popupContentGatsby
And then you have to remove all of the following lines:
然后,您必须删除以下所有行:
import L from 'leaflet';
...
import { promiseToFlyTo, getCurrentLocation } from 'lib/map';
...
import gatsby_astronaut from 'assets/images/gatsby-astronaut.jpg';
...
const ZOOM = 10;
Now you will get the basic map.
现在您将获得基本地图。
在GraphCMS中管理旅行位置列表 (Managing a list of travel location in GraphCMS)
To get started with GraphCMS, First you need an account and there is a free tier available that makes it easy to sign up for our demo. If you already have an account then you can log in with that.
要开始使用GraphCMS,首先您需要一个帐户,并且有一个免费的可用层,可以轻松注册我们的演示。 如果您已经有一个帐户,则可以使用该帐户登录。
在GraphCMS中创建一个新项目 (Creating a new project in GraphCMS)
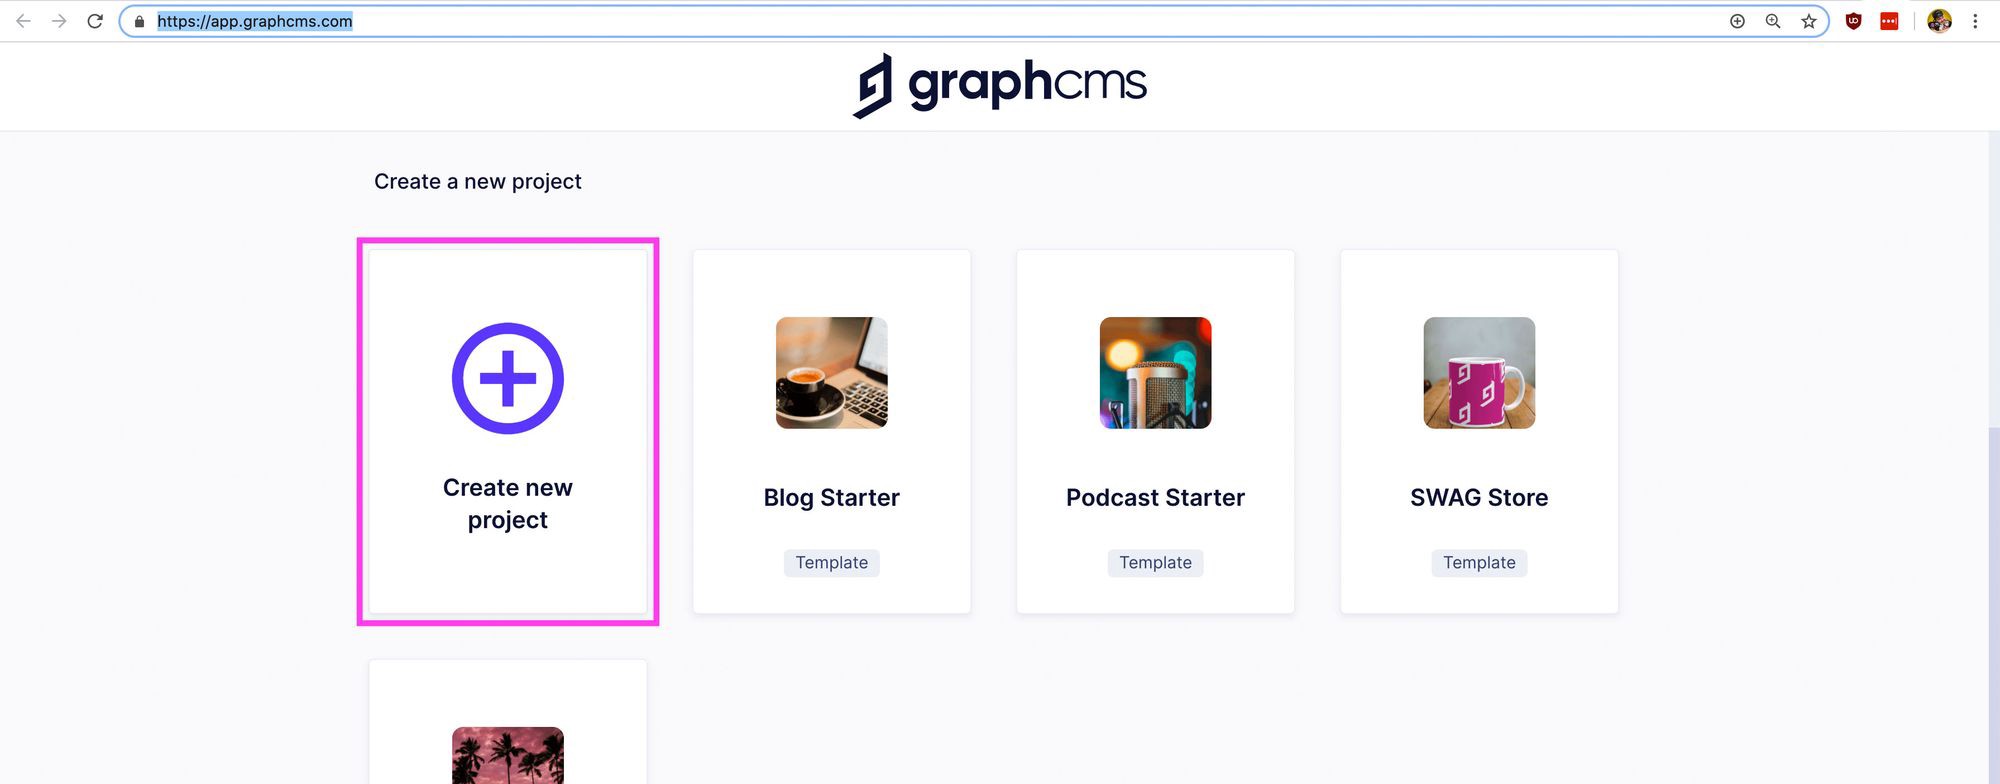
Once logged in,you have to create a new project. We are going to create manually, so go to GraphCMS Dashboard and select Create new project.
登录后,您必须创建一个新项目。 我们将手动创建,因此转到GraphCMS 仪表板,然后选择创建新项目。
Now you have to enter the Name and Description:
现在,您必须输入名称和描述:
Name: My Travel Bucket List
名称 :我的旅行清单
Description: The locations that I want to travel.
描述 :我要旅行的地点。
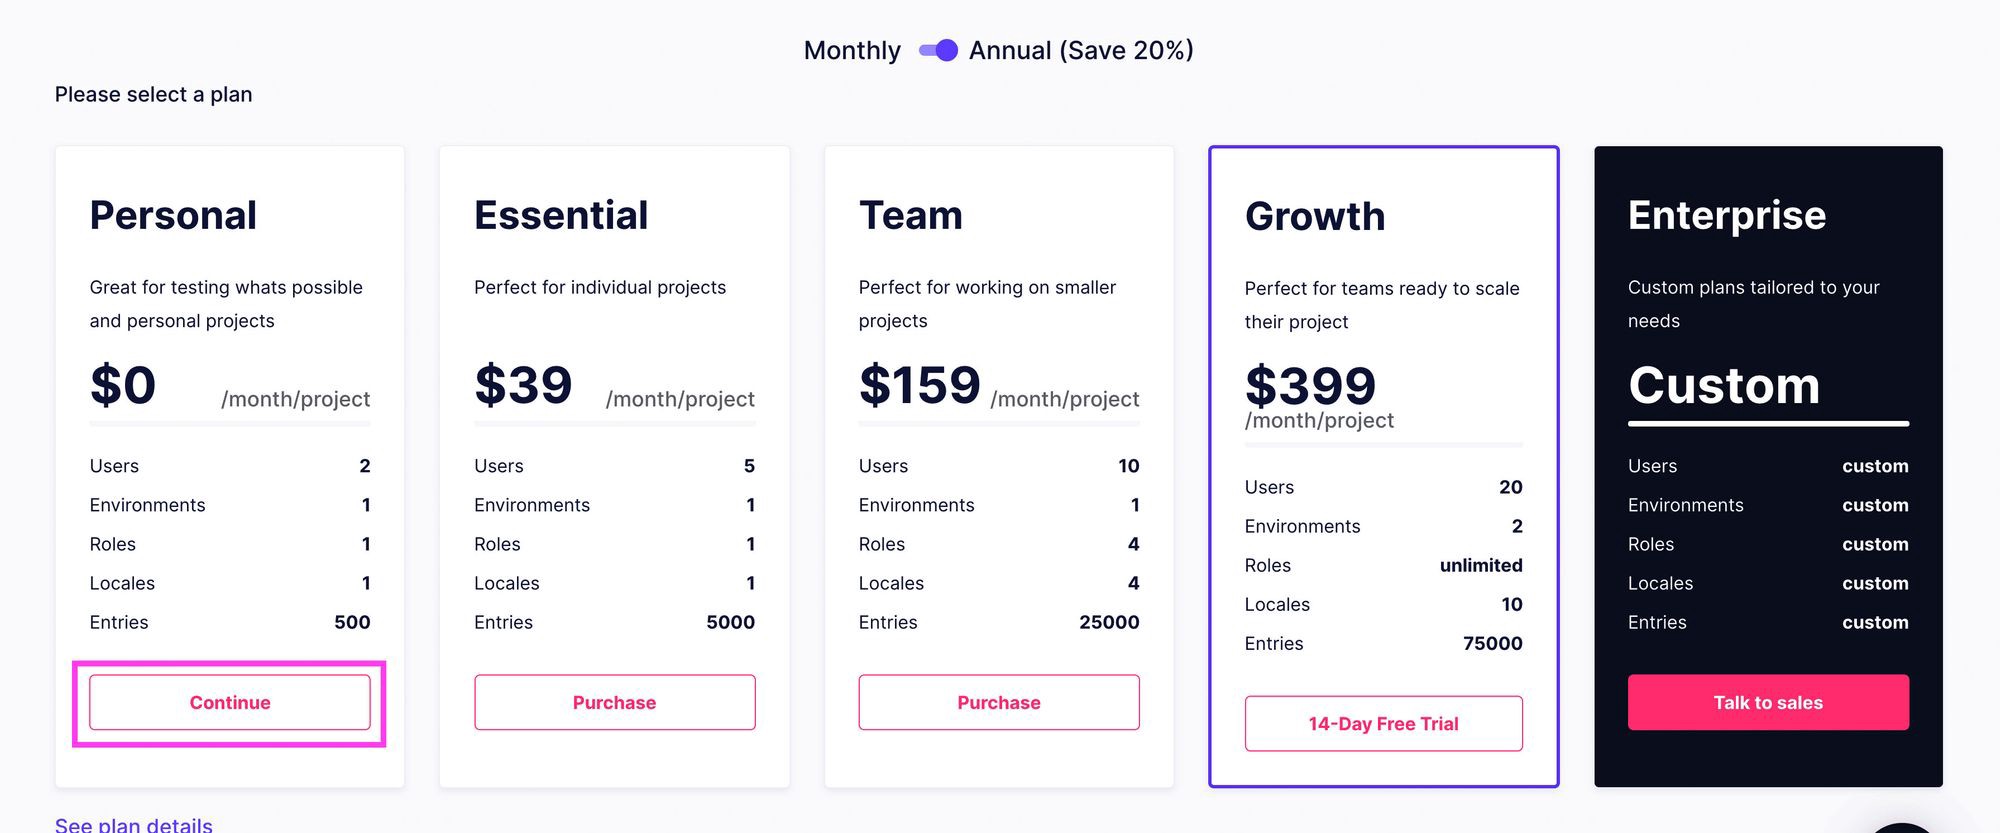
Select the region shown in the below map for storing the data in this region. Select your nearby region for your convenience.
选择下图所示的区域,将数据存储在该区域中。 为方便起见,请选择您附近的地区。

After you select your region then click Create Project.
选择区域后,请单击创建项目。
Creating a new Content Model in GraphCMS
在GraphCMS中创建新的内容模型
In GraphCMS, a Content Model is a specific type of data that contains specific properties associated with it. In our case, our Model is a Destination, we can define by a Name and a Location.
在GraphCMS中,内容模型是一种特定类型的数据,包含与之关联的特定属性。 在我们的例子中,我们的模型是目的地,我们可以通过名称和位置来定义。
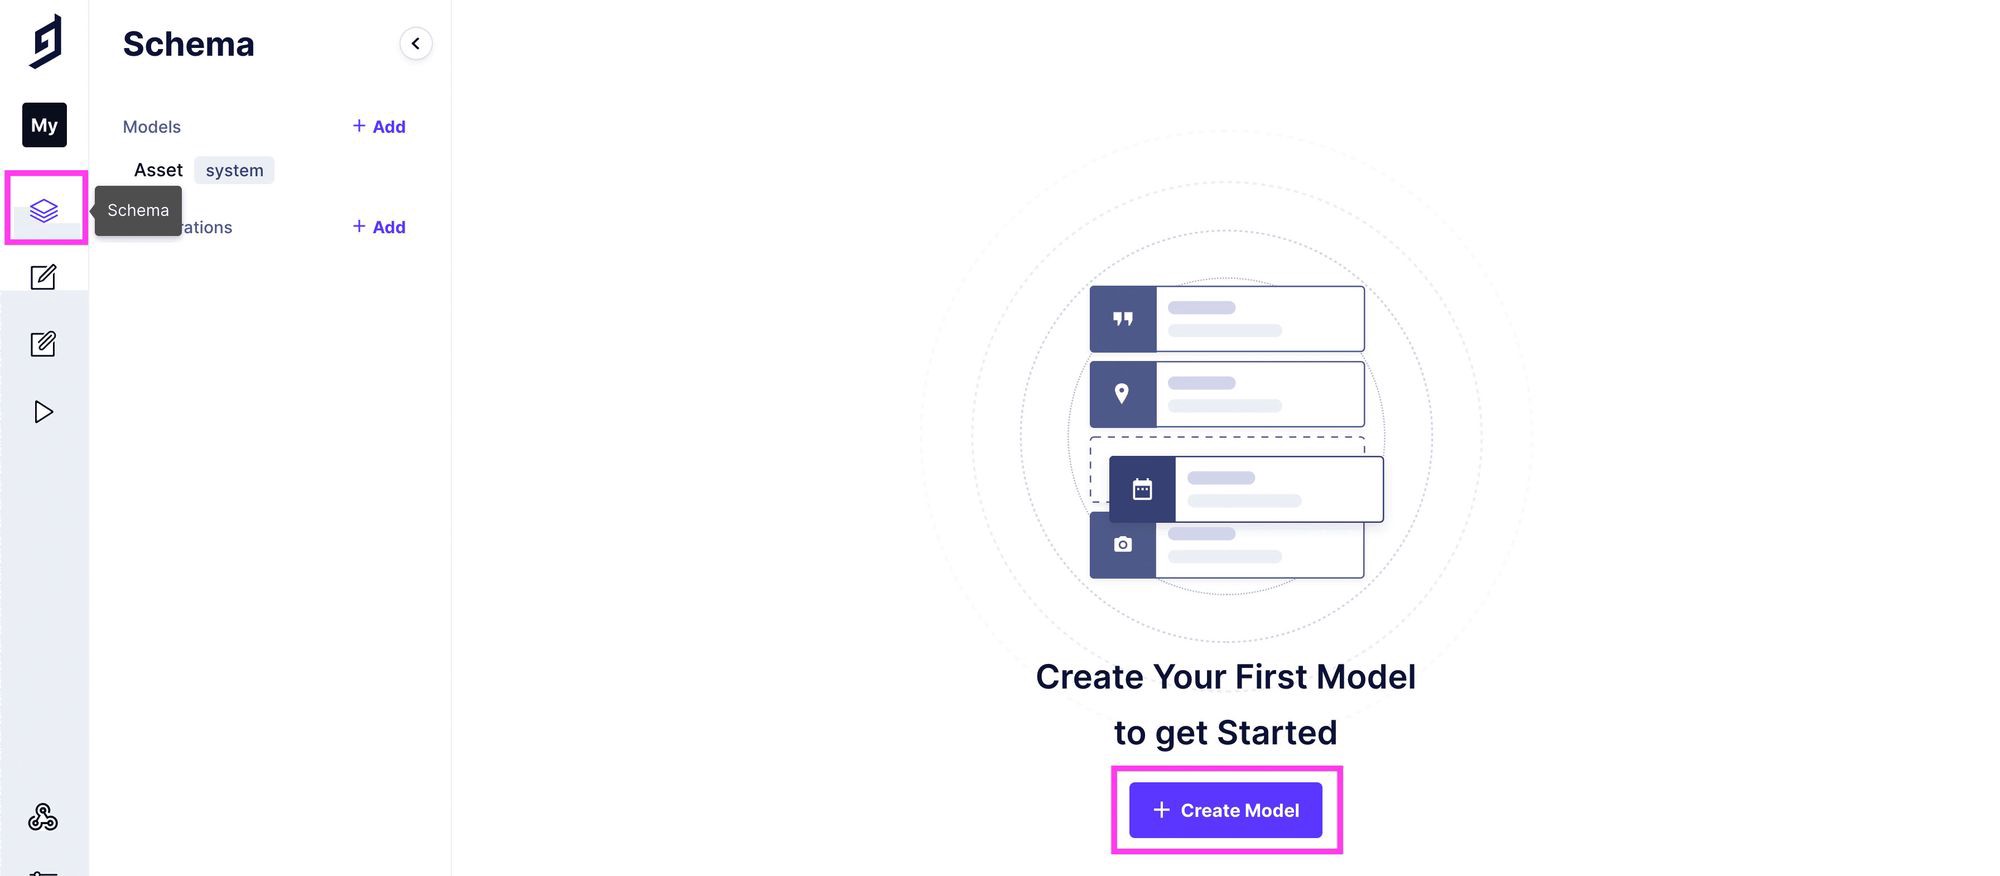
And then go to Schema section of GraphCMS in the left sidebar and select Create Model.
然后转到左侧栏中的GraphCMS的“架构”部分,然后选择“创建模型”。
Once selected, you’ll see a popup that asks for a more information. You can type in “Destination” as the Display Name there but it optional one not necessary.
选择后,您将看到一个弹出窗口,要求提供更多信息。 您可以在此处输入“目的地”作为显示名称 ,但这不是必需的。

And then add a description if you want, it’s not important. Then select Create model.
然后根据需要添加描述,这并不重要。 然后选择创建模型。
Now that we have our Model with properties, then select Single text in the right list of fields and add a Display Name of “Name”. This will generate an App Id. Then click Create.
现在我们有了带有属性的模型,然后在右侧的字段列表中选择“单个文本”并添加“名称”的显示名称。 这将生成一个应用ID。 然后单击创建。

Next, scroll down in the Location and select Map. Add “Location” as the Display Name and set the App Id as “location” then click Create.
接下来,在“位置”中向下滚动并选择“地图”。 添加“位置”作为显示名称,并将应用程序ID设置为“位置”,然后单击“创建”。
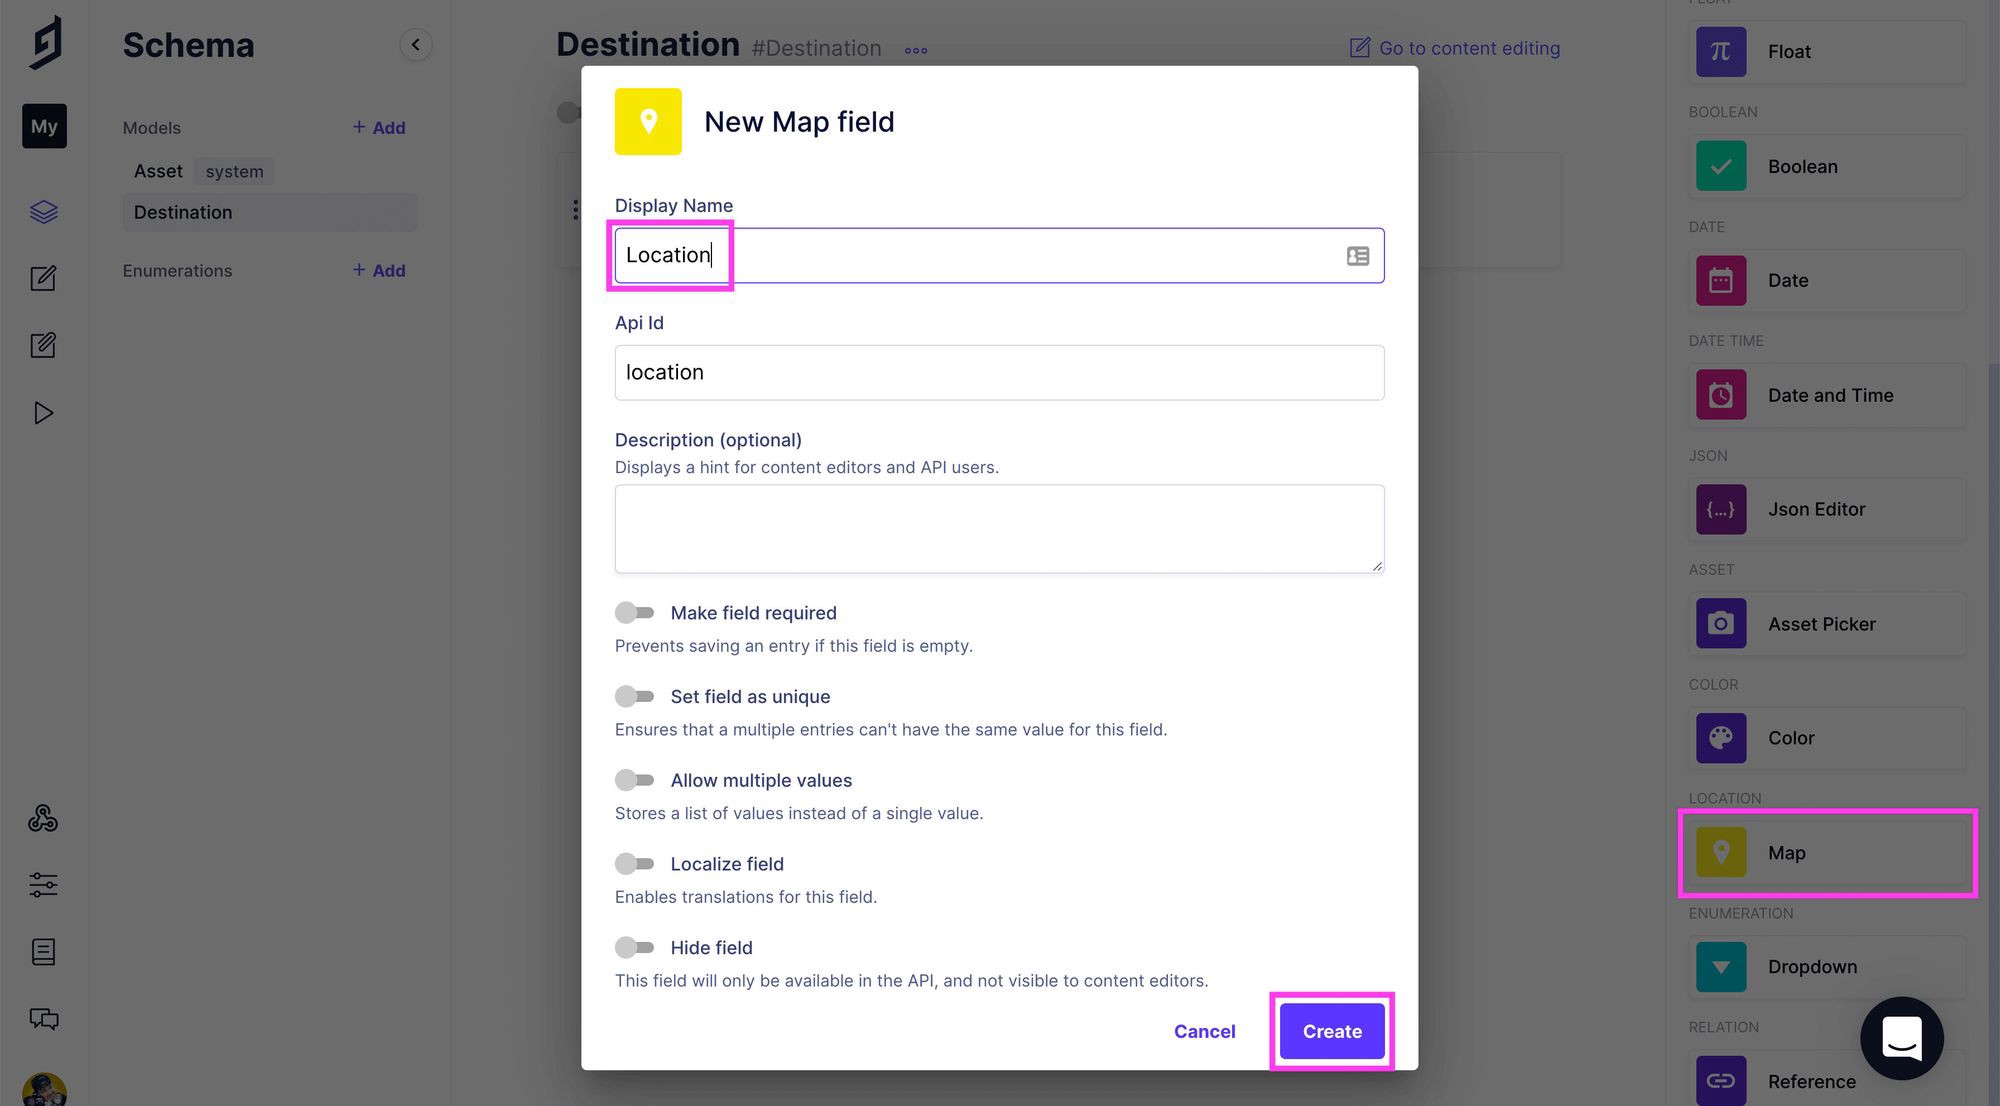
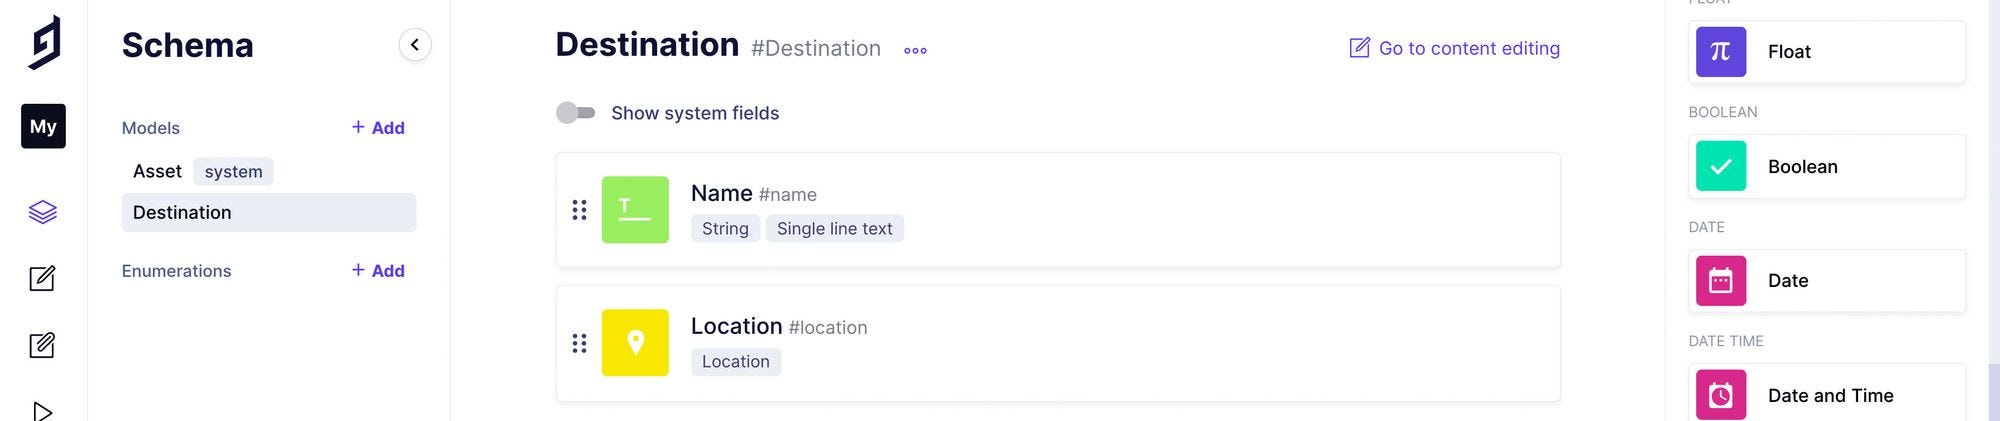
And then we have a Content Model which is use to create our locations.
然后我们有一个内容模型,用于创建我们的位置。
Creating our locations
创建我们的位置
Now let’s create our locations. Go to Content in the GraphCMS dashboard and selected Destination under System, Then Create New.
现在,让我们创建位置。 转到GraphCMS仪表板中的“内容”,然后在“系统”下选择“目标”,然后选择“新建”。

Now we have to start adding all of the locations. First add the name of your location in the Name field, then add the Search box under Location to find that location on the map.
现在我们必须开始添加所有位置。 首先,在名称字段中添加您的位置名称,然后在位置下方添加搜索框,以在地图上找到该位置。
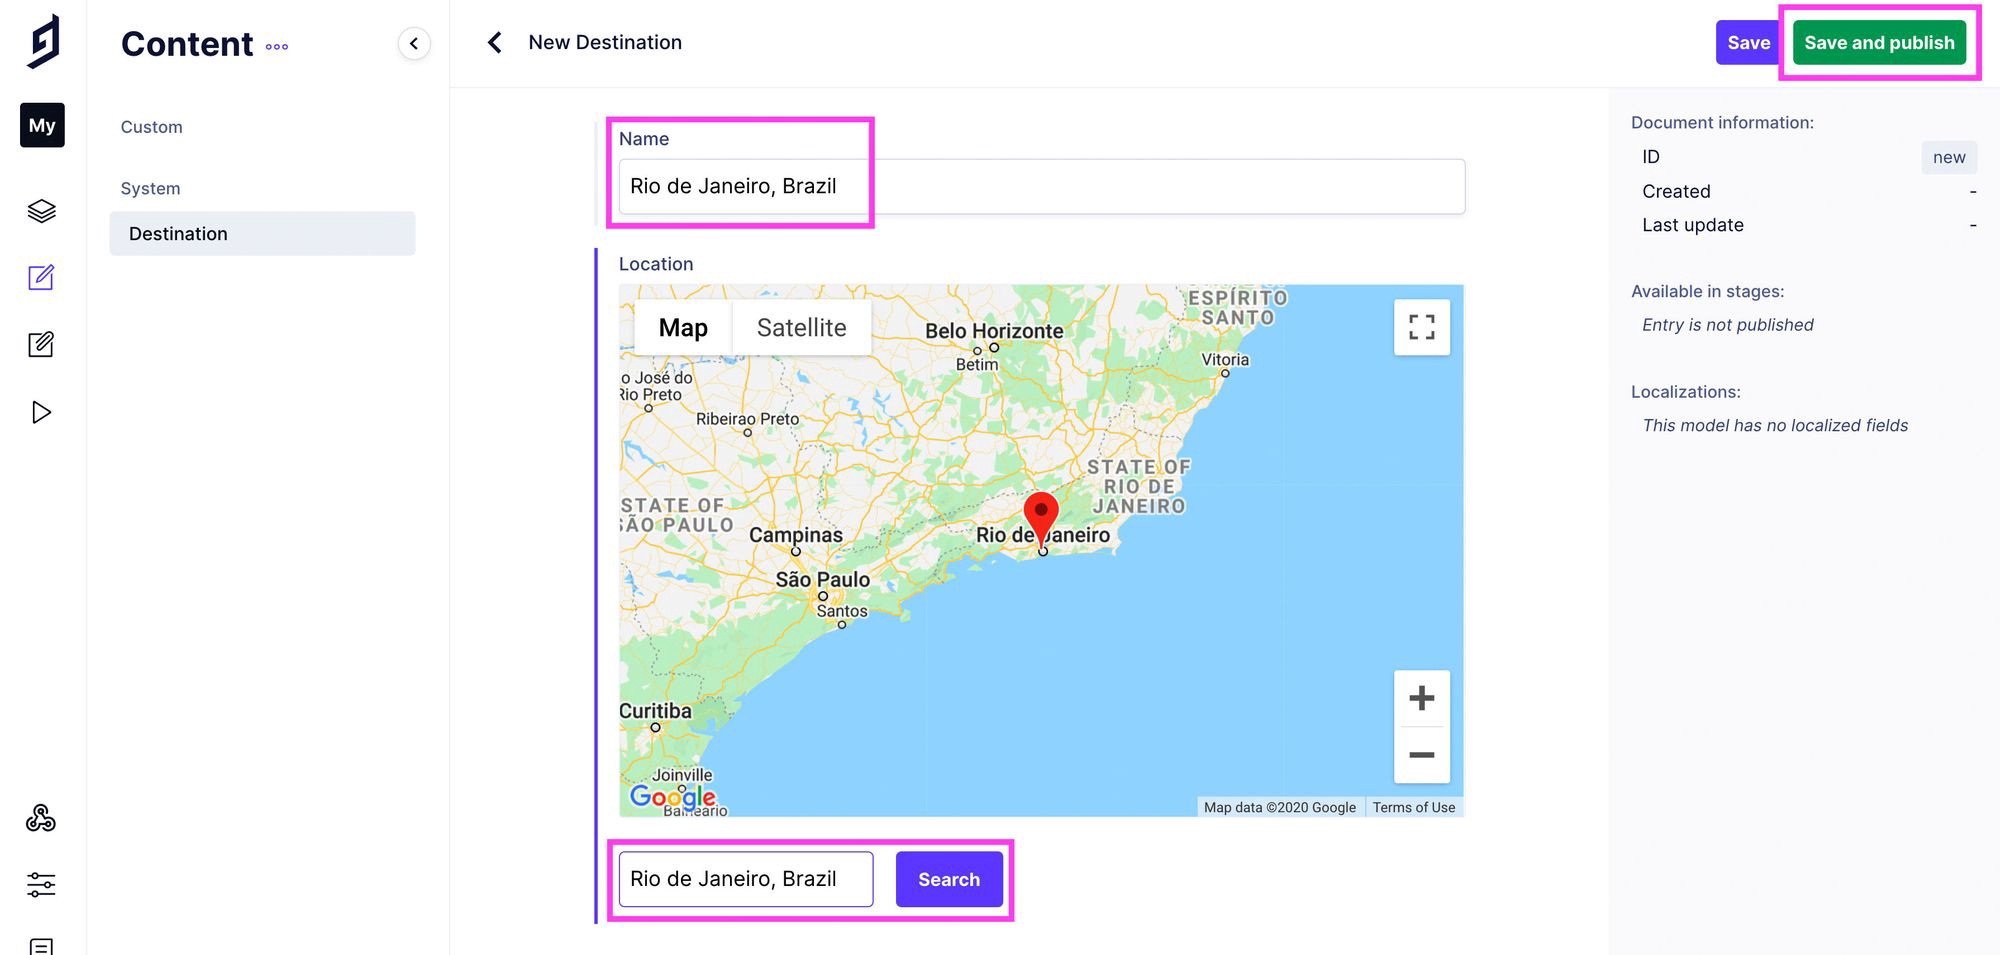
At last Save and publish. Now you have successfully created your first location.
最后保存并发布。 现在,您已经成功创建了第一个位置。
Follow these same steps to create as many locations you needed.
请按照以下相同步骤创建所需的多个位置。

用GraphQL查询我们的数据位置 (Querying our data location with GraphQL)
Now we have our locations, let’s use the data now.
现在我们有了位置,让我们现在使用数据。
向Gatsby添加插件以查询我们的GraphQL数据 (Add a plugin to Gatsby to query our GraphQL data)
The first step we have to add a new plugin to our Gatsby project to query our GraphQL data. In your terminal run the following code:
第一步,我们必须向Gatsby项目中添加一个新插件来查询GraphQL数据。 在您的终端中运行以下代码:
yarn add gatsby-source-graphql
# or
npm install gatsby-source-graphql
Next open your gatsby-config.js file in your project and add the following to the plugins:
接下来,在您的项目中打开gatsby-config.js文件,并将以下内容添加到插件中:
{
  resolve: 'gatsby-source-graphql',
  options: {
    typeName: 'GCMS',
    fieldName: 'gcms',
    url: '[API ENDPOINT]',
  }
}
查找我们的GraphCMS API端点 (Finding our API endpoint for GraphCMS)
Open your browser and navigate to your GraphCMS project and select Settings in the left navigation then select API Access.
打开浏览器并导航到GraphCMS项目,然后在左侧导航中选择“设置”,然后选择“ API访问”。
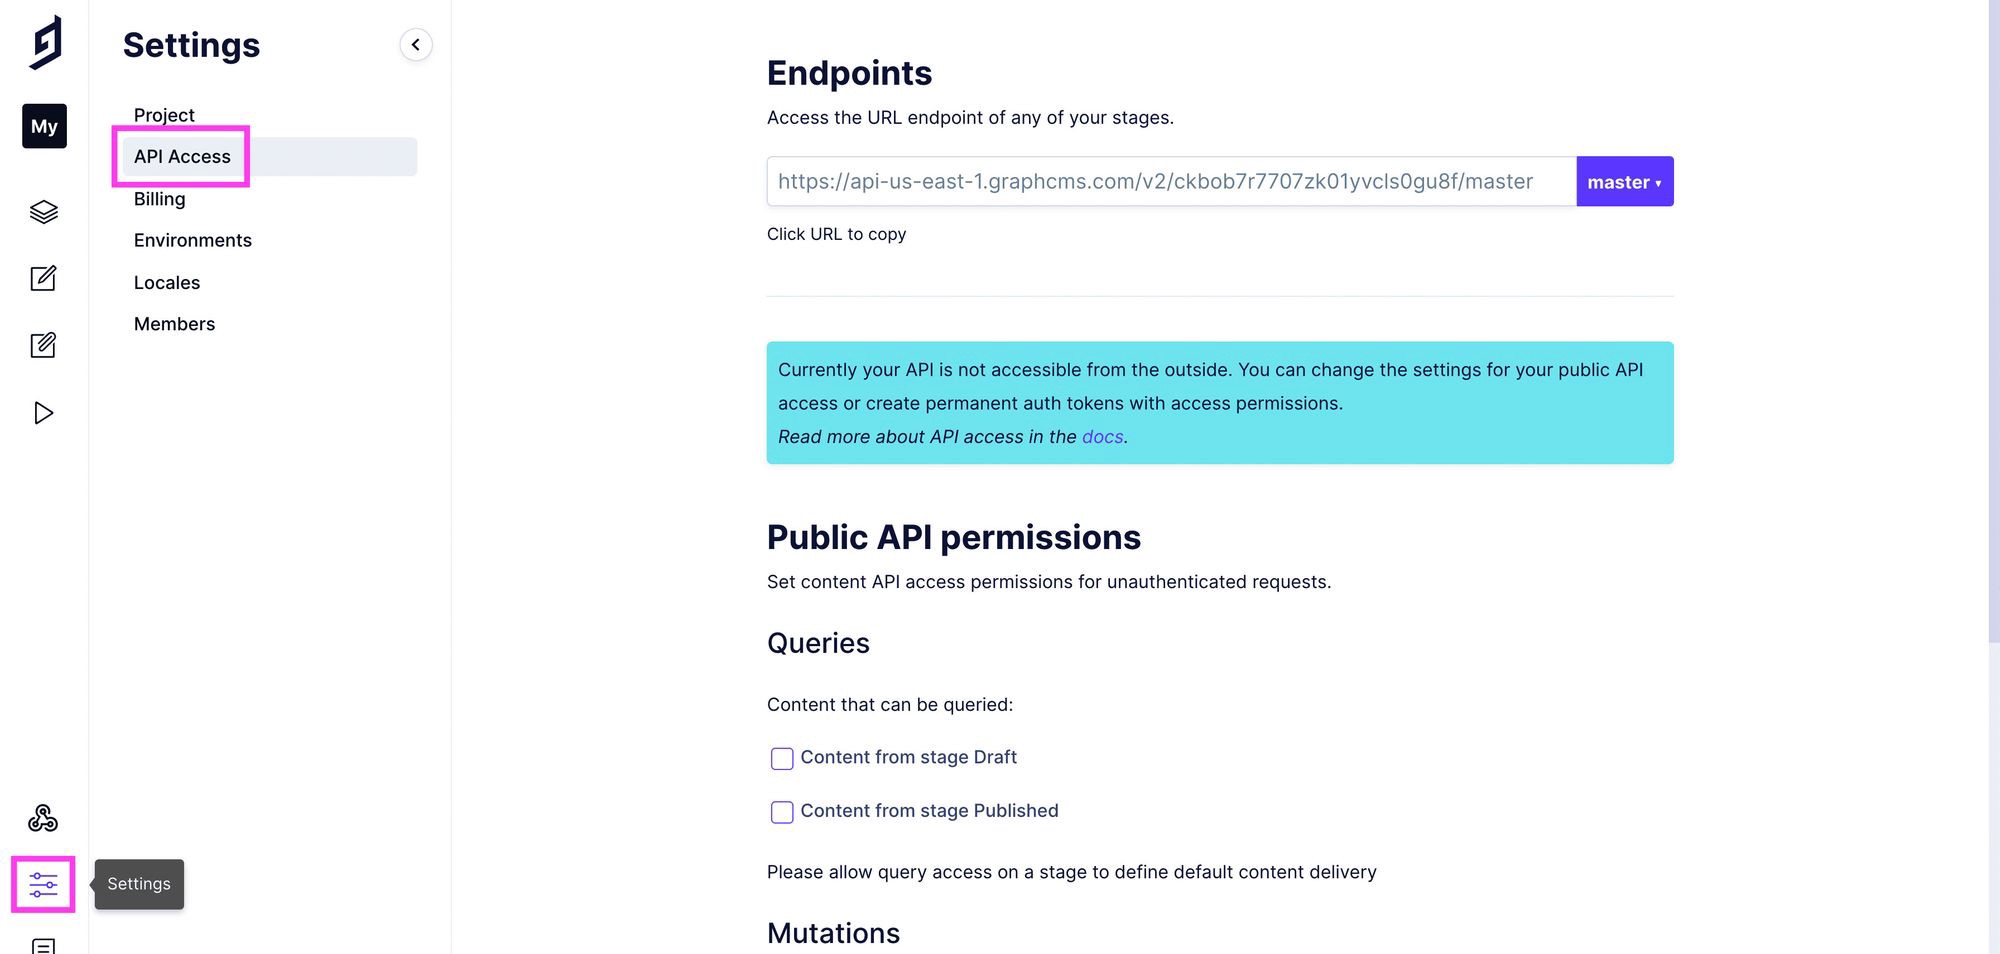
First we have to to update our permissions before copying the previous codes, so we have to query our API. Under Public API Permissions, check the box near to Content from stage Published and click Save.
首先,我们必须在复制以前的代码之前更新权限,因此我们必须查询我们的API。 在“ 公共API权限”下 ,选中“发布阶段”中“ 内容 ”附近的框,然后单击“ 保存” 。
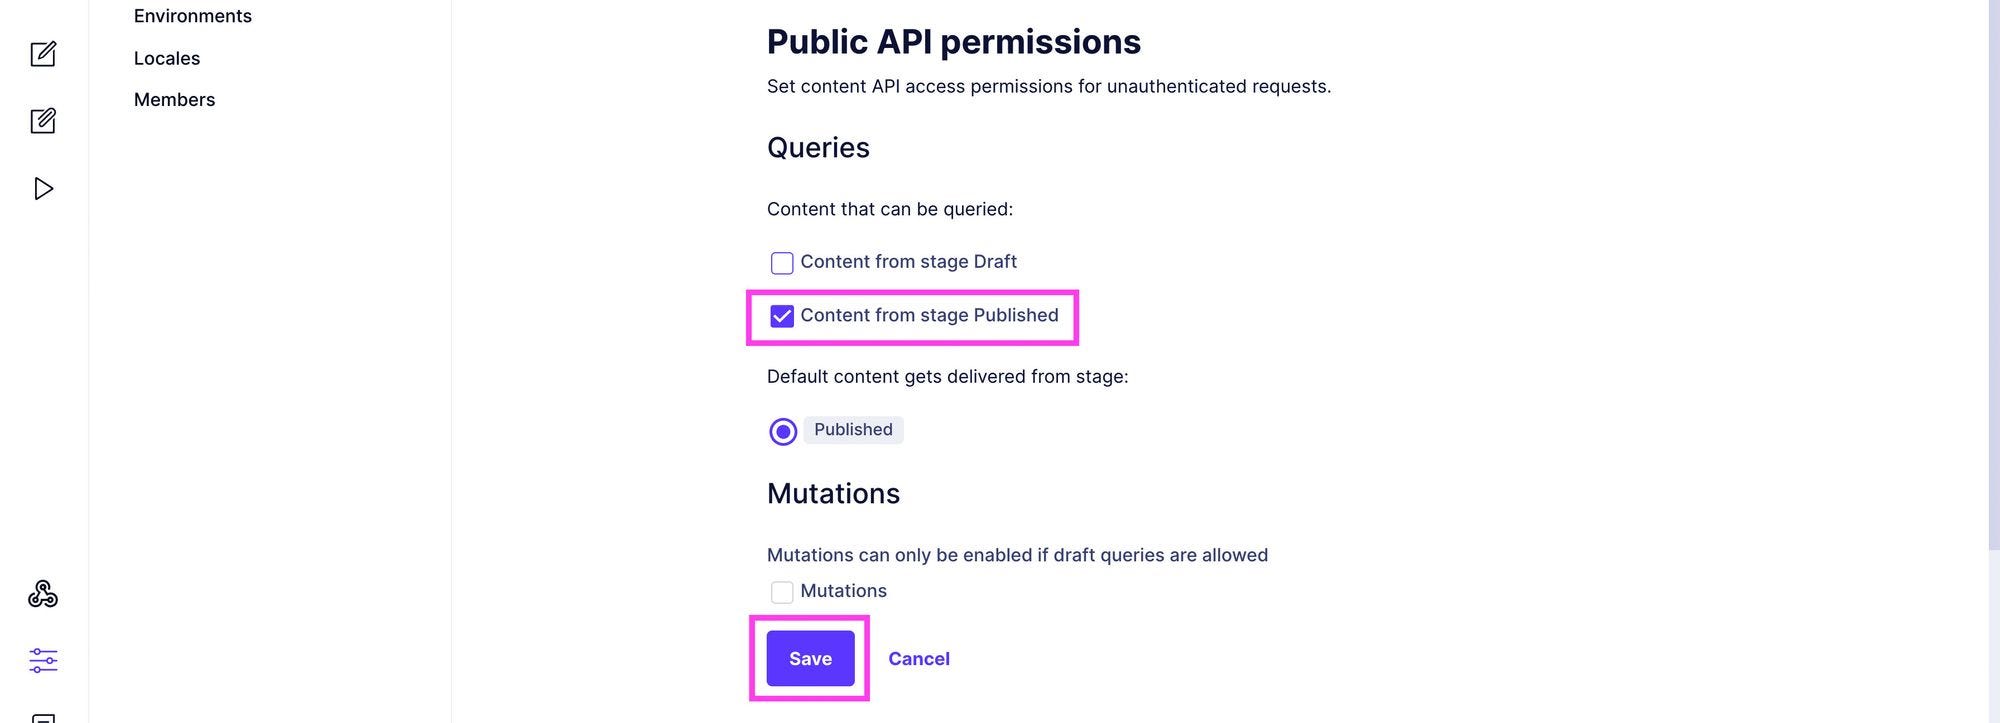
Now copy the URL under Endpoints:
现在,复制“端点”下的URL:

And paste it to your gatsby-config.js file:
并将其粘贴到您的gatsby-config.js文件中:
{
  resolve: 'gatsby-source-graphql',
  options: {
    typeName: 'GCMS',
    fieldName: 'gcms',
    url: 'https://[region-id].graphcms.com/v2/[project-id]/master',
  },
},
Now save the gatsby-config.js file and start the development server.
现在保存gatsby-config.js文件并启动开发服务器。
通过GraphQL查询我们的位置 (Querying our locations via GraphQL)
Now we will query our data and able to use it in our app.
现在,我们将查询我们的数据,并能够在我们的应用程序中使用它。
First we have to create a new React Hook to grab our locations anywhere within our app.
首先,我们必须创建一个新的React Hook,以在应用程序中的任何位置获取我们的位置。
In the src/hooks/index.js, add the following code to the existing list:
在src / hooks / index.js中 ,将以下代码添加到现有列表中:
export { default as useDestinations }And then in src/hooks, create a new file useDestinations.js and paste the following code:
然后在src / hooks中 ,创建一个新文件useDestinations.js并粘贴以下代码:
import { graphql, useStaticQuery } from 'gatsby';
export default function useDestinations() {
  const { gcms = {} } = useStaticQuery( graphql`
    query {
      gcms {
        destinations {
          id
          name
          location {
            latitude
            longitude
          }
        }
      }
    }
  ` );
  let { destinations } = gcms;
  return {
    destinations,
  };
}
Now go to your src/pages/index.js file and import our new hook:
现在转到您的src / pages / index.js文件并导入我们的新钩子:
import { useDestinations } from 'hooks';Now go to the IndexPage component and query our data:
现在转到IndexPage组件并查询我们的数据:
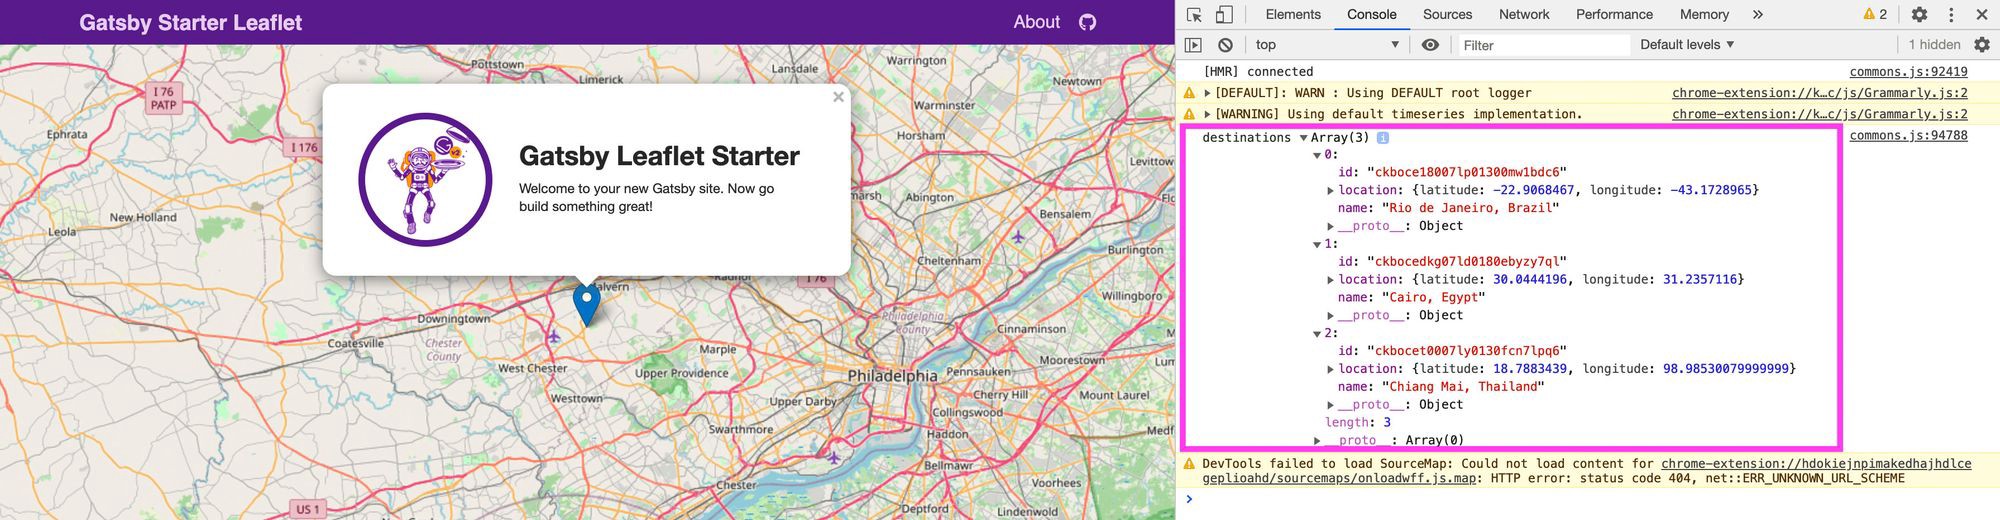
const { destinations } = useDestinations();This will generate all the locations into the destinations variable. We can test this by logging in console:
这会将所有位置生成到destinations变量中。 我们可以通过登录控制台进行测试:
console.log('destinations', destinations);Now open your browser and look the developer console, you can see our location data.
现在打开浏览器并查看开发者控制台,您可以看到我们的位置数据。
创建目的地的存储区列表并将其添加到我们的地图中 (Create a bucket list for destination and adding to our map)
Now We are going to start creating a simple list of our destinations.
现在,我们将开始创建一个简单的目的地列表。
创建目的地的文本列表 (Creating a text list of our destinations)
Navigate to our IndexPage and add the following code:
导航到我们的IndexPage并添加以下代码:
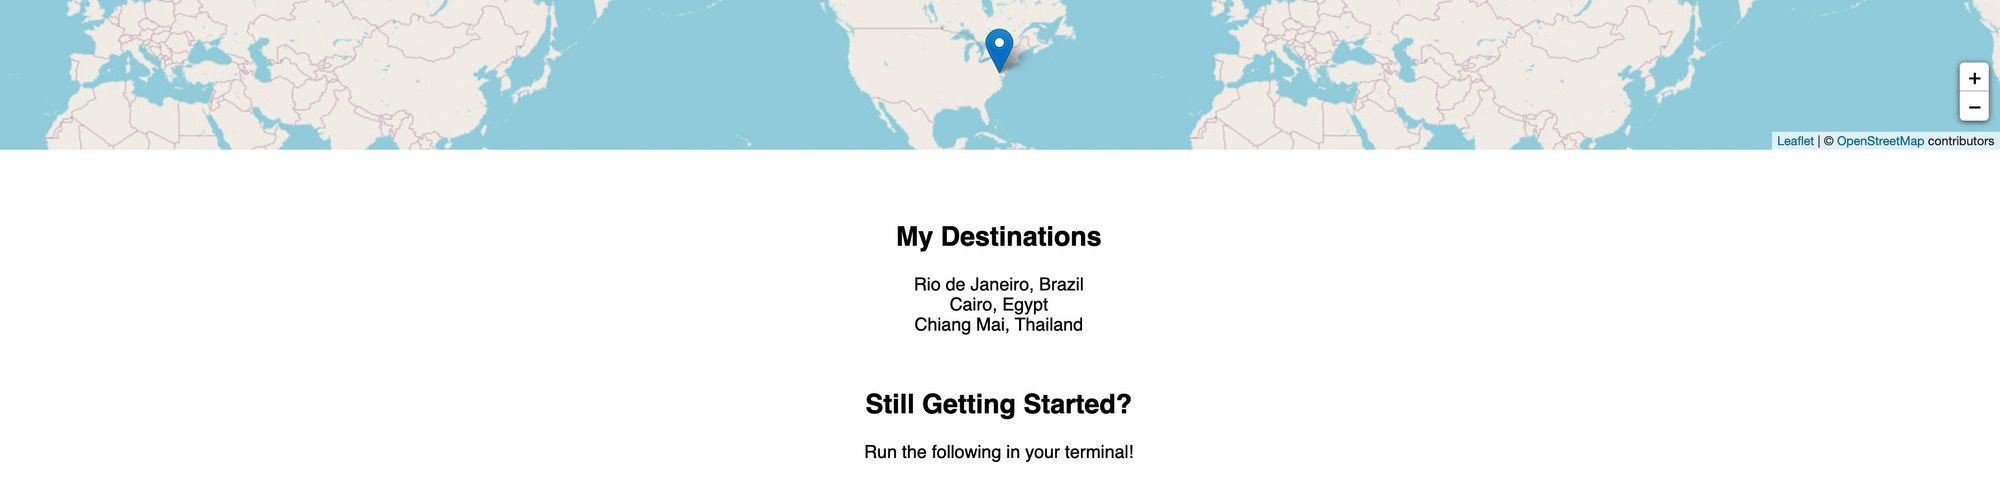
<h2>My Destinations</h2>
<ul>
  { destinations.map(destination => {
    const { id, name } = destination;
    return <li key={id}>{ name }</li>
  })}
</ul>
And then save and reload, we will see our list in our map.
然后保存并重新加载,我们将在地图中看到我们的列表。

Now open src/assets/stylesheets/pages/_home.scss and add the following code inside the .home-start class:
现在打开src / assets / stylesheets / pages / _home.scss并将以下代码添加到中。 入门班:
.home-start {
  ...
  ul {
    list-style: none;
    padding: 0;
    margin: 1.2em 0;
  }
And then modify the h2 to make a little better:
然后修改h2以使其更好一点:
.home-start {
  ...
  h2 {
    margin-top: 2em;
    &:first-child {
      margin-top: 0;
    }
  }
Then save and reload, now it looks like this:
然后保存并重新加载,现在看起来像这样:
将我们的目的地添加到地图 (Adding our destinations to the map)
Now we have to add our destinations to the map.
现在,我们必须将目的地添加到地图上。
Navigate to your <Map> component, we already have a <Marker>. This is used to add a marker to the map in a given position.
导航到您的<Map>组件,我们已经有了一个<Marker> 。 这用于在给定位置向地图添加标记。
Add the following code into the <Map> section:
将以下代码添加到<Map>部分:
<Map {...mapSettings}>
  { destinations.map(destination => {
    const { id, name, location } = destination;
    const position = [location.latitude, location.longitude];
    return <Marker key={id} position={position} />
  })}
</Map>
Now we have to add a popup to each marker to show the name.
现在,我们必须向每个标记添加一个弹出窗口以显示名称。
First we have to import Popup from react-leaflet:
首先,我们必须从react-leaflet导入Popup :
import { Marker, Popup } from 'react-leaflet';Then add the following code in our <Marker> component to return:
然后在我们的<Marker>组件中添加以下代码以返回:
return (
<Marker key={id} position={position}>
<Popup>{ name }</Popup>
</Marker>
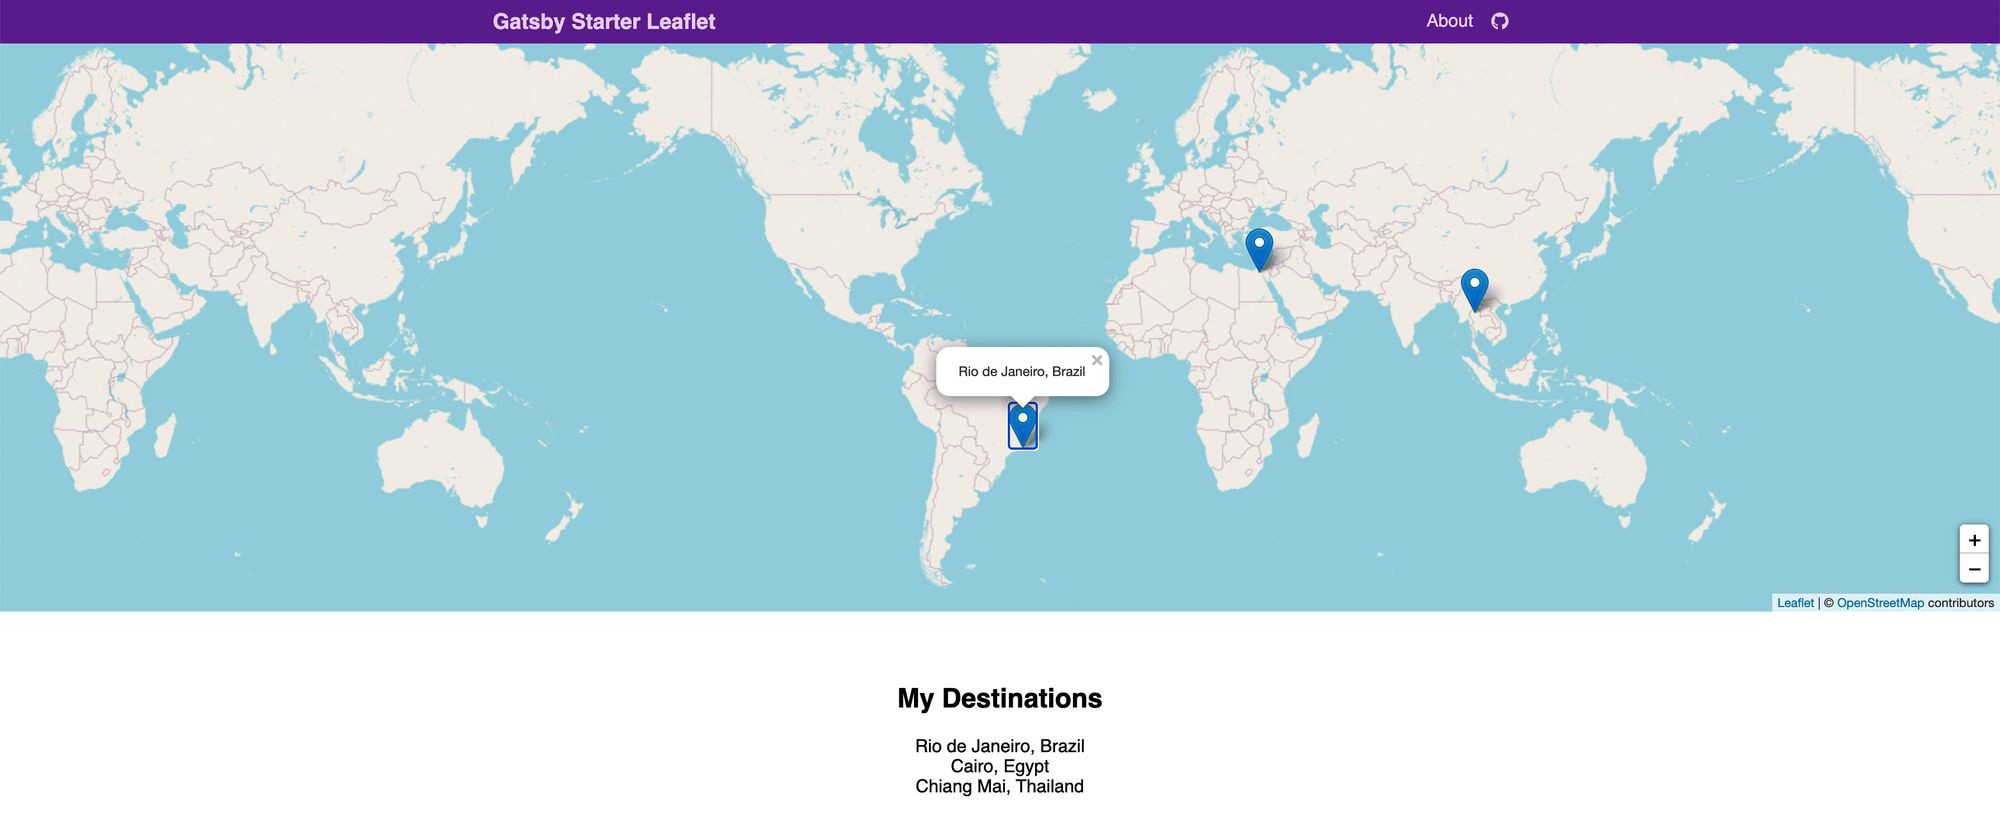
);And then save and open our map and click each marker to see our destinations name.
然后保存并打开我们的地图,然后单击每个标记以查看我们的目的地名称。
结论 (Conclusion)
I hope you enjoyed a lot. This app gives you all your destination to travel around the world. You can also add more styles and functions into this app.
希望您喜欢。 这个应用程序为您提供了前往世界各地旅行的所有目的地。 您还可以在此应用中添加更多样式和功能。
Thanks for reading!
谢谢阅读!
翻译自: https://medium.com/javascript-in-plain-english/create-a-travel-list-app-in-react-ab1564885bbe
创建react应用程序


 347
347


 被折叠的 条评论
为什么被折叠?
被折叠的 条评论
为什么被折叠?
 到【灌水乐园】发言


