


js得到json节点
The first thing you want to do after creating a hello world REST service using TypeScript, Node.js and Express.js is figure out how to let it consume and produce JSON.
使用TypeScript,Node.js和Express.js创建Hello World REST服务后,您要做的第一件事是弄清楚如何使用它消费和产生JSON。
抓住上一篇博客文章的模板 (Grabbing the template from last blog post)
If you didn’t follow the previous blog post, make sure you have:
如果您没有关注上一篇博客文章 ,请确保您具有:
IntelliJ IDEA or Webstorm. VSCode might also do the job but my project doesn’t contain settings for it.
IntelliJ IDEA或Webstorm 。 VSCode可能也可以完成这项工作,但是我的项目没有针对它的设置。
On github, do a git clone https://github.com/Leejjon/node-ts-again and then switch to the 1.2 tag by running: git checkout tags/1.2
在github上,执行git clone https://github.com/Leejjon/node-ts-again ,然后通过运行切换到1.2标签: git checkout tags/1.2
Verify that it works:
验证它是否有效:
Run:
npm install运行:
npm installOpen a new terminal and run:
npm run webpack打开一个新终端并运行:
npm run webpackRun:
npm start运行:
npm startBrowse to http://localhost:8080/ and it should say “”Hello Leon!” or whatever name you entered when following the previous post.
浏览到http:// localhost:8080 / ,它应该显示“” Hello Leon!”。 或您在关注上一篇文章时输入的任何名称。
那么我们要生产和消费什么呢? (So what do we want to produce and consume?)
We will create a sample endpoint on localhost:8080/comments, on which we can do a POST request with JSON in the body to store a comment. The response body will contain the newly generated comment id and timestamp. Normally a comment would be stored in a database so we can retrieve the comment later via GET requests, but let’s leave that out for now (maybe for a future blog post? I need to test the Firebase API anyway).
我们将在localhost:8080 / comments上创建一个示例终结点,在该终结点上,我们可以使用正文中的JSON进行POST请求以存储注释。 响应正文将包含新生成的评论ID和时间戳。 通常,注释将存储在数据库中,以便我们稍后可以通过GET请求检索该注释,但让我们暂时将其省略(也许是将来的博客文章?我仍然需要测试Firebase API)。
重组项目 (Restructuring the project)
Besides the existing index.ts in our ‘src’ folder, I’d recommend creating a folder for the controller and one for the model:
除了在“ src”文件夹中现有的index.ts之外,我建议为控制器创建一个文件夹,为模型创建一个文件夹:
创建一个请求处理函数 (Creating a request handler function)
Right now we have a request handler in the index.ts itself, but I think it’s nice to put request handlers in a separate file. Create a CommentController.ts file in a controller directory. Put a function there with a fitting name for storing a comment:
现在,我们在index.ts本身中有一个请求处理程序,但是我认为将请求处理程序放在单独的文件中很好。 在控制器目录中创建CommentController.ts文件。 将带有合适名称的函数放在此处以存储注释:
import {Request, Response} from "express";
export const postComment = async (req: Request, res: Response) => {
    res.send('Hello POST');
}
Now we need to tell Express to forward POST requests on /comments to this new function.
现在我们需要告诉Express将/ comments上的POST请求转发到这个新函数。
import express from "express";import { postComment } from "./controller/RequestController";
const PORT = process.env.PORT || 8080;
const app = express();
app.use(express.json());app.post("/comments", postComment);
const server = app.listen(PORT, () => {
    console.log(`Listening on port ${PORT}`);
});
定义请求和响应的接口 (Defining interfaces for the request and response)
Below is what first came to my mind. I’d create a Comment.ts file in the model directory that exports these interfaces.
以下是我首先想到的。 我将在导出这些接口的模型目录中创建Comment.ts文件。
export interface NewCommentRequest {
    message: string,
    nickname: string
}export interface CommentConfirmation {
    id: number,
    timestamp: Date
}
使用接口消费和产生JSON (Using the interfaces to consume and produce JSON)
So let’s do a very basic implementation that doesn’t really do anything with the request, but parses it and :
因此,让我们做一个非常基本的实现,该实现实际上不对请求做任何事情,但是会解析并:
import {Request, Response} from "express";
import {CommentConfirmation, NewCommentRequest} from "../model/Comment";
export const postComment = async (req: Request, res: Response) => {
    try {
        const newCommentRequest: NewCommentRequest = req.body;
        console.log(`Stored comment from ${newCommentRequest.nickname}.`);
        let response: CommentConfirmation = {id: 'commentId', timestamp: new Date()};
        res.status(200);
        res.send(response);
    } catch (error) {
        res.status(400);
        res.send("Invalid request.");
    }
}
To test this you can use curl:
要测试这一点,您可以使用curl:
curl -d '{"message": "Hi", nickname:"Leejjon"}' -X POST http://localhost:8080/commentsOr postman:
或邮递员:
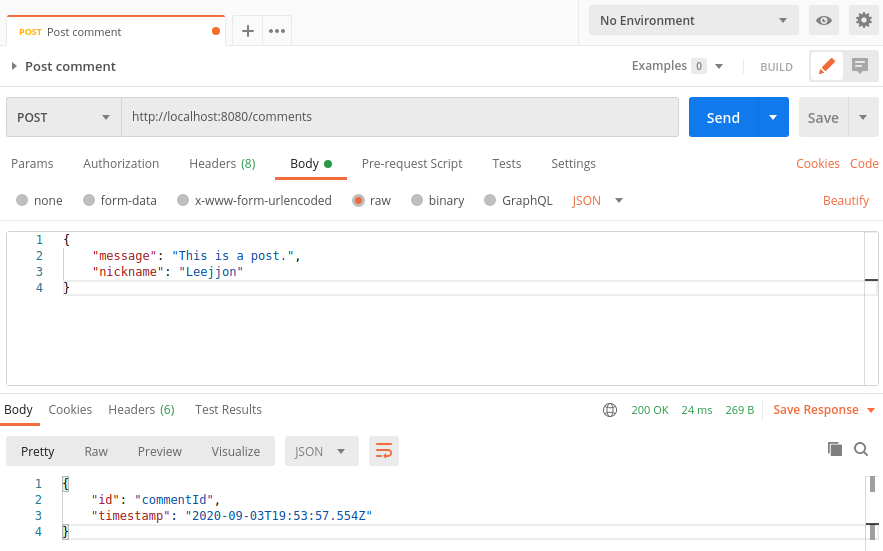
That’s it for this second blog post. You can download the code so far here.
这是第二篇博客文章。 到目前为止,您可以在此处下载代码。
In my next post we will add validation on the JSON requests.
在我的下一篇文章中,我们将对JSON请求添加验证。
翻译自: https://medium.com/@Leejjon_net/let-a-node-js-backend-consume-and-produce-json-b206e8043fbf
js得到json节点


 1973
1973

 被折叠的 条评论
为什么被折叠?
被折叠的 条评论
为什么被折叠?
 到【灌水乐园】发言


