


We see more and more companies using JS as their tech stack for both backend and frontend. It makes sense because the development cycle reduces in time, cost, and increases in efficiency, and gives a unique stack for different parts of the system.
我们看到越来越多的公司使用JS作为后端和前端的技术堆栈。 这是有道理的,因为开发周期减少了时间,降低了成本并提高了效率,并且为系统的不同部分提供了唯一的堆栈。
Today I’ll show you how you to build a small web app using Node easily. JS enhanced with TypeScript, PostgreSQL as our database, and how to dockerize it.
今天,我将向您展示如何轻松使用Node构建小型Web应用程序。 JS使用TypeScript,PostgreSQL作为我们的数据库以及如何对其进行泊坞化进行了增强。
This article starts with the basic setup of our Node.JS app, Express server, and PostgreSQL configuration. The Docker part is described at the end of the story, so if you want to see the Docker setup for this app only, scroll to the bottom.
本文从我们的Node.JS应用程序,Express服务器和PostgreSQL配置的基本设置开始。 故事的结尾部分介绍了Docker部分,因此,如果您只想查看此应用程序的Docker设置,请滚动至底部。
创建一个Node.JS应用程序 (Creating a Node.JS application)
I assume you have installed Node.JS before. Creating every Node.JS application starts with a simple command npm init If you add -y , it will fill all input for you and create a package.json file necessary for managing our application dependencies required for it to run.
我假设您之前已经安装了Node.JS。 创建每个Node.JS应用程序都从一个简单的命令npm init如果添加-y ,它将为您填充所有输入,并创建一个package.json文件,该文件是管理运行它所需的应用程序依赖关系所必需的。
Since we said we’re going to use TypeScript, we have to set up our project to work with TypeScript right away.
既然我们说过要使用TypeScript,我们必须立即设置项目以使用TypeScript。
Next, we’ll install TypeScript and tslint in our project by typing the following:
接下来,我们将通过键入以下内容在项目中安装TypeScript和tslint:
npm install typescript tslint --save-devThis command will install TypeScript in our dev dependencies. After we have installed TypeScript, we’ll edit our package.json file and add tsc command for accessing TypeScript commands. We’ll be using this command for starting and bundling our application.
此命令将在我们的开发依赖项中安装TypeScript。 安装TypeScript后,我们将编辑package.json文件并添加tsc命令以访问TypeScript命令。 我们将使用此命令来启动和捆绑我们的应用程序。
After we’ve installed these packages, we’ll run the following command to initialize our tsconfig.json file where compiler options for our project are stored.
安装完这些软件包后,我们将运行以下命令来初始化tsconfig.json文件, 该文件用于存储项目的编译器选项。
tsc --initSince we’ll be using Express, it’s important to install a package that helps TypeScript identify express types by typing:
由于我们将使用Express,因此安装一个可帮助TypeScript通过键入以下内容来识别快递类型的软件包非常重要:
npm i @types/express @types/node --save-devThis way, TypeScript will be able to recognize Express classes and global Node types. For example, after you install the types package, you’ll be able to import Request and Response types from Express directly.
这样,TypeScript将能够识别Express类和全局Node类型。 例如,安装类型包后,您将可以直接从Express导入请求和响应类型。
If we initialize tsconfig.json with the first command, we’ll get a file like this:
如果我们使用第一个命令初始化tsconfig.json ,我们将获得如下文件:
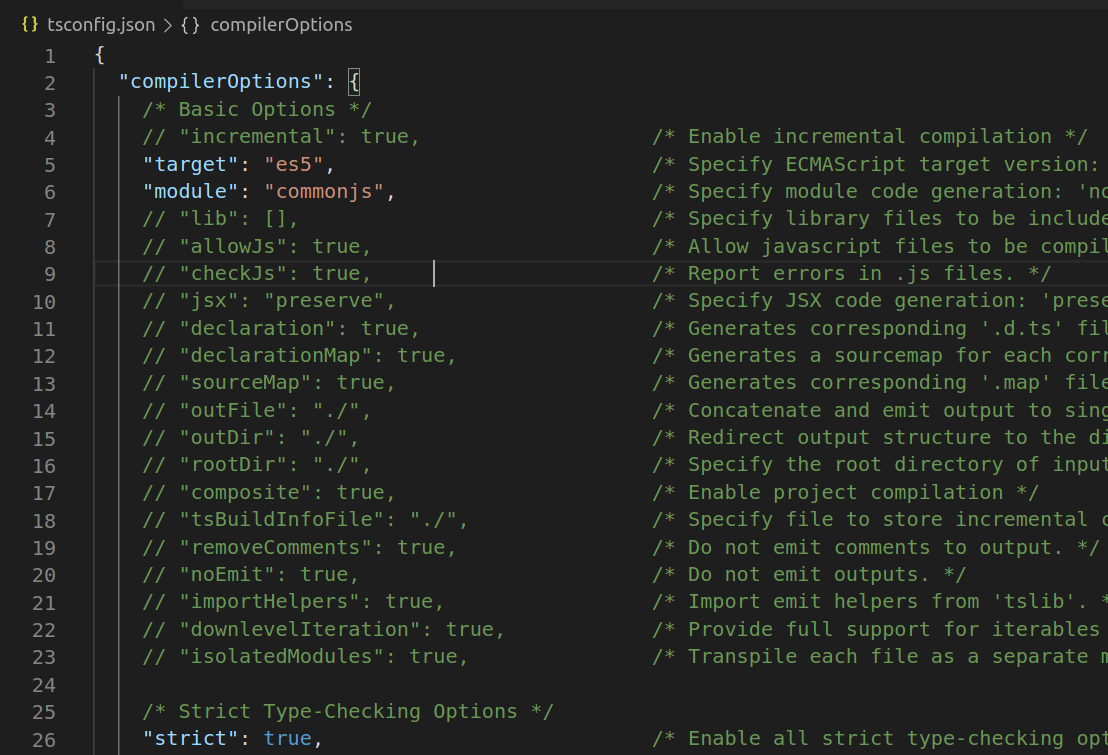
This is our tsconfig.json file with plenty of compiler options you can customize.
这是我们的tsconfig.json文件,其中包含许多您可以自定义的编译器选项。
We’ll replace it with the following:
我们将其替换为以下内容:
{
 "module": "commonjs",
 "esModuleInterop": true,
 "target": "es6",
 "moduleResolution": "node",
 "sourceMap": true,
 "outDir": "dist/src"
}, "lib": ["es2015"]
}
We are mostly interested in our outDir property where we specify the output directory for our transpiled TS code into JS.
我们对outDir属性最感兴趣,在其中我们为将 TS代码转换为JS指定输出目录。
使用TypeScript创建和启动我们的服务器 (Creating and starting our server using TypeScript)
It is always a good idea to separate your scripts for defining your server and start your application using that server configuration.
分开定义服务器的脚本并使用该服务器配置启动应用程序始终是一个好主意。
For now, our project structure looks like this:
现在,我们的项目结构如下:
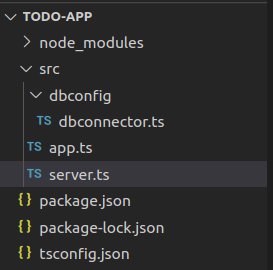
I’ve created dbconfig directory with database configuration that we’ll use when initializing thePostgres connection.
我用数据库配置创建了dbconfig目录,该数据库配置将在初始化Postgres连接时使用。
In the server.ts file lies our server configuration looking like this:
在server.ts文件中包含我们的服务器配置,如下所示:
We’ll explain the configuration as we go. Firstly, we initialize our Express application, move to server specific configurations such as configuring body-parser to handle our incoming data. In the end, there is a public method we’ll use to start our server in our app.ts file. We also set up our routing to use separated router configuration for getting all todos.
我们将逐步解释配置。 首先,我们初始化Express应用程序,转到服务器特定的配置,例如配置 正文解析器来处理我们的传入数据。 最后,我们将使用一个公共方法在app.ts文件中启动服务器。 我们还设置了路由,以使用单独的路由器配置来获取所有待办事项。
Here we call our “start” method and log in case of success or failure.
在这里,我们称为“启动”方法,并在成功或失败的情况下进行记录。
Postgres配置 (Postgres configuration)
Pooling is a process of creating connections and caching them to reuse them. There is no resource waste as it would be if you create a new connection every time.
池化是创建连接并将其缓存以重复使用的过程。 每次创建一个新连接都不会浪费资源。
Below is the explanation of the mentioned configuration properties :
以下是上述配置属性的说明:

I am using pgAdmin4 for accessing my database cluster and managing my databases.
我正在使用pgAdmin4来访问数据库集群和管理数据库。
TodosController (TodosController)
We’ll create a TodosController and route for fetching all todos from the database.
我们将创建一个TodosController并路由以从数据库中获取所有待办事项。
A controller would look like this:
控制器将如下所示:
- Importing pool from our database configuration class 从我们的数据库配置类导入池
- Initializing new connection and creating an instance of pg client 初始化新连接并创建pg客户端实例
Sending our raw query to our client’s query method — async
将原始查询发送到客户的查询方法-异步
Releasing our connection —THIS IS IMPORTANT!
释放我们的联系-这很重要 !
- Returning fetched data 返回获取的数据
Always release your connection when using the pool. That way, the client will return to the pool of available connections.
使用池时,请始终释放连接。 这样,客户端将返回到可用连接池。
托多斯路由器 (Todos router)
We’ll set up our router in a separate file stored in src/routers and give it a route to the GET method defined upper in our TodosController.
我们将在设置为src / routers的单独文件中设置路由器,并为其路由到TodosController中定义在上方的GET方法。
Now, all we have to do is register this router in our server.ts where we set up our server.
现在,我们要做的就是在我们设置服务器的server.ts中注册该路由器。

We import our todos router and we say to our Express server that anytime someone hits “/todos” in the URL, pass the instance todosRouter to handle all the requests with that route.
我们导入todos路由器,并对Express服务器说,只要有人在URL中点击“ / todos”, 就将实例todosRouter传递给该路由,以处理所有请求。
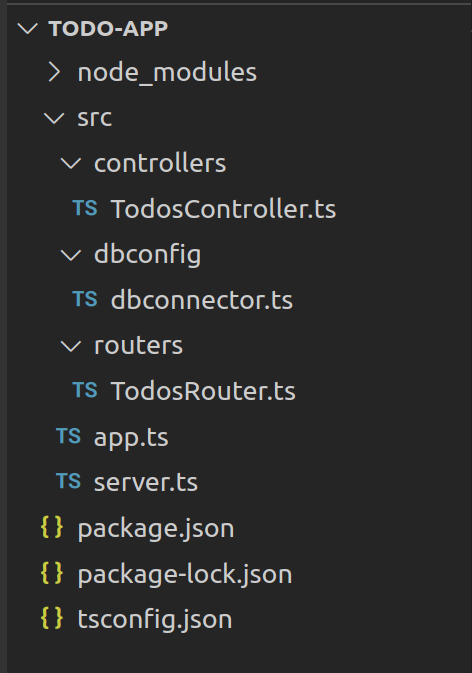
项目结构 (Project structure)
So far, we have the following project’s structure:
到目前为止,我们具有以下项目的结构:
建立我们的应用程序 (Building our application)
Now that we have all set up, we can test our endpoint for fetching all todos from the database.
现在我们已经完成了所有设置,我们可以测试端点是否可以从数据库中获取所有待办事项。
First, we’ll run the following command from our terminal
首先,我们将从终端运行以下命令
npm run buildUsing this command, we will look up our tsconfig.json and see the output dir we specified so that it knows the output directory for our transpiled files.
使用此命令,我们将查找tsconfig.json并查看我们指定的输出目录,以便它知道已编译文件的输出目录。
Make sure your main in the package.json points to the same directory as the output dir you specified for the TypeScript since it will be our main point of entry for our application.
确保您的main package.json中的指向与您为TypeScript指定的输出目录相同的目录,因为它是我们应用程序的主要入口。
"main": "dist/src/app.js",Our scripts section in package.json should be like this:
package.json中的脚本部分应如下所示:
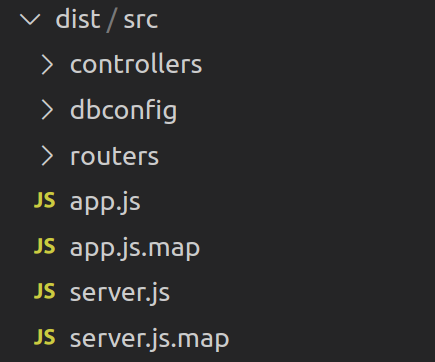
"scripts": {"build": "tsc","start": "tsc && node dist/app.js","test": "echo \"Error: no test specified\" && exit 1"},Now, if you check your directories tree, you’ll see a new directory dist just as we specified in the tsconfig.json.
现在,如果您检查目录树,您将看到一个新目录dist ,就像我们在tsconfig.json中指定的一样。
测试我们的应用 (Testing our application)
To start your application type and check your terminal:
要启动您的应用程序类型并检查您的终端:
npm start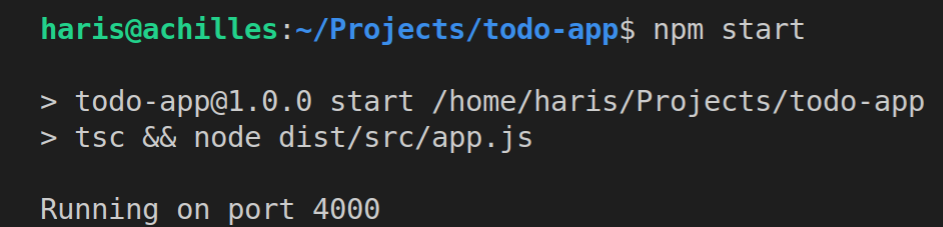
We have it up and running, and since we previously set up our Express server, database configuration, and router, let’s test our endpoint for todos.
我们已经启动并运行它,并且由于我们之前已经设置了Express服务器,数据库配置和路由器,因此让我们测试端点的待办事项。
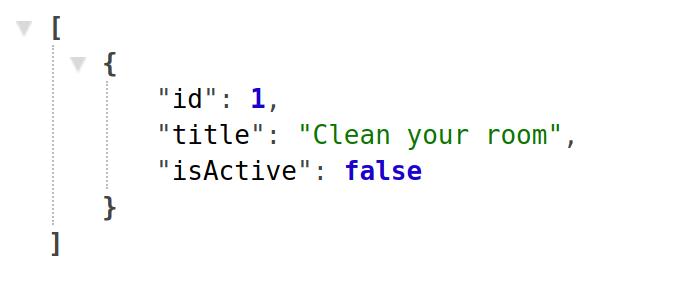
Now, if we go to the browser and visit:
现在,如果我们转到浏览器并访问:
http://localhost:4000/todoswe should get a result from our database
我们应该从我们的数据库中得到一个结果
Such a piece of good advice!
这样的好建议!
Docker化我们的应用程序 (Dockerizing our application)
Since containers are so popular and almost a must when you’re building, testing, and deploying your applications, we’re gonna make our application run inside a Docker container.
由于容器是如此流行,并且在您构建,测试和部署应用程序时几乎是必须的,因此我们将使我们的应用程序在Docker容器中运行。
To achieve that, we need to build an image from our application. Images are basically our packed applications containing everything for the application to run.
为此,我们需要从应用程序中构建图像。 图像基本上是我们打包的应用程序,其中包含要运行的所有应用程序。
Containers are running instances of our images.
容器正在运行我们图像的实例。
You can read more about containers here.
您可以在此处阅读有关容器的更多信息。
Docker撰写 (Docker compose)
We’ll create a file called docker-compose.yml where we can setup configuration for all of the services our application will be using.
我们将创建一个名为docker-compose.yml的文件,在其中可以为应用程序将使用的所有服务设置配置。
We need a service for our web application running in Node.JS and our database service, which is PostgreSQL.
我们需要为运行在Node.JS中的Web应用程序提供服务,并为我们的数据库服务PostgreSQL提供服务。
We use docker-compose to run multiple containers for our application.
我们使用docker-compose为我们的应用程序运行多个容器。
Our docker-compose file would look like this:
我们的docker-compose文件如下所示:
If you take a look at our Postgres container in our docker-compose configuration, you can see that we are using a 10.4 Postgres image to build our container, expose the “5432” port on our local machine and map it to the container’s 5432 port. Meaning, if I want to access my Postgres instance running inside my container, I would use localhost:5432 port along with the defined username and password.
如果您在docker-compose配置中查看我们的Postgres容器,您会看到我们使用的是10.4 Postgres映像来构建容器,在本地计算机上公开“ 5432”端口并将其映射到容器的5432端口。 意思是,如果我要访问运行在容器中的Postgres实例,则可以使用localhost:5432端口以及定义的用户名和密码。
We also run our pgAdmin on port 80, which is our database management service where we can access our Postgres databases, create clusters, and do all kinds of operations.
我们还在端口80上运行pgAdmin , 这是我们的数据库管理服务,我们可以在其中访问Postgres数据库,创建集群以及进行各种操作。
在容器启动时初始化我们的数据库架构 (Initializing our database schema on the container startup)
It would be great to initialize the database with schema, so we don’t have to manually create it.
使用模式初始化数据库将非常有用,因此我们不必手动创建它。
- ./src/migrations/dbinit.sql:/docker-entrypoint-initdb.d/dbinit.sqlThis piece of code in our docker-compose file will trigger our dbinit.sql file from our project and use it to execute whatever SQL we wrote inside of it.
docker-compose文件中的这段代码将触发我们项目中的dbinit.sql文件,并使用它执行我们在其中编写的任何SQL。
Docker文件 (Dockerfile)
Our Dockerfile would look like this:
我们的Dockerfile看起来像这样:
What this will do is create an image of our application with our virtual directories structure to hold everything that we already have on our machine.
这将使用虚拟目录结构创建应用程序的映像,以保存我们计算机上已有的所有内容。
We list which version of Node do we want for our image created our working directory, then copied everything from our src folder to our virtual one.
我们列出了要为映像创建工作目录所需的Node版本,然后将所有内容从src文件夹复制到虚拟目录。
Here we used -alpine image. Alpine comes from Linux and represents a minified version of Linux that has enough resources to run your applications. It is beneficial when creating Docker images because the output size will be a lot smaller.
在这里,我们使用-alpine图像。 Alpine来自Linux,代表Linux的精简版,它具有足够的资源来运行您的应用程序。 创建Docker映像时这是有益的,因为输出大小会小很多。
容器可能已经准备好,但是我们的数据库可能还没有! (The container might be ready but our database might not!!!)
What is that part with that URL? It looks like we’re also downloading and running something when building our image, some kind of a waiting process.
该网址的那部分是什么? 看起来我们在构建映像时也在下载并运行某些内容,这是一种等待过程。
Yes, your container may be ready for communication, but the process you’re running inside of it may not. In this case, it’s our Postgres database. It takes a bit more time for it to start than our application. Hence, we are going to download a shell script that will delay our database connection call until it is ready to accept connections.
是的,您的容器可能已准备好进行通信,但其中正在运行的进程可能尚未准备好。 在这种情况下,这是我们的Postgres数据库。 它比我们的应用程序花费更多的时间来启动。 因此,我们将下载一个Shell脚本,该脚本将延迟数据库连接调用,直到准备好接受连接为止。
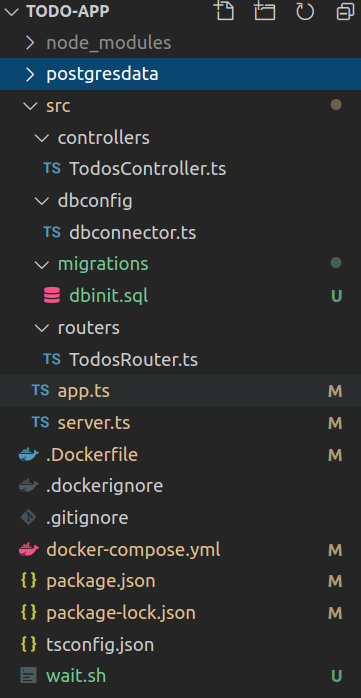
我们的最终项目结构 (Our final project structure)
使用Docker运行我们的应用程序服务 (Running our application services with Docker)
Now when we have our Docker configurations all ready, we can set them up and running in a matter of seconds.We can achieve this by typing the following command in the root of our project where our Docker configuration files are:
现在我们已经准备好所有的Docker配置,我们可以在几秒钟内设置并运行它们,我们可以在我们项目的Docker配置文件所在的根目录中键入以下命令来实现此目的:
docker-compose up --build -dThe -d says to run the container in the background, and the — build builds the image before starting containers. It is important because you often want to have access to the command prompt while the container is running.
该-d表示在后台运行的容器,和— build开始之前容器构建图像。 这很重要,因为您通常希望在容器运行时可以访问命令提示符。
Now, we should have our app image built and containers up and running. To check your running containers, execute the following:
现在,我们应该构建我们的应用程序映像并启动并运行容器。 要检查正在运行的容器,请执行以下操作:
docker ps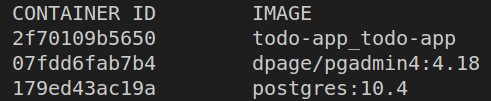
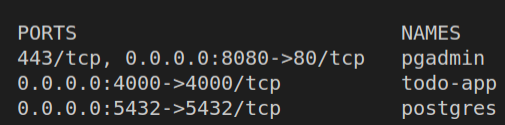
We see that our containers are up and running, and we can see on which port each and every one of them has been exposed and mapped.
我们看到我们的容器已经启动并且正在运行,我们可以看到每个容器都在哪个端口上公开和映射。
It would be nice to see what is going on inside our containers, some kind of logs or something.
很高兴看到我们的容器内部发生了什么,某种日志或其他东西。
To see the output of your containers during their execution time, just execute:
要在执行期间查看容器的输出,只需执行:
docker logs {container}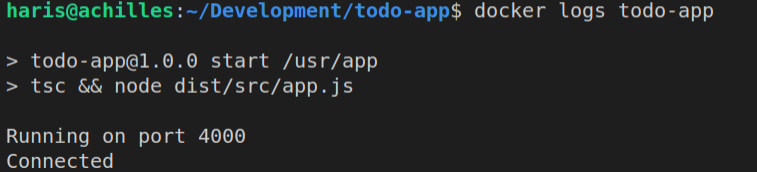
This is the output of our Node app — the same output as if we’d execute npm start. It’s the output of our application starting, but now running in the container.
这是Node应用程序的输出-与执行npm start相同的输出。 它是我们应用程序开始的输出,但现在在容器中运行。
管理员 (PgAdmin)
We also see that our db management is running on port 80. If we go to “localhost:8080”, we’ll get our database management login page where we can log into our system.
我们还看到数据库管理正在端口80上运行。如果转到“ localhost:8080”,我们将获得数据库管理登录页面,可在其中登录到系统。
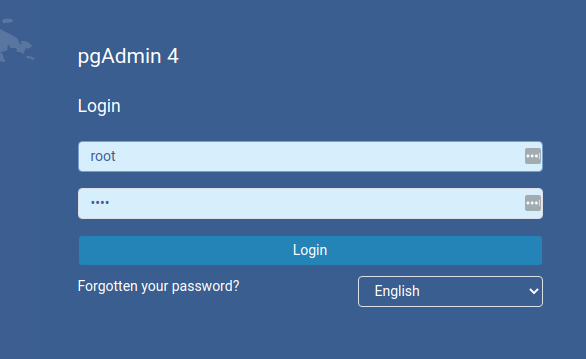
We’ll use our credentials from the pgadmin container’s environment variables, and now we have access to our database server.
我们将使用pgadmin容器的环境变量中的凭据,现在可以访问数据库服务器了。
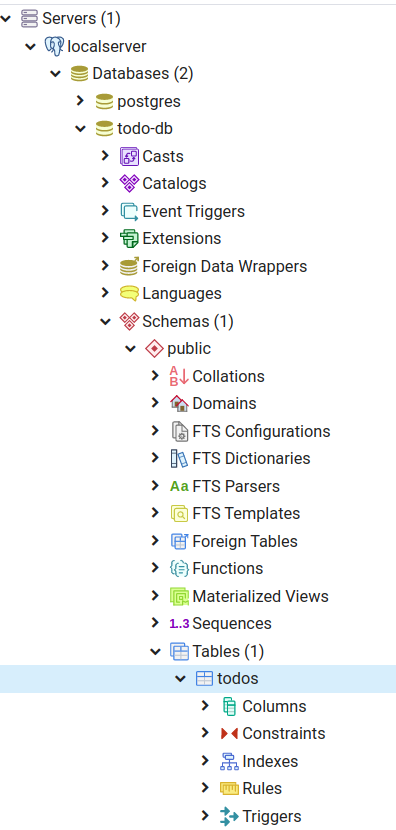
You see that we already have our todo-db, and the todos table created.
您会看到我们已经有了我们的todo-db和todos 表 。
测试我们的/ todos路线 (Testing our /todos route)
Okay, we have our database services and application up and running inside docker containers, so now we can test our todos endpoint.
好的,我们已经在Docker容器中启动并运行了数据库服务和应用程序,因此现在我们可以测试todos端点了。
I’ll hit a simple CURL request towards our TodosController with the JSON formatting pipe.
我将使用JSON格式化管道向TodosController发出一个简单的CURL请求。
curl 'http://localhost:4000/todos' | json_pp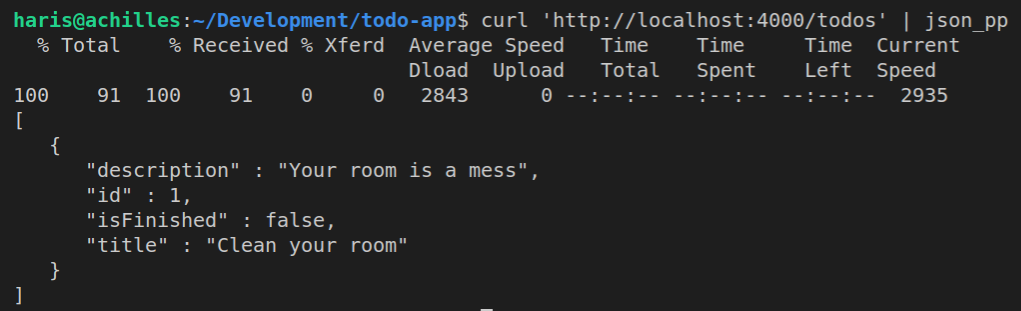
And there we have our data.
那里我们有我们的数据。
结论 (Conclusion)
The point of using Docker for your development is that you can put together a bunch of cool services, set up a testing environment, work with different versions of tools and see how your app behaves and a lot of other stuff. Just edit your docker-compose file, put some new services, and play around.
使用Docker进行开发的重点是,您可以组合许多很棒的服务,设置测试环境,使用不同版本的工具,并查看您的应用程序的行为方式以及许多其他内容。 只需编辑docker-compose文件,放置一些新服务,然后就可以玩了。
Thank you for reading. I hope you learned something useful!
感谢您的阅读。 希望您学到了有用的东西!
GitHub repo: https://github.com/CyberZujo/todo-app
GitHub回购: https : //github.com/CyberZujo/todo-app


 292
292

 被折叠的 条评论
为什么被折叠?
被折叠的 条评论
为什么被折叠?
 到【灌水乐园】发言


