Implementing user authentication in an application is the most sensitive part, and honestly I don’t want to do it. However, it is unavoidable because user authentication is a necessary feature for many applications. FaunaDB offers built-in identity, authentication, and password management. Thanks to them, you don’t have to use JWT or hash your password with bcrypt, which not only simplifies the process of implementing authentication, but also reduces the amount of code and makes your app slimmer.
在应用程序中实现用户身份验证是最敏感的部分,老实说,我不想这样做。 但是,这是不可避免的,因为用户身份验证是许多应用程序的必要功能。 FaunaDB提供内置的身份,身份验证和密码管理。 多亏了他们,您不必使用JWT或使用bcrypt哈希密码,这不仅简化了实现身份验证的过程,而且减少了代码量并使应用程序更苗条。
In this tutorial, we’ll use the FaunaDB features to implement cookie-based authentication in a Next.js app. You can use the app created in the previous tutorial as a basis:
在本教程中,我们将使用FaunaDB功能在Next.js应用程序中实现基于cookie的身份验证。 您可以将上一教程中创建的应用程序用作基础:
The app mainly uses GraphQL, but for authentication, we will use FQL and Next.js basic API Routes.
该应用程序主要使用GraphQL ,但是为了进行身份验证,我们将使用FQL和Next.js基本API路由 。
What we will:
我们将:
Create an index to find user documents
创建索引以查找用户文档
Create roles for guest and authenticated users
为访客和经过身份验证的用户创建角色
Create an access key for guests
为访客创建访问密钥
- Create functions to handle cookies 创建处理Cookie的函数
- Implement sign-up, login, and logout features 实施注册,登录和注销功能
- Test authentication and access restrictions 测试身份验证和访问限制
Please note that this article is likely to be lengthy, so I will omit the CSS files, but they are on GitHub.
请注意,本文可能很长,因此我将省略CSS文件,但它们位于GitHub上 。
准备工作 (Preparations)
安装依赖项 (Install Dependencies)
If you copied the project with git clone, run yarn install to install all the dependencies listed in package.json into node_modules:
如果您使用git clone复制了项目,请运行yarn install将package.json列出的所有依赖项安装到node_modules :
yarn install更新环境文件 (Update Env File)
Open .env.local in the root of your project and update it as follows:
在项目的根目录中打开.env.local ,并按以下步骤进行更新:
NEXT_PUBLIC_FAUNA_GUEST_SECRET=
FAUNA_GUEST_SECRET=
If you don’t have this file, create it in the root of your project.
如果没有此文件,请在项目的根目录中创建它。
更新GraphQL模式 (Update GraphQL Schema)
Open schema.gql in the root of your project and update it as follows:
在项目的根目录中打开schema.gql并按如下所示进行更新:
type Todo {
  task: String!
  completed: Boolean!
  owner: User!
}
type User {
  email: String! @unique
  todos: [Todo!] @relation
}
type Query {
  allTodos: [Todo!]
}
A simple User type with only email and todos fields has been added. User and Todo have a one-to-many relationship.
添加了仅包含email和todos字段的简单User类型。 User和Todo具有一对多关系。
创建一个数据库 (Create a Database)
If you don’t have a FaunaDB account, go to the Fauna sign-up page and create your account.
如果您没有FaunaDB帐户,请转到Fauna注册页面并创建您的帐户。
Create a new database in the FaunaDB Console. I’ll name it “next-fauna-auth”. You don’t have to use the same name.
在FaunaDB控制台中创建一个新数据库。 我将其命名为“ next-fauna-auth”。 您不必使用相同的名称。
导入GraphQL模式 (Import the GraphQL Schema)
As before, import the schema on the GraphQL Playground screen. Collections and indexes are created automatically when you import the schema:
和以前一样,在GraphQL Playground屏幕上导入模式。 导入架构时,将自动创建集合和索引:
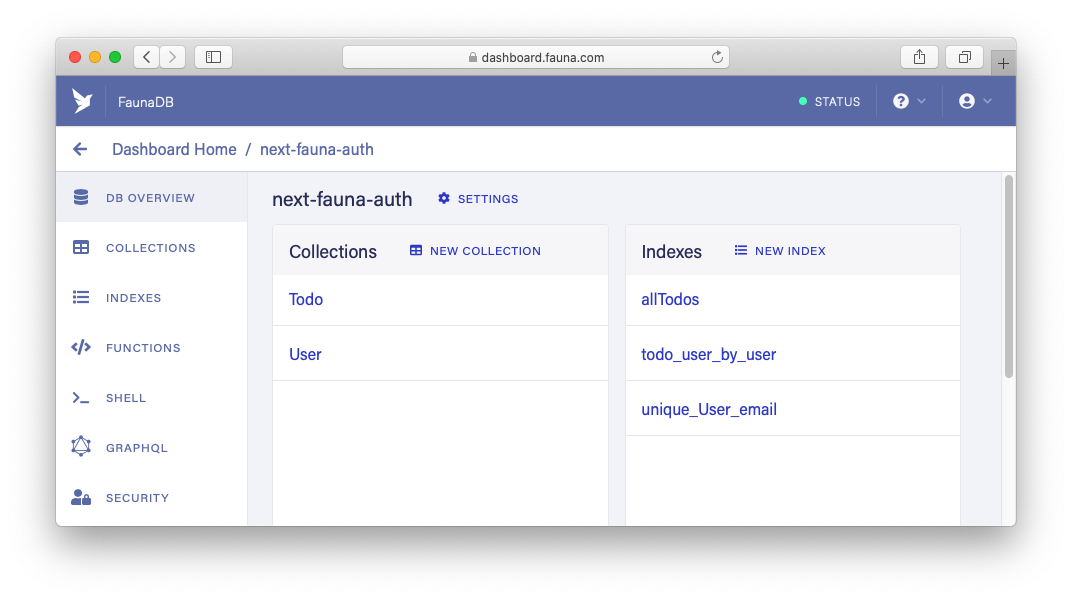
todo_user_by_user and unique_User_email are not used in this tutorial.
本教程中未使用todo_user_by_user和unique_User_email 。
创建一个新索引 (Create a New Index)
Indexes help you find the document(s) you want. Let’s create an index called user_by_email to use when signing up and logging in:
索引可帮助您找到所需的文档。 让我们创建一个名为user_by_email的索引,以便在注册和登录时使用:
- Go to “SHELL” in the left menu of the FaunaDB Console. 转到FaunaDB控制台左侧菜单中的“ SHELL”。
- Copy the following code, paste it into the Shell and run the query. 复制以下代码,将其粘贴到命令行管理程序中并运行查询。
CreateIndex({
  name: "user_by_email",
  unique: true,
  serialized: true,
  source: Collection("User"),
  terms: [{ field: ["data", "email"], transform: "casefold" }]
})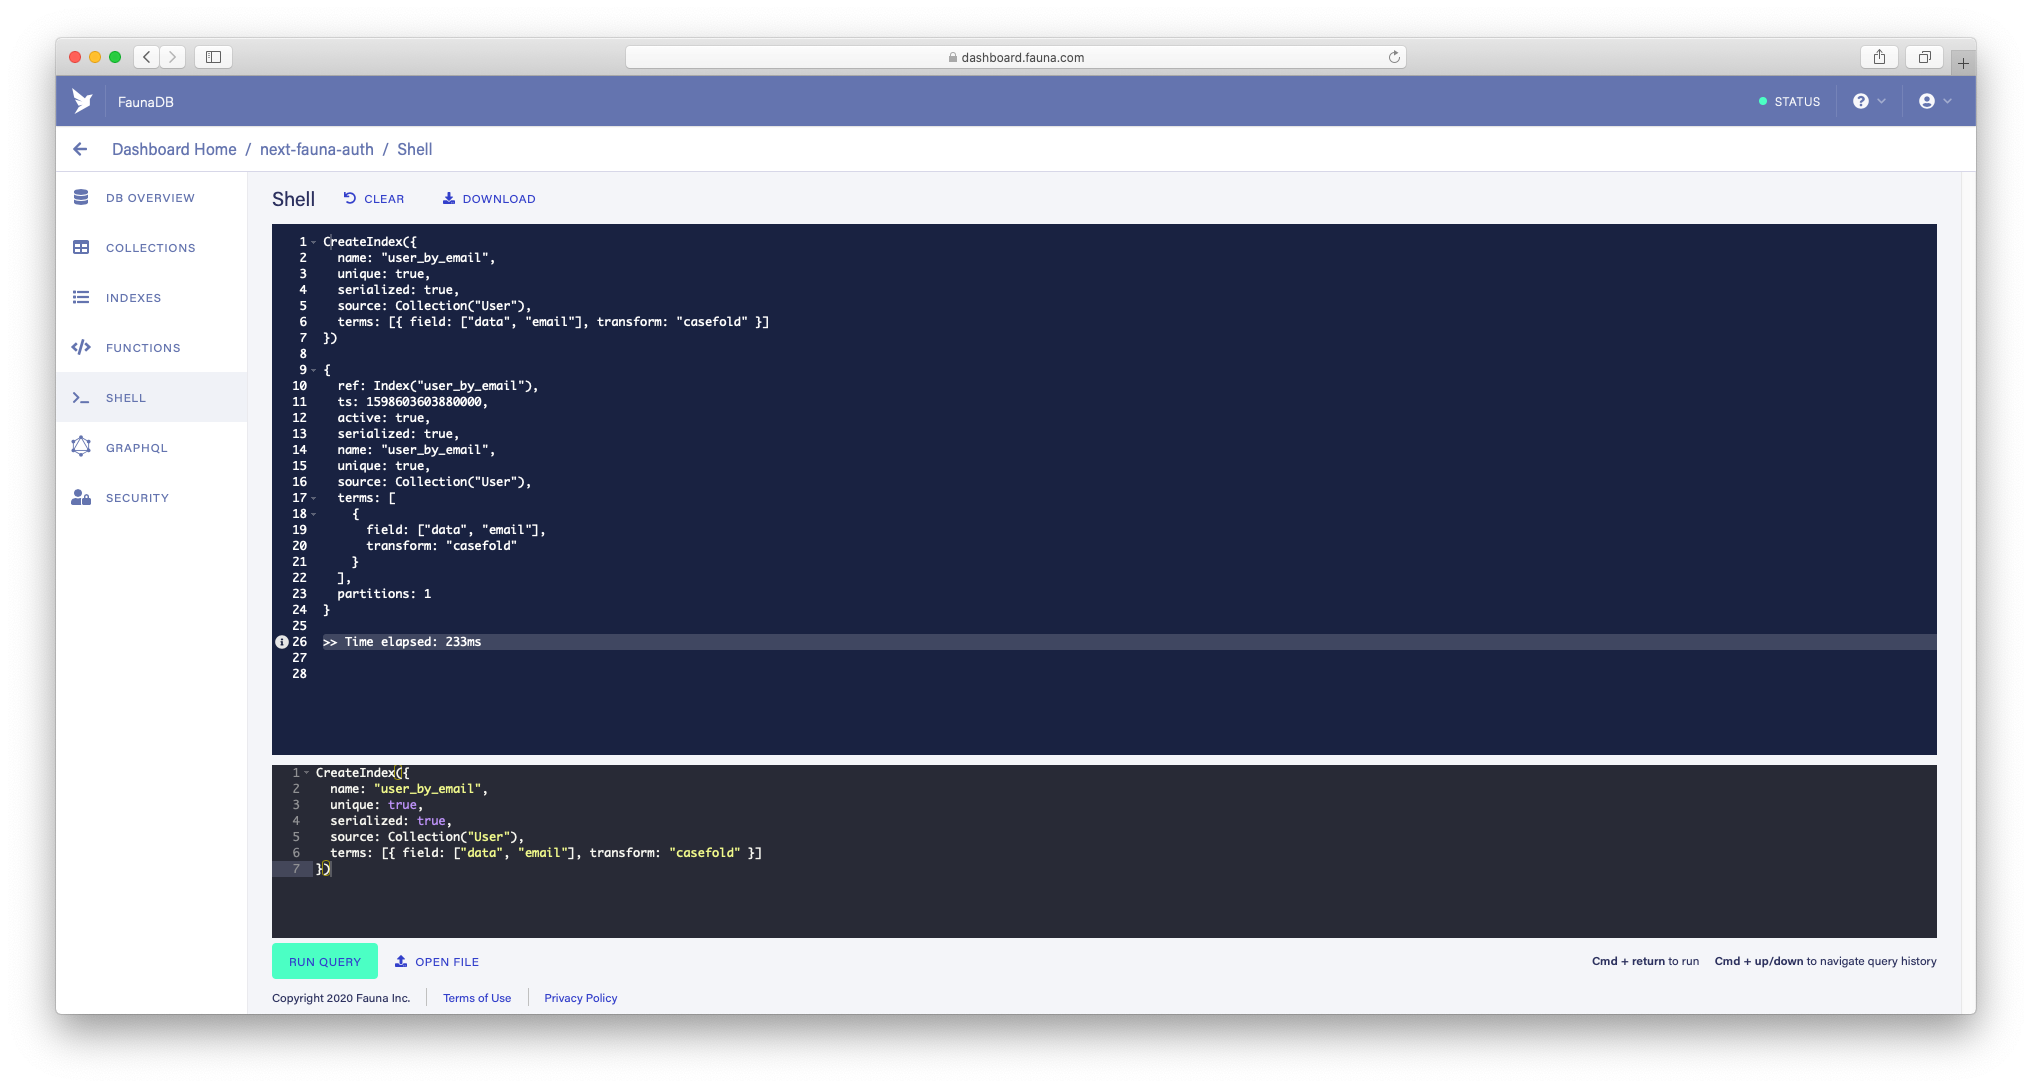
If there are no errors, the result is returned as above. unique_User_email and user_by_email are very similar, but user_by_email has transform: "casefold" in the terms field. When querying the index, the casefold function converts the query terms to lowercase. At the time of this writing, updating the terms field of the index is not allowed, so if you need customization, you have no choice but to create a new index.
如果没有错误,则如上所述返回结果。 unique_User_email和user_by_email非常相似,但user_by_email已transform: "casefold" terms字段中的transform: "casefold" 。 查询索引时, casefold函数将查询词转换为小写。 在撰写本文时,不允许更新索引的terms字段,因此,如果需要自定义,则别无选择,只能创建一个新索引。
创建访客角色 (Create a Guest Role)
FaunaDB has built-in roles called “admin” and “server”, but you can also create user-defined roles. Many access is allowed to the built-in roles, so it is necessary to create user-defined roles to control access. First, we will create a “Guest” role:
FaunaDB具有称为“ admin”和“ server”的内置角色,但是您也可以创建用户定义的角色 。 内置角色具有许多访问权限,因此有必要创建用户定义的角色来控制访问。 首先,我们将创建一个“来宾”角色:
- Go to “SECURITY” in the left menu of the FaunaDB Console. 转到FaunaDB控制台左侧菜单中的“安全”。
- Click “MANAGE ROLES”, then “NEW ROLE”. 单击“管理角色”,然后单击“新角色”。
Add the
Usercollection and check the "Read" and "Create" actions.添加
User集合并检查“读取”和“创建”操作。Add the
user_by_emailindex, and check the "Read" action.添加
user_by_email索引,然后检查“读取”操作。- Click the “SAVE” button. 点击“保存”按钮。

Guests only need to be able to see if the user exists and create a user account.
来宾仅需要能够查看用户是否存在并创建用户帐户。
创建访问密钥 (Create an Access Key)
Let’s create an access key using the Guest role we just created. Guests don’t have access tokens, so they use the secret that corresponds to the key to access the FaunaDB API.
让我们使用刚刚创建的Guest角色创建访问密钥 。 来宾没有访问令牌,因此他们使用与密钥相对应的秘密来访问FaunaDB API。
- Go to “SECURITY” and click “NEW KEY”. 转到“安全”,然后单击“新密钥”。
- Select the Guest role and click the “SAVE” button. 选择来宾角色,然后单击“保存”按钮。
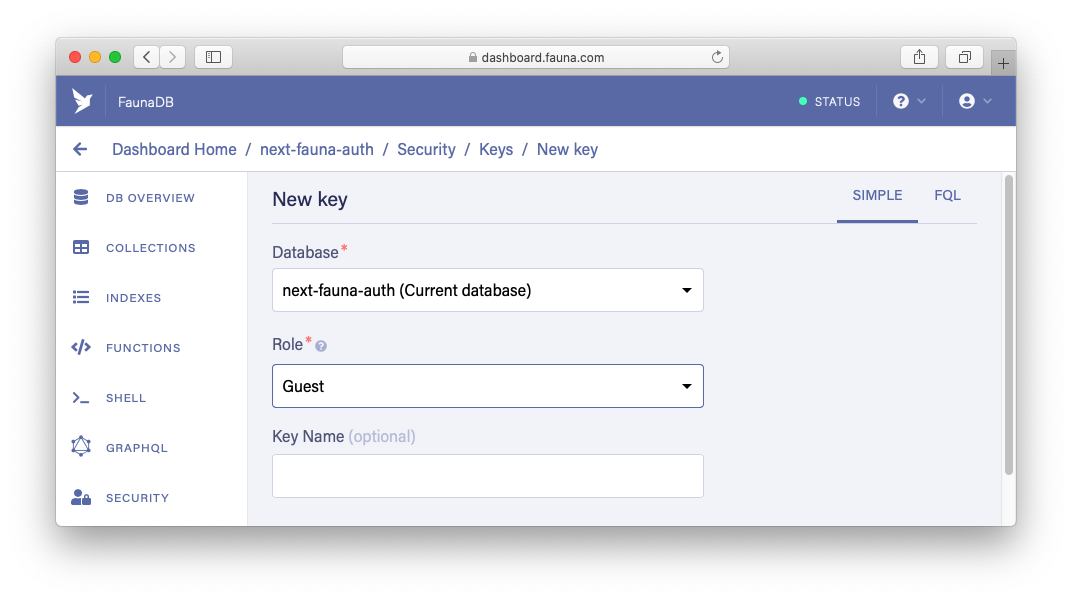
After creating the key, you should see the key’s secret. Copy the secret and paste it into .env.local in your project:
创建密钥后,您应该会看到密钥的秘密 。 复制机密并将其粘贴到项目中的.env.local中:
NEXT_PUBLIC_FAUNA_GUEST_SECRET=<YOUR KEY'S SECRET>
FAUNA_GUEST_SECRET=<YOUR KEY'S SECRET>
NOTE: To load the environment variables, you need to restart the
devserver.注意: 要加载环境变量,您需要重新启动
dev服务器。
实例化客户端 (Instantiate a Client)
Create a new file called
fauna-client.jsin theutilsdirectory.在
utils目录中创建一个名为fauna-client.js的新文件。- Instantiate two types of clients. 实例化两种类型的客户端。
// utils/fauna-client.js


import faunadb from 'faunadb';


export const guestClient = new faunadb.Client({
  secret: process.env.FAUNA_GUEST_SECRET,
});


export const authClient = (secret) =>
  new faunadb.Client({
    secret,
  });
As the name implies, guestClient is for guests and authClient is for authenticated users. guestClient is instantiated with the access key and used for sign-up and login. authClient is instantiated with an access token and used to get the user data and logout.
顾名思义, guestClient用于访客,而authClient用于经过身份验证的用户。 guestClient用访问密钥实例化,并用于注册和登录。 authClient使用访问令牌实例化,并用于获取用户数据和注销。
更新GraphQL客户端 (Update the GraphQL Client)
Open utils/graphql-client.js and update it as follows:
打开utils/graphql-client.js并进行如下更新:
// utils/graphql-client.js


import { GraphQLClient } from 'graphql-request';


const endpoint = 'https://graphql.fauna.com/graphql';


export const graphQLClient = (token) => {
  const secret = token || process.env.NEXT_PUBLIC_FAUNA_GUEST_SECRET;


  return new GraphQLClient(endpoint, {
    headers: {
      authorization: `Bearer ${secret}`,
      // 'X-Schema-Preview': 'partial-update-mutation', // move to `pages/index.js`
    },
  });
};
If the user is logged in, send the token through the authorization header. Otherwise, send the key's secret.
如果用户已登录,请通过authorization标头发送token 。 否则,发送密钥的秘密。
Due to this update, some files need to be updated:
由于此更新,一些文件需要更新:
components/edit-form.jscomponents/edit-form.jspages/index.jspages/index.jspages/new.jspages/new.jspages/todo/[id].jspages/todo/[id].js
graphQLClient needs to take the token variable as an argument, so update it as follows:
graphQLClient需要将token变量作为参数,因此请按以下方式进行更新:
// await graphQLClient.request(...);
await graphQLClient(token).request(...);
In addition, move the following code in pages/index.js inside the Home function:
另外,将以下代码移到Home函数内的pages/index.js :
// pages/index.js
const Home = () => {
  const fetcher = async (query) => await graphQLClient(token).request(query);
  ...
};
Also, a custom HTTP header X-Schema-Preview is moved from utils/graphql-client.js to pages/index.js. Set it in the toggleTodo function as follows:
另外,自定义HTTP标头X-Schema-Preview从utils/graphql-client.js移到pages/index.js 。 在toggleTodo函数中进行如下设置:
// pages/index.js
const toggleTodo = async (id, completed) => {
  ...
  try {
    await graphQLClient(token)
      .setHeader('X-Schema-Preview', 'partial-update-mutation')
      .request(mutation, variables);
    ...
  }
};
In graphql-request, I found out that to set headers after the GraphQLClient has been initialised, you can use setHeader (or setHeaders) function(s). This makes sense because the X-Schema-Preview header is not used anywhere else.
在graphql-request中 ,我发现要在GraphQLClient初始化后设置头,可以使用setHeader (或setHeaders )函数。 这是有道理的,因为X-Schema-Preview标头未在其他任何地方使用。
创建处理Cookie的函数 (Create Functions to Handle Cookies)
We’ll create three functions to set, get and remove auth cookies.
我们将创建三个函数来设置,获取和删除身份验证cookie。
Create a new file called auth-cookies.js in the utils directory:
在utils目录中创建一个名为auth-cookies.js的新文件:
// utils/auth-cookies.js


import { serialize, parse } from 'cookie';


const TOKEN_NAME = 'faunaToken';
const MAX_AGE = 60 * 60 * 8; // 8 hours


export function setAuthCookie(res, token) {
  const cookie = serialize(TOKEN_NAME, token, {
    httpOnly: true,
    maxAge: MAX_AGE,
    path: '/',
    sameSite: 'lax',
    secure: process.env.NODE_ENV === 'production',
  });


  res.setHeader('Set-Cookie', cookie);
}


export function removeAuthCookie(res) {
  const cookie = serialize(TOKEN_NAME, '', {
    maxAge: -1,
    path: '/',
  });


  res.setHeader('Set-Cookie', cookie);
}


export function getAuthCookie(req) {
  // for API Routes, we don't need to parse the cookies
  if (req.cookies) return req.cookies[TOKEN_NAME];


  // for pages, we do need to parse the cookies
  const cookies = parse(req.headers.cookie || '');
  return cookies[TOKEN_NAME];
}
There has been a lot of discussion about where to store secret data, but my personal opinion is that storing it in a cookie with the httpOnly and secure attributes is the most secure. However, that is just my opinion at the moment, and more research is needed.
关于将秘密数据存储在何处已有很多讨论,但我个人认为,将其存储在具有httpOnly和secure属性的cookie中是最安全的。 但是,这只是我目前的观点,需要更多的研究。
Don’t forget to install cookie:
不要忘记安装cookie :
yarn add cookie使用getServerSideProps获取Cookie (Use getServerSideProps to Get Cookies)
From Next.js 9.3, one of the data fetching methods called getServerSideProps is provided. getServerSideProps only runs on server-side. And you can write server-side code directly in getServerSideProps like this:
从Next.js 9.3开始,提供了一种名为getServerSideProps的数据获取方法。 getServerSideProps仅在服务器端运行。 您可以像这样在getServerSideProps直接编写服务器端代码:
// pages/index.js


import { getAuthCookie } from '../utils/auth-cookies';


const Home = ({ token }) => {
  ...
};


export async function getServerSideProps(ctx) {
  const token = getAuthCookie(ctx.req);
  return { props: { token: token || null } };
}


export default Home;
Note that getServerSideProps is used outside the default function of the page component. The getServerSideProps function takes an object that contains several keys, such as req and res. As above, the retrieved data is passed to the page component as props.
请注意,在页面组件的默认功能之外使用了getServerSideProps 。 getServerSideProps函数采用一个包含几个键的对象,例如req和res 。 如上所述,检索到的数据作为道具传递到页面组件。
Let’s update pages/new.js and pages/todo/[id].js in the same way. However, pages/todo/[id].js needs to pass the token to the EditForm component:
让我们以相同的方式更新pages/new.js和pages/todo/[id].js 。 但是, pages/todo/[id].js需要将token传递给EditForm组件:
// pages/todo/[id].js
<EditForm defaultValues={data.findTodoByID} id={id} token={token} />
Then, update components/edit-form.js as follows:
然后,如下更新components/edit-form.js :
// components/edit-form.js
const EditForm = ({ defaultValues, id, token }) => {
  ...
};
Now we’re ready to start the main work.
现在我们准备开始主要工作。
实施注册 (Implement Signup)
First, implement the sign-up feature.
首先,实现注册功能。
创建一个注册API (Create a Signup API)
Create a directory called
apiin thepagesdirectory (if you don't have it).在
pages目录中创建一个名为api的目录(如果没有的话)。Create a file called
signup.jsinpages/api.在
pages/api创建一个名为signup.js的文件。
// pages/api/signup.js


import { query as q } from 'faunadb';
import { guestClient } from '../../utils/fauna-client';
import { setAuthCookie } from '../../utils/auth-cookies';


export default async function signup(req, res) {
  const { email, password } = req.body;


  if (!email || !password) {
    return res.status(400).send('Email and Password not provided');
  }


  try {
    const existingEmail = await guestClient.query(
      // Exists returns boolean, Casefold returns normalize string
      q.Exists(q.Match(q.Index('user_by_email'), q.Casefold(email)))
    );


    if (existingEmail) {
      return res.status(400).send(`Email ${email} already exists`);
    }


    const user = await guestClient.query(
      q.Create(q.Collection('User'), {
        credentials: { password },
        data: { email },
      })
    );


    if (!user.ref) {
      return res.status(404).send('user ref is missing');
    }


    const auth = await guestClient.query(
      q.Login(user.ref, {
        password,
      })
    );


    if (!auth.secret) {
      return res.status(404).send('auth secret is missing');
    }


    setAuthCookie(res, auth.secret);


    res.status(200).end();
  } catch (error) {
    console.error(error);
    res.status(error.requestResult.statusCode).send(error.message);
  }
}
FaunaDB provides its own query language called Fauna Query Language (FQL). FQL provides many built-in functions that you can use to query and modify your database. They can be used like q.Create() via the query module of FaunaDB's JavaScript driver. And they are used through the FaunaDB client.
FaunaDB提供了自己的查询语言,称为Fauna查询语言(FQL) 。 FQL提供了许多内置函数 ,可用于查询和修改数据库。 通过FaunaDB的JavaScript驱动程序的query模块,它们可以像q.Create()一样使用。 它们通过FaunaDB客户端使用。
I’ll simply explain the sign-up flow: First, check if the requested email matches existing data. The Exists function simply returns a boolean value. Next, if no data with the email exists, a user document will be created. The requested password is set in the credentials field of the Create function. This will securely store the BCrypt hash of the password. Then, the Login function will create an authentication token for the user based on the password. Finally, the authentication token is stored in a cookie.
我将简单地解释注册流程:首先,检查所请求的电子邮件是否与现有数据匹配。 Exists函数只是返回一个布尔值。 接下来,如果电子邮件中没有数据,将创建用户文档。 在“ Create功能的credentials字段中设置请求的密码。 这将安全地存储密码的BCrypt哈希。 然后, Login功能将基于password为用户创建一个身份验证令牌。 最后,身份验证令牌存储在cookie中。
Recall that we set the Casefold function to the terms field of the user_by_email index. The values of the field (email) specified in terms are converted to lowercase, so the requested email address must also be converted to lowercase using the Casefold function. Essentially, this technique is useful for fields that require mixed case, such as Username. Email addresses don't need to be stored in uppercase, just convert them to lowercase when creating a user.
回想一下,我们将Casefold函数设置为user_by_email索引的terms字段。 terms中指定的字段(电子邮件)的值将转换为小写,因此还必须使用Casefold函数将请求的电子邮件地址转换为小写。 本质上,此技术对于需要区分大小写的字段(例如用户名)很有用。 电子邮件地址不需要大写存储,只需在创建用户时将其转换为小写即可。
创建注册页面 (Create a Signup Page)
Create a new file called signup.js in the pages directory:
在pages目录中创建一个名为signup.js的新文件:
// pages/signup.js


import { useState } from 'react';
import { useRouter } from 'next/router';
import { useForm } from 'react-hook-form';
import Layout from '../components/layout';
import utilStyles from '../styles/utils.module.css';


const Signup = () => {
  const router = useRouter();


  const [errorMessage, setErrorMessage] = useState('');


  const { handleSubmit, register, watch, errors } = useForm();


  const onSubmit = handleSubmit(async (formData) => {
    if (errorMessage) setErrorMessage('');


    try {
      const res = await fetch('/api/signup', {
        method: 'POST',
        headers: {
          'Content-Type': 'application/json',
        },
        body: JSON.stringify(formData),
      });


      if (res.ok) {
        router.push('/');
      } else {
        throw new Error(await res.text());
      }
    } catch (error) {
      console.error(error);
      setErrorMessage(error.message);
    }
  });


  return (
    <Layout>
      <h1>Sign Up</h1>


      <form onSubmit={onSubmit} className={utilStyles.form}>
        <div>
          <label>Email</label>
          <input
            type="email"
            name="email"
            placeholder="e.g. john@example.com"
            ref={register({ required: 'Email is required' })}
          />
          {errors.email && (
            <span role="alert" className={utilStyles.error}>
              {errors.email.message}
            </span>
          )}
        </div>


        <div>
          <label>Password</label>
          <input
            type="password"
            name="password"
            placeholder="e.g. John-1234"
            ref={register({ required: 'Password is required' })}
          />
          {errors.password && (
            <span role="alert" className={utilStyles.error}>
              {errors.password.message}
            </span>
          )}
        </div>


        <div>
          <label>Confirm Password</label>
          <input
            type="password"
            name="password2"
            placeholder="e.g. John-1234"
            ref={register({
              validate: (value) =>
                value === watch('password') || 'Passwords do not match',
            })}
          />
          {errors.password2 && (
            <span role="alert" className={utilStyles.error}>
              {errors.password2.message}
            </span>
          )}
        </div>


        <div className={utilStyles.submit}>
          <button type="submit">Sign up</button>
        </div>
      </form>


      {errorMessage && (
        <p role="alert" className={utilStyles.errorMessage}>
          {errorMessage}
        </p>
      )}
    </Layout>
  );
};


export default Signup;
The page sends a request using the Fetch API, and if the ok property of the returned Response instance is true, it takes you to the home page. It's very simple.
该页面使用Fetch API发送请求,并且如果返回的Response实例的ok属性为true,它将带您进入主页。 非常简单
测试注册 (Test Signup)
Let’s test the sign-up feature. Go to the Signup page ( http://localhost:3000/signup) and create a user:
让我们测试一下注册功能。 转到“注册”页面( http:// localhost:3000 / signup )并创建一个用户:
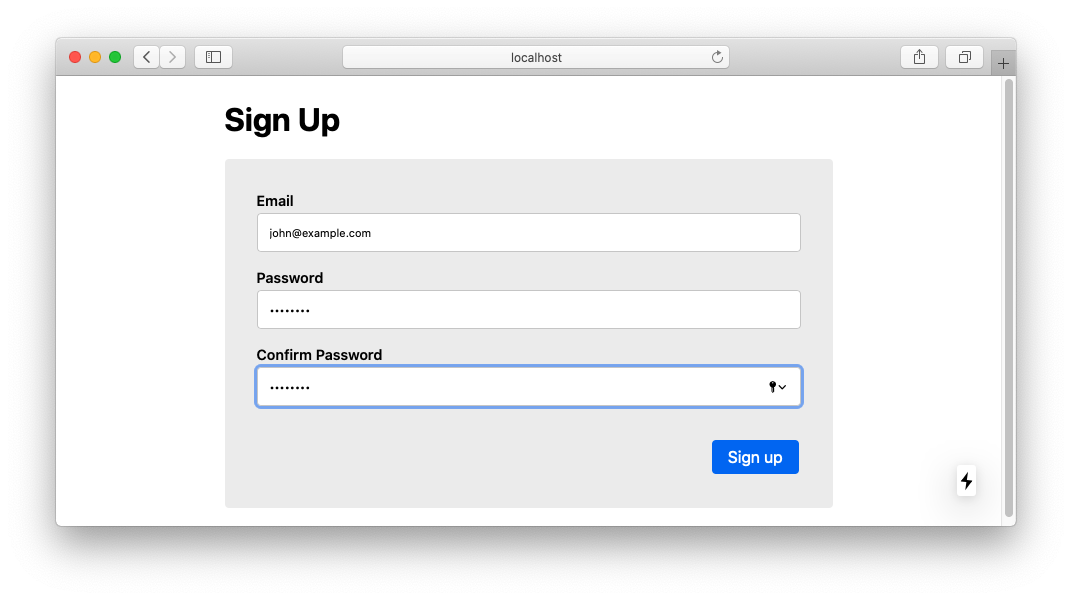
The user was successfully created and the auth cookie was set:
已成功创建用户并设置了身份验证cookie:
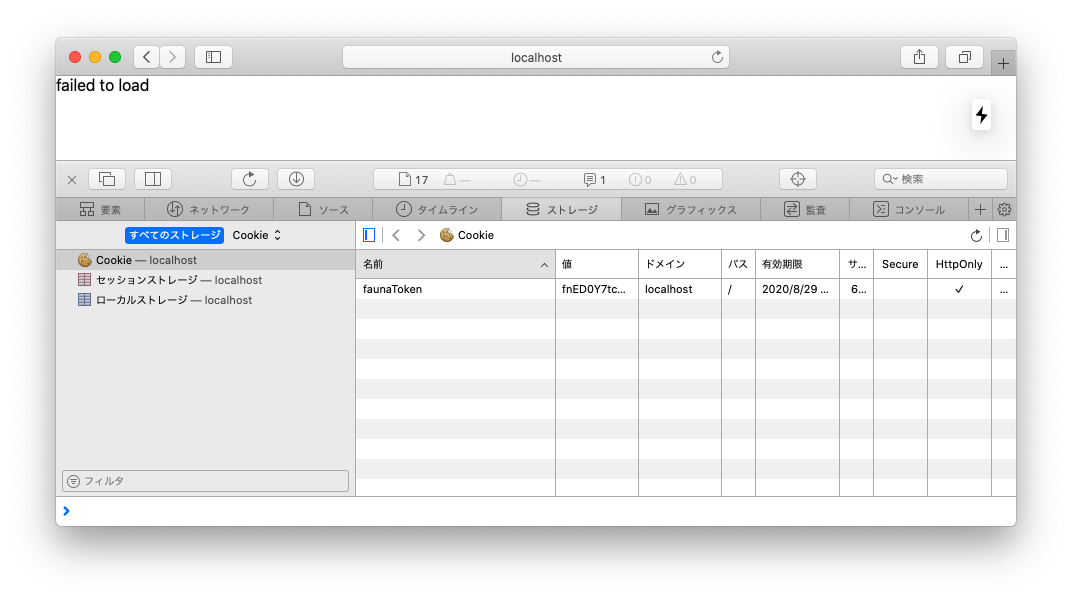
However, the page is displaying an error message. We haven’t created a role for authenticated users yet.
但是,页面显示错误消息。 我们尚未为经过身份验证的用户创建角色。
创建身份验证角色 (Create a Auth Role)
Let’s create a “Auth” role:
让我们创建一个“ Auth”角色:
Add the
TodoandUsercollections.添加
Todo和User集合。Check the “Read”, “Write”, “Create” and “Delete” actions of the
Todocollection.检查
Todo集合的“读取”,“写入”,“创建”和“删除”操作。Check the “Read” action of the
Usercollection.检查
User集合的“读取”操作。Add the
allTodosindex and check the "Read" action.添加
allTodos索引并检查“读取”操作。
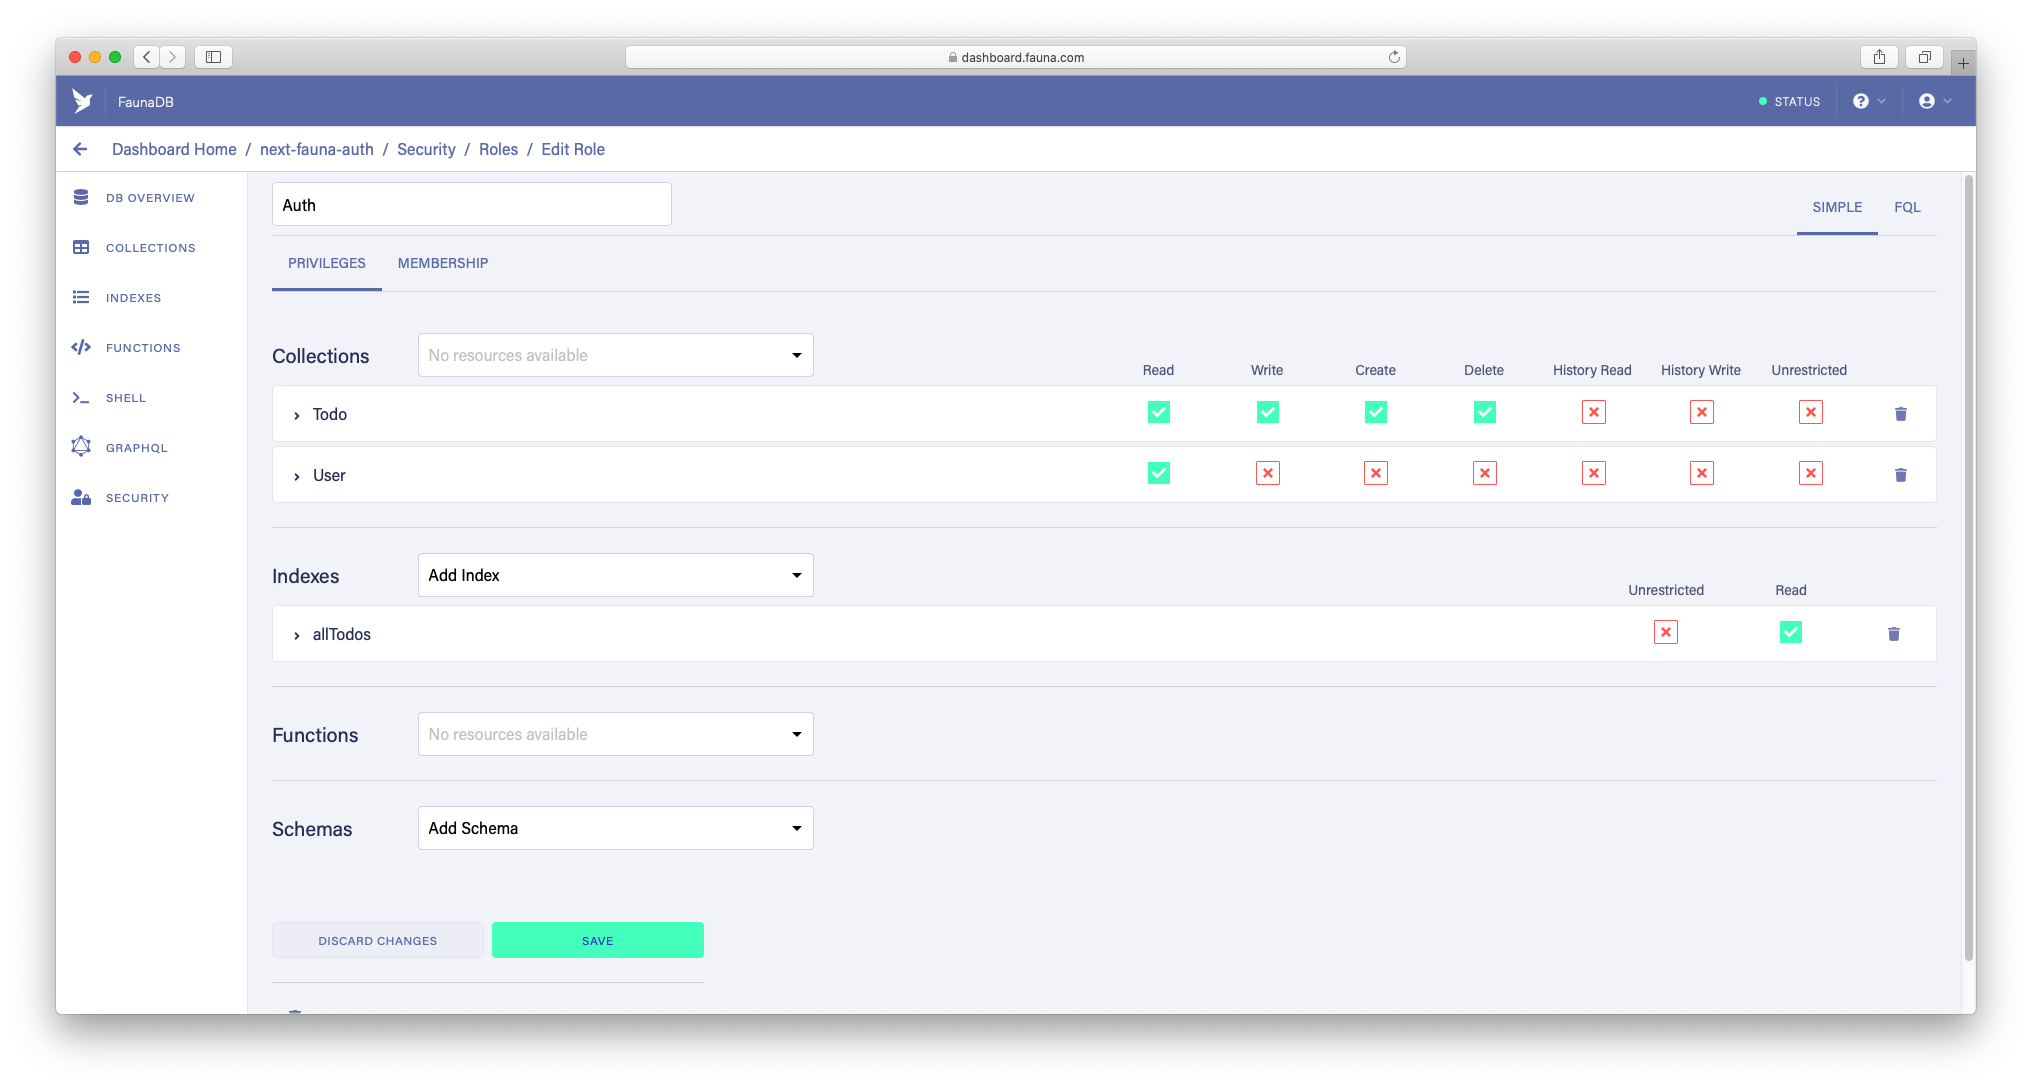
This is the simplest setting, but it allows users to work with other users’ documents. It’s not good. Let’s customize the value of each action:
这是最简单的设置,但是它允许用户使用其他用户的文档。 这不好。 让我们自定义每个动作的值:
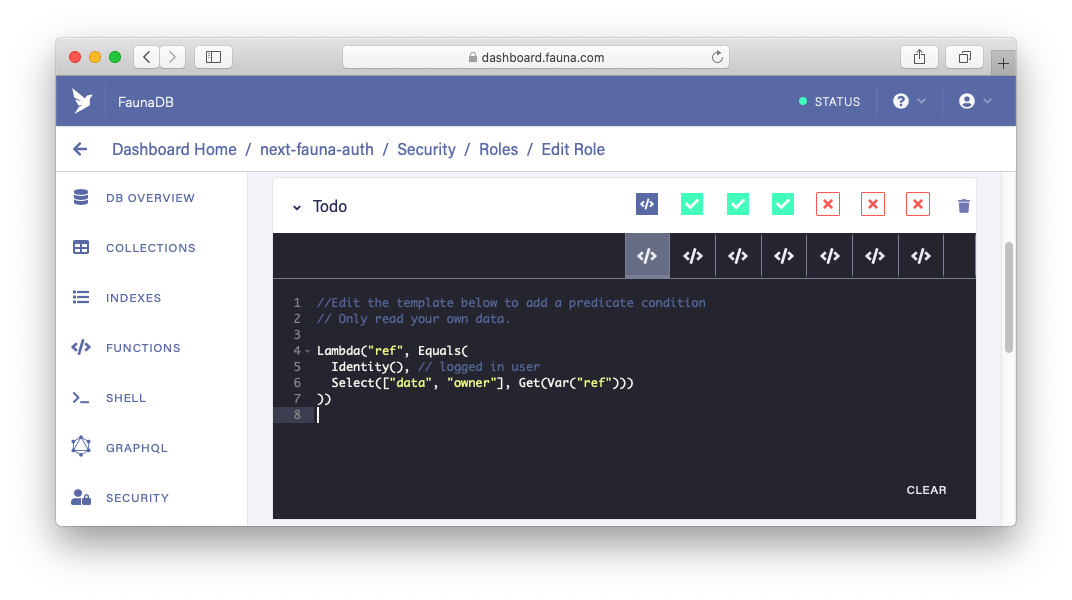
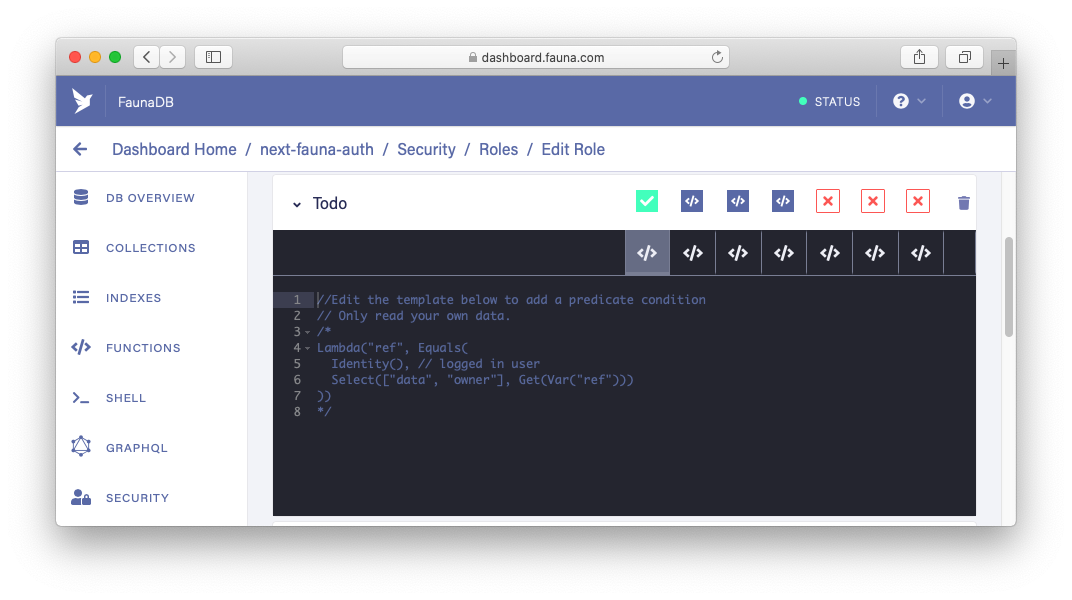
To customize the values of the actions, create a lambda predicate function as above. Templates are prepared for each action in advance, so you can edit and use them. This time, all you have to do is uncomment.
要自定义操作的值,请如上所述创建一个lambda谓词函数。 预先为每个操作准备了模板,因此您可以编辑和使用它们。 这次,您要做的就是取消注释。
Edit “Write”, “Create” and “Delete” in the same way:
以相同的方式编辑“写入”,“创建”和“删除”:

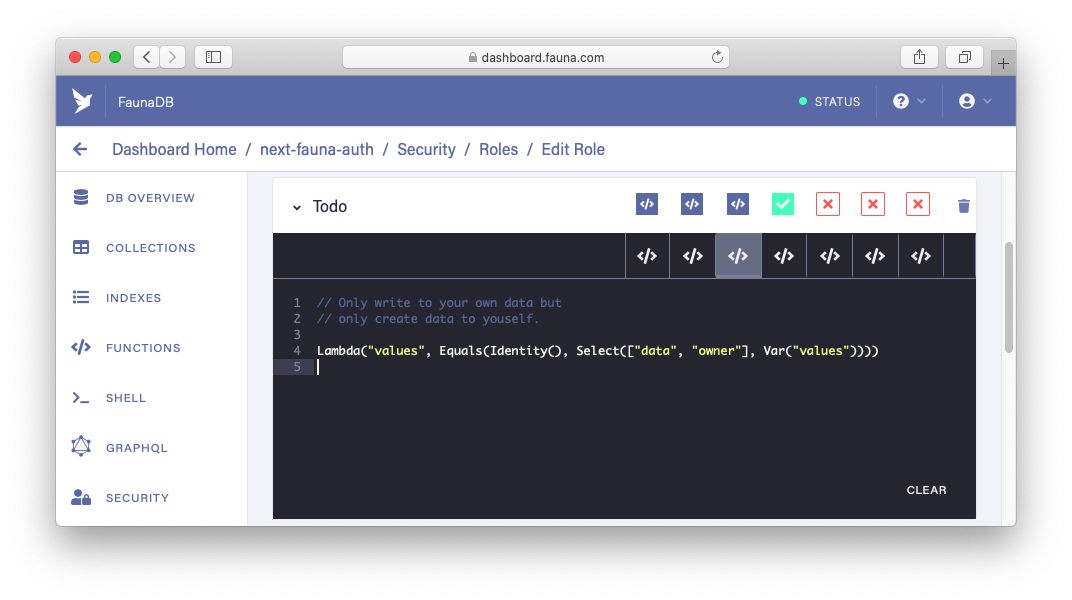
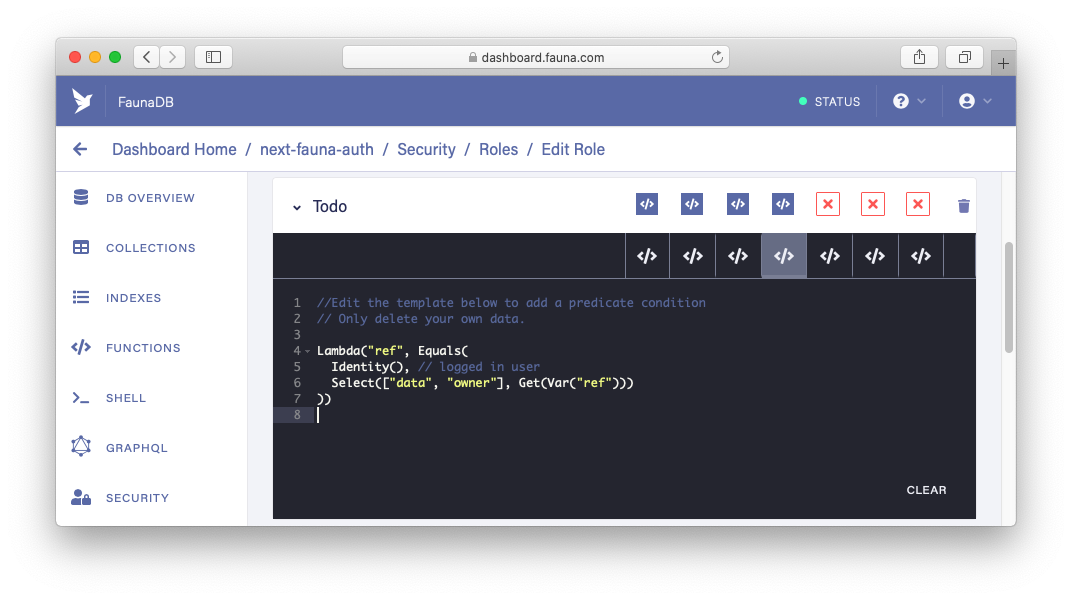
Now users can only work with their own documents.
现在,用户只能使用自己的文档。
Finally, you need to add the User collection to Membership of the Auth role:
最后,您需要将User集合添加到Auth角色的Membership中:
- Move to “MEMBERSHIP” and add the User collection. 移至“ MEMBERSHIP”并添加用户集合。
- Click the “SAVE” button. 点击“保存”按钮。
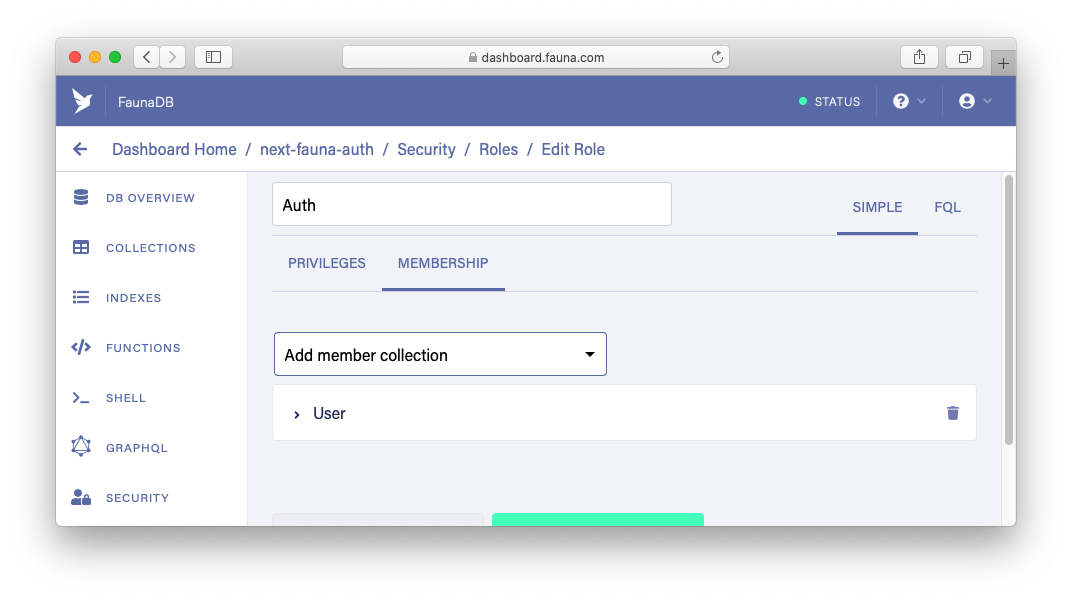
This will apply the Auth role to authenticated users.
这会将Auth角色应用于经过身份验证的用户。
Now, go back to the home page again. The error should be gone.
现在,再次返回主页。 该错误应该消失了。
Please remove the auth cookie from your browser manually before moving on to the next section.
在继续进行下一部分之前,请从浏览器中手动删除身份验证cookie。
实施登录和注销 (Implement Login & Logout)
创建登录API (Create a Login API)
Create a file called login.js in pages/api:
在pages/api创建一个名为login.js的文件:
// pages/api/login.js


import { query as q } from 'faunadb';
import { guestClient } from '../../utils/fauna-client';
import { setAuthCookie } from '../../utils/auth-cookies';


export default async function login(req, res) {
  const { email, password } = req.body;


  if (!email || !password) {
    return res.status(400).send('Email and Password not provided');
  }


  try {
    const auth = await guestClient.query(
      q.Login(q.Match(q.Index('user_by_email'), q.Casefold(email)), {
        password,
      })
    );


    if (!auth.secret) {
      return res.status(404).send('auth secret is missing');
    }


    setAuthCookie(res, auth.secret);


    res.status(200).end();
  } catch (error) {
    console.error(error);
    res.status(error.requestResult.statusCode).send(error.message);
  }
}
It’s almost the same as the latter part of the Signup API. There is nothing new.
它与Signup API的后半部分几乎相同。 没有什么新鲜的。
创建注销API (Create a Logout API)
Create a file called logout.js in pages/api:
在pages/api创建一个名为logout.js的文件:
// pages/api/logout.js


import { query as q } from 'faunadb';
import { authClient } from '../../utils/fauna-client';
import { getAuthCookie, removeAuthCookie } from '../../utils/auth-cookies';


export default async function logout(req, res) {
  const token = getAuthCookie(req);


  // already logged out
  if (!token) return res.status(200).end();


  try {
    await authClient(token).query(q.Logout(false));
    removeAuthCookie(res);
    res.status(200).end();
  } catch (error) {
    console.error(error);
    res.status(error.requestResult.statusCode).send(error.message);
  }
}
To log out, just use the Logout function. If its parameter is false, only the token used in this request is deleted. Otherwise, all tokens associated with the user ID are deleted. It means logging out of all devices of the user. After logging out, the auth cookie is removed.
要注销,只需使用Logout功能。 如果其参数为false ,则仅删除此请求中使用的令牌。 否则,将删除与用户ID关联的所有令牌。 这意味着注销用户的所有设备。 注销后,身份验证cookie被删除。
创建一个用户API (Create a User API)
We’ll also create an API route to retrieve the authenticated user’s data.
我们还将创建一个API路由来检索经过身份验证的用户的数据。
Create a file called user.js in pages/api:
在pages/api创建一个名为user.js的文件:
// pages/api/user.js


import { query as q } from 'faunadb';
import { authClient } from '../../utils/fauna-client';
import { getAuthCookie } from '../../utils/auth-cookies';


export default async function user(req, res) {
  const token = getAuthCookie(req);


  if (!token) {
    return res.status(401).send('Auth cookie not found');
  }


  try {
    const { ref, data } = await authClient(token).query(q.Get(q.Identity()));
    res.status(200).json({ ...data, id: ref.id });
  } catch (error) {
    console.error(error);
    res.status(error.requestResult.statusCode).send(error.message);
  }
}
The Identity function returns the ref of the document associated with the token, and the Get function uses the ref to return the corresponding document. We also need the id, so include it in the response data.
Identity函数返回与token关联的文档的引用,而Get函数使用该引用返回相应的文档。 我们还需要id ,因此将其包括在响应数据中。
创建登录页面 (Create a Login Page)
Create a file called login.js in the pages directory:
在pages目录中创建一个名为login.js的文件:
// pages/login.js


import { useState } from 'react';
import { useRouter } from 'next/router';
import { useForm } from 'react-hook-form';
import Layout from '../components/layout';
import utilStyles from '../styles/utils.module.css';


const Login = () => {
  const router = useRouter();


  const [errorMessage, setErrorMessage] = useState('');


  const { handleSubmit, register, errors } = useForm();


  const onSubmit = handleSubmit(async (formData) => {
    if (errorMessage) setErrorMessage('');


    try {
      const res = await fetch('/api/login', {
        method: 'POST',
        headers: {
          'Content-Type': 'application/json',
        },
        body: JSON.stringify(formData),
      });


      if (res.ok) {
        router.push('/');
      } else {
        throw new Error(await res.text());
      }
    } catch (error) {
      console.error(error);
      setErrorMessage(error.message);
    }
  });


  return (
    <Layout>
      <h1>Log In</h1>


      <form onSubmit={onSubmit} className={utilStyles.form}>
        <div>
          <label>Email</label>
          <input
            type="email"
            name="email"
            ref={register({ required: 'Email is required' })}
          />
          {errors.email && (
            <span role="alert" className={utilStyles.error}>
              {errors.email.message}
            </span>
          )}
        </div>


        <div>
          <label>Password</label>
          <input
            type="password"
            name="password"
            ref={register({ required: 'Password is required' })}
          />
          {errors.password && (
            <span role="alert" className={utilStyles.error}>
              {errors.password.message}
            </span>
          )}
        </div>


        <div className={utilStyles.submit}>
          <button type="submit">Log in</button>
        </div>
      </form>


      {errorMessage && (
        <p role="alert" className={utilStyles.errorMessage}>
          {errorMessage}
        </p>
      )}
    </Layout>
  );
};


export default Login;
It’s almost the same as the Signup page.
它与“注册”页面几乎相同。
创建标题组件 (Create a Header Component)
Before testing login and logout, create a “header” component. It’s important for user authentication.
在测试登录和注销之前,请创建一个“标题”组件。 这对用户身份验证很重要。
Create a file called header.js in the components directory:
在components目录中创建一个名为header.js的文件:
// components/header.js


import Link from 'next/link';
import { useRouter } from 'next/router';
import useSWR from 'swr';
import styles from './header.module.css';


const Header = () => {
  const router = useRouter();

  const fetcher = (url) => fetch(url).then((r) => r.json());


  const { data: user, mutate: mutateUser } = useSWR('/api/user', fetcher);


  const logout = async () => {
    const res = await fetch('/api/logout');
    if (res.ok) {
      mutateUser(null);
      router.push('/login');
    }
  };


  return (
    <div className={styles.header}>
      <header>
        <nav>
          <Link href="/">
            <a>Home</a>
          </Link>


          <ul>
            {user ? (
              <>
                <li>
                  <Link href="/profile">
                    <a>{user.email}</a>
                  </Link>
                </li>
                <li>
                  <button onClick={logout}>Logout</button>
                </li>
              </>
            ) : (
              <>
                <li>
                  <Link href="/login">
                    <a>Login</a>
                  </Link>
                </li>
                <li>
                  <Link href="/signup">
                    <a>Signup</a>
                  </Link>
                </li>
              </>
            )}
          </ul>
        </nav>
      </header>
    </div>
  );
};


export default Header;
By specifying null in the mutate (which I named mutateUser) function returned by useSWR, the cached value of the user data will be updated to Null after logging out. If it is not set, the header display will not switch after logging out.
通过在mutateUser返回的mutate (我将其命名为mutateUser )函数中指定null , useSWR后用户数据的缓存值将更新为Null。 如果未设置,则注销后标题显示不会切换。
Don’t forget to include the Header component in the Layout component:
不要忘记在Layout组件中包含Header组件:
// components/layout.js
import Header from '../components/header';
const Layout = ({ children }) => (
  <>
    ...
    <Header />
    ...
  </>
);
Also, update the following code in pages/index.js to use the header:
另外,更新pages/index.js的以下代码以使用标头:
// pages/index.js
// if (error) return <div>failed to load</div>;
if (error)
  return (
    <Layout>
      <div>failed to load</div>
    </Layout>
  );
测试登录和注销 (Test Login & Logout)
Let’s test the login and logout features. Go to the Login page via the link in the header, then try logging in:
让我们测试登录和注销功能。 通过标题中的链接转到“登录”页面,然后尝试登录:
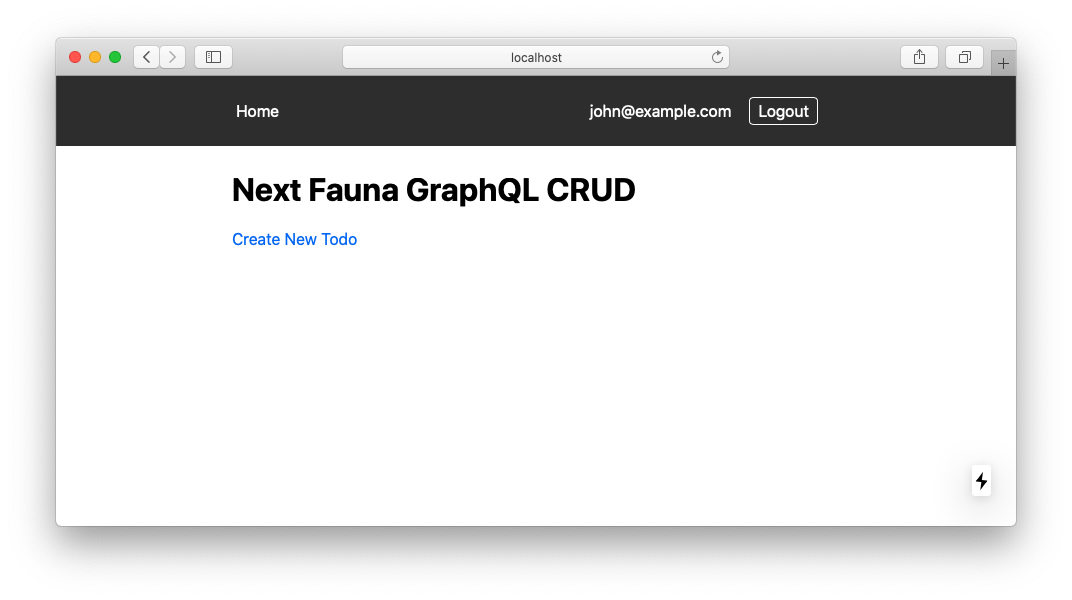
Good! An auth cookie should have been saved, just check it out.
好! 身份验证Cookie应该已经保存,只需将其签出即可。
Then try logging out. The auth cookie should be removed:
然后尝试注销。 auth cookie应该被删除:
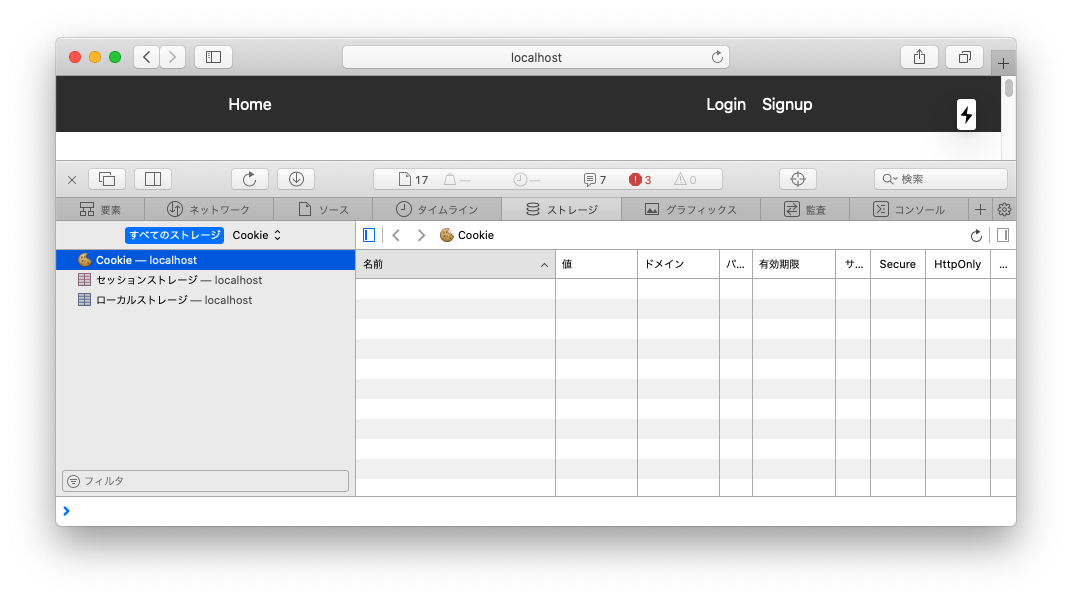
It worked! Implementing user authentication is now complete.
有效! 现在,完成用户身份验证。
展示许可行动的有效性 (Demonstrate the Effectiveness of the Permitted Actions)
Let’s create a Todo document. Before that, we need to update pages/new.js as follows:
让我们创建一个Todo文档。 在此之前,我们需要如下更新pages/new.js :
// pages/new.js


import useSWR from 'swr'; // add


const New = ({ token }) => {
  const { data: user } = useSWR('/api/user'); // add
  ...
  const onSubmit = handleSubmit(async ({ task }) => {
    ...
    // update
    const mutation = gql`
      mutation CreateATodo($task: String!, $owner: ID!) {
        createTodo(
          data: { task: $task, completed: false, owner: { connect: $owner } }
        ) {
          task
          completed
          owner {
            _id
          }
        }
      }
    `;

    // add
    const variables = {
      task,
      owner: user && user.id,
    };

    try {
      await graphQLClient(token).request(mutation, variables); // update
      ...
    }
  });
  ...
};
The Todo document created will have the current authenticated user as its owner.
创建的Todo文档将以当前经过身份验证的用户作为其所有者。
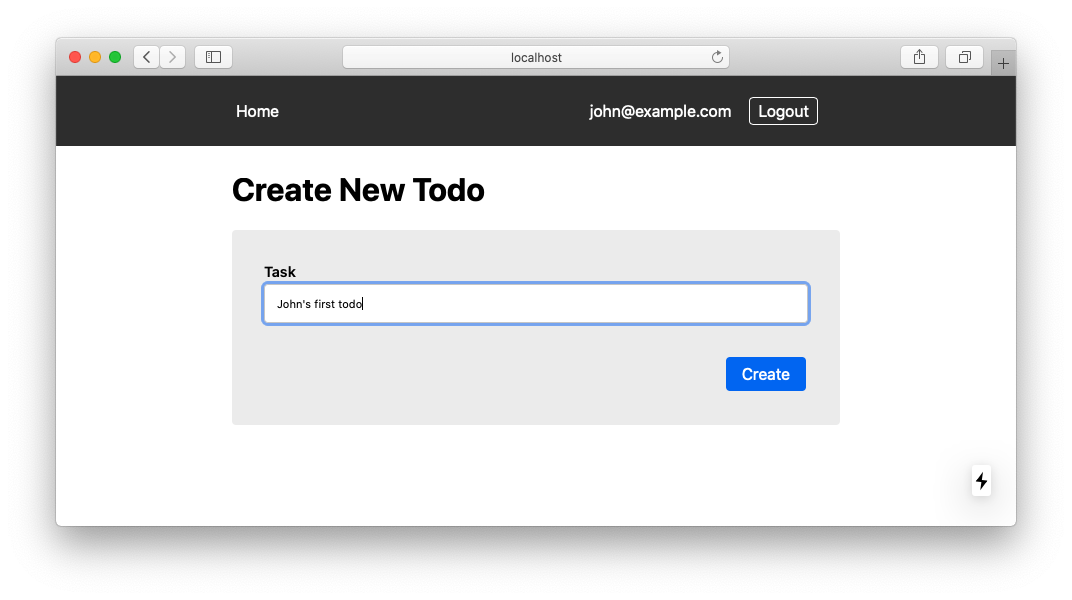
After logging in, create a Todo:
登录后,创建一个待办事项:
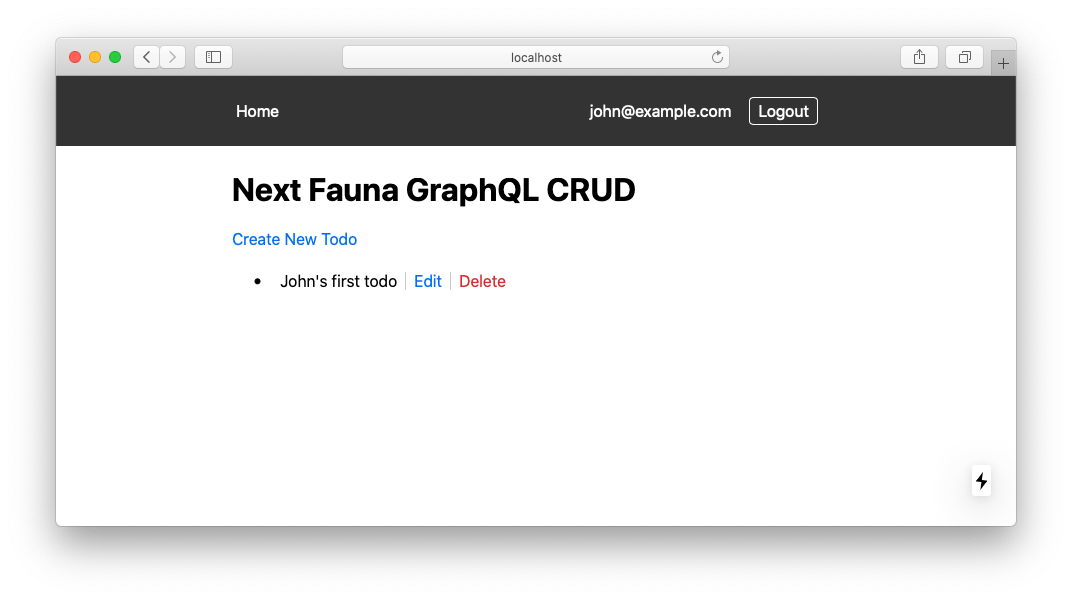
The Todo you created should be displayed:
您创建的待办事项应显示:
Alright. Then log out, create a new user and create a few Todos:
好的。 然后注销,创建一个新用户并创建一些待办事项:
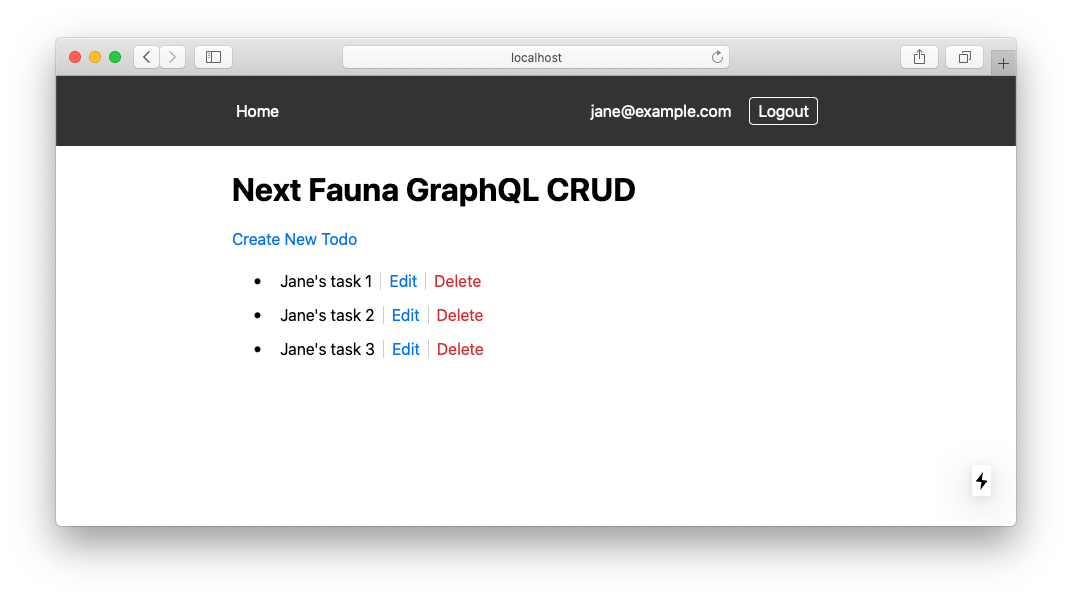
John’s Todo is not displayed in the Jane’s Todo list. Great!
约翰的待办事项未显示在简的待办事项列表中。 大!
Try out the other actions yourself. To retrieve the Todos of all users, clear and check the Read action of the Todo collection of the Auth role:
自己尝试其他操作。 要检索所有用户的待办事项,请清除并检查Auth角色的Todo集合的Read动作:
If user “A” tries to update or delete a Todo owned by user “B”, it should get an error.
如果用户“ A”试图更新或删除用户“ B”拥有的待办事项,则应该得到一个错误。
结论 (Conclusion)
This tutorial covered only the basics of FaunaDB’s authentication features. To build more sophisticated and complex authentication, we need to learn more about FQL and ABAC. In the near future, I would like to write articles for each subject such as Roles and Tokens.
本教程仅涵盖FaunaDB身份验证功能的基础知识。 要构建更复杂的复杂身份验证,我们需要了解有关FQL和ABAC的更多信息。 在不久的将来,我想为每个主题撰写文章,例如角色和令牌。
You can find the code for this tutorial on GitHub.
您可以在GitHub上找到本教程的代码。
Originally published at https://kjmczk.dev.
最初发布在 https://kjmczk.dev 。
翻译自: https://medium.com/technest/implement-faunadb-authentication-in-next-js-and-graphql-app-29aaca4d8d96


 被折叠的 条评论
为什么被折叠?


