api文档服务器开发
During these series we will dive together in the journey of developing a .NET Core 3.1 API with swagger interface, secured with Identity Server 4. We’re also gonna use .NET API versioning and Redis for server side caching.
在这些系列中,我们将一起探讨开发具有swagger接口并受Identity Server 4保护的.NET Core 3.1 API的过程。我们还将使用.NET API版本控制和Redis进行服务器端缓存。
On the first part of the series we’ll be focusing on creation of the solution and the Identity Server project. At this point I assume you understand the concepts behind securing an API and Identity Server. Either way, I suggest reviewing the Identity Server official docs. Enough talking…let’s get our hands dirty.
在本系列的第一部分中,我们将专注于创建解决方案和Identity Server项目。 至此,我假设您了解保护API和Identity Server背后的概念。 无论哪种方式,我都建议您查看Identity Server官方文档。 足够多的谈话……让我们动手吧。

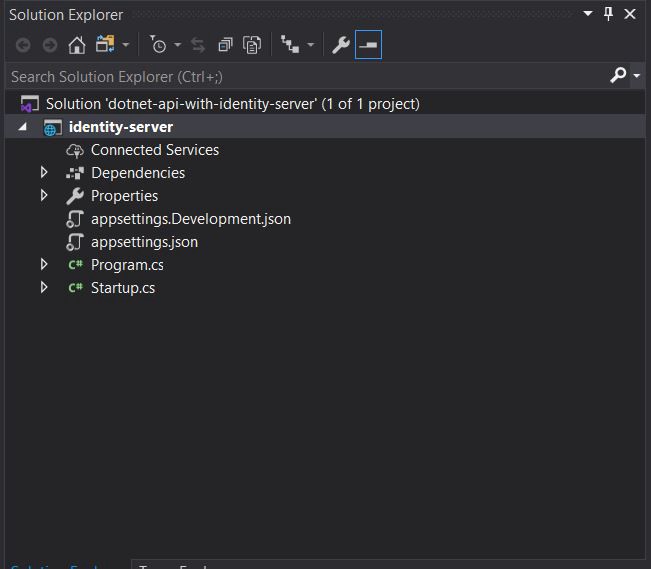
First of all, let’s open Visual Studio and create an empty .NET Core 3.1 web application project and let’s call it “identity-server”. I’ve placed the project under a solution named “dotnet-api-with-identity-server” as you can see in the left.
首先,我们打开Visual Studio并创建一个空的.NET Core 3.1 Web应用程序项目,并将其称为“身份服务器”。 正如您在左侧看到的那样,我已将该项目放置在名为“ dotnet-api-with-identity-server”的解决方案下。
After creating the project, let’s install all the NuGet packages we need for this project. Open the NuGet window and install IdentityServer4 (4.1.0) — of course, the Identity Server package, IdentityServer4.EntityFramework (4.1.0) — we need this because we’ll be using SQL Server as configuration and operational store for Identity Server, Microsoft.EntityFrameworkCore.SqlServer (3.1.8) and Microsoft.EntityFrameworkCore.Design (3.1.8) — both used for dealing with Entity Framework code first migrations for creating the database and the migrations. NOTE: The versions written above are the latest versions at the time of writing this article.
创建项目后,让我们安装该项目所需的所有NuGet软件包。 打开NuGet窗口并安装IdentityServer4(4.1.0)(当然是Identity Server软件包IdentityServer4.EntityFramework(4.1.0)),我们需要这样做,因为我们将使用SQL Server作为Identity Server的配置和操作存储, Microsoft.EntityFrameworkCore.SqlServer(3.1.8)和Microsoft.EntityFrameworkCore.Design(3.1.8)—都用于处理实体框架代码优先迁移,以创建数据库和进行迁移。 注意:以上编写的版本是撰写本文时的最新版本。
Now, let’s add the connection string where our database for storing the identity data will be kept, so in the appSettings.Development.json add a new section name “ConnectionStrings” as below — replace “your_datasource” with the proper data source where your SQL Server resides and only use this type of connection on your local machine in development mode.
现在,在连接字符串中添加用于存储身份数据的数据库,因此在appSettings.Development.json中添加新的节名称“ ConnectionStrings” ,如下所示-将“ your_datasource”替换为SQL正确的数据源服务器驻留在开发模式下,并且仅在本地计算机上使用这种类型的连接。
//appSettings.Development.json
.
.
,"ConnectionStrings": {
     "IdentityServerDatabase": "Data Source=your_datasource;database=MyIdentityServerDb;trusted_connection=yes;"
}
Next, we are going to switch to Startup.cs file and register in the .NET Core pipeline the Identity Server and configure it’s Configuration and Operational Stores.
接下来,我们将切换到Startup.cs文件,并在.NET Core管道中注册Identity Server并配置其配置存储和操作存储。
public void ConfigureServices(IServiceCollection services)
{
      var connectionString = Configuration.GetConnectionString("IdentityServerDatabase");
      var migrationAssembly = typeof(Startup).GetTypeInfo().Assembly.GetName().Name;


      services.AddIdentityServer()
              .AddDeveloperSigningCredential()
              .AddConfigurationStore(options =>
              {
                  options.ConfigureDbContext = b => b.UseSqlServer(connectionString, sql => sql.MigrationsAssembly(migrationAssembly));
              })
              .AddOperationalStore(options =>
              {
                  options.ConfigureDbContext = b => b.UseSqlServer(connectionString, sql => sql.MigrationsAssembly(migrationAssembly));
              });
}
As it can be observed above, in the ConfigureServices method of Startup.cs we’ve taken the connection string (the one we’ve set at the previous step) from the appSettings.json file and then we’ve registered the Identity Service, we specified to use the Developer Signing Credentials since we are in development mode (this needs to be changed when going to production) and then configured the both configuration store and operational store specifying to use SQL Server with our connection string.
从上面可以看出,在Startup.cs的ConfigureServices方法中,我们从appSettings.json文件中获取了连接字符串(在上一步中设置的连接字符串),然后注册了Identity Service,由于我们处于开发模式(在投入生产时需要更改),因此我们指定使用开发者签名证书,然后配置配置存储和操作存储,以指定将SQL Server与我们的连接字符串一起使用。
At this time we pretty much have more than half of our Identity Server setup, now we need to create the migrations which will contain the code for creating the database table. Make sure you have dotnet ef core tools installed on your machine and than open the package manager console and run the following two commands.
目前,我们几乎已经拥有一半以上的Identity Server设置,现在我们需要创建迁移,其中将包含用于创建数据库表的代码。 确保在计算机上安装了dotnet ef核心工具,然后打开程序包管理器控制台并运行以下两个命令。
dotnet ef migrations add InitialIdentityServerPersistedGrantDbMigration -c PersistedGrantDbContext -o Data/Migrations/IdentityServer/PersistedGrantDb --project identity-serverdotnet ef migrations add InitialIdentityServerConfigurationDbMigration -c ConfigurationDbContext -o Data/Migrations/IdentityServer/ConfigurationDb --project identity-serverThis will create the migrations for the Configuration and Operational Store under the folder Data/Migrations, though at this time the database is not yet populated with the specific tables nor created.
这将在“数据/迁移”文件夹下为“配置和操作存储”创建迁移,尽管此时数据库尚未使用特定表填充或创建。
Before moving forward, I know I’ve mentioned multiple times the Configuration and Operational Store of the Identity Server, so I need to explain this a bit…Configuration Store is used for encapsulating the configuration data and tables such as clients, resources and scopes, while the Operational Store is keeping the temporary data such as authorization codes and refresh tokens. For a better understanding I do encourage you to read the Identity Server docs.
在继续之前,我知道我已经多次提到过Identity Server的配置和操作存储,因此我需要对此进行一些解释……配置存储用于封装配置数据和表,例如客户端,资源和范围,而操作存储则保留诸如授权码和刷新令牌之类的临时数据。 为了更好地理解,我鼓励您阅读Identity Server文档。
With the migration in place, only thing left is to actually run the migrations and populate the database with some data. For this, let’s create under the Data folder a Config.cs file.
进行适当的迁移后,剩下的就是实际运行迁移并用一些数据填充数据库。 为此,让我们在Data文件夹下创建一个Config.cs文件。
using System.Collections.Generic;
using IdentityServer4.Models;


namespace identity_server.Data
{
    public static class Config
    {
        public static List<Client> Clients = new List<Client>
        {
                new Client
                {
                    ClientId = "the-big-client",
                    AllowedGrantTypes = new List<string> { GrantType.ClientCredentials },
                    ClientSecrets =
                    {
                        new Secret("secret".Sha256())
                    },
                    AllowedScopes = { "my-api", "write", "read" },
                    Claims = new List<ClientClaim>
                    {
                        new ClientClaim("companyName", "John Doe LTD")
                        //more custom claims depending on the logic of the api
                    },
                    AllowedCorsOrigins = new List<string>
                    {
                        "https://localhost:5001",
                    },
                    AccessTokenLifetime = 86400
                }
        };


        public static List<ApiResource> ApiResources = new List<ApiResource>
        {
            new ApiResource
            {
                Name = "my-api",
                DisplayName = "My Fancy Secured API",
                Scopes = new List<string>
                {
                    "write",
                    "read"
                }
            }
        };


        public static IEnumerable<ApiScope> ApiScopes = new List<ApiScope>
        {
            new ApiScope("read"),
            new ApiScope("write")
        };
    }
}
What we’ve defined here, is a list of clients and a list of API Resources. We’ve created one Client, we’ve set the Client Id, Client Secret and the Allowed Grand Types — this tells us how the client is going to connect to our API Resources, in this case we’ve used client credentials. Under the allowed scopes, we said that the client has access to the API Resource named “my-api” and has the scopes “write” and “read” — these are custom scopes defined for the API Resource object. The claims list can contain any custom claims you need to identity the client id or any business logic, the claims will be encrypted in the access token. AllowedCorsOrigins property indicates from what URLs the client is allowed to access the “my-api” resource and of course, the AccessTokenLifetime is self explanatory. The last list contains the API Scopes we’re gonna use, we need to register this into the store as described below.
我们在这里定义的是客户端列表和API资源列表。 我们创建了一个客户端,设置了客户端ID,客户端密钥和允许的大类型-这告诉我们客户端如何连接到我们的API资源,在这种情况下,我们使用了客户端凭据。 在允许的范围内,我们说客户端可以访问名为“ my-api”的API资源,并具有范围“ write”和“ read”-这些是为API Resource对象定义的自定义范围。 声明列表可以包含您需要用来标识客户端ID的任何自定义声明或任何业务逻辑,这些声明将在访问令牌中进行加密。 AllowedCorsOrigins属性指示允许客户端从哪些URL访问“ my-api”资源,并且AccessTokenLifetime当然是不言自明的。 最后一个列表包含我们将要使用的API范围,我们需要按如下所述将其注册到商店中。
Final step, let’s create a DatabaseInitializer class where we’re gonna call the migrations to create the database and after that populate it with our client, API Resource and API Scopes defined in the Config.cs. I’ve placed the file under the folder Data.
最后一步,我们创建一个DatabaseInitializer类,在该类中我们将调用迁移来创建数据库,然后使用Config.cs中定义的客户端,API资源和API范围填充该数据库。 我已将文件放在“数据”文件夹下。
using IdentityServer4.EntityFramework.DbContexts;
using IdentityServer4.EntityFramework.Mappers;
using Microsoft.AspNetCore.Builder;
using Microsoft.EntityFrameworkCore;
using Microsoft.Extensions.DependencyInjection;
using System.Linq;


namespace identity_server.Data
{
    public static class DatabaseInitializer
    {
        public static void PopulateIdentityServer(IApplicationBuilder app)
        {
            using (var serviceScope = app.ApplicationServices.GetService<IServiceScopeFactory>().CreateScope())
            {
                serviceScope.ServiceProvider.GetRequiredService<PersistedGrantDbContext>().Database.Migrate();


                var context = serviceScope.ServiceProvider.GetRequiredService<ConfigurationDbContext>();


                context.Database.Migrate();


                if (!context.Clients.Any())
                {
                    foreach (var client in Config.Clients)
                    {
                        context.Clients.Add(client.ToEntity());
                    }


                    context.SaveChanges();
                }


                if (!context.ApiResources.Any())
                {
                    foreach (var resource in Config.ApiResources)
                    {
                        context.ApiResources.Add(resource.ToEntity());
                    }


                    context.SaveChanges();
                }


                if (!context.ApiScopes.Any())
                {
                    foreach (var resource in Config.ApiScopes)
                    {
                        context.ApiScopes.Add(resource.ToEntity());
                    }


                    context.SaveChanges();
                }
            }
        }
    }
}
Using the .NET Core service scope we load the PersistedGrantDbContext — Context of the Operational Store and we migrate it, then we do the same thing for the ConfigurationDbContext. After this two steps the database should be created and the Identity Server tables should be there. Then we just populate the clients table and the API Resources one with our data. Last step is populating the ApiScopes table — if we don’t do this we’ll get an “invalid_scope” error even if we declared the scopes on API Resource and the client.
使用.NET Core服务范围,我们加载PersistedGrantDbContext —操作存储的上下文并进行迁移,然后对ConfigurationDbContext执行相同的操作。 经过这两个步骤后,应该创建数据库,并且Identity Server表应该在那里。 然后,我们用数据填充客户表和API资源。 最后一步是填充ApiScopes表-如果不这样做,即使我们在API Resource和客户端上声明了范围,也将收到“ invalid_scope”错误。
Last step before running the project is to call the DatabaseInitializer from the Startup.cs Configure method and very important to call the UseIdentityServer() extension method on IApplicationBuilder (last line in the method). This makes the Identity Server endpoints available. For example, you can comment that out and see that you’ll get a 404 on /connect/token.
运行项目之前的最后一步是从Startup.cs Configure方法调用DatabaseInitializer,并且在IApplicationBuilder上调用UseIdentityServer()扩展方法(方法的最后一行)非常重要。 这使Identity Server端点可用。 例如,您可以将其注释掉,并在/ connect / token上看到404。
public void Configure(IApplicationBuilder app, IWebHostEnvironment env)
{
    DatabaseInitializer.PopulateIdentityServer(app);


    if (env.IsDevelopment())
    {
      app.UseDeveloperExceptionPage();
    }


    app.UseRouting();


    app.UseEndpoints(endpoints =>
    {
        endpoints.MapGet("/", async context =>
        {
            await context.Response.WriteAsync("Hello World!");
        });
    });


    app.UseIdentityServer();
}
Everything in place? You’ve run the application with no issues, the database is created? Great 🎆! Now, let’s test it and see if we can obtain a valid token using our client. I like to use Postman for this.
一切都准备就绪了吗? 您已成功运行该应用程序,数据库已创建? 太好了! 现在,让我们对其进行测试,看看是否可以使用客户端获得有效的令牌。 我喜欢为此使用邮递员。

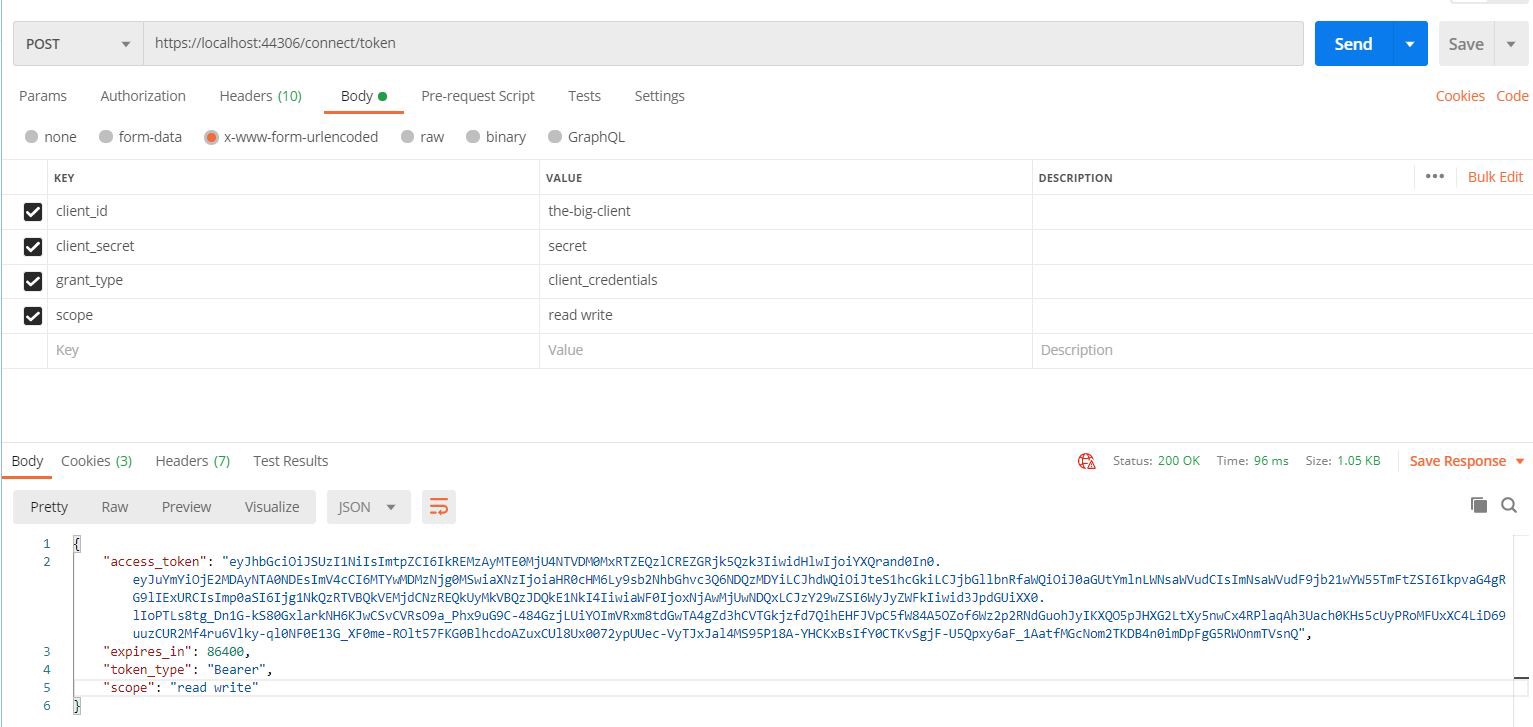
For obtaining a token we call the /connect/token endpoint with a POST request. This endpoint knows to read data from an form url encoded body, so make sure you select the “x-www-form-urlencoded” body. Then, we set the client_id, client_secret, grant_type (client_credentials) — this is the one for which our client has access to and of course the scope that we are requesting. Scopes are divided by spaces. As a response we get the access token, the expiration, the token type and the scopes we’ve requested. You can copy and paste the token to jwt.io and you’ll see exactly what data it contains.
为了获得令牌,我们通过POST请求调用/ connect / token端点。 该端点知道从表单url编码的正文中读取数据,因此请确保选择“ x-www-form-urlencoded”正文。 然后,我们设置client_id,client_secret,grant_type(client_credentials)-这是我们的客户端可以访问的,当然是我们所请求的范围。 范围除以空格。 作为响应,我们获得了访问令牌,到期时间,令牌类型和我们要求的范围。 您可以将令牌复制并粘贴到jwt.io ,您将确切看到它包含的数据。
This was pretty much all that we’ve need to do for setting up a basic Identity Server and a client that uses the client_credentials flow, in the second part of this series we’re gonna develop the API (My Fancy Secured API) which will be secured by this Identity Server.
这几乎是我们设置基本Identity Server和使用client_credentials流的客户端所需要做的全部工作,在本系列的第二部分中,我们将开发API(My Fancy Secured API),它将由此身份服务器保护。
GitHub Repo: https://github.com/ionepaul/dotnet-api-with-identity-server
GitHub存储库: https : //github.com/ionepaul/dotnet-api-with-identity-server
Thank you for reading and I hope you enjoyed it. 🙌
感谢您的阅读,希望您喜欢它。 🙌
api文档服务器开发


 被折叠的 条评论
为什么被折叠?


