


 本文介绍如何在Kotlin中通过Android应用获取当前位置,并详细阐述了保存当前时间的步骤。教程引用了一篇Medium文章作为参考。
kotlin获取当前时间
This tutorial helps you learn How to get current latitude and longitude in the Android application and then saving them in Firebase Firestore. As a developer if you know how to get the location of any android device, you will surely make some great things.
本教程可帮助您学习如何在Android应用程序中获取当前的纬度和经度,然后将其保存在Firebase Firestore中。 作为开发人员,如果您知道如何获取任何Android设备的位置,那么您肯定会做一些很棒的事情。
There are two ways to get the current location of any Android device:
有两种方法可获取任何Android设备的当前位置:
→Android的位置管理器API (→ Android’s Location Manager API)
→融合位置提供者 (→ Fused Location Provider)
So we will take a look at both. Let’s start with the first one →
因此,我们将同时研究两者。 让我们从第一个开始→
·Android的位置管理器API (· Android’s Location Manager API)
Before diving in the location manager and it’s listener firstly we need to understand that what are the provider’s available in our android device for location. There are two provider’s available in any device:
在深入研究位置管理器和它的监听器之前,我们首先需要了解在我们的android设备中可用于提供位置的提供商。 任何设备上都有两个提供程序:
GPS Provider
GPS提供商
Network Provider
网络提供商
Both of them have their unique advantages, but we have to use both to get precise location coordinates. Because in some cases like in-door situations Network works and in other GPS works. The network gives the location based on the nearest mobile towers while GPS gives us the exact location.
两者都有其独特的优势,但是我们必须同时使用两者来获取精确的位置坐标。 因为在某些情况下,例如在室内情况下,网络可以工作,而在其他GPS情况下也可以。 网络会根据最近的移动塔楼给出位置,而GPS会提供准确的位置。
First of all, before implementing any method we have to take user permission:
首先,在实施任何方法之前,我们必须获得用户许可:
位置权限 (Location Permission)
To protect user privacy, apps that use location services must request location permissions. Therefore we have to set the two permissions in the Android Manifest file before starting anything.
为了保护用户隐私,使用位置服务的应用必须请求位置权限。 因此,我们必须在开始任何操作之前在Android Manifest文件中设置两个权限。
<!-- To request foreground location access, declare one of these permissions. -->
<uses-permission android:name="android.permission.ACCESS_FINE_LOCATION" />
<uses-permission android:name="android.permission.ACCESS_COARSE_LOCATION" /><!-- Required only when requesting background location access on Android 10 (API level 29). --><uses-permission android:name="android.permission.ACCESS_BACKGROUND_LOCATION" />
We may also ask for permission for Internet access as we are using the Network provider and also saving the coordinates in Firestore
我们也可能在使用网络提供商时要求获得Internet访问权限,并将坐标保存在Firestore中
<uses-permission android:name="android.permission.INTERNET"/>We can check that if permissions are granted or not. If not granted then we can request permission in realtime.
我们可以检查是否授予权限。 如果未批准,我们可以实时请求许可。
if(ActivityCompat.checkSelfPermission(this,android.Manifest.permission.ACCESS_COARSE_LOCATION)!= PackageManager.PERMISSION_GRANTED            && ActivityCompat.checkSelfPermission(this,android.Manifest.permission.ACCESS_FINE_LOCATION)!= PackageManager.PERMISSION_GRANTED){
ActivityCompat.requestPermissions(this,arrayOf(android.Manifest.permission.ACCESS_FINE_LOCATION,                    android.Manifest.permission.ACCESS_COARSE_LOCATION)
,requestcode}<!--Here above we checks first that if permission is not granted through ActivityCompat and then asks for permission in realtime by requestpermission which takes three arguement - Context, permission , RequestCode. -->
Location Manager Instance
位置管理器实例
Now that we have checked for the permissions, it’s time for getting location by creating the location manager instance in the context of Location service
现在我们已经检查了权限,是时候通过在位置服务的上下文中创建位置管理器实例来获取位置了
lateinit var locationManager: LocationManager<!-- lateinitialize a variable locationManager -->locationManager = getSystemService(Context.LOCATION_SERVICE) as LocationManagerNow we will check that if the GPS is on or not and we also check for network and if both then we use one with greater accuracy.
现在,我们将检查GPS是否打开,并且还要检查网络,如果两者都正常,则我们将使用更高的精度。
If any of the GPS or Network provider is enabled then we will request a current location update from the location manager like this :
如果启用了任何GPS或网络提供商,则我们将向位置管理器请求当前位置更新,如下所示:
locationmanager.requestLocationUpdates(LocationManager.GPS_PROVIDER,minTimeinMS,minDistanceinM,locationlistener)In the above code snippet, you will see the location listener and the other two arguments for time and distance. We will receive location updates from LocationListener on change of location. LocationListener will be notified when the distance interval specified or the number of seconds changes.
在上面的代码片段中,您将看到位置侦听器 其他两个关于时间和距离的论点。 我们将在位置更改时从LocationListener接收位置更新。 指定的距离间隔或秒数更改时,将通知LocationListener。
And LocationListner has some callbacks methods to provide location-based on some behaviors in the android device, but in kotlin, we use only one that is onLocationChanged which will update in the specified time and distance provided in locationmanager.requestlocationupdate .
而且LocationListner有一些回调方法可基于android设备中的某些行为提供基于位置的信息,但在kotlin中,我们仅使用onLocationChanged的一种方法,它将在locationmanager.requestlocationupdate中提供的指定时间和距离内进行更新。
override fun onLocationChanged(p0: Location) {TODO("Not yet implemented")
}
onLocationChanged(p0: Location) — Run’s when location is changed.
onLocationChanged(p0:Location) -更改位置时运行。
override fun onProviderDisabled(provider: String) {super.onProviderDisabled(provider)
}override fun onProviderEnabled(provider: String) {super.onProviderEnabled(provider)
}override fun onStatusChanged(provider: String?, status: Int, extras: Bundle?) {super.onStatusChanged(provider, status, extras)
}
There are also three other callbacks like :
还有其他三个回调,例如:
onProviderDisabled(provider: String) — Run’s when the provider is disabled in Device.
onProviderDisabled( provider:String ) —在设备中禁用提供程序时运行。
onProviderEnabled(provider: String) — Run’s when the provider is enabled in Device.
onProviderEnabled( provider:String ) —在设备中启用提供程序时运行。
onStatusChanged(provider: String?, status: Int, extras: Bundle?) — This callback will never be invoked on Android Q and above, and providers can be considered as always in the LocationProvider#AVAILABLE state.
onStatusChanged( provider:String ?, status:Int,extras:Bundle? ) —永远不会在Android Q及更高版本上调用此回调,并且可以将Provider始终视为处于LocationProvider#AVAILABLE状态。
现在,我们将它们放在一起并举例说明 (Now let’s put all in one and makes an example)
private fun getLocation() {
val uid = Firebase.auth.currentUser?.uid
locationManager = getSystemService(Context.LOCATION_SERVICE) as LocationManager
hasGps = locationManager.isProviderEnabled(LocationManager.GPS_PROVIDER)
hasNetwork = locationManager.isProviderEnabled(LocationManager.NETWORK_PROVIDER)
if (hasGps || hasNetwork) {
if (hasGps) {
locationManager.requestLocationUpdates(LocationManager.GPS_PROVIDER, 5000, 0F, object : LocationListener {
override fun onLocationChanged(p0: Location) {
if (p0 != null) {
locationGps = p0
if (uid != null) {
Firebase.firestore.collection("Drivers").document(uid).update("Longitude",
locationGps!!.longitude,"Latitude", locationGps!!.latitude)
.addOnSuccessListener {
Snackbar.make(takeabreak, "Location Data feeds start", Snackbar.LENGTH_SHORT).show()
}
.addOnFailureListener {
Snackbar.make(takeabreak, "Failed location feed", Snackbar.LENGTH_SHORT).show()
}
}
}
}
})
val localGpsLocation = locationManager.getLastKnownLocation(LocationManager.GPS_PROVIDER)
if (localGpsLocation != null)
locationGps = localGpsLocation
}
if (hasNetwork) {
locationManager.requestLocationUpdates(LocationManager.NETWORK_PROVIDER, 5000, 0F, object : LocationListener {
override fun onLocationChanged(p0: Location) {
if (p0 != null) {
locationNetwork = p0
if (uid != null) {
Firebase.firestore.collection("Drivers").document(uid).update("Longitude",
locationNetwork!!.longitude,"Latitude", locationNetwork!!.latitude)
.addOnSuccessListener {
Snackbar.make(takeabreak, "Location Data feeds start", Snackbar.LENGTH_SHORT).show()
}
.addOnFailureListener {
Snackbar.make(takeabreak, "Failed location feed", Snackbar.LENGTH_SHORT).show()
}
}
}
}
})
val localNetworkLocation = locationManager.getLastKnownLocation(LocationManager.NETWORK_PROVIDER)
if (localNetworkLocation != null)
locationNetwork = localNetworkLocation
}
if(locationGps!= null && locationNetwork!= null){
if(locationGps!!.accuracy > locationNetwork!!.accuracy){
if (uid != null) {
Firebase.firestore.collection("Drivers").document(uid).update("Longitude",
locationGps!!.longitude,"Latitude", locationGps!!.latitude)
.addOnSuccessListener {
Snackbar.make(takeabreak, "Location Data feeds start", Snackbar.LENGTH_SHORT).show()
}
.addOnFailureListener {
Snackbar.make(takeabreak, "Failed location feed", Snackbar.LENGTH_SHORT).show()
}
}
}else{
if (uid != null) {
Firebase.firestore.collection("Drivers").document(uid).update("Longitude",
locationNetwork!!.longitude,"Latitude", locationNetwork!!.latitude)
.addOnSuccessListener {
Snackbar.make(takeabreak, "Location Data feeds start", Snackbar.LENGTH_SHORT).show()
}
.addOnFailureListener {
Snackbar.make(takeabreak, "Failed location feed", Snackbar.LENGTH_SHORT).show()
}
}
}
}
} else {
startActivity(Intent(Settings.ACTION_LOCATION_SOURCE_SETTINGS))
}
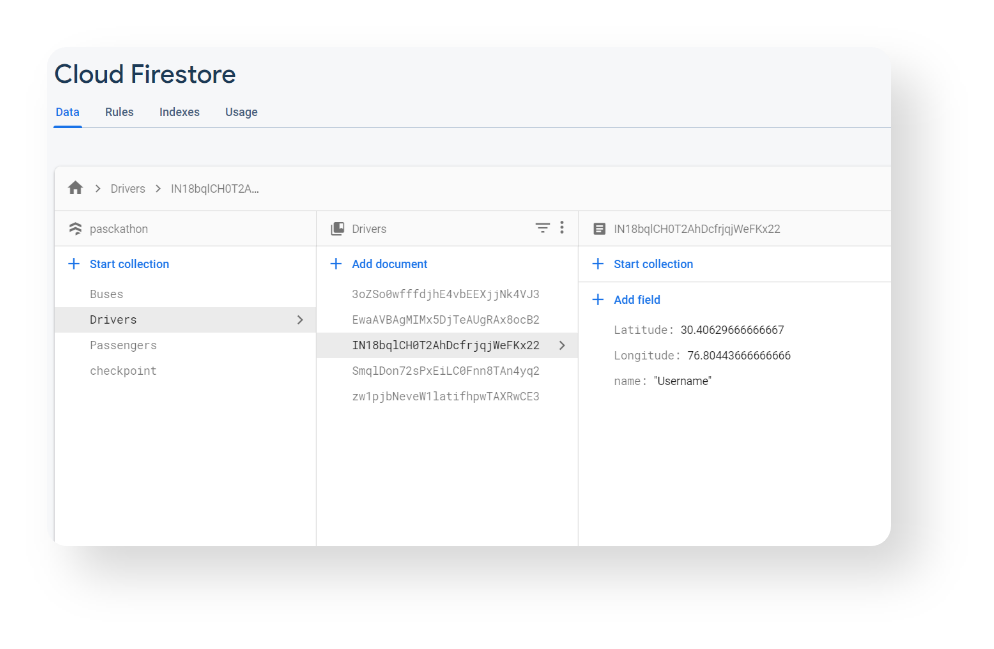
}Now after a user turns on his location the longitude and latitude are saving in Firebase Firestore in the given path.
现在,在用户打开其位置后,经度和纬度将保存在给定路径的Firebase Firestore中。
·融合位置提供者 (· Fused Location Provider)
Firstly follow all the steps for asking permission and requesting in realtime from the above part and then follow next.
首先,按照上述部分中的所有步骤实时进行许可和请求,然后继续下一步。

Fused Location Provider is the Google Play services location APIs, your app can request the last known location of the user’s device.
Fused Location Provider是Google Play服务的位置API,您的应用可以请求用户设备的最后一个已知位置。
Use the fused location provider to retrieve the device’s last known location. The fused location provider is one of the location APIs in Google Play services. It provides a simple API so that you can specify requirements at a high level, like high accuracy or low power. It also optimizes the device’s use of battery power.
使用融合的位置提供程序检索设备的最后一个已知位置。 融合的位置提供程序是Google Play服务中的位置API之一。 它提供了一个简单的API,以便您可以高级别指定要求,例如高精度或低功耗。 它还可以优化设备对电池电量的使用。
First, we will create a fusedlocationcleint variable and then give it an instance of FusedLocationProviderClient inside the onCreate
首先,我们将创建一个fusedlocationcleint变量,然后在onCreate中为其提供一个FusedLocationProviderClient实例。
private lateinit var fusedLocationClient: FusedLocationProviderClientoverride fun onCreate(savedInstanceState: Bundle?) {<!--Inside the onCreate give the lateinitialized variable an instance of Fused Location -->fusedLocationClient = LocationServices.getFusedLocationProviderClient(this)}Fused location provider API can broadly categorize two use cases.
融合的位置提供程序API可以将两个用例大致分类。
getLastLocation(GoogleApiClient): It should be used when there is no need for continuous access to the location from an application.getLastLocation(GoogleApiClient):当不需要从应用程序连续访问位置时,应使用该方法。requestLocationUpdates(GoogleApiClient,LocationRequest, LocationListener): It should be used when there a need for continuous location updates and the location is accessed when the application is active in the foreground.requestLocationUpdates(GoogleApiClient,LocationRequest, LocationListener):当需要连续更新位置并且在前台应用程序处于活动状态时访问位置时,应使用此方法。
So, we will we using requestLocationUpdates method and for that, we have to create a request with an instance of LocationRequest() method and for the same, we will create interval, fastestInterval, priority objects.
因此,我们将使用requestLocationUpdates方法,为此,我们必须使用LocationRequest()方法的实例创建一个请求,并且为此,我们将创建interval,fasterInterval,优先级对象。
And after checking the permissions we call the client with requestlocationupdate API in which we pass our request and our Location Listener for updating the location in realtime.
在检查了权限之后,我们使用requestlocationupdate API调用客户端,在该API中,我们传递请求和位置侦听器以实时更新位置。
And when the location is changed the listener runs and updates the location coordinates in Firebase Firestore.
更改位置后,侦听器将运行并更新Firebase Firestore中的位置坐标。
val request = LocationRequest()
request.interval = 10000
request.fastestInterval = 5000
request.priority = LocationRequest.PRIORITY_HIGH_ACCURACYval permission = ContextCompat.checkSelfPermission(this, Manifest.permission.ACCESS_FINE_LOCATION)if (permission == PackageManager.PERMISSION_GRANTED) { // Request location updates and when an update is
    // received, store the location in FirebasefusedLocationClient.requestLocationUpdates(request, object : LocationCallback() {override fun onLocationResult(locationResult: LocationResult) {val location: Location? = locationResult.lastLocationif (location != null) {                       Firebase.firestore.collection("Collection").document(doc).update("Longitude",location!!.longitude,"Latitude", location!!.latitude)
            }
        }
    }, null)
}
You can also follow steps in this Codelab provided by Google.
您还可以按照Google提供的此Codelab中的步骤进行操作。
And for extra resources go to Official Documentation by Android
有关更多资源,请转到Android的官方文档
结论 (Conclusion)
Thank you for the reading 😊.
谢谢您的阅读😊。
Stay safe and Keep Coding ✌.
保持安全并保持编码✌。
Now you can able to get current latitude and longitude in your android device and then save them in Firebase Firestore. If you have any issue regarding same , please put it in comment section.
现在,您可以在Android设备中获取当前的纬度和经度,然后将其保存在Firebase Firestore中。 如果您对此有任何疑问,请放在评论部分。
kotlin获取当前时间


 2245
2245

 被折叠的 条评论
为什么被折叠?
被折叠的 条评论
为什么被折叠?
 到【灌水乐园】发言


