


node.js轻量级
While working on a project recently, I had to containerize a NodeJs Windows application. I was surprised to find that there was no single official image for the NodeJs Windows container on Docker Hub so I decided to create one. This process inspired me to put together a step by step guide on how to build a lightweight NodeJs Windows container using the Windows Nano Server. Please note that we chose to create this for a Windows Nano Server due to its optimized small size.
最近在从事一个项目时,我不得不将NodeJs Windows应用程序容器化。 我很惊讶地发现Docker Hub上没有NodeJs Windows容器的单一正式映像,因此我决定创建一个。 这个过程启发了我,逐步编写了有关如何使用Windows Nano Server构建轻量级NodeJs Windows容器的指南。 请注意,由于其优化的小尺寸,我们选择为Windows Nano Server创建此文件。
先决条件 (Pre-Requisites)
- Windows 10 or Windows 2016 serverWindows 10或Windows 2016服务器
- Docker installed and switched to Windows containersDocker已安装并切换到Windows容器
- Hyper-V turned on to run Windows ContainersHyper-V已打开以运行Windows容器
建立(Setup)
Create a folder labeled “docker-nodejs” on your hard disk.
在硬盘上创建一个标记为“ docker-nodejs”的文件夹。
下载NodeJ (Download NodeJs)
Download the NodeJs ZIP (x64) package from the list of available versions on the following web-page:
从以下网页上的可用版本列表中下载NodeJs ZIP(x64)软件包:
For this example, I have chosen version v14.9.0
在此示例中,我选择了v14.9.0版
Once the file has been downloaded, extract the content of the zip file into a folder. Rename the extracted folder “nodejs”. Move the nodejs folder inside the folder “docker-nodejs” (created in the first step).
下载文件后,将zip文件的内容提取到一个文件夹中。 重命名提取的文件夹“ nodejs”。 将nodejs文件夹移至“ docker-nodejs”文件夹(在第一步中创建)内。
Docker文件 (Docker File)
Inside docker-nodejs folder, shift + right click — this will open the context menu. From the menu, select the option Open PowerShell window here and type the following command in the PowerShell to open the notepad application and create a file (with the label “Dockerfile”).
在docker-nodejs文件夹中,按住Shift键并单击鼠标右键-这将打开上下文菜单。 从菜单中选择选项“在此处打开PowerShell窗口”,然后在PowerShell中键入以下命令以打开记事本应用程序并创建文件(标签为“ Dockerfile”)。
notepad Dockerfile.In notepad, paste the following docker commands and save the file:
在记事本中,粘贴以下docker命令并保存文件:
FROM mcr.microsoft.com/windows/nanoserver:1803
COPY nodejs /windows/system32
CMD [ “node.exe” ]
After saving the file, the docker-nodejs folder will have a nodejs folder (this folder contains an extracted version of NodeJs) and a Dockerfile.
保存文件后,docker-nodejs文件夹将具有一个nodejs文件夹(此文件夹包含NodeJ的提取版本)和一个Dockerfile。
构建Node.js映像 (Building the Nodejs Image)
Now in the PowerShell, we will run command to build an image from the Dockerfile (created in the step above). For this example, I am not specifying any tag in the command because Docker will add the latest tag to the image by default. But you can add it by adding node:14.9.0 instead of node in the following command:
现在在PowerShell中,我们将运行命令以从Dockerfile构建映像(在上述步骤中创建)。 在此示例中,我未在命令中指定任何标签,因为Docker默认会将最新标签添加到映像中。 但是您可以通过添加node:14.9.0代替以下命令中的node来添加它:
docker build -t node .运行NodeJs容器 (Running NodeJs Container)
Before running the image that is created in the step above, let’s list all the images with the following command:
在运行在以上步骤中创建的图像之前,让我们使用以下命令列出所有图像:
docker imagesThe output will look like the following screenshot. As we have used the Windows Nano Server to build the image, the image size is quite small (totaling 457MB). Please note that, as we have not provided a tag, Docker has added the latest tag to the node image (as you can see in the screenshot). If you had provided a tag in the previous step then you would see that tag under the TAG column.
输出将类似于以下屏幕截图。 由于我们使用Windows Nano Server生成映像,因此映像大小非常小(总计457MB)。 请注意,由于我们未提供标签,因此Docker已将最新标签添加到节点映像(如您在屏幕快照中所见)。 如果您在上一步中提供了标签,那么您会在TAG列下看到该标签。
Optional: If you want, you can now remove the Nano Server image as it is no longer required.
可选:如果需要,您现在可以删除不再需要的Nano Server映像。
// Command to remove an image docker rmi <Image ID>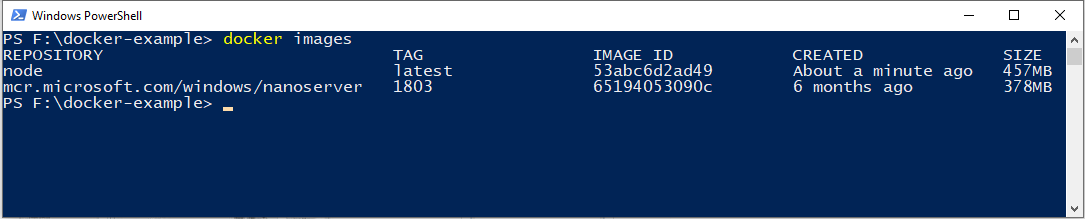
Run the image with the following command. Please note that if you have provided a tag in the step above, you will need to change the following command node:<tag_provided_in_step_above> instead of node.
使用以下命令运行映像。 请注意,如果您在上述步骤中提供了标签,则需要更改以下命令节点:<tag_provided_in_step_above>而不是node 。
docker run -t -d node cmd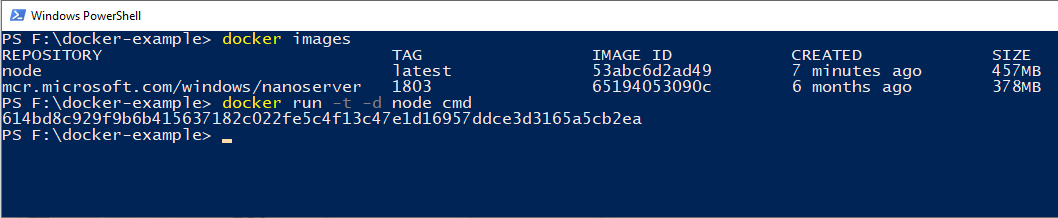
This will start the container. You can see the running container with the following command:
这将启动容器。 您可以使用以下命令查看正在运行的容器:
docker ps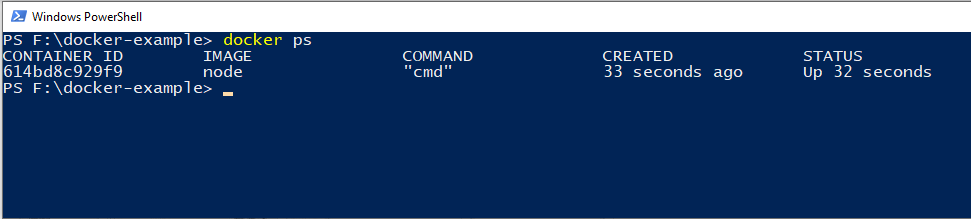
Now, enter the following command to connect to the running container to verify the NodeJs version installed. Note: 614 are the first three letters of the container ID, your container ID will be different. Update the following command accordingly:
现在,输入以下命令以连接到正在运行的容器,以验证已安装的NodeJs版本。 注意: 614是容器ID的前三个字母,您的容器ID将有所不同。 相应地更新以下命令:
docker exec -it 614 cmd
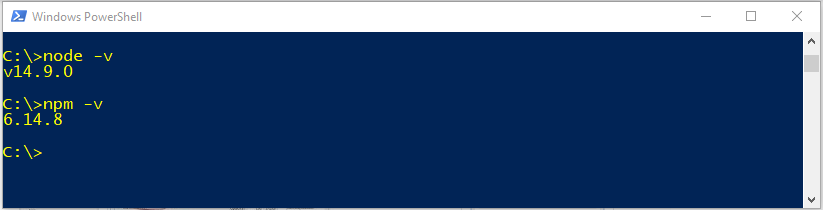
The command above will connect to the terminal of the running container. Now type node -v and press enter, this will display the node version. To display the version of NPM installed type — npm -v and press Enter.
上面的命令将连接到正在运行的容器的终端。 现在输入node -v并按Enter,这将显示节点版本。 要显示已安装的NPM版本,请输入— npm -v并按Enter。
结论 (Conclusion)
There you have it! You can now remove the docker-nodejs folder created in the first step and upload the image to your Docker Hub account to use for your NodeJs projects. Hopefully this post will help you in creating your own image of NodeJs Windows Container! Please leave any questions or feedback in the comments section, thanks for reading.
你有它! 现在,您可以删除第一步中创建的docker-nodejs文件夹,并将映像上传到您的Docker Hub帐户以用于您的NodeJs项目。 希望本文能帮助您创建自己的NodeJs Windows容器映像! 请在评论部分留下任何问题或反馈,谢谢阅读。
翻译自: https://medium.com/swlh/lightweight-nodejs-windows-container-nano-server-372c8fbf667a
node.js轻量级


 1883
1883


 被折叠的 条评论
为什么被折叠?
被折叠的 条评论
为什么被折叠?
 到【灌水乐园】发言


