


TL;DR: You can run other code while also running the eye animation on the HalloWing M4 by updating the Adafruit
M4_EyesC++ Library.TL; DR:您可以通过更新Adafruit
M4_EyesC ++库,在运行其他代码的同时在HalloWing M4上运行眼睛动画。
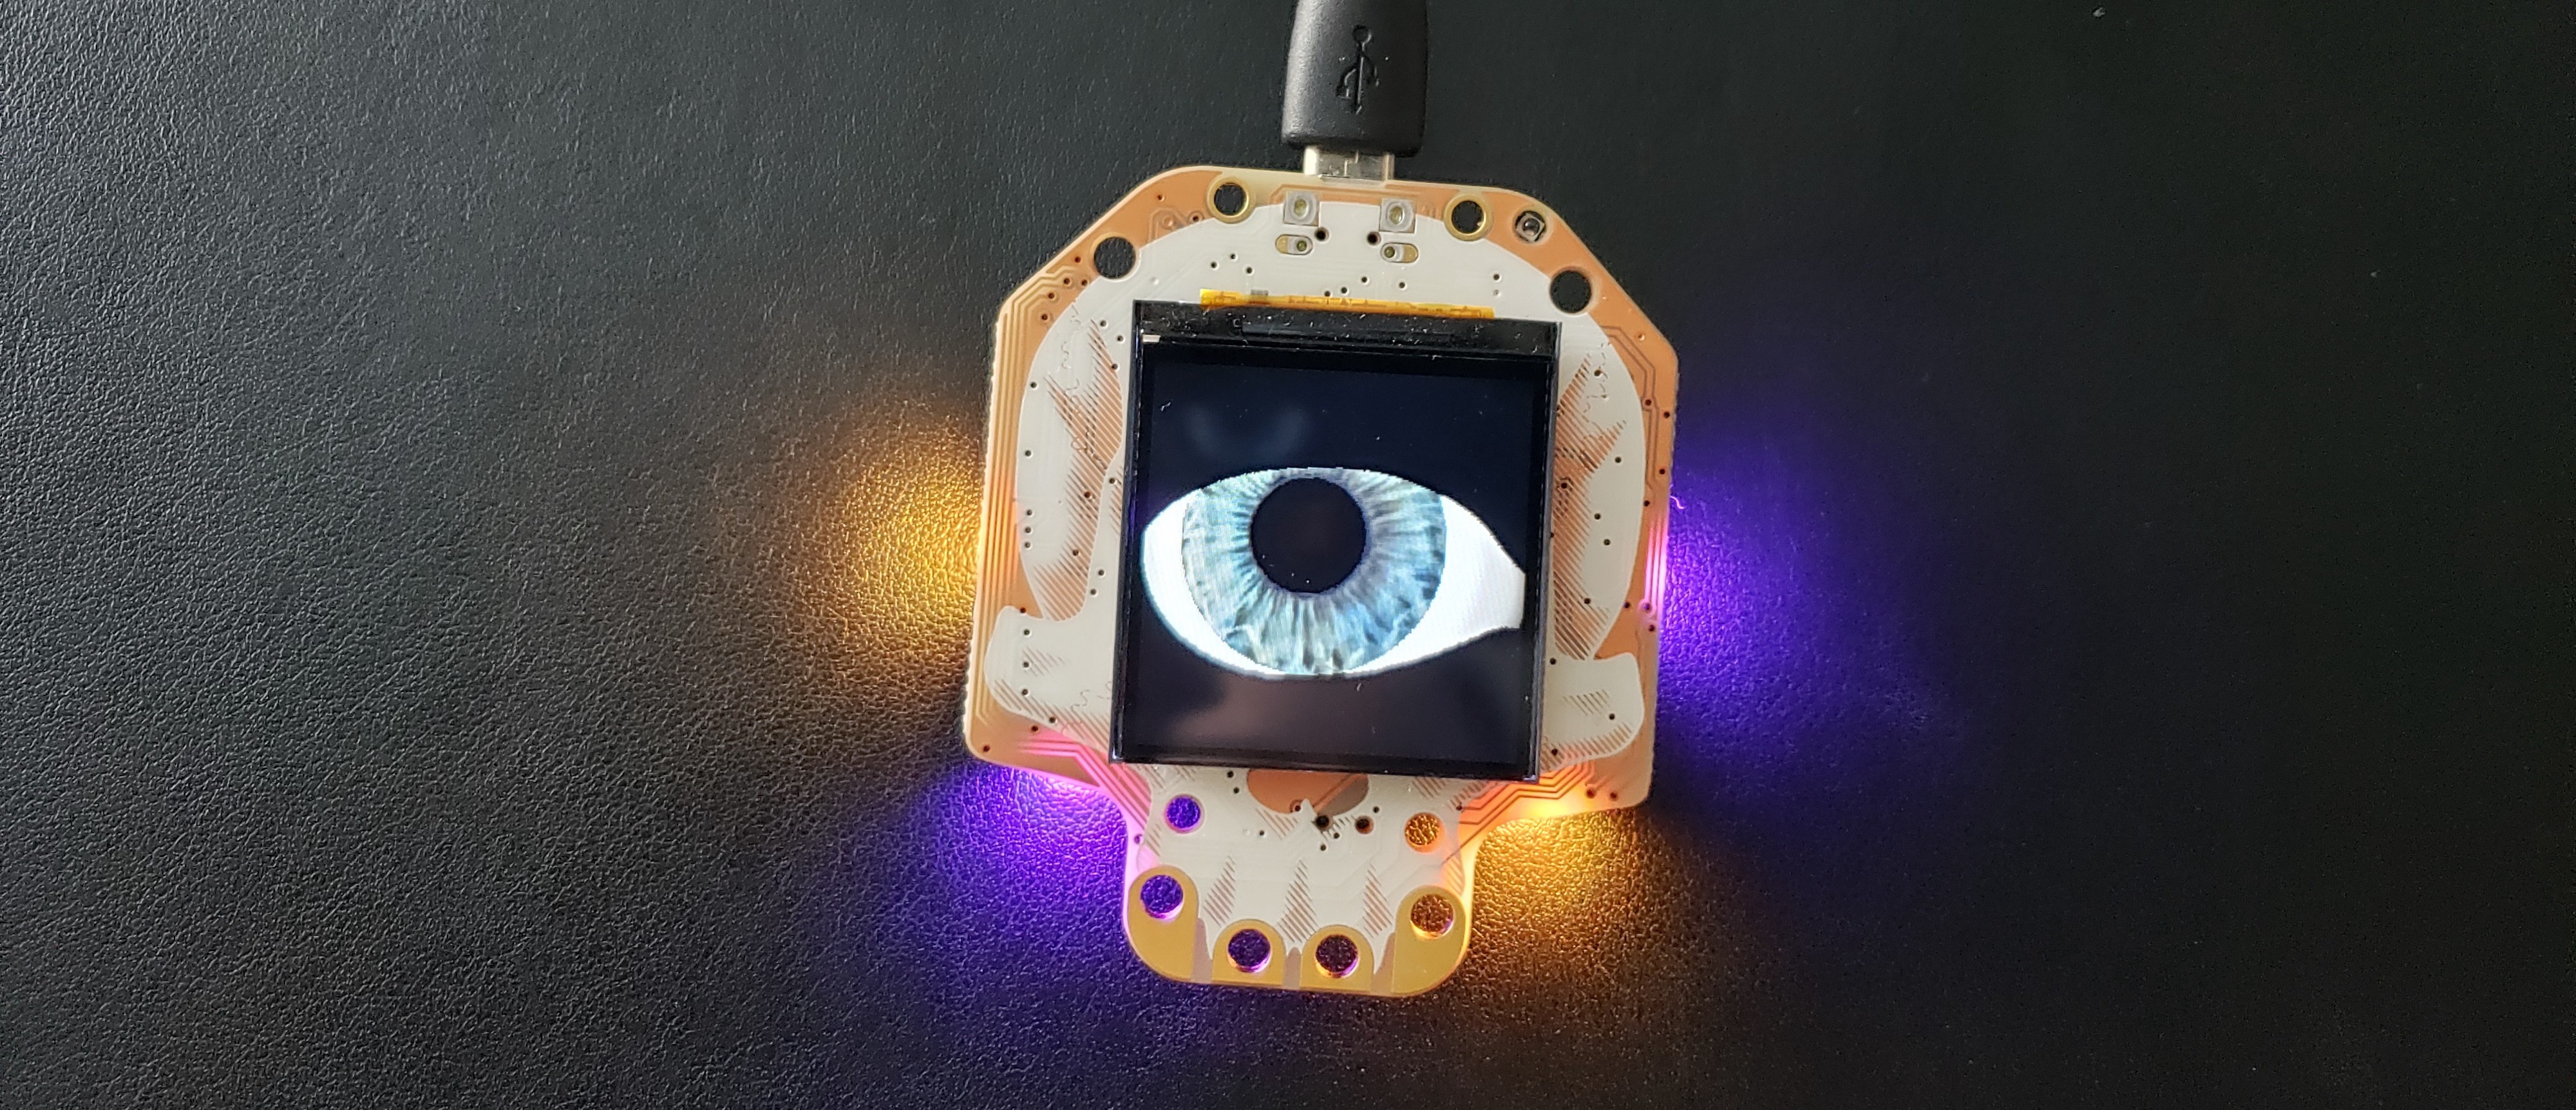
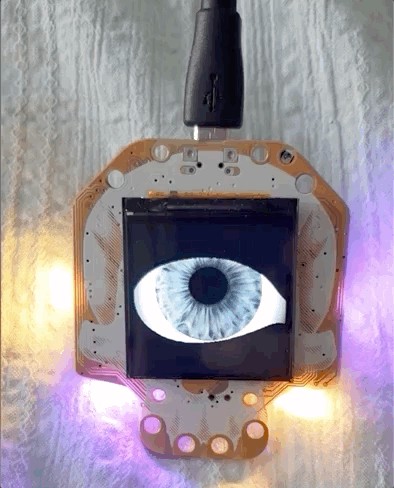
With Halloween coming up next month, I was looking around the Adafruit website for a fun Halloween-themed project. They have a few options, but the one that caught my eye (pun intended 😆) was the HalloWing M4 board. It’s a skull-shaped ATSAMD51J19A board with a 1.54" 240x240 full color IPS TFT screen that’s preset to show a moving eye that gives the impression something is watching you 👁.
随着下个月万圣节的到来,我在Adafruit网站周围寻找一个有趣的万圣节主题项目。 他们有几种选择,但是引起我注意的是HalloWing M4板。 这是一块头骨形的ATSAMD51J19A板,带有1.54英寸240x240全彩IPS TFT屏幕,该屏幕预设为显示动眼的视觉效果,给人以注视之感。
Plus, it has lots of features including:
另外,它具有许多功能,包括:
- 8 MB of SPI Flash storage 8 MB的SPI闪存存储
- A 3-axis accelerometer3轴加速度计
- A light sensor that can be used to trigger eye movements可用于触发眼睛运动的光传感器
- Four built-in side-light NeoPixel LEDs that create an underlighting effect四个内置侧灯NeoPixel LED产生暗光效果
- A mono Class-D speaker driver for sound effects单声道D类扬声器驱动器,可产生声音效果
- Four capacitive touch pads四个电容式触摸板
It’s fun for either a Halloween costume or decoration. If the look of the default eye doesn’t suit your style, Adafruit has 15 to choose from and you can even create your own fairly easily with their templates and the JSON data use to create the eye animation.
万圣节服装或装饰都很有趣。 如果默认眼睛的外观不适合您的样式,则Adafruit有15种可供选择,您甚至可以使用其模板轻松创建自己的模板,并使用JSON数据创建眼睛动画。
There are some nuances to programming this board though. If you want to program the NeoPixel LEDs to light up or use the capacitive touch pads to trigger interactions while also running the eye animation, then you need to update the C++Adafruit library to do so. The board supports CircuitPython, but the eye animation is currently only available as an Arduino library.
但是,对该板进行编程有一些细微差别。 如果要对NeoPixel LED进行编程以点亮或使用电容性触摸板触发交互,同时还运行眼睛动画,则需要更新C ++ Adafruit库来执行此操作。 该开发板支持CircuitPython,但眼动动画目前仅作为Arduino库提供。
This didn’t seem clear from the Adafruit website and I found it a little tricky to get the NeoPixel LEDs working with the eye animation on my HalloWing M4, so I wanted to share my steps here in case anyone else is trying to do something similar.
在Adafruit网站上似乎还不太清楚,我发现让NeoPixel LED与我的HalloWing M4上的眼睛动画配合使用有些棘手,所以我想在这里分享我的步骤,以防其他人尝试做类似的事情。
Here are the steps I took to make the NeoPixel LEDs work with the animation. You should also be able to expand on these steps to use other features of the board along with the eye animation.
这是我使NeoPixel LED与动画配合使用的步骤。 您还应该能够扩展这些步骤,以将板的其他功能与眼睛动画一起使用。
环境设定 (Environment Setup)
Download and install the Arduino IDEThe first step to update the C++ library is to download and install the Arduino IDE. I used the downloadable software version, but there’s a web-based version that you could try as well. While there is a Pro version, you don’t need that in order to update this library.
下载并安装Arduino IDE 更新C ++库的第一步是下载并安装Arduino IDE 。 我使用了可下载的软件版本,但是您也可以尝试使用基于Web的版本。 虽然有Pro版本,但您不需要该版本即可更新此库。
Install the Board in the Arduino IDEThe Arduino IDE has certain boards installed by default that you can start working with right away. As of the time of writing, the HalloWing M4 is not one of them, so you’ll need to follow the steps below to install it.
在Arduino IDE中安装开发板Arduino IDE默认情况下安装了某些板,您可以立即开始使用。 在撰写本文时,HalloWing M4并不是其中之一,因此您需要按照以下步骤进行安装。
- Open the “Preferences” menu. 打开“首选项”菜单。
In the dialog that pops up, paste the following URL into the “Additional Boards Manager URLs” field:
https://adafruit.github.io/arduino-board-index/package_adafruit_index.json. This makes it possible to install third-party boards in the IDE.在弹出的对话框中,将以下URL粘贴到“其他Boards Manager URL”字段中:
https://adafruit.github.io/arduino-board-index/package_adafruit_index.json:https://adafruit.github.io/arduino-board-index/package_adafruit_index.json。 这样就可以在IDE中安装第三方板。- Open Tools > Board > Boards Manager in the menu. 在菜单中打开工具>板>板管理器。
- In the dialog that pops up, search for Arduino SAMD Boards. Click the install button next to it when it appears in the list. Note: you should use version 1.6.11 or later. 在弹出的对话框中,搜索Arduino SAMD开发板。 当它出现在列表中时,单击它旁边的安装按钮。 注意:您应该使用1.6.11或更高版本。
- In the same dialog, search for Adafruit SAMD and install it. 在同一对话框中,搜索并安装Adafruit SAMD。
- Close and re-open the IDE. 关闭并重新打开IDE。
- If you go to Tools > Board > Adafruit SAMD (32-bits ARM Cortex-M0+and Cortex-M4) Boards now, you should see Adafruit Hallowing M4 (SAMD51) in the list. That’s the board we’re using, so go ahead and select it. 如果现在转到工具>主板> Adafruit SAMD(32位ARM Cortex-M0 +和Cortex-M4)主板,您应该在列表中看到Adafruit Hallowing M4(SAMD51)。 那就是我们正在使用的电路板,所以继续进行选择。
Clone the Adafruit Learning System Guides RepoNext, you’ll want to clone the Github repo for the Adafruit Learning System Guides to your local computer.
克隆Adafruit学习系统指南回购接下来,您需要将“ Adafruit学习系统指南”的Github存储库克隆到本地计算机。
If you’re new to using Github, here are the steps for cloning the repo:
如果您不熟悉Github,请按以下步骤克隆存储库:
Make sure that you have Git installed. You’ll need to run Git commands to interact with Github. Run
git --versionin your Terminal/Command Prompt and if it’s not installed, either follow the prompts to install it or download it from the Git website.确保已安装Git。 您需要运行Git命令才能与Github进行交互。 在终端/命令提示符中运行
git --version,如果尚未安装,请按照提示进行安装或从Git网站下载。- On the Terminal/Command Prompt, navigate to the folder on your computer where you want to store your local copy of the Github repo. Leave the Terminal/Command Prompt open. 在终端/命令提示符上,导航到计算机上要存储Github存储库本地副本的文件夹。 使终端/命令提示符保持打开状态。
- On the Github repo page, look for the green “Code” button. Click on that button and click the “clipboard” icon beside the link under “Clone with HTTPS.” This is the link you’ll need to run the next command. 在Github存储库页面上,寻找绿色的“代码”按钮。 单击该按钮,然后单击“使用HTTPS克隆”下链接旁边的“剪贴板”图标。 这是运行下一个命令所需的链接。
Back in your Terminal/Command Prompt, run the following command to clone the repo:
git clone [INSERT LINK COPIED IN STEP 3]. After this command runs, you should see all of the folders and code in the Github repo on your local machine.返回终端/命令提示符,运行以下命令来克隆存储库:
git clone [INSERT LINK COPIED IN STEP 3]。 运行此命令后,您应该在本地计算机上的Github存储库中看到所有文件夹和代码。
更新代码 (Updating the Code)
Now that you have the Arduino IDE installed and setup and have cloned the Github repo, you can start editing the library. As you’ve probably noticed, there are a lot of programs in the Adafruit Learning System Guides repo. The one that we’re interested in is the M4_Eyes program, so our focus will be on the files in that folder.
现在您已经安装并设置了Arduino IDE,并克隆了Github存储库,您可以开始编辑该库了。 您可能已经注意到,《 Adafruit学习系统指南》存储库中有很多程序。 我们感兴趣的是M4_Eyes程序,因此我们的重点将放在该文件夹中的文件上。
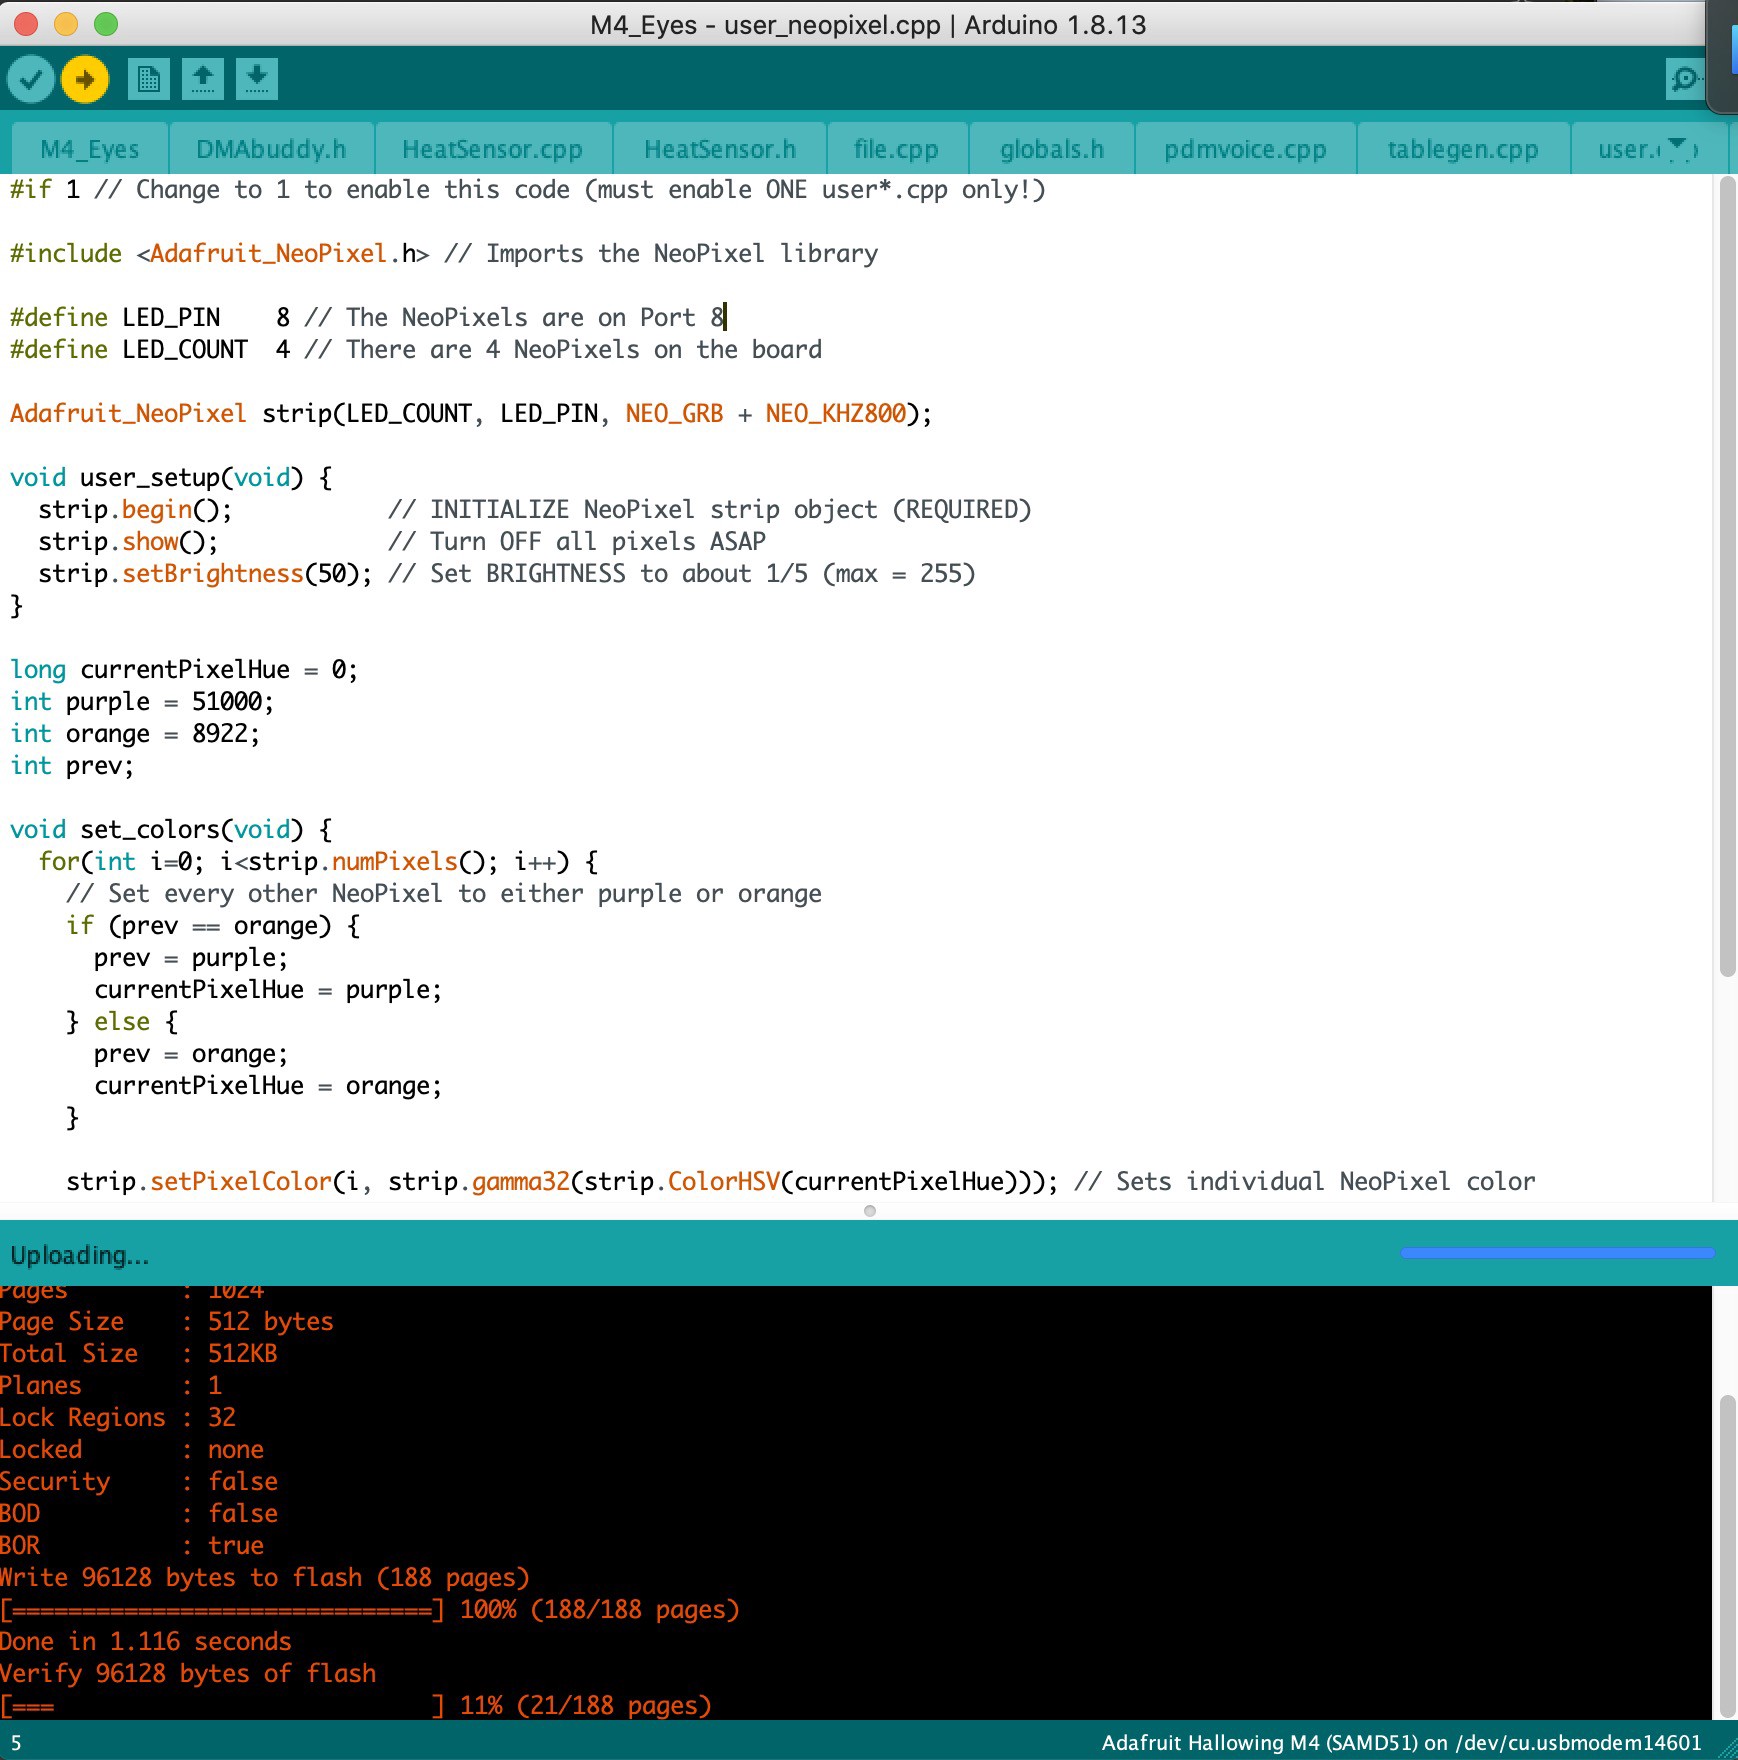
Within the M4_Eyes program folder, there are a handful of files with the extension .cpp. These are C++ files and all of the ones that begin with user are things that you can configure and adjust based on your needs. This guide will focus on the user_neopixel.cpp file because we’re enabling the NeoPixel sidelight LEDs. Here’s a quick rundown of the other .cpp user files though and ways you can use them:
在M4_Eyes程序文件夹中,有几个扩展名为.cpp的文件。 这些是C ++文件,所有以user开头的文件都是可以根据需要配置和调整的东西。 本指南将重点关注user_neopixel.cpp文件,因为我们启用了NeoPixel侧灯LED。 这是其他.cpp用户文件的简要介绍,以及使用它们的方式:
user.cpp— For programming with any of the pins on the board. You could enable and colorize the LED lights, access the speaker, etc.user.cpp—用于使用板上的任何引脚进行编程。 您可以启用LED灯并使它们变色,访问扬声器等。user_pir.cpp— For programming with the motion sensoruser_pir.cpp—用于使用运动传感器进行编程user_hid.cpp— For programming sound detectionuser_hid.cpp—用于编程声音检测user_touchneopixels.cpp— Change LEDs based on external inputs like touchpadsuser_touchneopixels.cpp根据触摸板等外部输入更改LEDuser_watch.cpp— For using a heat sensor to set the eye focususer_watch.cpp—用于使用热传感器设置眼睛焦点user_fizzgig.cpp— For programming the eye to be part of a robot that uses servos to control a faceuser_fizzgig.cpp—用于将眼睛编程为使用伺服器控制面部的机器人的一部分
You can only run one of these user*.cpp files at a time. For the one that you want to use, the first line of code in the file should look like this:
您一次只能运行这些user*.cpp文件之一。 对于您要使用的代码,文件中的第一行代码应如下所示:
#if 1 // Change to 1 to enable this code (must enable ONE user*.cpp only!)Change the 1 to a 0 when you don’t want to use a user*.cpp file (0 is the default).
当您不想使用user*.cpp文件时,请将1更改为0 (默认为0 )。
Editing the user_neopixel.cpp FileThe user_neopixel.cpp file in the M4_Eyes program gives us a nice starting point that smoothly cycles the four NeoPixels around the edges of the board through the color wheel, like this:
编辑user_neopixel.cpp文件该user_neopixel.cpp在文件M4_Eyes方案为我们提供了一个很好的出发点是平滑周期围绕董事会通过色轮的边缘,这样四个NeoPixels:
For my HalloWing though, I thought it would be fun to use purple and orange for the NeoPixels to give it more of a Halloween vibe. The code to make these changes is available in a Github Gist and I’ll walk through it below.
不过,对于我的HalloWing,我认为将NeoPixels用作紫色和橙色以使其更具有万圣节氛围是很有趣的。 Github Gist中提供了进行这些更改的代码,我将在下面逐步介绍。
First, at the top of the file, make sure the value after #if is set to 1, so that this file gets included in the project build.
首先,在文件顶部,确保#if之后的值设置为1 ,以便将该文件包含在项目构建中。
#if 1 // Change to 1 to enable this code (must enable ONE user*.cpp only!)On the next line, keep the #include statement from the original code in the user_neopixel.cpp file. This is used to import the Adafruit NeoPixel library into the program so that we can access the NeoPixels.
在下一行,将#include语句与原始代码保留在user_neopixel.cpp文件中。 这用于将Adafruit NeoPixel库导入程序,以便我们可以访问NeoPixels。
Then, let’s define a few constants. Specially, let’s define constants for the LED_PIN, which indicates which pin the NeoPixels are using, and the LED_COUNT , which indicates the number of LEDs on the HalloWing board.
然后,让我们定义一些常量。 特别地,让我们为LED_PIN (用于指示NeoPixel使用的是哪个引脚)和LED_COUNT (用于指示HalloWing板上的LED数量)定义常量。
#define LED_PIN    8 // The NeoPixels are on Port 8
#define LED_COUNT  4 // There are 4 NeoPixels on the board
Now, let’s setup the NeoPixels. First, define the strip of NeoPixels as an object. To do this, you need to use the Adafruit_NeoPixel type and call the strip() function, which takes three arguments: the number of LEDs (LED_COUNT in our case), the pin that the strip is using (LED_PIN in our case), and the pixel type flags. For the HalloWing M4, the NeoPixels use the GRB bitstream and 800 KHz bitstream (the NeoPixels on this board are using WS2812 LEDs).
现在,让我们设置NeoPixels。 首先,将NeoPixels带定义为对象。 要做到这一点,你需要使用Adafruit_NeoPixel类型,并调用strip()函数,它有三个参数:发光二极管(数量LED_COUNT在我们的例子),该带使用(销LED_PIN在我们的例子),和像素类型标志。 对于HalloWing M4,NeoPixels使用GRB比特流和800 KHz比特流(此板上的NeoPixels使用WS2812 LED)。
Adafruit_NeoPixel strip(LED_COUNT, LED_PIN, NEO_GRB + NEO_KHZ800);Then, create a user_setup(void) function that initializes the NeoPixel strip. The function doesn’t return anything, so it’s type is void and it doesn’t need to take any arguments either. You can adjust the brightness value based on your desired effect; the minimum value is 0 and the maximum is 255.
然后,创建一个user_setup(void)函数来初始化NeoPixel带。 该函数不返回任何内容,因此其类型为void,并且也不需要接受任何参数。 您可以根据需要的效果调整亮度值。 最小值为0,最大值为255。
void user_setup(void) {
   strip.begin();    // INITIALIZE NeoPixel strip object (REQUIRED)
   strip.show();     // Turn OFF all pixels ASAP
   strip.setBrightness(50); // Set BRIGHTNESS to about 1/5 max value
}
Next up, let’s create a few variables to store the purple and orange color values as well as the the current and previous colors. The purple and orange color values are based on the HSV color model. You can use the color wheel depicted in the Adafruit NeoPixel Uberguide to determine color values for other colors.
接下来,让我们创建一些变量来存储紫色和橙色值以及当前和以前的颜色。 紫色和橙色值基于HSV颜色模型。 您可以使用Adafruit NeoPixel Uberguide中描绘的色轮来确定其他颜色的颜色值。
long currentPixelHue = 0;
int purple = 51000;
int orange = 8922;
int prev;
Then, create a set_colors(void) function to set the NeoPixel color values. This is where the magic happens! Inside the function, loop over each NeoPixel and check what the previous color was. If it was orange, make the current NeoPixel purple; otherwise, make it orange to set the alternating effect.
然后,创建一个set_colors(void)函数来设置NeoPixel颜色值。 这就是魔术发生的地方! 在函数内部,遍历每个NeoPixel并检查以前的颜色是什么。 如果是橙色,则将当前的NeoPixel设为紫色;否则,将其设为紫色。 否则,将其设置为橙色以设置交替效果。
The strip.setPixelColor() function takes the current NeoPixel index and sets its color value using the HSV color selected. After the loop completes, call strip.show() to update the colors in the NeoPixel strip so that the colors actually display on the board.
strip.setPixelColor()函数采用当前NeoPixel索引,并使用所选的HSV颜色设置其颜色值。 循环完成后,调用strip.show()更新NeoPixel带中的颜色,以便颜色实际显示在板上。
In addition to the setPixelColor(), ColorHSV(), and show() functions, there are other functions in the Adafruit NeoPixel library that you can use to manipulate the NeoPixels.
除了setPixelColor() , ColorHSV()和show()函数之外, Adafruit NeoPixel库中还有其他函数可用于操作NeoPixels。
void set_colors(void) {
   for(int i=0; i<strip.numPixels(); i++) {
   // Set every other NeoPixel to either purple or orange
      if (prev == orange) {
         prev = purple;
         currentPixelHue = purple;
      } else {
         prev = orange;
         currentPixelHue = orange;
      }           // Sets individual NeoPixel color
      strip.setPixelColor(i,
         strip.gamma32(strip.ColorHSV(currentPixelHue)));
   }   // Update strip with new colors
   strip.show();
}
At this point, you just need to add a user_loop(void) function that gets run when the program loads. Inside this function, call the set_colors() function to update the NeoPixels to purple and orange when the program loads.
此时,您只需要添加一个user_loop(void)函数即可在程序加载时运行。 在此函数内部,调用set_colors()函数可在程序加载时将NeoPixels更新为紫色和橙色。
void user_loop(void) {
   set_colors();
}
That’s it! You can now publish the updated M4_Eyes library to your HalloWing M4 to see the changes.
而已! 现在,您可以将更新的M4_Eyes库发布到HalloWing M4中以查看更改。
将更新的M4_Eyes库发布到HalloWing M4 (Publishing the Updated M4_Eyes Library to the HalloWing M4)
In the Arduino IDE, follow the steps below to publish the changes to the M4_Eyes library to your HalloWing M4.
在Arduino IDE中,按照以下步骤将对M4_Eyes库的更改发布到HalloWing M4。
- Plug your HalloWing M4 into your computer (if you haven’t already). 将HalloWing M4插入计算机(如果尚未插入)。
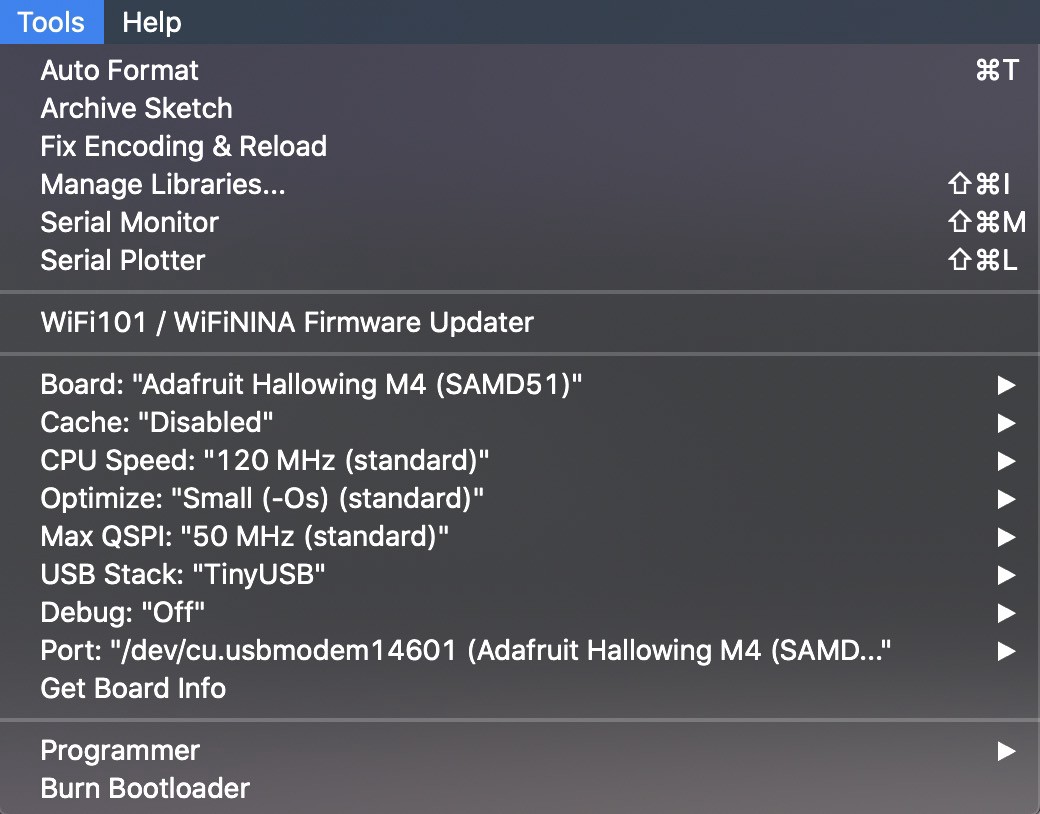
2. In the Tools menu, make sure that the Board is set to your HalloWing M4 board and the Port it’s connected to is selected. You should see something like this:
2.在“工具”菜单中,确保将开发板设置为HalloWing M4开发板,并且已选择与其连接的端口。 您应该会看到以下内容:
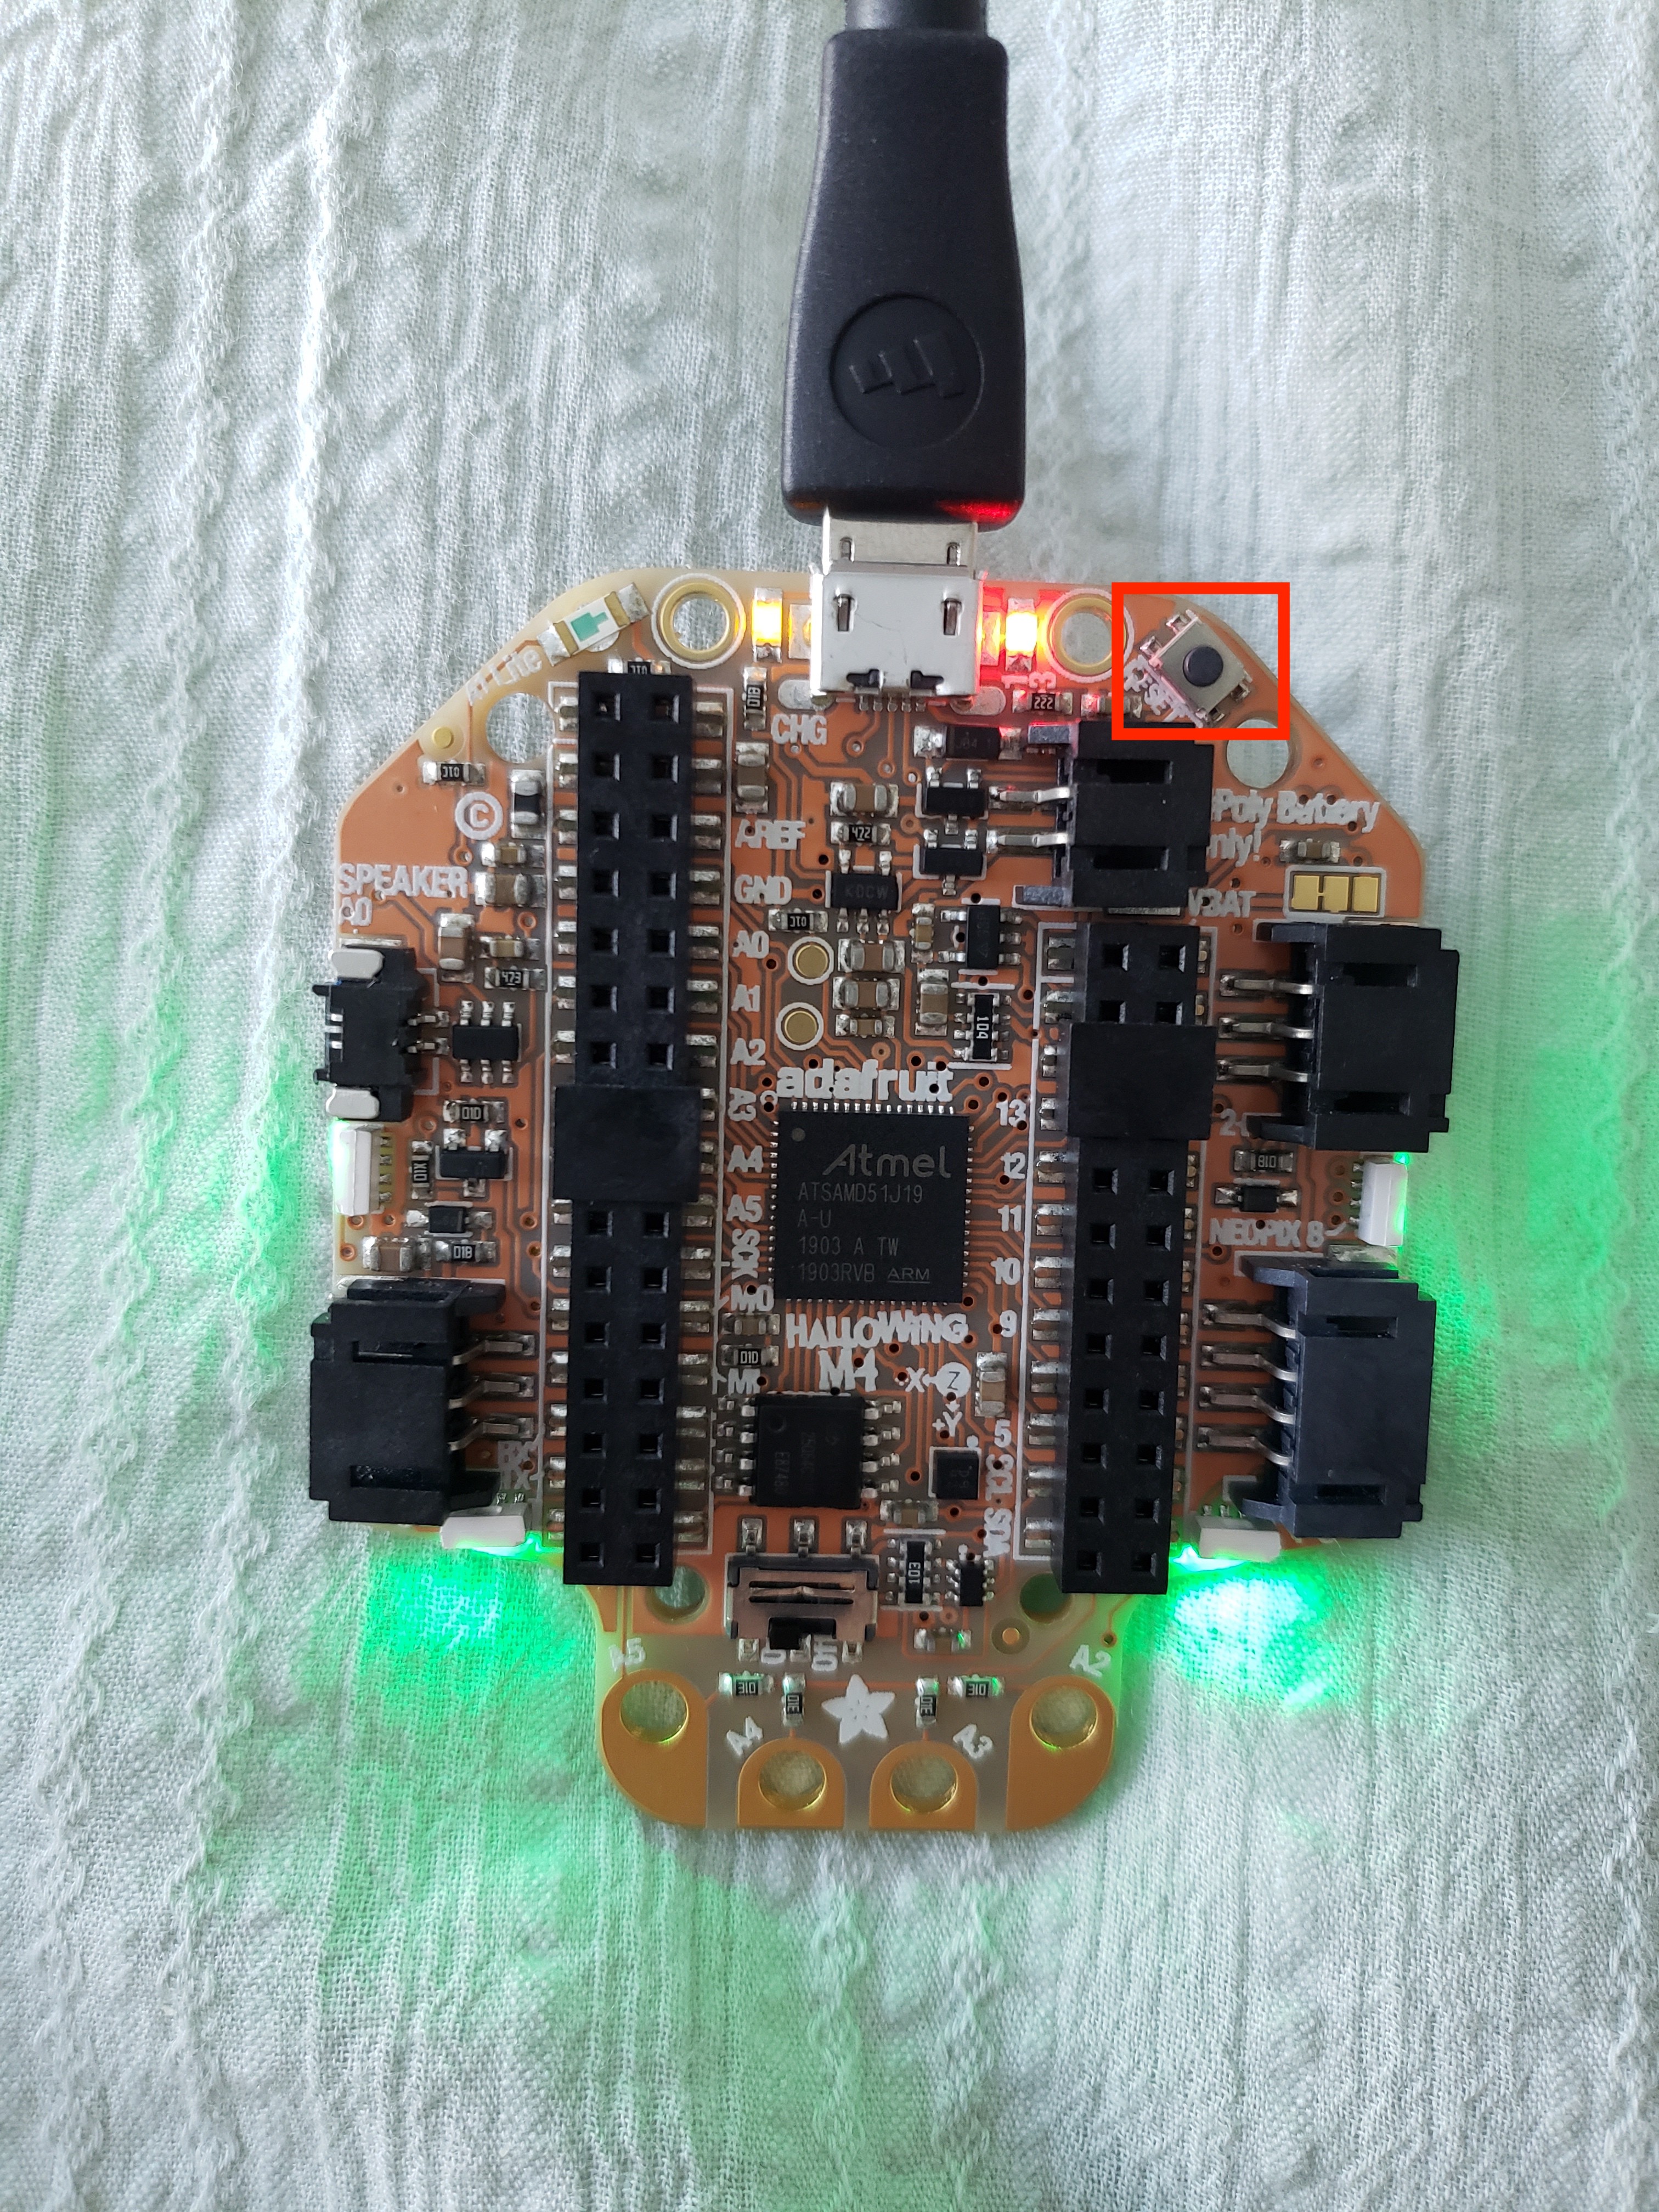
3. Put the board in Bootloader Mode. To do this, double click on the black button in the top right corner on the back of the board. You should see the LEDs flash red and then turn green.
3.将板置于引导加载程序模式。 为此,请双击板子背面右上角的黑色按钮。 您应该看到LED闪烁红色,然后变成绿色。
4. At the top of your program, you should see an arrow icon that points to the right. That’s the Publish button. Click that button to copy your program to your board. It should show a status that first says “Compiling sketch…” and then it will say “Uploading…”.
4.在程序顶部,您应该看到一个指向右侧的箭头图标。 那就是“发布”按钮。 单击该按钮可将程序复制到板上。 它应该显示一个状态,首先显示“正在编译草图...”,然后显示“正在上传...”。
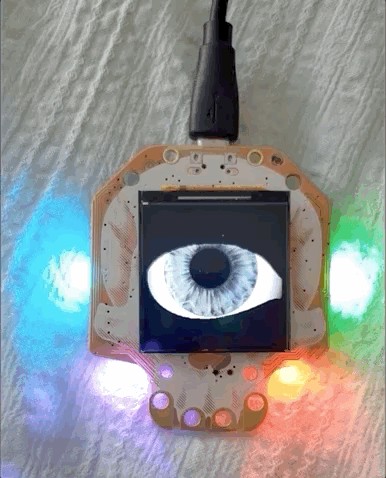
5. Once it’s done uploading the program, you should see the eye animation running on your board and the NeoPixel LEDs should be purple and orange.
5.上传完程序后,您应该看到板上运行的眼睛动画,并且NeoPixel LED应为紫色和橙色。
改变眼神的风格 (Changing Eye Styles)
It’s pretty straight forward to change the eye style to one of the pre-defined Adafruit eye styles. There’s one hidden gotcha though.
将眼型更改为预定义的Adafruit眼型之一非常简单。 虽然有一个隐藏的陷阱。
Download the pre-defined eye styles from the Adafruit website.
- Copy the folder for the eye style you want to use onto your HalloWing M4. 将要使用的眼睛样式文件夹复制到HalloWing M4。
Copy the
config.eyefile from the eye style folder to the root folder on your HalloWing. This is used by the C++ library to know which eye styles to load. Be sure to remove any comments from theconfig.eyefile (i.e., anything that looks like// text here). If there are comments in your config file, then the C++ library won’t load it correctly and you’ll see the default blue animated eye instead of the one you selected.将
config.eye文件从eye style文件夹复制到HalloWing的根文件夹。 C ++库使用它来了解要加载的眼型。 确保从config.eye文件中删除所有注释(即,类似于// text here)。 如果配置文件中有注释,则C ++库将无法正确加载它,并且您将看到默认的蓝色动画眼,而不是所选的动画眼。
Those are the main steps for running the NeoPixels while also using the eye animation and configuring the pixel colors. Enjoy getting your HalloWing ready for Halloween! 🎃
这些是运行NeoPixels的主要步骤,同时还使用眼睛动画和配置像素颜色。 祝您为万圣节准备好HalloWing! 🎃
翻译自: https://medium.com/going-fullstack/programming-the-hallowing-m4-ae7a973b5806


 649
649

 被折叠的 条评论
为什么被折叠?
被折叠的 条评论
为什么被折叠?
 到【灌水乐园】发言


