


前端vue后端java
Docker is an enterprise-ready container platform that enables organizations to seamlessly build, share, and run any application, anywhere. Almost every company is containerizing its applications for faster production workloads so that they can deploy anytime and sometimes several times a day. There are so many ways we can build a Vue App. One way is to dockerize the Vue app with Java backend and create a docker image so that we can deploy that image any time or sometimes several times a day.
Docker是企业就绪的容器平台,使组织可以在任何地方无缝地构建,共享和运行任何应用程序。 几乎每家公司都在对其应用程序进行容器化,以实现更快的生产工作负载,以便它们可以随时随地进行部署,有时一天可以部署几次。 我们可以通过多种方式来构建Vue应用。 一种方法是使用Java后端对Vue应用进行docker化并创建一个docker映像,以便我们可以每天或有时每天多次部署该映像。
In this post, we look at the example project and see the step by step guide on how we can dockerize the Vue app with Java as a server.
在本文中,我们将查看示例项目,并逐步介绍如何使用Java作为服务器对Vue应用进行docker化。
Introduction
介绍
Example Project
示例项目
Dockerizing the App
Docker化应用
Running The App on Docker
在Docker上运行应用程序
Summary
概要
Conclusion
结论
介绍(Introduction)
Nowadays, it’s very common to dockerize and deploy the Docker image in the production with the help of container orchestration engines such as Docker Swarn or Kubernetes. We are going to Dockerize the app and create an image and run it on Docker on our local machine. We could also push that Image into the Docker hub and pull it whenever and wherever we need it.
如今,借助容器编排引擎(例如Docker Swarn或Kubernetes)在生产中对Docker映像进行Docker化和部署是非常普遍的。 我们将对应用程序进行Docker化并创建映像,然后在本地计算机上的Docker上运行它。 我们还可以将该映像推送到Docker集线器中,并随时随地将其拉出。
Here is the complete guide on how to develop a Vue app with Java as a backend server. If you are not familiar with the process or you want to know before studying this guide, I would recommend you going through it.
这是有关如何使用Java作为后端服务器开发Vue应用程序的完整指南。 如果您不熟悉此过程,或者想在学习本指南之前先了解一下,建议您仔细阅读。
先决条件(Prerequisite)
As a prerequisite, you have to install Docker for Desktop (whatever your OS is). Please follow this link to install Docker on your laptop. Once installed you can check the Docker info or version with the following commands.
前提条件是,必须安装Docker for Desktop(无论您的操作系统是什么)。 请点击此链接在笔记本电脑上安装Docker。 安装后,您可以使用以下命令检查Docker信息或版本。
docker info
docker --version
示例项目 (Example Project)
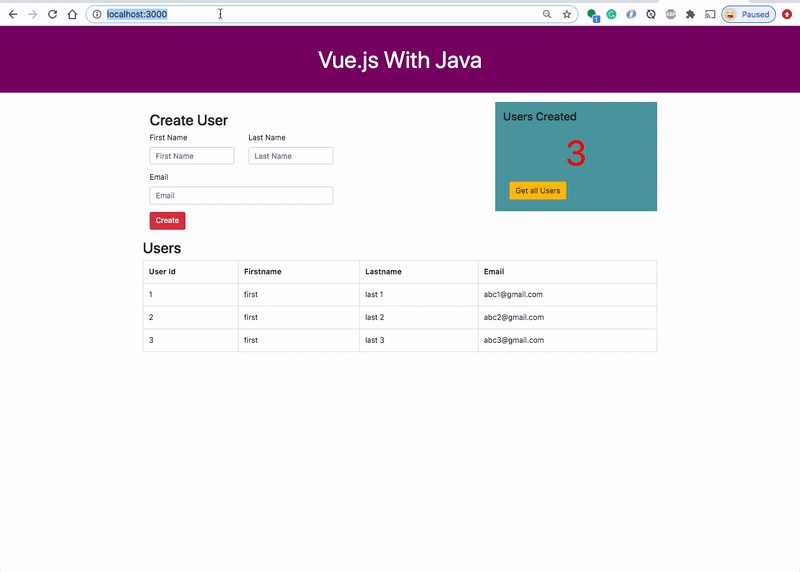
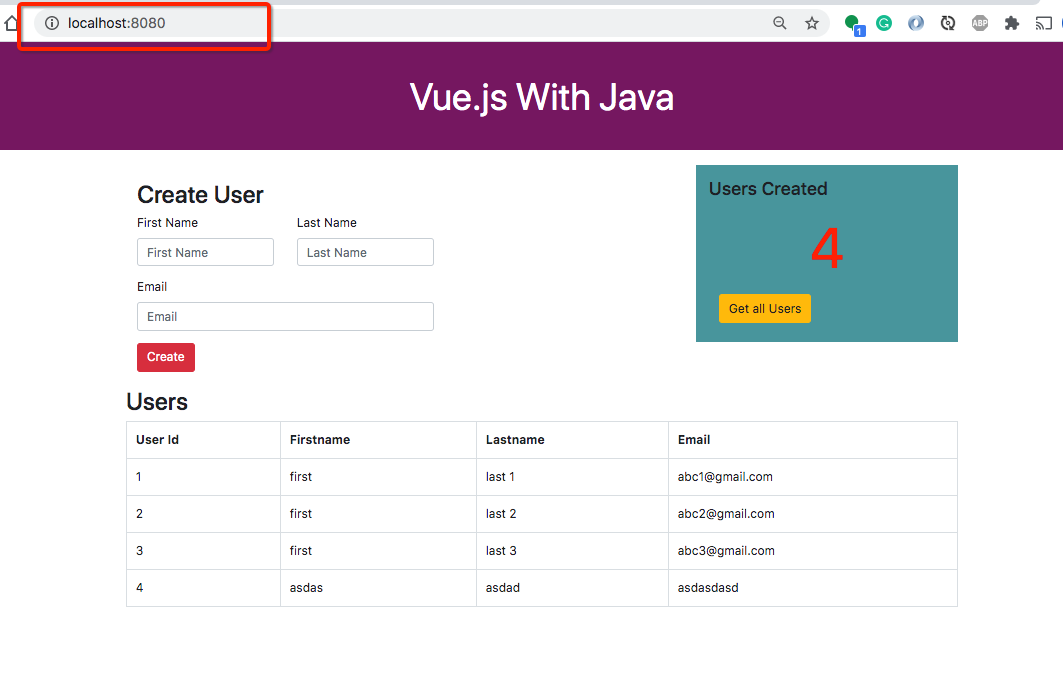
This is a simple project which demonstrates developing and running Vue application with Java. We have a simple app in which we can add users, count, and display them at the side, and retrieve them whenever you want.
这是一个简单的项目,演示了如何使用Java开发和运行Vue应用程序。 我们有一个简单的应用程序,可以在其中添加用户,计数并在侧面显示它们,并在需要时检索它们。
Here is a Github link to this project. You can clone it and run it on your machine.
这是该项目的Github链接。 您可以克隆它并在计算机上运行它。
// clone the project
git clone https://github.com/bbachi/vuejs-java-docker.git// Build the projectmvn clean install
java -jar target/users-0.0.1-SNAPSHOT.jar
Once you run the above commands and you can access the application on the port 8080. We have all the plugins needed to build the project for production We have a plugin called frontend-maven-plugin that can be used to compile all the Vue source code. Here is the link to know more about this plugin.
一旦运行了以上命令,就可以在端口8080上访问该应用程序。 我们拥有构建用于生产的项目所需的所有插件。我们有一个名为frontend-maven-plugin的插件,可用于编译所有Vue源代码。 这是更多了解此插件的链接。
There is another plugin called exec-maven-plugin which executes commands in our case we are running gulp to place all the compiled source code from folder /src/main/ui/dist to /src/main/resources/static.
在我们正在运行gulp的情况下,还有一个名为exec-maven-plugin的插件可以执行命令,以将所有已编译的源代码从文件夹/ src / main / ui / dist放置到/ src / main / resources / static。
<?xml version="1.0" encoding="UTF-8"?>
<project xmlns="http://maven.apache.org/POM/4.0.0" xmlns:xsi="http://www.w3.org/2001/XMLSchema-instance"
	xsi:schemaLocation="http://maven.apache.org/POM/4.0.0 https://maven.apache.org/xsd/maven-4.0.0.xsd">
	<modelVersion>4.0.0</modelVersion>
	<parent>
		<groupId>org.springframework.boot</groupId>
		<artifactId>spring-boot-starter-parent</artifactId>
		<version>2.2.6.RELEASE</version>
		<relativePath/> <!-- lookup parent from repository -->
	</parent>
	<groupId>com.bbtutorials</groupId>
	<artifactId>users</artifactId>
	<version>0.0.1-SNAPSHOT</version>
	<name>users</name>
	<description>Demo project for Spring Boot</description>


	<properties>
		<java.version>1.8</java.version>
	</properties>


	<dependencies>
		<dependency>
			<groupId>org.springframework.boot</groupId>
			<artifactId>spring-boot-starter-actuator</artifactId>
		</dependency>
		<dependency>
			<groupId>org.springframework.boot</groupId>
			<artifactId>spring-boot-starter-data-jpa</artifactId>
		</dependency>
		<dependency>
			<groupId>com.h2database</groupId>
			<artifactId>h2</artifactId>
			<scope>runtime</scope>
			<version>1.4.199</version>
		</dependency>
		<dependency>
			<groupId>org.springframework.boot</groupId>
			<artifactId>spring-boot-starter-data-rest</artifactId>
		</dependency>
		<dependency>
			<groupId>org.springframework.boot</groupId>
			<artifactId>spring-boot-starter-hateoas</artifactId>
		</dependency>
		<dependency>
			<groupId>org.springframework.boot</groupId>
			<artifactId>spring-boot-starter-web</artifactId>
		</dependency>
		<dependency>
			<groupId>org.springframework.data</groupId>
			<artifactId>spring-data-rest-hal-browser</artifactId>
		</dependency>
		<!-- QueryDSL -->
		<dependency>
			<groupId>com.querydsl</groupId>
			<artifactId>querydsl-apt</artifactId>
		</dependency>
		<dependency>
			<groupId>com.querydsl</groupId>
			<artifactId>querydsl-jpa</artifactId>
		</dependency>


		<dependency>
			<groupId>com.h2database</groupId>
			<artifactId>h2</artifactId>
			<scope>runtime</scope>
		</dependency>


		<dependency>
			<groupId>org.springframework.boot</groupId>
			<artifactId>spring-boot-devtools</artifactId>
			<scope>runtime</scope>
			<optional>true</optional>
		</dependency>
		<dependency>
			<groupId>org.projectlombok</groupId>
			<artifactId>lombok</artifactId>
			<optional>true</optional>
		</dependency>
		<dependency>
			<groupId>org.springframework.boot</groupId>
			<artifactId>spring-boot-starter-test</artifactId>
			<scope>test</scope>
			<exclusions>
				<exclusion>
					<groupId>org.junit.vintage</groupId>
					<artifactId>junit-vintage-engine</artifactId>
				</exclusion>
			</exclusions>
		</dependency>
	</dependencies>


	<build>
		<plugins>
			<plugin>
				<groupId>org.springframework.boot</groupId>
				<artifactId>spring-boot-maven-plugin</artifactId>
				<executions>
		            <execution>
		                <goals>
		                    <goal>repackage</goal>
		                </goals>
		                <configuration>
		                    <mainClass>com.bbtutorials.users.UsersApplication</mainClass>
		                    <outputDirectory>${project.basedir}/docker</outputDirectory>
		                </configuration>
		            </execution>
		        </executions>
			</plugin>
			<plugin>
				<groupId>com.mysema.maven</groupId>
				<artifactId>apt-maven-plugin</artifactId>
				<version>1.1.3</version>
				<executions>
					<execution>
						<goals>
							<goal>process</goal>
						</goals>
						<configuration>
							<outputDirectory>target/generated-sources/java</outputDirectory>
							<processor>com.querydsl.apt.jpa.JPAAnnotationProcessor</processor>
						</configuration>
					</execution>
				</executions>
			</plugin>
			<plugin>
			  <groupId>com.github.eirslett</groupId>
			  <artifactId>frontend-maven-plugin</artifactId>
			  <version>1.7.6</version>
			  <configuration>
        		<installDirectory>root</installDirectory>
        		<workingDirectory>src/main/ui</workingDirectory>
    		  </configuration>
			  <executions>
			      <execution>
			          <id>install node and npm</id>
			          <goals>
			              <goal>install-node-and-npm</goal>
			          </goals>
			          <configuration>
			              <nodeVersion>v10.15.3</nodeVersion>
			              <npmVersion>6.9.0</npmVersion>
			          </configuration>
			      </execution>
			      <execution>
			          <id>npm install</id>
			          <goals>
			              <goal>npm</goal>
			          </goals>
			      </execution>
			      <execution>
			          <id>prod build</id>
			          <goals>
			              <goal>npm</goal>
			          </goals>
			          <phase>generate-resources</phase>
			          <configuration>
			              <arguments>run build</arguments>
			              <npmInheritsProxyConfigFromMaven>false</npmInheritsProxyConfigFromMaven>
			          </configuration>
			      </execution>
			  </executions>
			</plugin>
			<plugin>
				<groupId>org.codehaus.mojo</groupId>
				<artifactId>exec-maven-plugin</artifactId>
				<version>1.6.0</version>
				<executions>
					<execution>
						<id>gulp install</id>
						<phase>initialize</phase>
						<goals>
							<goal>exec</goal>
						</goals>
						<configuration>
							<executable>npm</executable>
							<arguments>
								<argument>install</argument>
								<argument>gulp</argument>
							</arguments>
						</configuration>
					</execution>
					<execution>
						<id>del install</id>
						<phase>initialize</phase>
						<goals>
							<goal>exec</goal>
						</goals>
						<configuration>
							<executable>npm</executable>
							<arguments>
								<argument>install</argument>
								<argument>del</argument>
							</arguments>
						</configuration>
					</execution>
					<execution>
						<id>log install</id>
						<phase>initialize</phase>
						<goals>
							<goal>exec</goal>
						</goals>
						<configuration>
							<executable>npm</executable>
							<arguments>
								<argument>install</argument>
								<argument>fancy-log</argument>
							</arguments>
						</configuration>
					</execution>
					<execution>
						<id>gulp build</id>
						<phase>generate-resources</phase>
						<goals>
							<goal>exec</goal>
						</goals>
						<configuration>
							<executable>gulp</executable>
						</configuration>
					</execution>
				</executions>
			</plugin>
		</plugins>
	</build>


</project>Docker化应用(Dockerizing the App)
We have seen how to build the project and tun the application in a normal way. Let’ see how we can create a Dockerfile and run the same application in the Docker.
我们已经看到了如何以常规方式构建项目和调整应用程序。 让我们看看如何创建一个Dockerfile并在Docker中运行相同的应用程序。
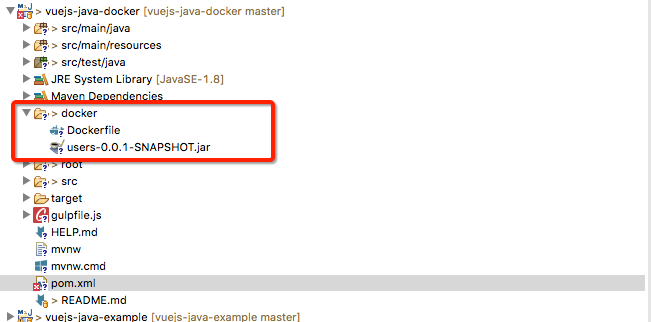
First, let’s create a folder called docker and place the generated war file there with the maven plugin. If you look at the build portion of the pom.xml we have a goal called repackage to place the packaged war file in the docker folder when we build the app. One of the advantages of using a separate folder is that you don’t have to send the entire application code to the Docker daemon when building the image.
首先,让我们创建一个名为docker的文件夹,并使用maven插件将生成的war文件放置在该文件夹中。 如果您查看pom.xml的构建部分,我们有一个名为repackage的目标,可以在构建应用程序时将打包的war文件放置在docker文件夹中。 使用单独的文件夹的优点之一是,构建映像时不必将整个应用程序代码发送到Docker守护程序。
<build>
  <plugins>
    <plugin>
      <groupId>org.springframework.boot</groupId>
      <artifactId>spring-boot-maven-plugin</artifactId>
      <executions>
            <execution>
                <goals>
                    <goal>repackage</goal>
                </goals>
                <configuration>
                    <mainClass>com.bbtutorials.users.UsersApplication</mainClass>
                    <outputDirectory>${project.basedir}/docker</outputDirectory>
                </configuration>
            </execution>
        </executions>
    </plugin>
  </plugins>
</build>
Let’s go to the root of the application and run the mvn command mvn clean install. Now we should have the war file in the docker folder.
让我们转到应用程序的根目录并运行mvn命令mvn clean install. 现在我们应该在docker文件夹中有war文件。
Second, we need to create a Dockerfile that create a Docker image. Here is the file which starts with FROM command and with base image openjdk:8-jre-alpine. Copy the generated war file and finally CMD command that runs when the image is instantiated.
其次,我们需要创建一个可创建Docker映像的Dockerfile。 这是从FROM命令和基础图像openjdk:8-jre-alpine开头的文件。 复制生成的war文件,最后复制在实例化映像时运行的CMD命令。
# Alpine Linux with OpenJDK JRE
FROM openjdk:8-jre-alpine


# Copy war file
COPY users-0.0.1-SNAPSHOT.jar /users.war


# run the app
CMD ["/usr/bin/java", "-jar", "/users.war"]
Change your directory if you are in the root location and build the docker image and verify with the following commands
如果您位于根目录中,请更改目录并构建docker映像,并使用以下命令进行验证
// change directory
cd docker// build the image
docker build -t java-vue .// list the image
docker images// login into your registry (Docker Hub)
docker login// tag the image
docker tag java-vue <repository name>/java-vue// push the image
docker push <repository name>/java-vue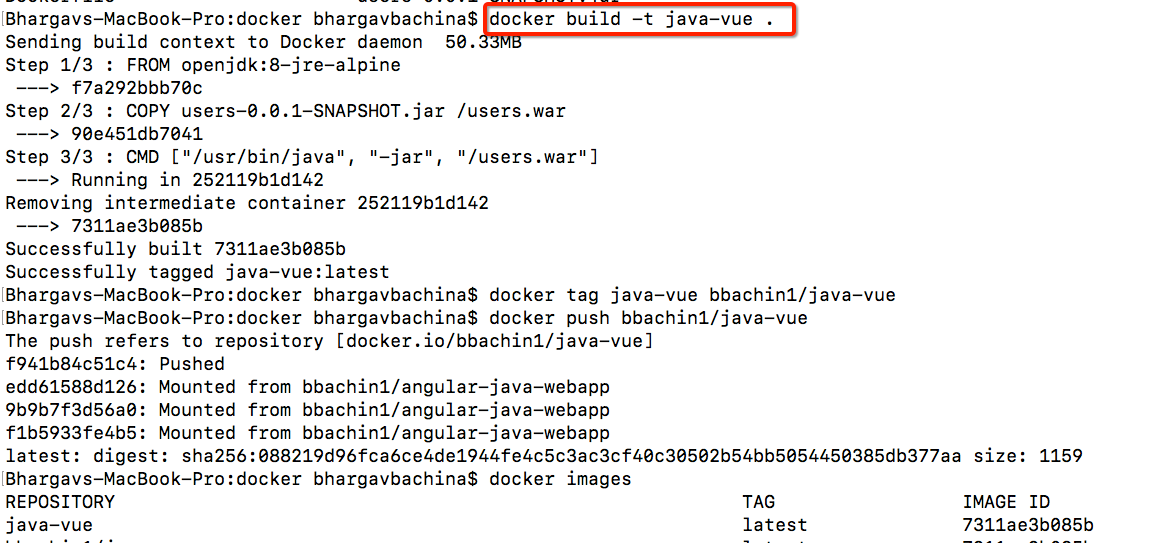
在Docker上运行应用程序(Running The App on Docker)
Now, we have the docker image, and let’s run the container and once it is up and running you can access the application at http://localhost:8080/.
现在,我们有了docker映像,让我们运行该容器,一旦它启动并运行,您就可以通过http:// localhost:8080 /访问该应用程序。
// run the container
docker run -d -p 8080:8080 --name javavue java-vue// list the container
docker ps// logs
docker logs javavue// exec into running container
docker exec -it javavue /bin/sh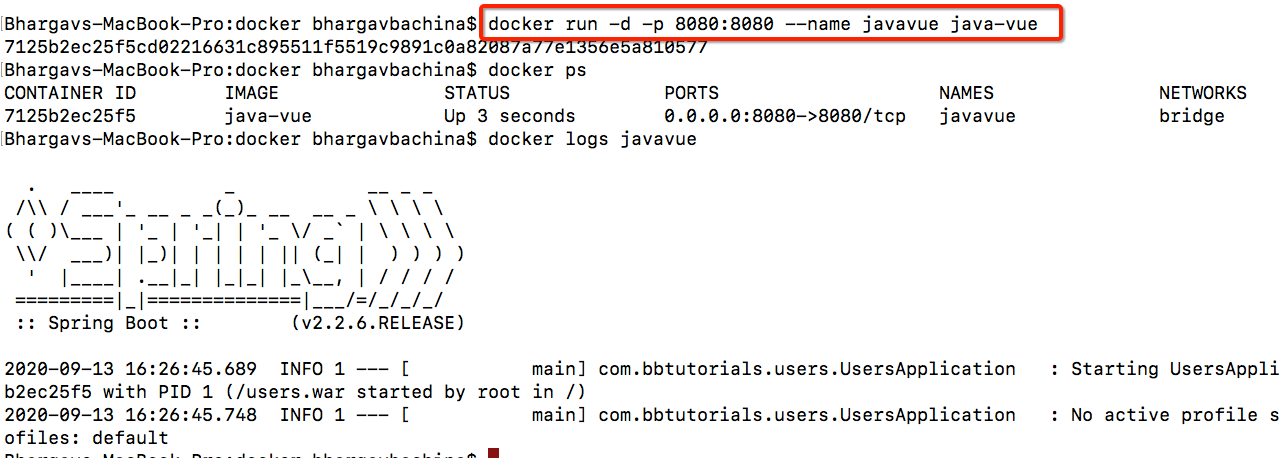
概要(Summary)
- Docker is an enterprise-ready container platform that enables organizations to seamlessly build, share, and run any application, anywhere.Docker是企业就绪的容器平台,使组织可以在任何地方无缝地构建,共享和运行任何应用程序。
- You need to build a war file with the maven plugin. 您需要使用maven插件构建一个war文件。
- Create a separate folder for the docker so that you don’t have to send all the source code to the docker daemon. 为Docker创建一个单独的文件夹,这样您就不必将所有源代码发送到Docker守护程序。
- Use the maven goal called repackage to place the packaged war file in the docker folder. 使用称为repackage的maven目标将打包的war文件放置在docker文件夹中。
- Always start with the slim Docker image when you are building the image and copy the war file and start the application with java command. 构建映像时,请始终从细长的Docker映像开始,并复制war文件并使用java命令启动应用程序。
You can tag and push that image into any registry you want with this command
docker push您可以使用此命令
docker push图像标记并推送到所需的任何注册表中Finally, you can run the docker container with
docker runcommand.最后,您可以使用
docker run命令运行docker容器。
结论 (Conclusion)
Start running your Java applications on Docker. This is the simplest configuration while building the Docker images and in future posts, we can see some more complex docker images such as passing profiles, using volumes, etc.
开始在Docker上运行Java应用程序。 这是构建Docker映像时最简单的配置,在以后的文章中,我们可以看到一些更复杂的Docker映像,例如传递配置文件,使用卷等。
翻译自: https://medium.com/bb-tutorials-and-thoughts/dockerizing-vue-js-app-with-java-backend-996892ddcb6a
前端vue后端java


 1276
1276


 被折叠的 条评论
为什么被折叠?
被折叠的 条评论
为什么被折叠?
 到【灌水乐园】发言


