


This is a story of an implementation of MVVM pattern in table view controllers. It’s using UIKit, released a bit late considering that now we have the new best thing in iOS development — SwiftUI, but anyway as it was staying in my drafts folder I wanted to eventually put it out here. And as I was trying out the same sample project with using Combine and SwiftUI might be interesting to compare the different implementation at the end.
这是在表视图控制器中实现MVVM模式的故事。 它使用的是UIKit,考虑到现在我们在iOS开发中拥有最好的新东西SwiftUI,发布得有点晚了,但是无论如何,因为它一直留在我的drafts文件夹中,所以我最终希望将其放到这里。 当我尝试使用Combine和SwiftUI尝试相同的示例项目时,比较最后的不同实现可能会很有趣。
In this first part I will cover the good part of the story — how this approach worked perfectly fine for read only data. In the second part you can see how things got pretty complicated when user input was needed.
在第一部分中,我将介绍该故事的大部分内容-这种方法对只读数据的工作方式非常完美。 在第二部分中,您将看到需要用户输入时情况变得非常复杂。
When starting new project (or in my case redesigning the UI layer) always comes up the question about which architecture and design patterns to be used. And we always think “Oh yes, now we will make it perfect! We will throw away that shitty code and make it the best now!”… too bad that this usually doesn’t come out as expected. Every approach has it’s own good and bad sides, but code can always be improved, it’s never perfect.
在开始新项目时(或者在我的情况下重新设计UI层)时,总会出现关于要使用哪种架构和设计模式的问题。 我们一直认为:“哦,是的,现在我们将使其完美! 我们将丢弃那些糟糕的代码,并使其成为现在最好的代码!”…太糟糕了,通常不会如期出现。 每种方法都有其自身的优点和缺点,但是代码总是可以改进的,它从来都不是完美的。
And of course, it starts with research.. reading books, articles, best practices, other app examples.. everything is out here. So yes, you will read many things for MVC, MVVM, MVP, Viper, you will compare them and try to find what fits best for your project. After all of this my decision was to go with MVVM for several reasons:
当然,它从研究开始。阅读书籍,文章,最佳实践和其他应用示例。一切都在这里。 因此,是的,您将阅读有关MVC,MVVM,MVP,Viper的许多内容,将它们进行比较,并尝试找到最适合您的项目的内容。 完成所有这些之后,出于以下几个原因,我决定使用MVVM:
- It’s avoided writing much additional boilerplate code 避免编写很多额外的样板代码
- Easy to make the whole UI testable易于使整个UI可测试
- The app is based on table views for all screens, reusable cells etc该应用程序基于所有屏幕,可重复使用的单元格等的表格视图
I won’t go into details or comparisons with the other patterns, I would just mention here the main concept of MVVM:
我将不详细介绍或与其他模式进行比较,在这里我仅提及MVVM的主要概念:
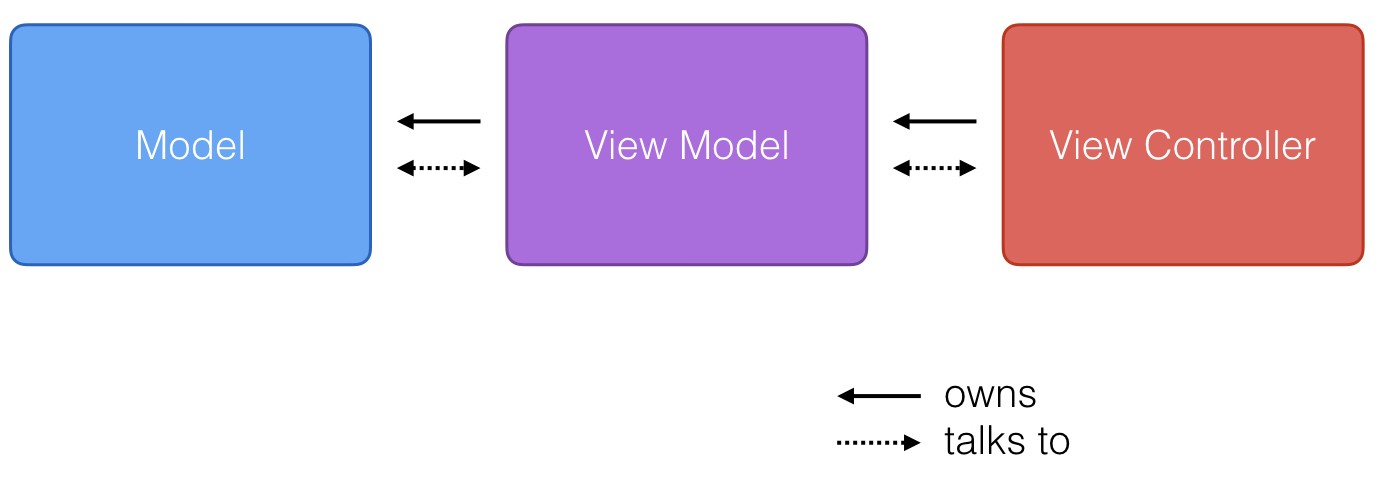
The Model contains the data that needs to be shown, the View (view controller) is responsible for showing the data and the ViewModel processes the data and prepares it in a format that can be displayed on the screen. So the view model will be responsible for all the logic, transforming the model data to data that is easily shown by the view.
Model包含需要显示的数据,View(视图控制器)负责显示数据,ViewModel处理数据并以可以在屏幕上显示的格式准备数据。 因此,视图模型将负责所有逻辑,将模型数据转换为视图容易显示的数据。
What do we get:
我们得到什么:
- Lightweight view: All the logic is within the view model, so there is little code in the view controller 轻量级视图:所有逻辑都在视图模型内,因此视图控制器中几乎没有代码
- Testability: The whole app can be tested including the UI with UnitTests可测试性:可以测试整个应用程序,包括带有UnitTests的UI
These are the main concepts in this approach with using MVVM with table views:
这些是在表视图中使用MVVM的方法中的主要概念:
- Every view controller has it’s view model 每个视图控制器都有它的视图模型
- Every cell / header / footer or any other view also has it’s view model每个单元格/页眉/页脚或其他任何视图也都具有其视图模型
- Every cell view model has extension which tells what type of cell view it needs to use每个单元格视图模型都有扩展,可以告诉它需要使用哪种类型的单元格视图
OK, that is the theory! We have read all these rules, we know it! But it doesn’t always work that great in practice, right? Especially not in huge and complex apps.
好的,这就是理论! 我们已经阅读了所有这些规则,我们知道! 但这在实践中并不总能奏效,对吧? 特别是在大型和复杂的应用程序中。
So, let’s get to the practical part. I will explain now the whole structure of the sample app and I will mention what are the advantages of this approach.
因此,让我们开始实践部分。 现在,我将解释示例应用程序的整个结构,并提及该方法的优点。
常规设置/基类 (General setup / base classes)
Let’s go through the base classes setup:
让我们来看一下基类的设置:
BaseTableDataSource — this is the data source which our view controllers will use. It knows how to construct a table just by having a list containing all the section view models (tableData).
BaseTableDataSource —这是我们的视图控制器将使用的数据源。 它知道如何仅通过具有包含所有横断面图模型(tableData)的列表来构造表。
public struct BaseTableSource: TableSource {
    public var tableData: [TableSectionVM]

    public func numberOfSections() -> Int {
        return tableData.count
    }

    public func numberOfRows(for section: Int) -> Int {
        return tableData[section].cellData.count
    }

    public func cellTypeFor(section: Int, row: Int) -> UITableViewCell.Type {
        let cell = tableData[section].cellData[row]
        if let ct = cell as? IdentifiableCellVM {
            return ct.cellType
        }
        return UITableViewCell.self
    }

    public func cellViewModelFor(section: Int, row: Int) -> CellVM {
        return tableData[section].cellData[row]
    }
}
TableSectionVM — just a structure identifying every section. It has a list of view models identifying the cells for that section. It can also contain header and footer view models which are optional.
TableSectionVM —只是标识每个部分的结构。 它具有一个视图模型列表,用于标识该部分的单元格。 它还可以包含可选的页眉和页脚视图模型。
public struct TableSectionVM {
    var headerVM: HeaderVM?
    var footerVM: FooterVM?
    var cellData: [CellVM]
}
CellVM — this for now is just an empty protocol which all the cell view models should conform to so they can be properly used for displaying the corresponding cells.
CellVM-目前,这只是一个空协议,所有单元格视图模型都应遵循此协议,因此它们可以正确地用于显示相应的单元格。
IdentifiableCellVM — protocol which the cell view models extensions need to implement so the data source knows what view it should use for the given view model. It identifies the view type.
IdentifiableCellVM-单元视图模型扩展需要实现的协议,以便数据源知道它应用于给定视图模型的视图。 它标识视图类型。
public protocol CellVM {}


public protocol IdentifiableCellVM {
    var cellType: UITableViewCell.Type { get }
}


public protocol CellView: class {
    func setup(viewModel: CellVM)
}
Regarding the cells setup the main concepts are the following:
关于单元设置,主要概念如下:
- Every cell view model contains only the parameters needed for the cell view. 每个单元格视图模型仅包含单元格视图所需的参数。
- Every cell view model conforms to CellVM. Also it’s extension conforms to IdentifiableCellVM which is used for finding the view to be shown. 每个单元格视图模型都符合CellVM。 同样,它的扩展符合IdentifiableCellVM,用于查找要显示的视图。
- Every cell conforms to CellView and implements a setup method with the view model as parameter. In the setup method the views are filled with the corresponding values contained in the view model. 每个单元格都符合CellView,并以视图模型作为参数来实现设置方法。 在设置方法中,视图用视图模型中包含的相应值填充。
The setup for the headers and footers is also pretty similar.
页眉和页脚的设置也非常相似。
BaseTableViewDataSource — knows how to reuse headers/ footers and cells for the tables. Contains an object conforming to TableSource which returns the cell types and the cell view models needed for constructing the table. Sets up those views with the corresponding view model. Handles the delegate methods from UITableViewDataSource.
BaseTableViewDataSource —知道如何为表重用页眉/页脚和单元格。 包含一个符合TableSource的对象,该对象返回构造表所需的单元格类型和单元格视图模型。 使用相应的视图模型设置这些视图。 处理来自UITableViewDataSource的委托方法。
This class will be the data source used by all our table view controllers, so we don’t have to always implement the same delegate methods.
此类将是我们所有表视图控制器使用的数据源,因此我们不必始终实现相同的委托方法。
BaseTableVM — all view models that are used by the view controller must conform to this protocol. Contains the basic needed properties for constructing the screen. BaseTableVMDelegate is the protocol that the view controllers will conform to, used from the view model so it can notify the view when it should be updated.
BaseTableVM-视图控制器使用的所有视图模型必须符合此协议。 包含构建屏幕所需的基本属性。 BaseTableVMDelegate是视图控制器将遵循的协议,用于视图模型,以便可以在应更新视图时通知视图。
protocol BaseTableVM {
    var headerTitle: String { get }

    var tableViewModel: BaseTableSource { get }

    // optional parameters
    var headerSubtitle: String { get }
    var notifications: [NotificationVM]? { get }
    var hasRefresh: Bool { get }
    var delegate: BaseTableVMDelegate? { get }
}


extension BaseTableVM {
    var headerSubtitle: String { "" }
    var notifications: [NotificationVM]? { nil }
    var hasRefresh: Bool { false }
    var delegate : BaseTableVMDelegate? { nil }
}


protocol BaseTableVMDelegate {
    func updateView()
}
BaseTableVC — all view controllers should extend from this class. It contains the initial setup and displaying of the table view data. Also handles the UITableViewDelegate methods. This base view controller is always linked to a generic base table view model which as I mentioned earlier contains the data source view models for display. On viewDidLoad we always have a few setup methods which should be implemented by the child classes.
BaseTableVC —所有视图控制器都应从此类扩展。 它包含表视图数据的初始设置和显示。 还处理UITableViewDelegate方法。 该基本视图控制器始终链接到通用基本表视图模型,正如我前面提到的,该模型包含要显示的数据源视图模型。 在viewDidLoad上,我们总是有一些设置方法,这些方法应该由子类实现。
class BaseTableVC<T : BaseTableVM>: UIViewController, UITableViewDelegate, BaseTableVMDelegate {
    @IBOutlet var tableView: UITableView!
    var dataSource: BaseTableViewDataSource?
    var viewModel: T!

    //MARK:- View lyfecycle
    override public func viewDidLoad() {
        super.viewDidLoad()
        setupTableView()
        setupViewModel()
        setupNavigationBar()
    }


    ...
}实施应用(Places app implementation)
OK, that was for the base classes that were implemented for easier development of new views. In the sample project I have implemented a simple feature about places overview. This is how it looks like:
好的,那是为了更容易开发新视图而实现的基类。 在示例项目中,我实现了有关场所概述的简单功能。 它是这样的:

When developing this feature we start with our PlacesOverviewVC and PlacesOverviewVM which should extend the base classes / protocols we already mentioned. Next we should define which cells we will be using, in this example we have two types of cells. For the cells and headers, as mentioned, we also have view model and view class.
开发此功能时,我们将从PlacesOverviewVC和PlacesOverviewVM开始,它们应该扩展我们已经提到的基类/协议。 接下来,我们应该定义将要使用的单元格,在此示例中,我们有两种类型的单元格。 如上所述,对于单元格和标头,我们还具有视图模型和视图类。
The main view controller seems pretty clean! There is really little code. Imagine, a view controller with like only 20 lines of code! It only registers the cell views, initializes the view model and handles button action.
主视图控制器看起来很干净! 几乎没有代码。 想象一下,一个只有20行代码的视图控制器! 它仅注册单元格视图,初始化视图模型并处理按钮动作。
class PlacesOverviewVC: BaseTableVC<PlacesOverviewVM> {

    override func setupTableView() {
        let cells = [PlaceCell.self, PlaceImageCell.self]
        tableView.register(cells: cells)
        tableView.register(headerFooterViews: [BaseHeader.self])
    }

    override func setupViewModel() {
       viewModel = PlacesOverviewVM(delegate: self)
    }

    @IBAction func switchGrouping(_ sender: Any) {
        viewModel.switchGroupingType()
    }

}
All the important work is left to the view model. In PlacesOverviewVM you will notice that there is more code, but it makes sense as the whole logic for the list shown on screen is there. It has methods for grouping by category and grouping by country. Also when the grouping type has been changed it notifies the view to be updated accordingly.
所有重要的工作都留给视图模型。 在PlacesOverviewVM中,您会注意到还有更多的代码,但这很有意义,因为屏幕上显示的列表的整个逻辑都在那里。 它具有按类别分组和按国家分组的方法。 同样,当分组类型已更改时,它会通知视图进行相应的更新。
class PlacesOverviewVM: BaseTableVM {
    var headerTitle: String = "Places"
    var delegate: BaseTableVMDelegate?

    var tableViewModel: BaseTableSource {
        var sections: [TableSectionVM] = []
        switch groupingType {
        case .byCategory:
            sections = placesGroupedByCategory()
        case .byCountry:
            sections = placesGroupedByCountry()
        }

        return BaseTableSource(tableData: sections)
    }

     var groupingType: PlacesGroupingType = .byCategory

    func switchGroupingType() {
        groupingType = groupingType == .byCategory ? .byCountry: .byCategory
        delegate?.updateView()
    }

    func placesGroupedByCategory() -> [TableSectionVM] {
        ....
    }

    func placesGroupedByCountry() -> [TableSectionVM] {
       ....
    }
}
We have two types of cells. PlaceImageCell shows only the title and the image and info whether the place is visited. The other — PlaceCell (when grouped by country) shows additionally info about stars, ratings and type of place.
我们有两种类型的单元格。 PlaceImageCell仅显示标题和图像以及是否已访问该位置的信息。 另一个-PlaceCell(按国家/地区分组时)还显示有关星级,评分和地点类型的信息。
struct PlaceCellVM: CellVM {
    var id: Int
    var name: String
    var imageName: String = ""
    var placeIconName: String = ""
    var stars: Int
    var ratings: Int

    init(place: Place, placeRatings: [Int]) {
    ....
    }
}


struct PlaceImageCellVM: CellVM {
    var id: Int
    var name: String
    var imageName: String
    var showVisitedIcon: Bool

    init(place: Place, visited: Bool) {
    ...
    }
}
Overall this works fine when we work with read-only data, showing the list of places in our case. We can group it by different criteria, which is done easily in the view model and we just change the data for the data source correspondingly. It works smooth and fast.
总的来说,当我们使用只读数据时(在我们的案例中显示位置列表),这可以很好地工作。 我们可以按照不同的标准对它进行分组,这在视图模型中很容易做到,而我们只需相应地更改数据源的数据即可。 它运行流畅,快速。
The best thing here is that we could test it all, independently from the UI!
最好的是,我们可以独立于UI进行所有测试!
We are able to test everything we show on the screen where is shown some mix of Places and Ratings models. We can write unit tests that will test whether the proper data is shown in all the labels, buttons etc, we can check whether the icons and ratings are correct depending of the place data. This is nice as it brings good code coverage and we know that our views are unit tested. Our code coverage jumped incredibly fast when we rewrote our view controllers using this approach!
我们可以测试屏幕上显示的所有内容,其中显示了位置和评分模型的某种混合。 我们可以编写单元测试,以测试所有标签,按钮等中是否显示了正确的数据,我们可以根据位置数据检查图标和等级是否正确。 很好,因为它带来了良好的代码覆盖率,而且我们知道我们的视图已经过单元测试。 当我们使用这种方法重写视图控制器时,我们的代码覆盖率Swift提高了!
class PlacesOverviewVMTests: XCTestCase {


    var placesOverviewVM = PlacesOverviewVM(delegate: BaseTestDelegate())

    // tests the table view when grouped by category of a place
    func testGroupByCategoryList()

    // tests the table view when grouped by country
    func testGroupByCountryList()


    // tests whether the correct places are marked as visited
    func testVisitedPlaces()

    // tests the content of the cells when grouped by category
    func testGroupByCategoryListContent()

    // tests the content of the cells when grouped by country
    func testGroupByCountryListContent()

    // tests whether the raitings for the places shown are correct
    func testRatings()

    // tests whether the categories shown for place are correct
    func testCategoryForPlace()
}结论(Conclusion)
It can be concluded that this was a good approach for applications that only show information with minimal user input.
可以得出结论,对于只显示最少用户输入信息的应用程序,这是一个很好的方法。
- view controllers are small and understandable 视图控制器小巧易懂
- all the logic is in the view models所有逻辑都在视图模型中
- structured unit tests for the view models, good code coverage视图模型的结构化单元测试,良好的代码覆盖率
Overall it seems pretty clean and structured.
总体而言,它看起来很干净而且结构合理。
Regarding using animations with this approach, it can be done but a few modifications are needed because currently the whole tableview is reloaded. In case where we need cells to be shown or hidden with animations we would need to reload only the specific index paths.
关于通过这种方法使用动画,可以完成,但是需要进行一些修改,因为当前重新加载了整个表视图。 如果我们需要用动画显示或隐藏单元格,则只需要重新加载特定的索引路径即可。
Source code can be found here:
源代码可以在这里找到:
Thank you for reading! Any suggestions for improvement are welcome!
感谢您的阅读! 欢迎任何改进建议!
翻译自: https://medium.com/@bbisera2/a-story-of-mvvm-with-uitableviews-part-1-78a682d7abb3


 8528
8528

 被折叠的 条评论
为什么被折叠?
被折叠的 条评论
为什么被折叠?
 到【灌水乐园】发言


