


树莓派 树莓派 编c++
Breast Milk — or liquid gold as many moms attest — can be extremely difficult to generate and keep in order to create a consistent supply for your little one.
乙 reast牛奶-或液体黄金尽可能多的妈妈们证明-可以是非常困难的产生和保持,以创建为您的孩子一个稳定供应。
One afternoon, my wife called me in tears. She noticed that the chest freezer in our pantry suddenly quit working. Months worth of breast milk was ruined. She was understandably depressed. So much so, that I never mentioned that I lost a few important things too — three racks of ribs, a pork butt, and a whole box of mozzarella sticks.
一个下午,我的妻子热泪盈眶。 她注意到我们食品储藏室中的胸部冰柜突然停止工作。 数月的母乳毁了。 她很沮丧。 如此之多,以至于我从来没有提到我也失去了一些重要的东西-三排肋骨,一个猪屁股和一整箱马苏里拉奶酪棒。
Losing breast milk really sucks, but there are lots of stories about refrigerators and freezers malfunctioning with devastating consequences. In March of 2018, two fertility clinics lost frozen embryos within days of each other — first in Ohio, and then in San Francisco.
失去母乳确实很烂,但是有很多关于冰箱和冰柜故障而造成毁灭性后果的故事。 2018年3月,两家生育诊所在几天之内就丢失了冷冻胚胎-首先是在俄亥俄州 ,然后在旧金山 。
This tutorial will tell you exactly how to build a smart freezer thermometer that SMS/Texts and emails if it has a problem. You can make this fully-monitored reliable solution for temperature and humidity in a freezer or refrigerator at a cost of around 30 dollars. The system also monitors the temperature sensor acquisition device in case it malfunctions. With this double-redundancy, you can be confident that if temperatures start to deviate or the device stops working, you will be notified in plenty of time to make arrangements.
本教程将准确地告诉您如何构建一个智能冰柜温度计,该温度计可以在出现问题时发送SMS /文本和电子邮件。 您可以在冰柜或冰箱中制作这种温度和湿度受到完全监控的可靠解决方案,价格约为30美元。 如果发生故障,系统还会监视温度传感器采集设备。 借助这种双重冗余,您可以确信,如果温度开始出现偏差或设备停止工作,则会有足够的时间通知您进行安排。
Can’t I just throw a wireless SmartThings sensor in the freezer? Unfortunately, No — alkaline batteries and lithium batteries do not work when frozen.
我不能只将无线SmartThings传感器扔进冰箱吗? 不幸的是,没有-冷冻时碱性电池和锂电池无法工作。
冰箱和冰柜 (Refrigerators and Freezers)
The only real difference between a working refrigerator and a freezer is temperature range. However, when they malfunction or a power outage occurs the timeframes for keeping food at a safe temperature varies widely, and it depends on what’s inside. Food is one thing, but what about certain medicines, vaccines, embryos, criminal DNA evidence, or even those cryogenic head-freezing services.
运转中的冰箱和冷冻室之间唯一真正的区别是温度范围。 但是,当它们发生故障或断电时,将食物保持在安全温度下的时间范围会大不相同,这取决于里面的食物。 食物是一回事,但是某些药物,疫苗,胚胎,犯罪的DNA证据,甚至那些低温的冷冻头巾服务又如何呢 ?
Did you know? A full freezer runs more efficiently and last longer in a power outage, because there’s less space for warm air to intrude when the door opens. Also, there is more frozen material to keep the space cooler longer.
你知道吗? 满满的冷冻机运行效率更高,并且在断电情况下使用寿命更长,因为当门打开时,有更少的空间让热空气进入。 此外,还有更多的冷冻物料,可以使空间保持更长的时间。
- Refrigerator |Operating Temperature: 36°F to 40°F | Spoilage: 4 Hours 冰箱|工作温度:36°F至40°F | 损坏:4小时
- Freezer | Temperature: -2°F to 0°F | Spoilage: up to 48 hours 冰柜| 温度:-2°F至0°F | 损坏:长达48小时
note: Spoilage times vary widely if you open the door. Keep it closed if you can help it.
注意: 如果您打开门,损坏时间会相差很大。 如果可以帮助,请保持关闭状态。
所需材料 (Materials Needed)
Raspberry Pi Zero W — $10 Raspberry Pi, great for headless applications, because it’s small, cheap, and has integrated Wifi.
Raspberry Pi零W — 10美元Raspberry Pi非常适合无头应用,因为它体积小,价格便宜,并且集成了Wifi。
MicroSD card — 16GB is enough for the operating system and code.
MicroSD卡 -16GB足够用于操作系统和代码。
BME280 — Integrated temperature and humidity sensor. You can find these for very cheap, but you’ll want it already integrated onto a breakout board, and it needs to expose the I2C lines for this tutorial code to work.
BME280 —集成温度和湿度传感器。 您可以以非常便宜的价格找到它们,但您希望它已经集成到分线板上,并且需要公开I2C行才能使本教程代码正常工作。
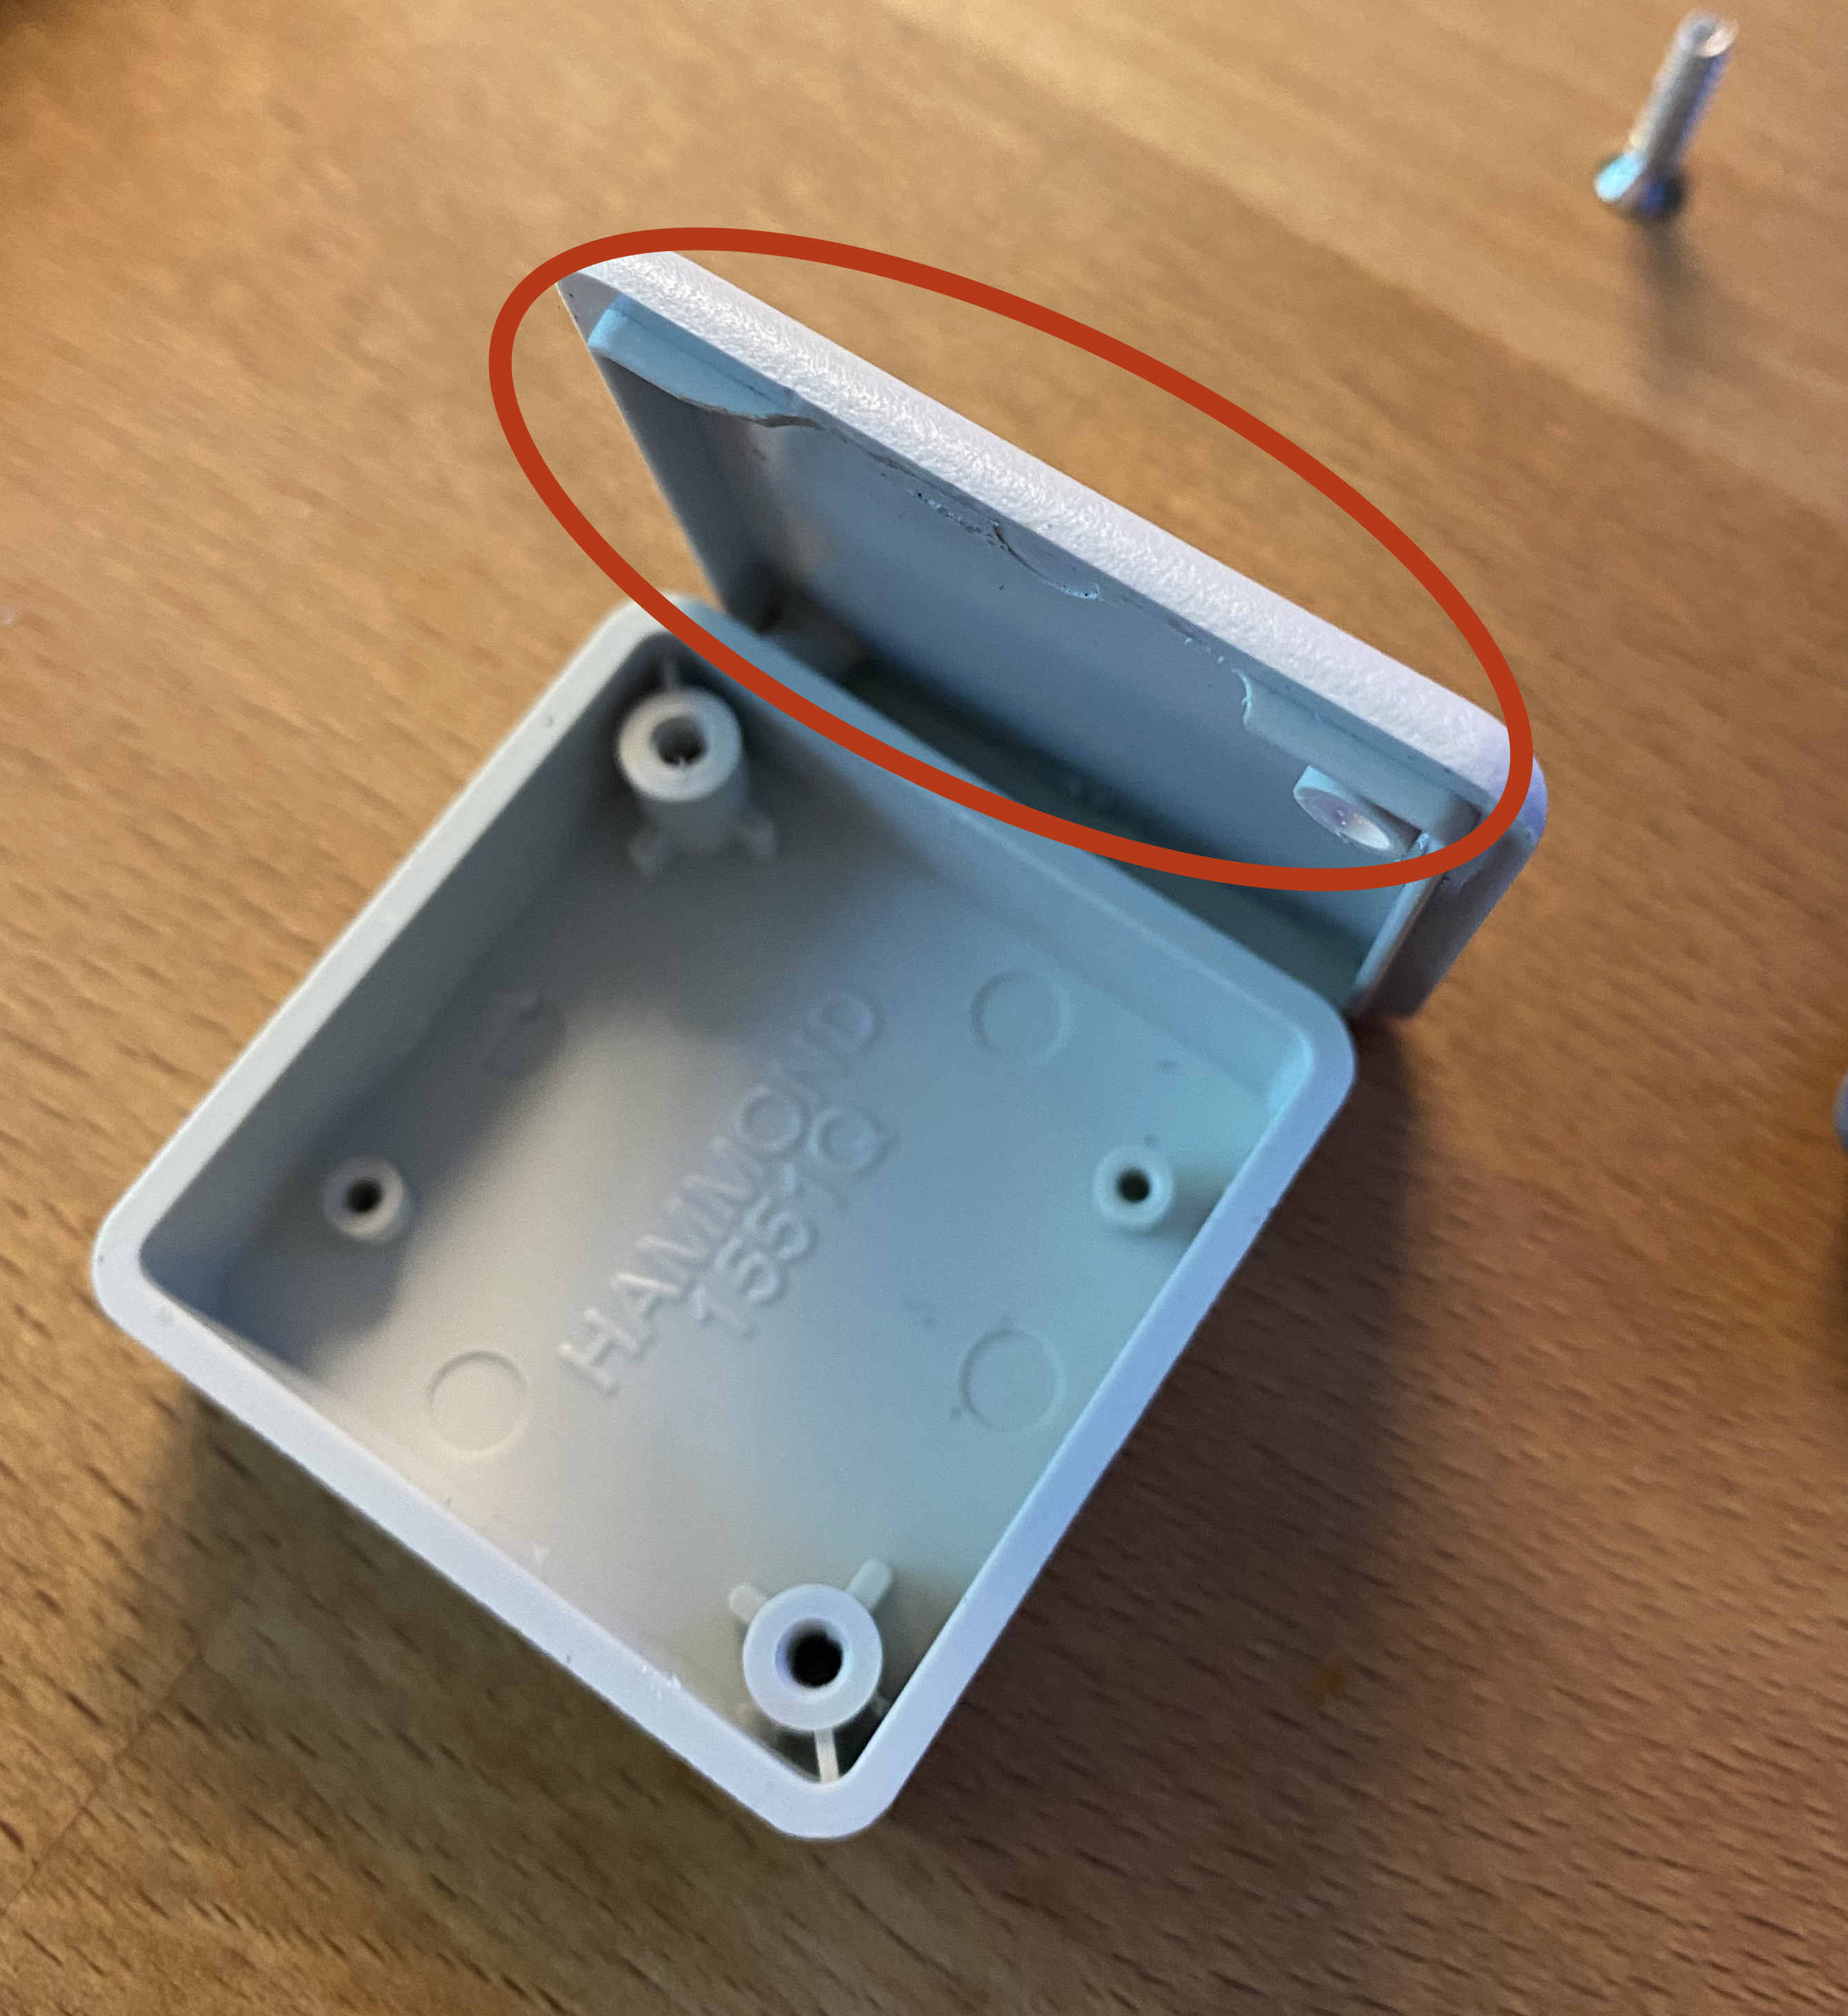
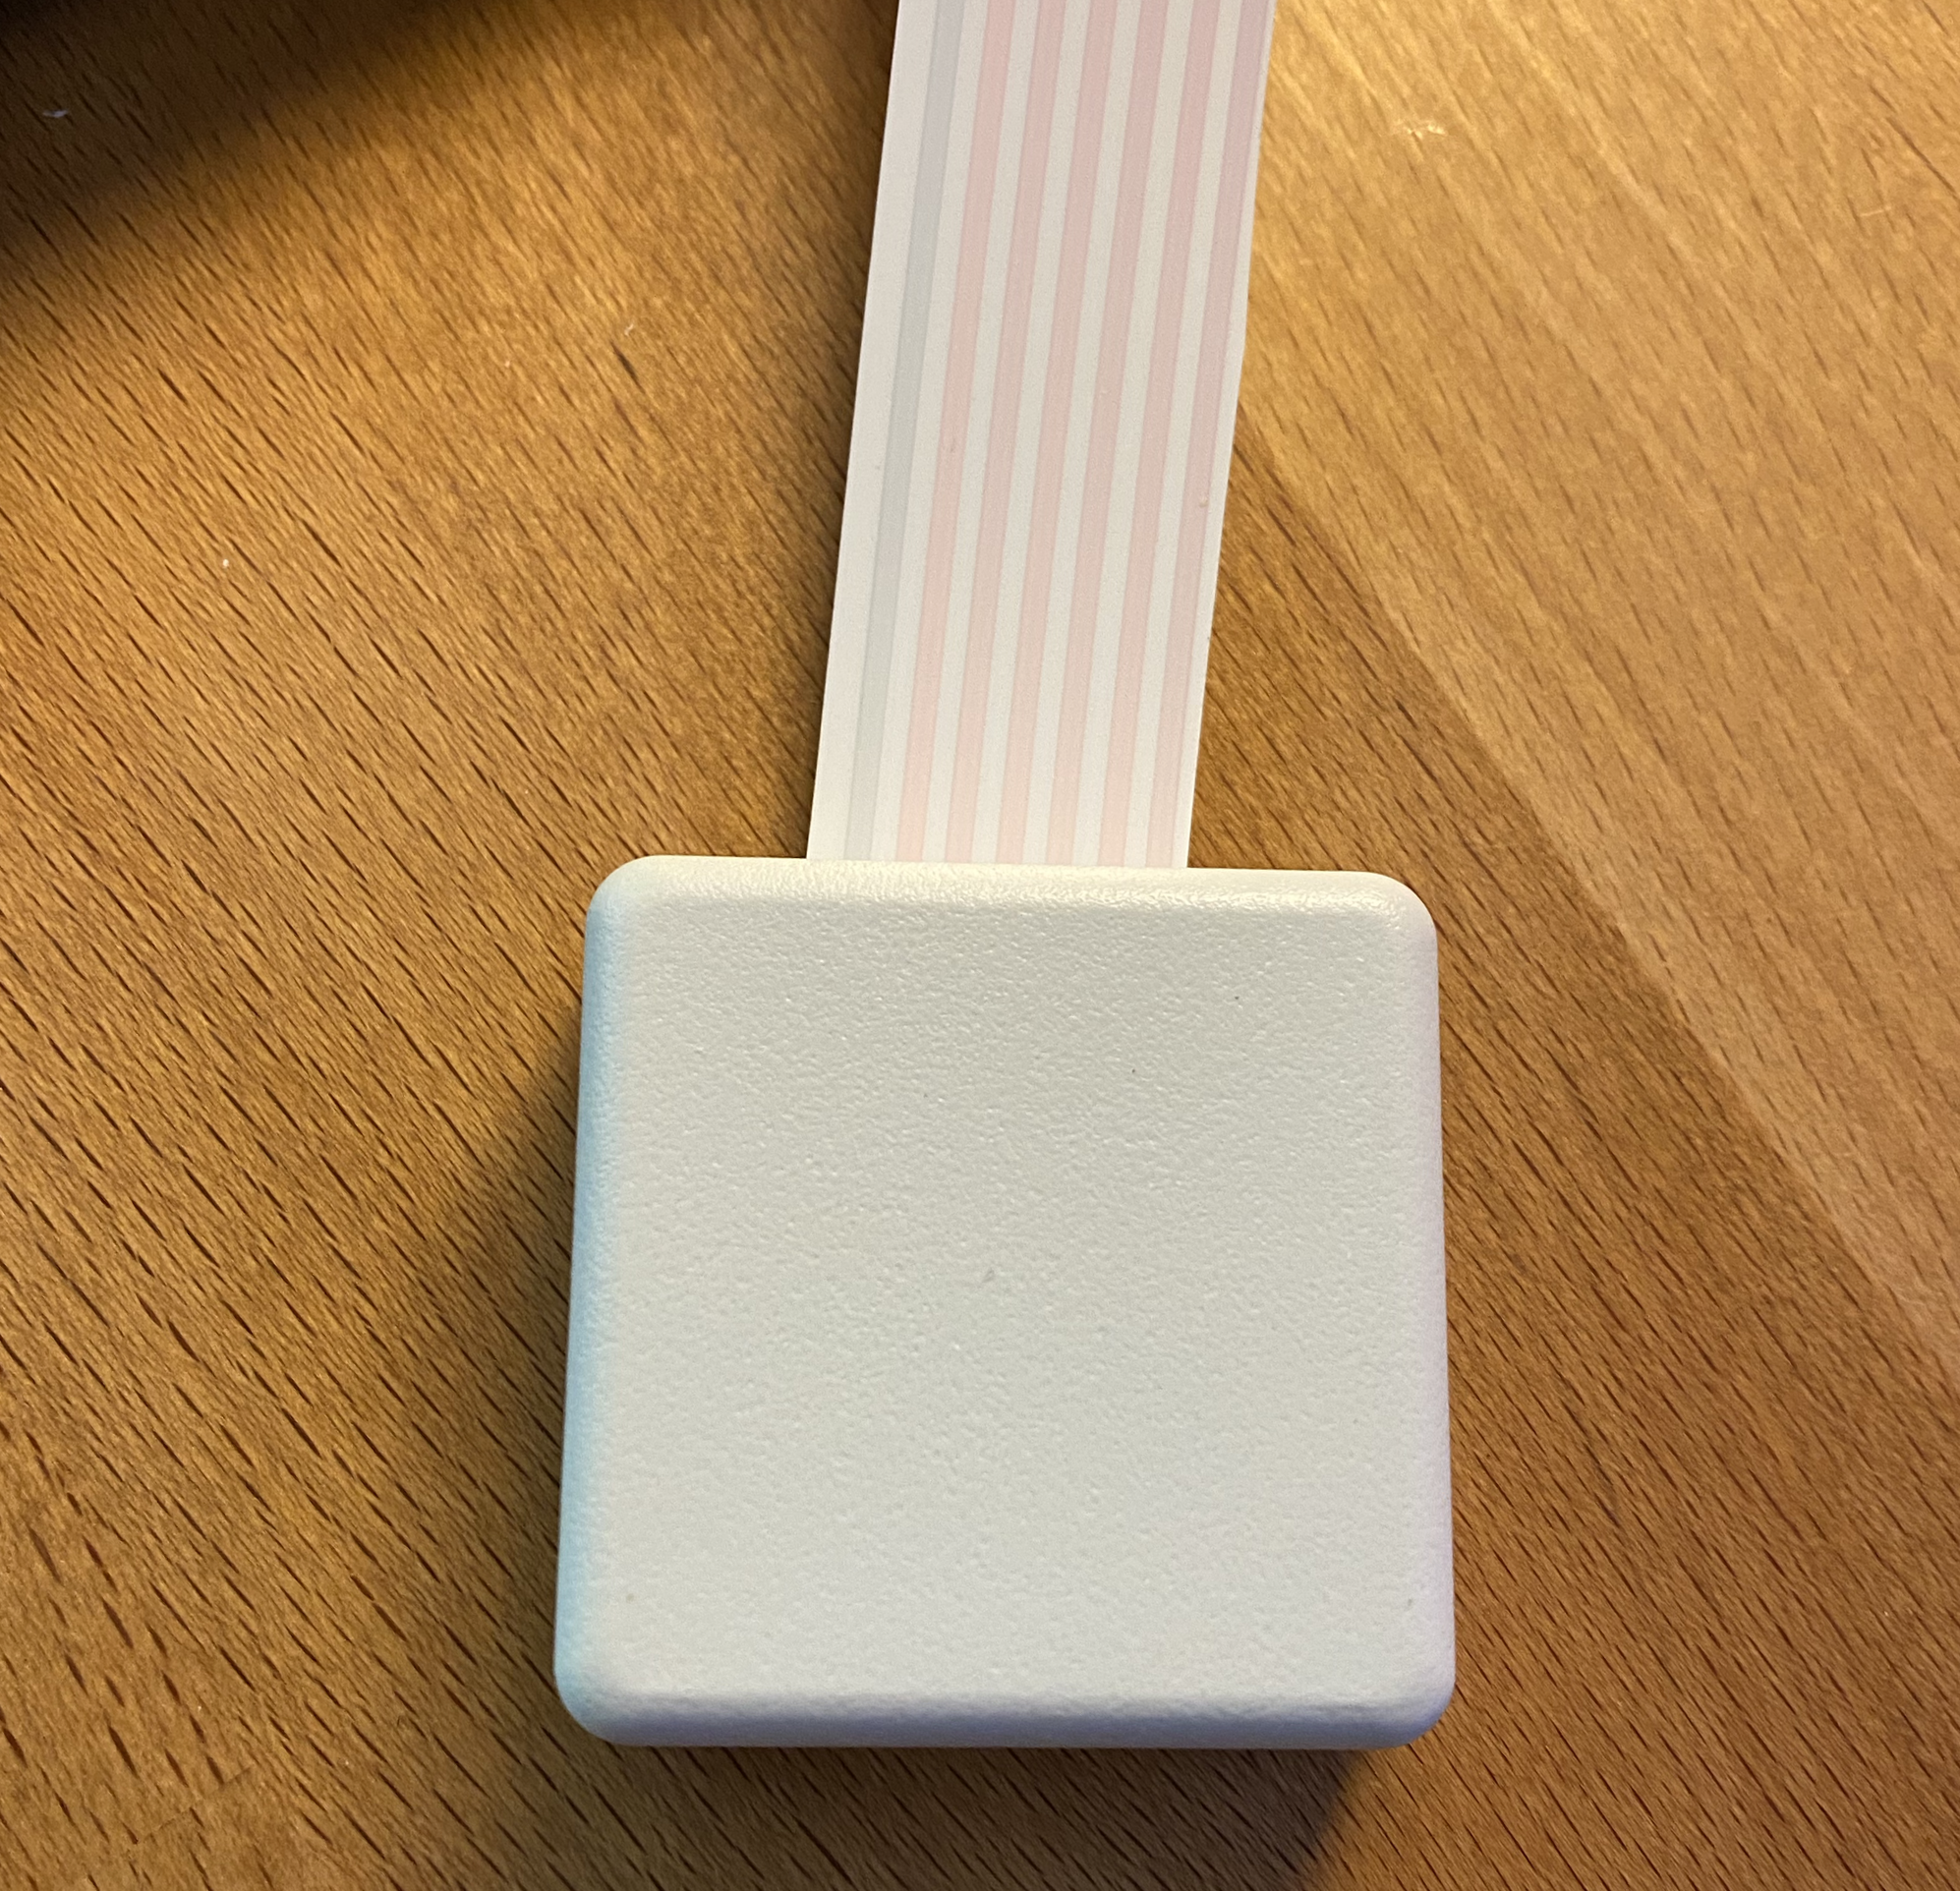
Hammond Miniature ABS Enclosure — Model: 1551QGY — used to enclose and mount the sensor inside the freezer.
Hammond微型ABS外壳 —型号:1551QGY —用于将传感器封装并安装在冰箱内。
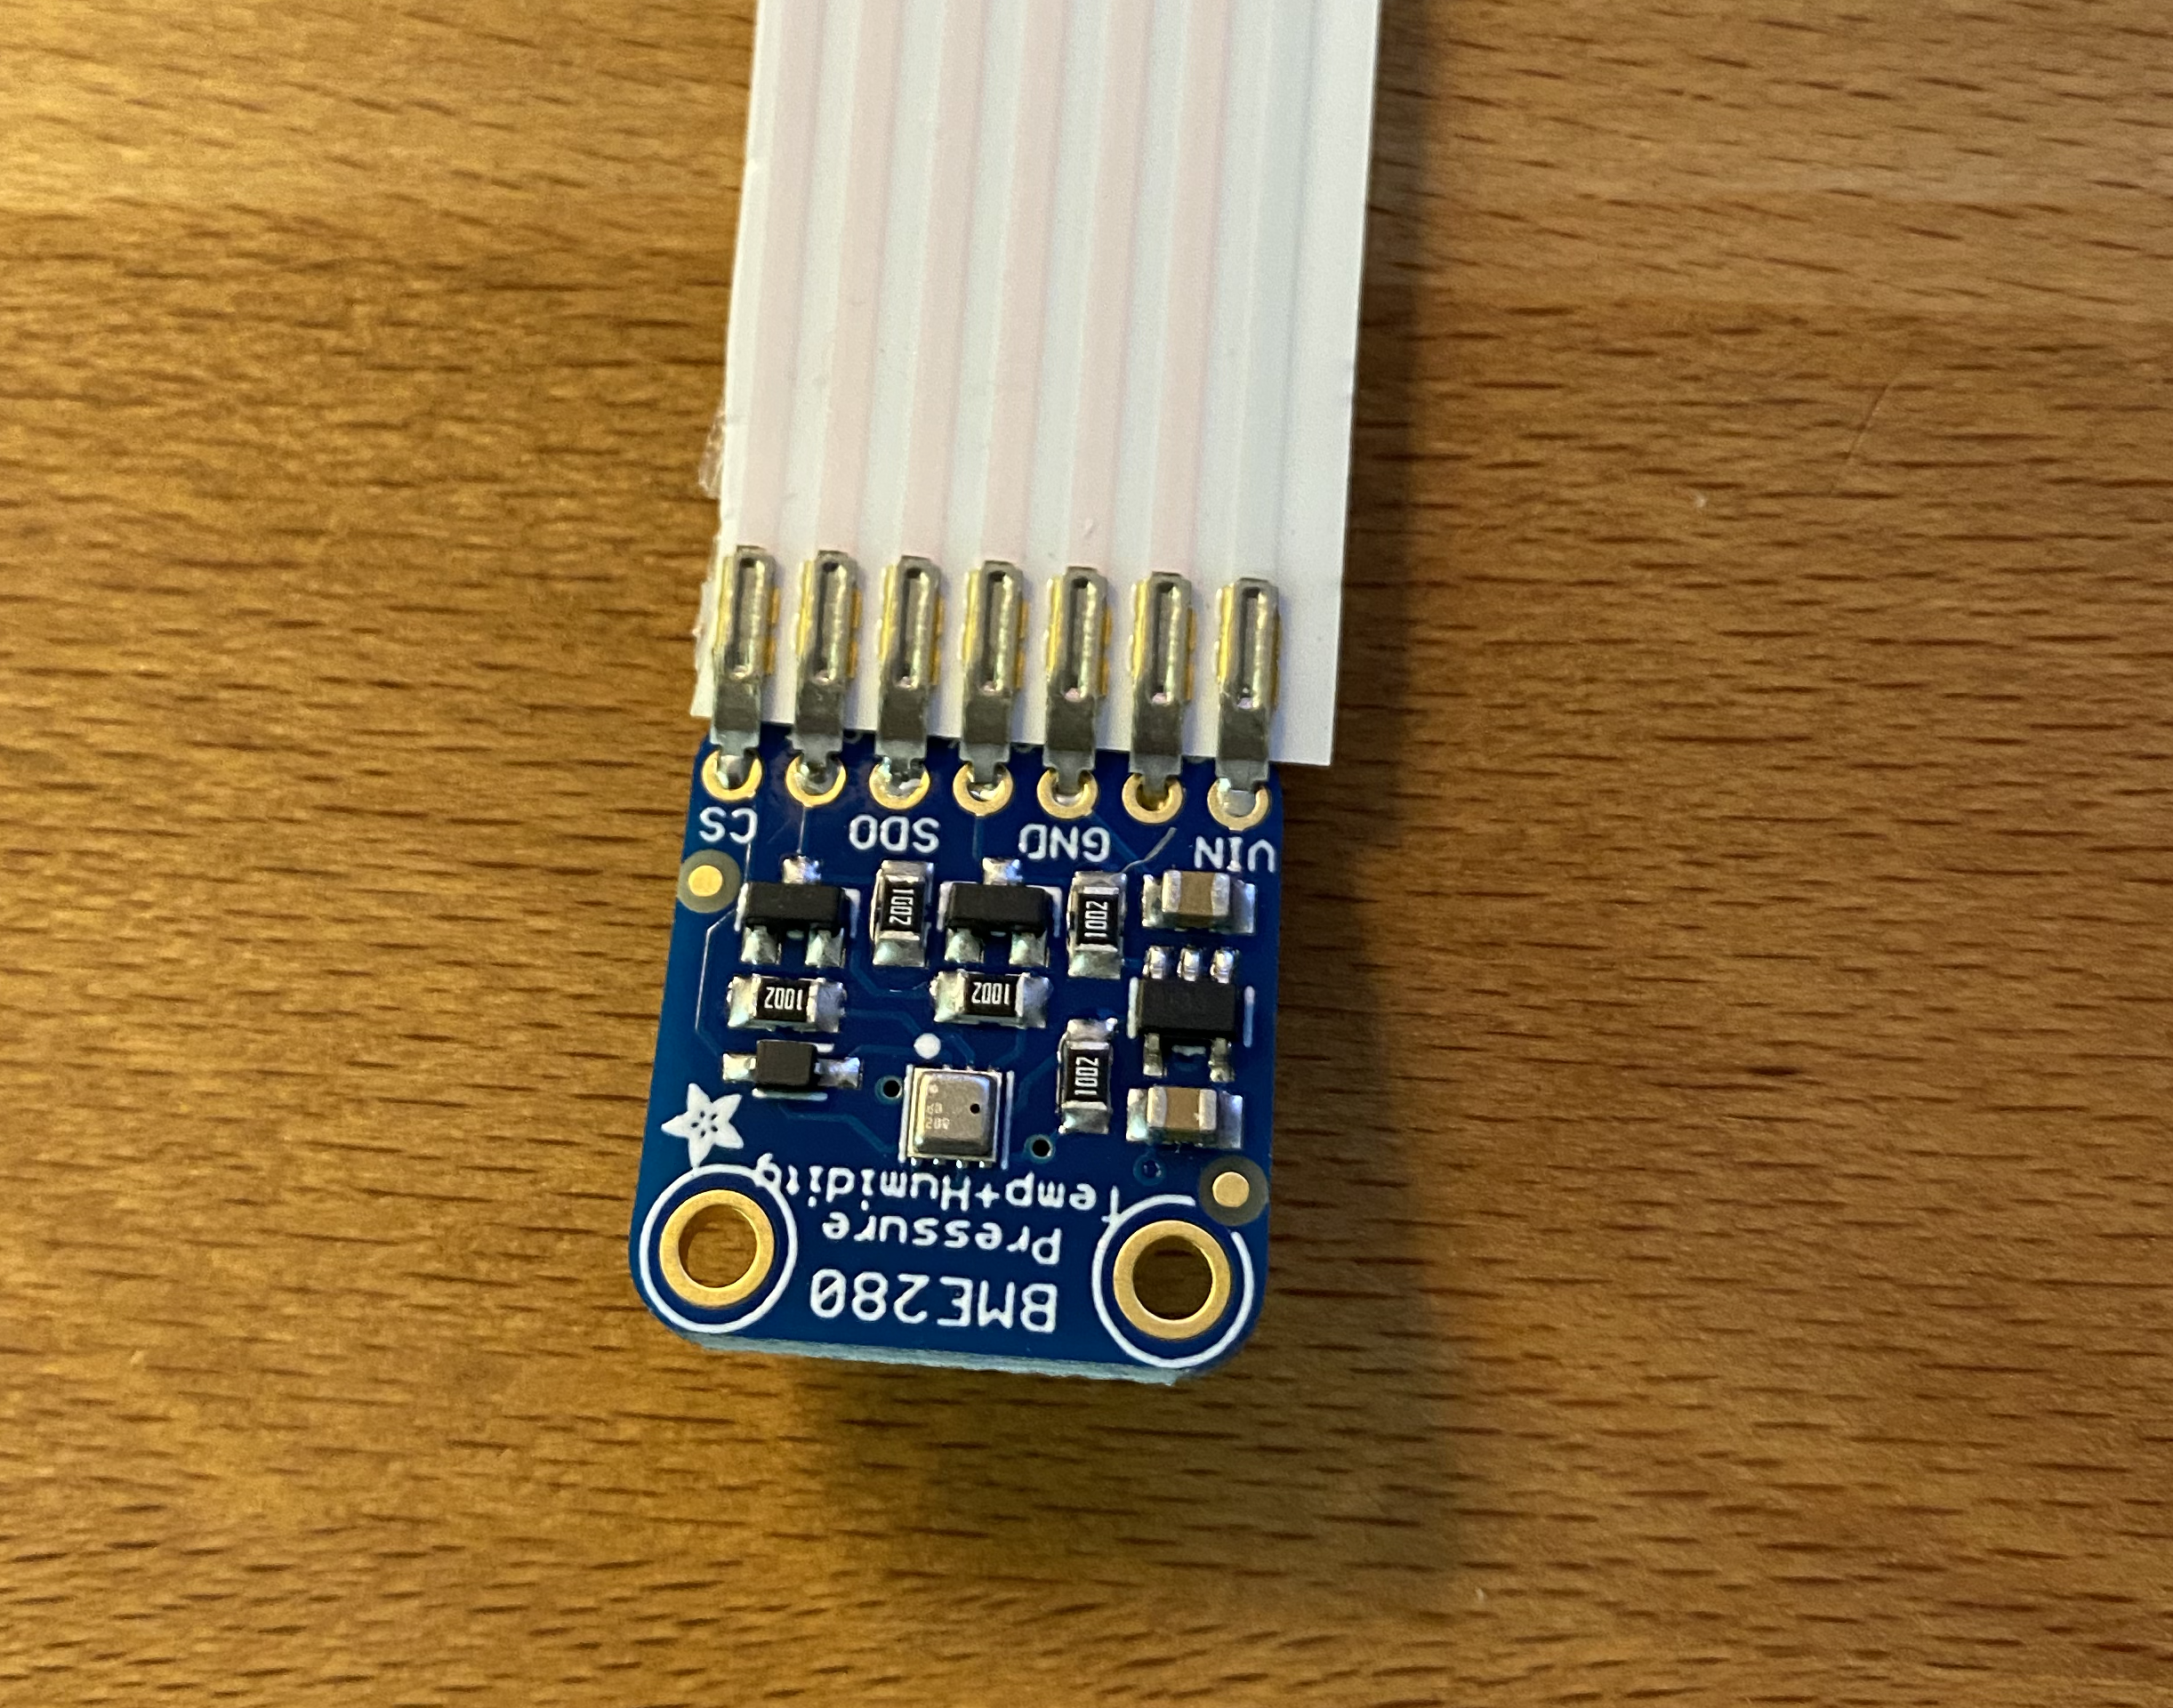
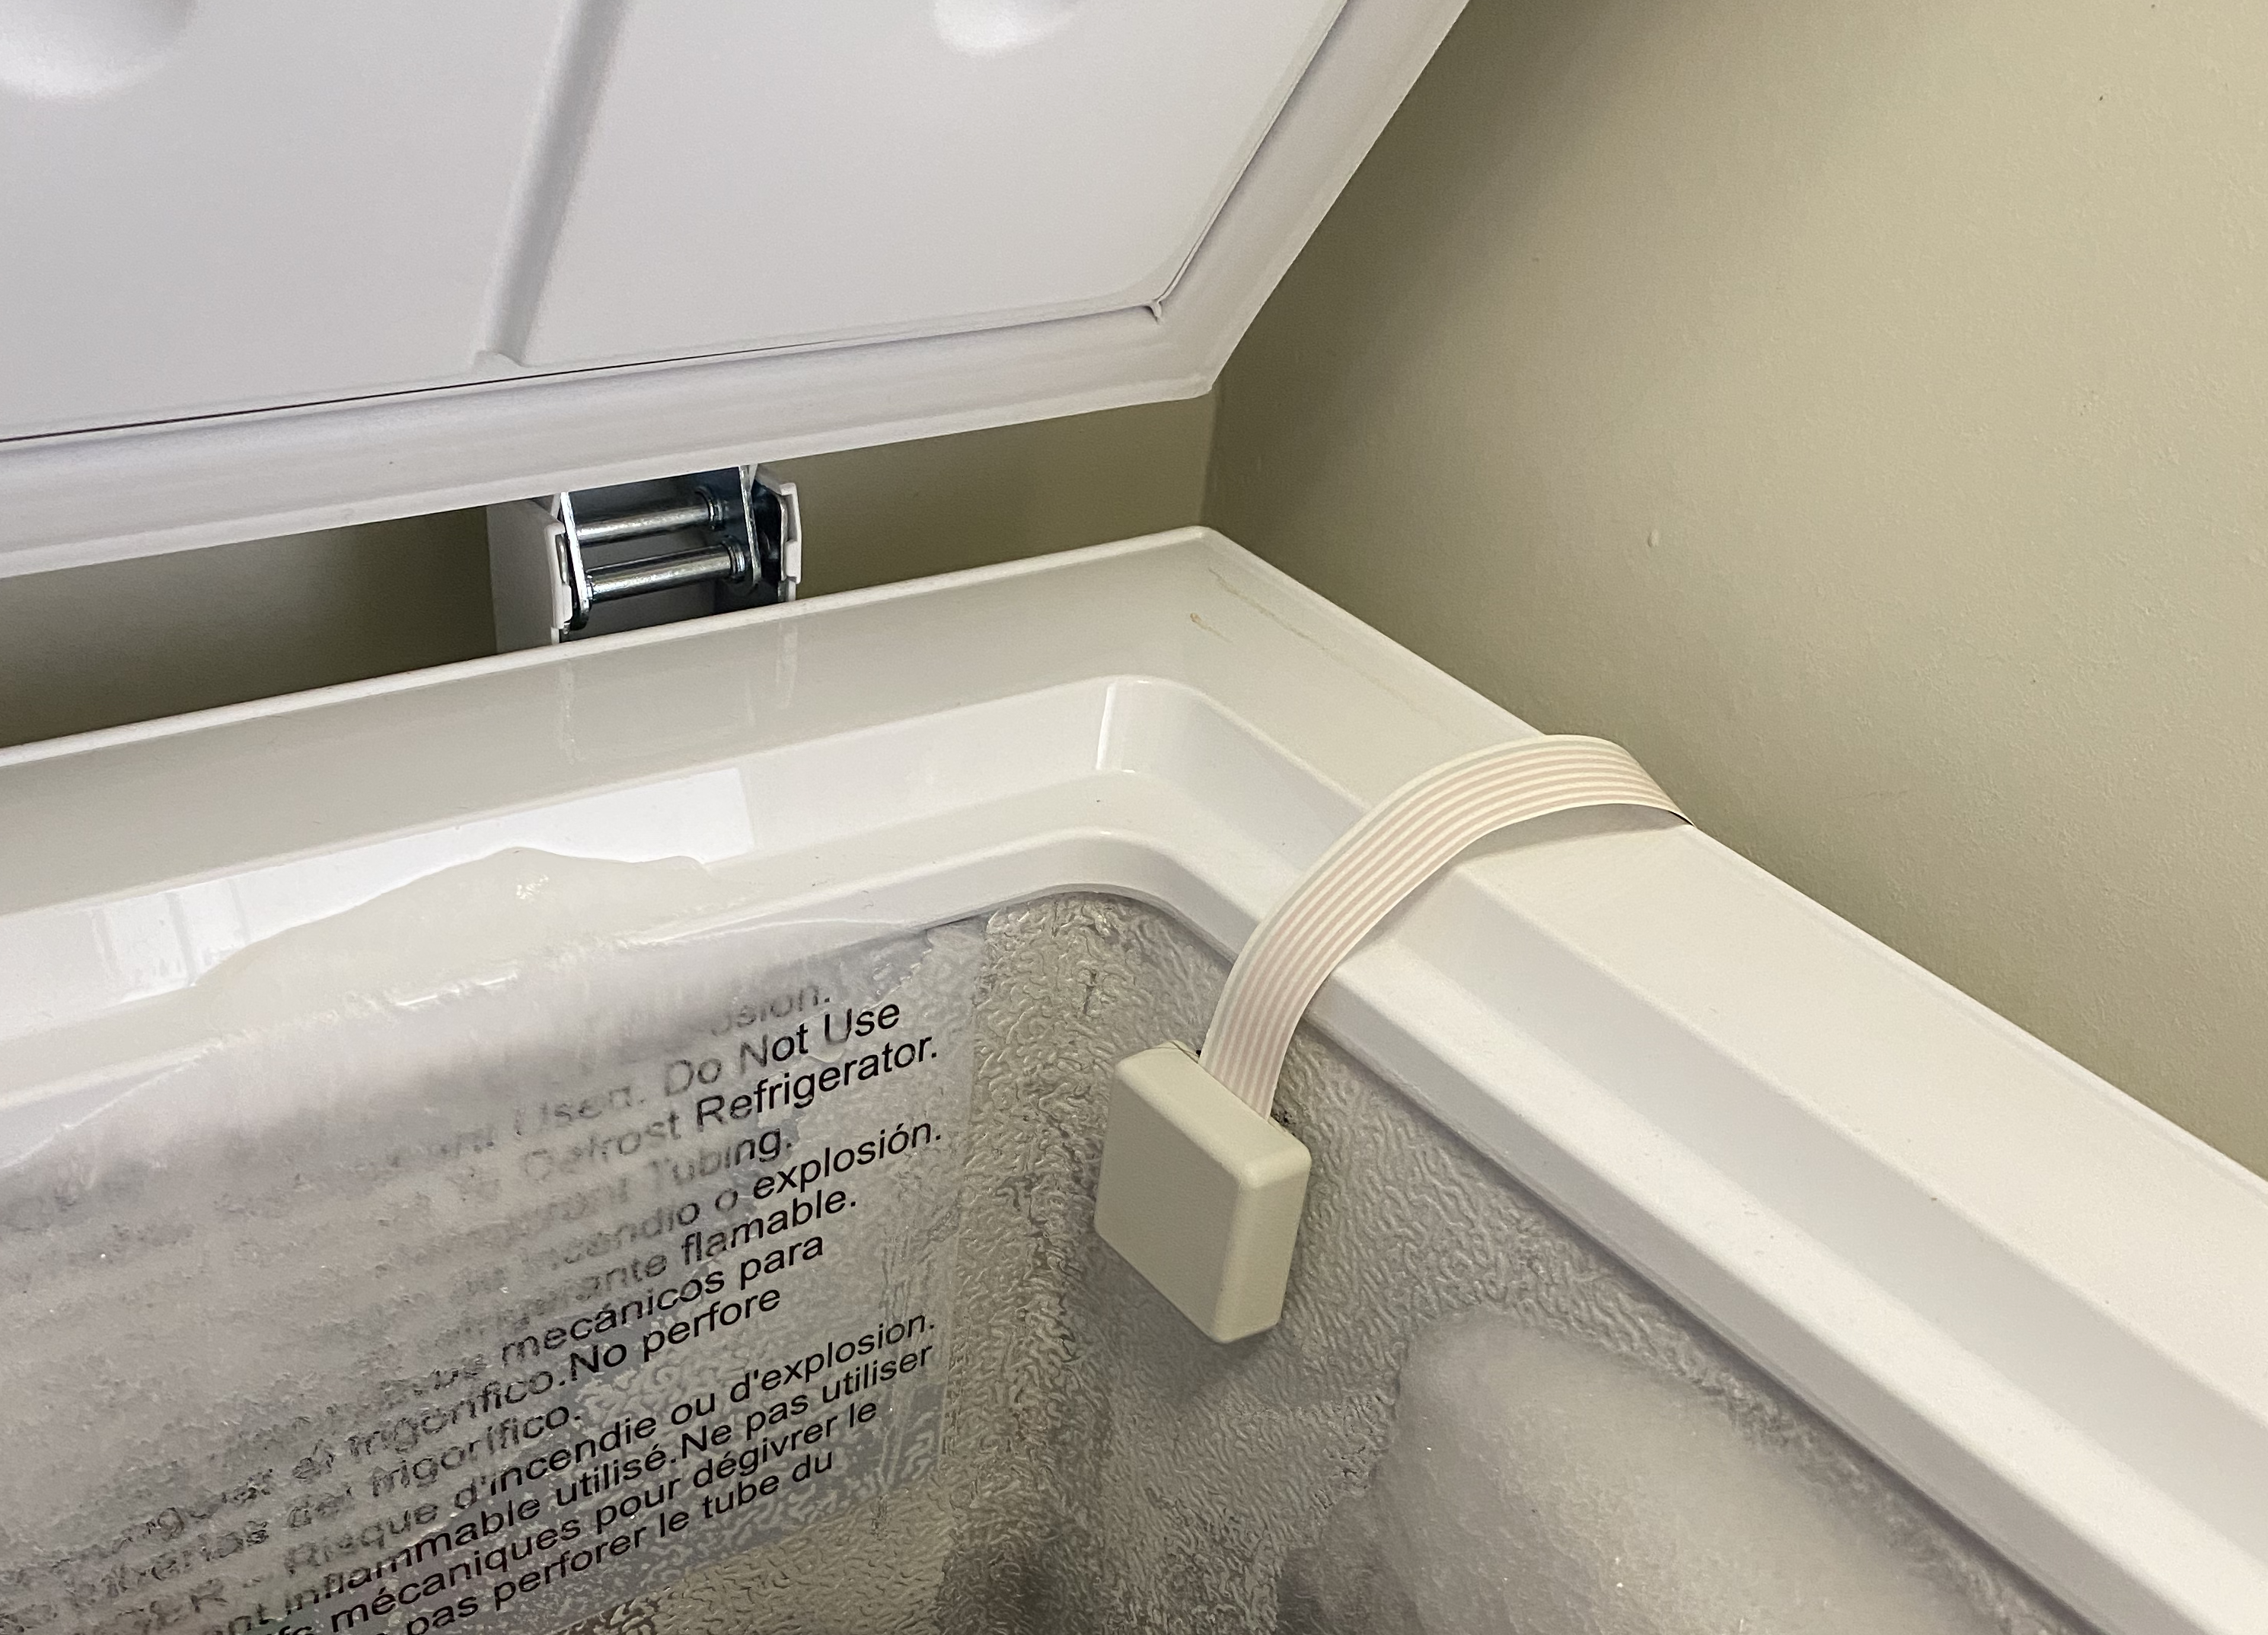
Flat Flex Cable — TE Connectivity Part: A9AAT-0808F — This is crucial, we need an extremely flat cable to bridge the seal of the freezer without causing an air leak. In addition, the linked cable already has solder tabs at the proper spacing for standard through-holes on the Pi and the BME280 protoboard.
扁平弯曲电缆 — TE Connectivity零件:A9AAT-0808F —这很关键,我们需要一根非常扁平的电缆来桥接冷冻机的密封件而又不会引起空气泄漏。 此外,链接的电缆已经在Pi和BME280原型板上的标准通Kong上以适当的间距留有焊片。
硬件设定 (Hardware Setup)
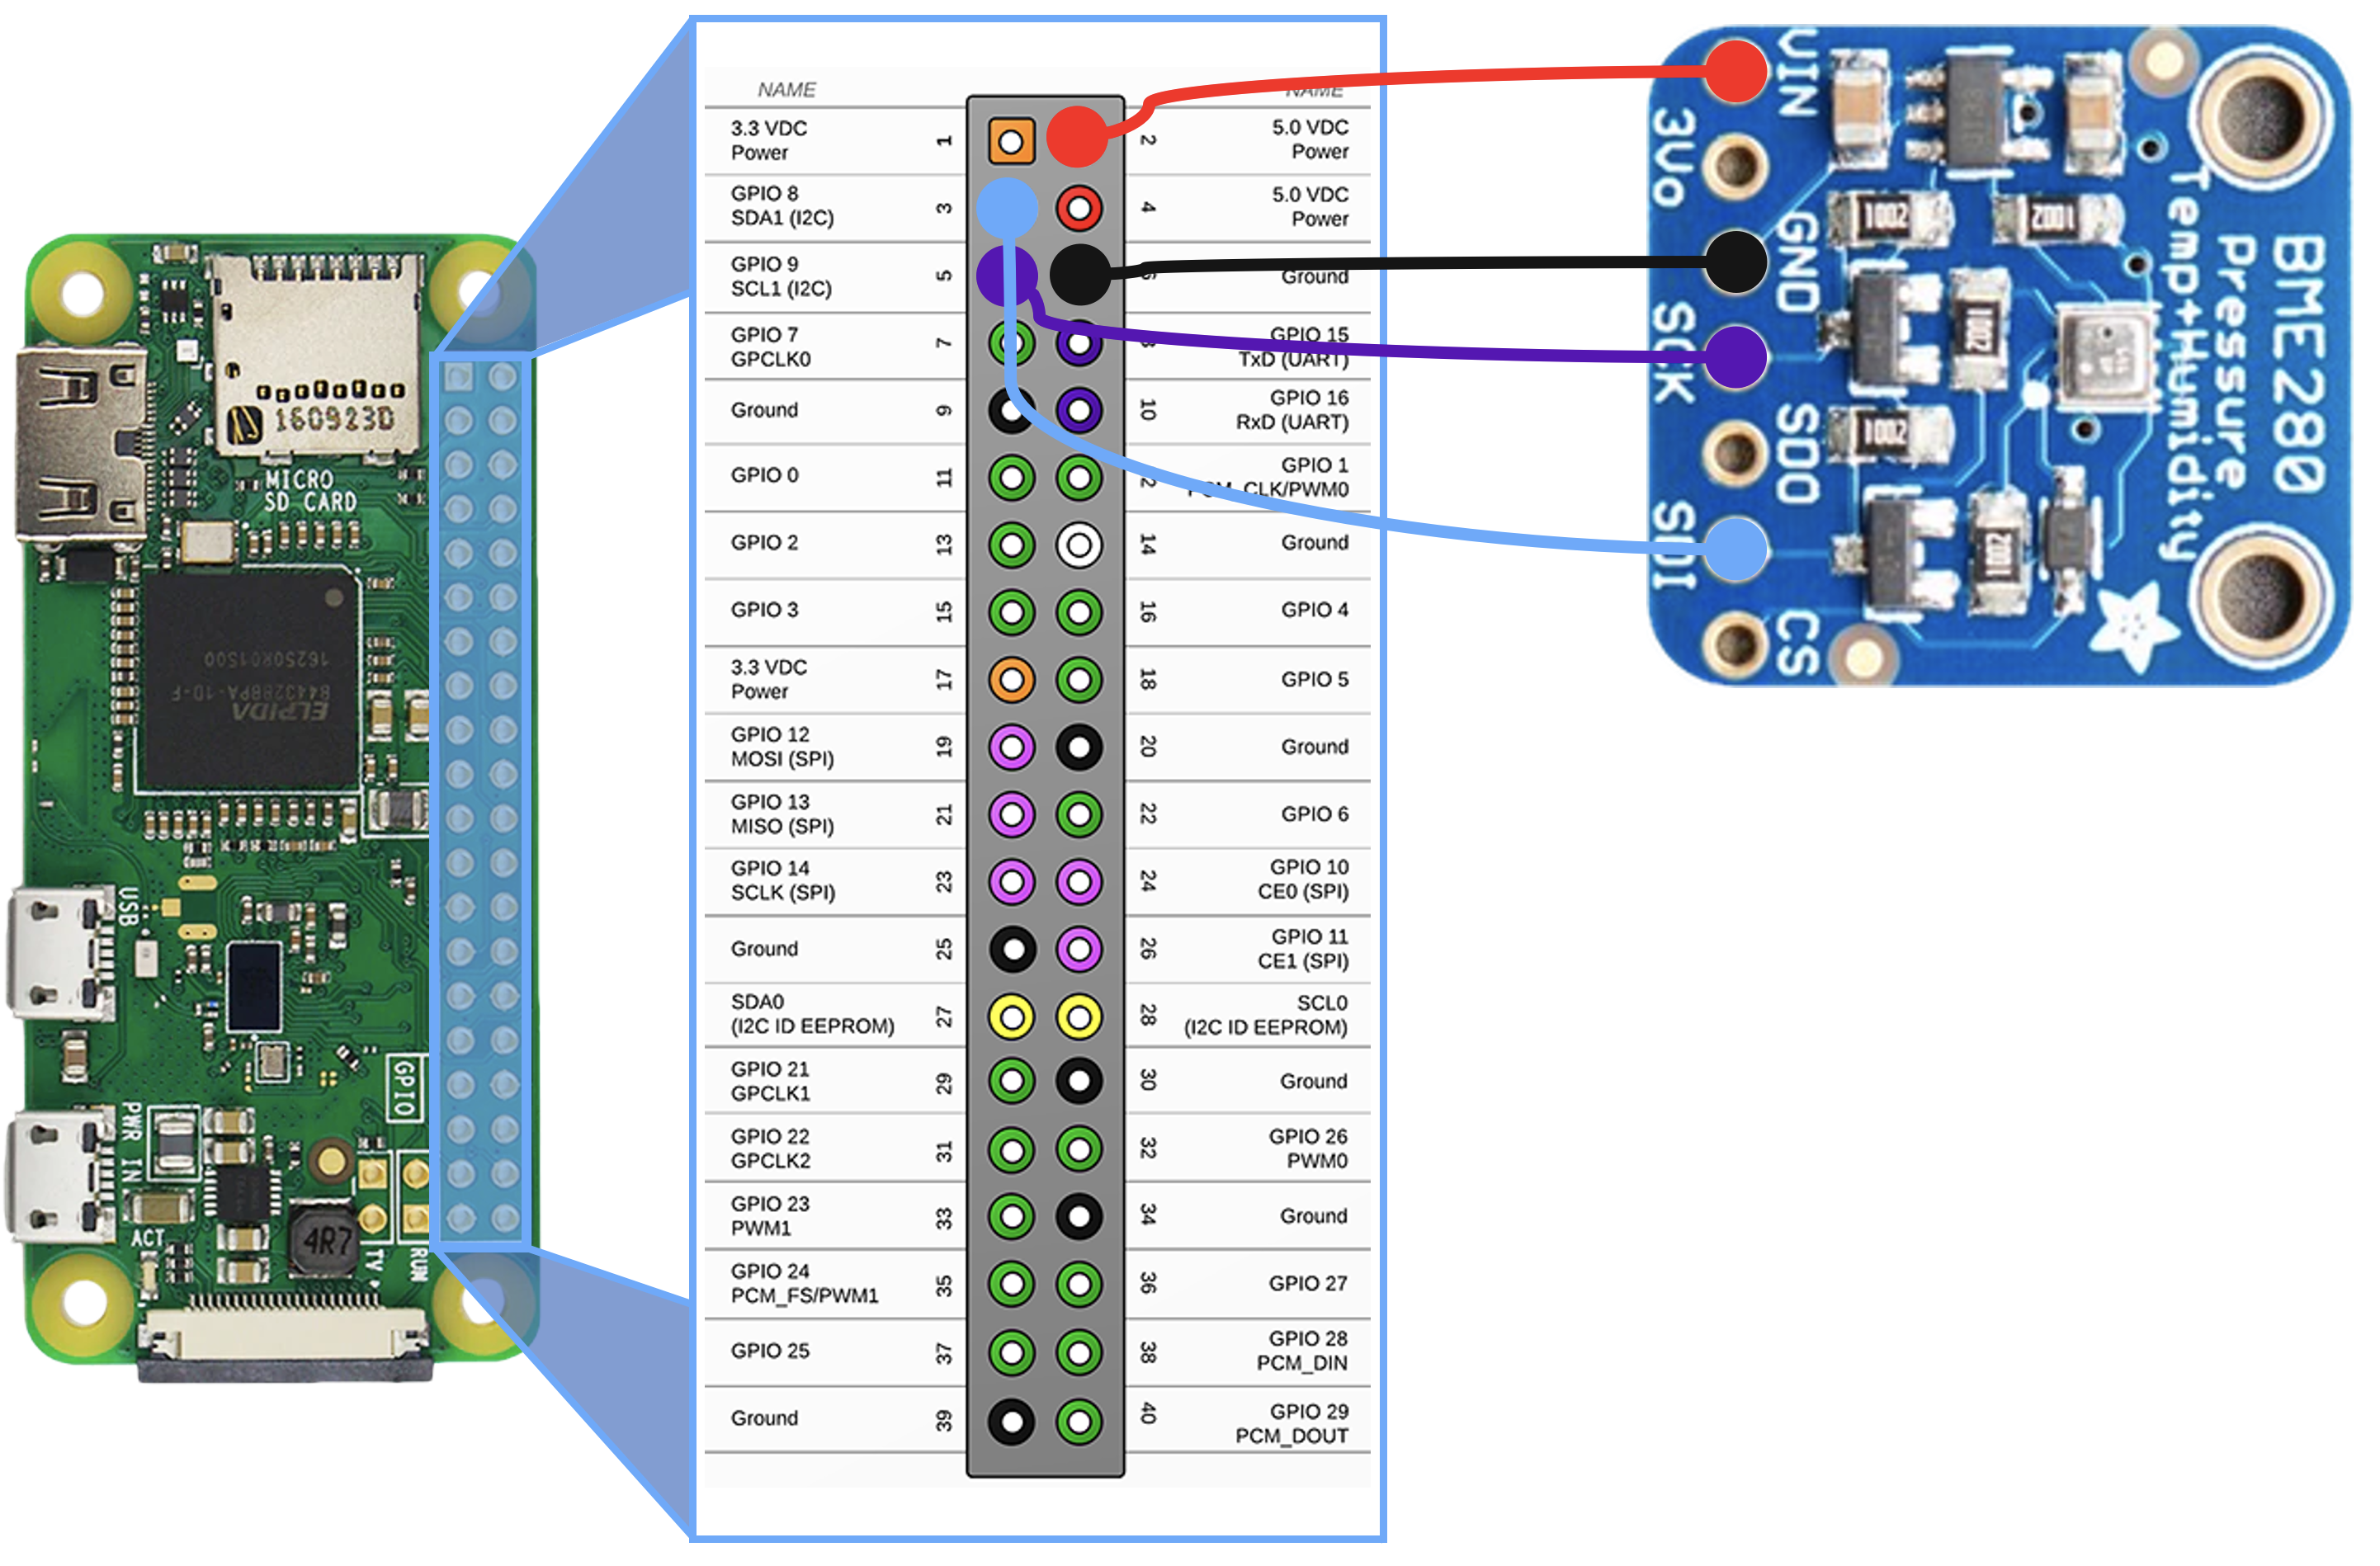
We are just going to wire the sensor directly to the Raspberry Pi — No extra components required.
我们只是将传感器直接连接到Raspberry Pi上-不需要额外的组件。
- Modify the cable — The protoboard for the BME280 has 7 solder points, but the cable has 8 connectors. I used a utility knife to carefully strip of one conductor. 修改电缆— BME280的原型板具有7个焊接点,但电缆具有8个连接器。 我用美工刀小心地剥了一根导体。
- Solder to the sensor board — this is where choosing the right flat flex cable comes in handy. The solder tabs already line up with the holes. 焊接到传感器板上-这在选择正确的扁平柔性电缆时很方便。 焊片已经与Kong对齐。
- Modify enclosure — I needed to Dremel away the lip of the mounting ridge for the cable to friction fit and exit the enclosure. 修改外壳—我需要Dremel去除安装脊的边缘,以使电缆摩擦配合并退出外壳。
- Mark your signals — before closing the clamshell enclosure, it is a good idea to mark the signals on other end of the cable with a sharpie. We’ll need to locate the two wires for I²C : Clock — SCL and Data — SDA. Also locate your power pins and ground. 标记您的信号-在关闭翻盖式外壳之前,最好用尖锐笔在电缆另一端标记信号。 我们需要找到I²C的两条线:时钟— SCL和数据— SDA。 同时找到电源引脚和接地。
- Cut Flat Flex into “flying leads” — Slice each of the flat flex conductors you need into individual wires so they are flexible enough to go through the proper connection points. 将Flat Flex切割成“飞线”-将所需的每条Flat Flex导体切成单根电线,这样它们的柔韧性足以穿过正确的连接点。
- Solder — I soldered the leads right to the board, but there are lots of way to interface between the Raspberry Pi I/O and your flat flex leads. 焊接—我将引线直接焊接到板上,但是在Raspberry Pi I / O和扁平柔性引线之间有很多接口方法。
- Install — The flat flex goes between the freezer seal and the edge of the freezer. Sensor on the inside — Pi on the out side. Use double sided Velcro or suction cups so that you can easily take the sensor in and out. 安装—扁平弯曲部分在冷冻机密封圈和冷冻机边缘之间。 内侧的传感器-外侧的Pi。 使用双面维可牢尼龙搭扣或吸盘,这样您就可以轻松地将传感器进出。


troubleshooting notes: (1) If you use the BME280 from Adafruit, you should solder in a jumper from CS to VIN to increase I²C reliability. (2) I connected VIN to the 5V pin on the Pi. This is not always the case because some BME280 breakout boards use the 3.3V.
故障排除注意事项: (1)如果使用Adafruit的BME280,则应从CS到VIN的跳线焊接,以提高I²C可靠性。 (2)我将VIN连接到Pi的5V引脚。 并非总是如此,因为某些BME280分支电路板使用3.3V。
软体:Raspberry Pi安装程式 (Software: Raspberry Pi Setup)
Our goal is to bring up the Raspberry Pi Zero W with a fresh operating system, and enable I2C.
我们的目标是使用新的操作系统启动Raspberry Pi Zero W,并启用I2C。
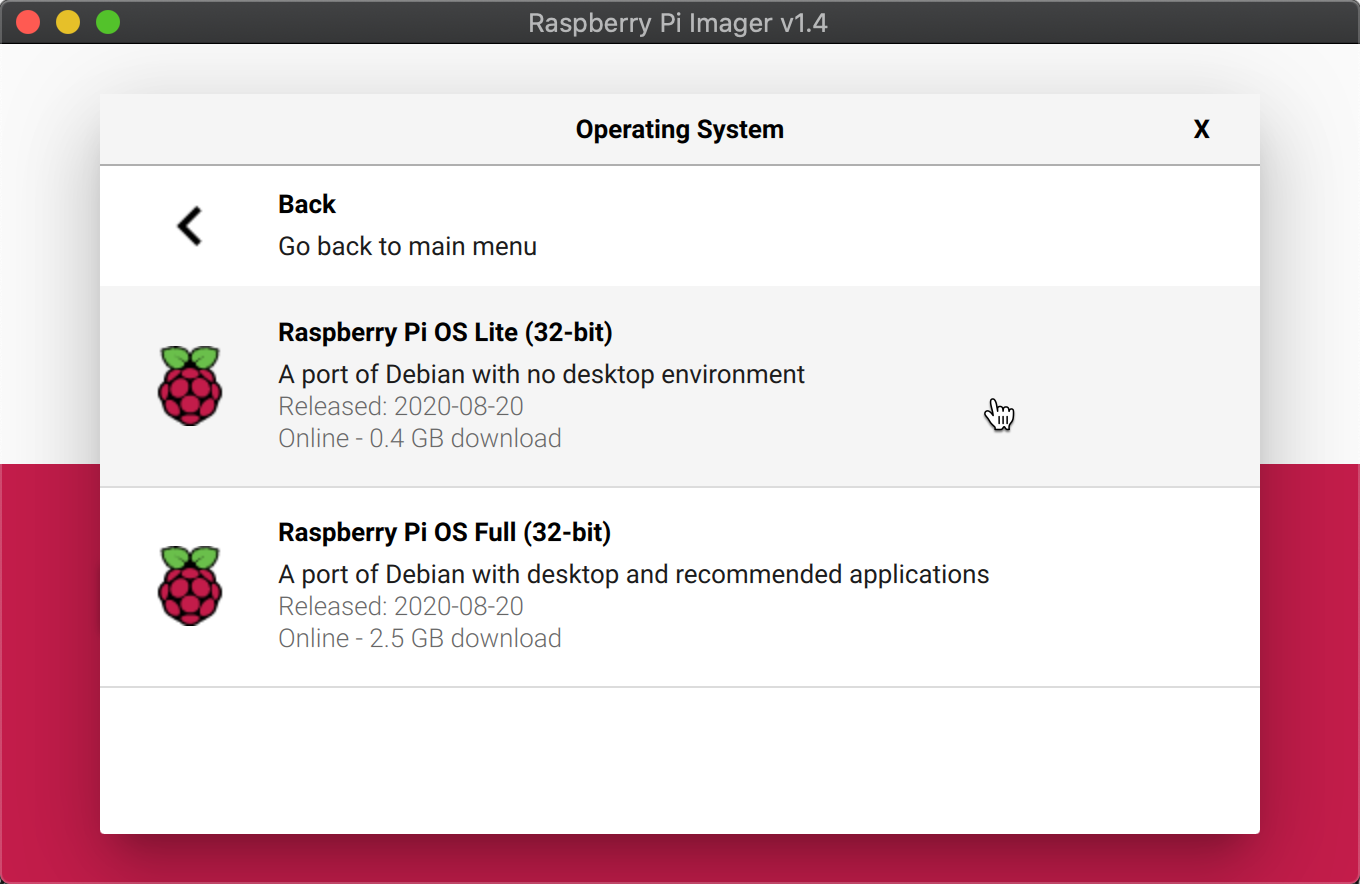
Get Raspbian Lite onto your MicroSD card using and SD card reader for your computer. Once you can access the SD card from a computer, use the imagers available from raspberry Pi to get a fresh image installed.
使用Raspbian Lite将Raspbian Lite安装到您的MicroSD卡上,并将SD卡读卡器用于计算机。 一旦可以从计算机访问SD卡,请使用raspberry Pi上可用的成像器来安装新的图像。
2. Enable SSH — After the imager finishes you should see a root directly on the SD card named boot . Simply create an empty file called ssh to enable ssh. Yeah that’s it for that.
2. 启用SSH-成像器完成后,您应该直接在名为boot的SD卡上看到根目录。 只需创建一个名为ssh的空文件即可启用ssh。 是的,仅此而已。
3. Setup Wifi — create a simple text file and call it wpa_supplicant.conf. Edit the file with your own wifi credentials like this:
3. 设置Wifi —创建一个简单的文本文件,并将其命名为wpa_supplicant.conf 。 使用您自己的wifi凭据编辑文件,如下所示:
country=us
update_config=1
ctrl_interface=/var/run/wpa_supplicantnetwork={
 scan_ssid=1
 ssid="MyNetworkSSID"
 psk="MyPa55w0rd"
}
4. Move your SD card from your PC to the socket on your raspberry pi and apply power. You need to wait about 30 seconds or so until your device connects to wifi.
4. 将SD卡从PC移到树莓派上的插槽中并通电。 您需要等待大约30秒钟左右,直到您的设备连接到wifi。
软体:取得SSH终端机 (Software: Get an SSH Terminal)
In order to log in to your device, you’ll need to SSH in. First though, you need to find your Raspberry Pi IP address on your local network. There are a couple of ways of doing that from your computer:
为了登录到设备,您需要SSH。但是,首先,您需要在本地网络上找到Raspberry Pi IP地址。 有两种方法可以通过计算机执行此操作:
A fresh raspberryPi image will have a hostname of
raspberrypi. Try searching for that in your router device list.新鲜的raspberryPi映像将具有
raspberrypi的主机名。 尝试在路由器设备列表中搜索。Open the terminal on your computer and try pinging it.
ping raspberrypi.local打开计算机上的终端,然后尝试ping通。
ping raspberrypi.localIf those don’t work take a deeper dive at the IP Address page on raspberrypi.org
如果这些方法无效,请在raspberrypi.org的“ IP地址”页面上进行更深入的研究。
Once you get your IP Address use SSH in the terminal to log in to your device. pi is a default username and the default password is raspberrypi
一旦获得IP地址,请在终端中使用SSH登录到设备。 pi是默认用户名,默认密码是raspberrypi
ssh pi@192.168.86.30软体:I²C设定 (Software: I²C Setup)
I²C is not on by default and the fresh install of Raspbian Lite does not have all the drivers.
默认情况下,I²C未启用,并且Raspbian Lite的全新安装没有所有驱动程序。
- Enable I²C in the OS by opening the configuration menu: 通过打开配置菜单在OS中启用I²C:
sudo raspi-config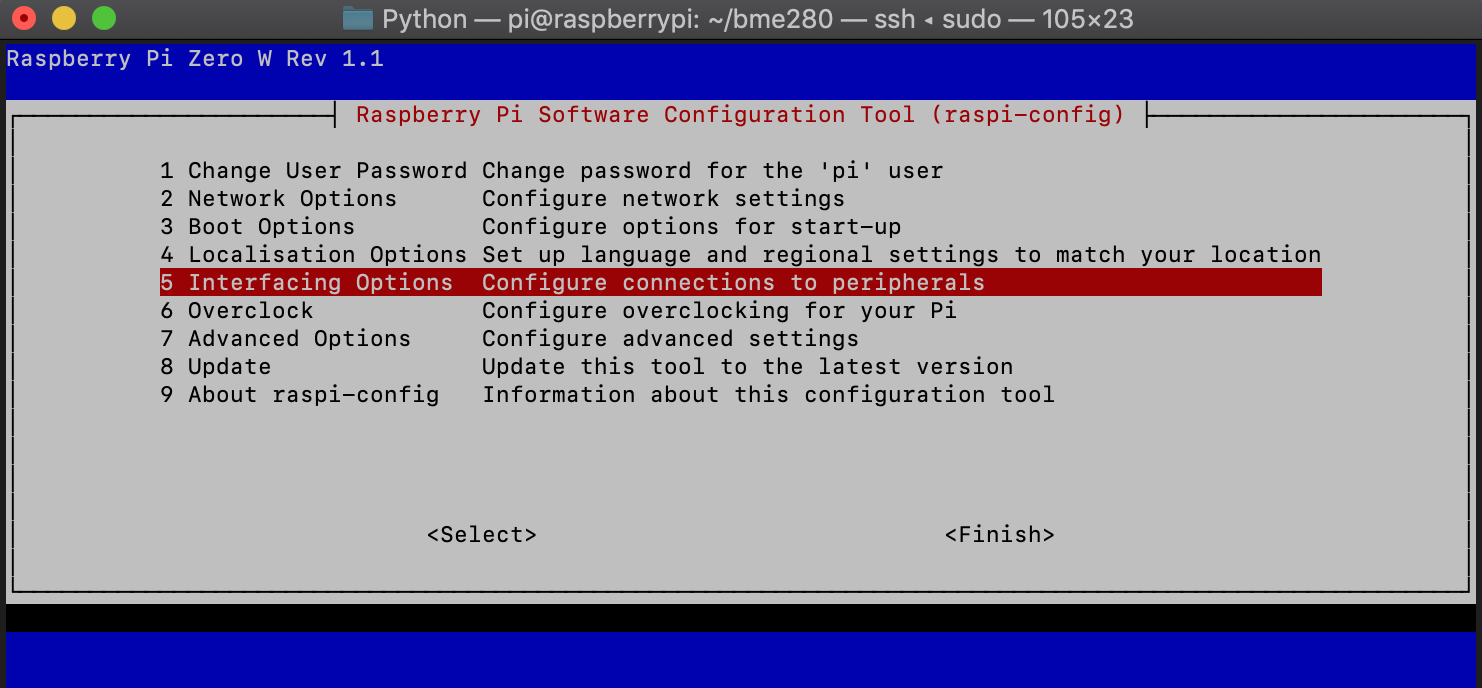
Select 5 Interfacing Options, P5 I2C, and select <YES> to enable i2c. Select <Finish> to save and exit.
选择5 Interfacing Options , P5 I2C ,然后选择<YES>以启用i2c。 选择<Finish>保存并退出。
2. Install smbus and i2c-tools
2.安装smbus和i2c-tools
sudo apt-get install -y python-smbus i2c-tools3. Verify installation using this command. If you see something like the output below, you are good.
3.使用此命令验证安装。 如果您看到类似以下输出的内容,那就很好。
lsmod | grep i2c_
4. This is the moment of truth! Test your connection to the I²C bus of the BME280 sensor. You should see an address at 0x76 or 0x77 like below. Take note of the address, we’ll need it later.
4.这是关键时刻! 测试您与BME280传感器的I²C总线的连接。 您应该看到如下0x76或0x77的地址。 记下该地址,稍后我们将需要它。
sudo i2cdetect -y 1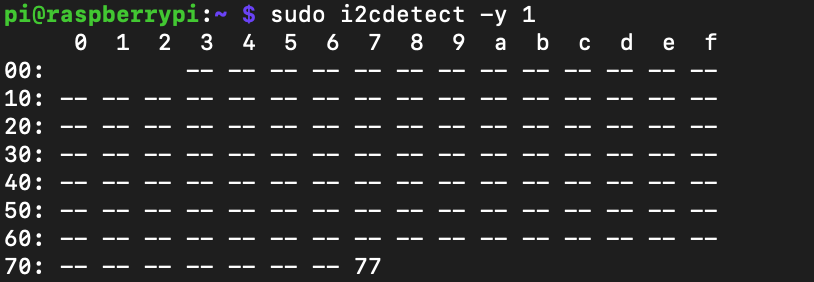
软体:安装Python程式库 (Software: Install Python Libraries)
First let’s get
pipto make everything easier.pipcomes pre-installed on Raspbian full but not Raspbian lite.首先,让我们开始
pip,使一切变得容易。pip预先安装在Raspbian full上,而不是Raspbian lite上。
sudo apt install python3-pip2. Install the BME280 pre-made raspberry pi driver, which gives us quick access to the sensor readings in our code.
2.安装BME280预制树莓派驱动程序,这使我们可以快速访问代码中的传感器读数。
sudo pip3 install RPi.bme2803. Install the Initial State streamer library which creates a simple data stream connection to Initial State for monitoring, alarming, and the dashboard.
3.安装Initial State streamer库,该库创建到Initial State的简单数据流连接,以进行监视,警报和仪表板。
sudo pip3 install ISStreamer软体:Python Code (Software: Python Code)
Now we are finally ready to drop some code. To start a new program on the Pi, use nano and copy/paste the code below:
现在,我们终于可以删除一些代码了。 要在Pi上启动新程序,请使用nano并复制/粘贴以下代码:
nano freezer_monitor.py
nano freezer_monitor.py
The
User Settingsarea is for you to fill in your desired names and sampling. It is a good idea to use 10 minutes as a preset minimum for this use-case.“
User Settings区域供您填写所需的名称和样本。 在此用例中,最好至少使用10分钟作为预设时间。You will need an access Key from Initial State. Register for a free trial, with no credit card required. The account access key has to be specified on line 10. Copy/paste this key from your Initial State account settings. (more info).
您将需要来自初始状态的访问密钥。 注册免费试用版 ,无需信用卡。 必须在第10行上指定帐户访问密钥。从“初始状态”帐户设置中复制/粘贴此密钥。 ( 更多信息 )。
- You’ll also need to fill in the I²C Address we found after setting up and testing the bus. Edit line 16. Mine was 0x77, yours may be something else. I’ve seen 0x76 on other BME280 sensor setups. 在设置和测试总线之后,您还需要填写我们发现的I²C地址。 编辑第16行。我的是0x77,您的可能是其他。 我在其他BME280传感器设置上看到了0x76。
WHILE TESTING: Uncomment lines 36–37 and Comment line 40. I added some code in the bottom to test your implementation more efficiently. It reduces the sleep time so you see faster sensor reads and prints them to console.
测试时:取消注释行36–37和注释行40。我在底部添加了一些代码以更有效地测试实现。 它减少了睡眠时间,因此您可以更快地读取传感器并将其打印到控制台。

FINAL PRODUCT: Comment lines 36–37 and uncomment line 40.
最终产品:注释行36–37和注释不行40。
python3 freezer_monitor.py建立网路资讯主页 (Build a Web Dashboard)
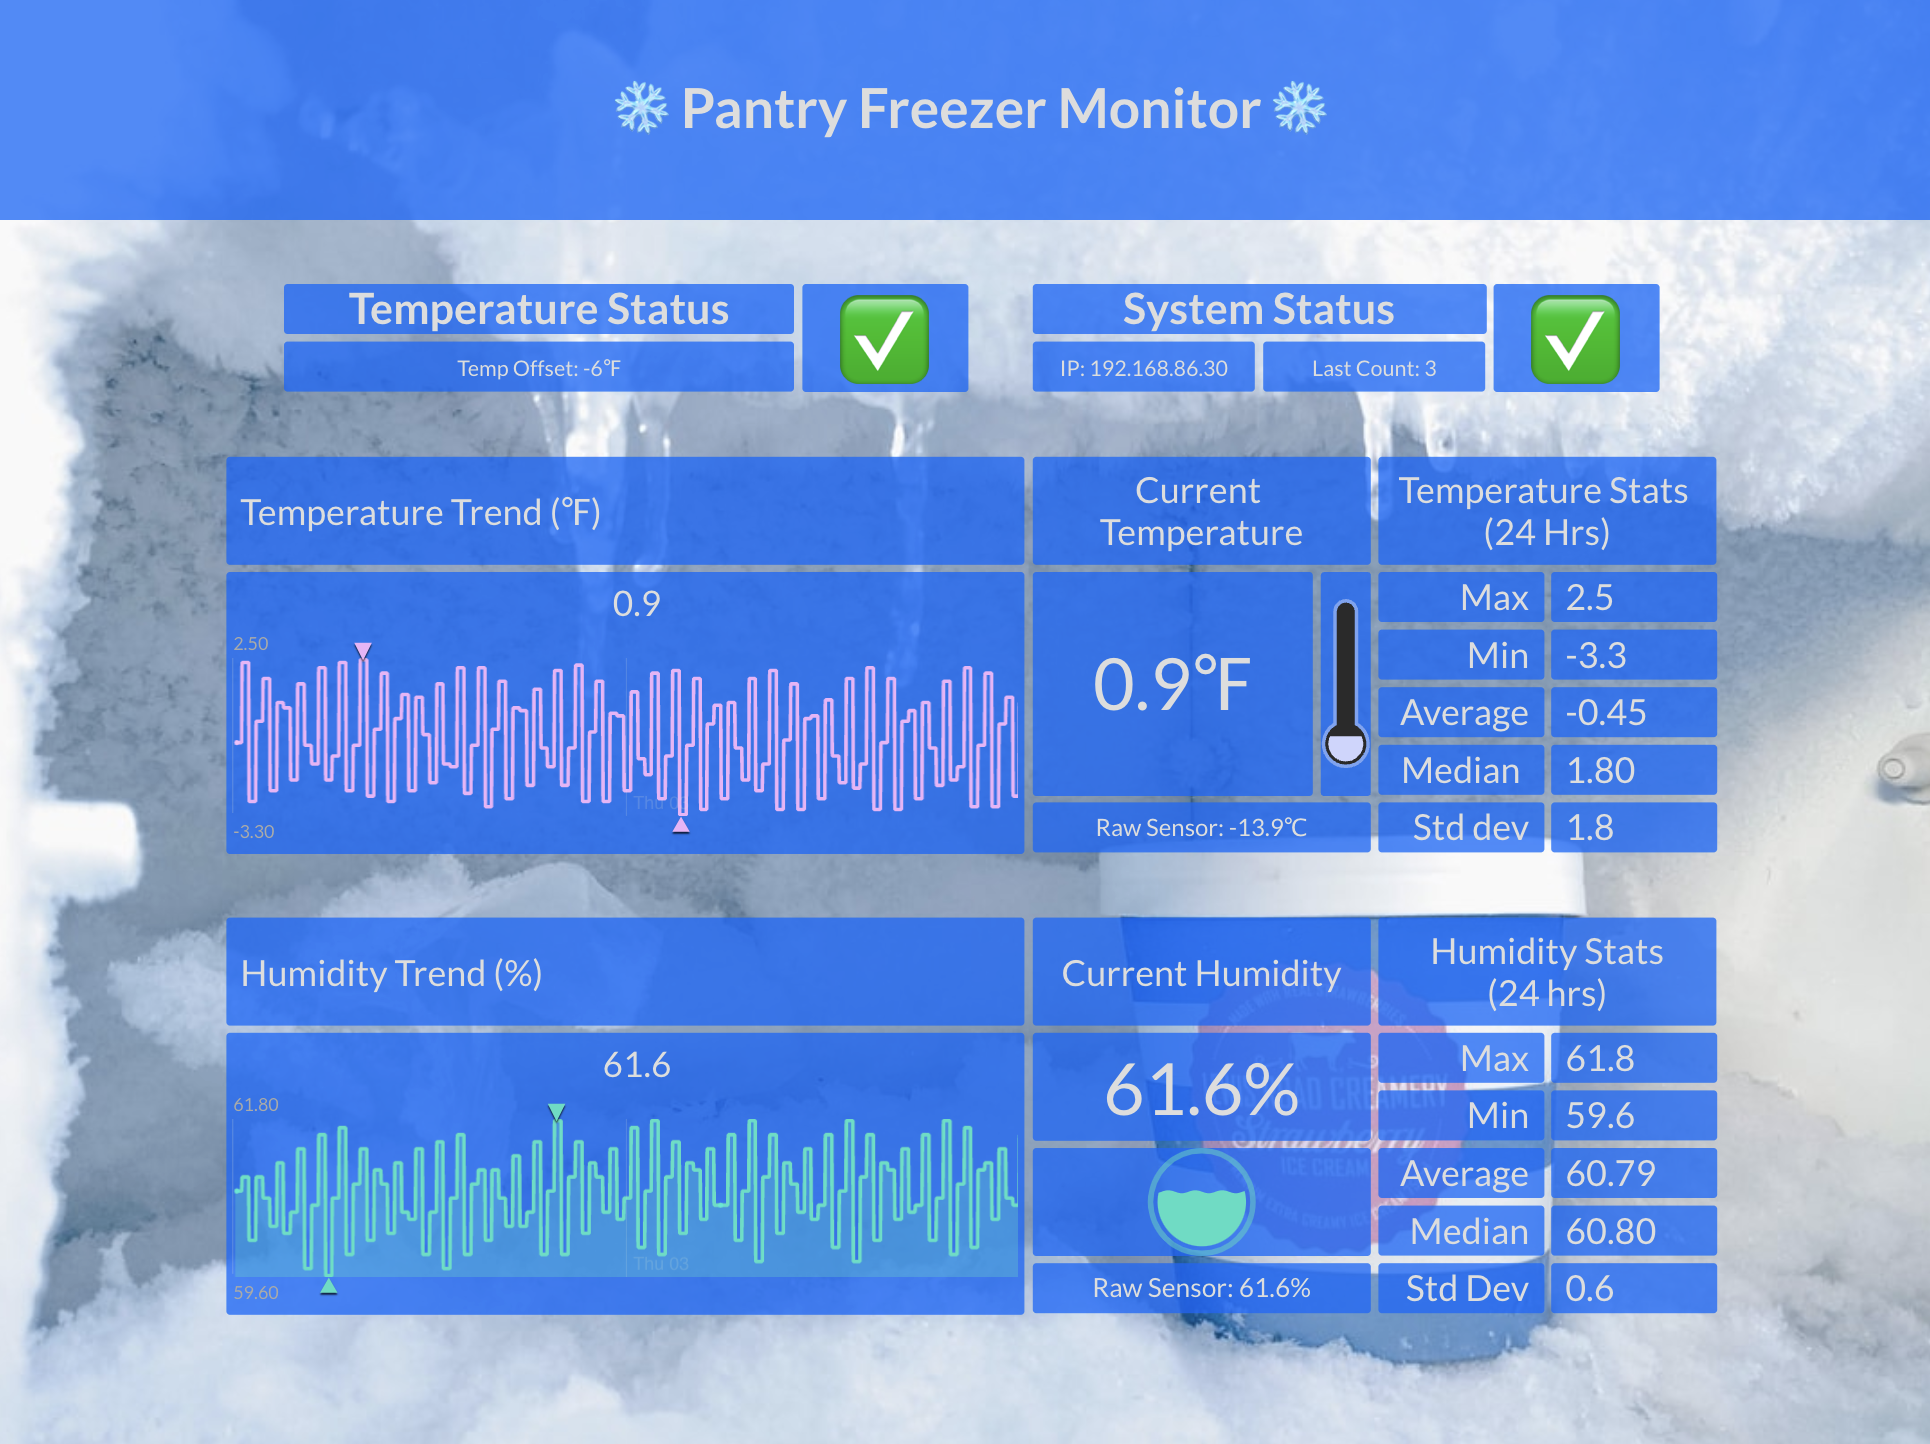
Go to your Initial State account (https://iot.app.initialstate.com), click on the “❄ Pantry Freezer” bucket name on your bucket shelf, and view the data coming into your dashboard. It’s live now, so go nuts… customize your dashboard by adding and sizing line graphs, gauges, statistics, images etc. (more info). Use expressions to round decimals and convert to degrees Fahrenheit if you like. Make it easy to read
转到您的初始状态帐户( https://iot.app.initialstate.com ),在存储桶架上单击“❄Pantry Freezer”存储桶名称,然后查看进入仪表板的数据。 现在就可以开始使用了,发疯了……通过添加折线图,量表,统计数据,图像等并调整其大小来自定义仪表板( 更多信息 )。 如果需要,可使用表达式将小数点四舍五入并转换为华氏度 。 易于阅读
Wanna see a public dashboard of my actual fridge? https://go.init.st/clht3qr
想查看我的实际冰箱的公共仪表板吗? https://go.init.st/clht3qr
黄铜大头钉:温度出现问题时提醒我 (Brass Tacks: Alert me when temperature goes wrong)
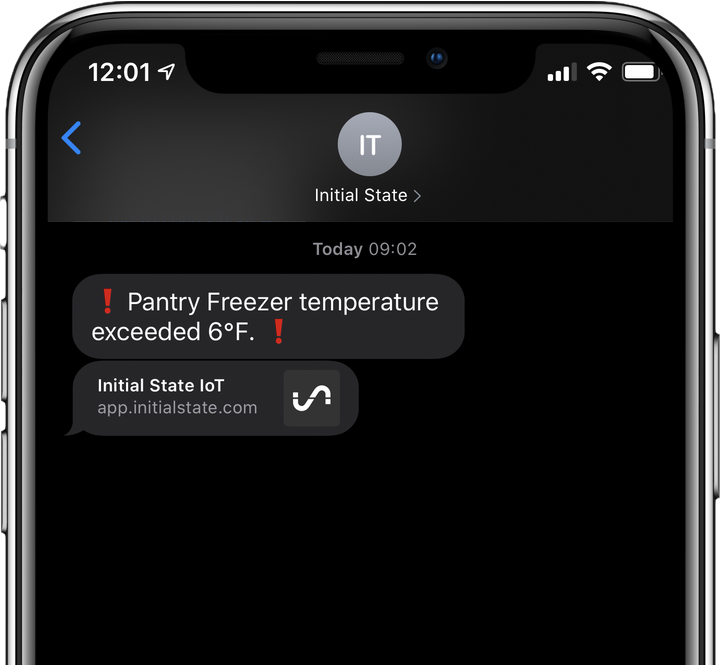
Monitoring on a dashboard is one thing, but the real value comes when we turn this into a smart thermometer alarm. We need to set an alert when the temperature drifts too high. SMS/Text and email coupled with a smart phone essentially deliver audible and visual alarms. This is done via triggers in Initial State. With a hosted IoT platform, the system can watch temperatures 24/7 and send you an email and a text when things go wrong.
在仪表板上进行监视是一回事,但真正的价值在于将其转变为智能温度计警报时 。 当温度漂移过高时,我们需要设置警报。 短信/文本和电子邮件与智能手机相结合,基本上可以发出声音和视觉警报。 这是通过处于初始状态的触发器来完成的。 借助托管的物联网平台,该系统可以监视24/7的温度,并在出现问题时向您发送电子邮件和文本。

使其可靠:在启动和/或重新启动时运行 (Make it Reliable: Run on Startup and/or Reboot)
To make our setup more robust, we need to kick off our Python script every time our Pi boots. This way the temperature monitor will restart without any intervention when we have a power outage.
为了使我们的设置更加健壮,我们需要在每次Pi启动时启动Python脚本。 这样,当我们停电时,温度监控器将在没有任何干预的情况下重新启动。
Adding a process that runs on boot is really easy. At the Pi terminal:
添加在启动时运行的进程非常容易。 在Pi终端:
crontab -eIt might ask which text editor you want to use (e.g. nano). Add one line to the bottom of the crontab file save and exit:
它可能会询问您要使用哪个文本编辑器(例如nano)。 在crontab文件的底部添加一行,然后保存并退出:
@reboot nohup python3 /home/pi/freezer_monitor/freezer_monitor.py &You will need to specify the exact path of your script. In the example above, I created a directory called freezer_monitor and the script is called freezer_monitor.py.
您将需要指定脚本的确切路径。 在上面的示例中,我创建了一个名为freezer_monitor的目录,该脚本名为freezer_monitor.py。
Now your code will run headless any time your Pi reboots.
现在,您的Pi重新启动后,您的代码将无头运行。
使其可靠:看门狗 (Make it Reliable: The Watchdog)
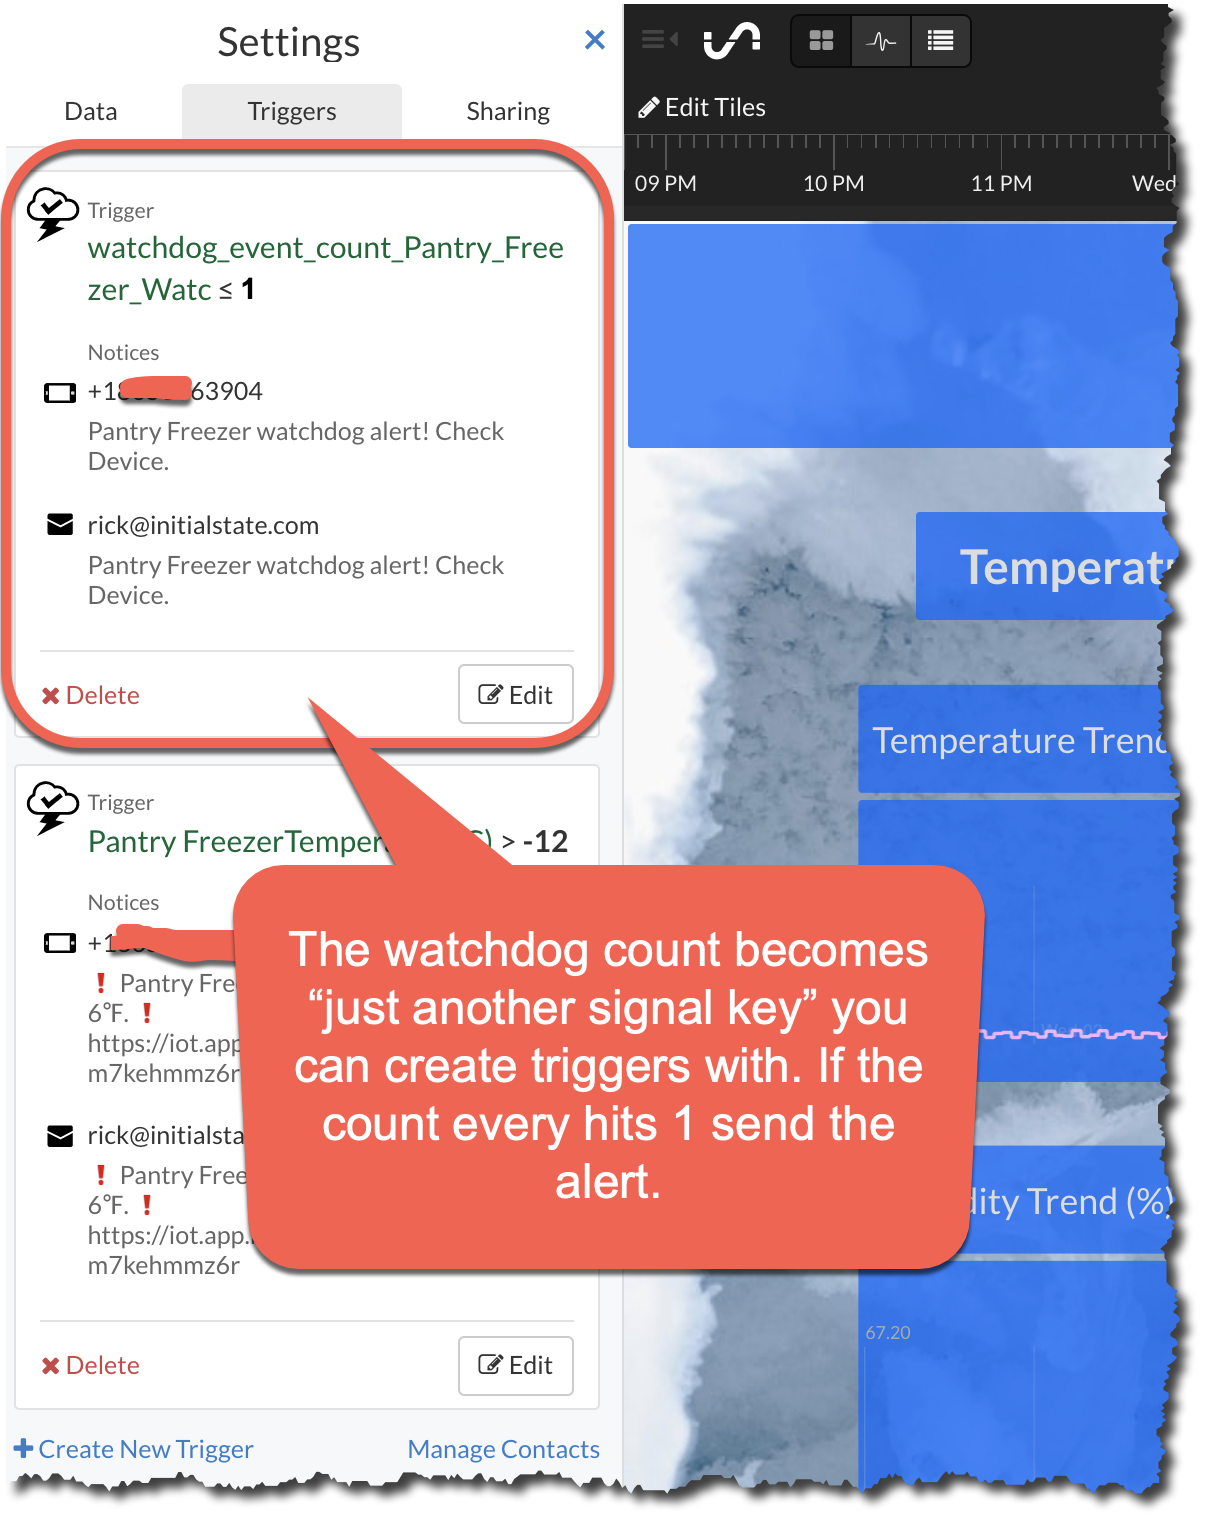
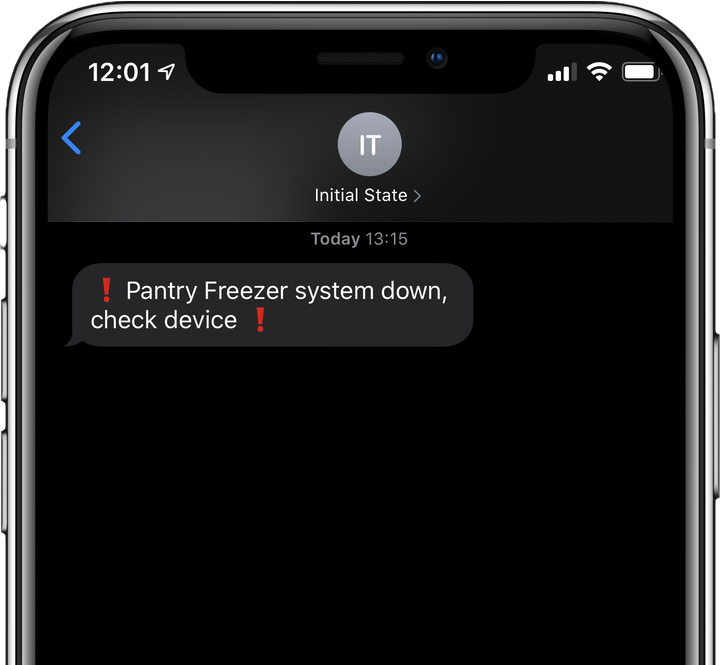
Anything can happen, so you need a foolproof way of “monitoring the monitor.” We could do more process monitoring on the Pi itself, but the broadest way to make sure everything is running is to make sure the “heartbeat” of data is continuing to come at regular intervals from the device. If the device breaks, looses power, looses internet, or stops working, the Initial State Watchdog trigger can alert you in a timely fashion. Access the Watchdog Trigger in the Initial State Integration Marketplace.
任何事情都可能发生,因此您需要一种万无一失的“监控显示器”方法。 我们可以在Pi本身上进行更多的过程监控,但是确保一切正常运行的最广泛方法是确保设备的数据“心跳”持续定期地出现。 如果设备出现故障,电源中断,互联网断开或停止工作,则初始状态看门狗触发器可以及时向您发出警报。 在初始状态集成市场中访问看门狗触发器。

The bucket watchdog counts incoming data points in the specified time interval. In the image above, I set the watchdog to watch my “Pantry Freezer” Bucket and return the count every 15 minutes. Since the code sends something every 10 minutes, we expect the number in the last 15 minutes to always be > 1. This logic becomes the trigger you make in your dashboard that ultimately sends you a text and/or email.
桶式看门狗在指定的时间间隔内对传入的数据点进行计数。 在上图中,我将看门狗设置为观看“ Pantry Freezer”存储桶,并每15分钟返回一次计数。 由于代码每10分钟发送一次,因此我们希望最近15分钟的数字始终大于1。此逻辑将成为您在信息中心中触发的触发器,最终会向您发送文本和/或电子邮件。
Note: The reason you set it to 1 and not 0 is because the watchdog itself sends one data point. If the devices stops sending, then that count will go down to one.
注意: 之所以将其设置为1而不是0是因为看门狗本身发送了一个数据点。 如果设备停止发送,则该计数将减为1。
结论 (Conclusion)
Monitoring refrigerators and freezers should be more common than it is. Shouldn’t my freezer just do this out of the box? Shouldn’t commercial units? Well until that day, use this tutorial to create a cheap redundant system for critical assets in just a few hours.
监视冰箱和冰柜应该比现在更普遍。 我的冰箱不应该直接使用吗? 商业单位不应该吗? 直到今天,使用本教程可以在短短几个小时内为关键资产创建廉价的冗余系统。
Ahhh… Although our family is through the breastfeeding phase, I can finally sleep at night knowing my two prime briskets from my last Costco run are safe and sound (and frozen)! My freezer alarms got me covered.
嗯……虽然我们一家人处于母乳喂养阶段,但我终于可以在晚上入睡,因为我上次Costco跑步中的两个牛胸肉是安全无害的(并且已经冷冻)! 我的冰柜警报使我无法自拔。
树莓派 树莓派 编c++


 被折叠的 条评论
为什么被折叠?
被折叠的 条评论
为什么被折叠?
 到【灌水乐园】发言


