


If you are new to libraries and dependencies about the android project, you can learn more about it here: https://developer.android.com/studio/projects/android-library
如果您不熟悉android项目的库和依赖项,可以在这里了解更多信息: https : //developer.android.com/studio/projects/android-library
我们为什么需要图书馆? (Why do we need a library?)
The libraries are mostly used for sharing codes among different projects for code reusability. Let’s take a small example here, consider your company has more than two mobile apps and is required to access the same database, API calls, and payment process, but the apps frequently have an issue and defect in API calls or database calls. The developer needs to handle both mobile apps code repository each time a new defect emerges and fix the defect; this wastes a lot of time in terms of productivity and resources. Imagine how easy it would be to fix such defects in one place instead of each different project?
这些库主要用于在不同项目之间共享代码,以实现代码可重用性。 让我们在这里举一个小例子,假设您的公司拥有两个以上的移动应用程序,并且需要访问同一数据库,API调用和付款流程,但是这些应用程序经常在API调用或数据库调用中存在问题和缺陷。 每次出现新缺陷时,开发人员都需要处理两个移动应用程序代码存储库,并修复缺陷。 就生产效率和资源而言,这浪费了很多时间。 想象一下在一个地方而不是每个不同的项目中修复这些缺陷有多么容易?
It would be great for most organizations to maintain such code in one repository; this makes it easy to fix the defect in one place and consume such code as a remote repository for both projects. This can save resources and bring more productivity to the team.
对于大多数组织来说,最好在一个存储库中维护这样的代码。 这样就可以轻松地将缺陷修复到一个位置,并可以将代码用作两个项目的远程存储库。 这样可以节省资源并为团队带来更高的生产率。
让我们建立一个双托盘帐户。 (Let’s set up a bintray account.)
The first step we need to do for uploading our library is to create an account on Bintray at https://bintray.com/signup/oss. I already have an account, so I am skipping it. Once you create an account and log in, please click on “Add new repository” and fill in the information just like below according to your repository requirement.
我们上载库的第一步是在Bintray上创建一个帐户,网址为https://bintray.com/signup/oss 。 我已经有一个帐户,所以我跳过了它。 创建帐户并登录后,请点击“添加新存储库”,然后根据您的存储库要求填写以下信息。

You can see in the above screenshot I have created a new repository by selecting maven as a type and the default license as Apache-2.0; you can choose whatever license your organization thinks appropriate.
您可以在上面的屏幕截图中看到,我通过选择maven作为类型并默认使用许可证Apache-2.0创建了一个新的存储库; 您可以选择组织认为合适的任何许可证。
After creating a repository, let’s add the package inside the repository, which holds our library. Please click on the freshly created repository, and you will see an option says “Add new package” I have completed my package as below screenshot. I have also mentioned details beside each box by the arrow for what information to fill.
创建存储库后,让我们将软件包添加到存储库的存储库中。 请单击新创建的存储库,您将看到一个选项“添加新软件包”,我已完成软件包的安装,如下图所示。 我还通过箭头在每个框旁边提到了要填充哪些信息的详细信息。
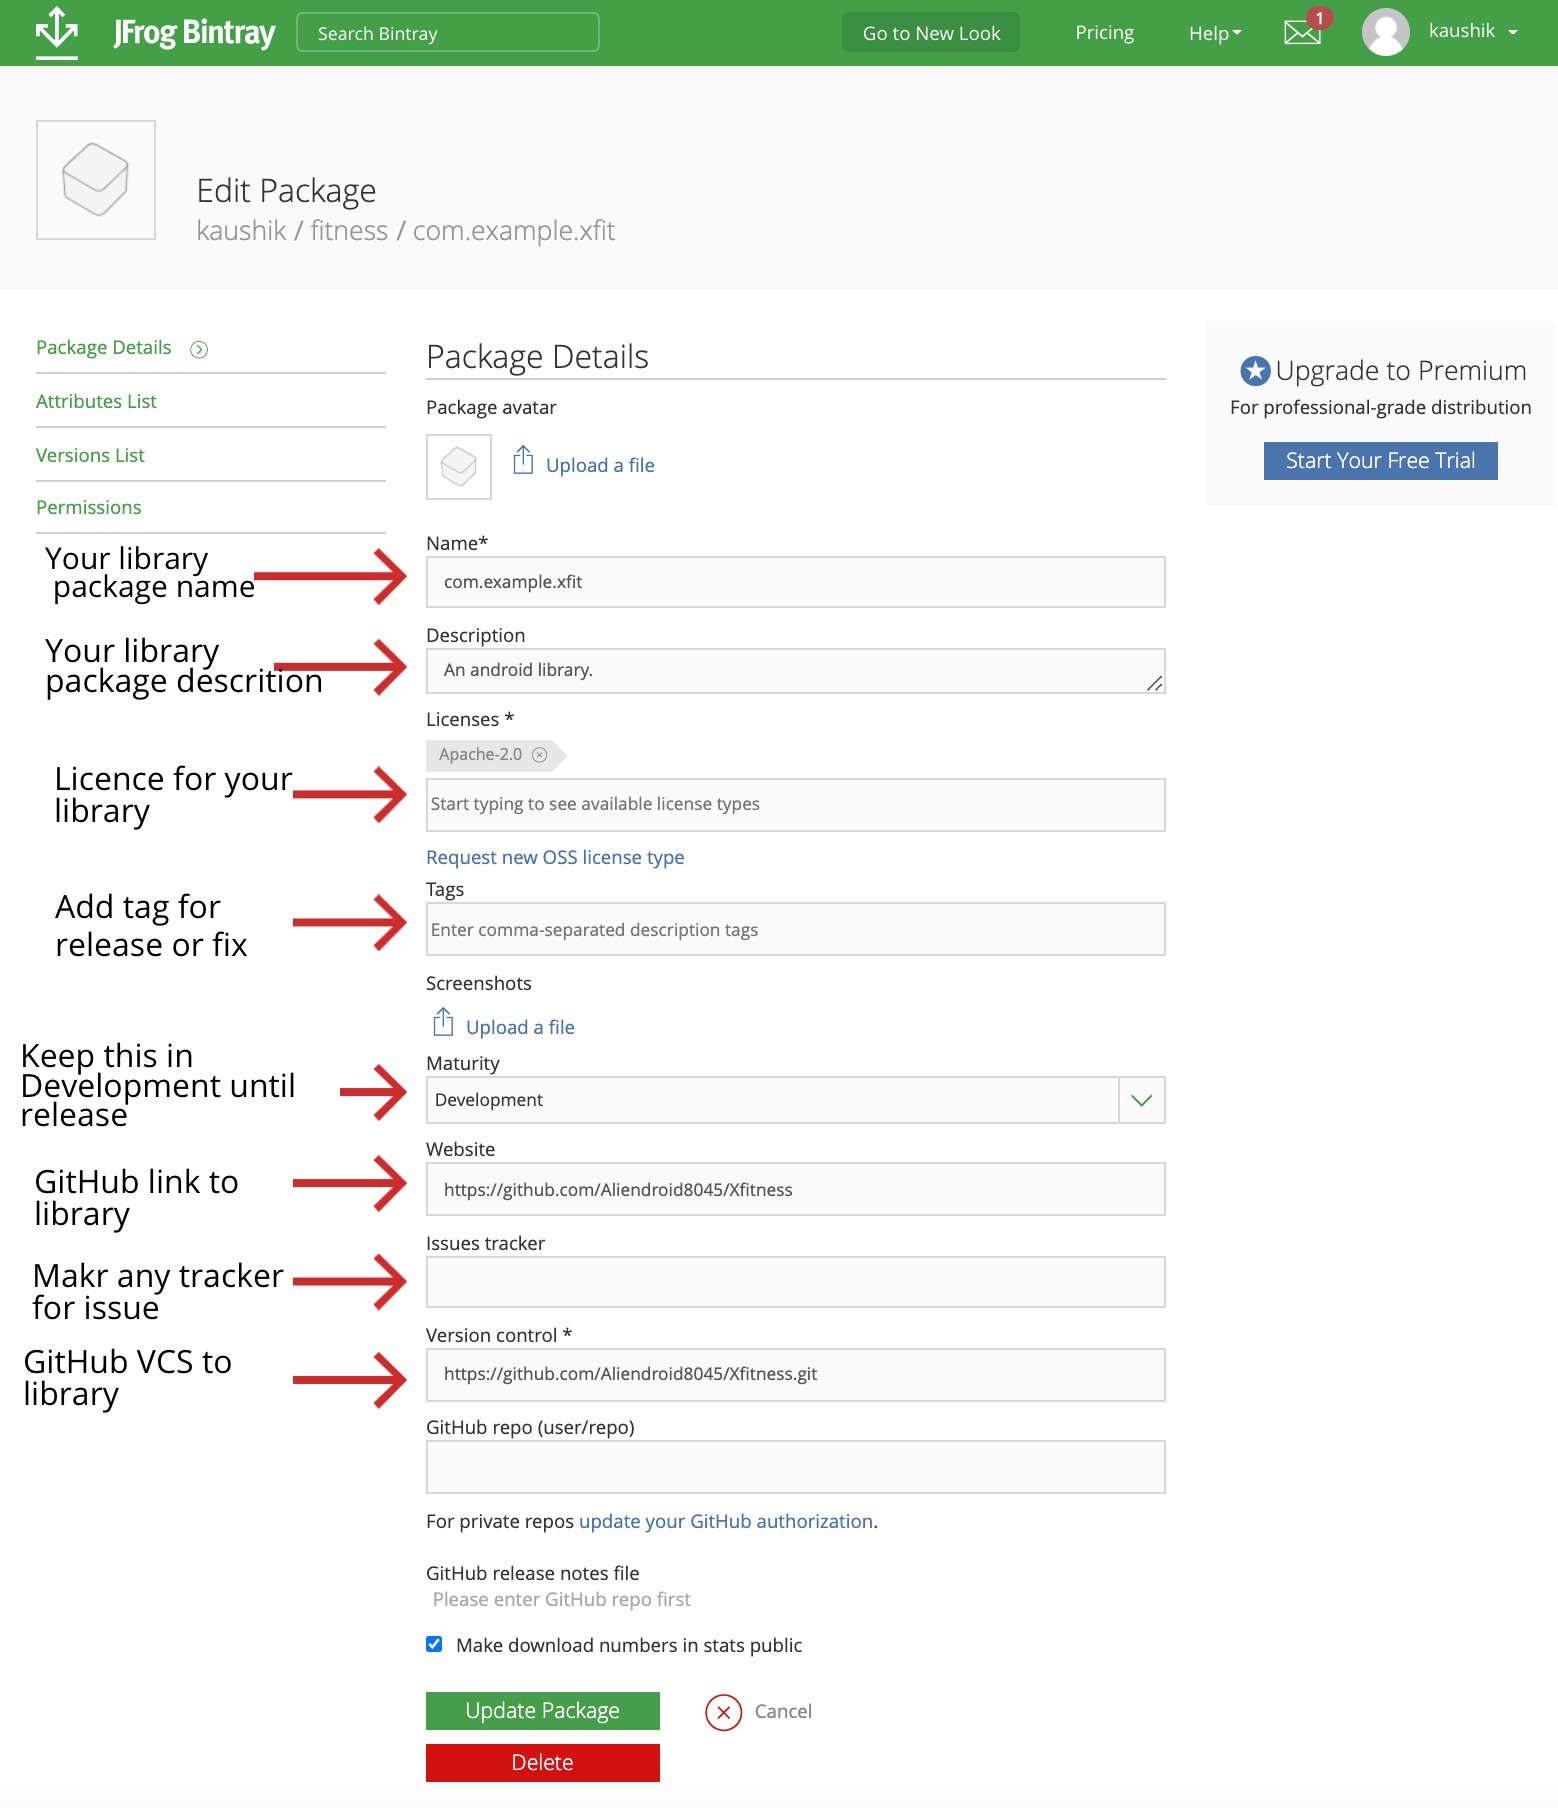
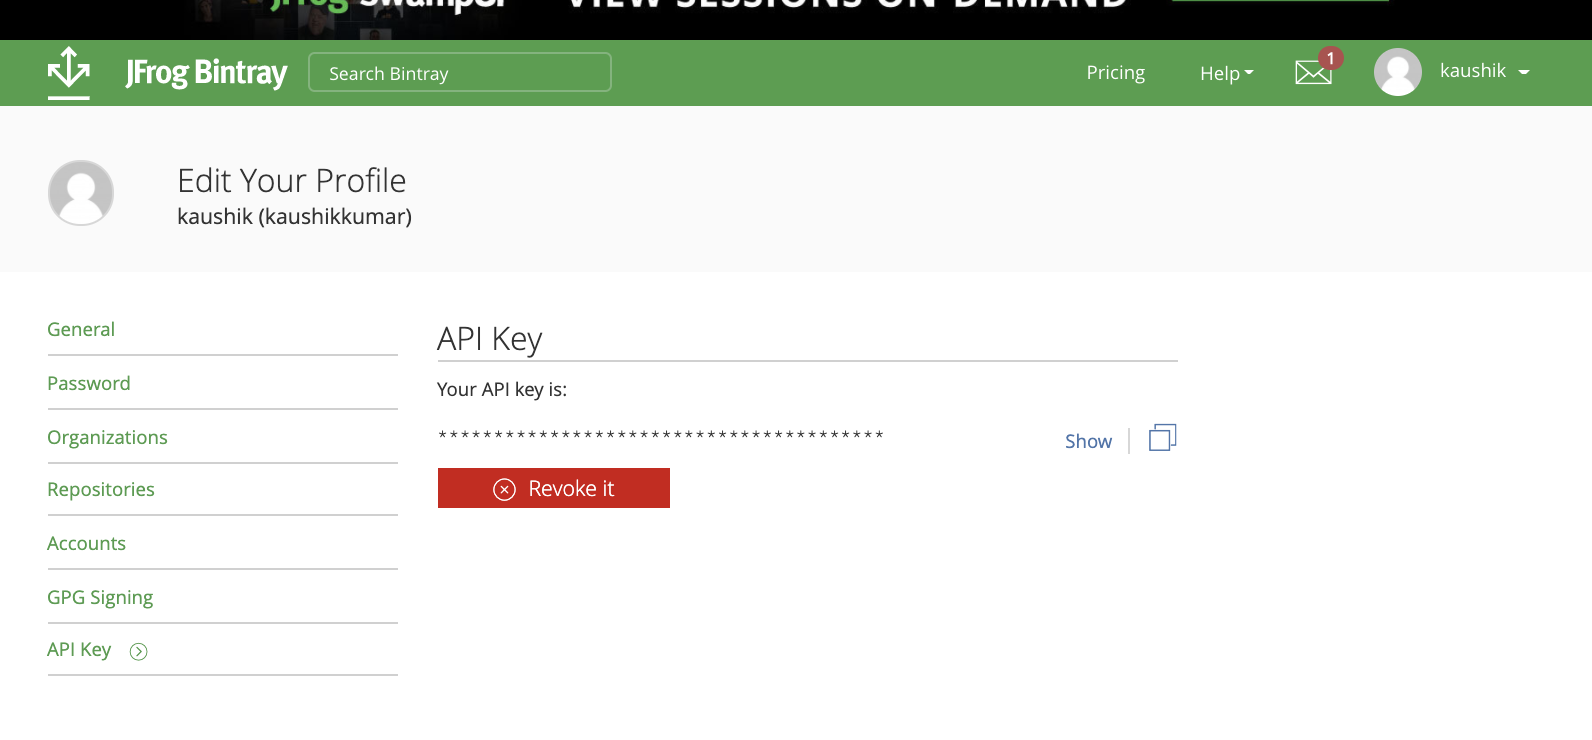
As you can see in the above screenshot, please fill out detail according to your library. The only last step we need to do on bintray is to retrieve your bintray API key for authentication when we are publishing our library to Bintray. To do that, please go into your Bintray profile and look for the API key like the below screenshot once you find it and copy it in any editor for later use.
如您在上述屏幕截图中所见,请根据您的资料库填写详细信息。 在将库发布到Bintray时,我们对bintray唯一要做的最后一步就是检索您的bintray API密钥以进行身份验证。 为此,请进入您的Bintray配置文件,找到API密钥,如下面的屏幕截图所示,找到它后,将其复制到任何编辑器中以备后用。
在Android Studio中添加Bintray设置。 (Add Bintray set up inside Android Studio.)
Let us come back to our android studio project, which we want to submit as a library. Now open your “local.properties” file inside Android Studio and add your API key and username of bintray, which we copied in the previous step. In the below screenshot, the left side“ local.properties” file in Android studio, I have blurred my username and API key due to security purposes. Make sure you don’t push this “local.properties” file to GitHub while pushing your code to remote. It means to be for user-specific.
让我们回到我们想作为库提交的android studio项目。 现在,在Android Studio中打开“ local.properties”文件,并添加我们在上一步中复制的API密钥和bintray用户名。 在下面的屏幕截图中,Android Studio左侧的“ local.properties ”文件,出于安全考虑,我已经模糊了用户名和API密钥。 确保在将代码推送到远程时不要将此“ local.properties ”文件推送到GitHub。 这意味着要针对特定用户。

Open the project-level “build.gradle” file in the android studio as shown in the below screenshot and paste the below code in it. We have two Gradle files in our android project. Make sure you open the project level Gradle.
如下面的屏幕快照所示,在android studio中打开项目级别的“ build.gradle”文件,并将以下代码粘贴到其中。 我们的android项目中有两个Gradle文件。 确保打开项目级别的Gradle。
Now we will write the script to upload our build to the bintray and apply the build plugin into our build.gradle file.
现在,我们将编写脚本以将构建文件上载到Bintray,并将构建插件应用到build.gradle文件中。
Create a two new Gradle file with the name as “bintray.gradle” and “install.gradle” inside the app folder as shown in the below screenshot; make sure you choose your project view window should be a project.
在应用程序文件夹中创建两个新的Gradle文件,名称分别为“ bintray.gradle”和“ install.gradle” ,如下面的屏幕快照所示; 确保您选择的项目视图窗口应该是一个项目。
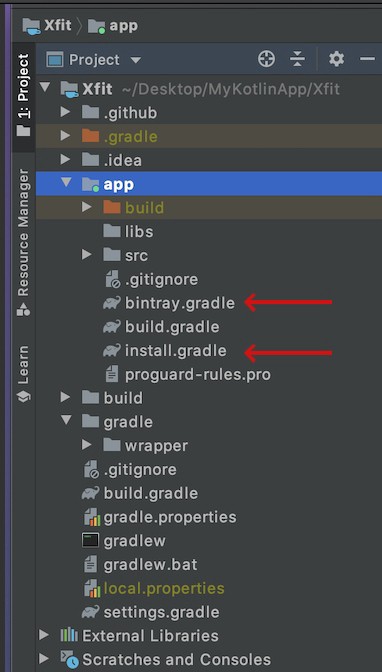
As you can see in the above screenshot, we have two files inside the app directory with the name as “bintray.gradle” and “install.gradle” now open the “bintray.gradle” file and paste the below code inside it.
如您在上面的屏幕截图中所见,我们在应用程序目录中有两个文件,名称分别为“ bintray.gradle”和“ install.gradle”,现在打开“ bintray.gradle”文件并将以下代码粘贴到其中。
Now open your second Gradle file, which is “install.gradle,” which we previously created, and paste the below code.
现在打开第二个Gradle文件,即我们先前创建的“ install.gradle” ,然后粘贴以下代码。
All the tasks are done, and now we are ready to build and publish our library to bintray. The last step we need to do as a part of the setup is to apply both newly created gradle as a plugin inside our module build.gradle file, just like the below screenshot.
所有任务都已完成,现在我们可以构建并将库发布到二进制文件了。 作为设置的一部分,我们需要做的最后一步是将新创建的gradle作为插件应用到模块build.gradle文件中,就像下面的屏幕截图一样。

运行用于构建的任务,并将库发布到Bintray。 (Run tasks for build and publish the library to Bintray.)
From your android studio terminal, go to your root project and run the command as “gradle bintrayUpload” and wait for the execution, just like the below screenshot.
从您的android studio终端,转到根项目,然后以“ gradle bintrayUpload”的身份运行命令,然后等待执行,如下面的屏幕截图所示。

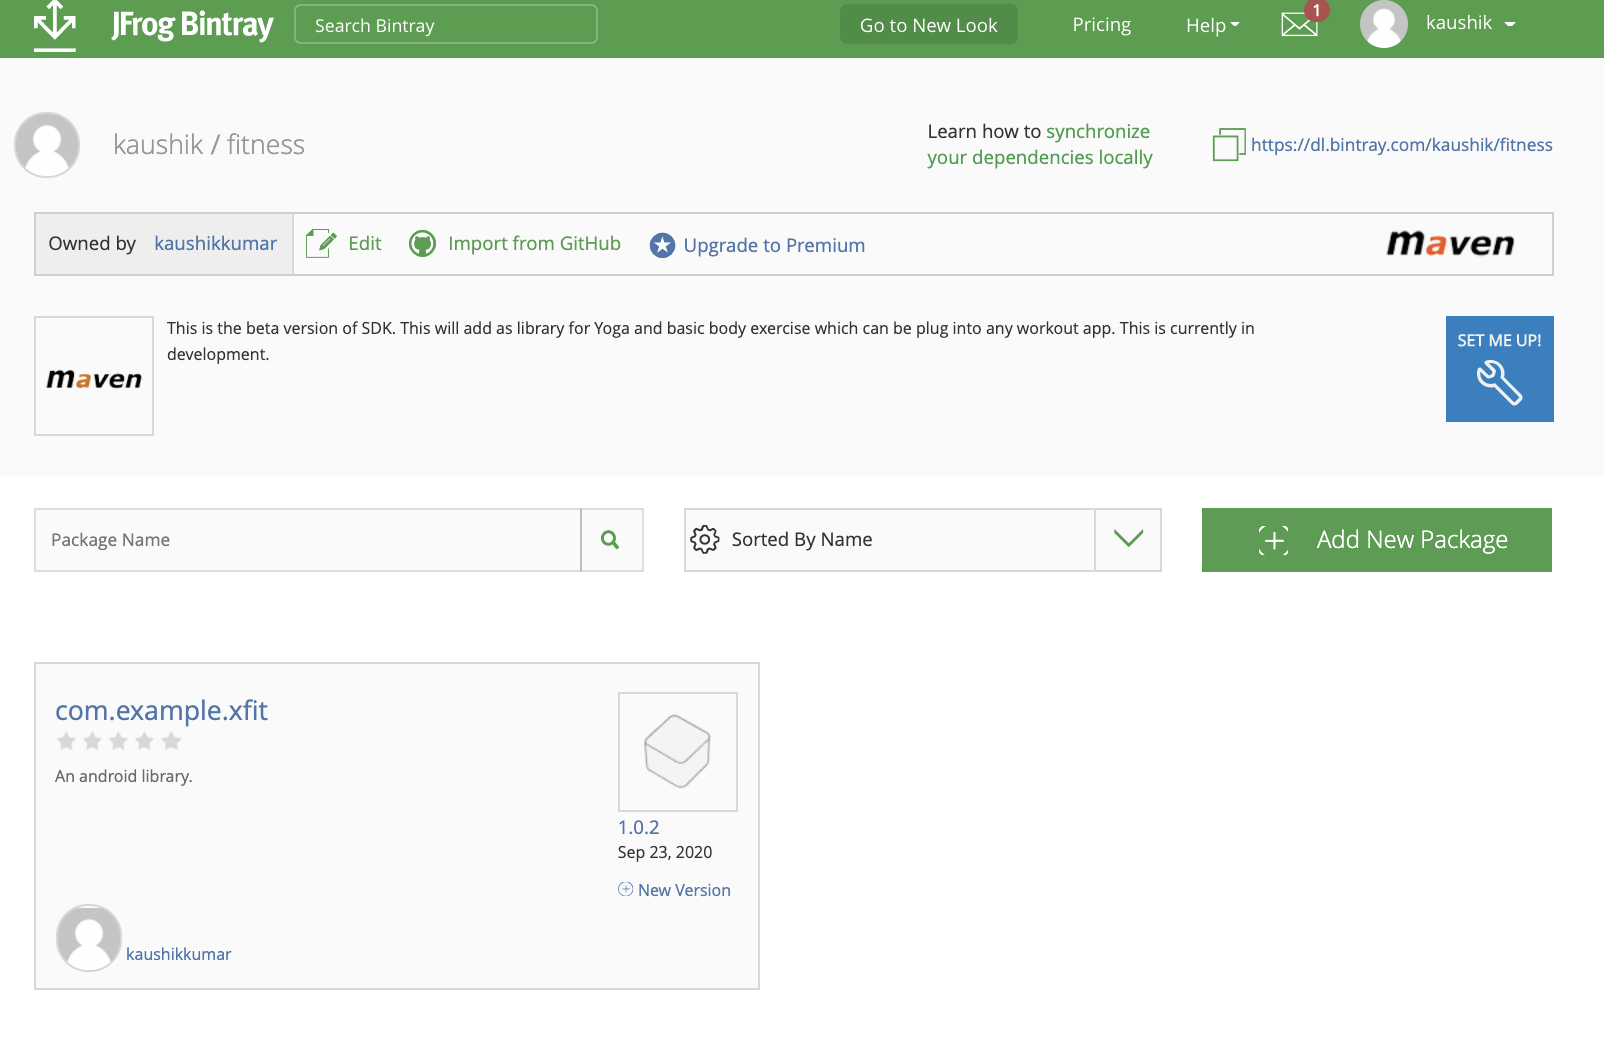
Now go to bintray, and inside your account, click on the repository. You will see your library published to your bintray maven repository as below screenshot. As you can see in the below screenshot, the “com.example.xfit” is published with version 1.0.2.
现在转到bintray,然后在您的帐户内,单击存储库。 您将看到您的库发布到Bintray Maven存储库中,如下面的屏幕截图所示。 如您在下面的屏幕快照中所见,“ com.example.xfit”是从1.0.2版发布的。
将其作为依赖项添加到您的项目中。 (Add it to your project as a dependency.)
The final step in the process is to submit your library to Jceter so you can consume it any project. To do so, we need to click on our package, and on the next screen, it will show you the option to add to Jcenter. Once you add to Jcenter, you have to wait for a couple of hours to get an approved library by Jcenter. Once it is approved, you can consume it any project by adding it to your build.gradle file.
该过程的最后一步是将库提交给Jceter,以便您可以在任何项目中使用它。 为此,我们需要单击我们的软件包,然后在下一个屏幕上,它将向您显示添加到Jcenter的选项。 添加到Jcenter后,您必须等待几个小时才能获得Jcenter批准的库。 一旦批准,您可以通过将其添加到build.gradle文件中来使用任何项目。


 258
258


 被折叠的 条评论
为什么被折叠?
被折叠的 条评论
为什么被折叠?
 到【灌水乐园】发言


