


 本文介绍如何使用API控制底部导航菜单的动态内容,包括项目图片、标签及目的地ID等属性。
Let’s say we need to implement a bottom navigation menu which will be controlled by API. This means that we can control from the serverside the following:
假设我们需要实现一个底部导航菜单,该菜单将由API控制。 这意味着我们可以从服务器端控制以下内容:
- item image 项目图片
- item label物品标签
- items order物品订购
- items count (this should be between 3 and 5 as BotttomNavigationView requirements)项目计数(根据BotttomNavigationView的要求,该数字应介于3到5之间)
First of all, we need to add to module level build.gradle file all the dependencies that we will use for this project.
首先,我们需要将用于该项目的所有依赖项添加到模块级别的build.gradle文件中。
Androidx Navigation
Androidx导航
def nav_version = "2.3.0"
implementation "androidx.navigation:navigation-fragment-ktx:$nav_version"
implementation "androidx.navigation:navigation-ui-ktx:$nav_version"
Picasso and Rx java. We will use this to load menu items icons.
毕加索和Rx Java 。 我们将使用它来加载菜单项图标。
implementation "com.squareup.picasso:picasso:2.71828"
implementation "io.reactivex.rxjava2:rxandroid:2.1.1"
Next, in our activity layout file we should add the BottomNavigationView, which we will populate later, and a NavHostFragment that will host all our fragments that can be triggerd by menu items
接下来,在活动布局文件中,我们应添加BottomNavigationView(稍后将填充)和NavHostFragment,该主机将容纳所有可通过菜单项触发的片段
<androidx.constraintlayout.widget.ConstraintLayout xmlns:android="http://schemas.android.com/apk/res/android"
    xmlns:app="http://schemas.android.com/apk/res-auto"
    xmlns:tools="http://schemas.android.com/tools"
    android:layout_width="match_parent"
    android:layout_height="match_parent"
    tools:context=".MainActivity">

    <fragment
        android:id="@+id/nav_host_fragment"
        android:name="androidx.navigation.fragment.NavHostFragment"
        android:layout_width="0dp"
        android:layout_height="0dp"
        app:defaultNavHost="true"
        app:layout_constraintBottom_toTopOf="@id/nav_view"
        app:layout_constraintLeft_toLeftOf="parent"
        app:layout_constraintRight_toRightOf="parent"
        app:layout_constraintTop_toTopOf="parent"
        app:navGraph="@navigation/main_nav_graph" />

    <com.google.android.material.bottomnavigation.BottomNavigationView
        android:id="@+id/nav_view"
        android:layout_width="match_parent"
        android:layout_height="64dp"
        android:background="@color/colorPrimary"
        app:itemIconTint="@color/menu_item"
        app:itemTextColor="@color/menu_item"
        app:labelVisibilityMode="labeled"
        app:layout_constraintBottom_toBottomOf="parent"
        tools:visibility="visible" />

</androidx.constraintlayout.widget.ConstraintLayout>
As you can see, NavHostFragment has an attribute called navGraph. To create this file, first we should create the Fragments that will represent the items that we can receive from the API. In this example we will use 3 fragments:
如您所见,NavHostFragment具有一个称为navGraph的属性。 要创建此文件,首先我们应该创建片段,这些片段代表可以从API接收的项目。 在此示例中,我们将使用3个片段:
Home
家
Chat
聊天室
Profile
个人资料
After creating those fragments, we come back to navGraph. In res/navigation directory, create a navigation resource file called main_nav_graph. It should look like this:
创建完这些片段后,我们回到navGraph。 在res/navigation目录中,创建一个名为main_nav_graph.的导航资源文件main_nav_graph. 它看起来应该像这样:
<?xml version="1.0" encoding="utf-8"?>
<navigation xmlns:android="http://schemas.android.com/apk/res/android"
    xmlns:app="http://schemas.android.com/apk/res-auto"
    android:id="@+id/main_nav_graph"
    app:startDestination="@id/home_dest">

    <fragment
        android:id="@+id/home_dest"
        android:name="com.comandenis.example.home.HomeFragment" />
    <fragment
        android:id="@+id/chat_dest"
        android:name="com.comandenis.example.chat.ChatFragment" />
    <fragment
       android:id="@+id/profile_dest"
       android:name="com.comandenis.example.profile.ProfileFragment" />
</navigation>
Here should be declared a destination for all the fragments that is planned to have on bottom navigation view. Don’t forget to add startDestination property!
应该将此处声明为计划在底部导航视图上包含的所有片段的目的地。 不要忘记添加startDestination属性!
Let’s assume that we have all the data from the API and will map them into a MenuItem data class which will have the properties that we want to use in the menu. For this example we will use a labeled menu so we will need this 3 properties:
假设我们拥有API中的所有数据,并将它们映射到MenuItem数据类中,该类具有要在菜单中使用的属性。 在此示例中,我们将使用带标签的菜单,因此我们需要以下3个属性:
data class MenuItem(
    val label: String,
    val image: String,
    val destinationId: Int
)
For the purpose of this post will create a hard-coded list of menu items
出于这篇文章的目的,将创建菜单项的硬编码列表
private val menuItems = listOf(
    MenuItem(
        label = "Home",
        image = "https://i.ibb.co/B4nR76t/home-24px.png",
        destinationId = R.id.home_dest),
    MenuItem(
        label = "Chat",
        image = "https://i.ibb.co/6gG1M71/message-24px.png",
        destinationId = R.id.chat_dest),
    MenuItem(
        label = "Profile",
        image = "https://i.ibb.co/FHP56wG/perm-identity-24px.png",
        destinationId = R.id.profile_dest)
)
destinationId is the id of the fragment declared in the nav graph, so after getting the data from the API we should map that list so we can add the destinationId for each item.
destinationId是在导航图中声明的片段的ID,因此从API获取数据后,我们应该映射该列表,以便为每个项目添加destinationId。
Finally, let’s add the items to bottom navigation
最后,让我们将项目添加到底部导航中
menuItems.forEachIndexed { index, menuItem ->nav_view.menu.add(Menu.NONE, menuItem.destinationId, index, menuItem.label)
}
Iterate over the menuItems list and add each item to the menu.
遍历menuItems列表,并将每个项目添加到菜单。
After doing this the result will be something like this.
完成此操作后,结果将是这样。
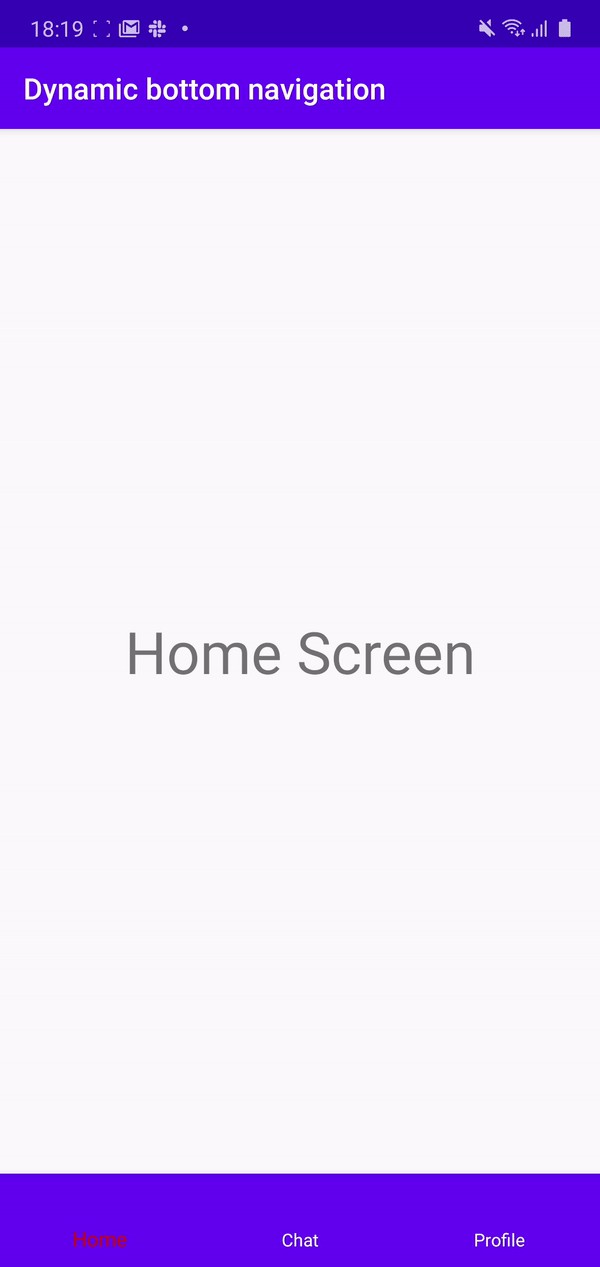
It’s obvious that we still need to add icons for this items, so let’s do it!
显然,我们仍然需要为此项目添加图标,所以让我们开始吧!
data class Tuple(val menuItem: MenuItem, val bitmap: Bitmap)
val picasso = Picasso.get()
menuItems.forEachIndexed { index, menuItem ->nav_view.menu.add(Menu.NONE, menuItem.destinationId, index, menuItem.label)
}subscriptions.add(
Observable.fromIterable(menuItems)
.switchMap {Observable.just(
Tuple(it, picasso.load(it.image).get())
)
}.subscribeOn(Schedulers.io())
.observeOn(AndroidSchedulers.mainThread())
.subscribe(
{val menuItem = nav_view.menu.findItem(it.menuItem.destinationId)
menuItem.icon = BitmapDrawable(resources, it.bitmap)
},
{// Handle errors here
},
{// On complete we should setup nav controller
val navController = findNavController(R.id.nav_host_fragment)
nav_view.setupWithNavController(navController)
})
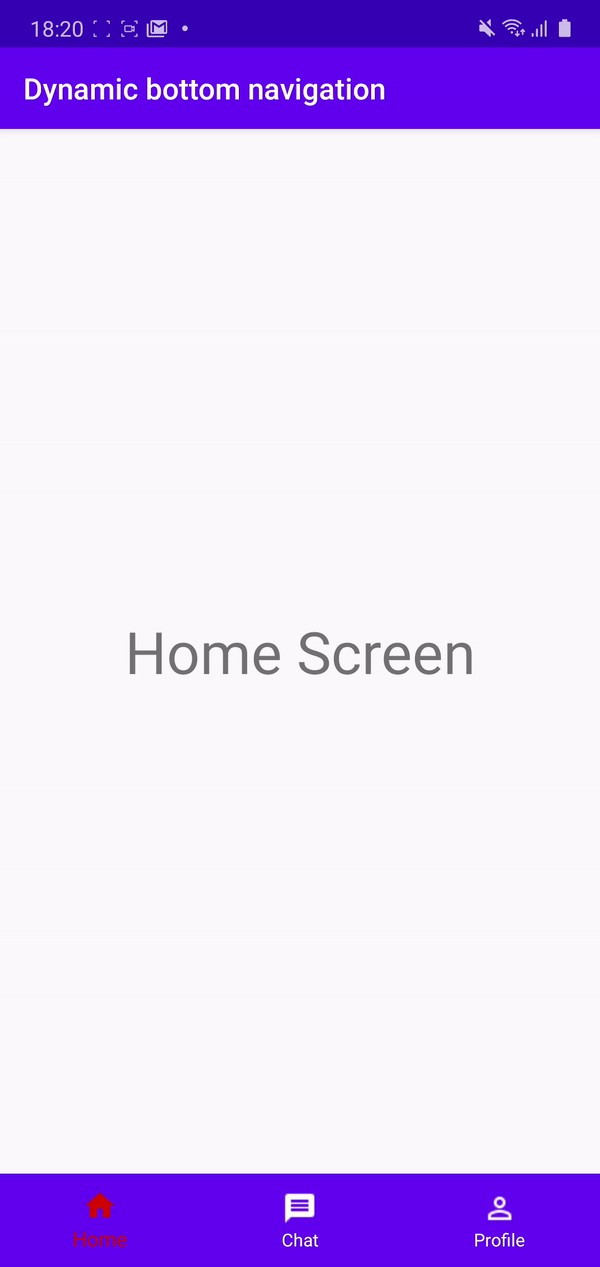
)Using rx java, I created an observable from the menu items list that emits each item. For each of those items we will use Picasso to get the from URL, then we will emit further a Tuple with the item and the bitmap that we get from Picasso.
使用rx java,我从发出每个项目的菜单项目列表中创建了一个可观察对象。 对于这些项目中的每一个,我们将使用Picasso从URL中获取,然后我们将进一步发送一个Tuple,其中包含该项目以及从Picasso中获得的位图。
When item arrive on the onNext method will search for the item in the menu that is already populated, convert the bitmap into drawable and set the icon of the item with it.
当项目到达时, onNext方法将在已填充的菜单中搜索该项目,将位图转换为可绘制的并设置项目的图标。
Here is the result
这是结果
Hope this will help you. Feel free to get an hands-on and ask anything.
希望这会帮助你。 随时动手做任何事情。
Happy Coding!
编码愉快!
翻译自: https://medium.com/agile-freaks/android-dynamic-bottom-navigation-e6818942e27a


 519
519

 被折叠的 条评论
为什么被折叠?
被折叠的 条评论
为什么被折叠?
 到【灌水乐园】发言


