


ssl自签名证书
Since iOS 13, Apple has made it so that if a web page requires access to the DeviceOrientation or DeviceMotion API in the browser, the site will need to request permission for it. In addition to that, the site must also be served over HTTPS, including localhost.
从iOS 13开始,Apple做出了这样的决定:如果网页需要访问浏览器中的DeviceOrientation或DeviceMotion API,则该网站将需要为此获得权限。 除此之外,该站点还必须通过HTTPS提供服务,包括localhost 。
However, even if localhost is exempted, for a typical use case for local development of a website that uses the above mentioned API, which is running a local server on a computer connected to a network then accessing a web page served from the server from one’s mobile device connected to the same network, it won’t work (and it probably shouldn’t).
但是,即使豁免了localhost ,对于使用上述API的网站的本地开发的典型用例,该API也在连接到网络的计算机上运行本地服务器,然后从该服务器访问由该服务器提供的网页移动设备连接到同一网络,它将无法正常工作(并且可能不应该)。
I’m documenting here the few setups that I have for overcoming this issue. It is by no means the best or the most ideal but hopefully it is useful. I’m also only focusing on Node.js based solution and a frontend project. For a full stack project I will write a follow up instead.
我在这里记录了克服此问题的一些设置。 它绝不是最好或最理想的,但希望它是有用的。 我也只关注基于Node.js的解决方案和前端项目。 对于全栈项目,我将撰写后续文章。
Before we go any further, here’s an important security note:Some parts of this instructions may ask you to manually bypass browser security warning. Please note you should only do it in the cases listed below and no more than that. NEVER manually bypass browser security warnings on pages whose certificate you don’t know!
在继续进行操作之前,这里有一个重要的安全注意事项:本说明的某些部分可能会要求您手动绕过浏览器安全警告。 请注意,您仅应在下面列出的情况下进行此操作,且仅此一种。 切勿在您不知道其证书的页面上手动绕过浏览器安全警告 !
项目设置 (Project Setup)
I’m going to use p5.js here so I don’t have to go too much into the DeviceOrientation and DeviceMotion API here. In p5.js rotationX/Y/Z and accelerationX/Y/Z are a thin wrapper around the values returned by the native APIs so if you are using the native API, it should work similarly.
我将在这里使用p5.js,因此在这里不必过多地介绍DeviceOrientation和DeviceMotion API。 在p5.js中, rotationX/Y/Z和accelerationX/Y/Z是原生API返回的值的瘦包装,因此,如果您使用的是原生API,则其工作原理应相似。
function setup() {
  createCanvas(400, 400);
}


function draw() {
  background(220);
  textSize(30);
  text("Rotation X: " + rotationX, 10, 40);
  text("Rotation Y: " + rotationY, 10, 80);
  text("Rotation Z: " + rotationZ, 10, 120);
}
The p5.js sketch is as simple as the above while index.htmlis minimal, you can use the one that comes with the empty example from p5.js complete download.
p5.js的草图和上面的一样简单,而index.html很小,您可以使用p5.js完整下载中的空示例附带的草图。
First we need to serve the file from a server, we can use http-server to spin up a simple web server quickly and view the page from http://localhost:8080by default. Here’s what it looks like:
首先,我们需要从服务器提供文件,我们可以使用http- server快速启动简单的Web服务器,并默认情况下从http://localhost:8080查看页面。 看起来是这样的:

If you want to preview this on your mobile device, you will need to find your local network IP address or hostname. We’ll assume you have the local IP address for your computer, if you cannot find it, you can do a quick search online for how to find it (keyword is “local IP”). With the IP address, as long as your smartphone is connected to the same network (eg. same Wi-Fi), you can key in the IP address and port in the mobile browser and it should show up.
如果要在移动设备上进行预览,则需要找到本地网络IP地址或主机名。 我们假设您拥有计算机的本地IP地址,如果找不到它,则可以在线快速搜索如何找到它(关键字是“本地IP”)。 使用IP地址,只要您的智能手机连接到相同的网络(例如,相同的Wi-Fi),您就可以在移动浏览器中键入IP地址和端口,它就会显示出来。

But as you can see, the rotation values are still 0 even on the mobile device. In this particular case (iOS) there are two reasons for it.
但是,您可以看到,即使在移动设备上,旋转值仍为0。 在这种情况下(iOS),有两个原因。
- Since iOS 13, websites are now required to explicitly request permission from the user in order to access the API. This request must be called as a result of user interaction, typically a click event. 从iOS 13开始,现在要求网站明确要求用户许可才能访问API。 必须通过用户交互(通常是单击事件)的结果来调用此请求。
- The website must be served through a secure connection (ie. a HTTPS connection). 网站必须通过安全连接(即HTTPS连接)进行服务。
These two problems must both be solved or the API will not return a value. To get around problem 1, we modify our code by adding a click event on the canvas itself and calling the requestPermissionfunction.
必须同时解决这两个问题,否则API将不会返回值。 为了解决问题1,我们通过在画布本身上添加click事件并调用requestPermission函数来修改代码。
let canvas;


function setup() {
  canvas = createCanvas(400, 400);


  canvas.mouseClicked(function(){
    // Detect if DeviceOrientationEvent.requestPermission is implemented
    if (typeof DeviceOrientationEvent.requestPermission === "function"){
      // If it is go ahead and call it. It returns a promise.
      DeviceOrientationEvent.requestPermission().then(permissionState => {
        if(permissionState === "granted"){
          console.log("Permission granted");
        }else if(permissionState === "denied"){
          console.log("Permission denied");
        }
      }).catch(console.error);
    }else{
      // Permission is not required
    }
  });
}


function draw() {
  background(220);
  textSize(30);
  text("Rotation X: " + rotationX, 10, 40);
  text("Rotation Y: " + rotationY, 10, 80);
  text("Rotation Z: " + rotationZ, 10, 120);
}
For problem 2, we will need to somehow establish a HTTPS connection to the server running on our computer. While http-server supports accepting SSL certificates with the -S -K -C arguments, they still require manually generating self-signed certificate. Whereas Parcel’s development server automatically generates a self-signed certificate. The nature of Parcel’s bundling process makes using our sketch code above difficult as the global setup() and draw() functions will get scoped after bundling thus breaking p5.js’ global mode functionality. If you are not using p5.js in global mode, Parcel gets a full recommendation here.
对于问题2,我们将需要以某种方式建立与计算机上运行的服务器的HTTPS连接。 尽管http-server支持使用-S -K -C参数接受SSL证书,但它们仍需要手动生成自签名证书。 而Parcel的开发服务器会自动生成一个自签名证书。 Parcel捆绑过程的性质使我们难以使用上面的草图代码,因为捆绑后全局setup()和draw()函数的作用域将变大,从而破坏了p5.js的全局模式功能。 如果您不在全局模式下使用p5.js,Parcel将在此处提供完整建议。
For our case however, I’ve forked http-server and added the ability to generate self-signed certificate using the same code as used in Parcel. (This isn’t fully released yet and will not be named http-server if and when it does release) You can install it as a CLI tool with :
但是,对于我们的情况,我分叉了 http-server,并添加了使用与Parcel中使用的相同代码生成自签名证书的功能。 (此版本尚未完全发布,并且如果发布,则不会命名为http-server )。可以使用以下命令将其安装为CLI工具:
npm install -g You may need to uninstall existing version of http-server if exist before running the above step. Once installed, you can run http-server -S and it will generate a certificate pair in the ssl-certificate folder and start the server using this certificate.
在运行上述步骤之前,您可能需要卸载现有版本的http-server 。 安装后,您可以运行http-server -S ,它将在ssl-certificate文件夹中生成一个证书对,并使用此证书启动服务器。
Navigate to https://localhost:8080/ to view the project. Your browser will display a big warning saying the site is potentially dangerous or insecure, they are absolutely right! If you skip the warning before, go back and read them now!
导航到https://localhost:8080/以查看项目。 您的浏览器将显示一个大警告,表示该网站可能存在危险或不安全,这是绝对正确的! 如果您之前跳过警告,请立即回过头阅读!

Gingerly, we will manually bypass the warning as we know this self-signed certificate is valid since we just generated it for development purposes, in Firefox, click on “Advanced” and “Accept the Risk and Continue”. Your sketch should display as before now on your browser.
Gingerly,由于我们知道此自签名证书是有效的,因为我们只是出于开发目的而生成该证书,因此我们将手动绕过警告,在Firefox中,单击“高级”和“接受风险并继续”。 您的草图应像以前一样显示在浏览器上。
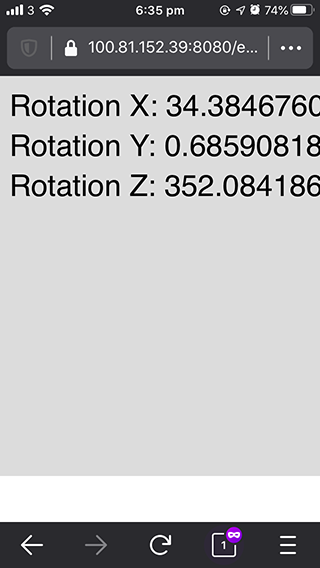
For mobile, just go to the same IP address as before but instead of http make sure it is https now. Bypass the browser warning here as well. Tap on the canvas and you should be prompted for permission to allow access to the API, tap on “Allow”, hopefully now you will see sensor values displayed in the sketch!
对于移动设备,只需转到与以前相同的IP地址,但不要使用http来确保它现在是https 。 这里也绕过浏览器警告。 点击画布,然后会提示您允许访问API的权限,点击“允许”,希望现在您将看到草图中显示的传感器值!

If that’s all you need, you can stop here.
如果您仅需这些,可以在这里停止。
If you need a full stack solution, you can look at part two of this tutorial.
如果您需要一个完整的堆栈解决方案,则可以阅读本教程的第二部分 。
ssl自签名证书


 1363
1363

 被折叠的 条评论
为什么被折叠?
被折叠的 条评论
为什么被折叠?
 到【灌水乐园】发言


