


In this tutorial, we are going to learn how to fetch data from a Spring Boot REST service and display the results in Flutter UI.
在本教程中,我们将学习如何从Spring Boot REST服务获取数据并在Flutter UI中显示结果。
For this purpose, we are going to build an application that collects server data about the status of some required services.
为此,我们将构建一个应用程序来收集有关某些必需服务状态的服务器数据。
Imagine that you have multiple servers where some services are required to be running. Instead of manually connecting via SSH to the servers and executing service check commands, we are going to create a service checker application that displays all the data for us.
假设您有多个服务器,其中需要运行某些服务。 我们将创建一个为我们显示所有数据的服务检查器应用程序,而不是通过SSH手动连接到服务器并执行服务检查命令。
Let’s get started!
让我们开始吧!
准备后端 (Prepare the Back End)
First, let’s create a very basic Spring Boot project. I am using Gradle as a build tool in this tutorial. We only need to get the org.springframework.boot:spring-boot-starter-web dependency:
首先,让我们创建一个非常基本的Spring Boot项目。 我在本教程中将Gradle用作构建工具。 我们只需要获取org.springframework.boot:spring-boot-starter-web依赖项:
dependencies {
    implementation 'org.springframework.boot:spring-boot-starter-web'
}
If you need more information on how to get started with Spring Boot, refer to the documentation.
如果您需要有关如何开始使用Spring Boot的更多信息,请参阅文档 。
1.创建应用程序启动器 (1. Create the application starter)
package com.serverchecker;
import org.springframework.boot.SpringApplication;
import org.springframework.boot.autoconfigure.SpringBootApplication;


@SpringBootApplication
public class Api {


    /**
     * @param args the command line arguments
     */
    public static void main(String[] args) {
        SpringApplication.run(Api.class, args);
    }
}
2.创建DTO对象 (2. Create the DTO objects)
ServerInfo.java holds the information about the server data, including the status of the required services:
ServerInfo.java包含有关服务器数据的信息,包括所需服务的状态:
public class ServerInfo {

    public final String name;


    public final List<ServiceInfo> services;


    public ServerInfo(String name, List<ServiceInfo> services) {
        this.name = name;
        this.services = services;
    }
}
ServiceInfo.java contains the name and status of the services:
ServiceInfo.java包含服务的名称和状态:
public class ServiceInfo {


    public final String name;


    public final boolean running;


    public ServiceInfo(String name, boolean running) {
        this.name = name;
        this.running = running;
    }


}
3.配置全局属性 (3. Configure global properties)
To keep the code organised, let’s set up some global properties.
为了使代码井井有条,让我们设置一些全局属性。
Create a file called application.properties under the /resources folder in your project. You can also configure the server port if you need to modify the default one. Check out the documentation to see what you can set up.
在项目的/resources文件夹下创建一个名为application.properties的文件。 如果需要修改默认端口,也可以配置服务器端口。 查看文档以了解您可以进行哪些设置。
For now, let’s keep it like this:
现在,让我们保持这样:
datapath=./data4.创建服务器数据文件 (4. Create the server data file)
How to collect the server data is beyond the scope of this tutorial. It could be via a bash script, etc. For simplicity’s sake, we are going to hard-code the service information in a server file.
如何收集服务器数据超出了本教程的范围。 它可以通过bash脚本等来实现。为简单起见,我们将服务信息硬编码在服务器文件中。
Create a file called
server1and insert the following service status information where0stands for stopped and1stands for running:创建一个名为
server1的文件,并插入以下服务状态信息,其中0代表已停止 ,1代表正在运行 :
mysql:1,apache:0If you want to cover an error case, create another server file and insert
error:如果要解决错误情况,请创建另一个服务器文件并插入
error:
error5.创建数据服务 (5. Create the data service)
Now let’s create the DataService.java that will execute our logic. Note that I am referring to the datapath using the @Value( “${datapath}” ) annotation.
现在,让我们创建执行我们的逻辑的DataService.java 。 请注意,我这里指的是datapath使用@Value( “${datapath}” )注解。
This snippet shows how to read the server file and collect the service data:
此代码段显示了如何读取服务器文件并收集服务数据:
package com.serverchecker.service;
import com.serverchecker.dto.ServerInfo;
import com.serverchecker.dto.ServiceInfo;
import java.io.BufferedReader;
import java.io.File;
import java.io.FileInputStream;
import java.io.FileNotFoundException;
import java.io.InputStreamReader;
import java.util.ArrayList;
import java.util.HashMap;
import java.util.List;
import java.util.Map;
import java.util.logging.Level;
import java.util.logging.Logger;
import java.util.stream.Collectors;
import org.springframework.beans.factory.annotation.Value;
import org.springframework.stereotype.Service;


@Service
public class DataService {

    @Value( "${datapath}" )
    private String datapath;


    private Map<String, String> getServerData() {
        File path = new File(datapath);


        Map<String, String> result = new HashMap<>();

        File [] files = path.listFiles();
        for (int i = 0; i < files.length; i++){
            if (files[i].isFile()){
                try {
                    FileInputStream fis = new FileInputStream(files[i]);
                    result.put(files[i].getName(), new BufferedReader(new InputStreamReader(fis)).lines().collect(Collectors.joining("\n")));

                } catch (FileNotFoundException ex) {
                    Logger.getLogger(DataService.class.getName()).log(Level.SEVERE, null, ex);
                }
            }
        }

        return result;
    }
Then we will process the collected information and map it to our final result.
然后,我们将处理收集的信息并将其映射到我们的最终结果。
If the server data file contains the string error, it means that no information was available. This can happen when the server is unavailable, for example.
如果服务器数据文件包含字符串error ,则意味着没有可用信息。 例如,当服务器不可用时,可能会发生这种情况。
public List<ServerInfo> getServerInfo() {
        List<ServerInfo> result = new ArrayList<>();
        Map<String, String> serverData = getServerData();
        for (Map.Entry<String, String> info : serverData.entrySet()) {
            result.add(new ServerInfo(info.getKey(), map(info.getValue())));
        }
        return result;
    }

    private static List<ServiceInfo> map(String data) {
        List<ServiceInfo> result = new ArrayList<>();
        if (!data.isEmpty() && !data.startsWith("error")) {
            String[] split = data.split(",");
            for (String service : split) {
                String[] status = service.split(":");
                Boolean b = false;
                if (Integer.valueOf(status[1])>0) {
                    b = true;
                }
                result.add(new ServiceInfo(status[0], b));
            }
        }
        return result;

    }
6.将DataService添加到应用程序控制器 (6. Add the DataService to the application controller)
Finally, let’s hook our DataService to the application’s controller. The target URL will point to /api:
最后,让我们将DataService挂钩到应用程序的控制器。 目标网址将指向/api :
package com.serverchecker;
import com.serverchecker.dto.ServerInfo;
import com.serverchecker.service.DataService;
import java.util.List;
import org.springframework.beans.factory.annotation.Autowired;
import org.springframework.web.bind.annotation.RestController;
import org.springframework.web.bind.annotation.RequestMapping;


@RestController
public class ApiController {
    @Autowired
    private DataService dataservice;


	@RequestMapping("/api")
	public List<ServerInfo> index() {
		return dataservice.getServerInfo();
	}


}
7.运行应用程序 (7. Run the application)
To check if everything so far is correct, run Gradle task bootRun to start the application or right-click on Api.java and select “Run File.”
要检查到目前为止一切是否正确,请运行Gradle任务bootRun以启动应用程序,或右键单击Api.java并选择“运行文件”。
The application will respond on http://localhost:8080/api and you should see a JSON string representing the servers and their service status.
该应用程序将在http://localhost:8080/api上响应,您应该看到一个表示服务器及其服务状态的JSON字符串。
准备前端 (Prepare the Front End)
1.颤振的先决条件 (1. Prerequisites for Flutter)
To get started, you should have the Flutter SDK installed. For more information on how to install Flutter, refer to the documentation.
首先,您应该已安装Flutter SDK。 有关如何安装Flutter的更多信息,请参阅文档 。
2.创建DTO对象 (2. Create the DTO objects)
Similarly to with our back end, create two DTOs for the server and the services: serverinfo.dart and serviceinfo.dart, respectively.
与后端类似,分别为服务器和服务创建两个DTO: serverinfo.dart和serviceinfo.dart 。
import 'package:myapp/serviceinfo.dart';


class ServerInfo {
  const ServerInfo({this.name, this.services});


  final String name;


  final List<ServiceInfo> services;


  factory ServerInfo.fromJson(Map<String, dynamic> json) {
    return ServerInfo(
        name: json['name'],
        services: (json['services'] as List)
            .map((p) => ServiceInfo.fromJson(p))
            .toList());
  }
  bool running() {
    bool ok = services.isNotEmpty;
    for (ServiceInfo service in services) {
      if (!service.running) {
        ok = false;
      }
    }


    return ok;
  }


  bool notAvailable() {
    return services.isEmpty;
  }
}
class ServiceInfo {
const ServiceInfo({this.name, this.running});
final String name;
final bool running;
String status() {
if (running) {
return "running";
}
return "stopped";
}
factory ServiceInfo.fromJson(Map<String, dynamic> json) {
return ServiceInfo(name: json['name'], running: json['running']);
}
}Note that the fromJson(Map<String, dynamic> json) method is needed to consume the response from our REST service. We will see the full response handling implementation shortly.
请注意,需要使用fromJson(Map<String, dynamic> json)方法来消耗来自REST服务的响应。 我们将很快看到完整的响应处理实现。
3.创建StartPage小部件 (3. Create the StartPage widget)
Create a startpage.dart file that is responsible for displaying the data on the screen. For this example, I want to display cards in a GridView for all the servers. Each card represents a server and displays the status of the required service.
创建一个startpage.dart文件,该文件负责在屏幕上显示数据。 对于此示例,我想在GridView为所有服务器显示卡。 每张卡代表一台服务器,并显示所需服务的状态。
Usually, we have many servers to deal with, so to make it more challenging, let’s create the cards dynamically.
通常,我们有许多服务器要处理,因此要使其更具挑战性,让我们动态创建卡。
To create the StartPage widget, type the following code:
要创建StartPage小部件,请键入以下代码:
import 'package:flutter/material.dart';
import 'package:myapp/serverinfo.dart';
import 'package:myapp/serviceinfo.dart';
import 'package:myapp/utils.dart';


class StartPage extends StatelessWidget {
  StartPage({Key key, this.title, this.serverInfo}) : super(key: key);


  final String title;
  final Future<List<ServerInfo>> serverInfo;


  @override
  Widget build(BuildContext context) {
    return Scaffold(
        appBar: AppBar(
          title: Text(title),
        ),
        body: Center(
            child: FutureBuilder<List<ServerInfo>>(
                future: this.serverInfo,
                builder: (context, snapshot) {
                  switch (snapshot.connectionState) {
                    case ConnectionState.none:
                    case ConnectionState.waiting:
                      return CircularProgressIndicator();
                    default:
                      if (snapshot.hasError)
                        return new Text('Error: ${snapshot.error}');
                      else
                        return _buildGridView(context, snapshot.data);
                  }
                })));
  }
Build the
GridView.构建
GridView。
This snippet shows how to build the GridView:
此代码段显示了如何构建GridView :
Widget _buildGridView(BuildContext context, List<ServerInfo> serverInfo) {
    return GridView.count(
      primary: false,
      padding: const EdgeInsets.all(1.5),
      crossAxisCount: determineCrossAxisCount(context),
      childAspectRatio: 1.2,
      mainAxisSpacing: 1.0,
      crossAxisSpacing: 1.0,
      children: _prepareServerInfoCards(serverInfo), //new Cards()
      shrinkWrap: true,
    );
}- Determine how many cards to display on the screen. 确定要在屏幕上显示多少张卡。
I am planning to use this application in a web browser, where it looks fine. However, the number of cards should be adjusted for a mobile device for a better experience.
我打算在看起来不错的网络浏览器中使用此应用程序。 但是,应针对移动设备调整卡数,以获得更好的体验。
To achieve this, create a utility class called utils.dart:
为此,创建一个名为utils.dart的实用程序类:
import 'package:flutter/material.dart';


int determineCrossAxisCount(BuildContext context) {
  int _crossAxisCount = 1;
  final double screenWidthSize = MediaQuery.of(context).size.width;
  if (screenWidthSize > 820) {
    _crossAxisCount = 4;
  } else if (screenWidthSize > 720) {
    _crossAxisCount = 3;
  } else if (screenWidthSize > 520) {
    _crossAxisCount = 2;
  } else {
    _crossAxisCount = 1;
  }


  return _crossAxisCount;
}
Create the
ServerInfocards.创建
ServerInfo卡。
Then use this code to prepare the cards for the server info:
然后使用此代码为服务器信息准备卡:
List<Widget> _prepareServerInfoCards(List<ServerInfo> serverInfo) {
    List<Widget> serverInfoCells = [];
    // we can call the rest service here?
    for (ServerInfo category in serverInfo) {
      serverInfoCells.add(_getServerInfoCard(category));
    }


    return serverInfoCells;
  }
    Container _getServerInfoCard(ServerInfo serverInfo) {
    return new Container(
        width: 200.0,
        height: 300.0,
        child: Card(
          elevation: 2.0,
          color: _getColorByServerStatus(serverInfo),
          child: new Column(
              crossAxisAlignment: CrossAxisAlignment.stretch,
              mainAxisSize: MainAxisSize.min,
              verticalDirection: VerticalDirection.down,
              children: _prepareStatusText(serverInfo)),
        ));
  }
  List<Widget> _prepareStatusText(ServerInfo serverInfo) {
    final TextStyle textStyle =
        TextStyle(fontWeight: FontWeight.bold, height: 3);
    return <Widget>[
      new Center(
        child: new Text(serverInfo.name.toUpperCase(), style: textStyle),
      ),
      new Center(
        child: _createStatusTable(serverInfo),
      ),
    ];
  }
Create the
Tablewidget holding theGridView.创建包含
GridView的Table小部件。
Now let’s move on to the Table widget creation by creating the header and the cells:
现在,通过创建标题和单元格,继续进行Table小部件的创建:
Widget _createStatusTable(ServerInfo serverInfo) {
    if (serverInfo.notAvailable()) {
      return new Text('Server unreachable');
    }
    return Table(
        border: TableBorder.all(
            color: Colors.black26, width: 1, style: BorderStyle.none),
        children: _createStatusCells(serverInfo.services));
  }


  List<TableCell> _prepareHeader() {
    final TextStyle textStyle = TextStyle(fontWeight: FontWeight.bold);
    return [
      TableCell(
          child: Padding(
              padding: EdgeInsets.only(left: 20),
              child: Text("SERVICE", style: textStyle))),
      TableCell(child: Center(child: Text("STATUS", style: textStyle)))
    ];
  }


  List<TableRow> _createStatusCells(List<ServiceInfo> serviceInfo) {
    List<TableRow> rows = [];
    // prepare header
    rows.add(TableRow(children: _prepareHeader()));
    // prepare data
    for (ServiceInfo info in serviceInfo) {
      rows.add(TableRow(children: [
        TableCell(
            child: Padding(
                padding: EdgeInsets.only(left: 20),
                child: Text(info.name, textAlign: TextAlign.left))),
        TableCell(
            child: Center(
                child: Text(info.status(),
                    style: _getStyleByServiceStatus(info.running))))
      ]));
    }
    return rows;
  }
Add
TextStyleto theTextwidget.将
TextStyle添加到“Text小部件中。
For a better user experience and more readability, add italics style to indicate that a service is not running.
为了获得更好的用户体验和更高的可读性,请添加斜体样式以指示服务未运行。
TextStyle _getStyleByServiceStatus(bool running) {
    if (!running) {
      return TextStyle(fontStyle: FontStyle.italic);
    }
    return TextStyle();
}- Define the colors for the grid cards. 定义网格卡的颜色。
Of course, we need colors for the cards. If all the necessary services are running, the color should be green. If a required service or no services are running, the color should be red.
当然,我们需要卡片的颜色。 如果所有必需的服务都在运行,则颜色应为绿色。 如果需要的服务或没有任何服务正在运行,则颜色应为红色。
Color _getColorByServerStatus(ServerInfo info) {
    if (info.running()) {
      return Colors.teal[600];
    } else {
      return Colors.red[200];
    }
  }
4.处理REST服务响应 (4. Handle the REST service response)
Now let’s consume the REST service response by creating a dataservice.dart file:
现在,通过创建dataservice.dart文件来使用REST服务响应:
import 'package:myapp/serverinfo.dart';
import 'dart:js' as js;
import 'package:http/http.dart' as http;
import 'dart:async';
import 'dart:convert';


Future<List<ServerInfo>> fetchServerInfo() async {
  final response = await http.get("http://localhost:8080/api");


  if (response.statusCode == 200) {
    // If the server did return a 200 OK response,
    // then parse the JSON.
    var responseJson = json.decode(response.body);
    return (responseJson as List).map((p) => ServerInfo.fromJson(p)).toList();
  } else {
    // If the server did not return a 200 OK response,
    // then throw an exception.
    throw Exception('Failed to load server data');
  }
}
You will get a compilation error on this step because the http and js packages haven’t been downloaded yet. To update the dependencies, open the pubspec.yaml file and type this under the dependencies section:
由于尚未下载http和js软件包,因此您将在此步骤上遇到编译错误。 要更新依赖关系,请打开pubspec.yaml文件,然后在“依赖关系”部分下键入以下内容:
http: any
html: any
After successfully pulling the dependencies, we are almost ready to go.
成功提取依赖关系后,我们几乎可以开始了。
5.创建主应用程序小部件 (5. Create the main application widget)
The core of the application is the main.dart file. Type the code below to create the main widget:
该应用程序的核心是main.dart文件。 输入以下代码以创建主窗口小部件:
import 'package:flutter/material.dart';
import 'package:myapp/dataservice.dart';
import 'dart:async';


import 'package:myapp/serverinfo.dart';
import 'package:myapp/startpage.dart';


void main() {
  runApp(MyApp());
}


class MyApp extends StatefulWidget {
  MyApp({Key key}) : super(key: key);


  @override
  _MyAppState createState() => _MyAppState();
}


class _MyAppState extends State<MyApp> {
  // This widget is the root of your application.
  Future<List<ServerInfo>> futureData;


  @override
  void initState() {
    super.initState();
    futureData = fetchServerInfo();
  }


  @override
  Widget build(BuildContext context) {
    return MaterialApp(
      title: "Serverstatus monitor",
      theme: ThemeData(
        primarySwatch: Colors.blue,
        visualDensity: VisualDensity.adaptivePlatformDensity,
      ),
      home: StartPage(title: "Server status monitor", serverInfo: futureData),
    );
  }
}
We need a stateful widget because we want it to change its appearance in response to events triggered by received data. More on stateful and stateless widgets can be found in Flutter’s documentation.
我们需要一个有状态的小部件,因为我们希望它能够更改其外观以响应接收到的数据触发的事件。 在Flutter的文档中可以找到有关有状态和无状态小部件的更多信息 。
6.启动Flutter应用程序 (6. Start the Flutter application)
In this tutorial, we are using the web platform, which needs to be enabled. Type the following commands into your Terminal window:
在本教程中,我们使用需要启用的Web平台。 在“终端”窗口中键入以下命令:
flutter channel betaflutter channel betaflutter config -enable-webflutter config -enable-webflutter create webflutter create webflutter run -d webflutter run -d web
The host and port will be displayed in the terminal window. Copy the address to a browser to access the UI.
主机和端口将显示在终端窗口中。 将地址复制到浏览器以访问UI。
7.启用跨域资源共享 (7. Enable cross-origin resource sharing)
Now, if you type the Flutter application’s URL into the browser, you will see a fancy error message. This is because the browser permits scripts contained in a first web page to access data in a second web page, but only if both web pages have the same origin.
现在,如果您在浏览器中键入Flutter应用程序的URL,您将看到一个精美的错误消息。 这是因为浏览器允许第一个网页中包含的脚本访问第二个网页中的数据,但前提是两个网页的来源相同 。
To solve the issue, install the Access-Control-Allow-Origin plug-in on your browser. It enables cross-origin access by requesting specific origins.
要解决此问题,请在浏览器上安装Access-Control-Allow-Origin 插件 。 它通过请求特定来源来启用跨域访问。
Next time you load the UI, just enable the plug-in.
下次加载UI时,只需启用插件即可。
As a result, you should see something like this:
结果,您应该看到类似以下内容的内容:
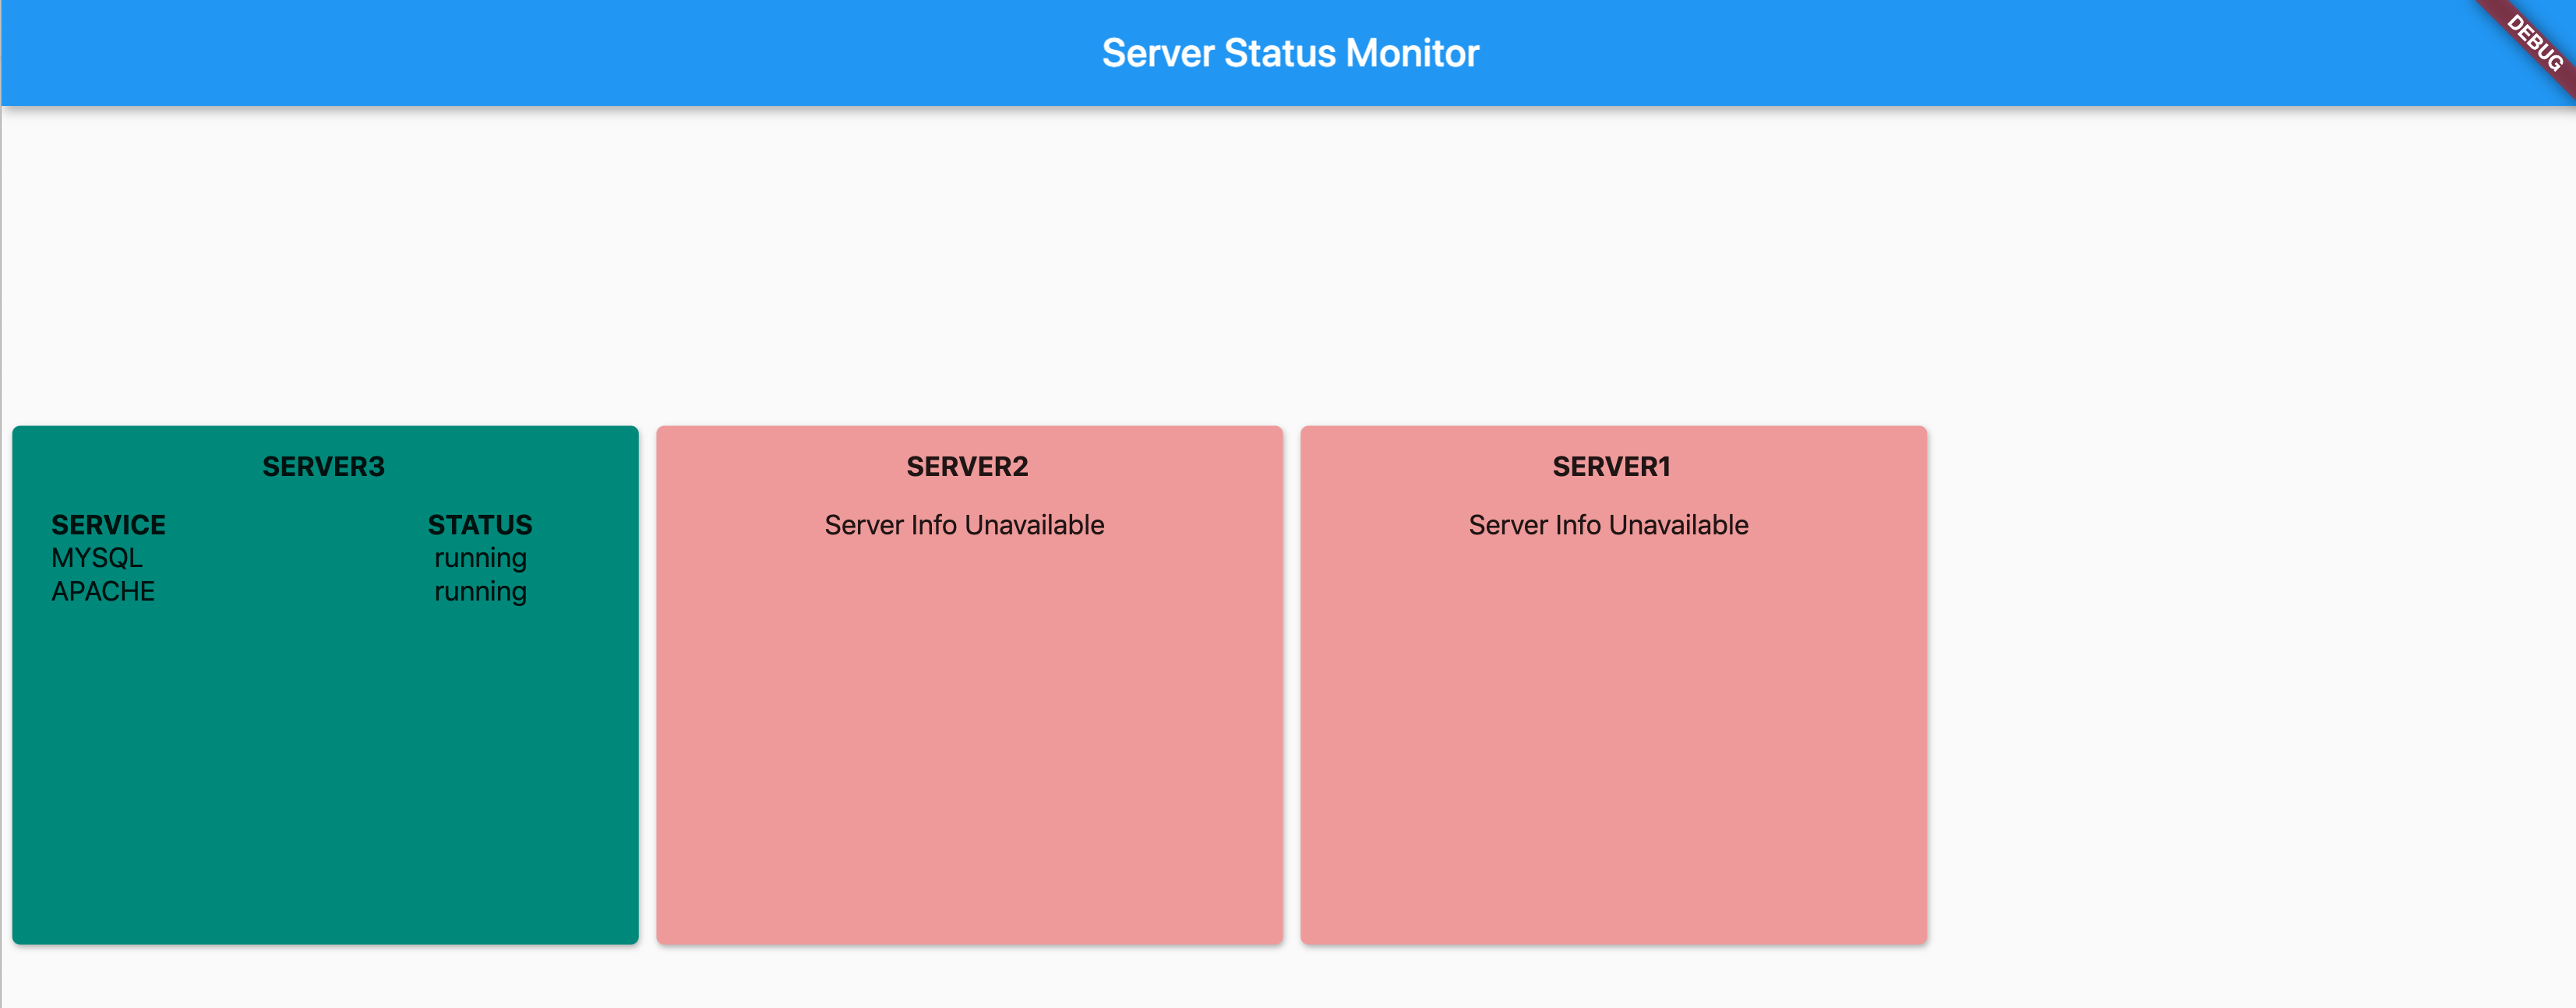
Don’t forget to disable the plug-in to avoid issues with other sites.
不要忘记禁用该插件,以避免其他站点出现问题。
结论 (Conclusion)
We have come to the end of this tutorial. I hope that you have learned something new today. Thank you for reading and happy coding!
我们到了本教程的结尾。 希望您今天学到了一些新知识。 感谢您的阅读和愉快的编码!
https://docs.spring.io/spring-boot/docs/current/reference/html/getting-started.html
https://docs.spring.io/spring-boot/docs/current/reference/html/getting-started.html
https://docs.spring.io/spring-boot/docs/current/reference/html/appendix-application-properties.html
https://docs.spring.io/spring-boot/docs/current/reference/html/appendix-application-properties.html


 181
181

 被折叠的 条评论
为什么被折叠?
被折叠的 条评论
为什么被折叠?
 到【灌水乐园】发言


