swift uikit
Difficulty: Beginner | Easy | Normal | Challenging
难度:初学者| 容易 | 普通| 具有挑战性的
先决条件: (Prerequisites:)
This requires you create a Single View Application. In the final repo, I’ve placed the alternatives in a stackview that is scrollable.
这需要您创建一个Single View Application 。 在最后的仓库中 ,我将替代方案放置在可滚动的stackview中 。
术语 (Terminology)
CALayer: The Core Animation layer that is responsible for managing image-based content
CALayer:核心动画层,负责管理基于图像的内容
动机 (Motivation)
You might well need to create a profile image for your app, and often your designer will insist that you have a nicely cropped image — a circular one at that. The point is that many backends (end users) do not give a circular image — rather they give the frontend a rectangle. So how can you clip the thing>
您可能需要为您的应用程序创建一个配置文件图像,并且通常您的设计师会坚持认为您拥有一个裁剪好的图像-就是一个圆形的图像。 关键是许多后端(最终用户)没有给出圆形图像,而是为前端提供了矩形。 那你怎么剪东西>
This article is here to help you out by giving no less than 4 ways to create the profile image. They are presented in the App using a UIStackView that is scrollable (so can be rotated),
本文旨在通过提供至少四种创建个人资料图像的方法来帮助您。 它们使用可滚动(可以旋转) 的UIStackView在应用程序中显示 ,

The first two images (as you can see) are plain profile images. The second two images deliver a circular image with a grey circle around the profile image.
前两个图像(如您所见)是普通的个人资料图像。 后两个图像传递圆形图像,轮廓图像周围带有灰色圆圈。
For this guide there is an Asset catalogue with an image called man (there is a single image here rather than the different resolutions you would expect in a production App — sorry)
在本指南中,有一个资产目录,其中包含一个名为man的图像(这里只有一个图像,而不是您在生产应用程序中期望的不同分辨率-抱歉)
CALayer背景 (CALayer Background)
CALayers are a backing store for any UIView (in order to manage the content), but in fact can even be used without a view at all (although in this tutorial CALayer will indeed be used with a view).
CALayers是任何UIView的后备存储(以便管理内容),但实际上甚至可以在没有视图的情况下使用(尽管在本教程中CALayer的确会与视图一起使用)。
A UIView will have a root CALayer, but also has zero or more additional CALayers for various features (like gradients, for example).
UIView将具有根CALayer ,但对于各种功能(例如渐变),也将具有零个或多个其他CALayers 。
In this tutorial we will use the layer property on UIView in order to produce a circular view with a border.
在本教程中,我们将在UIView上使用layer属性,以生成带有边框的圆形视图。
设置个人资料图片 (Setting up the Profile Image)
All of these demonstration images are placed in a view controller called ProfileViewController.
所有这些演示图像都放在一个名为ProfileViewController的视图控制器中。
一个标准的UIImageView (A standard UIImageView)
Standard ImageView
标准ImageView
The simplest way to implement a profile image is to use a UIImageView and add an image through the image property (of course the outlet must be set from the storyboard)
实现个人资料图像的最简单方法是使用UIImageView并通过image属性添加图像(当然,必须从情节提要中设置出口)

This gives us a rather simple square image. Pretty dull. Your designer will feel physically sick.
这给了我们一个相当简单的正方形图像。 很沉闷。 您的设计师会感到身体不适。
Circular UIImageView
圆形UIImageView
We can make a CircularImageView class that sets a cornerRadius and confines the subview to the bounds of the view through clipsToBounds. To make this easier to see in the storyboard I’ve used @IBDesignable in the implementation.
我们可以创建一个CircularImageView类,该类设置一个cornerRadius并将子视图通过clipsToBounds限制在视图的范围内。 为了使这更容易在情节提要中看到,我在实现中使用了@IBDesignable 。

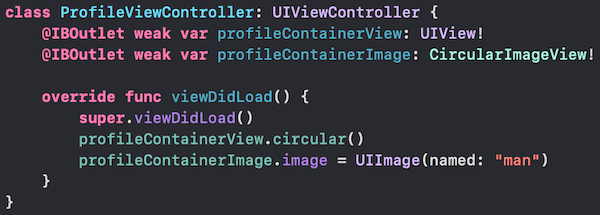
this can then be called from the ProfileViewController.
然后可以从ProfileViewController调用ProfileViewController 。

This allows to have a nice circular image
这样可以产生漂亮的圆形图像

添加边框 (Adding a border)
It would be really nice to show a circular border around the profile image (wouldn’t it?). This section of the article will show you how!
在个人资料图片周围显示圆形边框真的很好(不是吗?)。 本文的这一部分将向您展示如何!
UIImageView in a container
容器中的UIImageView
One simple (ish) way to create a border around a UIImageView is to embed it in a container UIView.
一种在UIImageView周围创建边框的简单方法是将其嵌入容器UIView 。

Xcode allows us to embed a UIImage into a UIView. Now the constraints for the image give a little bit of padding around it.
Xcode允许我们将UIImage嵌入到UIView 。 现在,图像的约束条件为图像提供了一些填充。

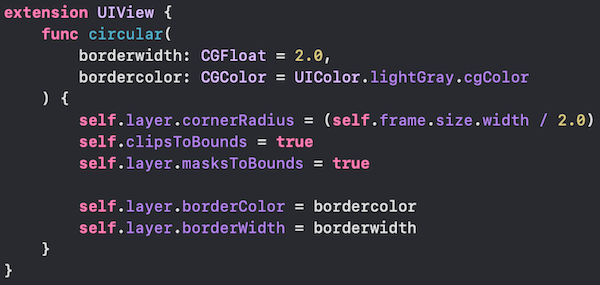
To make the border circular on this container UIView is implemented through an extension.
为了使边框在此容器上圆形, UIView是通过扩展实现的。

This does (unfortunately) require two separate outlets (the final part of this article details a way of avoiding this) which can then be called with the following:
这确实(不幸地)需要两个单独的出口(本文的最后部分详细介绍了避免这种情况的方式),然后可以使用以下方法调用该出口:

Awesome! But how can we produce a nicer solution?
太棒了! 但是,我们如何产生更好的解决方案?
UIViewSubclass
UIViewSubclass
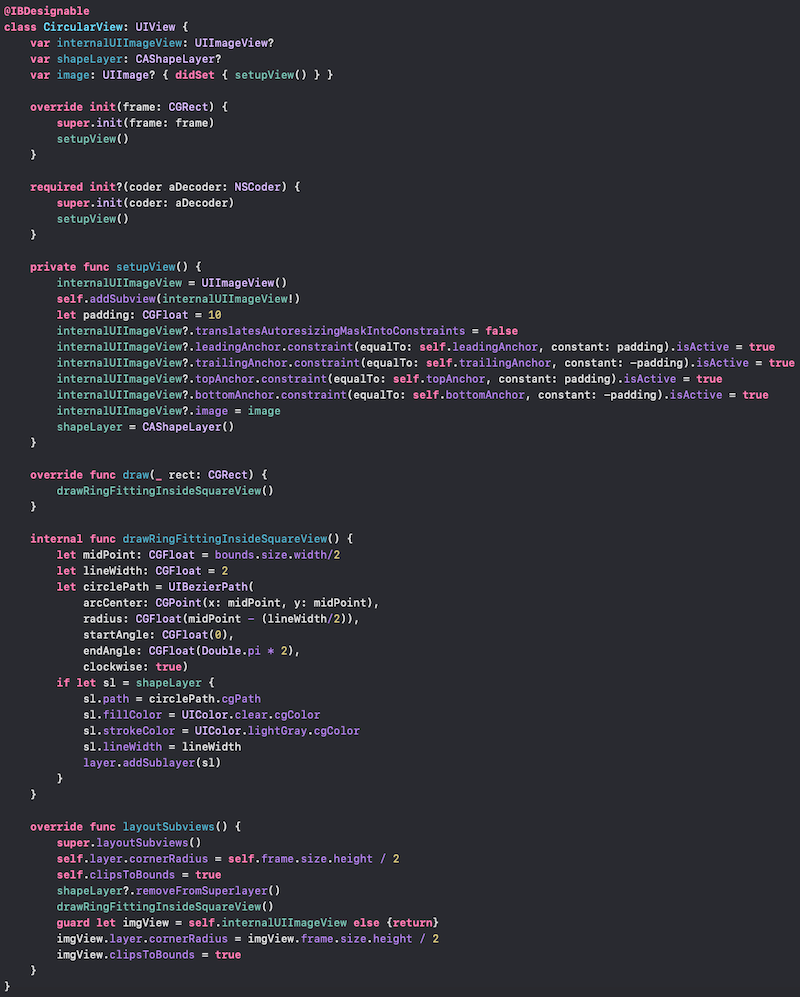
Wouldn’t it be nice to have a single UIView that contains the UIImageView . Now it is true that this code is not that easy. It features initialisers for both the storyboard and through code that call setupView() which is a shared function to initialise the UIView. The method setupView() sets up constraints and initalises the CAShapeLayer shapelayer. Once UIKit has setup the drawing environment func draw(_ rect: CGRect) is called, during which we drawRingFittingInsideSquareView().
有一个包含UIImageView UIView不好吗? 现在,这是事实,这个代码是不是 容易。 它具有用于情节提要和通过调用setupView()的代码的初始化程序,setupView()是用于初始化UIView的共享函数。 setupView()方法设置约束并初始化CAShapeLayer形状图层。 一旦UIKit设置好绘图环境func draw( _ rect: CGRect) ,在此期间我们drawRingFittingInsideSquareView() 。
drawRingFittingInsideSquareView() essentially draws a UIBezierPath and adds it to the Layer — which works fine if we have not set an image through the image propery. When the image is set, setupView() is called again in order to set up the constraints for the UIImageView.
drawRingFittingInsideSquareView()本质上绘制了一个UIBezierPath并将其添加到Layer中-如果我们没有通过图像属性设置图像,则可以正常工作。 设置图像后 ,将再次调用setupView(),以设置UIImageView的约束。
layoutSubViews() sets the corner radius of the container, and makes the subviews clip to bounds. We remove any existing shapeLayer (containing the ring), and then instruct swift to draw the ring back in with drawRingFittingInsideSquareView() this allows us to add the UIImageView back in and make that circular.
layoutSubViews()设置容器的角半径,并使子视图裁剪到边界。 我们删除任何现有的shapeLayer(包含环),然后使用drawRingFittingInsideSquareView()指示swift将环拉回去,这使我们能够添加UIImageView并使其成为圆形。
Phew! Luckily, the code is quite easy to read:
! 幸运的是,代码很容易阅读:

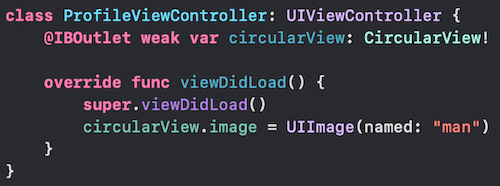
Of course an extension is required in order to create this view.
当然,需要扩展才能创建此视图。

为什么不只是UIImageView ? (Why not just subclass UIImageView ?)
UIImageView does not call func draw(_ rect: CGRect) because it should be, well, drawing an image. Therefore drawing the ring over the existing picture view really isn’t what we are looking for here, rather we want to be able to draw over a UIView and put an image inside it. This is something that we have managed to do with the featured implementation above.
UIImageView不会调用func draw( _ rect: CGRect)因为它应该可以绘制图像。 因此,在现有图片视图上绘制环确实不是我们在这里想要的,而是我们希望能够在UIView上绘制并在其中放置图像。 这是我们通过上面的功能实现而成功完成的。
结论 (Conclusion)
Like many things in programming, this is as easy or as difficult as you want it to be. To put it another way, when you do it right you do it once. To put it another way, complexity makes things easier. To put it another way, do it your way. To put it another way; you need to choose which of the last two implementations in your particular project. You decide!
就像编程中的许多事情一样,这就像您想要的那样容易或困难。 换句话说,当您正确执行操作时,只需执行一次。 换句话说,复杂性使事情变得更容易。 换句话说,按照自己的方式做。 换一种方式; 您需要选择特定项目中的最后两个实现中的哪个。 你决定!
I’d love to hear from you if you have questions
如果您有任何疑问,我很想听听您的意见
翻译自: https://medium.com/swlh/create-a-circular-profile-image-swift-uikit-19ae4eaa8bb1
swift uikit


 这篇博客介绍了如何在Swift中利用UIKit来创建一个圆形轮廓的图像,适用于UI设计和iOS应用开发。


 1283
1283

 被折叠的 条评论
为什么被折叠?


