


While working on Peel, we quickly realized we needed to be able to set up multiple targets for the same React Native project. There’s several big advantages to doing that:
在研究Peel时 ,我们很快意识到我们需要能够为同一个React Native项目设置多个目标。 这样做有很多好处:
- Store your environment variables in separate files 将环境变量存储在单独的文件中
- Multiple instances of your app with different environments can be installed on the same phone (with different bundle identifiers) 您可以将具有不同环境的应用程序的多个实例安装在同一部手机上(具有不同的捆绑包标识符)
- No need to add extra-logic to swap between API urls, constants, keys etc. 无需添加额外的逻辑即可在API网址,常量,键等之间进行交换。
There’s some great articles describing how to do that on React Native, but all the ones I could find were written a few years back and things have changed a bit since then. So I’ve decided to give an up-to-date tutorial on the matter.
有一些很棒的文章描述了如何在React Native上实现该功能,但是我能找到的所有内容都是几年前写的,自那以后,情况有所变化。 因此,我决定提供有关此问题的最新教程。
开始之前 (Before we start)
The goal of this tutorial is for you to set up multiple environments on your own React Native app. However, if you want to follow along for the sake of learning I’ve created this repository which you can clone on your machine.
本教程的目标是让您在自己的React Native应用程序上设置多个环境。 但是,如果您想继续学习,我已经创建了该存储库 ,可以在您的计算机上对其进行克隆。
安装react-native-config (Install react-native-config)
We are going to use the package react-native-config to handle our environment variables. In your repo, run:
我们将使用包react-native-config来处理环境变量。 在您的仓库中,运行:
npm install react-native-config --saveYou then need to link the library, even if you using Cocoapods:
然后, 即使您使用Cocoapods , 也需要链接库:
npx react-native link react-native-configIf you’re using Cocoapods, you also need to run a pod install:
如果您使用的是Cocoapods,则还需要运行pod安装:
cd ios
pod install
cd ../
We will then create the files that will store our environment variables. We’ll set two environments: development and production, so we create two files at the root of our project: .env.development and .env.production.
然后,我们将创建用于存储环境变量的文件。 我们将设置两个环境: development和production ,因此我们在项目的根目录创建两个文件: .env.development和.env.production 。
For the sake of this tutorial, we’ll only store one variable in each file in order to know in what environment our app is running.
在本教程中,我们仅在每个文件中存储一个变量,以便了解我们的应用程序在哪种环境下运行。
In .env.development:
在.env.development :
ENVIRONMENT=developmentAnd in .env.production:
在.env.production :
ENVIRONMENT=productionIn a real app, these files would contain all your API urls, constants, API keys… anything that is specific to each environment.
在真实的应用程序中,这些文件将包含您所有的API URL,常量,API密钥……任何特定于每种环境的内容。
在Android上设置构建类型 (Setting up build types on Android)
We will be using build types with suffixes to create different versions of our app on Android.
我们将使用带有后缀的构建类型在Android上创建应用程序的不同版本。
Open
android/app/build.gradle打开
android/app/build.gradle- At the very top of the file, we’ll assign an environment file to each build type: 在文件的最顶部,我们将为每个构建类型分配一个环境文件:
project.ext.envConfigFiles = [
  release: ".env.production",
  debug: ".env.development",
  developmentrelease: ".env.development",
]
The naming of your build types is important! Make sure to use only lowercase letters with no special characters and append “release” at the end of the name of your custom build types, or they might not work.
构建类型的命名很重要! 确保仅使用不带特殊字符的小写字母,并在自定义构建类型名称的末尾附加“ release”,否则它们可能不起作用。
Add this line after
apply plugin:在
apply plugin之后添加以下行:
apply from: project(":react-native-config").projectDir.getPath() + "/dotenv.gradle"- Since we’ll use suffixes, we need to edit our default config: 由于我们将使用后缀,因此我们需要编辑默认配置:
defaultConfig {
  ...
  resValue "string", "build_config_package", "com.myapp"
}
Replace
"com.myapp"with the bundle identifier of your app.用您的应用程序的捆绑标识符替换
"com.myapp"。
Add
developmentreleasebuild type with the".development"suffix:添加带有
".development"后缀的developmentrelease构建类型:
buildTypes {
  ...
  developmentrelease {
    initWith debug
    applicationIdSuffix ".development"
  }
}
Add matching fallbacks to
debugbuild type:添加匹配的后备以
debug构建类型:
debug {
  ...
  matchingFallbacks = ['debug', 'release']
}
That’s it! Your environment variables are now available to your native code, as well as your Javascript code:
而已! 现在,您的本机代码和Javascript代码都可以使用您的环境变量:
import Config from 'react-native-config';Config.ENVIRONMENT; // "development" or "production"If you are following this tutorial using the repository I gave earlier, add this line at the top of the App.js file:
如果您使用我之前提供的存储库来学习本教程,请在App.js文件顶部添加以下行:
import Config from 'react-native-config';And change line 21 to:
并将第21行更改为:
const environment = Config.ENVIRONMENT;You can now run both versions of the app on your device.Development:
现在,您可以在设备上运行两个版本的应用程序。
npx react-native run-android --variant=developmentreleaseProduction:
生产:
npx react-native run-android --variant=release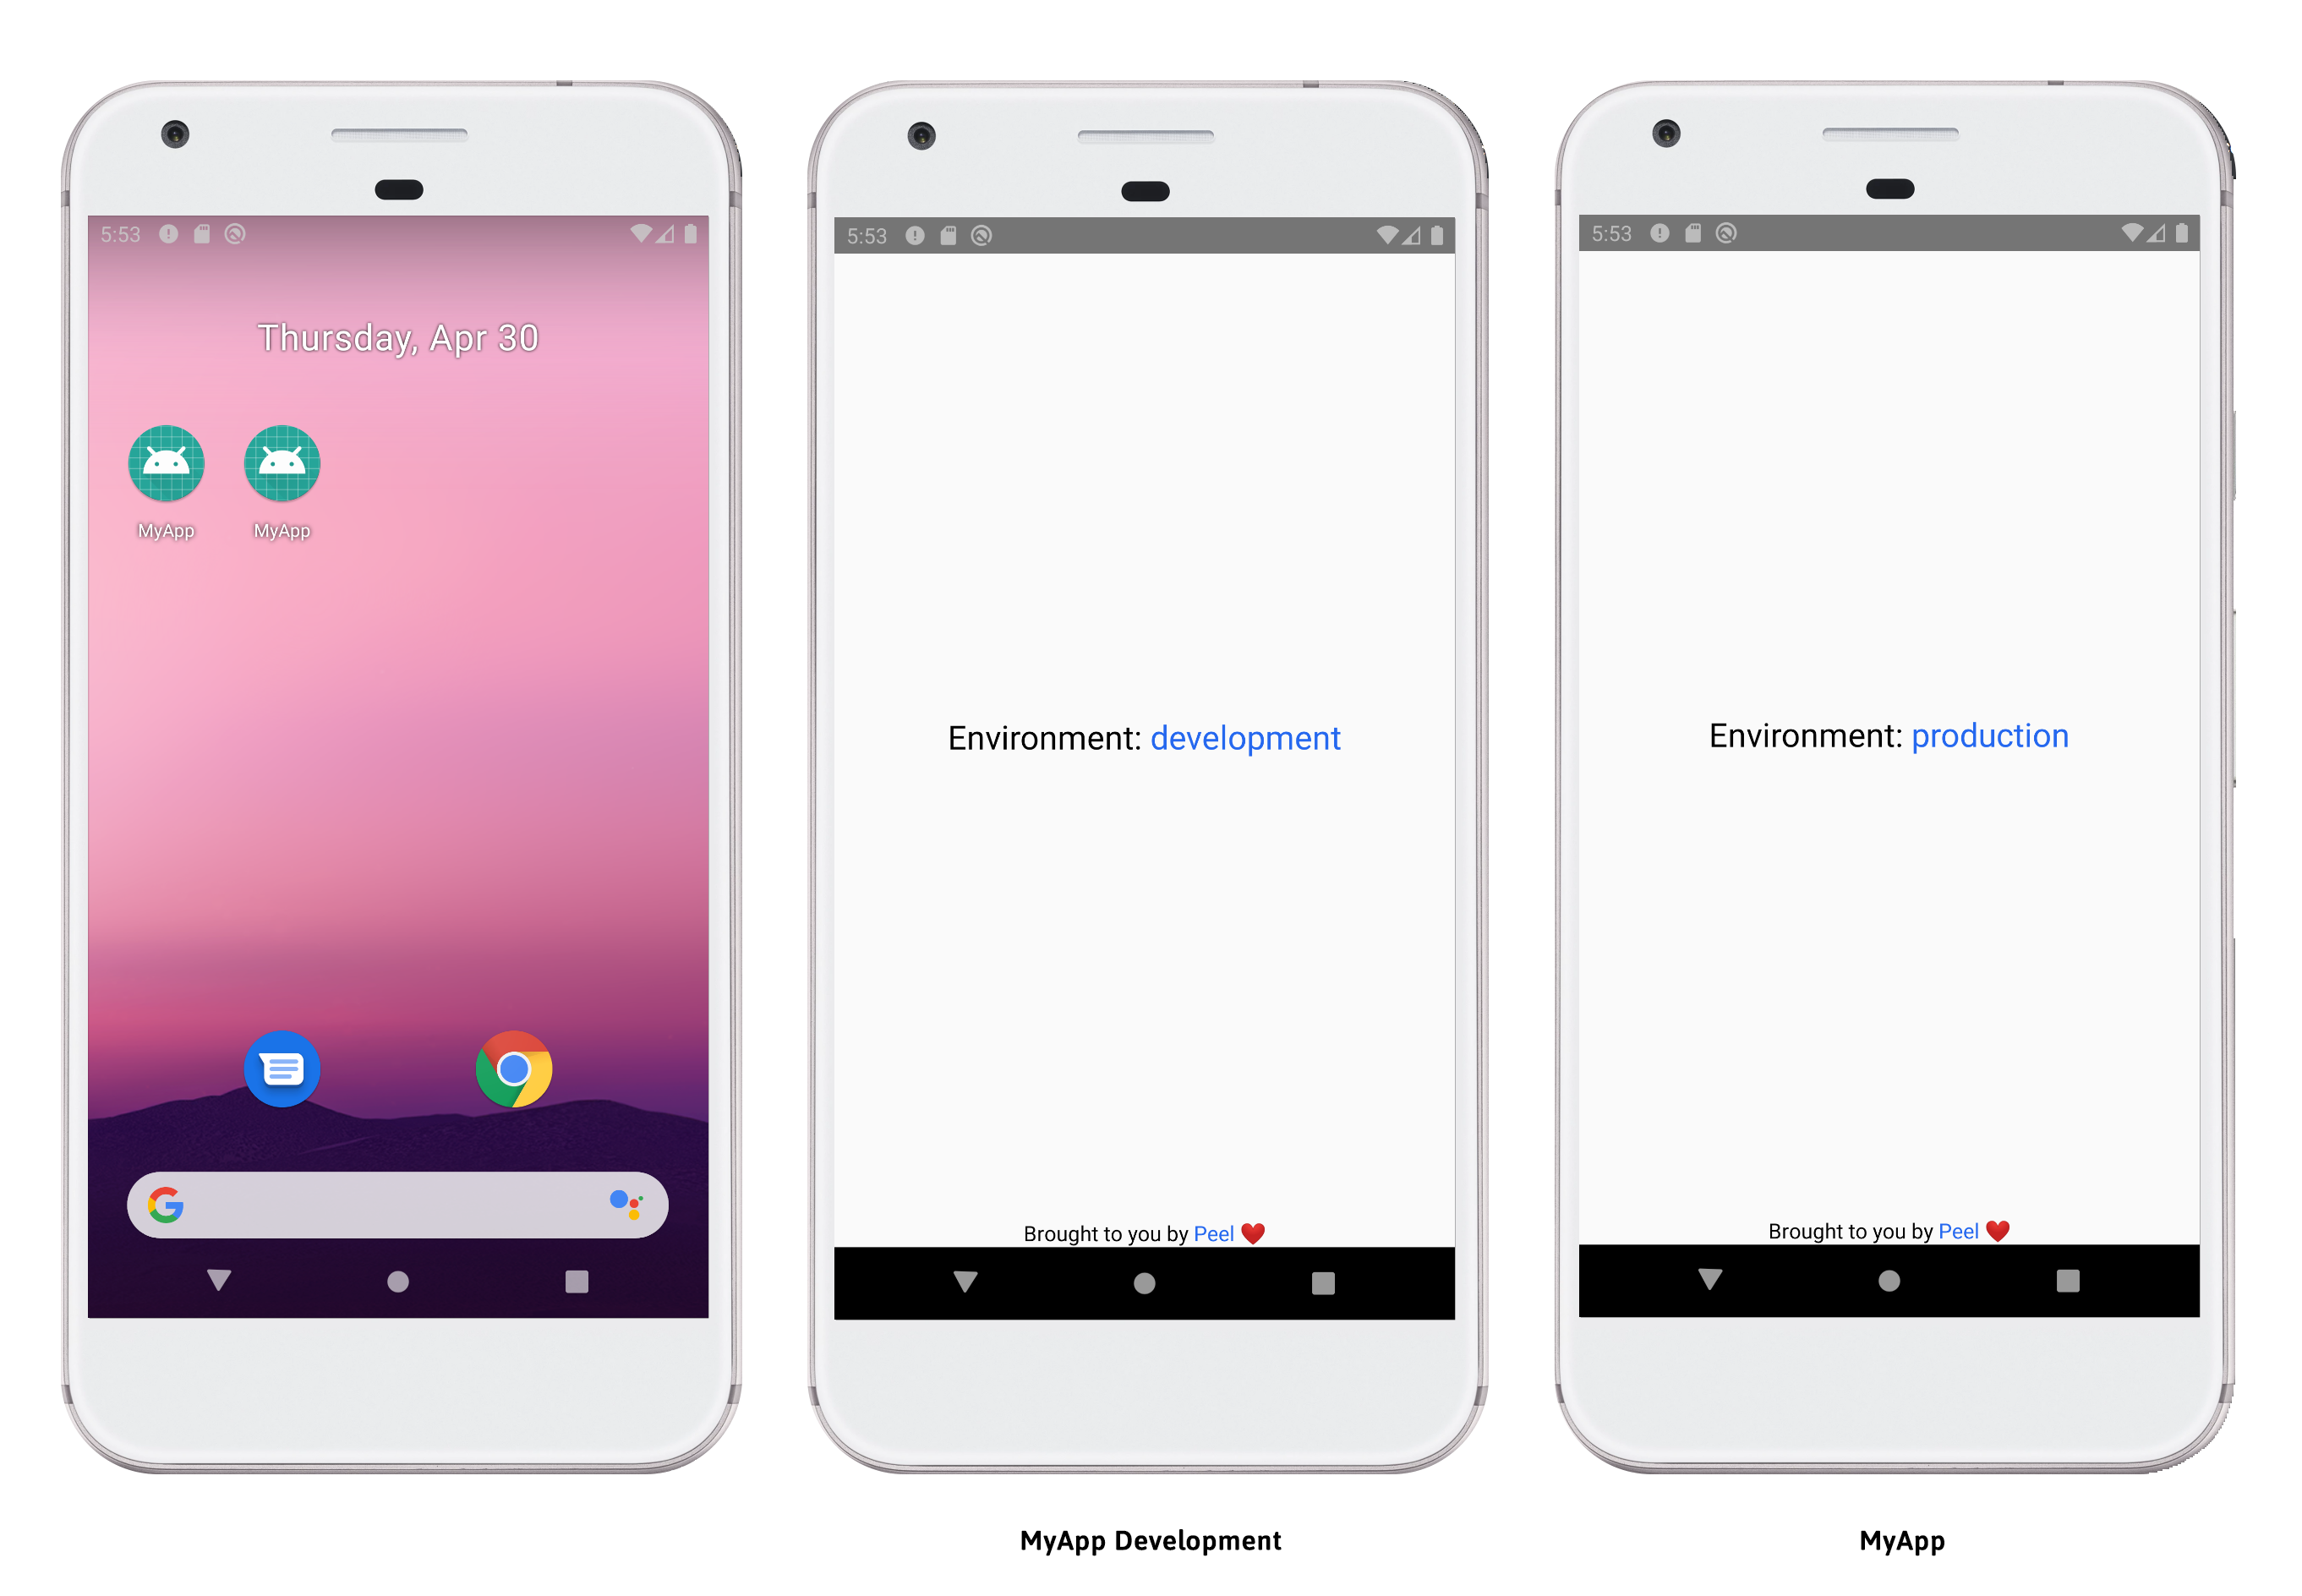
在iOS上添加目标 (Adding a target on iOS)
We will be using targets to handle our environments on iOS. The configuration is a bit more daunting than for Android, so hold tight!
我们将使用目标来处理iOS上的环境。 该配置比Android的配置更令人生畏,因此请紧紧使用!
Open the
.xcworkspacefile of your app in Xcode, then right click on your project >New Group在Xcode中打开应用程序的
.xcworkspace文件,然后右键单击您的项目>New Group
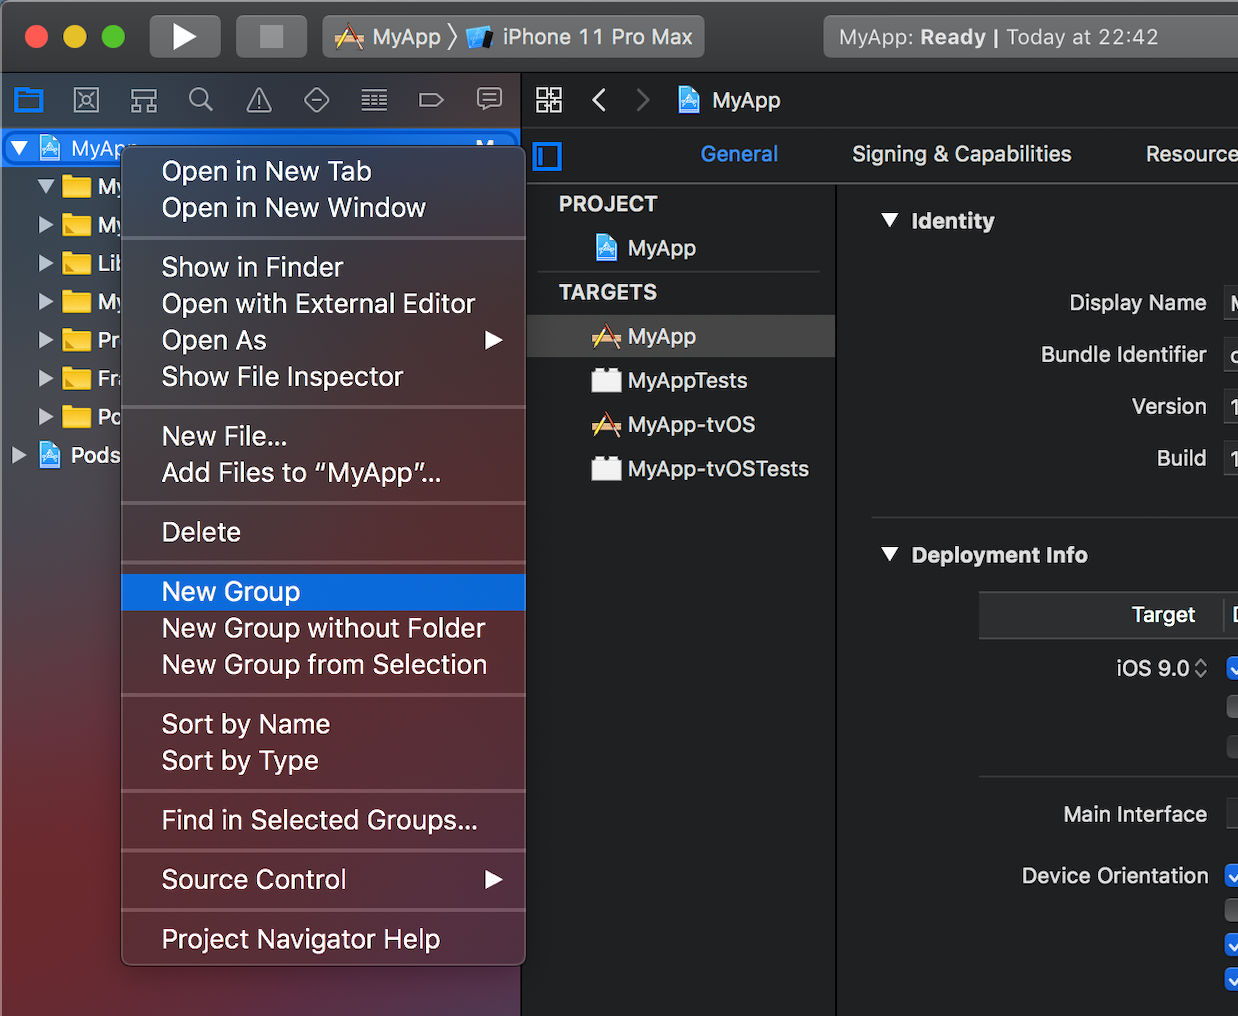
Rename this group to
MyAppDevelopment(replacing “MyApp” with the name of your app)将该组重命名为
MyAppDevelopment(用您的应用名称替换“ MyApp”)Right click on your main target (
MyAppfor me) >Duplicate>Duplicate Only右键单击您的主要目标(对我来说是
MyApp)>Duplicate>Duplicate Only

Rename the duplicated target to
MyAppDevelopment将重复的目标重命名为
MyAppDevelopmentIn the
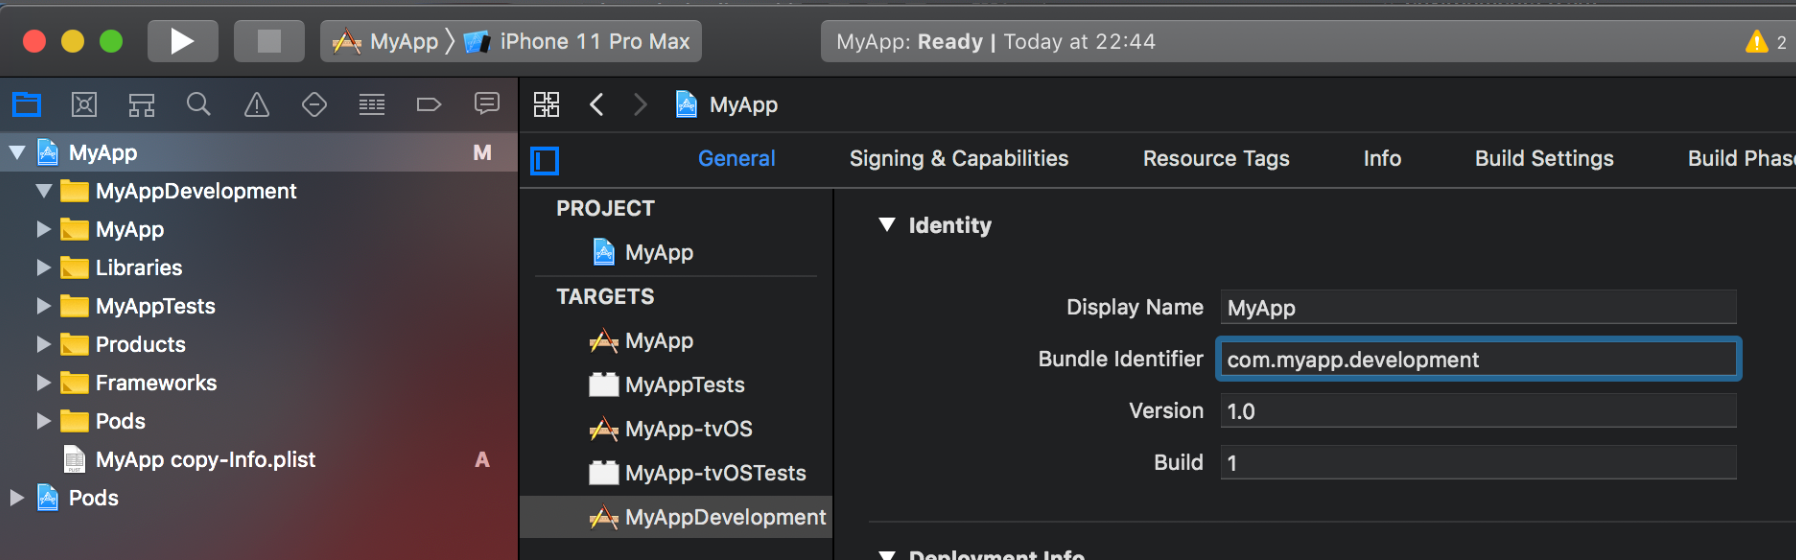
General, set theBundle Identifiertocom.myapp.development. By having a different bundle identifier, we’ll be able to install the two versions of our app (development and production) on the same device.在“
General,将“Bundle Identifier设置为com.myapp.development。 通过使用不同的捆绑包标识符,我们将能够在同一设备上安装应用程序的两个版本(开发和生产)。
Move the new
Info.plistfile that got automatically created when you duplicated the target intoMyAppDevelopmentgroup, then rename it toInfo.plist. Note that you’ll need to actually copy and paste the file intoMyAppDevelopmentgroup, if you just slide it from Xcode only the reference will be moved, not the actual file!将复制目标时自动创建的新
Info.plist文件移动到MyAppDevelopment组中,然后将其重命名为Info.plist。 请注意,您实际上需要将文件复制并粘贴到MyAppDevelopment组中,如果仅从Xcode滑动文件,则仅引用将被移动,而不是实际文件!If your main target contains a
.entitlementsfile (MyApp.entitlements), duplicate it and move it insideMyAppDevelopmentgroup, then rename it toMyAppDevelopment.entitlements. This will permit you to support different capabilities for each target (remote notifications, app groups…).如果您的主要目标包含一个
.entitlements文件 (MyApp.entitlements),请复制该 文件MyApp.entitlements其移至MyAppDevelopment组内,然后将其重命名为MyAppDevelopment.entitlements。 这将允许您为每个目标(远程通知,应用程序组…)支持不同的功能。In the
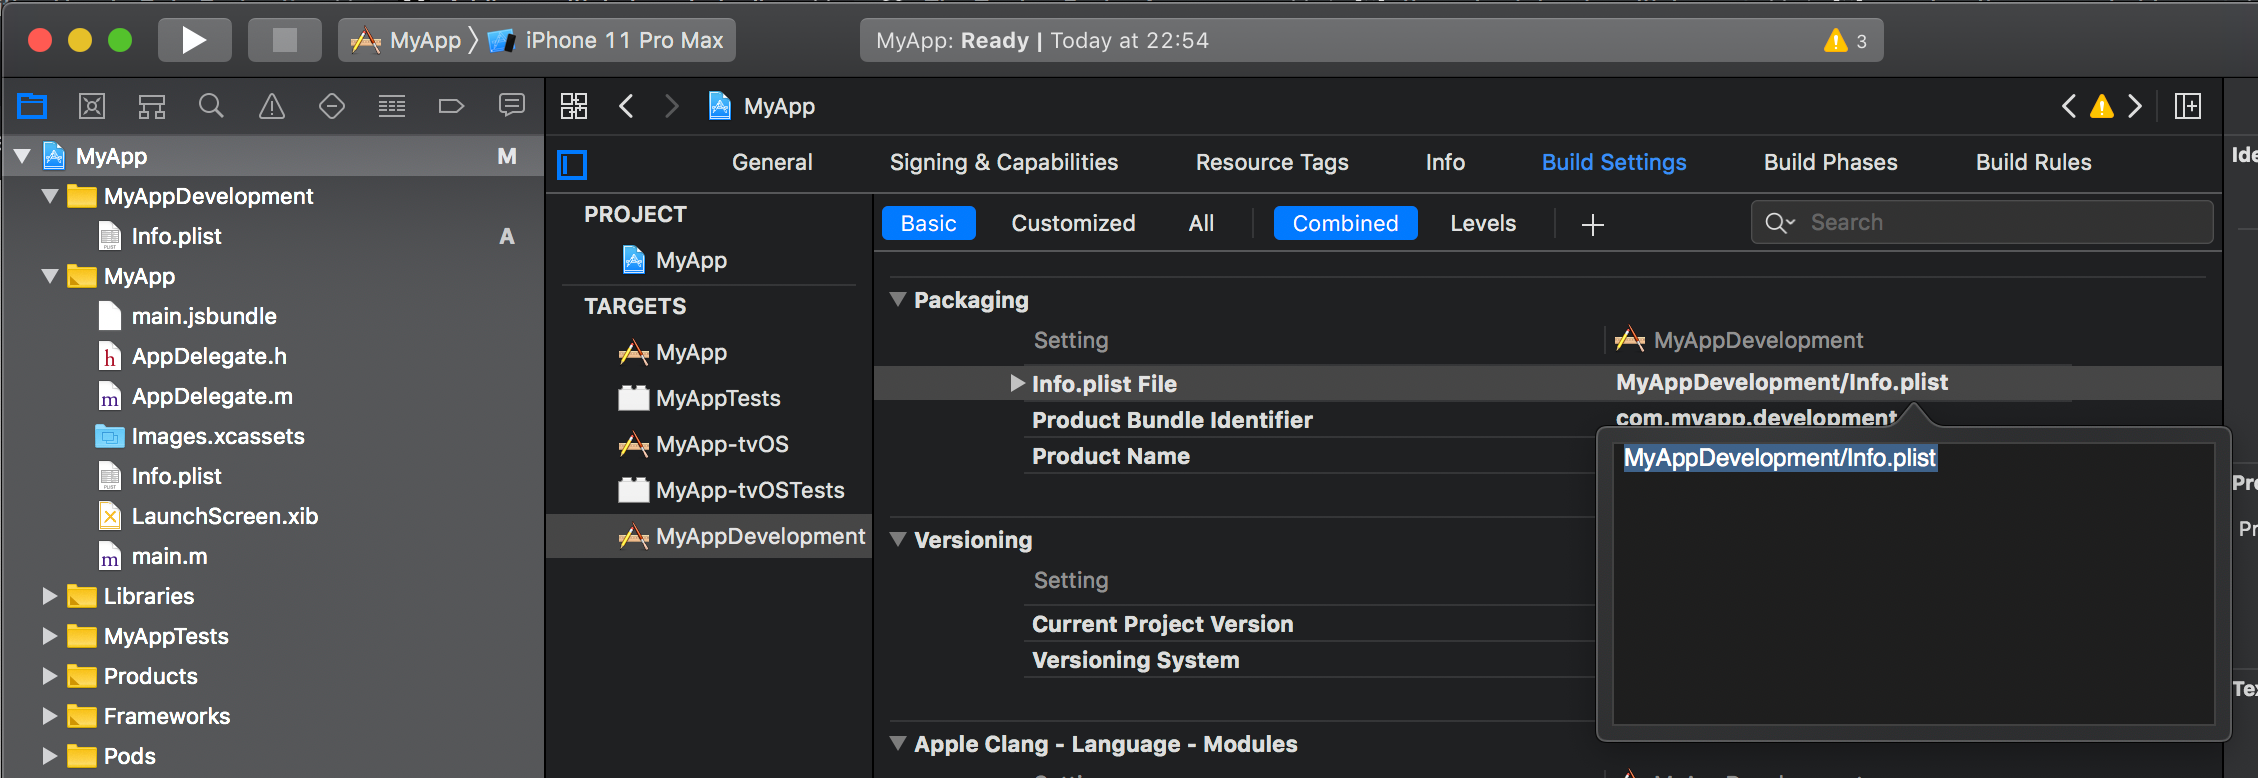
Build Settingstab ofMyAppDevelopmenttarget, search for thePackagingsection then setInfo.plist Fileto the path of theInfo.plistwe just moved;MyAppDevelopment/Info.plistin our case.在
MyAppDevelopment目标的Build Settings选项卡中,搜索Packaging部分,然后将Info.plist File设置为我们刚刚移动的Info.plist的路径。 在我们的案例中为MyAppDevelopment/Info.plist。
If in the previous step you duplicated a
.entitlementsfile, you’ll also need to search for the sectionSigningand setCode Signing Entitlementsto the path of the.entitlements file(MyAppDevelopment/MyAppDevelopment.entitlements).如果在上一步中你复制一个
.entitlements文件,你还需要搜索的部分Signing,并设置Code Signing Entitlements的路径.entitlements file(MyAppDevelopment/MyAppDevelopment.entitlements)。
Click on
MyAppin the left corner of the top bar >Manage Schemesand scroll down to find the newly created schemeMyApp copy. Rename it toMyAppDevelopment, then click onEditin the bottom left corner.单击顶部栏左上角的
MyApp>Manage Schemes然后向下滚动以查找新创建的方案MyApp copy。 将其重命名为MyAppDevelopment,然后单击左下角的“Edit”。Click on
Buildaccordion (without expanding it), then on the+in the bottom left corner. Search for “React” and add the item namedReact(dah). Make sure to untickParallelize build.单击“
Build手风琴”(不展开它),然后单击左下角的+。 搜索“React”并添加名为React(dah)的项目。 确保取消选中Parallelize build。
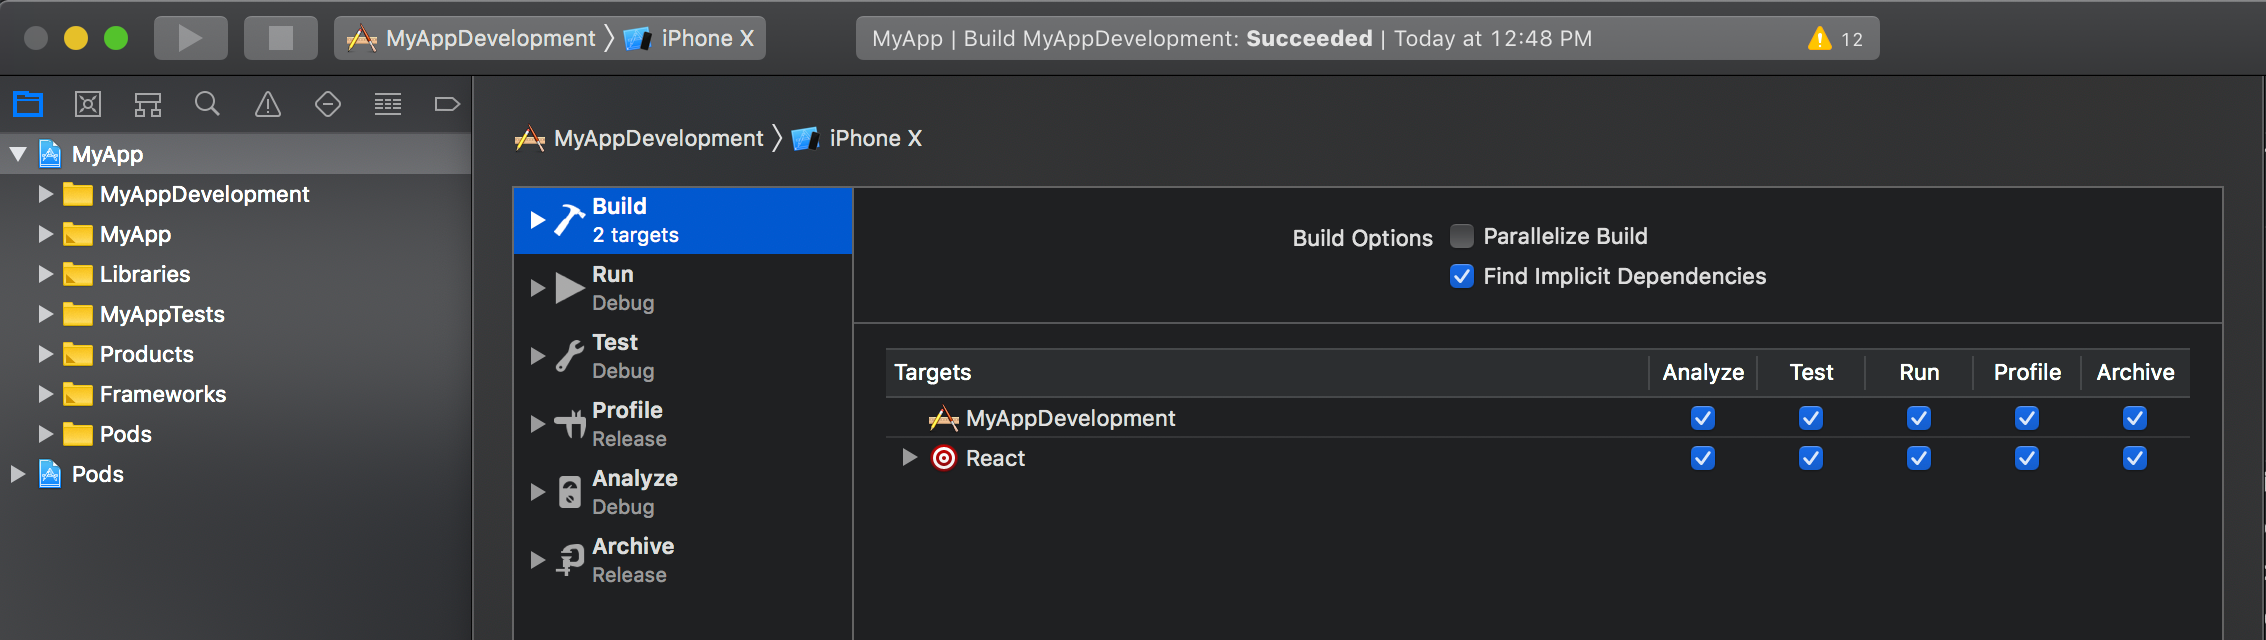
Our new target should now be able to run, but we need to configure react-native-config.
现在我们的新目标应该可以运行了,但是我们需要配置react-native-config 。
Expand
Buildaccordion, click onPre-actionsthen on the+in the bottom left corner >New Run Script Action.展开
Build手风琴,单击Pre-actions然后单击左下角的+>New Run Script Action。- Replace the content of the script with: 将脚本的内容替换为:
echo ".env.development" > /tmp/envfile- Repeat the same action for the main target, this time replacing the content of the script with: 对主要目标重复相同的操作,这次将脚本的内容替换为:
echo ".env.production" > /tmp/envfileWe’re done playing with Xcode! We’ll now edit the Podfile of the project (ios/Podfile).
Xcode玩完了! 现在,我们将编辑项目的Podfile ( ios/Podfile )。
Since you’re reading this tutorial, chances are your project is articulated around one main target. We’ll first need to set an abstract target, so multiple targets can use the same pods and also use their own pods. In the
Podfile, replace the line:由于您正在阅读本教程,因此您的项目很有可能围绕一个主要目标进行阐述。 我们首先需要设置一个抽象目标,以便多个目标可以使用相同的容器,也可以使用自己的容器。 在
Podfile,替换以下行:
target 'MyApp' doWith:
带有:
abstract_target 'App' do
Appcan be replaced with anything you want, but shouldn’t be the same as any of your targets’ names!
App可以替换为您想要的任何名称,但不应与您的目标名称相同!
We now need to define our targets, that will inherit from our abstract target. Right bellow the last
pod ‘SOME_PLUGIN’, :path => ‘../node_modules/SOME_PLUGIN’(wereSOME_PLUGINwill probably bereact-native-configsince that’s the last plugin we installed), add our two targets:现在,我们需要定义目标,该目标将从抽象目标中继承。 在最后一个
pod 'SOME_PLUGIN', :path => '../node_modules/SOME_PLUGIN'(在SOME_PLUGIN情况下,SOME_PLUGIN可能是react-native-config因为这是我们安装的最后一个插件),添加两个目标:
target 'MyApp' do
  #Production-specific pods  target 'MyAppTests' do
    inherit! :complete
    # Pods for testing
  end
endtarget 'MyAppDevelopment' do
  #Development-specific pods
end
Note: we moved the default test target
MyAppTestsinsideMyAppto respect the original architecture.注意:我们将默认的测试目标
MyAppTestsMyApp以尊重原始体系结构。
If you used the repository I linked at the beginning of this tutorial, your Podfile should look like this:
如果您使用的是我在本教程开始时链接的存储库,则Podfile应该如下所示:
platform :ios, '9.0'
require_relative '../node_modules/@react-native-community/cli-platform-ios/native_modules'


def add_flipper_pods!(versions = {})
  versions['Flipper'] ||= '~> 0.33.1'
  versions['DoubleConversion'] ||= '1.1.7'
  versions['Flipper-Folly'] ||= '~> 2.1'
  versions['Flipper-Glog'] ||= '0.3.6'
  versions['Flipper-PeerTalk'] ||= '~> 0.0.4'
  versions['Flipper-RSocket'] ||= '~> 1.0'


  pod 'FlipperKit', versions['Flipper'], :configuration => 'Debug'
  pod 'FlipperKit/FlipperKitLayoutPlugin', versions['Flipper'], :configuration => 'Debug'
  pod 'FlipperKit/SKIOSNetworkPlugin', versions['Flipper'], :configuration => 'Debug'
  pod 'FlipperKit/FlipperKitUserDefaultsPlugin', versions['Flipper'], :configuration => 'Debug'
  pod 'FlipperKit/FlipperKitReactPlugin', versions['Flipper'], :configuration => 'Debug'


  # List all transitive dependencies for FlipperKit pods
  # to avoid them being linked in Release builds
  pod 'Flipper', versions['Flipper'], :configuration => 'Debug'
  pod 'Flipper-DoubleConversion', versions['DoubleConversion'], :configuration => 'Debug'
  pod 'Flipper-Folly', versions['Flipper-Folly'], :configuration => 'Debug'
  pod 'Flipper-Glog', versions['Flipper-Glog'], :configuration => 'Debug'
  pod 'Flipper-PeerTalk', versions['Flipper-PeerTalk'], :configuration => 'Debug'
  pod 'Flipper-RSocket', versions['Flipper-RSocket'], :configuration => 'Debug'
  pod 'FlipperKit/Core', versions['Flipper'], :configuration => 'Debug'
  pod 'FlipperKit/CppBridge', versions['Flipper'], :configuration => 'Debug'
  pod 'FlipperKit/FBCxxFollyDynamicConvert', versions['Flipper'], :configuration => 'Debug'
  pod 'FlipperKit/FBDefines', versions['Flipper'], :configuration => 'Debug'
  pod 'FlipperKit/FKPortForwarding', versions['Flipper'], :configuration => 'Debug'
  pod 'FlipperKit/FlipperKitHighlightOverlay', versions['Flipper'], :configuration => 'Debug'
  pod 'FlipperKit/FlipperKitLayoutTextSearchable', versions['Flipper'], :configuration => 'Debug'
  pod 'FlipperKit/FlipperKitNetworkPlugin', versions['Flipper'], :configuration => 'Debug'
end


# Post Install processing for Flipper
def flipper_post_install(installer)
  installer.pods_project.targets.each do |target|
    if target.name == 'YogaKit'
      target.build_configurations.each do |config|
        config.build_settings['SWIFT_VERSION'] = '4.1'
      end
    end
  end
end


abstract_target 'App' do
  # Pods for MyApp
  pod 'FBLazyVector', :path => "../node_modules/react-native/Libraries/FBLazyVector"
  pod 'FBReactNativeSpec', :path => "../node_modules/react-native/Libraries/FBReactNativeSpec"
  pod 'RCTRequired', :path => "../node_modules/react-native/Libraries/RCTRequired"
  pod 'RCTTypeSafety', :path => "../node_modules/react-native/Libraries/TypeSafety"
  pod 'React', :path => '../node_modules/react-native/'
  pod 'React-Core', :path => '../node_modules/react-native/'
  pod 'React-CoreModules', :path => '../node_modules/react-native/React/CoreModules'
  pod 'React-Core/DevSupport', :path => '../node_modules/react-native/'
  pod 'React-RCTActionSheet', :path => '../node_modules/react-native/Libraries/ActionSheetIOS'
  pod 'React-RCTAnimation', :path => '../node_modules/react-native/Libraries/NativeAnimation'
  pod 'React-RCTBlob', :path => '../node_modules/react-native/Libraries/Blob'
  pod 'React-RCTImage', :path => '../node_modules/react-native/Libraries/Image'
  pod 'React-RCTLinking', :path => '../node_modules/react-native/Libraries/LinkingIOS'
  pod 'React-RCTNetwork', :path => '../node_modules/react-native/Libraries/Network'
  pod 'React-RCTSettings', :path => '../node_modules/react-native/Libraries/Settings'
  pod 'React-RCTText', :path => '../node_modules/react-native/Libraries/Text'
  pod 'React-RCTVibration', :path => '../node_modules/react-native/Libraries/Vibration'
  pod 'React-Core/RCTWebSocket', :path => '../node_modules/react-native/'


  pod 'React-cxxreact', :path => '../node_modules/react-native/ReactCommon/cxxreact'
  pod 'React-jsi', :path => '../node_modules/react-native/ReactCommon/jsi'
  pod 'React-jsiexecutor', :path => '../node_modules/react-native/ReactCommon/jsiexecutor'
  pod 'React-jsinspector', :path => '../node_modules/react-native/ReactCommon/jsinspector'
  pod 'ReactCommon/callinvoker', :path => "../node_modules/react-native/ReactCommon"
  pod 'ReactCommon/turbomodule/core', :path => "../node_modules/react-native/ReactCommon"
  pod 'Yoga', :path => '../node_modules/react-native/ReactCommon/yoga', :modular_headers => true


  pod 'DoubleConversion', :podspec => '../node_modules/react-native/third-party-podspecs/DoubleConversion.podspec'
  pod 'glog', :podspec => '../node_modules/react-native/third-party-podspecs/glog.podspec'
  pod 'Folly', :podspec => '../node_modules/react-native/third-party-podspecs/Folly.podspec'
  pod 'react-native-config', :path => '../node_modules/react-native-config'


  target 'MyApp' do
    #Production-specific pods


    target 'MyAppTests' do
      inherit! :complete
      # Pods for testing
    end
  end


  target 'MyAppDevelopment' do
    #Development-specific pods
  end


  use_native_modules!


  # Enables Flipper.
  #
  # Note that if you have use_frameworks! enabled, Flipper will not work and
  # you should disable these next few lines.
  add_flipper_pods!
  post_install do |installer|
    flipper_post_install(installer)
  end
end


target 'MyApp-tvOS' do
  # Pods for MyApp-tvOS


  target 'MyApp-tvOSTests' do
    inherit! :search_paths
    # Pods for testing
  end
end- Finally, if you use Cocoapods you’ll need to run pod install again: 最后,如果您使用Cocoapods,则需要再次运行pod install:
cd ios
pod install
cd ../
That’s it! Your environment variables are now available to your native code, as well as your Javascript code.
而已! 现在,您的本机代码以及Javascript代码都可以使用您的环境变量。
If you want to access your environment variables from your
Info.plistfiles, follow these extra steps for each scheme.如果要从
Info.plist文件访问环境变量,请为每个方案执行以下额外步骤 。
You can now run both versions of the app on your device.Development:
现在,您可以在设备上运行两个版本的应用程序。
npx react-native run-ios --scheme "MyAppDevelopment"Production:
生产:
npx react-native run-ios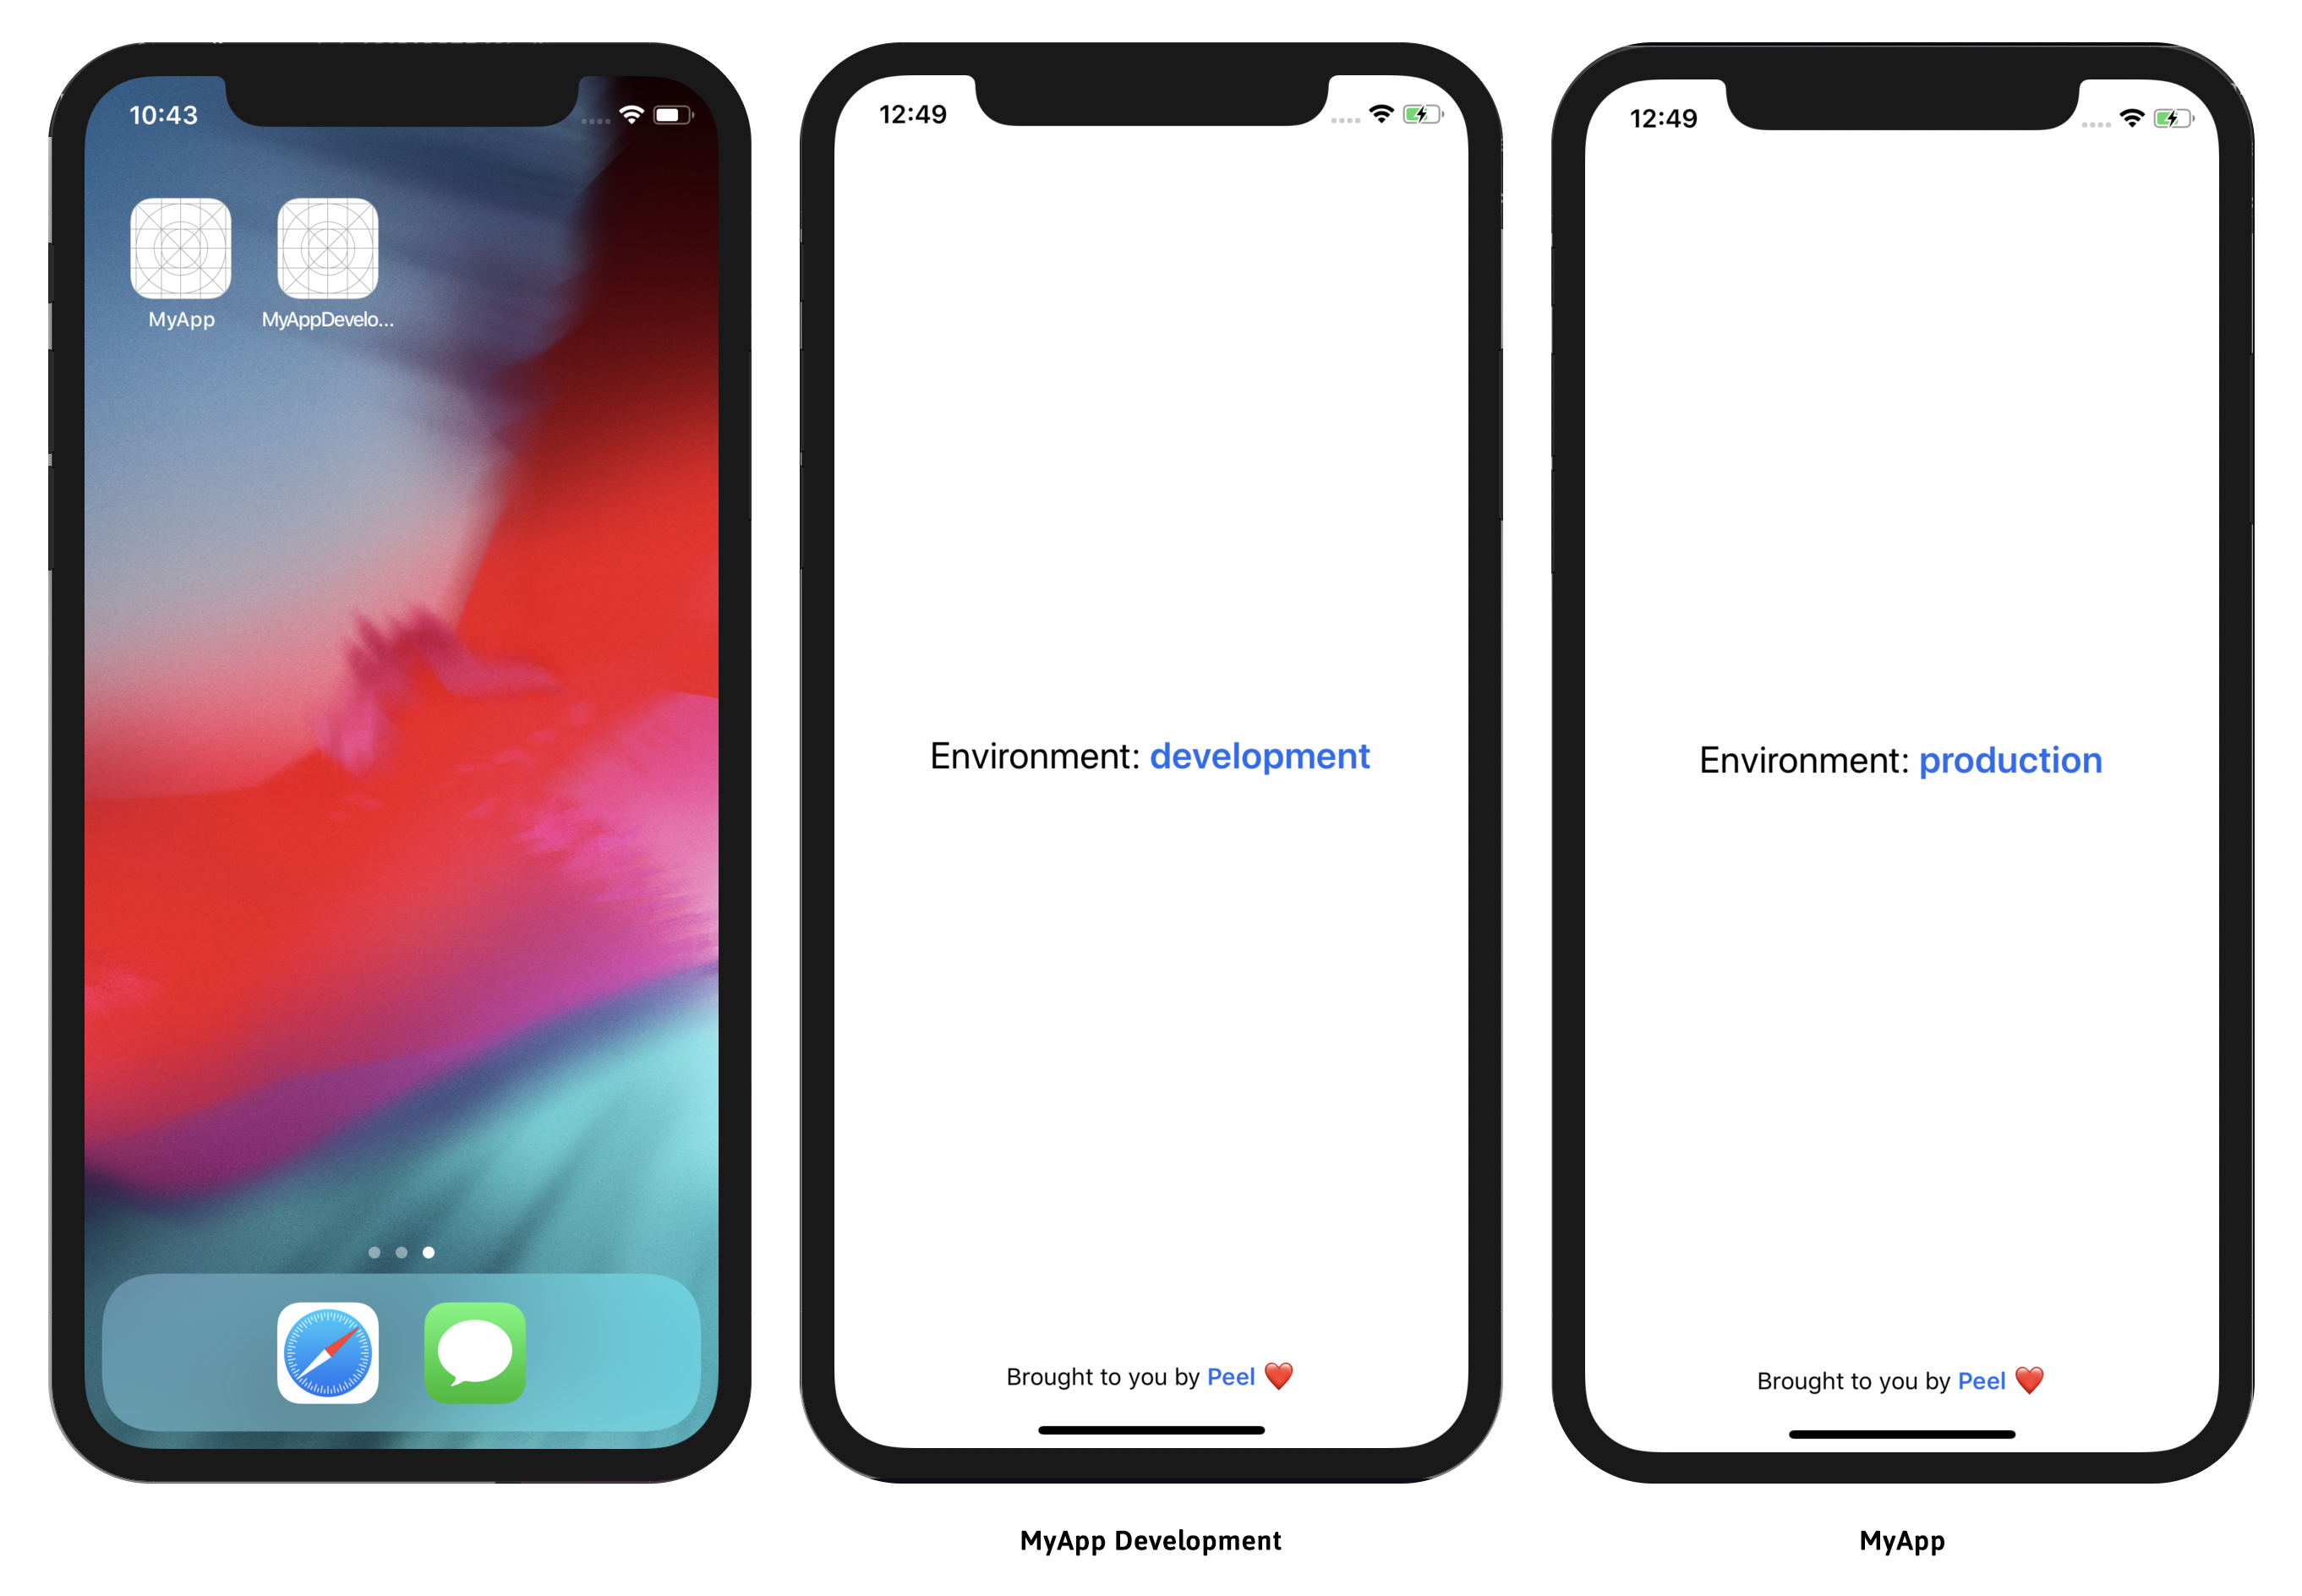
I hope this tutorial was helpful to you. If you’d like to see the codebase on Github with all the environments set up, here it is.
希望本教程对您有所帮助。 如果您想在Github上查看所有设置环境的代码库, 这里就是 。
Feel free to ask me any questions you have by commenting on this post. Have fun!
对此评论发表评论,随时问我任何问题。 玩得开心!
P.S.: My best friend and I just released Peel; our own dating app for serious relationships, available on both iOS and Android! It’s built on React Native and it’s awesome; check it out! 😁
PS:我最好的朋友,我刚刚放开了 Peel ; 我们自己的约会应用程序,用于建立认真的关系,可在 iOS 和 Android上使用 ! 它建立在React Native之上,很棒。 看看这个! 😁


 1402
1402


 被折叠的 条评论
为什么被折叠?
被折叠的 条评论
为什么被折叠?
 到【灌水乐园】发言


