


安卓架构 ios架构
重点 (Top highlight)
什么是RIB? (What is RIBs?)
Joining UBER was a new chapter in my iOS Engineering career, and it all began with the new architecture, which is called RIBs. The major idea behind this architecture is that the app should be driven by business logic, and not by the view. The best way to visualize it is a tree: each RIB is a node, and it can have none, one, or multiple child nodes.
加入UBER是我的iOS工程生涯的新篇章,所有这一切都始于称为RIB的新架构。 该体系结构背后的主要思想是,应用程序应由业务逻辑而不是视图驱动。 可视化它的最佳方法是一棵树:每个RIB都是一个节点,并且它可以不包含一个,一个或多个子节点。
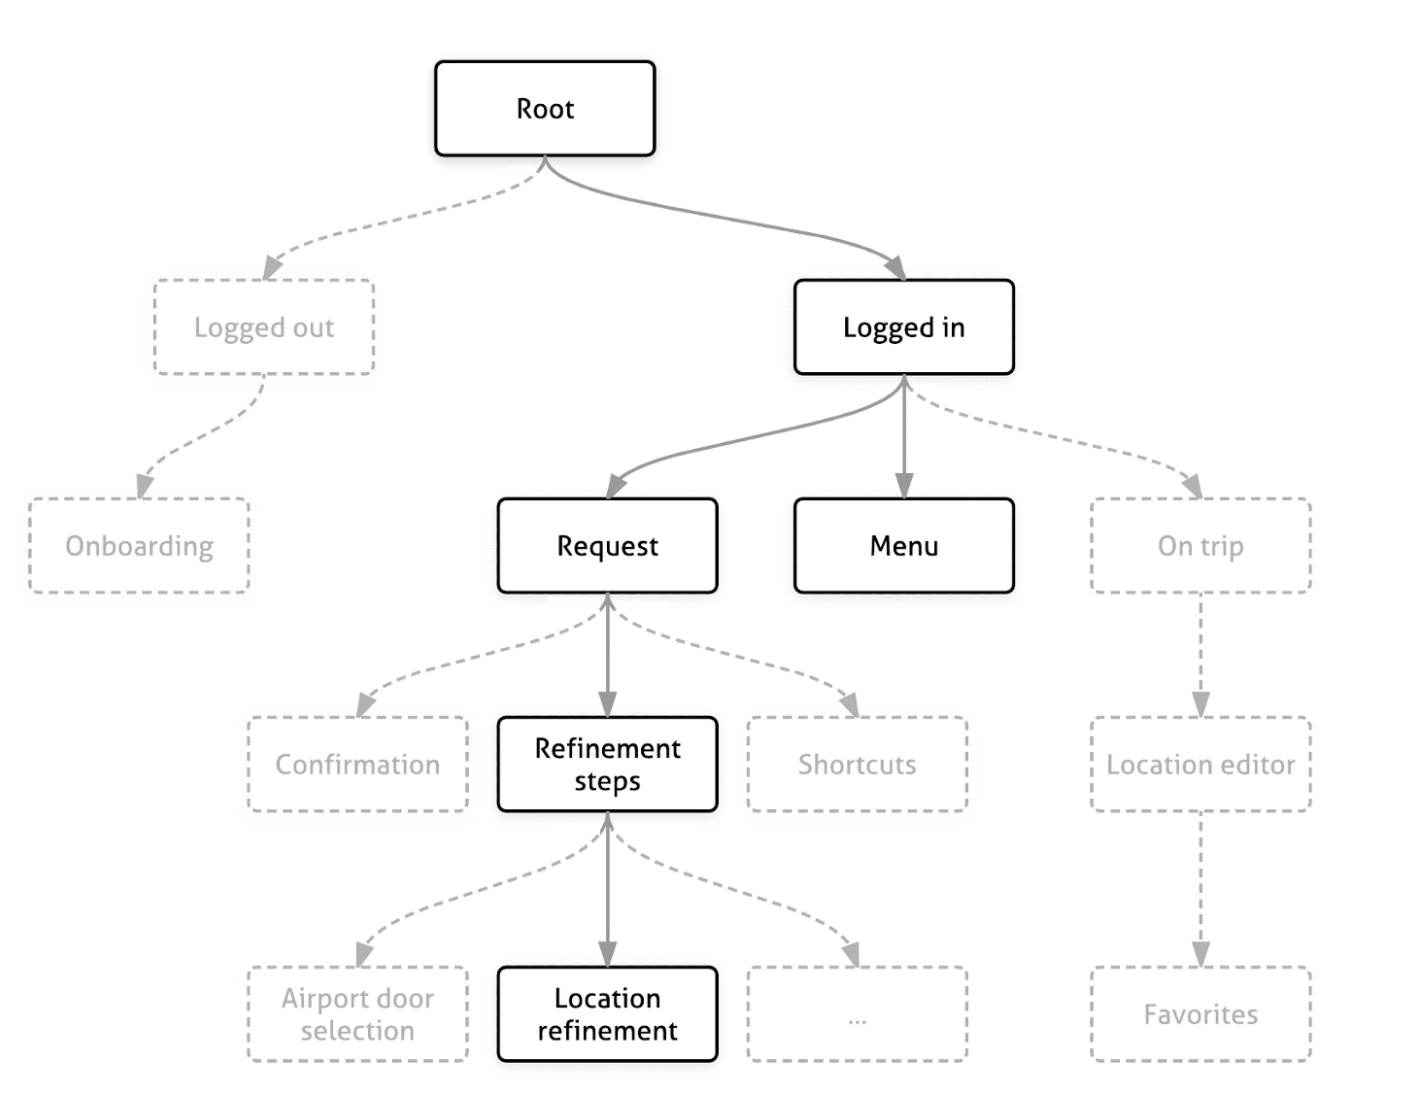
During the app lifecycle, RIBs can be attached and detached, create the child nodes, and interact with them.
在应用程序生命周期中,可以附加和分离RIB,创建子节点并与其进行交互。
RIBs stands for “Router Interactor Builder”.
RIB代表“路由器交互器生成器”。
router is responsible for navigation between the adjacent RIBS
路由器负责相邻RIBS之间的导航
interactor is the main component, that handles the RIB business logic. It reacts to user interactions, talks to a backend, and prepares data that will be displayed to the user.
交互器是处理RIB业务逻辑的主要组件。 它对用户交互做出React,与后端对话,并准备将要显示给用户的数据。
builder is a constructor that builds together all the RIB pieces
builder是将所有RIB片段组合在一起的构造函数
There are also an optional view and presenter. The view itself doesn’t have any business logic, and it’s only responsible for rendering a UI and accept the user touches, that are passed to an interactor. The interactor owns the view, and the view talks to interactor via delegate pattern. The presenter is basically a protocol, that a view implements.
还有一个可选的视图和演示器 。 视图本身没有任何业务逻辑,它仅负责呈现UI并接受传递给交互器的用户触摸。 交互者拥有该视图,该视图通过委托模式与交互者对话。 演示者基本上是视图实现的协议。
For example, tapping a Login button on the View will trigger a web-task in the interactor, and the interactor will tell the presenter to display an activity indicator. When the login call is successful, the interactor will tell the router to navigate to the next app screen.
例如,在“视图”上点击“登录”按钮将触发交互器中的Web任务,并且交互器将告诉演示者显示活动指示器。 登录呼叫成功后,交互器将告诉路由器导航到下一个应用程序屏幕。
This was a simple overview, now we can dive into each of the RIBs components and see how they work together.
这是一个简单的概述,现在我们可以深入研究RIB的每个组件,并了解它们如何协同工作。
进入RIBS (Into the RIBS)
The good thing, you don’t have to write a boilerplate code every time you want to create a new RIB with all the components. You can install and configure the Xcode template. To create a new RIB, you simply need to open a file creation menu and select RIB from the list:
好消息是,您不必每次都想用所有组件创建新的RIB时都编写样板代码。 您可以安装和配置 Xcode模板。 要创建新的RIB,只需打开文件创建菜单,然后从列表中选择RIB:

We will create a RIB called Login, and check a RIB that owns a view:
我们将创建一个称为Login的RIB,并检查拥有视图的RIB:

Xcode template generates 4 files. We will go through each of them and discuss how they function.
Xcode模板生成4个文件。 我们将仔细研究它们中的每一个,并讨论它们的功能。

LoginBuilder (LoginBuilder)
As we know, a builder is responsible for creating all the RIB components. Note, all of the code below is auto-generated for you by the Xcode template.
众所周知,建设者负责创建所有RIB组件。 请注意,以下所有代码都是由Xcode模板自动为您生成的。
The first thing you will notice is that most of the components are protocols, not the concrete classes. This is one of the major RIBs features, that we will discuss later in this article.
您会注意到的第一件事是,大多数组件是协议,而不是具体的类。 这是RIB的主要功能之一,我们将在本文后面讨论。
LoginDependency is used to inject dependencies into the RIB from its parent. For example, we have a webService that we use to perform a login web-request. We create a WebServicing protocol we want to inject:
LoginDependency用于将依赖项从其父项注入RIB。 例如,我们有一个webService用于执行登录Web请求。 我们创建一个我们要注入的WebServicing协议:
Now we can update the LoginDependency protocol, providing builder access to its dependencies:
现在,我们可以更新LoginDependency协议,为构建器提供对其依赖项的访问:
The next component that we have here, is a LoginComponent. We can declare some local variables that we only use within this Builder, such as settings, or AdMob ID, etc. For our example, we will leave this class as is, because we don’t need any private dependencies.
我们在这里拥有的下一个组件是LoginComponent 。 我们可以声明一些仅在此Builder中使用的局部变量,例如设置或AdMob ID等。在我们的示例中,我们将保留此类,因为我们不需要任何私有依赖项。
The next protocol is a LoginBuildable that has only one method build(with listener:). The listener it takes as a parameter is a parent listener. We are free to add more parameters to this build method, as it’s suitable for our logic.LoginBuilder class implements LoginBuildable and it’s a major component here. It uses the LoginDependency to create a LoginComponent.
下一个协议是LoginBuildable ,它只有一个方法build(with listener:) 。 它作为参数的侦听器是父侦听器。 我们可以自由地向此构建方法添加更多参数,因为它适合我们的逻辑。 LoginBuilder类实现了LoginBuildable ,它是此处的主要组件。 它使用LoginDependency创建一个LoginComponent 。
LoginComponent now encapsulates all the dependencies we need for this RIB. The builder also creates a LoginViewController, LoginInteractor, that is used to create and return a LoginRouter.
现在, LoginComponent封装了此RIB所需的所有依赖项。 该构建器还创建一个LoginViewController LoginInteractor ,用于创建和返回LoginRouter 。
Here is another important line of code:
这是另一行重要的代码:
interactor.listener = listener This is how we connect the parent interactor with a child interactor. For example, we have a
LoginRIBthat is connected to aRootRIB. In this caseRootInteractorwill have to implement the methods, that LoginInteractor listener will declare. IfLoginInteractorsaysdismissLogin, root RIB will implement this method to detach Login flow and present a home page.这就是我们将父交互器与子交互器连接的方式。 例如,我们有一个
LoginRIB连接到RootRIB。 在这种情况下,RootInteractor将必须实现LoginInteractor侦听器将声明的方法。 如果LoginInteractor说出dismissLogin,则根RIB将实现此方法以分离Login流并显示一个主页。
We will return to Router later when we need to use some of its dependencies, for now we move to the next component — Interactor.
稍后,当我们需要使用它的某些依赖项时,我们将返回到Router,现在我们移至下一个组件Interactor。
登录交互器 (LoginInteractor)
Again, all of the code below is auto-generated for you by the Xcode template.
同样,Xcode模板会自动为您生成以下所有代码。
LoginRouting is the protocol we use to navigate from Login RIB to subsequent RIBs. Let’s say, we want to be able to navigate to CreateAccount screen:
LoginRouting是我们用来从Login RIB导航到后续RIB的协议。 假设,我们希望能够导航到CreateAccount屏幕:
LoginPresentable is used to update the Login view in response to business logic, performed within the interactor. If you open LoginViewController, you will notice, that it implements this protocol. LoginPresentable also owns a LoginPresentableListener . This is a way that LoginViewController will communicate with the interactor and invoke business logic. In other words, here is how Interactor and ViewController communicate with each other:
LoginPresentable用于响应在交互器中执行的业务逻辑来更新Login视图。 如果打开LoginViewController ,您会注意到它实现了此协议。 LoginPresentable还拥有一个LoginPresentableListener 。 这是LoginViewController与交互器进行通信并调用业务逻辑的一种方式。 换句话说,这是Interactor和ViewController相互通信的方式:

As we discussed above, we want our view controller to show an activity indicator when the web-task is in progress. To implement this, we add a new method showActivityIndicator to LoginPresentable:
如上所述,我们希望我们的视图控制器在执行Web任务时显示活动指示器。 要实现这一点,我们添加一个新的方法showActivityIndicator到LoginPresentable :
Finally, we have a LoginListener . Remember this line of code in LoginBuilder?
最后,我们有一个LoginListener 。 还记得LoginBuilder这一行代码吗?
interactor.listener = listenerThis is a listener that a Root RIB will implement. This is a way for a child RIB to communicate back to its parent. We need to notify the Root RIB when login is finished, so login flow can be dismissed:
这是Root RIB将实现的侦听器。 这是子级RIB与父级进行通信的一种方式。 登录完成后,我们需要通知Root RIB,因此可以取消登录流程:
Now we look at LoginInteractor class. It has two weak variables, router, and listener. This is how the interactor is connected to its router and parent interactor respectively. You’ve seen about, that interactor also owns a presenter.
现在我们看一下LoginInteractor类。 它有两个弱变量,路由器和侦听器。 这就是交互器分别连接到其路由器和父交互器的方式。 您已经了解到,该交互者还拥有一个演示者。
As you remember, the core idea behind RIBs is that the app should be driven by business logic. An interactor is a place where this business logic lives.
您还记得,RIB背后的核心思想是应用程序应由业务逻辑驱动。 交互器是该业务逻辑所在的地方。
Here is how we use interactor to control the app flow:
这是我们使用交互器控制应用程序流程的方式:
we invoke
presentermethods to update Login UI (we haveshowActivityIndicatorin our example)我们调用
presenter方法来更新登录UI(我们的示例中有showActivityIndicator)we invoke
routermethods to navigate to the child RIBs (we haverouteToCreateAccountin our example)我们调用
router方法导航到子RIB(我们的示例中有routeToCreateAccount)we invoke
listenermethods to talk to parent RIB (we havedismissLoginFlowin our example)我们调用
listener方法与父RIB对话(我们的示例中有dismissLoginFlow)
Next we see a few lifecycle-managed methods, didBecomeActive and willResignActive . These methods are self-explanatory, and we don’t call them directly. For example, we can perform a web-task in didBecomeActive to fetch required data, or make an initial view setup depending on our business logic.
接下来,我们看到一些生命周期管理的方法didBecomeActive和willResignActive 。 这些方法是不言自明的,我们不会直接调用它们。 例如,我们可以在didBecomeActive执行Web任务以获取所需的数据,或者根据我们的业务逻辑进行初始视图设置。
We will return to interactor later, now let’s finish with the remaining components — router, view, and presenter
稍后我们将返回到交互器,现在让我们完成其余组件-路由器,视图和演示者
登录路由器 (LoginRouter)
Again, all of the code below is auto-generated for you by the Xcode template.
同样,Xcode模板会自动为您生成以下所有代码。
LoginInteractable is the main protocol here, that contains two components, LoginRouting and LoginListener . We created both of them in Interactor.
LoginInteractable是此处的主要协议,包含两个组件, LoginRouting和LoginListener 。 我们在Interactor中创建了它们。
LoginViewControllable is used to manipulate the view hierarchy. So when the Interactor tells a router to navigate to CreateAccount using LoginRouting , the router will eventually need to present a CreateAccount screen. We need to add the following method:
LoginViewControllable用于操纵视图层次结构。 因此,当Interactor告诉路由器使用LoginRouting导航到CreateAccount ,路由器最终将需要显示CreateAccount屏幕。 我们需要添加以下方法:
As you can see, LoginRouter implements LoginRouting protocol, so we need to add a required method routeToCreateAccount:
如您所见, LoginRouter实现了LoginRouting协议,因此我们需要添加必需的方法routeToCreateAccount :
We need to have the CreateAccount RIB before we can present its viewController. Go ahead and create another RIB.
在展示其viewController之前,我们需要拥有CreateAccount RIB。 继续并创建另一个RIB。

We are not going to make any changes in this RIB, so just leave it there and return to LoginRouter .
我们不会在此RIB中进行任何更改,因此只需将其保留并返回LoginRouter 。
To to build a CreateAccount RIB, LoginRouter needs to have CreateAccountBuilder. Declare a private variable of type CreateAccountBuildable, and also update LoginRouter init, injecting CreateAccountBuildable.
要构建CreateAccount RIB, LoginRouter需要具有CreateAccountBuilder 。 声明一个类型为CreateAccountBuildable的私有变量,并更新LoginRouter init,注入CreateAccountBuildable 。
Remember, we don’t use a concrete type
CreateAccountBuilder.Instead, we use a protocolCreateAccountBuildable请记住,我们不使用具体类型
CreateAccountBuilder.相反,我们使用协议CreateAccountBuildable
Now we can complete routeToCreateAccount method.
现在我们可以完成routeToCreateAccount方法。
We use
createAccountBuilderto build acreateAccountRouter. We need to pass the currentinteractoras a listener inbuildmethod.我们使用
createAccountBuilder构建一个createAccountRouter。 我们需要在build方法中将当前的interactor作为侦听器传递。We attach the
createAccountRouteras a child to the current router. This is how we build s RIBs tree.我们将
createAccountRouter作为子级附加到当前路由器。 这就是我们构建RIB树的方式。We invoke
LoginViewControllablemethod to presentCreateAccountview controller.我们调用
LoginViewControllable方法来呈现CreateAccount视图控制器。
First thing you will notice here, is the following compiler error:
您在这里会注意到的第一件事是以下编译器错误:
Argument type ‘LoginInteractable’ does not conform to expected type ‘CreateAccountListener’To fix it, we need to make sure LoginInteractable implements CreateAccountListener protocol:
要解决此问题,我们需要确保LoginInteractable实现CreateAccountListener协议:
Here is another important thing to remember. We use attachChild method to attach createAccountRouter . Going forward, you will eventually need another method to dismiss CreateAccount screen. Once the child screen is dismissed, we have to detach its router from the current tree.
这是另一件事要记住。 我们使用attachChild方法附加createAccountRouter 。 展望未来,您最终将需要另一种方法来关闭CreateAccount屏幕。 子屏幕关闭后,我们必须将其路由器与当前树分离。
We don’t want to see ourselves in the state, when the viewController is no longer available, but the corresponding RIB is still in the tree. This may eventually cause memory leaks and unexpected behavior.
当viewController不再可用,但相应的RIB仍在树中时,我们不想看到自己处于这种状态。 这最终可能导致内存泄漏和意外行为。
To avoid this, we will keep a reference to CreateAccountRouter . Create a variable within LoginRouter:
为了避免这种情况,我们将保留对CreateAccountRouter的引用。 在LoginRouter创建一个变量:
Now we update routeToCreateAccount method. We need to save createAccountRouter to a local variable. As a bonus, we can guard ourselves against creating a router and presenting a child view controller, if a child router has already been created:
现在,我们更新routeToCreateAccount方法。 我们需要将createAccountRouter保存到本地变量。 另外,如果已经创建了子路由器,我们可以防止自己创建路由器和提供子视图控制器:
Finally, when we want to dismiss CreateAccount screen, we have to detach its router after we manipulate with a view hierarchy:
最后,当要关闭CreateAccount屏幕时,在使用视图层次结构进行操作后,我们必须分离其路由器:
Xcode will show another compiler error, so we need to update LoginBuilder and pass CreateAccountBuilder to router init. We use LoginBuilder to create and inject a child builder:
Xcode将显示另一个编译器错误,因此我们需要更新LoginBuilder并将CreateAccountBuilder传递给路由器init。 我们使用LoginBuilder创建并注入一个子生成器:
Note, that we use component.dependency as createAccountBuilder dependency. To do so, we need our LoginDependency to implement CreateAccountDependency protocol. This is how we connect dependencies from the parent to child RIBs:
请注意,我们使用component.dependency作为createAccountBuilder依赖项。 为此,我们需要LoginDependency来实现CreateAccountDependency协议。 这是我们将依赖关系从父RIB连接到子RIB的方式:
CreateAccountDependency doesn’t have any variables in our example. If it does, we will have to provide them at some point. It’s convenient to create and keep all the dependencies in the root component, and then pass them using this protocol inheritance. We will do this by the end of this article.
在我们的示例中, CreateAccountDependency没有任何变量。 如果是这样,我们将不得不在某些时候提供它们。 在根组件中创建并保留所有依赖项,然后使用此协议继承传递它们,这很方便。 我们将在本文结尾处做到这一点。
At this point, the app should compile without any errors.
在这一点上,该应用程序应该编译没有任何错误。
LoginPresenter / LoginViewController (LoginPresenter/LoginViewController)
LoginPresentableListener has good auto-generated documentation. We just need to know what actions we want to perform on this ViewController. We are going to add two methods to LoginPresentableListener:
LoginPresentableListener具有良好的自动生成的文档。 我们只需要知道我们要在此ViewController上执行哪些操作即可。 我们将向LoginPresentableListener添加两个方法:
We are not going to focus on the UI, but you can go ahead and create a simple UI if you want to see in action. Make sure the buttons trigger the right listener methods.
我们不会专注于UI,但是如果您希望实际使用,可以继续创建一个简单的UI。 确保按钮触发正确的listener方法。
Class LoginViewController implements LoginPresentable protocol, that we configured before (so the interactor can communicate to viewController). It means, LoginViewController has to implement showActivityIndicator method:
LoginViewController类实现了我们之前配置的LoginPresentable协议(以便交互器可以与viewController通信)。 这意味着LoginViewController必须实现showActivityIndicator方法:
The next protocol the viewController implements is LoginViewControllable (so the router can modify the view hierarchy). To conform, LoginViewController has to implement present method:
viewController实现的下一个协议是LoginViewControllable (以便路由器可以修改视图层次结构)。 为了符合要求, LoginViewController必须实现present方法:
This is all we need to do in LoginViewController for now. Again, you can add missing UI buttons, text fields, and the activity indicator.
现在,这是我们在LoginViewController需要做的所有事情。 同样,您可以添加缺少的UI按钮,文本字段和活动指示器。
Because we added a few methods to LoginPresentableListener , and LoginInteractor implements this protocol, we need to add missing methods to interactor:
因为我们向LoginPresentableListener添加了一些方法,并且LoginInteractor实现了此协议,所以我们需要向交互器添加缺少的方法:
didTapCreateAccount has to route to CreateAccount RIB, so we just need to invoke an existing LoginRouting method:
didTapCreateAccount必须路由到CreateAccount RIB,因此我们只需要调用现有的LoginRouting方法:
To invoke a login web-task we need access to WebServicing login method, that we created before. We will pass WerServicing to LoginInteractor init:
要调用登录Web任务,我们需要访问我们之前创建的WebServicing登录方法。 我们将把WerServicing传递给LoginInteractor init:
Having a WebServicing in interactor, we can complete the login method:
在交互器中具有WebServicing ,我们可以完成login方法:
Inside this method we implement all the login business logic, showing and hiding activity indicator, dismiss LoginFlow on login success, and log an error in case of login failure. Let’s also add another LoginPresentable method showErrorAlert that will notify the user if login is failed:
在此方法内部,我们实现了所有登录业务逻辑,显示和隐藏活动指示器,在登录成功时关闭LoginFlow,并在登录失败的情况下记录错误。 我们还添加另一个LoginPresentable方法showErrorAlert ,如果登录失败,该方法将通知用户:
The compiler will make sure you’ve implemented this method in LoginViewController . Invoke this method from the login failure case:
编译器将确保您已在LoginViewController实现了此方法。 从login失败的情况下调用此方法:
Lastly, we have to update LoginBuilder and pass WebServicing dependency into LoginInteractor:
最后,我们必须更新LoginBuilder并将WebServicing依赖项传递到LoginInteractor :
顶级RIB (Top-level RIB)
Now we have a complete Login module for our app. If you want to see it all in action, you have to add a few missing pieces.
现在,我们为我们的应用程序提供了完整的登录模块。 如果您想查看全部内容,则必须添加一些缺失的部分。
Create a Root RIB, that will be a parent for Login RIB (you should be able to connect login to root using the same steps I provided above. The few differences will be in RootRouter and RootBuilder, because it’s a top-level RIB that doesn’t have a parent.
创建一个Root RIB ,它将成为Login RIB的父级(您应该能够使用上面提供的相同步骤将登录名连接到root。一些区别将在RootRouter和RootBuilder ,因为这是一个顶级RIB,没有父母。
Instead of creating RootRouting we need to create a LaunchRouting (specific RIB component designed for the top-level RIB):
除了创建RootRouting我们还需要创建LaunchRouting (为顶级RIB设计的特定RIB组件):
This is a very specific case and it is pretty much self-explanatory, so I am not going to go into details.
这是一个非常具体的案例,这几乎是不言而喻的,因此我将不做详细介绍。
RootRouter will also inherit from LaunchRouting instead of ViewableRouter, that is launch-specific routing protocol:
RootRouter还将继承自LaunchRouting而不是LaunchRouting ViewableRouter,后者是特定于启动的路由协议:
We also need to create an AppComponent that uses a component with an EmptyDependency. This component will have most of the dependencies we want to pass along using Dependency protocol. You can create a WebService class that inherits from WebServicing protocol and keep it as a variable in AppComponent:
我们还需要创建一个AppComponent ,它使用具有AppComponent的组件EmptyDependency. 该组件将具有我们要使用Dependency协议传递的大多数Dependency 。 您可以创建一个继承自WebServicing协议的WebService类,并将其保留为AppComponent的变量:
In AppDelegate we need to create a RootRouter using this AppComponent , and lunch it from the current window:
在AppDelegate中,我们需要使用此AppComponent创建一个RootRouter ,并在当前窗口中对其进行午餐:
At this point we should be able to compile and launch the app. If you add a missing UI, you can see it in action.
在这一点上,我们应该能够编译并启动该应用程序。 如果添加缺少的UI,则可以看到它的实际效果。
高级RIB (Advanced RIBs)
模拟世代 (Mock generation)
I’ve mentioned at the beginning of this article, that in RIBs we don’t use concrete types, but rather work with protocols in most of our components and dependencies. This comes very handily when we want to cover our code with unit tests. Since all of the business logic in RIBs lives within Interactor, we try to reach a 100% test coverage for interactors and routers. Protocols allow us to mock most of the types we use, making it possible to test it without exposing the real types.
我在本文开头提到过,在RIB中,我们不使用具体类型,而是在大多数组件和依赖项中使用协议。 当我们想用单元测试覆盖我们的代码时,这非常方便。 由于RIB中的所有业务逻辑都存在于Interactor中,因此我们尝试对交互器和路由器进行100%的测试覆盖率。 协议允许我们模拟我们使用的大多数类型,从而可以在不暴露实际类型的情况下对其进行测试。
But at the same time, mocking protocols is tedious work and it requires a lot of boilerplate code. Luckily, there are multiple tools that allow us to generate all of the mocks for protocols. One of them is a tool called Mockolo. You can follow the provided link and install the dependency, otherwise, feel free to use any other mock generation tool out there. With Mockolo all you have to do is to mark the protocol with ///@mockable annotation and run a mock-generation.
但是同时,模拟协议是繁琐的工作,并且需要大量样板代码。 幸运的是,有多种工具可以让我们生成协议的所有模拟。 其中之一是称为Mockolo的工具。 您可以单击提供的链接并安装依赖项,否则,可以随时使用任何其他模拟生成工具。 使用Mockolo,您要做的就是用///@mockable批注标记协议,并运行模拟生成。
For example, we have a WebServicing protocol that we want to use in tests. Let’s generate mock for this service:
例如,我们有一个要在测试中使用的WebServicing协议。 让我们为此服务生成模拟:
This mock has a loginCallCount and loginHandler that we will use to test if Login method was called, and if it uses the right parameters and outcome.
这个模拟具有一个loginCallCount和loginHandler ,我们将使用它们来测试是否调用了Login方法,以及它是否使用了正确的参数和结果。
We can generate mocks for all of our RIBs protocols and dependencies, opening it for extensive unit test coverage.
我们可以为我们所有的RIB协议和依赖项生成模拟,并为广泛的单元测试范围打开它。
单元测试 (Unit tests)
I will provide an example of how we can cover LoginInteractor with tests, using mock generation.
我将提供一个示例,说明如何使用模拟生成通过测试覆盖LoginInteractor 。
Let’s look at didTapLogin(:,:) method we have in LoginInteractor . Here are multiple thinks we want to test:
让我们看看didTapLogin(:,:)方法我们在LoginInteractor 。 这是我们要测试的多种想法:
- presenter show activity indicator 主持人显示活动指示器
webService makes a
loginweb-taskwebService使
loginWeb任务if
logintask succeeds, the listener should invokedismissLoginFlowmethod如果
login任务成功,则侦听器应调用dismissLoginFlow方法if
logintask fails, the presenter should invokeshowErrorAlertmethod如果
login任务失败,则演示者应调用showErrorAlert方法- presenter hides activity indicator when web-task completes Web任务完成时,演示者隐藏活动指示器
Here is an initial setup for LoginInteractorTests that connect all of the test components together (mocks are generated my Mockolo):
这是将所有测试组件连接在一起的LoginInteractorTests的初始设置( LoginInteractorTests是由Mockolo生成的):
Let’s write tests for didTapLogin method.
让我们为didTapLogin方法编写测试。
Similarly we can cover the remaining Interactor methods, including didBecome active if we use it. Routers can be tested the same way. This becomes possible, because in RIBs we have most of the components as protocols, not concrete types. Additionally, Both Router and Interactor mostly contain methods, that implementing other protocols. With mock generation we don’t have to write any additional code to cover all the app business logic with unit tests.
类似地,我们可以涵盖其余的Interactor方法,包括如果使用它,则包括didBecome active。 路由器可以用相同的方式进行测试。 这成为可能,因为在RIB中,我们将大多数组件作为协议,而不是具体类型。 此外, Router和Interactor大多包含实现其他协议的方法。 使用模拟生成,我们不必编写任何其他代码即可使用单元测试覆盖所有应用程序业务逻辑。
依赖注入 (Dependency Injection)
In the example project we use Dependency and Component to work with dependencies, and we have to pass all the way from AppComponent . Having a protocol inheritance makes it clear and organized, but it’s still tedious to connect all the dependencies.
在示例项目中,我们使用Dependency和Component处理依赖关系,并且必须从AppComponent一直传递AppComponent 。 拥有协议继承可以使它清晰明了且井井有条,但是连接所有依赖项仍然很乏味。
There is another open-sourced Uber tool we use: Needle Dependency Injection.
我们使用了另一个开源的Uber工具: Needle Dependency Injection 。
I will not explain Needle in detail here, but a link above provides a good explanation and gives examples on how to integrate and use it.
我不会在这里详细解释Needle,但是上面的链接提供了很好的解释,并提供了有关如何集成和使用它的示例。
Hopefully, I will cover Needle in upcoming articles if I see readers interest for it, so don’t forget to follow me :)
希望,如果我看到读者对此感兴趣,那么我将在以后的文章中介绍Needle,所以请不要忘记关注我:)
结论 (Conclusion)
In this article I’ve covered the essentials of RIBs architecture, explained some edge cases, and provided tips and examples for most of its components.
在本文中,我介绍了RIBs体系结构的要点,解释了一些极端情况,并提供了其大多数组件的提示和示例。
RIBs may look like overkill for the small project like the one we used in the example. However, if you understand the basics, it doesn’t take too much time or effort to adopt this architecture. And if you combine it with dependency injection and mock generation, you will have a bold solution for most of your app use cases.
对于我们在示例中使用的那个小型项目,RIB看起来有点过分。 但是,如果您了解这些基础知识,则无需花费太多时间或精力即可采用这种体系结构。 而且,如果将其与依赖项注入和模拟生成相结合,则将为大多数应用程序用例提供一个大胆的解决方案。
Please share your thoughts in the comments below, or feel free to contact me directly.
请在下面的评论中分享您的想法,或者随时直接与我联系。
You can find a complete example project with UI and all the required logic here.
您可以在此处找到带有UI和所有必需逻辑的完整示例项目。
翻译自: https://medium.com/swlh/ios-architecture-exploring-ribs-3db765284fd8
安卓架构 ios架构


 1万+
1万+


 被折叠的 条评论
为什么被折叠?
被折叠的 条评论
为什么被折叠?
 到【灌水乐园】发言


