


ios ar
We recently worked with the amazing folks at Bauer for a really fun and challenging app called Bauer Fit. One of the requirements was to implement a screen on which users can measure their hands or elbows. In this article, I will be sharing how I implemented the measurement flow and solved some issues I encountered along the way, hoping that can help someone out there. Also, I will explain things on a sample application which I put together for this post.
我们最近与宝华(Bauer)的出色伙伴合作,开发了一款名为Bauer Fit的真正有趣且具有挑战性的应用程序。 要求之一是实现一个屏幕,用户可以在该屏幕上测量自己的手或肘。 在本文中,我将分享我如何实现测量流程以及如何解决我在此过程中遇到的一些问题,希望能对那里的人们有所帮助。 另外,我将在一个示例应用程序中对此进行解释,该示例应用程序已汇总到本文中。
内容 (Contents)
屏幕布局 (Screen Layout)
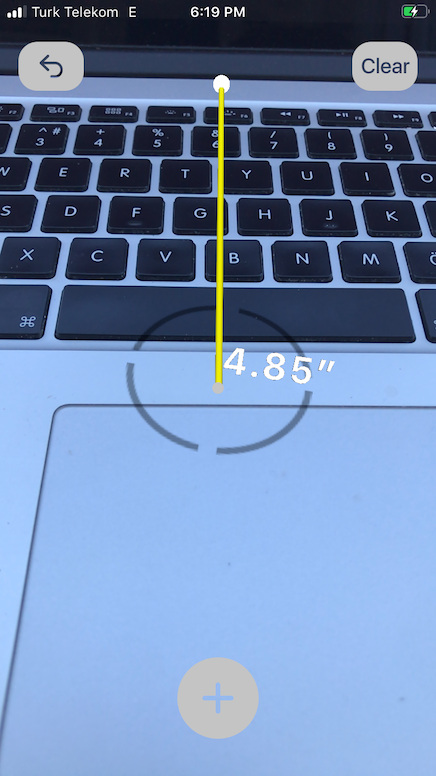
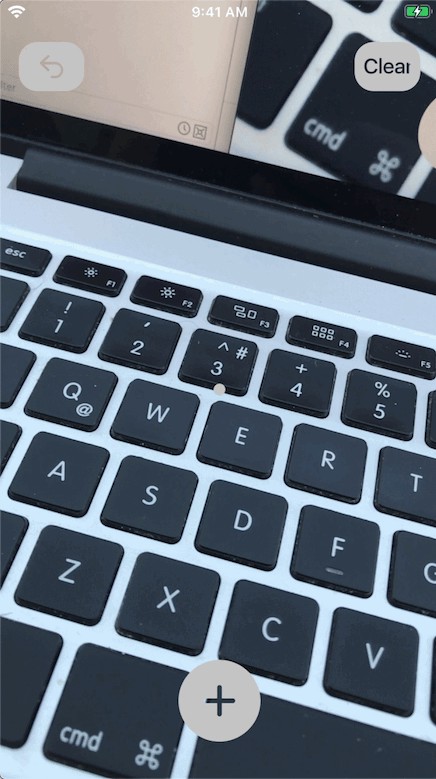
The layout of the screen is very straightforward as you can see here. There are three buttons, undo, clear, add, and an image view for center dot.
如您在此处看到的,屏幕布局非常简单。 共有三个按钮:撤消,清除,添加和中心点的图像视图。
示例应用程序的功能 (Sample App’s Functionality)
The functionality of app is pretty straightforward too; Users will be able to measure things just by using three buttons.
应用程序的功能也非常简单。 用户只需使用三个按钮就可以测量事物。
Add button functionality:
添加按钮功能:
- When tapped, a dot node is added on screen, if necessary. 点击时,如果需要,可以在屏幕上添加一个点节点。
Clear button funtionality:
清除按钮功能:
- Clears everything on screen, which added in measurement session. 清除屏幕上的所有内容,这些内容已添加到测量会话中。
Undo button funtionality:
撤消按钮功能:
- Undos last operation, if necessary. 如有必要,撤消上一个操作。
添加点节点 (Adding dot nodes)
A dot should be put and kept on screen each time add button is tapped. We can achieve this by adding an SCNNode on any ARCNSceneView.
每次点击添加按钮时,都应在屏幕上放置一个点并保持在屏幕上。 我们可以通过在任何ARCNSceneView上添加一个SCNNode来实现。
I used the method; func hitTest(_ point: CGPoint, types: ARHitTestResult.ResultType) -> [ARHitTestResult]to get real world coordinates based on center of screen.
我用了这种方法。 func hitTest(_ point: CGPoint, types: ARHitTestResult.ResultType) -> [ARHitTestResult]以获取基于屏幕中心的真实世界坐标。
The hitTest method on SceneKit view returns results for real-world objects or surfaces detected based on 2D coordinate(CGPoint) we deliver.
SceneKit视图上的hitTest方法返回基于我们提供的2D坐标(CGPoint)检测到的真实对象或曲面的结果。
As result I ended up the method below as ARSCNView extension;
结果,我结束了下面的方法作为ARSCNView扩展;
func realWorldPosition(for point: CGPoint) -> SCNVector3? {
    let result = self.hitTest(
        point,
        types: [ .featurePoint, .existingPlaneUsingExtent ]
    )
    guard let hitResult = result.last else {
        return nil
    }
    let hitTransform = SCNMatrix4(hitResult.worldTransform)    let hitVector = SCNVector3Make(
        hitTransform.m41,
        hitTransform.m42,
        hitTransform.m43
    )    return hitVector
}
The method simply takes a CGPoint as a parameter and converts the hitTest’s result into a SCNVector which is needed to determine dot node(SCNNode) positions. Also, I was only interested in the first result because the results are sorted from nearest to farthest from the camera.
该方法仅将CGPoint作为参数,并将hitTest的结果转换为SCNVector ,这是确定点节点(SCNNode)位置所需的。 另外,我只对第一个结果感兴趣,因为结果的排序是从距离最近的相机到最远的相机。
Note that the method is called with the ARSCNView’s center point, which corresponds to the dot image’s position according to the screen’s UI.realWorldPosition(for: view.center)
请注意,该方法是使用ARSCNView的中心点调用的,该中心点对应于根据屏幕UI的点图像的位置。 realWorldPosition(for: view.center)
划清界限 (Drawing the line)
In order to draw a line, we need to add another SCNNode, in a line shape, between two points, and also another node to display measurement results.
为了画一条线,我们需要在两个点之间添加另一个SCNNode ,呈线形,并添加另一个节点以显示测量结果。
When the add button tapped for the first time, in addition to adding a dot node on the screen its position is also used as the start point of the line, inSCNSceneRendererDelegate's method renderer:updateAtTime.
当第一次点击添加按钮时,除了在屏幕上添加一个点节点外,它的位置还用作行的起点,在SCNSceneRendererDelegate的方法renderer:updateAtTime 。
func renderer(
    _ renderer: SCNSceneRenderer,
    updateAtTime time: TimeInterval
) {
    let view = self.measurementView    DispatchQueue.main.async {
        let position = view.centerRealWorldPosition()
        let pointOfView = view.pointOfView
        if let line = self.draft.drawLineIfNeeded(
            to: position,
            withPointOfView: pointOfView
        ) {
            self.measurementView.addChildNodes(line.nodes)
        }
        ...
    }
}
During each update, the center point of the screen determines the end position of the line, therefore the line is redrawn with the updated endpoint each time the user moves the camera to another point.
在每次更新期间,屏幕的中心点都会确定线条的终点位置,因此,每当用户将相机移动到另一个点时,都会使用更新的端点重新绘制线条。
Note that if the add button is tapped for the second time, the line is kept at its recent position. I achieved this by keeping/checking a step logic on ARMeasurement struct.
请注意,如果第二次点击添加按钮,则该行将保持在其最近位置。 我通过保持/检查ARMeasurement结构上的步骤逻辑来实现这一点。
struct ARMeasurement {
    let steps: [Step] = [.first, .second, .last]
    var currentStep: Step = .first
}
...func drawLineIfNeeded(
    to position: SCNVector3?,
    withPointOfView pointOfView: SCNNode?
) -> Line? {
    if measurement.isCompleted {
        return nil
    }
    return addLine(to: position, withPointOfView: pointOfView)
}private func addLine(
    to position: SCNVector3?,
    withPointOfView pointOfView: SCNNode?
) -> Line? {
    guard
        measurement.currentStep == .second,
        let fromPosition = startDotNode?.position,
        let toPosition = position,
        let pointOfView = pointOfView
        else {
            return nil
    }
    let line = Line(
        fromVector: fromPosition,
        toVector: toPosition,
        pointOfView: pointOfView
    )
    self.line?.nodes.forEach { $0.removeFromParentNode() }
    self.line?.removeFromParentNode()
    self.line = line
    return line
}
在线显示文字 (Displaying text on line)
I used another SCNNode, setting anSCNText as its geometry, to display measurements. Also, I set its position to endpoint of the line to make sure it's always visible.
我用另一SCNNode ,设置一个SCNText作为它的几何形状,来显示测量结果。 另外,我将其位置设置为直线的端点,以确保其始终可见。
private final class TextNode: SCNNode {
    private var textGeometry = SCNText()
    private lazy var textWrapperNode = SCNNode(
        geometry: textGeometry
    )    ...
}
平面指示器 (Plane indicator)
The plane indicator is important to acknowledge users about the detected plane instantly so that the user can make sure whether the nodes will be added on the right plane, which is essential for making the right measurement.
平面指示器对于立即确认有关检测到的平面的用户非常重要,以便用户可以确保是否将节点添加到正确的平面上,这对于进行正确的测量至关重要。
The indicator is only visible if there is a detected plane, which is determined by the method, realWorldPosition(for point: CGPoint) -> SCNVector3?. If the method returns a position addIndicatorNode() is called and the indicator is displayed on the center of the screen. When the method doesn't detect anything and returns nil, then the indicator is removed from the screen via removeIndicatorNode() method.
仅当存在检测到的平面(由方法realWorldPosition(for point: CGPoint) -> SCNVector3?确定)时,该指示器才可见realWorldPosition(for point: CGPoint) -> SCNVector3? 。 如果该方法返回一个位置, addIndicatorNode()调用addIndicatorNode()并将指示符显示在屏幕中央。 当该方法未检测到任何东西并返回nil时,则通过removeIndicatorNode()方法从屏幕上删除指示器。
Also to update indicators position, resetIndicatorPosition() method is called in renderer(_ renderer: SCNSceneRenderer, didUpdate node: SCNNode, for anchor: ARAnchor.
为了更新指示器的位置,在renderer(_ renderer: SCNSceneRenderer, didUpdate node: SCNNode, for anchor: ARAnchor调用resetIndicatorPosition()方法。
private func addIndicatorNode() {
    let geometry = SCNPlane(width: 0.05, height: 0.05)
    let material = SCNMaterial()
    material.diffuse.contents = UIImage(
        named: "icon-plane-indicator"
    )
    indicatorNode.geometry = geometry
    indicatorNode.geometry?.firstMaterial = material
    scene.rootNode.addChildNode(indicatorNode)
}func resetIndicatorPosition() {
    if self.indicatorNode.parent == nil {
        self.addIndicatorNode()
    }
    guard let position = self.centerRealWorldPosition() else {
        self.removeIndicatorNode()
        return
    }
    self.indicatorNode.eulerAngles.x = -.pi / 2
    self.indicatorNode.position = position
}func renderer(_ renderer: SCNSceneRenderer, didUpdate node: SCNNode, for anchor: ARAnchor) {
    DispatchQueue.main.async {
        self.measurementView.resetIndicatorPosition()
        ...
    }
}
AR会议反馈 (AR Session feedback)
Other than plane indicator, I also used ARSessionDelegate's methods to give additional info about the ar session. The message Move your phone on a flat surface until it's detected is displayed when no plane is detected in the ar session.
除了平面指示器之外,我还使用ARSessionDelegate的方法来提供有关ar会话的其他信息。 当在ar会话中未检测到任何平面时,将显示消息“ Move your phone on a flat surface until it's detected被检测到”。
private func updateSessionInfoLabel(
        for frame: ARFrame,
        trackingState: ARCamera.TrackingState
    ) {
    let message: String
    switch trackingState {
    case .normal where frame.anchors.isEmpty, // No planes detected
         .limited(.excessiveMotion),
         .limited(.initializing),
         .limited(.insufficientFeatures),
         .notAvailable:
        message = "Move your phone on a flat surface until it's detected"
    default:
        message = ""
    }
    measurementView.info = message
}
结论 (Conclusion)
In conclusion, this was my first experience with ARKit and although things seemed a little unfamiliar in the beginning, I was able to put things together with the help of sources on topic on the net, hoping that this one also be one of them, thanks for reading.
总而言之,这是我第一次使用ARKit,尽管一开始似乎不太熟悉,但我还是能够借助网上主题资源将这些东西放在一起,希望这也是其中之一,谢谢阅读。
翻译自: https://blog.hipolabs.com/ar-measurement-essentials-on-ios-fd15c77f125a
ios ar


 7613
7613


 被折叠的 条评论
为什么被折叠?
被折叠的 条评论
为什么被折叠?
 到【灌水乐园】发言


