


ios 相机 制定图片大小
Every passing day more and more apps are using the iPhone camera for more than just taking photos, videos or video calls. Apps such as Snapchat process images real-time to preview filters. Facebook attempts to make video calls fun with filters too. Many apps use the camera to scan barcodes and QR codes. Some scan credit cards and other documents.
每一天,越来越多的应用程序正在使用iPhone相机拍摄照片,视频或视频通话。 Snapchat等应用程序实时处理图像以预览过滤器。 Facebook也尝试通过过滤器使视频通话变得有趣。 许多应用程序都使用相机扫描条形码和QR码。 有些扫描信用卡和其他文件。
In this post we’ll learn how to use the iOS device camera in a app. Furthermore we’ll learn how to receive images from the camera feed real-time to allow us to process these images. We won’t be processing the images themselves in this post.
在本文中,我们将学习如何在应用程序中使用iOS设备相机。 此外,我们将学习如何实时地从相机源接收图像,以便我们处理这些图像。 在这篇文章中,我们将不再处理图像本身。
For this post I assume you have intermediate knowledge of Swift and iOS development. You should be familiar with Grand Central Dispatch.
对于本文,我假设您具有Swift和iOS开发的中级知识。 您应该熟悉Grand Central Dispatch 。
I have used Swift 5.2 and Xcode 11.4.1 for this article.
我已经在本文中使用了Swift 5.2和Xcode 11.4.1。
入门 (Getting started)
The steps we’ll take in this post are:
我们在本文中将采取的步骤是:
- Create a new app 创建一个新的应用程序
- Display the camera feed 显示相机提要
- Processing the camera feed 处理相机提要
Let’s dive in!
让我们潜入吧!
1.创建一个新应用 (1. Create a new app)
Let’s start by opening Xcode. From menu select File > New > Project…
让我们从打开Xcode开始。 从菜单中选择文件 > 新建 > 项目…
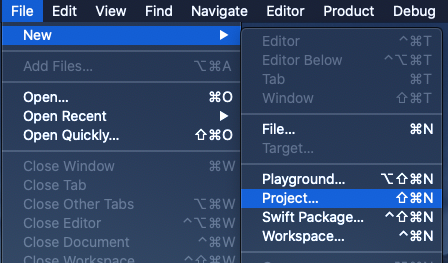
When prompted “Choose a template for your new project:” search and select Single View App. Click Next.
当出现提示“ 为新项目选择模板: ”时,搜索并选择Single View App 。 单击下一步 。

When prompted “Choose options for your new project:” type ProcessingCameraFeed for “Product Name:”. Select Swift for “Language:”. Select Storyboard for “User Interface:”. Uncheck all check boxes. Click Next.
当系统提示“ 选择新项目的选项: ”时,在“ 产品名称: ”中键入ProcessingCameraFeed 。 选择“ 语言: ”为Swift 。 为“ 用户界面: ”选择情节提要 。 取消选中所有复选框。 单击下一步 。

Save the project wherever desired then click Create.
将项目保存到所需位置,然后单击创建 。
2.显示相机提要 (2. Display the camera feed)
In this section we’ll display the feed from the camera to the user.
在本部分中,我们将显示从摄像机到用户的提要。
To access the camera on iOS devices Apple provides us AVFoundation framework. The AVFoundation framework provides us methods to make use of various audiovisual media, such as microphone, wireless playback using Airplay connected devices as well as the camera amongst other things. In this post we’ll only be making use of the camera.
为了在iOS设备上访问相机,Apple提供了我们的AVFoundation框架 。 AVFoundation框架为我们提供了使用各种视听媒体的方法,例如麦克风,使用Airplay连接的设备进行无线播放以及相机等。 在本文中,我们将仅使用相机。
First let’s open the controller for our blank screen. Open ViewController.swift. Add the following line of code right below import UIKit:
首先,让我们打开空白屏幕的控制器。 打开ViewController.swift 。 在import UIKit下面添加以下代码行:
import AVFoundationThis will allow us to make use of the AVFoundation framework.
这将使我们能够利用AVFoundation框架 。
Next let’s create an instance of AVCaptureSession. Add the following property to the ViewController class:
接下来,我们创建一个AVCaptureSession实例。 将以下属性添加到ViewController类:
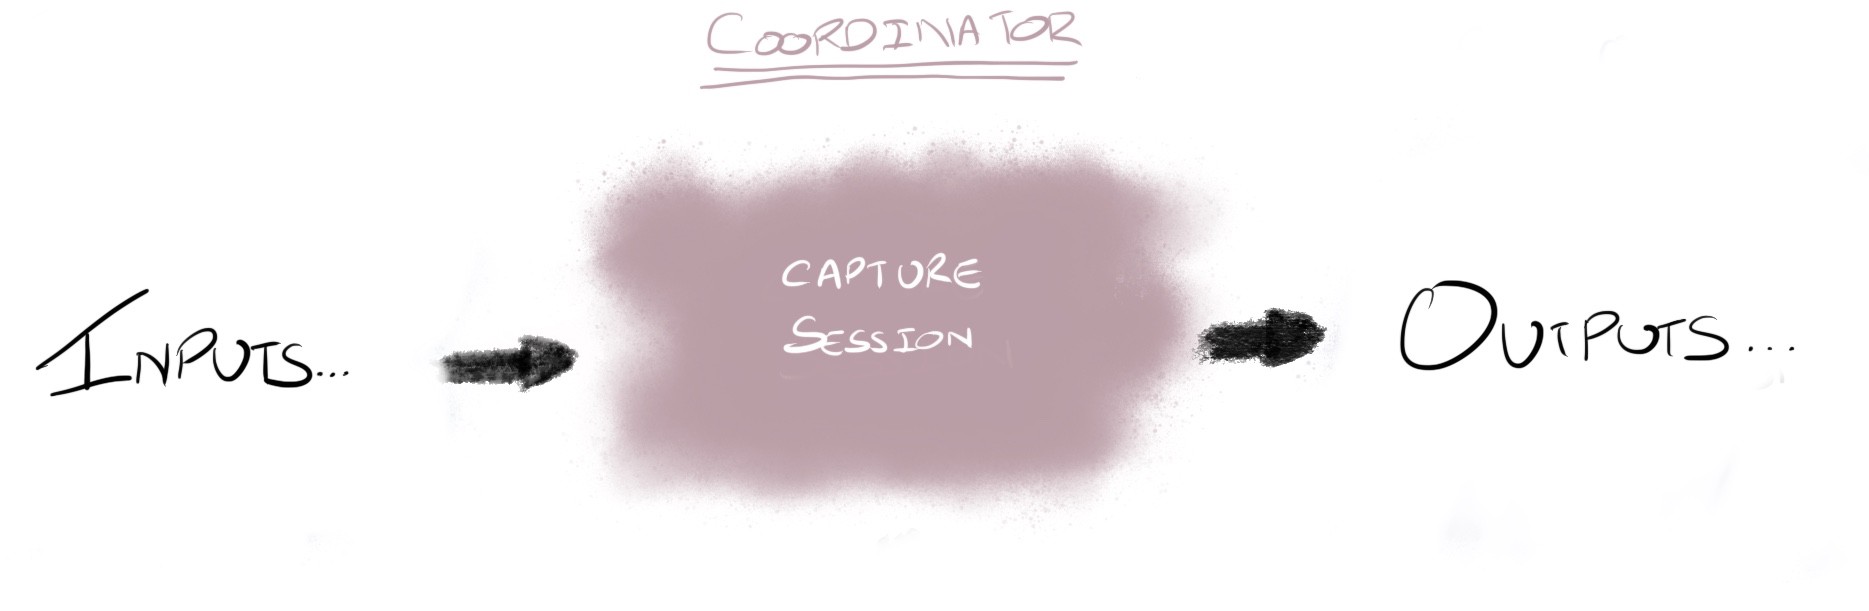
private let captureSession = AVCaptureSession()To output the camera feed we need to use AVCaptureSession to coordinate the devices capture inputs and the output destination.
要输出相机提要,我们需要使用AVCaptureSession来协调设备捕获输入和输出目标。
Next let’s add the back camera as a capture input to our captureSession. Add the following functions that will allow us to do so:
接下来,让我们将后置摄像头作为捕获输入添加到我们的captureSession 。 添加以下使我们可以这样做的功能:
private func addCameraInput() {
    let device = AVCaptureDevice.default(for: .video)!
    let cameraInput = try! AVCaptureDeviceInput(device: device)
    self.captureSession.addInput(cameraInput)
}
The code above takes the default camera which is the standard back camera, wraps it into a capture input and finally adds the camera input as part of our sessions inputs. As we’ll only be making use of the camera this will be our only input.
上面的代码采用默认的摄像头(即标准后置摄像头),将其包装到捕获输入中,最后将摄像头输入添加为会话输入的一部分。 由于我们只会使用相机,因此这是我们唯一的输入。
Now let’s call the addCameraInput function. Add the following line of code to viewDidLoad function:
现在让我们调用addCameraInput函数。 将以下代码行添加到viewDidLoad函数:
self.addCameraInput()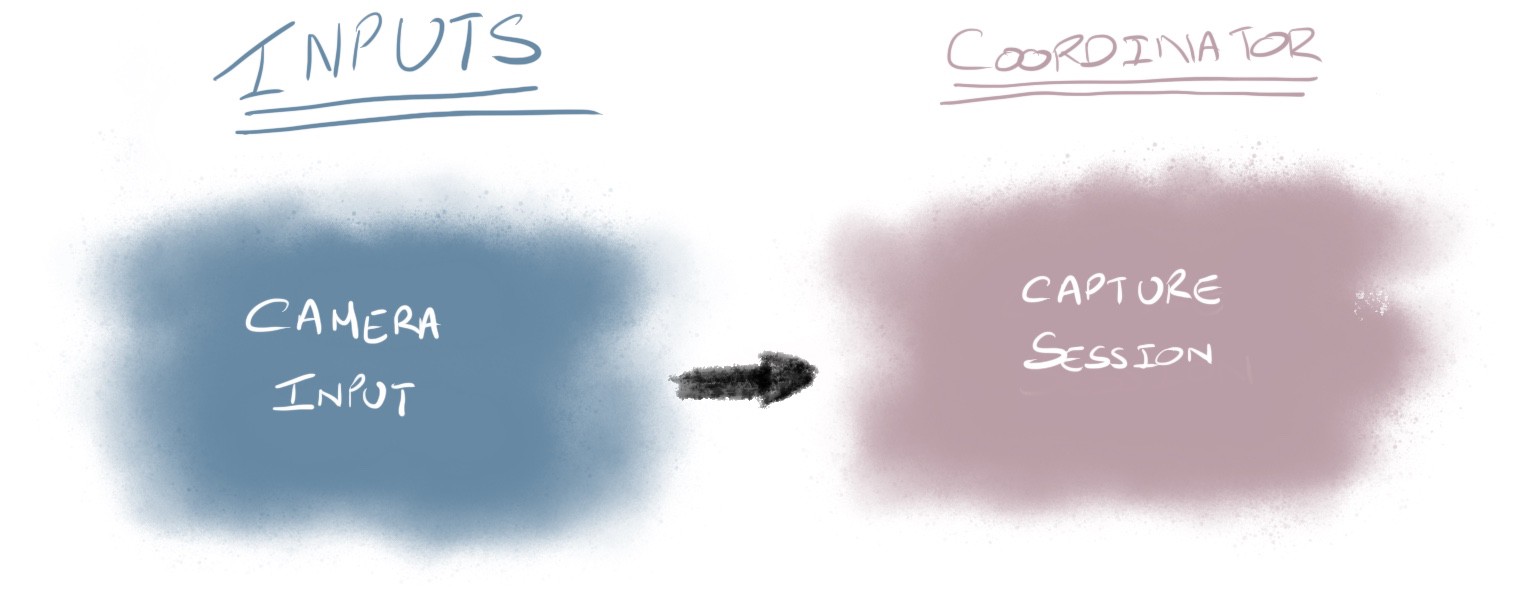
Why do we call this at viewDidLoad? We’ll cover that in a bit.
为什么我们在viewDidLoad调用它? 我们将稍作介绍。
Next let’s present the camera feed on screen. Add the following property to the view controller, just below the captureSession property:
接下来,让我们在屏幕上显示摄像机供稿。 将以下属性添加到视图控制器中,位于captureSession属性的正下方:
private lazy var previewLayer: AVCaptureVideoPreviewLayer = {
    let preview = AVCaptureVideoPreviewLayer(session: self.captureSession)
    preview.videoGravity = .resizeAspect
    return preview
}()
The property above will create and configure and instance of AVCaptureVideoPreviewLayer when accessed the first time; it’s lazily loaded. Additionally we also specify on how to display the image from the camera feed; it will resize to fit the preview layers bounds whilst maintaining the aspect ratio of the image. To check resizing option check AVLayerVideoGravity.
第一次访问时,上面的属性将创建和配置AVCaptureVideoPreviewLayer实例; 它是懒洋洋的 。 此外,我们还指定了如何显示来自摄像机源的图像; 它将调整大小以适合预览层边界,同时保持图像的纵横比。 要检查调整大小选项,请检查AVLayerVideoGravity 。
Next let’s add the camera preview layer to the screen. Add the following function to do so:
接下来,我们将相机预览层添加到屏幕上。 添加以下功能即可:
private func addPreviewLayer() {
    self.view.layer.addSublayer(self.previewLayer)
}
Notice that the preview layer is added as a sublayer of an existing view. That is why the earliest we can this function is after the view is loaded - that is at viewDidLoad function.
请注意,预览层被添加为现有视图的子层。 这就是为什么我们最早可以在加载视图后使用此功能的原因-即在viewDidLoad函数上。
Now let’s call the addPreviewLayer and start the capture session so it coordinate the camera input with the capture session. Add the following two lines of code to viewDidLoad:
现在,让我们调用addPreviewLayer并启动捕获会话,以使摄像机输入与捕获会话协调。 将以下两行代码添加到viewDidLoad :
self.addPreviewLayer()
self.captureSession.startRunning()
There’s one thing to do so we can successfully see the camera preview. We must update the frame of the preview layer when the view controller’s container view frame updates.
只有一件事,我们才能成功查看摄像机预览。 当视图控制器的容器视图框架更新时,我们必须更新预览层的框架。
Add the following function to update the preview layers frame:
添加以下功能以更新预览图层框架:
override func viewDidLayoutSubviews() {
    super.viewDidLayoutSubviews()
    self.previewLayer.frame = self.view.bounds
}
CALayer’s require manually setting of the frame. AVCaptureVideoPreviewLayer is a subclass of CALayer. In this case we are setting the preview layer to cover the whole screen.
CALayer需要手动设置框架。 AVCaptureVideoPreviewLayer是CALayer的子类。 在这种情况下,我们将预览层设置为覆盖整个屏幕。

One last thing before we can run the app and show the camera preview. The app requires permission from the user to access the camera. Camera is considered as private. All private or privacy considered data on iOS requires the app to:
在我们可以运行该应用并显示相机预览之前的最后一件事。 该应用需要用户的许可才能访问相机。 相机被视为私人相机。 iOS上所有考虑私人或隐私的数据都要求该应用程序执行以下操作:
- declare the requirement of usage of such privacy considered aspect 声明使用这种隐私考虑方面的要求
- request user permission at runtime 在运行时请求用户权限
We won’t be needing to handle user permission at runtime. We’ll assume the user will authorise use of the camera. However if the user denies permission our app will crash.
我们将不需要在运行时处理用户权限。 我们假设用户将授权使用相机。 但是,如果用户拒绝许可,我们的应用程序将崩溃。
For the first part we have to declare that the app makes use of the camera. We need to declare this in the Info.plist file of the app. Add the key NSCameraUsageDescription with string value This message will be displayed to the user when requesting camera permission.
对于第一部分,我们必须声明该应用程序使用了相机。 我们需要在应用程序的Info.plist文件中声明它。 添加具有字符串值的键NSCameraUsageDescription , This message will be displayed to the user when requesting camera permission 。

Once NSCameraUsageDescription is entered Xcode will replace the key with a more user friendly description of the key for display on the editor: Privacy — Camera Usage Description.
输入NSCameraUsageDescription ,Xcode将用更易于使用的密钥说明替换密钥,以在编辑器上显示: Privacy — Camera Usage Description 。
Run the app on a device and accept the camera permission. You should now see the camera feed!
在设备上运行该应用程序并接受相机许可。 现在,您应该可以看到相机供稿了!
It is important to note that the code used in this step assumes that it will run on a device. All iOS devices have back cameras. However the app will crash if ran on a simulator as simulators have no cameras and aren’t capable of using a camera connected to macOS either.
重要的是要注意,此步骤中使用的代码假定它将在设备上运行。 所有iOS设备都有后置摄像头。 但是,如果在模拟器上运行,则该应用程序将崩溃,因为模拟器没有相机,也无法使用连接到macOS的相机。
3.处理相机提要 (3. Processing the camera feed)
Next let’s get the camera feed images for processing. For such a task we’ll need to make use of AVCaptureVideoDataOutput. Add the following property to ViewController.swift:
接下来,让我们获取相机供稿图像进行处理。 为此,我们需要使用AVCaptureVideoDataOutput 。 将以下属性添加到ViewController.swift :
private let videoOutput = AVCaptureVideoDataOutput()We can tell videoOutput to send the camera feed images to a handler of our choice. Let’s configure the videoOutput and add it to the capture session. Add the following function to do so:
我们可以告诉videoOutput将相机提要图像发送给我们选择的处理程序。 让我们配置videoOutput并将其添加到捕获会话。 添加以下功能即可:
private func addVideoOutput() {self.videoOutput.videoSettings = [(kCVPixelBufferPixelFormatTypeKey as NSString) : NSNumber(value: kCVPixelFormatType_32BGRA)] as [String : Any]
    self.videoOutput.setSampleBufferDelegate(self, queue: DispatchQueue(label: "my.image.handling.queue"))self.captureSession.addOutput(self.videoOutput)
}
In the code above we first set the image pixel format to receive. In this case we specify that each pixel in the image should be a 32-bit Blue-Green-Red-Alpha format (32BGRA). Next we tell videoOutput to send the camera feed image to our ViewController instance on a serial background thread. Finally we add videoOutput as part of the capture session from it will receive the camera feed and forward it.
在上面的代码中,我们首先将图像像素格式设置为接收。 在这种情况下,我们指定图像中的每个像素应为32位的Blue-Green-Red-Alpha格式( 32BGRA )。 接下来,我们告诉videoOutput在串行后台线程videoOutput摄像机供稿图像发送到我们的ViewController实例。 最后,我们将videoOutput添加为捕获会话的一部分,从中将接收到摄像头提要并将其转发。
You might have noticed that Xcode complains that we can’t set our ViewController instance as the handler of the camera feed output.
您可能已经注意到Xcode抱怨我们无法将ViewController实例设置为相机feed输出的处理程序。

That is because in order to become a video output handler the class must conform to AVCaptureVideoDataOutputSampleBufferDelegate.
这是因为要成为视频输出处理程序,该类必须符合AVCaptureVideoDataOutputSampleBufferDelegate 。
Change the ViewController class declaration to the following:
将ViewController类声明更改为以下内容:
class ViewController: UIViewController, AVCaptureVideoDataOutputSampleBufferDelegate {Now we’re ready to receive the camera feed image. To do so add the following AVCaptureVideoDataOutputSampleBufferDelegate protocol function:
现在,我们准备接收相机供稿图像。 为此,添加以下AVCaptureVideoDataOutputSampleBufferDelegate协议函数 :
func captureOutput(_ output: AVCaptureOutput,
                   didOutput sampleBuffer: CMSampleBuffer,
                   from connection: AVCaptureConnection) {guard let frame = CMSampleBufferGetImageBuffer(sampleBuffer) else {
        debugPrint("unable to get image from sample buffer")return}
    print("did receive image frame")
    // process image here
}
The code above extracts the image buffer from sample buffer. CMSampleBuffer can contain different types of audiovisual media. Thus we first make sure that the sample contains an image.
上面的代码从样本缓冲区中提取图像缓冲区。 CMSampleBuffer可以包含不同类型的视听媒体。 因此,我们首先要确保样本中包含图像。
Before we can receive the camera feed images we must add the video output to the capture session. Add the following line to viewDidLoad before self.captureSession.startRunning():
必须先将视频输出添加到捕获会话,然后才能接收摄像机的提要图像。 在self .captureSession.startRunning()之前, self .captureSession.startRunning()添加到viewDidLoad :
self.addVideoOutput()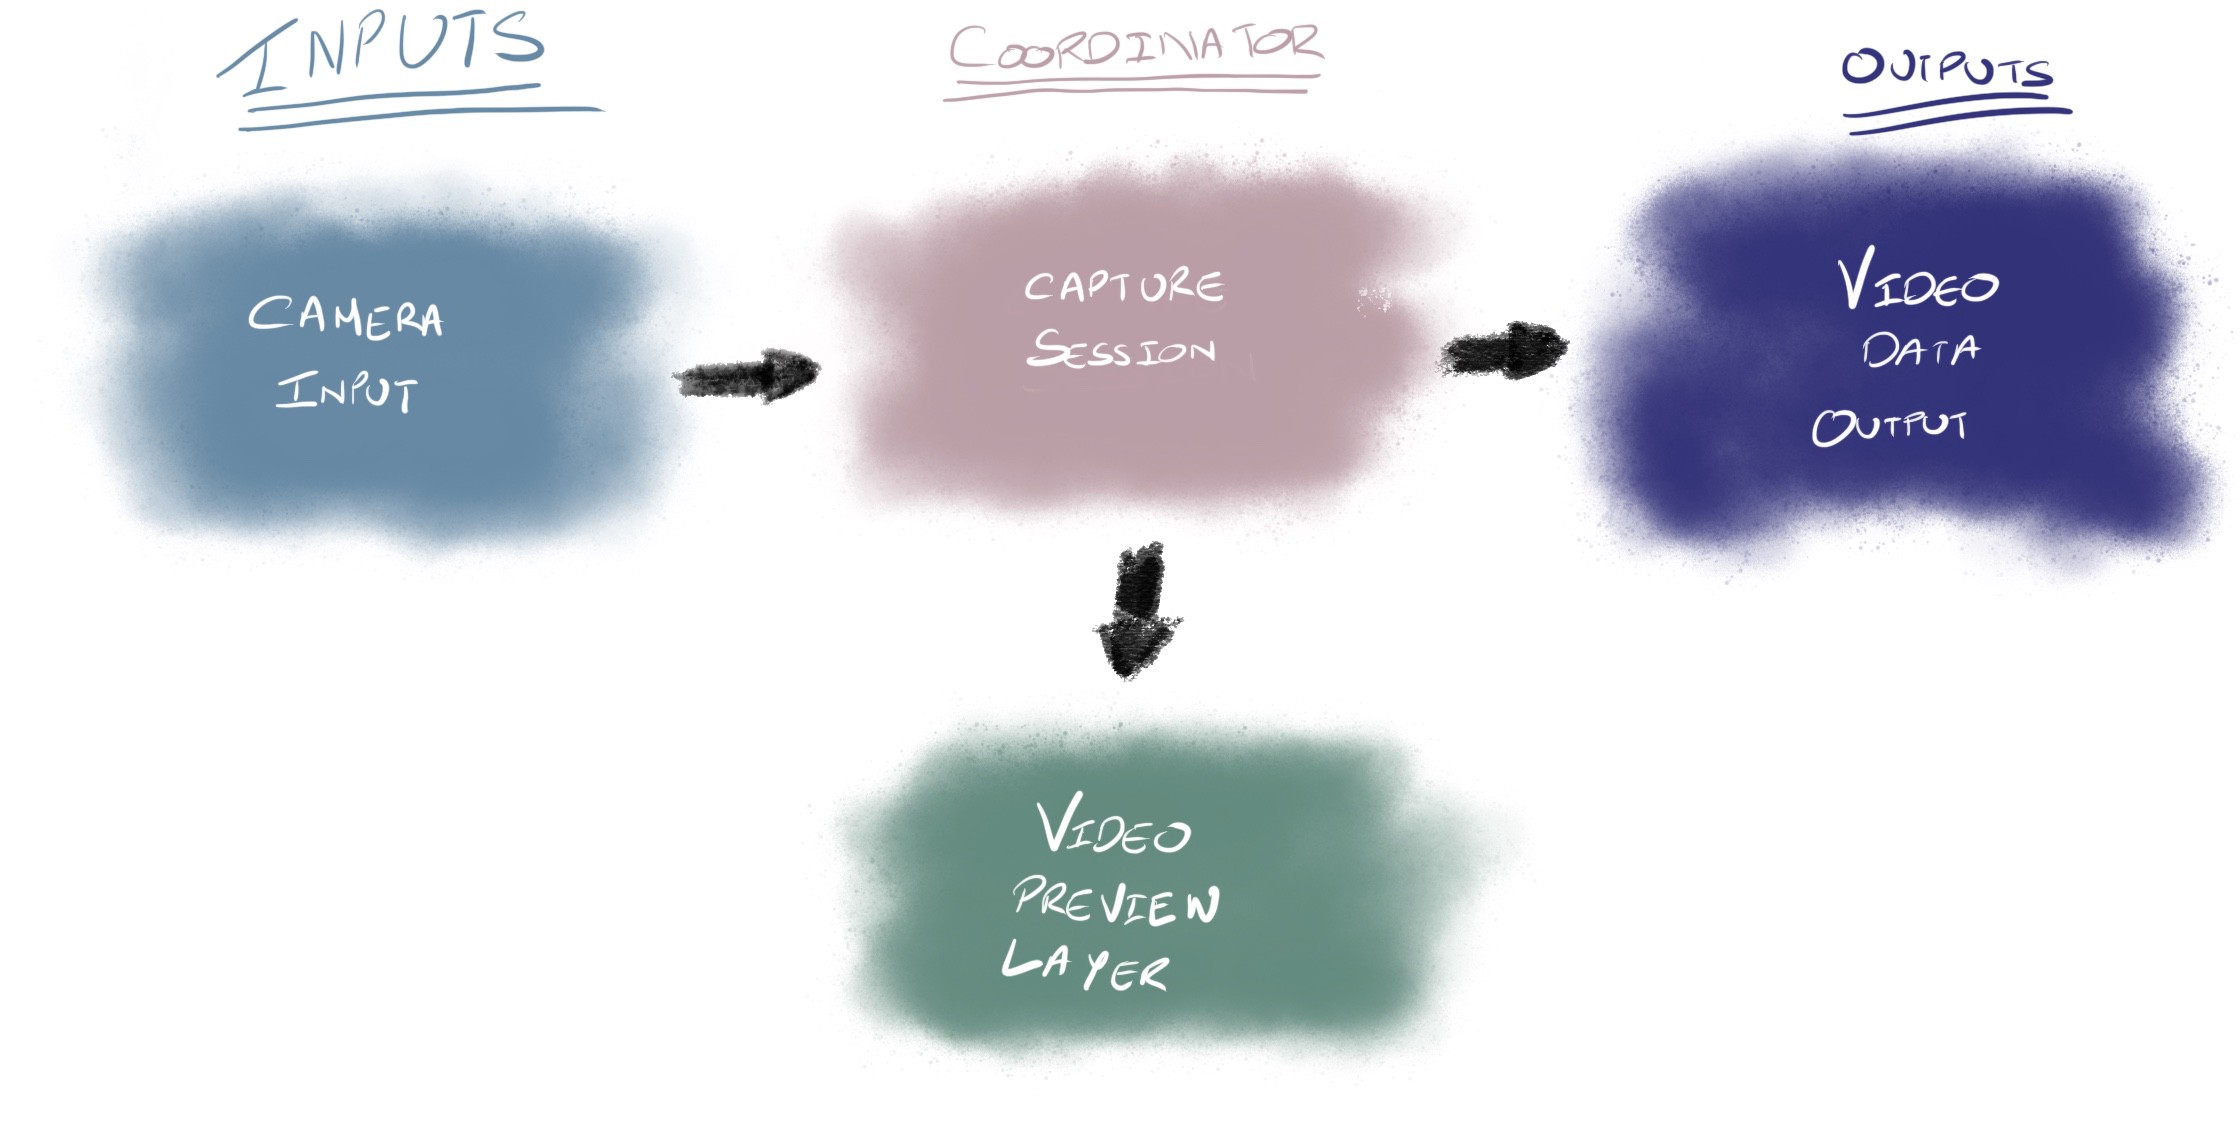
Run the app on a device and watch those frame come in on the console (View > Debug Area > Activate Console)! 🎉
在设备上运行该应用程序,然后观看那些帧进入控制台(“ 视图” >“ 调试区域” >“ 激活控制台” )! 🎉

摘要 (Summary)
In this post we learnt:
在这篇文章中,我们学习了:
- how access iOS device camera 如何访问iOS设备相机
- how to display the camera feed 如何显示相机提要
- how to process the camera feed image 如何处理相机提要图像
最后说明 (Final Notes)
You can find the full source code for this post in the link below:
您可以在下面的链接中找到此帖子的完整源代码:
In this post we slightly covered requesting camera permission with the assumption the user will grant access to the camera. Managing permissions was out of scope of the post. To learn more on handling permission check out “Requesting Authorization for Media Capture on iOS” from Apple documentation site.
在这篇文章中,我们以用户将授予对摄像机的访问权限为前提,略微介绍了请求摄像机的权限。 管理权限超出了帖子的范围。 要了解有关处理权限的更多信息,请查看Apple文档站点中的“ 在iOS上请求媒体捕获的授权 ”。
In this post we learnt how to setup to process the camera feed. But what can we with those images?
在这篇文章中,我们学习了如何设置以处理相机提要。 但是我们能用那些图像做什么呢?
Since iOS 11 Apple includes a framework within iOS called Vision framework. I previously posted on how to do face detection using this framework.
从iOS 11开始,Apple在iOS中包含一个称为Vision框架的框架 。 我之前曾发布过如何使用此框架进行人脸检测的文章 。
Alternatively there are third party libraries that offer tools and functionalities to process live camera images such as OpenCV. I previously posted on using OpenCV to run simple lane detection on iOS.
或者,有第三方库提供工具和功能来处理实时摄像机图像,例如OpenCV 。 我以前发布过使用OpenCV 在iOS上运行简单车道检测的信息 。
I will continue to post ways to process live images that can enhance the end user experience of your app.
我将继续发布处理实时图像的方法,这些方法可以增强应用程序的最终用户体验。
Stay tuned for more posts on iOS development! Follow me on Twitter or Medium!
翻译自: https://medium.com/@anuragajwani/how-to-process-images-real-time-from-the-ios-camera-9c416c531749
ios 相机 制定图片大小


 982
982

 被折叠的 条评论
为什么被折叠?
被折叠的 条评论
为什么被折叠?
 到【灌水乐园】发言


