


总览 (Overview)
In iOS development, sometimes we need to show different view elements in a single place of a view controller. It can be done by managing different child view controller (AKA ContainerView) into a parent view controller depending upon different conditions. In this tutorial, we will learn:
在iOS开发中,有时我们需要在视图控制器的单个位置显示不同的视图元素。 可以通过根据不同的条件将不同的子视图控制器(AKA ContainerView)管理到父视图控制器中来完成。 在本教程中,我们将学习:
- How to configure container views in a view controller? 如何在视图控制器中配置容器视图?
- How to show different container views by managing them depending on different conditions? 如何通过根据不同条件进行管理来显示不同的容器视图?
- How to pass information from parent to child view controllers and vice versa using a closure. 如何使用闭包将信息从父视图控制器传递给子视图控制器,反之亦然。
This tutorial is written using Swift 5, Xcode 11.2, iOS 13 & Storyboard Interface.
本教程使用 Swift 5,Xcode 11.2,iOS 13和Storyboard Interface 编写 。
从创建项目开始 (Start with creating a project)
Create a single view application in Xcode. Take a label for the top of the view controller and an image view at the bottom. Set constrain and take outlets for them.
在Xcode中创建一个单视图应用程序。 在视图控制器的顶部放置一个标签,在底部放置一个图像视图。 设置约束并为其选择插座。
We will take two different container views from the object library and set them as child view controllers of this “View Controller”.
我们将从对象库中获取两个不同的容器视图,并将它们设置为该“视图控制器”的子视图控制器。
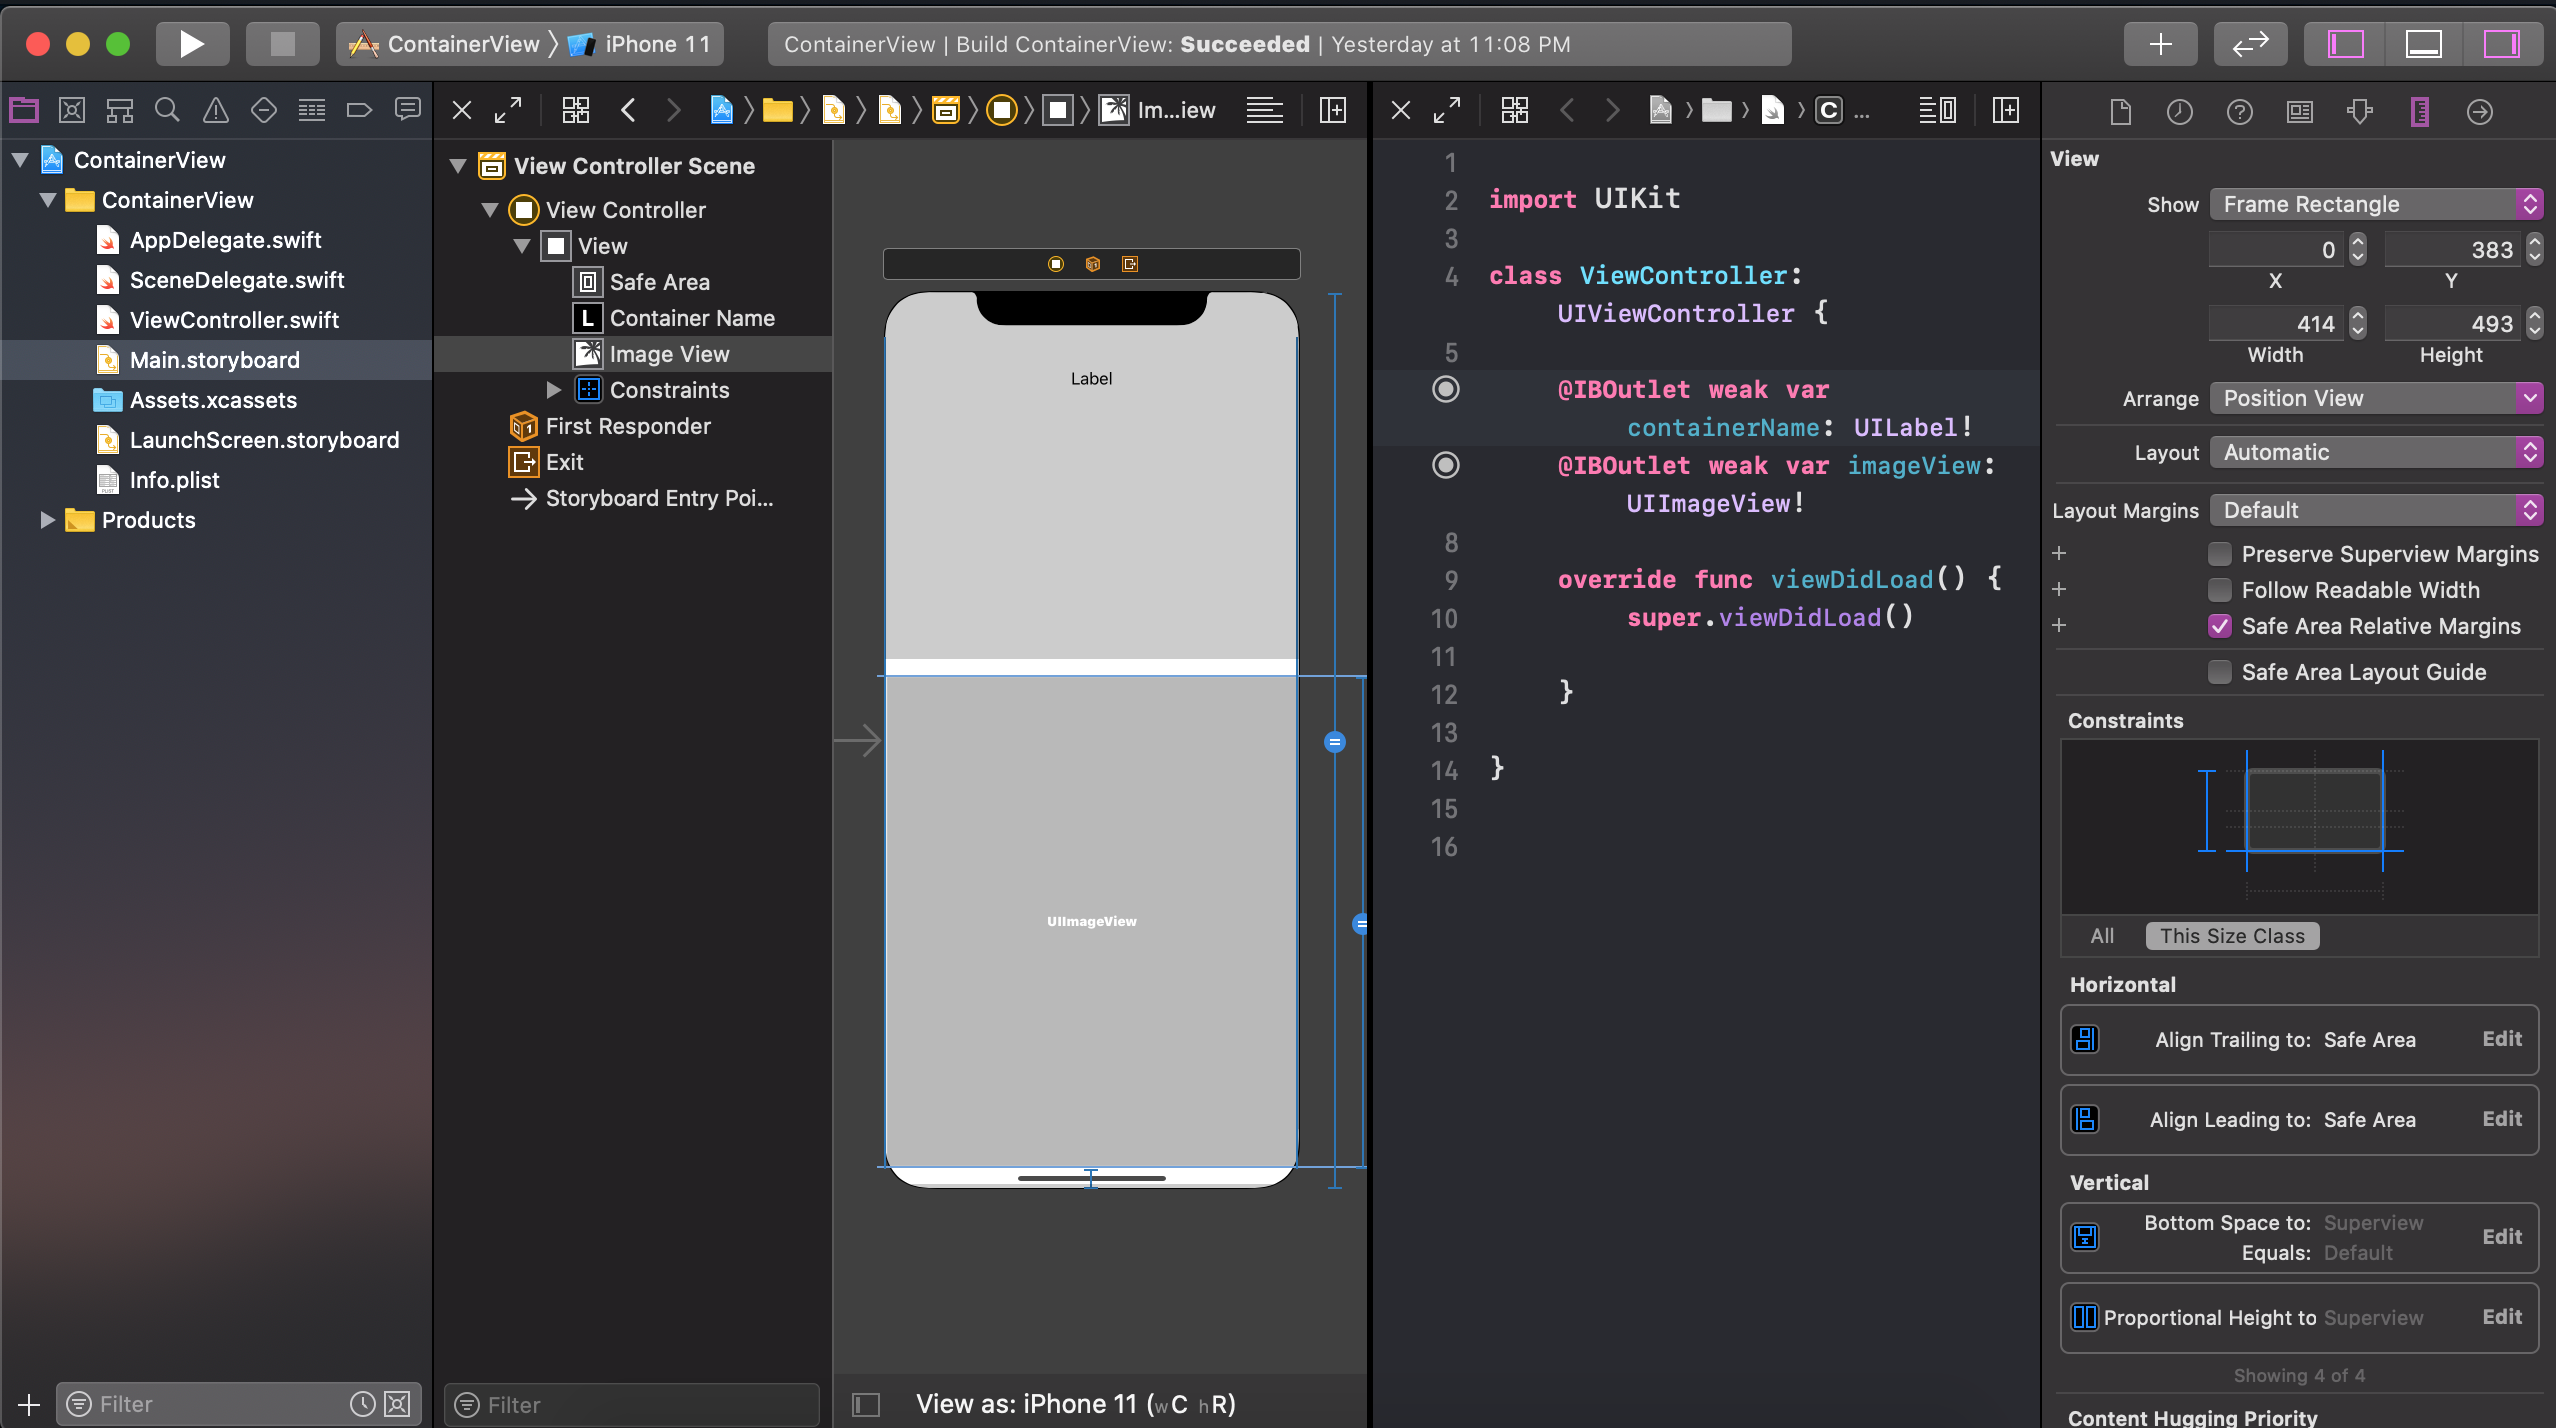
Drag and drop a container view from the object library into your view controller and place it between the label and image view. Set constrain for that container view. Create a swift file named as “FirstChildVC”. Select that container view from the storyboard, set class and identifier for that container view as “FirstChildVC”. I added the project overview picture after adding the first child view controller.
将容器视图从对象库拖放到视图控制器中,并将其放置在标签视图和图像视图之间。 为该容器视图设置约束。 创建一个名为“ FirstChildVC”的快速文件。 从情节提要中选择该容器视图,并将该容器视图的类和标识符设置为“ FirstChildVC”。 在添加第一个子视图控制器之后,我添加了项目概述图片。
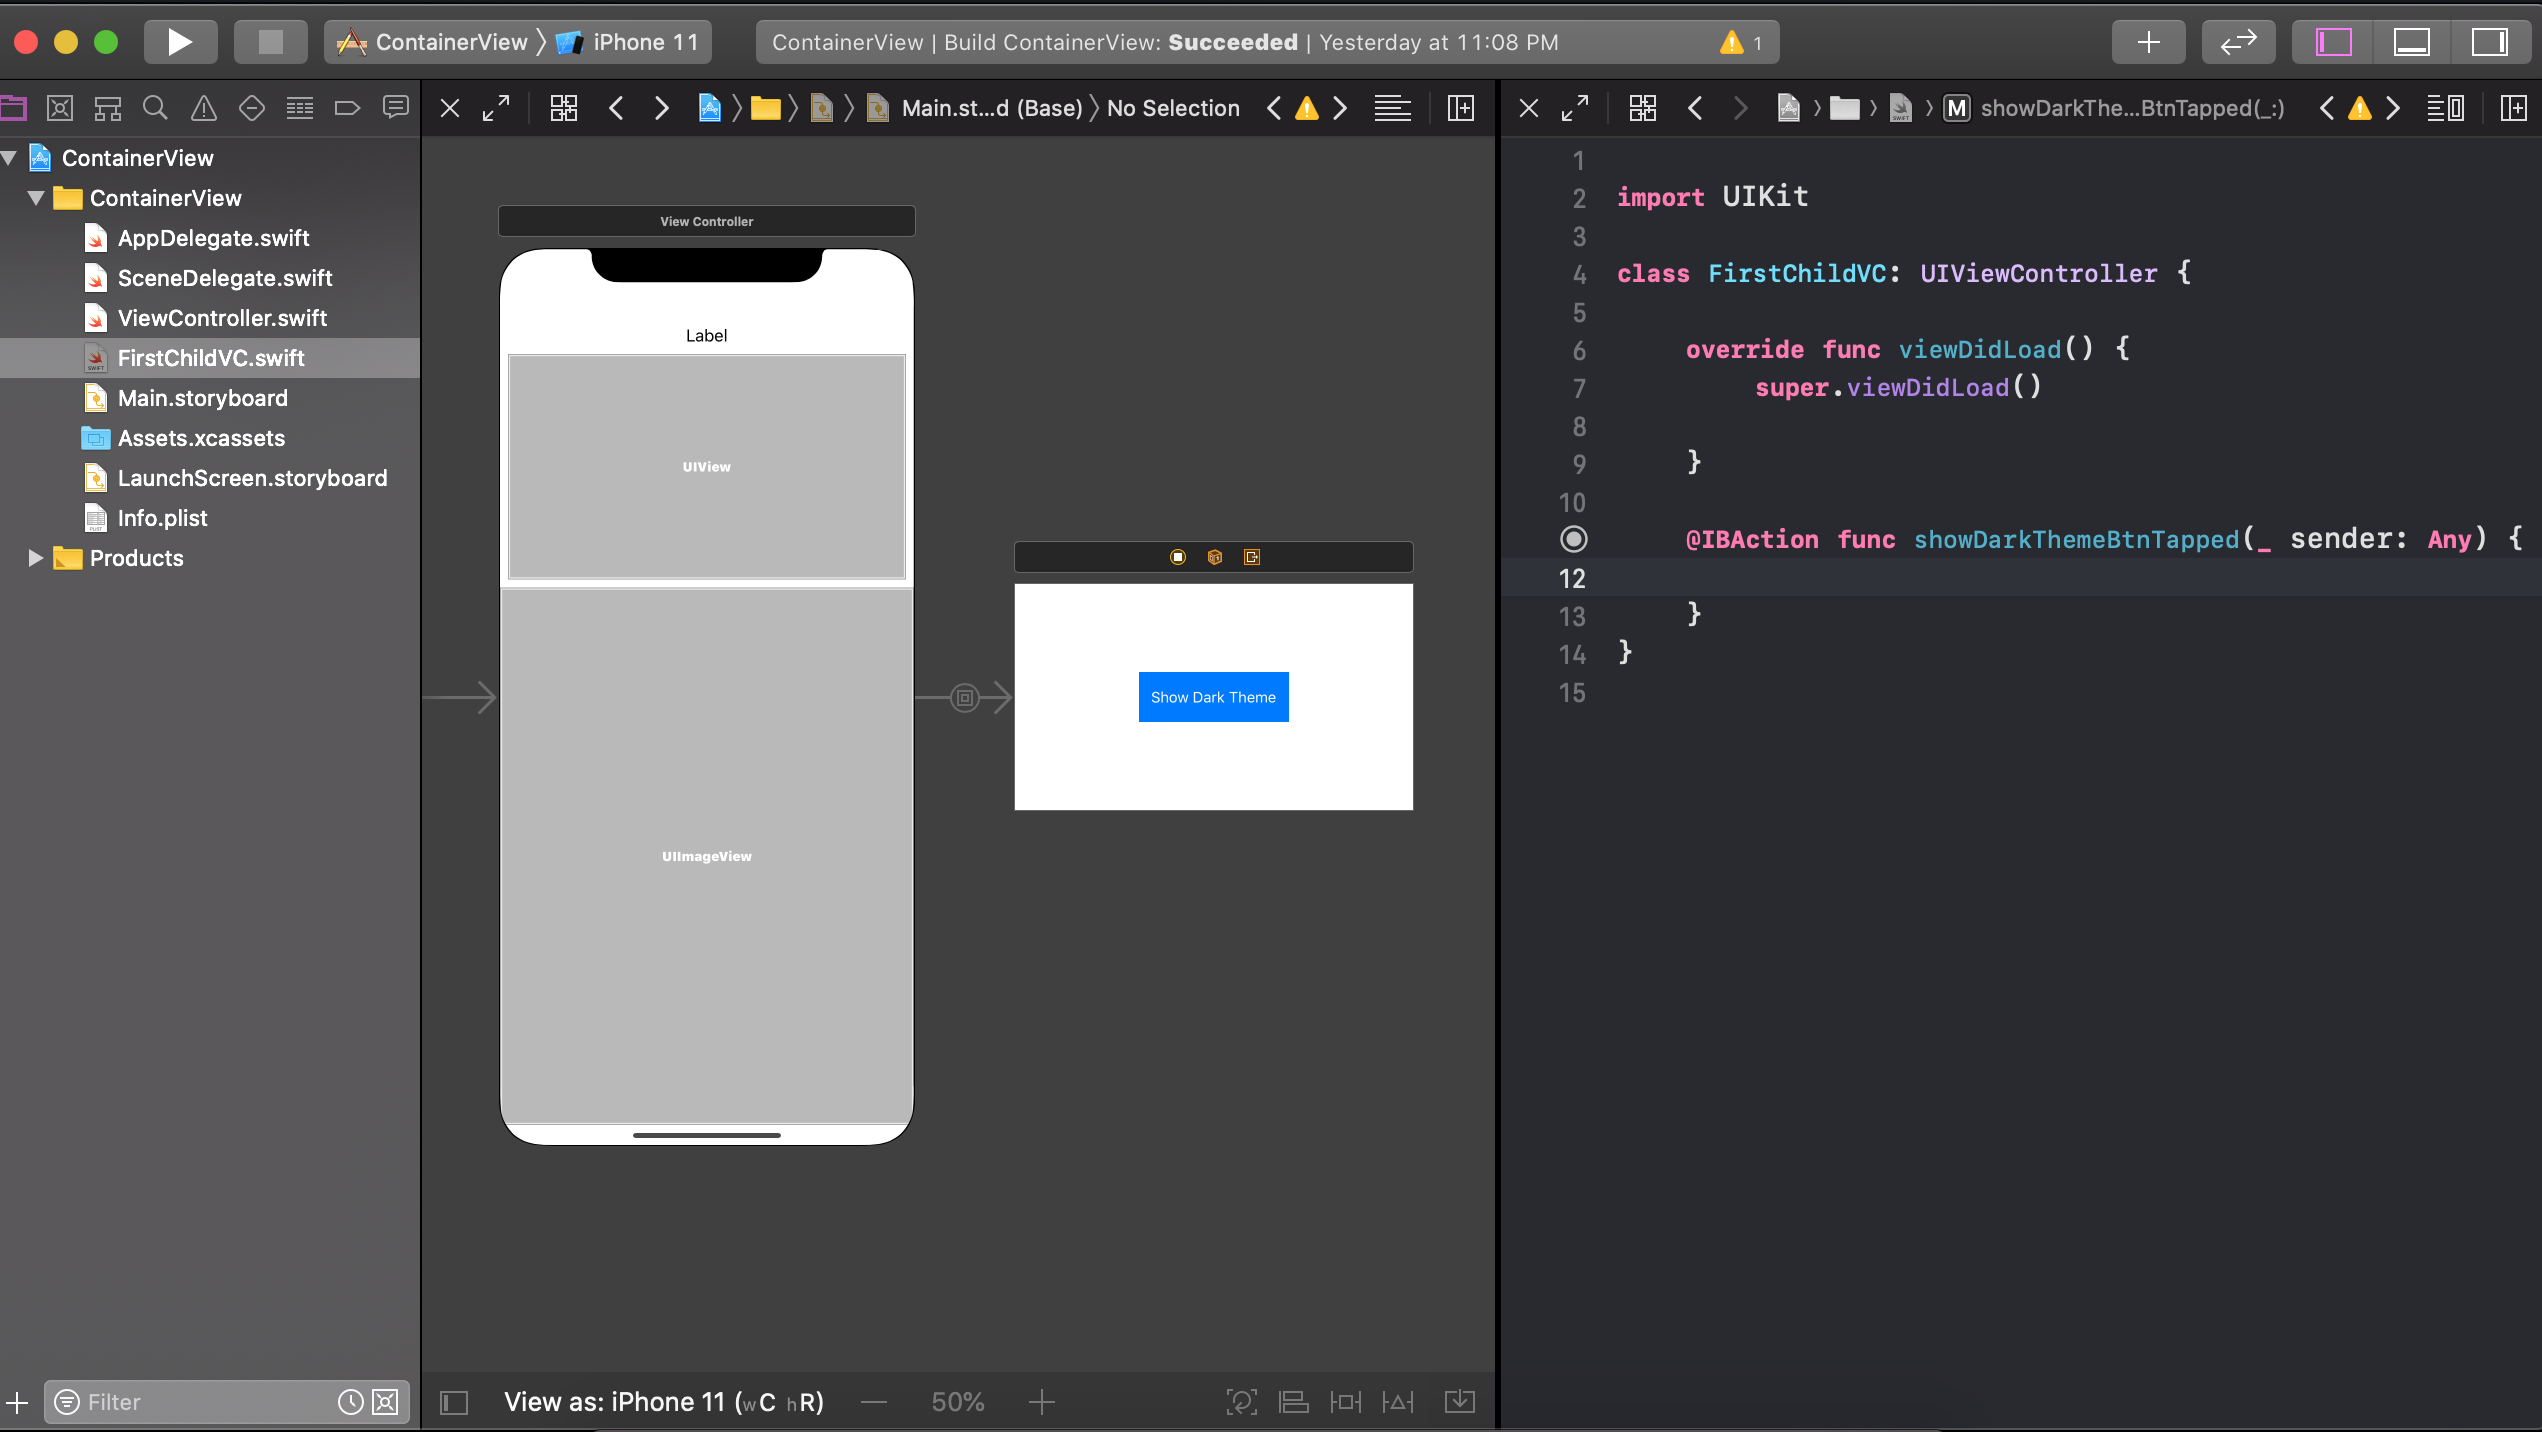
Now drag and drop a button into your “FirstChildVC”. Set name, constrain, and take an action outlet for that. The idea is that when we press this button, it will communicate with “View Controller” and based on that we will do some changes in our “View Controller”.
现在将一个按钮拖放到“ FirstChildVC”中。 设置名称,约束并为此采取行动。 想法是,当我们按下此按钮时,它将与“ View Controller”通信,并在此基础上对“ View Controller”进行一些更改。
Now drag and drop another container view and set similar constrain as “FirstChildVC”. It will place up to the “FirstChildVC”. Take a swift file as “SecondChildVC”. Set class, an identifier for that container view as “SecondChildVC”. Put a button into it, take an action outlet, and design that button.
现在,拖放另一个容器视图,并将类似的约束设置为“ FirstChildVC”。 它将放置在“ FirstChildVC”上。 将一个快速文件作为“ SecondChildVC”。 设置类,该容器视图的标识符为“ SecondChildVC”。 在其中放入一个按钮,打开一个动作插座,然后设计该按钮。
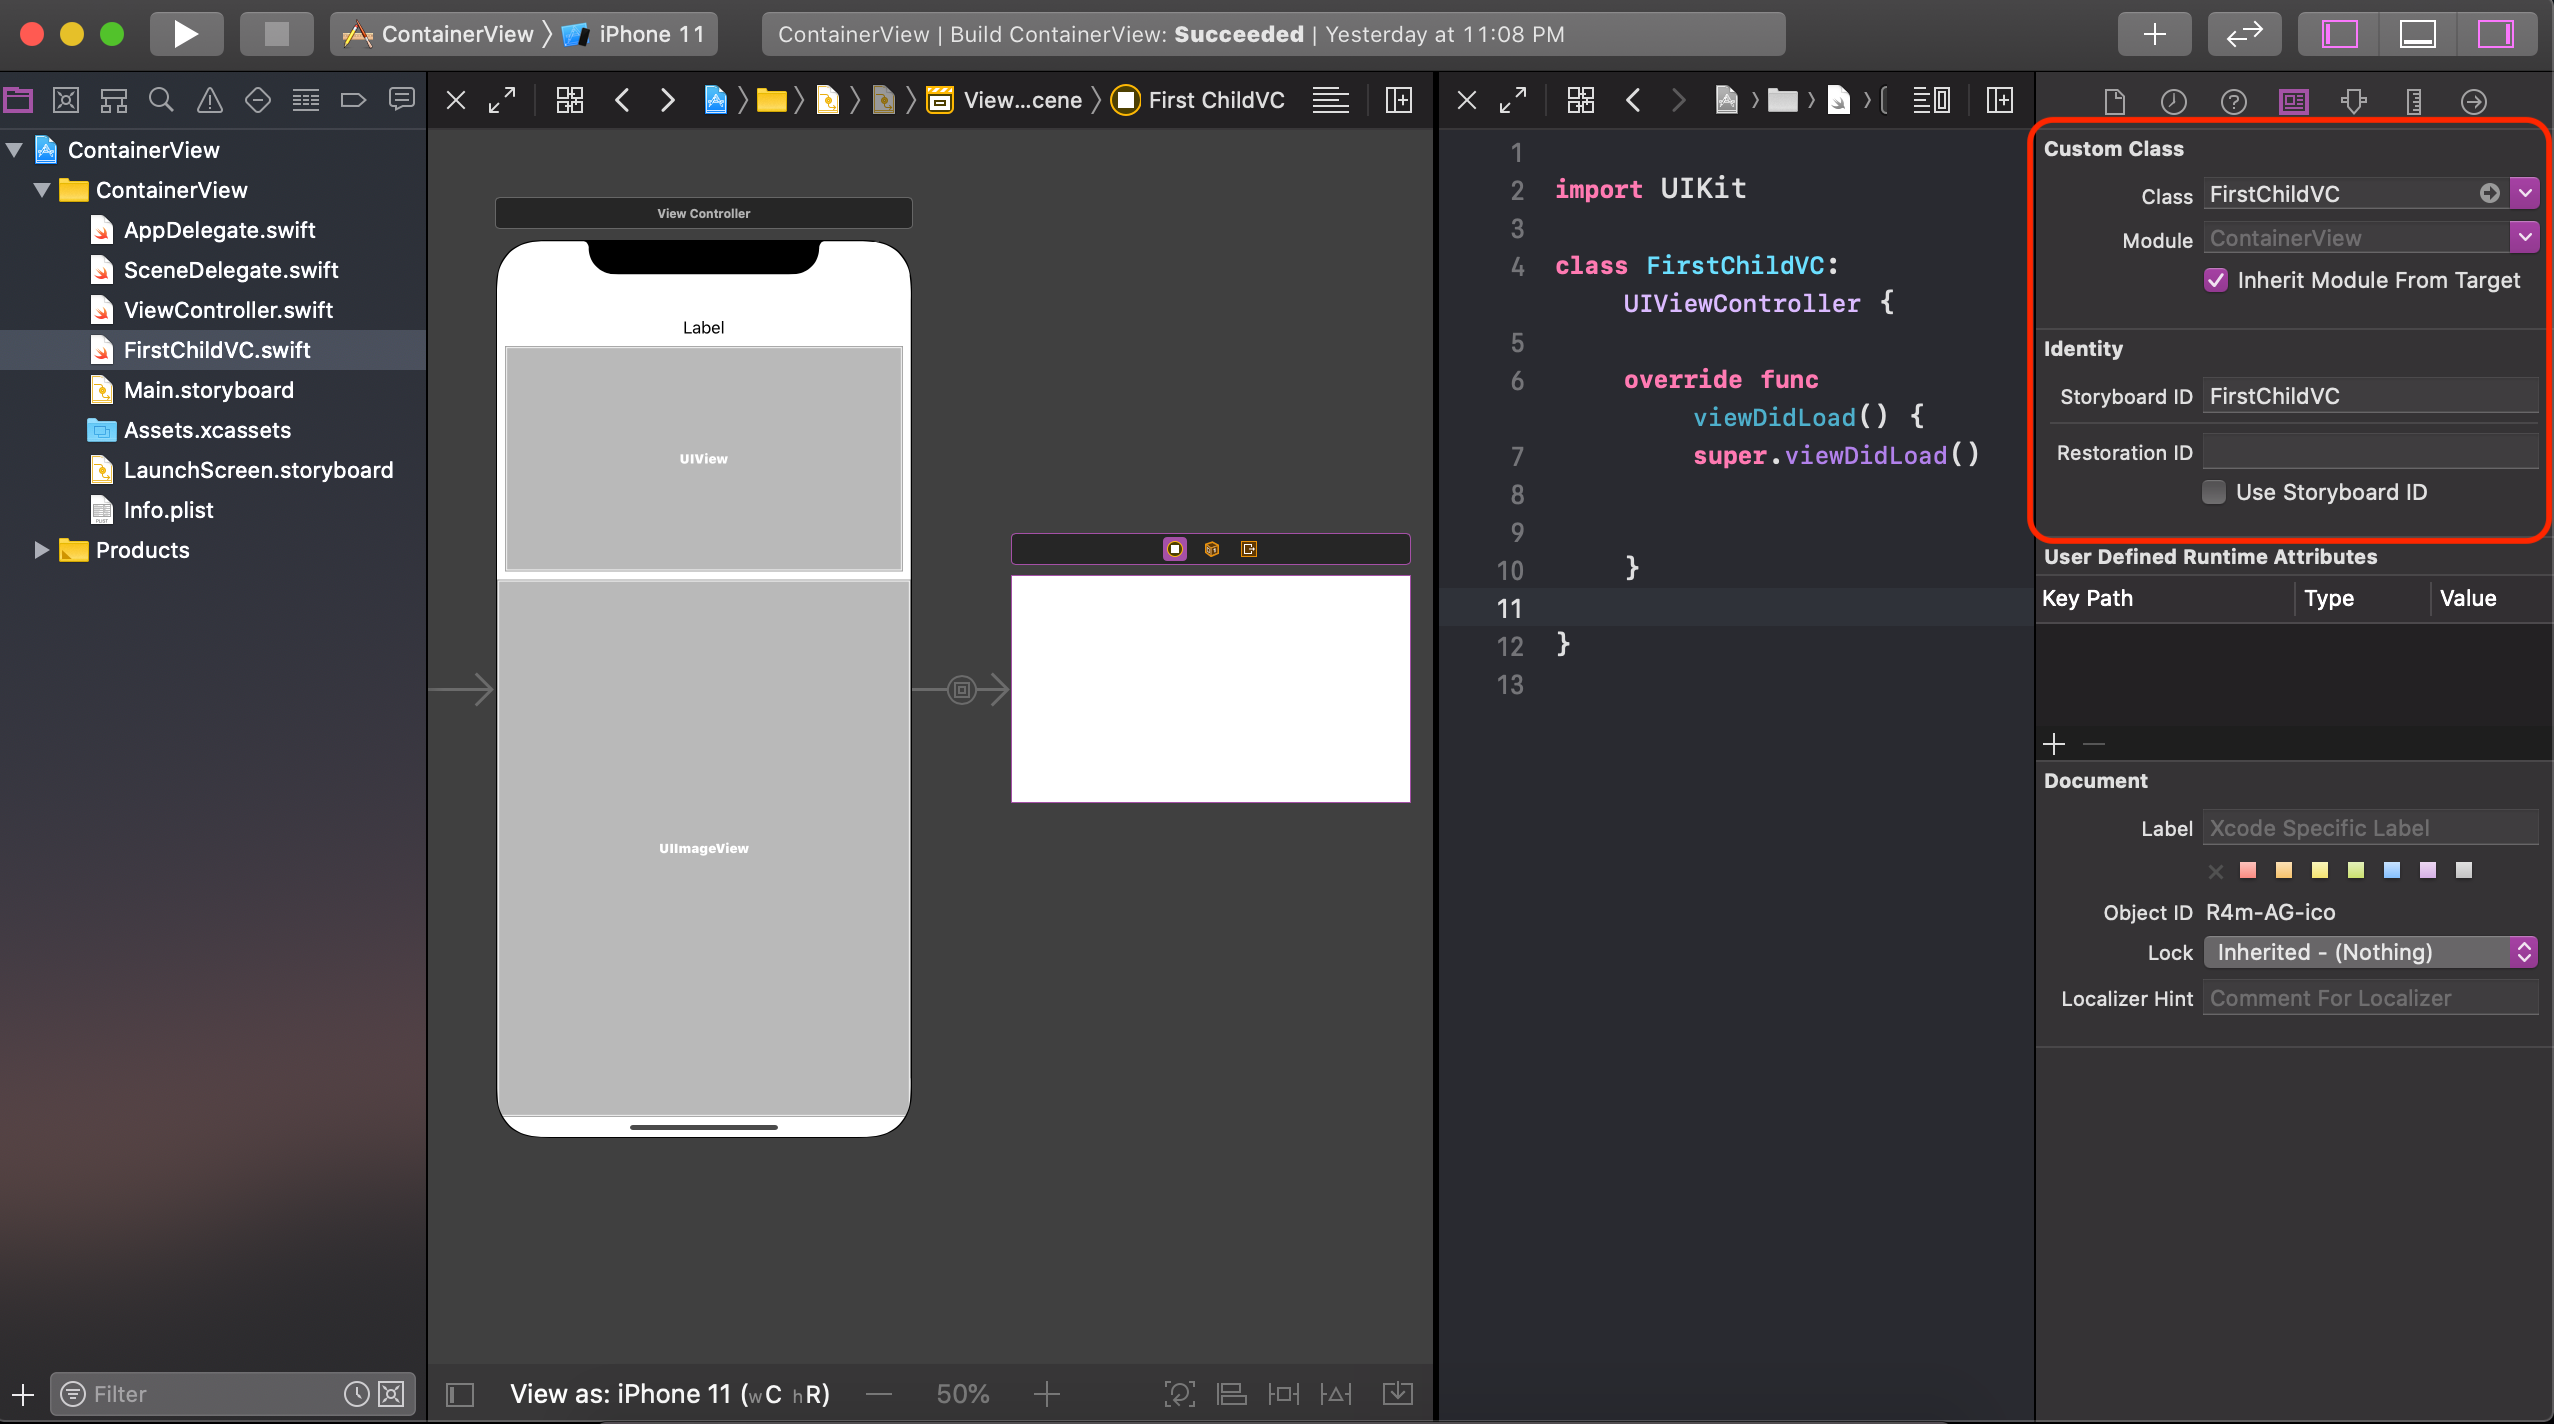
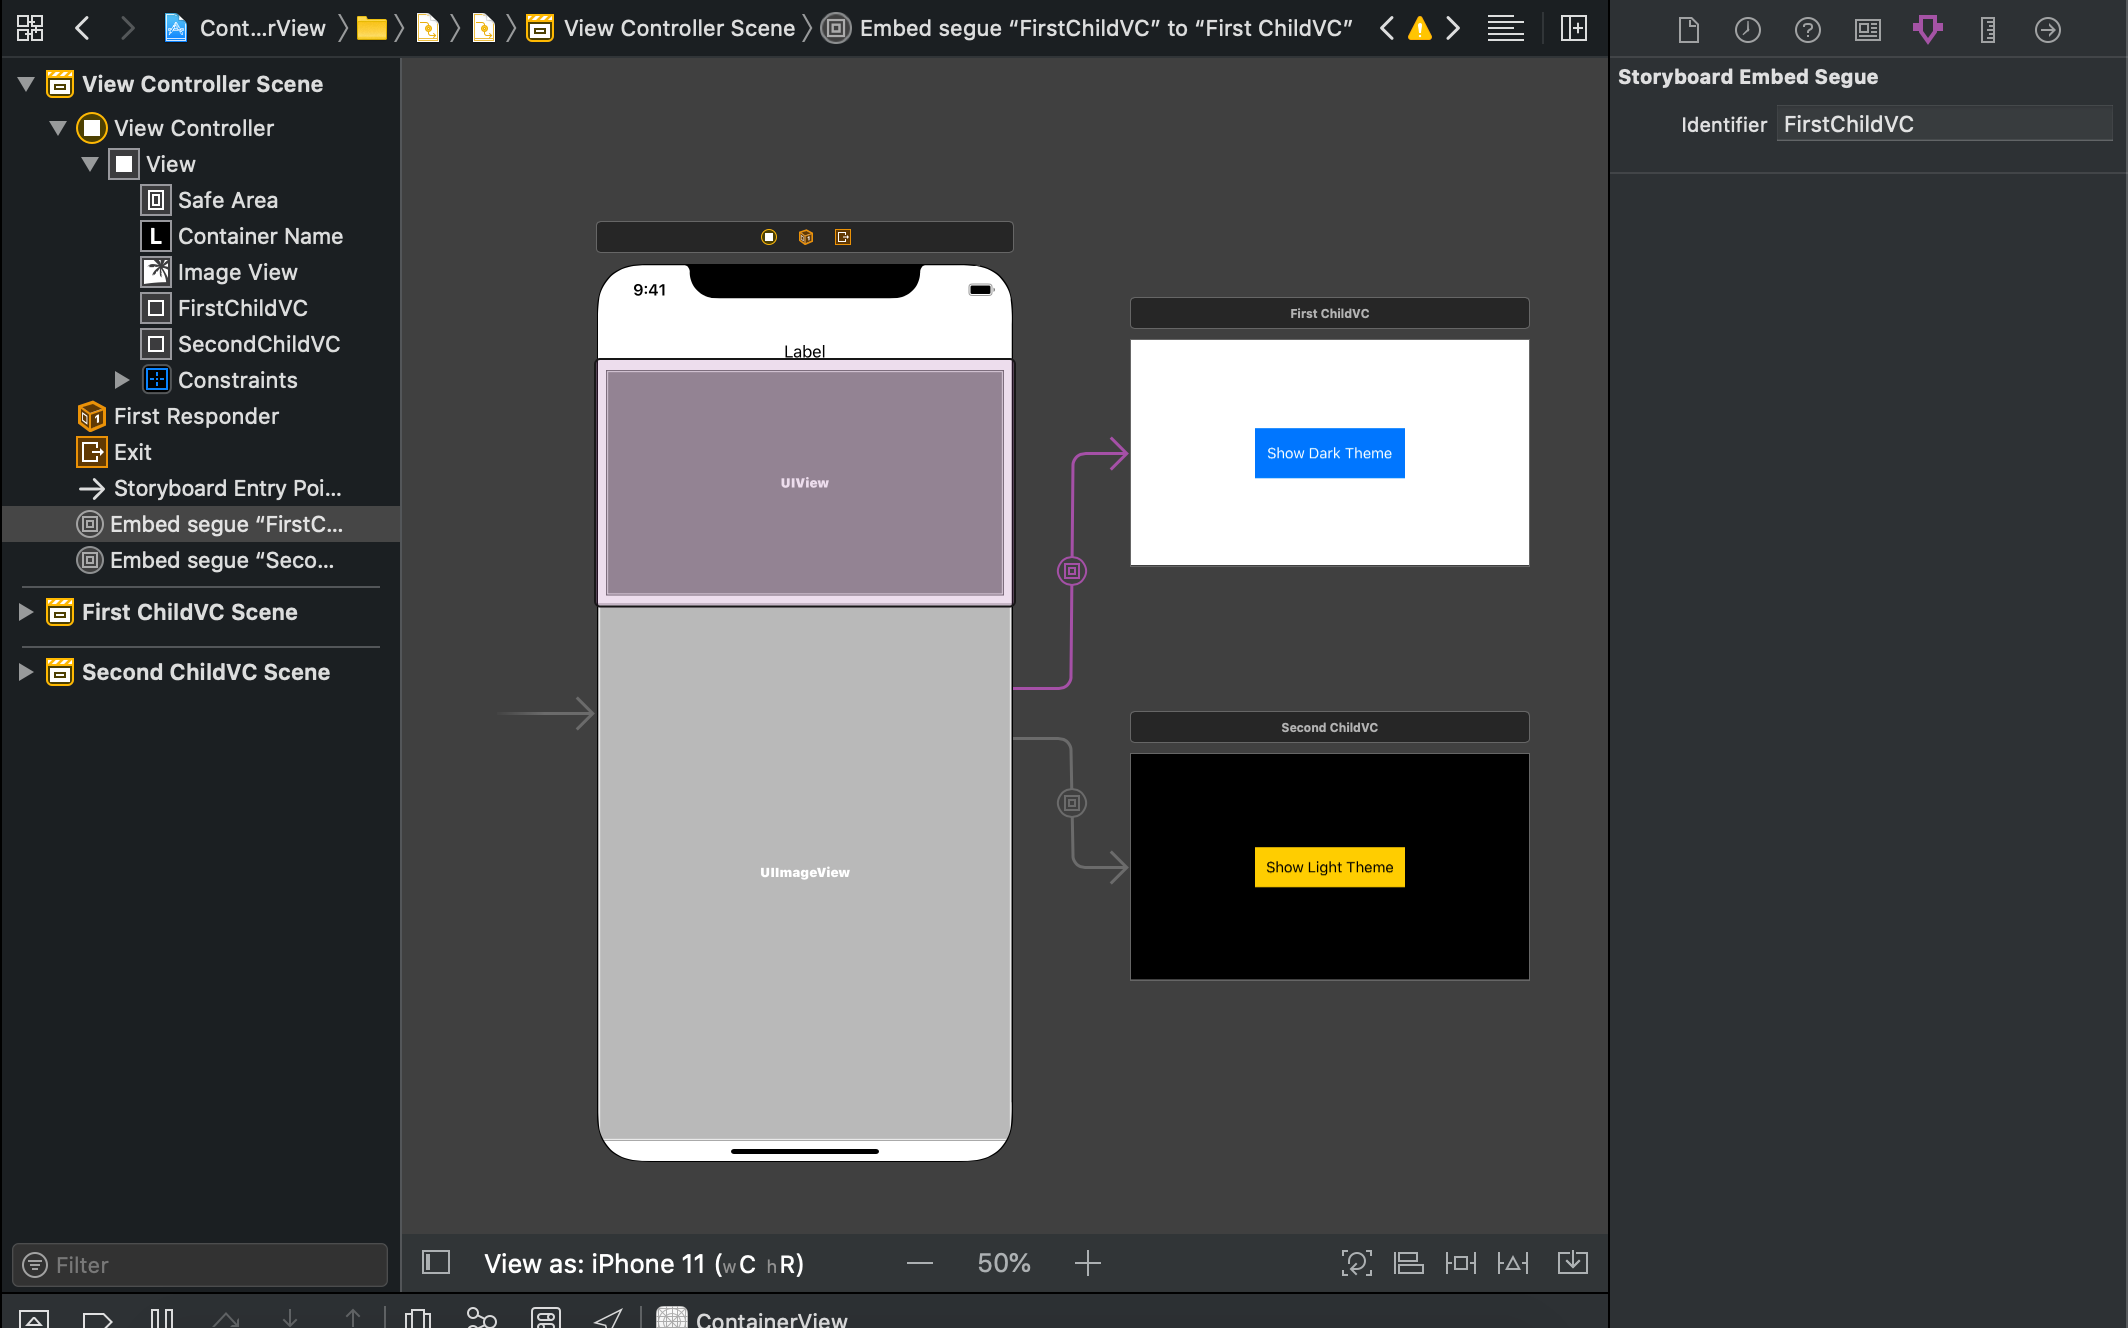
Container views are connected with our “View Controller” as a segue. So we have to set an identifier for each segue. Set the identifier as the class name of each container view. The below picture shows how to set an identifier for “FirstChildVC”. Don't forget to set it also for “SecondChildVC”.
容器视图与我们的“视图控制器”连接在一起。 因此,我们必须为每个segue设置一个标识符。 将标识符设置为每个容器视图的类名称。 下图显示了如何为“ FirstChildVC”设置标识符。 不要忘记也为“ SecondChildVC”设置了它。
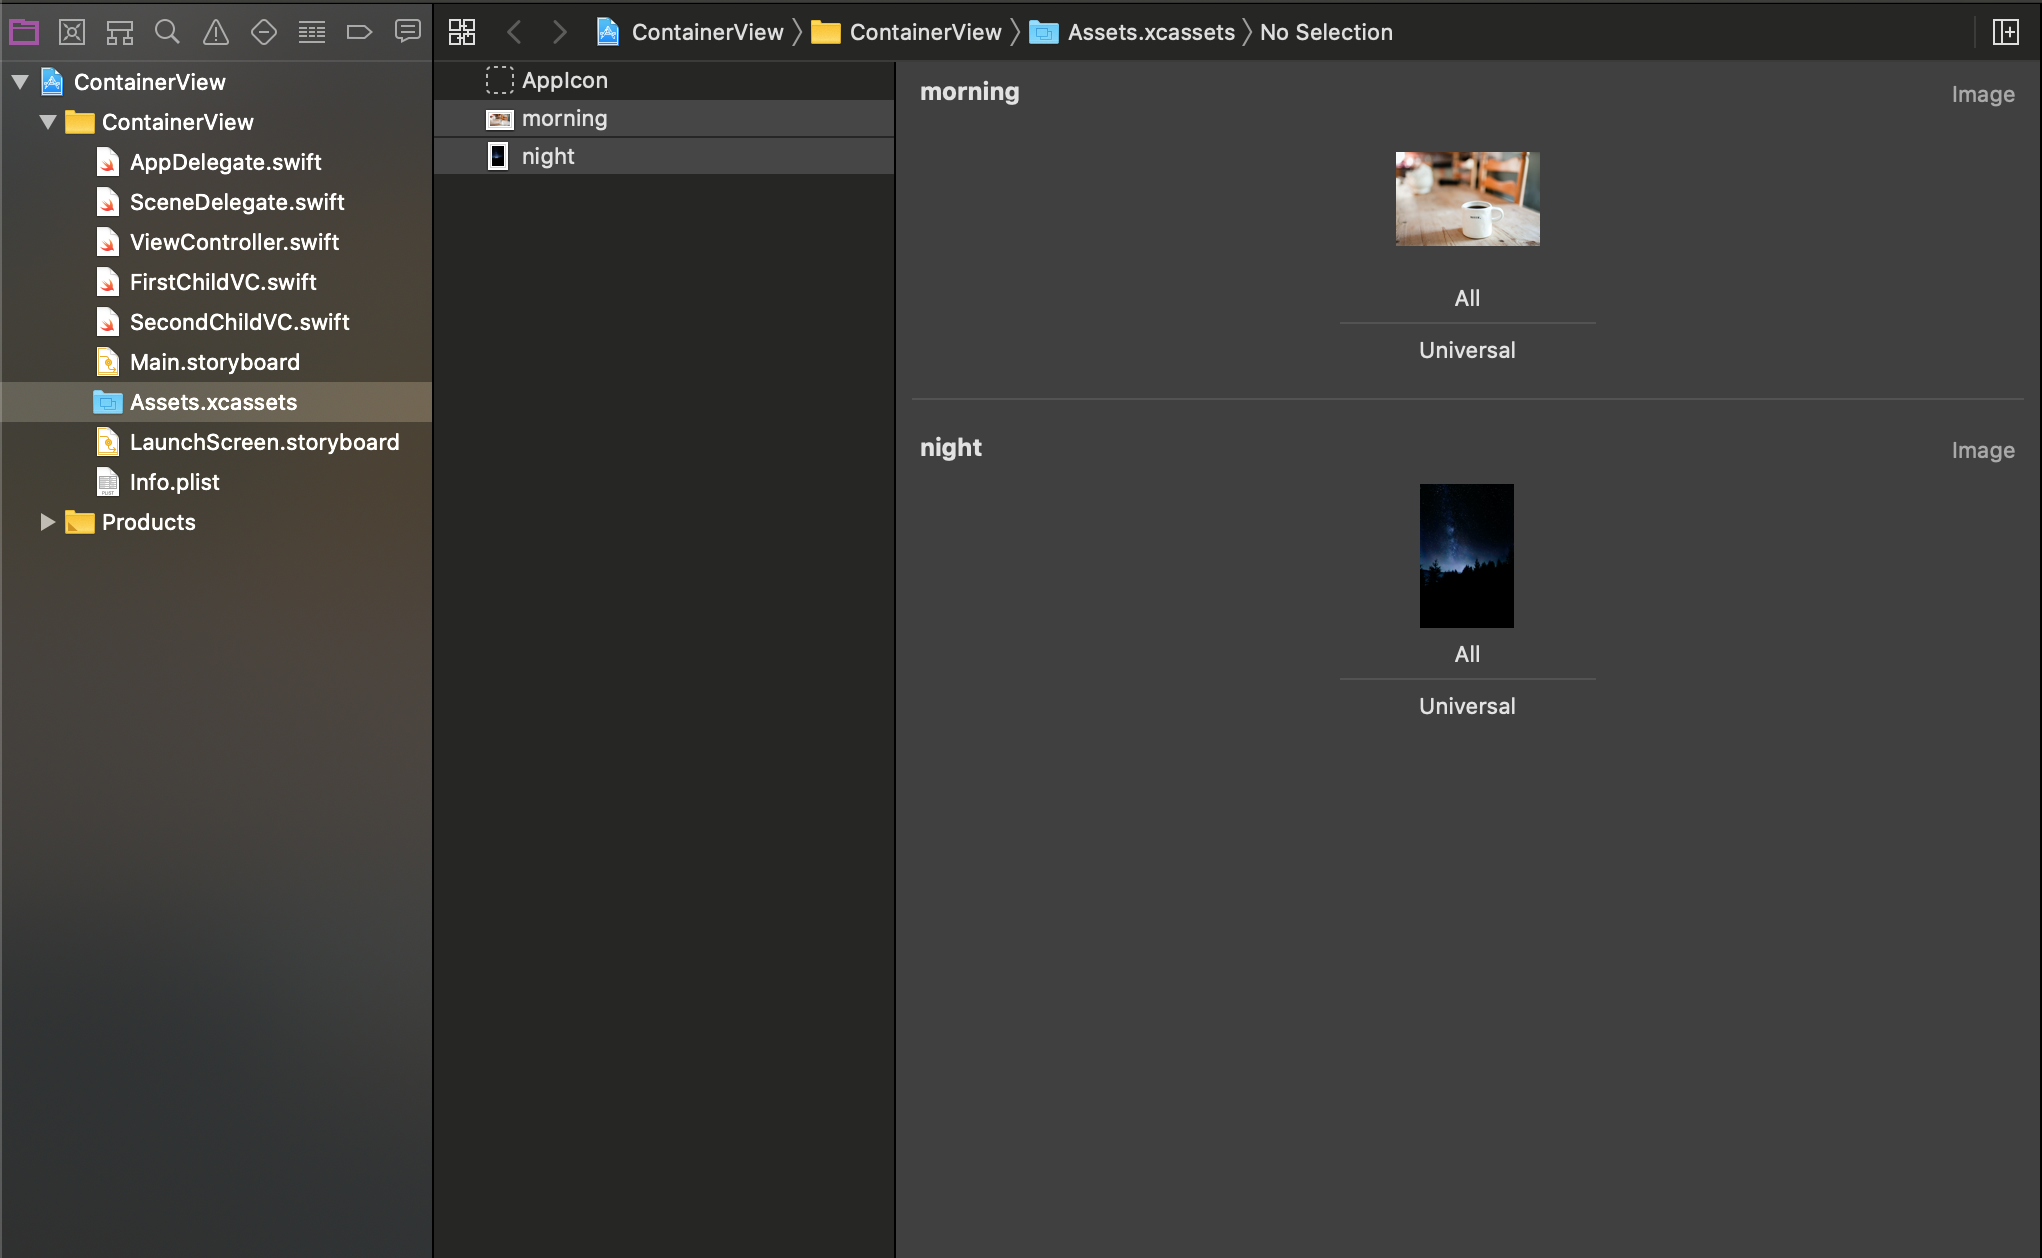
Our project setup is almost done but just one more thing to do. Added two images related to dark and light themes though my image it not fitted perfectly as theme image but leave it as it is. I named them as “morning” and “night”.
我们的项目设置几乎已完成,但还有另一件事要做。 添加了两个与深色和浅色主题相关的图像,尽管我的图像不能完美地适合主题图像,但仍保持原样。 我将它们分别命名为“早晨”和“夜晚”。
连接容器视图 (Connect with the container view)
First of all, we will do some initial setup for the container views in the view controller. Initially, We will show “FirstChildVC” container view, and hide “SecondChildVC” container view from the “View Controller”. That’s why at the top of the “View Controller” we will set the label as “FirstChildVC” because it is on the screen right now. We also set “morning” image as the image view image. Replace your “viewDidLoad” function with this code:
首先,我们将在视图控制器中对容器视图进行一些初始设置。 最初,我们将显示“ FirstChildVC”容器视图,并从“视图控制器”中隐藏“ SecondChildVC”容器视图。 这就是为什么在“视图控制器”顶部将标签设置为“ FirstChildVC”的原因,因为它现在在屏幕上。 我们还将“早晨”图像设置为图像视图图像。 用以下代码替换“ viewDidLoad”函数:
override func viewDidLoad() {super.viewDidLoad() firstChildVC.layer.borderColor = UIColor.systemBlue.cgColor firstChildVC.layer.borderWidth = 1 secondChildVC.layer.borderColor = UIColor.systemYellow.cgColor secondChildVC.layer.borderWidth = 1 /* Initially FirstChildVC is showing and SecondChildVC is hidden*/ firstChildVC.isHidden = false secondChildVC.isHidden = true /*Initially Container Name set to FirstChildVC*/ containerName.text = "FirstChildVC" /*Initially imageView image set to morning image*/ imageView.image = UIImage(named: "morning")}Our container view already places into the storyboard and ready to go but we have to connect them from the “View Controller.swift” class also. First of all, Go find the identifier of the container views from the storyboard and put them into different variables in “ViewController.swift” file.
我们的容器视图已经放置在情节提要中,可以使用了,但是我们也必须从“ View Controller.swift”类中将它们连接起来。 首先,从情节提要中查找容器视图的标识符,并将其放入“ ViewController.swift”文件中的不同变量中。
static let toFirstChild = "FirstChildVC"static let toSecondChild = "SecondChildVC"To talk with our container views we have to make connections with them. We will do it using “override func prepare(for segue: UIStoryboardSegue, sender: Any?)” function. This function takes the identifiers of the container view controllers and makes a connection for them. Write down this block of code into your view controller class.
要与我们的容器视图进行对话,我们必须与它们建立联系。 我们将使用“ 覆盖 func prepare(用于segue:UIStoryboardSegue,发件人: Any 吗? )”功能。 此功能获取容器视图控制器的标识符并为其建立连接。 将这段代码写到您的视图控制器类中。
override func prepare(for segue: UIStoryboardSegue, sender: Any?) {if segue.identifier == ViewController.toFirstChild {if let firstChildCV = segue.destination as? FirstChildVC { //Access your child VC elements }}if segue.identifier == ViewController.toSecondChild{if let secondChildCV = segue.destination as? SecondChildVC { //Access your child VC elements } }}Inside the “segue. destination” block you can communicate with your child container view, send, and receive data. Cool 😎 😎 😎
里面的“ segue。 您可以与子容器视图进行通信,发送和接收数据。 酷😎
回调功能 (Callback function)
Now we want to notify View controller and do something when container view buttons are pressed. For that, we need a Callback function. The callback function is basically a closure which is used to communicate different view controller and pass data depending on any event happens.
现在我们要通知View控制器,并在按下容器视图按钮时执行某些操作。 为此,我们需要一个回调函数。 回调函数基本上是一个闭包,用于与不同的视图控制器进行通信,并根据发生的任何事件传递数据。
Declare this callback function in your “FirstChildVC” class.
在“ FirstChildVC”类中声明此回调函数。
var showDarkThemeBtnTap : (()-> Void)?And write down this line of code into your “showDarkThemeBtnTapped” button action function
并将这行代码写到您的“ showDarkThemeBtnTapped”按钮操作函数中
showDarkThemeBtnTap?()Do some things for the “SecondChildVC” also, declare a callback function
也为“ SecondChildVC”做一些事情,声明一个回调函数
var showLightThemeBtnTap : (()-> Void)?Similarly to the previous one write this on “showLightThemeBtnTapped” button action
与上一个类似,将其写在“ showLightThemeBtnTapped”按钮上
showLightThemeBtnTap?()Now from the parent view controller, we have to set an observer to observe the callback function. The bold marked block of code will notify us when the callback function sends events from the child view controller to the parent view controller.
现在,从父视图控制器开始,我们必须设置一个观察器以观察回调函数。 当回调函数将事件从子视图控制器发送到父视图控制器时,粗体标记的代码块将通知我们。
if segue.identifier == ViewController.toFirstChild {     if let firstChildCV = segue.destination as? FirstChildVC {     firstChildCV.showDarkThemeBtnTap = {      //Access your child VC elements       firstChildCV.showDarkThemeBtnTap = {
              //Do action on child class button tap          }      }   }
Here inside this block “firstChildCV.showDarkThemeBtnTap = {}” you can do anything depending on button tap action. Basically, here we will show and hide our view controllers, set image for image, and showing the name of the view controller that is on the screen now. Inside this block write those lines of code.
在此块“ firstChildCV.showDarkThemeBtnTap = {}”中,您可以根据按钮的点击操作执行任何操作。 基本上,这里我们将显示和隐藏我们的视图控制器,为图像设置图像,并显示当前在屏幕上的视图控制器的名称。 在此块中编写这些代码行。
firstChildCV.showDarkThemeBtnTap = { //show hide view controllers self.firstChildVC.isHidden = true self.secondChildVC.isHidden = false //set image for imageview self.imageView.image = UIImage(named: "night") /*Set Container Name*/ self.containerName.text = "SecondChildVC}Similarly, we will set an observer for the second child view controller and write code like this to toggle between container view.
同样,我们将为第二个子视图控制器设置一个观察器,并编写类似这样的代码以在容器视图之间切换。
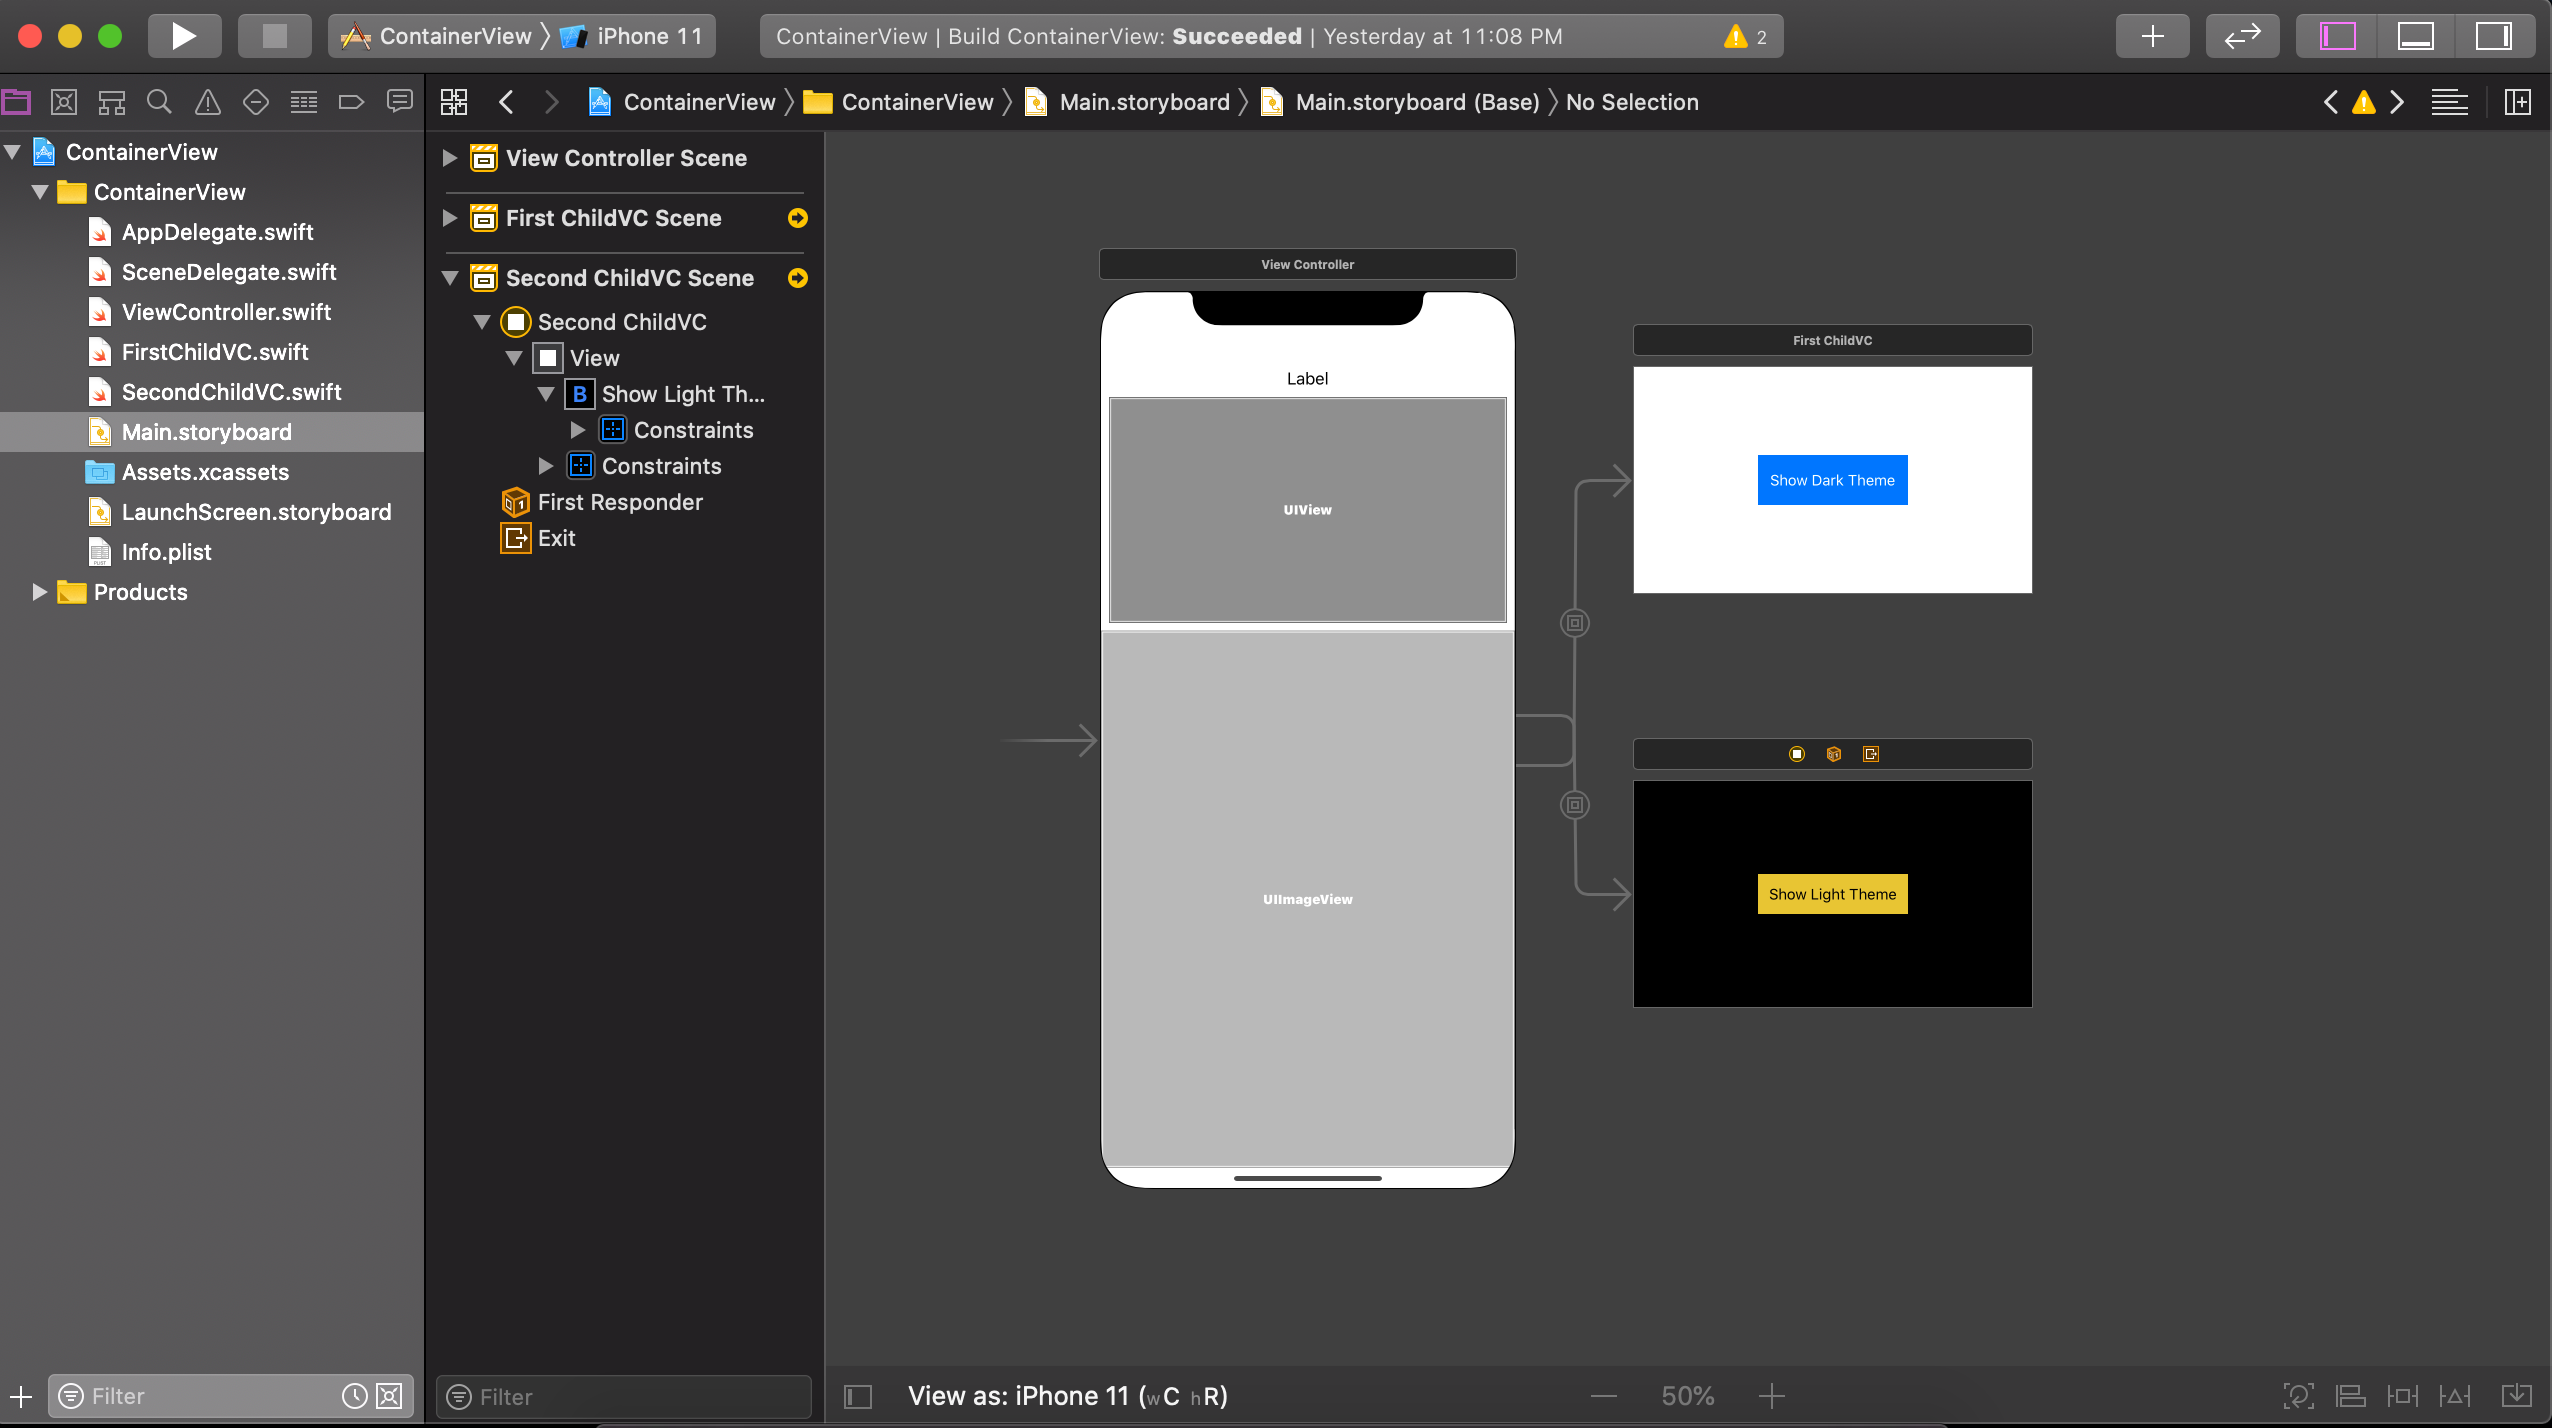
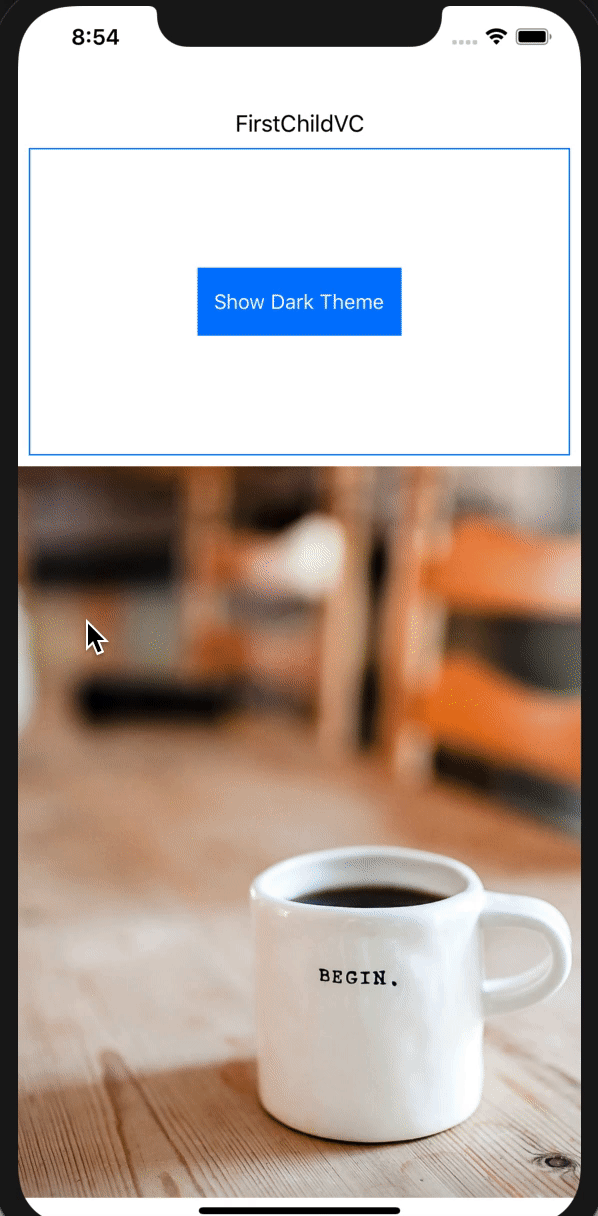
secondChildCV.showLightThemeBtnTap = { //show hide view controllers self.firstChildVC.isHidden = false self.secondChildVC.isHidden = true //set image for imageview self.imageView.image = UIImage(named: "morning") /*Set Container Name*/ self.containerName.text = "FirstChildVC"}It’s time to test what we do so far. Build and run your project and check your program output
现在该测试我们到目前为止的工作了。 生成并运行您的项目并检查程序输出
Here is the full code snippet of the “View Controller” class.
这是“ View Controller”类的完整代码段。
import UIKitclass ViewController: UIViewController {@IBOutlet weak var containerName: UILabel!@IBOutlet weak var imageView: UIImageView!@IBOutlet weak var firstChildVC: UIView!@IBOutlet weak var secondChildVC: UIView!static let toFirstChild = "FirstChildVC"static let toSecondChild = "SecondChildVC"override func viewDidLoad() {super.viewDidLoad() firstChildVC.layer.borderColor = UIColor.systemBlue.cgColor firstChildVC.layer.borderWidth = 1 secondChildVC.layer.borderColor = UIColor.systemYellow.cgColor secondChildVC.layer.borderWidth = 1 /* Initially FirstChildVC is showing and SecondChildVC is hidden*/ firstChildVC.isHidden = false secondChildVC.isHidden = true /*Initially Container Name set to FirstChildVC*/ containerName.text = "FirstChildVC" /*Initially imageView image set to morning image*/ imageView.image = UIImage(named: "morning")}override func prepare(for segue: UIStoryboardSegue, sender: Any?) { if segue.identifier == ViewController.toFirstChild { if let firstChildCV = segue.destination as? FirstChildVC { firstChildCV.showDarkThemeBtnTap = { //Access your child VC elements //show hide view controllers self.firstChildVC.isHidden = true self.secondChildVC.isHidden = false //set image for imageview self.imageView.image = UIImage(named: "night") /*Set Container Name*/ self.containerName.text = "SecondChildVC" } }} if segue.identifier == ViewController.toSecondChild{ if let secondChildCV = segue.destination as? SecondChildVC { //Access your child VC elements secondChildCV.showLightThemeBtnTap = { //show hide view controllers self.firstChildVC.isHidden = false self.secondChildVC.isHidden = true //set image for imageview self.imageView.image = UIImage(named: "morning") /*Set Container Name*/ self.containerName.text = "FirstChildVC" } } } }}Our “FirstChildVC” class
我们的“ FirstChildVC”课程
import UIKitclass FirstChildVC: UIViewController {var showDarkThemeBtnTap : (()-> Void)?override func viewDidLoad() {super.viewDidLoad()}@IBAction func showDarkThemeBtnTapped(_ sender: Any) {showDarkThemeBtnTap?()}}Code snipped of “SecondChildVC” class
摘录“ SecondChildVC”类的代码
import UIKitclass SecondChildVC: UIViewController {var showLightThemeBtnTap : (()-> Void)?override func viewDidLoad() {super.viewDidLoad()}@IBAction func showLightThemeBtnTapped(_ sender: Any) {showLightThemeBtnTap?()}}Congratulations 🎉 🎉 🎉 , now you know how to set container views on a view controller, how to access, and communicate with the container view elements.
恭喜您,现在您知道如何在视图控制器上设置容器视图,如何访问容器视图元素并与之通信。
If you found this article useful please share and give some clap 👏👏👏Check my other articles on Medium and connect me on LinkedIn.
如果您觉得这篇文章很有用,请分享并给予一些鼓掌 。👏👏👏查看我在Medium上的其他文章,并在LinkedIn上与我联系。
Thank you for reading & Happy coding 🙂
感谢您的阅读和快乐的编码🙂
翻译自: https://levelup.gitconnected.com/containerview-in-swift-83da488f4b57


 866
866


 被折叠的 条评论
为什么被折叠?
被折叠的 条评论
为什么被折叠?
 到【灌水乐园】发言


