


 本文介绍了如何在iOS应用中使用Lottie动画技术,通过链接翻译了一篇关于在iOS平台上集成和使用Lottie动画的教程。
ios lottie动画
If you are reading this, it means you are ready to add that magic touch to your iOS apps, that sprinkled salt to the top of your masterpiece, that one thing that will make your users cry of joy when they see it, because it’s just, beautiful.
如果您正在阅读此书,则意味着您已准备好将这种神奇的触感添加到您的iOS应用程序中,并在您的杰作顶部撒上盐,这一件事会让您的用户在看到它时感到喜悦,因为这仅仅是,美丽。

And how to do it, you wonder? Well there are many ways, of course, but the one that we’ll talk about here today is Lottie.
您想知道如何做? 嗯,当然有很多方法,但是今天我们要在这里谈论的是Lottie 。
我们将在这里做什么? (What will we be doing here?)
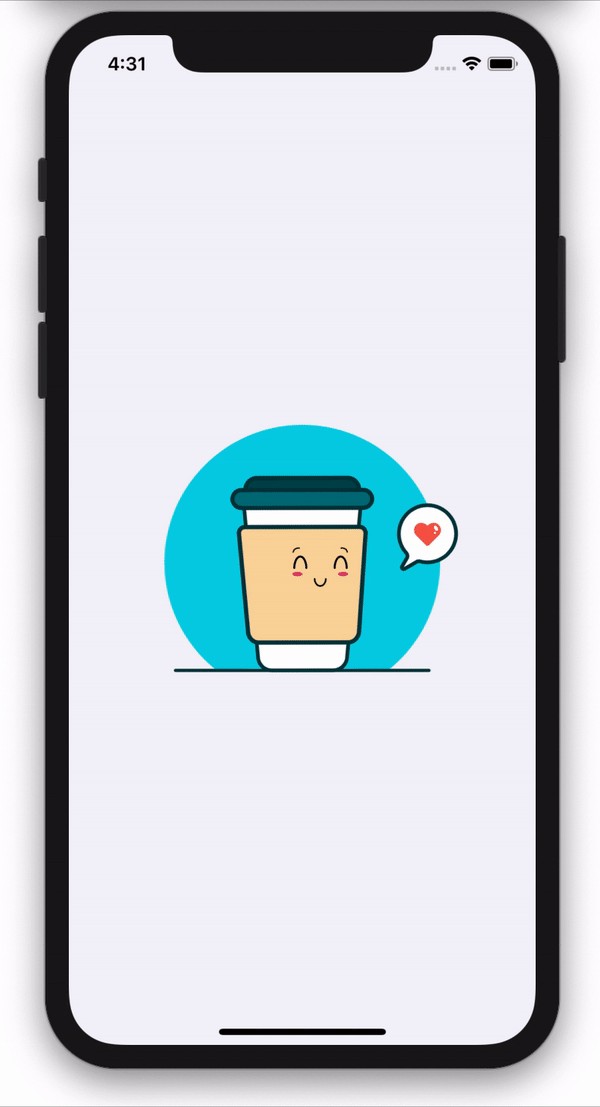
By the end of this article, you will understand and be able to build your own app with custom Lottie animations. And here’s what we are building:
到本文结尾,您将了解并能够使用自定义Lottie动画构建自己的应用程序。 这是我们正在构建的:

什么是乐蒂? (What is Lottie?)
It’s an iOS library by Airbnb that transforms JSON files into beautiful easy-to-use animations. And you can find a whole bunch of free awesome animations in here.
这是Airbnb的iOS库,可将JSON文件转换为漂亮的易于使用的动画。 您可以在此处找到一大堆免费的超赞动画。
我准备好了!! 我该如何开始? (Ok, I’m ready!! How do I start?)
Awesome, let’s start by opening Xcode and Creating a new iOS project.
太棒了,让我们开始打开Xcode并创建一个新的iOS项目。
- Open Xcode, select "Create new Xcode project" 打开Xcode,选择“创建新的Xcode项目”
- Select iOS, then "Single View App" 选择iOS,然后选择“ Single View App”

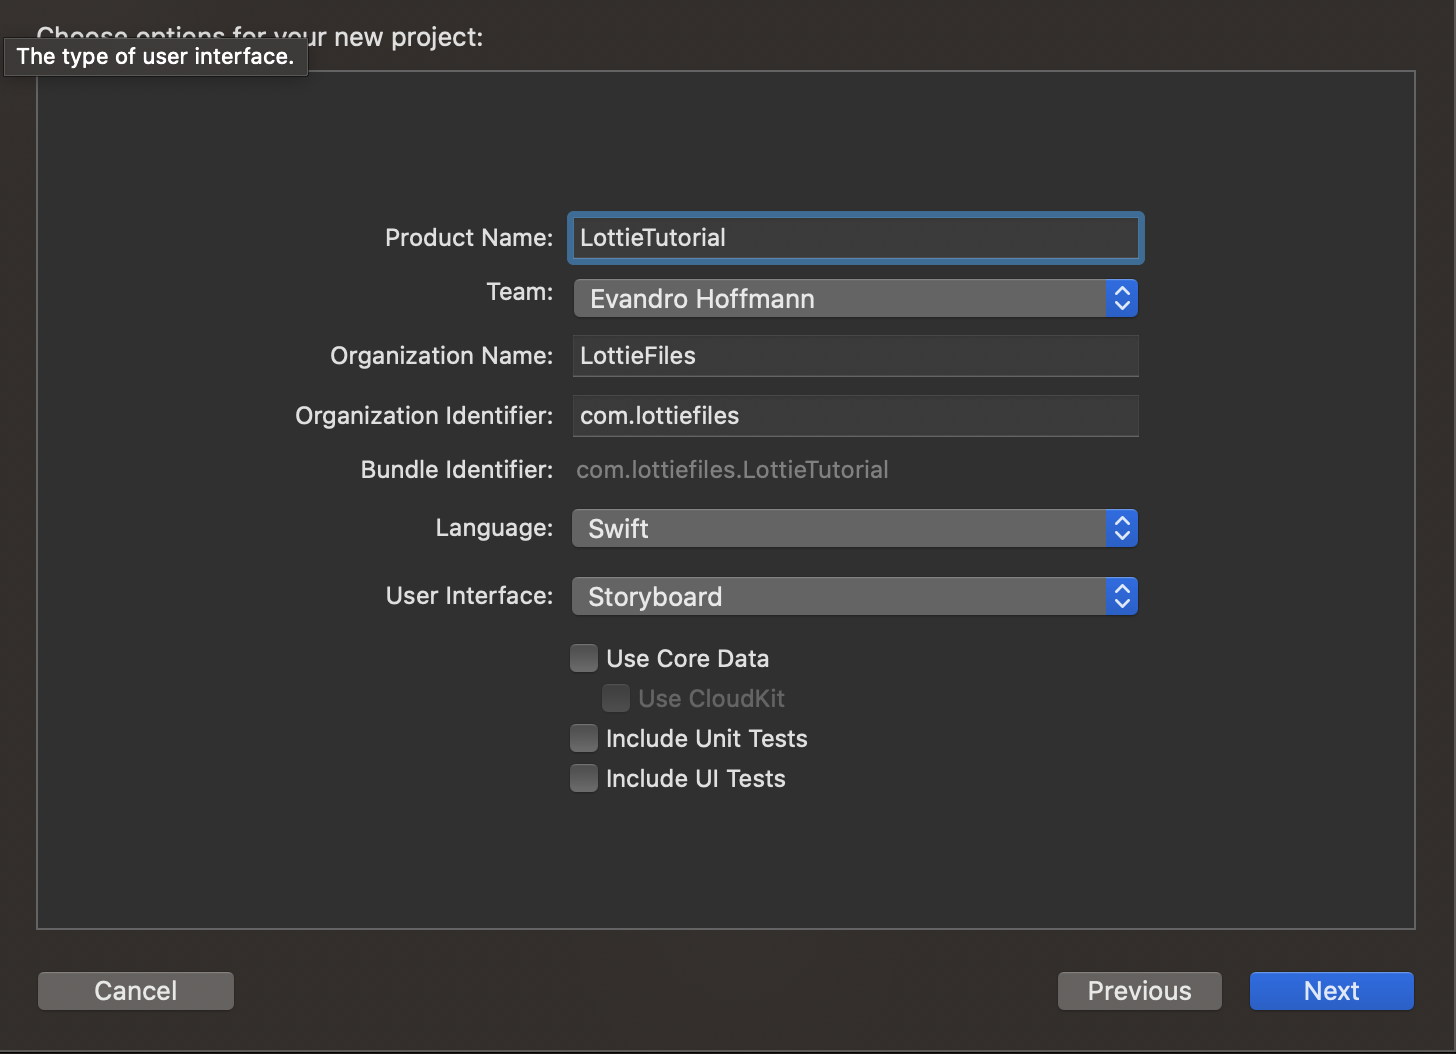
3. Add the name of the project, organization and identifier. Select Swift and Storyboard. Tap Next and Create.
3.添加项目名称,组织和标识符。 选择“ 快速”和“ 情节提要” 。 点击下一步并创建 。
Awesome, we have the project ready, now let’s add Lottie library. There are a few ways to add Lottie to our project, in this tutorial, we’ll be using the most popular one, CocoaPods.
太好了,我们已经准备好项目,现在让我们添加Lottie库。 有几种方法可以将Lottie添加到我们的项目中,在本教程中,我们将使用最受欢迎的CocoaPods 。
To start, close the project, open terminal and navigate to your project’s root folder. Type and run the following:
首先,关闭项目,打开终端并导航到项目的根文件夹。 输入并运行以下命令:
pod init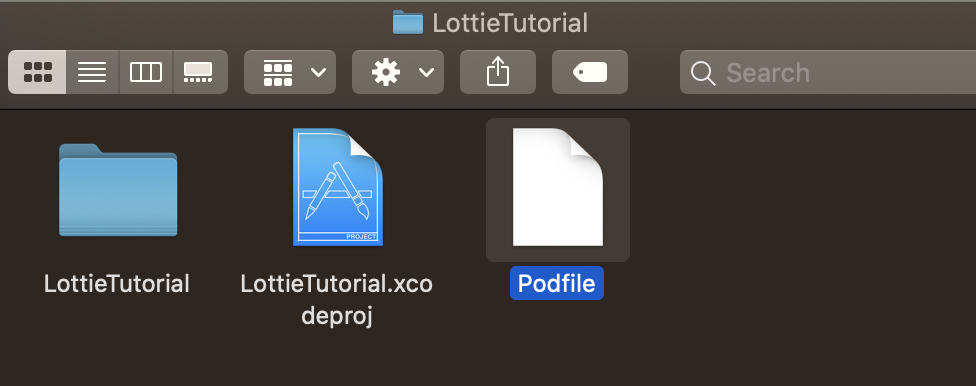
Notice that a file called Podfile will be created in the root folder of your project. Open it using any text editor (Xcode also works 🙂). Change it’s content with the following code:
请注意,将在项目的根文件夹中创建一个名为Podfile的文件。 使用任何文本编辑器将其打开(Xcode也可以使用🙂)。 使用以下代码更改其内容:
# 1. Uncomment the next line to define a global platform for your project
platform :ios, '13.0'# 2. Target to add frameworks totarget 'LottieTutorial' do  # 3. Frameworks to be imported  pod 'lottie-ios'end
Save, and open the terminal in your Mac and navigate to the project root folder, then type and run:
保存并在Mac中打开终端,然后导航到项目根文件夹,然后键入并运行:
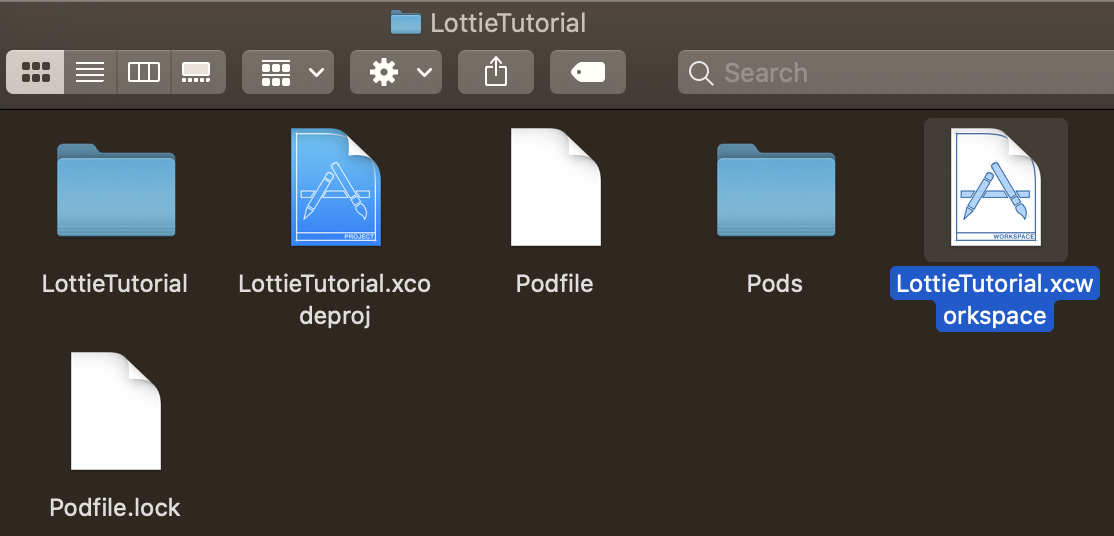
pod installAs soon as it’s finished, double tap to open the xcworkspace file:
完成后,双击打开xcworkspace文件:
Navigate to ViewController.swift, add the following line to the top of the file.
导航到ViewController.swift , 将以下行添加到文件顶部。
import LottieCMD+B and make sure everything is Ok.
CMD + B,并确保一切正常。

Great, now to the fun part! Let’s animate!!!
太好了,现在到有趣的部分! 让我们动起来!!!
We’ll be using this animation to start with. Once downloaded, drag and drop to the project, making sure our project is selected as target and copy items if needed is selected.
我们将从这个动画开始。 下载后,将其拖放到项目中,确保将我们的项目选择为目标并选择需要复制的项目 。

通过代码添加Lottie动画视图 (Adding a Lottie animation view by code)
In the ViewController.swift file, replace the method viewDidLoad with the following:
在ViewController.swift文件中,将方法viewDidLoad替换为以下内容:
// 1. Create the AnimationView
private var animationView: AnimationView?override func viewDidLoad() {  super.viewDidLoad()
  // 2. Start AnimationView with animation name (without extension)  animationView = .init(name: "coffee")  animationView!.frame = view.bounds  // 3. Set animation content mode  animationView!.contentMode = .scaleAspectFit  // 4. Set animation loop mode  animationView!.loopMode = .loop  // 5. Adjust animation speed  animationView!.animationSpeed = 0.5  view.addSubview(animationView!)  // 6. Play animation  animationView!.play()}
You did it! Press CMD+R and here’s what you should see:
你做到了! 按CMD + R,这是您应该看到的内容:
At this point, I encourage you to play around with different configurations :)
在这一点上,我鼓励您尝试不同的配置:)
使用Interface Builder添加Lottie动画视图 (Adding a Lottie animation view using Interface Builder)
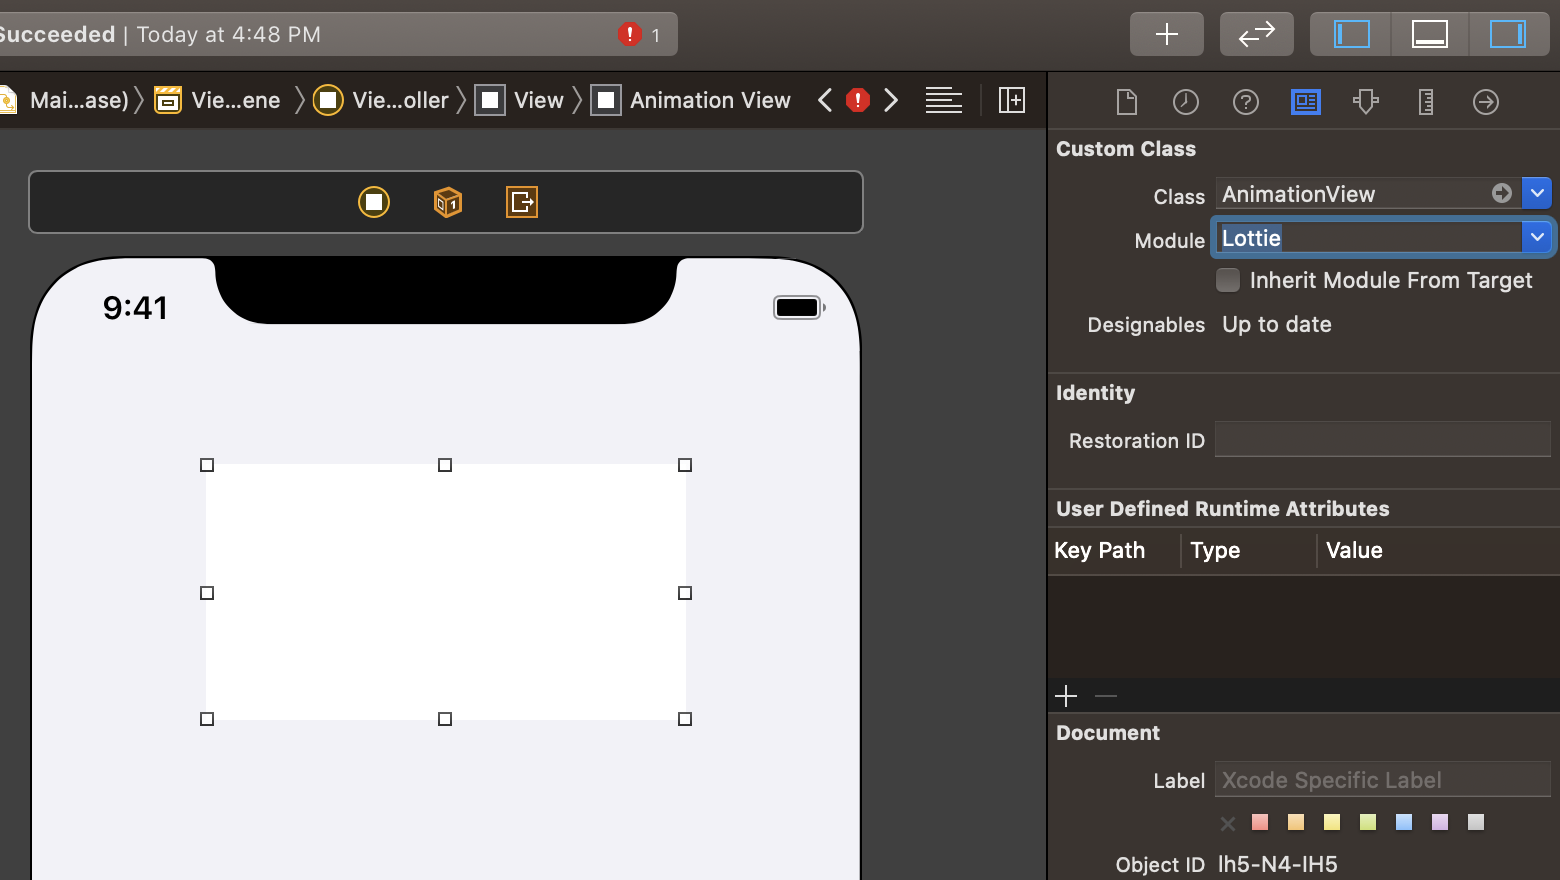
In your Storyboard or Xib file, drag and drop a UIView to your ViewController, add the desired constraints and position as you like. Then on the top right corner, navigate to Identity Inspector, change class to AnimationView and set module to Lottie.
在您的Storyboard或Xib文件中,将UIView拖放到ViewController中,根据需要添加所需的约束和位置。 然后在右上角,导航到Identity Inspector,将类更改为AnimationView并将模块设置为Lottie 。
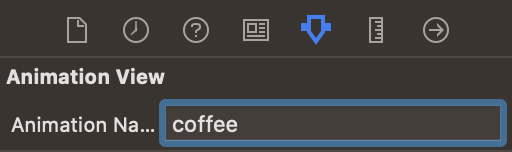
Then, yet in the top right corner, navigate to Attribute Inspector and add the name of the animation file (without the extension).
然后,在右上角,导航到“ 属性检查器”并添加动画文件的名称(不带扩展名)。
In your Keyboard, press CTRL+OPTION+CMD+ENTER to open ViewController class and OPTION+Drag view to top of the ViewController Enclosure.
在键盘中,按CTRL + OPTION + CMD + ENTER打开ViewController类,然后按OPTION + Drag视图到ViewController机柜的顶部。
Once linked, close the right side Editor and navigate to ViewController.swift. Replace the function viewDidLoad with the following:
链接后,关闭右侧的Editor并导航到ViewController.swift 。 将函数viewDidLoad替换为以下内容:
override func viewDidLoad() {  super.viewDidLoad()
  // 1. Set animation content mode  animationView.contentMode = .scaleAspectFit  // 2. Set animation loop mode  animationView.loopMode = .loop  // 3. Adjust animation speed  animationView.animationSpeed = 0.5  // 4. Play animation  animationView.play()}
And test it out by pressing CMD+R :) The results should be similar to the ones above, considering how you placed the view.
并按CMD + R进行测试:)考虑到放置视图的方式,结果应该与上述结果相似。
使用进度动画 (Using Progress animations)
Great, so now you know how to use Lottie animations, but then your application requires an extra touch of magic, and this requires you to be able to control what to play in animations, such as progress bars or animations that have different states. For this example, we’ll be building a download progress animation with this file. Same as before, download the file and drag and drop to the project.
太好了,所以现在您知道如何使用Lottie动画了,但是您的应用程序需要额外的魔力,这要求您能够控制动画中的播放内容,例如进度条或状态不同的动画。 在此示例中,我们将使用此文件构建下载进度动画。 与以前一样,下载文件并将其拖放到项目中。
When opening the file in LottieFiles, you’ll be able to slide through the animation progress.
在LottieFiles中打开文件时 ,您可以在动画进度中滑动。
If you are careful enough, you’ll be able to locate the exact frame of each part of the animation (located in the left bottom corner). In the example above, We’ve located 3 key frames:
如果足够小心,您将能够找到动画各部分的确切帧(位于左下角)。 在上面的示例中,我们找到了3个关键帧:
start of progress: 140
进展开始 :140
end of progress: 187
进展结束 :187
download complete: 240
下载完成 :240
What about the remaining frames?
剩下的帧呢?
- 0->140: start of animation 0-> 140:动画开始
- 240->320: reseting to original state 240-> 320:重置为原始状态
Having those values, we will create an enum to make it easier for us to use:
有了这些值,我们将创建一个枚举以使我们更易于使用:
enum ProgressKeyFrames: CGFloat { case start = 140 case end = 187 case complete = 240}And now, setup the AnimationView in viewDidLoad:
现在,在viewDidLoad中设置AnimationView :
private var progressView: AnimationView?override func viewDidLoad() {  super.viewDidLoad()
  // make sure the name of the animation matches the imported file  progressView = .init(name: "download")  progressView!.frame = view.bounds  progressView!.contentMode = .scaleAspectFit  view.addSubview(progressView!)}
And we add 3 more functions, to start the download, to progress to completion and finally to complete the download.
并且我们增加了3个功能,以开始下载 , 进行至完成并最终完成下载 。
// start the downloadprivate func startProgress() { // play from frame 0 to the start download of progress progressView?.play(fromFrame: 0, toFrame: ProgressKeyFrames.start.rawValue, loopMode: .none) { [weak self] (_) in self?.startDownload() }}// progress from 0 to 100%private func startDownload() { // play animation from start to end of download progress progressView?.play(fromFrame: ProgressKeyFrames.start.rawValue, toFrame: ProgressKeyFrames.end.rawValue, loopMode: .none) { [weak self] (_) in self?.endDownload() }}// download is completed, we show the completion stateprivate func endDownload() { // download is completed, we show the completion state progressView?.play(fromFrame: ProgressKeyFrames.end.rawValue, toFrame: ProgressKeyFrames.complete.rawValue, loopMode: .none)}And finally, to test it out, add the following after the end of the method viewDidLoad.
最后,为了测试它的方法viewDidLoad中结束后添加以下。
override func viewDidAppear(_ animated: Bool) { super.viewDidAppear(animated) startProgress()}That’s it, you may now run the application and here’s what you should see:
就是这样,您现在可以运行该应用程序,这是您应该看到的内容:
Awesome! We have the full animation! However, you might be interested in knowing how it would look like when downloading a file. Here’s how:
太棒了! 我们有完整的动画! 但是,您可能想知道下载文件时的外观。 这是如何做:
First, we’ll replace startDownload function with the following:
首先,我们将startDownload函数替换为以下内容:
// start downloadprivate func startDownload() { // 1. URL to download from let url = URL(string: "https://archive.org/download/SampleVideo1280x7205mb/SampleVideo_1280x720_5mb.mp4")! // 2. Setup download task and start download let configuration = URLSessionConfiguration.default let operationQueue = OperationQueue() let session = URLSession(configuration: configuration, delegate: self, delegateQueue: operationQueue) let downloadTask = session.downloadTask(with: url) downloadTask.resume()}Then, to handle the download task events, add this code to the bottom of your ViewController.swift file.
然后,要处理下载任务事件,请将此代码添加到ViewController.swift文件的底部 。
// MARK: - Download Delegateextension ViewController: URLSessionDownloadDelegate {
  // handles download progress  func urlSession(_ session: URLSession, downloadTask: URLSessionDownloadTask, didWriteData bytesWritten: Int64, totalBytesWritten: Int64, totalBytesExpectedToWrite: Int64) {    let percentDownloaded: CGFloat = CGFloat(totalBytesWritten) / CGFloat(totalBytesExpectedToWrite)    DispatchQueue.main.async {      self.progress(to: percentDownloaded)    }  }
  // finishes download  func urlSession(_ session: URLSession, downloadTask: URLSessionDownloadTask, didFinishDownloadingTo location: URL) {    DispatchQueue.main.async {      self.endDownload()    }  }}
Finally, to show the animation in the right progress, we add the following code after startDownload function:
最后,为了以正确的进度显示动画,我们在 startDownload函数之后添加以下代码:
// sets download progressprivate func progress(to progress: CGFloat) {  // 1. We get the range of frames specific for the progress from 0-100%  let progressRange = ProgressKeyFrames.end.rawValue - ProgressKeyFrames.start.rawValue  // 2. Then, we get the exact frame for the current progress  let progressFrame = progressRange * progress  // 3. Then we add the start frame to the progress frame
  // Considering the example that we start in 140, and we moved 30 frames in the progress, we should show frame 170 (140+30)  let currentFrame = progressFrame + ProgressKeyFrames.start.rawValue  // 4. Manually setting the current animation frame  progressView?.currentFrame = currentFrame  print("Downloading \((progress*100).rounded())%")}
Press CMD+R again to run the code and you should see the same effect as before, but this time, showing the progress of a real download. Pretty neat, huh?
再次按CMD + R运行代码,您应该会看到与以前相同的效果,但是这次显示了实际下载的进度。 很整洁吧?
This concludes our tutorial. By now, you should be able to play with animations and control their progress. Can you imagine the possibilities? 😀 So don’t waste any more time! Let the magic flow in your applications!
到此结束我们的教程。 现在,您应该可以播放动画并控制其进度了。 你能想象到可能性吗? 😀因此,不要再浪费时间了! 让魔力在您的应用程序中流动!

The complete code for this tutorial can be found here.
可以在此处找到本教程的完整代码。
Happy coding! 😎
编码愉快! 😎
翻译自: https://medium.com/swlh/using-lottie-animations-in-ios-ac05ff94d0fa
ios lottie动画


 1509
1509

 被折叠的 条评论
为什么被折叠?
被折叠的 条评论
为什么被折叠?
 到【灌水乐园】发言


