


为ios复制应用程序
快速应用开发 (Rapid Application Development)
This article is part of a series of articles that explores building a real-world application using SwiftUI, Firebase, and a couple of other technologies.
本文是一系列文章的一部分,这些文章探讨了使用SwiftUI,Firebase和其他两种技术构建真实应用程序的过程。
Here is an overview of the series and what we’re going to build:
以下是该系列的概述以及我们将要构建的内容:
In part 1 of the series, we focussed on building the UI with SwiftUI, using a simple data model.
在本系列的第1部分中,我们重点介绍了使用简单数据模型通过SwiftUI构建UI。
In part 2 (which you are reading right now), we’re going to connect the application to Firebase, and will synchronise the user’s tasks with Cloud Firestore
在第2部分 (您现在正在阅读)中,我们将把应用程序连接到Firebase,并将用户的任务与Cloud Firestore同步
In part 3, we will implement Sign in with Apple to turn the application into a real multi-user application
在第3部分中 ,我们将实现与Apple的登录,以将应用程序转变为真正的多用户应用程序。
In the previous article of this series, we saw how easy it was to replicate the UI of a well-known iOS app using SwiftUI: writing very little code, we implemented a fully functional copy of the iOS Reminders app. To keep things simple, we persisted data on the user’s device using the Disk framework.
在本系列的上一篇文章中,我们看到了使用SwiftUI复制著名的iOS应用程序的UI多么容易:编写很少的代码,我们实现了iOS Reminders应用程序的全功能副本。 为简单起见,我们使用磁盘框架将数据持久存储在用户的设备上。
Today, we’re going to look into what’s required to connect this app to Firebase, allowing users to store their data in the cloud.
今天,我们将研究将此应用程序连接到Firebase所需的条件,以允许用户将其数据存储在云中。
There are many reasons for storing data in the cloud: your users might want to access their data from multiple devices, such as their phone and their tablet. Or, they might want to share data with their coworkers or family and friends.
将数据存储在云中的原因很多:您的用户可能希望从多种设备(例如手机和平板电脑)访问其数据。 或者,他们可能希望与同事或家人和朋友共享数据。
Sounds complicated and like a lot of work? Well, fear not — all of this is possible with Firebase and Cloud Firestore, and as you will see in this article, it’s not even very complicated.
听起来很复杂,需要做很多工作? 好吧,不用担心-所有这些都可以通过Firebase和Cloud Firestore实现,并且正如您将在本文中看到的那样,它甚至不是很复杂。
So, let’s get started!
所以,让我们开始吧!
设置Firebase (Setting up Firebase)
If you’re following along, check out the tag
stage_3/implement_firestore_repository/startand openMakeItSo.xcworkspacein thefinalfolder.如果要继续,请签出标签
stage_3/implement_firestore_repository/start并 在final文件夹中 打开MakeItSo.xcworkspace。
To use Firebase in your app, you’ll have to set up a Firebase project and connect your app to it. It takes just a few steps:
要在您的应用程序中使用Firebase,您必须设置一个Firebase项目并将您的应用程序连接到它。 只需几个步骤:
Set up a new Firebase project with the Firebase console on the web
在网络上使用Firebase控制台设置新的Firebase项目
- Add the Firebase SDK to your app (I recommend using CocoaPods, as we’re already using this to integrate other libraries such as the Disk framework) 将Firebase SDK添加到您的应用程序(我建议使用CocoaPods,因为我们已经在使用它来集成其他库,例如磁盘框架)
Download the
GoogleService-Info.plistconfiguration file which tells the Firebase SDK which of your Firebase projects to connect to下载
GoogleService-Info.plist配置文件,该文件告诉Firebase SDK要连接到哪个Firebase项目- Import Firebase into your code and initialise it in your application delegate 将Firebase导入代码并在应用程序委托中对其进行初始化
Remember, we added Resolver and Disk in part of this series.
记住,在本系列的一部分中,我们添加了Resolver和Disk 。
Coincidentally, I just created a short video that explains how this works in more detail:
巧合的是,我刚刚制作了一个简短的视频,解释了它的工作原理:
无论如何,什么是Cloud Firestore? (What is Cloud Firestore, anyway?)
Let’s quickly review what Cloud Firestore is to understand why it is a good fit for our project.
让我们快速回顾一下Cloud Firestore是什么,以了解为什么它非常适合我们的项目。
The product website says that “Cloud Firestore is a NoSQL document database that lets you easily store, sync, and query data for your mobile and web apps — at a global scale.”
产品网站说:“ Cloud Firestore是一个NoSQL文档数据库,可让您轻松地在全球范围内存储,同步和查询移动和Web应用程序的数据。”
That sounds great, so let’s take a look at some of Cloud Firestore’s properties to better understand what all of this means:
听起来不错,所以让我们看一下Cloud Firestore的一些属性,以更好地理解所有这些含义:
It is a NoSQL document database, which means that your data doesn’t have to follow a schema you might know from a traditional SQL database like MySQL. This makes it easier to upgrade your data model without having to migrate all your existing data to a new schema.
这是一个NoSQL文档数据库 ,这意味着您的数据不必遵循您可能从传统SQL数据库(如MySQL)了解的模式。 这使升级数据模型变得更加容易,而不必将所有现有数据迁移到新的架构。
You can structure your data in collections and documents, making it easy to organise your data hierarchically. For example, you can store all the user’s tasks in one collection, making it convenient to retrieve all their tasks or just a few, based on some criteria you define.
您可以在集合和文档中构建数据结构,从而轻松地分层组织数据。 例如,您可以将所有用户的任务存储在一个集合中,从而使您可以轻松地根据定义的条件来检索其所有任务或仅检索少数任务。
Your users can make changes to their data even when offline, and all of their updates will get synchronised across all of the user’s devices automatically.
即使离线 ,您的用户也可以更改其数据,并且所有更新将自动在用户的所有设备上同步 。
Cloud Firestore provides SDKs for popular programming languages and environments such as iOS, Android, and the web.
Cloud Firestore提供了适用于流行编程语言和环境(例如iOS,Android和Web)的SDK 。
For more details, check out this video:
有关更多详细信息,请观看以下视频:
将我们的数据模型映射到Cloud Firestore (Mapping our data model to Cloud Firestore)
Mapping our data model to Cloud Firestore is pretty straightforward, and thanks to the recently added support for Codable, we won’t even have to make many changes to our existing code base.
将我们的数据模型映射到Cloud Firestore非常简单,而且由于最近增加了对Codable的支持,我们甚至不必对现有代码库进行很多更改。
In Cloud Firestore, you store data in documents. You can think of a document as a lightweight record that contains fields which map to values. Each document is identified by a unique name. Each field has a type, such as string, number, boolean, or more complex ones like map, array, and timestamp - see the documentation for a discussion of their specifics, such as value ranges and sort order.
在Cloud Firestore中,您将数据存储在文档中 。 您可以将文档视为轻量级记录,其中包含映射到值的字段。 每个文档都由唯一的名称标识。 每个字段都有一个类型,例如string , number , boolean或更复杂的类型(例如map , array和timestamp -有关其详细信息(例如值范围和排序顺序)的讨论,请参见文档 。
Documents are stored in collections. For example, you could have a tasks collection to contain all of your tasks.
文档存储在集合中 。 例如,您可能有一个tasks集合来包含所有任务。
分层数据模型 (Hierarchical data model)
Collections contain nothing but documents — you cannot store data directly into a collection. Similarly, documents cannot contain other documents, but they can point to sub-collections, which in turn contain other documents. This allows you to build a hierarchical data model.
集合只包含文档-您不能将数据直接存储到集合中。 同样,文档不能包含其他文档,但是它们可以指向子集合,而子集合又包含其他文档。 这使您可以构建分层数据模型。
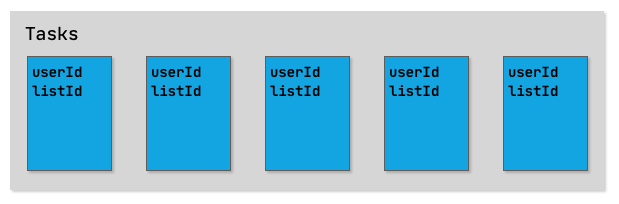
For a task list application that wants to support multiple lists per user, the most straightforward approach might be to build a hierarchical data model that looks like this:
对于要支持每个用户多个列表的任务列表应用程序,最直接的方法可能是构建如下所示的分层数据模型:

While this certainly works (and actually was the approach used in an earlier version of the app we’re building), it will make things more challenging in the long run. Let’s consider two use cases that we might want to implement in the future:
尽管这确实可行(实际上是我们正在构建的较早版本的应用程序中使用的方法),但从长远来看,它将使事情更具挑战性。 让我们考虑一下将来可能要实现的两个用例:
Supporting multiple lists per user: At first sight, this looks very simple: create a collection for each list, and put all tasks on that list into the corresponding collection. However, this structure will make it more difficult to run a query that yields all the user’s tasks across all lists that have been completed in the past week (something you might want to know when creating a report).
每个用户支持多个列表 :乍看起来,这很简单:为每个列表创建一个集合,并将该列表上的所有任务放入相应的集合中。 但是,这种结构将使运行查询变得更加困难,该查询将产生过去一周内已完成的所有列表中所有用户的任务(创建报表时您可能想知道的事情)。
Sharing lists with friends: In our hypothetical hierarchical data model, a user’s lists would be nested under the user’s ID. This would make sharing lists with other users very complicated — you’d have to come up with some sort of “proxy” lists that point at the original list. Reasoning about how to retrieve lists and tasks would become a lot more complicated than it needs to be.
与朋友共享列表 :在我们的假设分层数据模型中,用户列表将嵌套在用户ID下。 这将使与其他用户的共享列表变得非常复杂-您必须提出某种指向原始列表的“代理”列表。 关于如何检索列表和任务的推理将变得比需要复杂得多。
平面数据模型 (Flat data model)
Instead of using a hierarchical data model, let’s use a flat data model and store all tasks in a single tasks collection. To specify ownership, we will store the user ID of the owner in the task document. When retrieving a user's task, we can then simply query for all tasks that match the user's ID.
让我们使用平面数据模型,而不是使用分层数据模型,并将所有任务存储在单个tasks集合中。 为了指定所有权,我们将所有者的用户ID存储在任务文档中。 检索用户的任务时,我们可以简单地查询所有与用户ID匹配的任务。
Supporting advanced use cases becomes a lot easier now:
现在,支持高级用例变得更加容易:
To support multiple lists per user, we will create another collection containing all lists (again using a
userIdfield to specify list ownership). To assign a task to a list, all we need to do is store the list ID in a fieldlistIdin the task document, which makes it simple to search for all tasks in a particular list.为了支持每个用户多个列表 ,我们将创建另一个包含所有列表的集合(再次使用
userId字段指定列表所有权)。 要将任务分配给列表,我们要做的就是将列表ID存储在任务文档中的字段listId中,这使得在特定列表中搜索所有任务变得简单。Likewise, sharing lists with friends becomes rather simple as well: again , each list has a field userId to indicate the owner. To share a list with other users, we can add another field sharedWith that contains a list of user IDs this list is shared with.
同样, 与朋友共享列表也变得非常简单:同样,每个列表都有一个字段userId来指示所有者。 要与其他用户共享列表,我们可以添加另一个字段sharedWith,其中包含与该列表共享的用户ID列表。
Check out this video for a discussion of some of how to structure your data in Cloud Firestore:
观看此视频,以获取有关如何在Cloud Firestore中构建数据的一些讨论:
Here is how this would look like conceptually:
这是概念上的样子:
In the introduction to this series, we decided to deliberately simplify the application a bit — for example, we only support one list per user in the first iteration. The good news about our data model is that it is perfectly suitable for the simplified version of the app, while still being future proof: adding support for multiple lists per user is something that our data model can handle. We will update the UI to support multiple lists in a later part of the series.
在本系列的简介中,我们决定故意简化应用程序—例如,在第一次迭代中,每个用户仅支持一个列表。 关于我们的数据模型的一个好消息是,它非常适合应用程序的简化版本,同时仍然具有未来的前景:为每个用户添加对多个列表的支持是我们的数据模型可以处理的事情。 在本系列的后续部分中,我们将更新UI以支持多个列表。
Now that we have a good understanding of how the overall structure of our data model looks like, let’s take a look at the changes we have to make to our source code to implement this.
现在我们对数据模型的整体结构有了很好的了解,下面让我们看一下为实现此目的而必须对源代码进行的更改。
As promised earlier, there are just a few changes:
如前所述,只有几处更改:
We need to import
FirebaseFirestore(1) andFirebaseFirestoreSwift(which contains support for Swift Codable)我们需要导入
FirebaseFirestore(1)和FirebaseFirestoreSwift(其中包含对Swift Codable的支持)Every Firestore document (and every collection) has a unique identifier. We can make use of this fact and map this to our
idfield (remember we need to help theListview to track the individual rows, e.g. when inserting or deleting elements from the list). The@DocumentIDproperty wrapper (provided byFirebaseFirestoreSwift) tells Firebase to map the document's ID (the last part of the document path) to this property when decoding the document.每个Firestore文档(以及每个集合)都有唯一的标识符。 我们可以利用这一事实并将其映射到我们的
id字段(请记住,我们需要帮助List视图来跟踪各个行,例如,在从列表中插入或删除元素时)。@DocumentID属性包装器(由FirebaseFirestoreSwift提供)告诉Firebase在解码文档时将文档ID(文档路径的最后一部分)映射到此属性。Likewise,
@ServerTimestamptells Firestore that it should write the current server timestamp into this field when writing the document into the database. Using a server-side timestamp is important when working with data that originates from multiple clients, as the clocks on the clients are most likely not in sync with each other. We will later use this field to ensure that the data is displayed on the client in the order in which it was added to the list.同样,
@ServerTimestamp告诉Firestore在将文档写入数据库时应将当前服务器时间戳记写入此字段。 当处理来自多个客户端的数据时,使用服务器端时间戳很重要,因为客户端上的时钟很可能彼此不同步。 稍后,我们将使用此字段来确保数据按添加到列表的顺序在客户端上显示。
实施存储库 (Implementing the Repository)
In the first part of the series, we used the Disk framework to persist data to … disk. We also used dependency injection to decouple the view models from the repository and thus make it easier to swap out the repository implementation. As you will see in a minute, this allows us to change the persistence technology without having to change any of the views or view models.
在本系列的第一部分中,我们使用磁盘框架将数据持久保存到磁盘。 我们还使用依赖注入将视图模型与存储库解耦,从而更轻松地换出存储库实现。 您将在稍后看到,这使我们能够更改持久性技术,而不必更改任何视图或视图模型。
Let’s walk through the implementation of the new repository feature by feature.
让我们逐个功能介绍新存储库功能的实现。
从Firestore提取任务 (Fetching Tasks from Firestore)
One of the key features of Firebase is its near-real-time nature: clients can specify they’d like to be notified for any changes to a document or multiple documents. To do so, you’ll have to register a snapshot listener on the document or a query (to be notified when any of the documents in the result set of the query changes). All of this happens almost instantly (depending on the quality of your network connection).
Firebase的主要功能之一是其近乎实时的特性:客户可以指定要通知他们一个文档或多个文档的任何更改。 为此,您必须在文档或查询上注册快照侦听器(当查询结果集中的任何文档发生更改时都会收到通知)。 所有这些几乎都是立即发生的(取决于网络连接的质量)。
If you don’t care for real-time updates, you can also perform a one-time fetch.
如果您不关心实时更新,也可以执行一次提取 。
For our application, we are interested in real-time updates, as this will allow us to let the user use multiple devices to manage their data without having to worry about synchronising data manually (or implementing any pull-to-refresh functionality).
对于我们的应用程序,我们对实时更新感兴趣,因为这将使我们能够让用户使用多个设备来管理其数据,而不必担心手动同步数据(或实现任何即用刷新功能)。
To receive updates for the user’s tasks, we simply register a snapshot listener on the tasks collection.
要接收用户任务的更新,我们只需在tasks集合上注册一个快照侦听器。
A few things are worth pointing out:
有几点需要指出:
We keep a reference to the global Firestore instance (1). For the Firestore client SDK to know which database to connect to, Firebase needs to be properly initialised. We did this when we first added Firebase to the project. If you haven’t copied
GoogleService-Info.plistto the project and calledFirebaseApp.configure()in your application delegate, go back and watch that video I linked earlier in this article.我们保留对全局Firestore实例(1)的引用。 为了使Firestore客户端SDK知道要连接到哪个数据库,需要正确初始化Firebase。 我们是在首次将Firebase添加到项目中时执行此操作的。 如果您尚未将
GoogleService-Info.plist复制到项目中并在应用程序委托中调用FirebaseApp.configure(),请返回并观看我在本文前面链接的视频。The canonical way to register a snapshot listener is
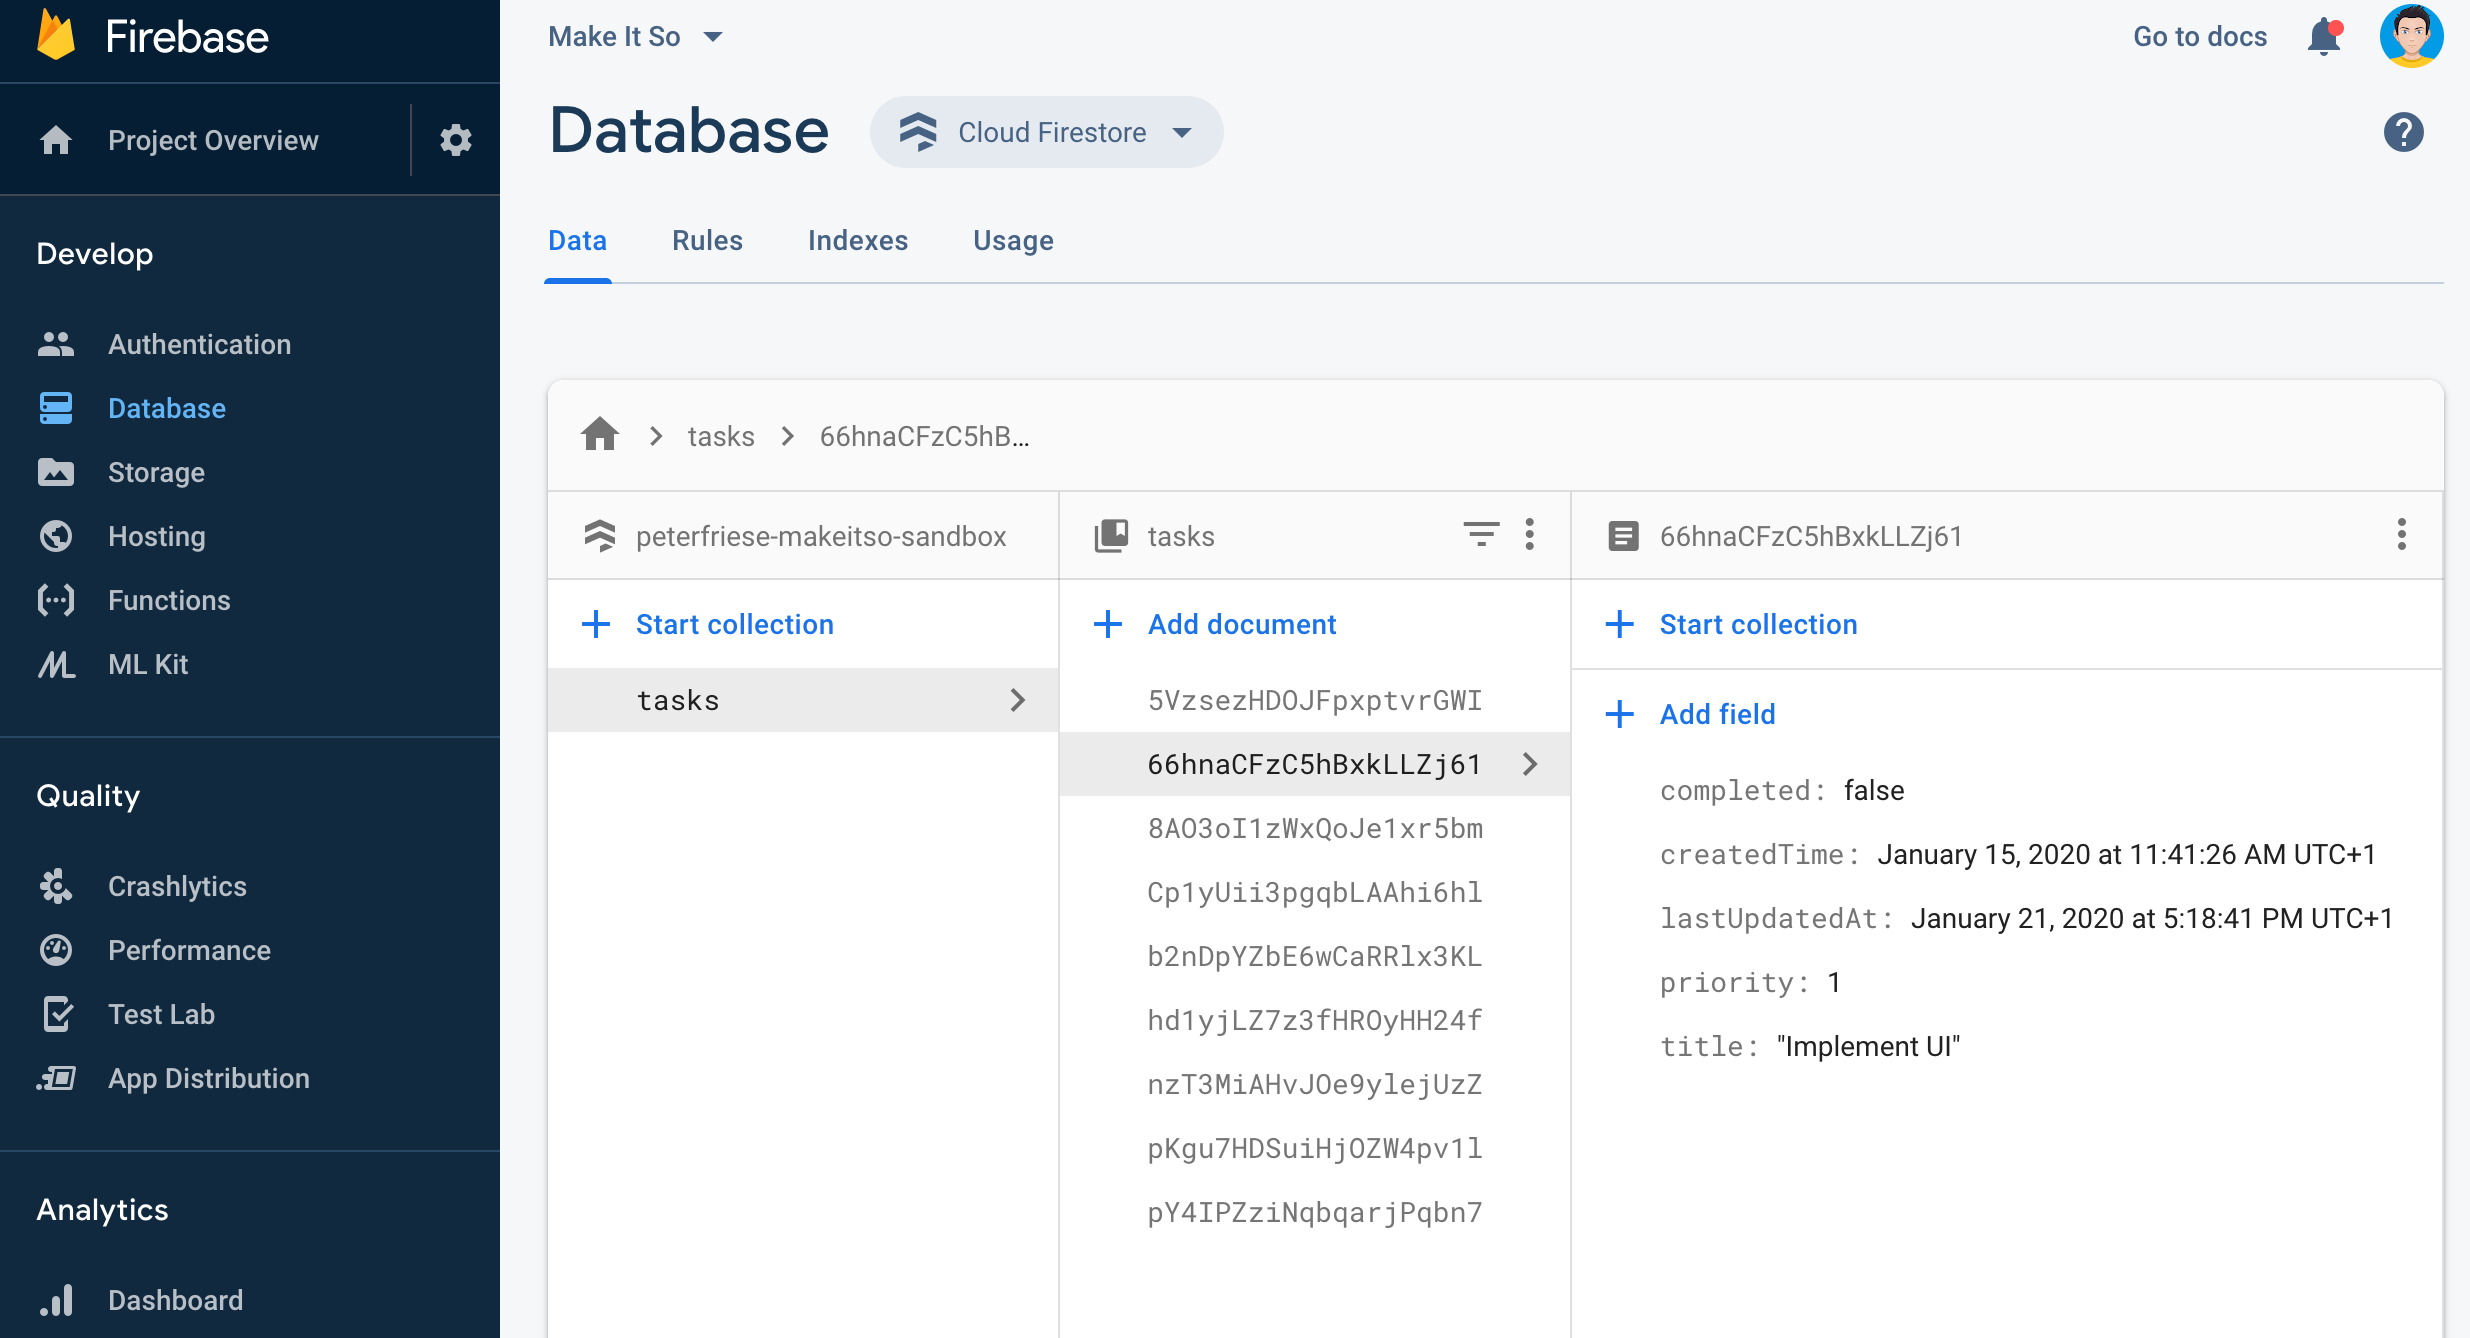
db.collection("path").addSnapshotListener(callback). In this snippet (2), I insertedorder(by: "createdTime")- why? By default, a query retrieves all documents that satisfy the query in ascending order by document ID. This means they will appear in ourListview in exactly this order, which is not what we want: document IDs are globally unique random strings which will result in random order. As we want to make sure that the tasks the user enters in the UI appear in exactly the order they add them, we'll use a server-side timestamp to order them chronologically. You can experiment with different order clauses and filters in the Cloud Firestore UI - see the following image:注册快照侦听器的规范方法是
db.collection("path").addSnapshotListener(callback)。 在此代码段(2)中,我插入了order(by: "createdTime")-为什么? 默认情况下,查询按文档ID升序检索满足查询条件的所有文档。 这意味着它们将完全按照我们想要的顺序出现在List视图中:文档ID是全局唯一的随机字符串,将导致随机顺序。 由于我们要确保用户在UI中输入的任务按照添加任务的顺序显示,因此我们将使用服务器端时间戳按时间顺序对其进行排序。 您可以在Cloud Firestore UI中尝试使用不同的订单条款和过滤器-参见下图:

The
querySnapshotwe receive in the closure contains a collection of all the documents that are a result of the query (as we didn't specify any conditions, we will receive all documents in the tasks collection). UsingmaporcompactMap(3), we can transform the elements of this collection intoTasks.我们在闭包中收到的
querySnapshot包含所有查询结果的文档的集合(由于我们未指定任何条件,因此我们将在task集合中接收所有文档)。 使用map或compactMap(3),我们可以将此集合的元素转换为Tasks。- Right now, this query will try to grab all tasks from all users, no matter who wrote them! This is obviously a major problem, which we’ll be fixing later in this post. 现在,此查询将尝试从所有用户那里获取所有任务,无论是谁编写的! 显然,这是一个主要问题,我们将在本文后面解决。
Thanks to Firestore’s support for
Codable, converting a FirestoreDocumentSnapshotinto aTaskis a one-liner (4). As the result of this call is an optional, and might benil(e.g. when there was a problem performing the mapping due to non-matching data types), we need to usecompactMapwhen iterating over the collection. This will ensure we only return non-nil elements from the closure, thus yielding a result of[Task](as expected), rather than[Task?].多亏了Firestore对
Codable的支持,将FirestoreDocumentSnapshot转换为Task成为了一种方法(4)。 由于此调用的结果是可选的,并且可能为nil(例如,由于数据类型不匹配而导致执行映射时出现问题),compactMap在迭代集合时需要使用compactMap。 这将确保我们仅从闭包中返回非nil元素,从而产生[Task](如预期)的结果,而不是[Task?]。
向Firestore添加新任务 (Adding New Tasks to Firestore)
To add a new document to a Firestore collection, it is sufficient to call addDocument() on the collection. Firestore's support for Codable makes this a delightfully simple call, as we can just pass in any struct or class that implements Codable. In the past, you'd have to convert your object into a dictionary first.
要将新文档添加到Firestore集合, addDocument()在集合上调用addDocument() 。 Firestore对Codable的支持使此调用非常简单,因为我们可以传入实现Codable任何结构或类。 过去,您必须先将对象转换成字典。
Here is the complete code for adding a new task:
这是添加新任务的完整代码:
FirestoreTaskRepository.swift
FirestoreTaskRepository.swift
You might be wondering why we didn’t add the new task to the local tasks property. Firestore will call the snapshot listener we've registered on the tasks collection immediately after making any changes to the contained documents - even if the application is currently offline. This means that the closure in loadData() will be called shortly after we've added a new task, and thus update the tasks property. This means we don't need to bother updating the property inside addTask() or any of the other methods that operate on the user's tasks.
您可能想知道为什么我们没有将新任务添加到本地tasks属性。 对包含的文档进行任何更改后,即使应用程序当前处于脱机状态,Firestore也会立即调用我们已经在tasks集合上注册的快照侦听器。 这意味着在添加新任务后不久将调用loadData()中的闭包,从而更新了tasks属性。 这意味着我们无需费心更新addTask()内的属性或对用户任务进行操作的任何其他方法。
更新Firestore中的现有任务 (Updating an Existing Task in Firestore)
Once the user updates a task by tapping on the task’s checkbox or changing its title, we want to send those updates to Firestore as well.
一旦用户通过点击任务的复选框或更改其标题来更新任务,我们也希望将这些更新也发送到Firestore。
Updating a document in Firestore requires knowing its path and document ID. Since we asked Firestore to map the document ID to the id field of our Task struct, we already have the document ID:
在Firestore中更新文档需要知道其路径和文档ID。 由于我们要求Firestore将文档ID映射到Task结构的id字段,因此我们已经有了文档ID:
FirestoreTaskRepository.swift
FirestoreTaskRepository.swift
Again, it’s really easy to update the document, thanks to Firestore’s Codable support (1): just call setData(from:) - it's that simple.
同样,由于Firestore的Codable支持(1),更新文档确实非常容易:只需调用setData(from:) -就这么简单。
从Firestore删除任务 (Deleting a Task from Firestore)
Finally, let’s look at how to delete tasks from Firestore:
最后,让我们看一下如何从Firestore中删除任务:
We first build a reference to the document, using the collection path (tasks) and the document's ID. Deleting the document then is as easy as calling delete() on the document reference.
我们首先使用收集路径( tasks )和文档的ID建立对该文档的引用。 然后,删除文档就像在文档引用上调用delete()一样容易。
连接存储库 (Wiring up the Repository)
To try out the new repository, we need to register it with our dependency injection framework, Resolver:
要尝试新的存储库,我们需要在我们的依赖注入框架Resolver中进行注册:
Before you can run the application, we need to make provision a Firestore database in our Firebase project. To do so, go to the Firebase Console and navigate to the database section of your project and click on “Create database” to create a Firestore database for your project:
在运行该应用程序之前,我们需要在Firebase项目中设置一个Firestore数据库。 为此,请转到Firebase控制台并导航至项目的数据库部分,然后单击“创建数据库”为您的项目创建Firestore数据库:

When asked about security rules, choose “Start in test mode”. Later on, we will need to update the security rules to properly secure the database. For now, your database is open for everyone to read and write. To minimize the risk, this full access expires one month into the future (and you will receive some increasingly nagging emails shortly before this time runs out).
当询问安全规则时,选择“以测试模式启动”。 稍后,我们将需要更新安全规则以正确保护数据库。 目前,您的数据库已打开,供所有人读取和写入。 为了最大程度地降低风险,这种完全访问权限将在未来的一个月后过期(在此时间用完之前不久,您会收到越来越多的令人讨厌的电子邮件)。
Now, run the application on a Simulator or your phone. Initially, you should see an empty list. Go ahead and add a couple of tasks (keep in mind you need to tap the enter key to commit them), mark some of them as done, and update others.
现在,在模拟器或手机上运行该应用程序。 最初,您应该看到一个空列表。 继续并添加一些任务(请记住,您需要点击Enter键以提交它们),将其中一些标记为已完成,然后更新其他任务。
To better understand what’s going on, open the Firebase Console in your browser navigate into the database section of your app. You should see something similar to this:
为了更好地了解发生了什么,请在浏览器中打开Firebase控制台 ,导航到应用程序的数据库部分。 您应该看到类似以下内容:
You will notice how the data in the database browser gets updated almost instantaneously as you update the tasks in your app. Now go ahead and update a task by editing it in the database browser — as soon as you save the change, it will be reflected in the app! Take it a step further by starting the app on two devices (or a Simulator and a physical device) and try the same — the data stays in sync across all instances. Nice, huh?
您将注意到在更新应用程序中的任务时,数据库浏览器中的数据几乎是即时更新的。 现在,通过在数据库浏览器中对其进行编辑来更新任务-保存更改后,该任务将立即反映在应用程序中! 通过在两个设备(或模拟器和物理设备)上启动该应用程序并尝试相同的操作,可以使操作更进一步—数据在所有实例之间保持同步。 好吧
但是,多个用户呢? (But what about multiple users?)
By now, you’re probably wondering how we’re going to support multiple users. After all, when we talked about the data model, we did mention multiple users, right? As it stands, the current implementation will use the same Firestore collection for all users — so all users will have to share their tasks. This is not what we want.
到目前为止,您可能想知道我们将如何支持多个用户。 毕竟,当我们谈论数据模型时,我们确实提到了多个用户,对吗? 就目前而言,当前的实现将对所有用户使用相同的Firestore集合-因此所有用户将必须共享其任务。 这不是我们想要的。
Ultimately, we will need to implement a way for users to create an account and sign in to the app. Authentication systems usually have some form of user ID that can be used to organise the user’s data. If you recall our earlier discussion of the data model for our application, you’ll remember that we were going to add a field userId to each task document to refer to the user who "owns" this piece of data.
最终,我们需要为用户提供一种创建帐户并登录应用的方法。 身份验证系统通常具有某种形式的用户ID,可用于组织用户数据。 如果您还记得我们之前对应用程序的数据模型的讨论,您会记得我们将在每个任务文档中添加一个字段userId来引用“拥有”该数据块的用户。
Asking users to create a user account does have advantages (for example, this is a prerequisite to sharing data with other users of your app), but it might also be a roadblock: if your users have to sign up for an account before being able to start using your app, they might decide to not give your app a try and uninstall it instead. The drop-off numbers can be significant. Thankfully, there is an easy way to avoid this (and pave the way for using a full-blown authentication system later on): Firebase Anonymous Authentication.
要求用户创建用户帐户确实有优势(例如,这是与您的应用程序其他用户共享数据的先决条件),但这也可能是一个障碍:如果您的用户必须先注册一个帐户,然后才能要开始使用您的应用,他们可能会决定不尝试使用您的应用,而是将其卸载。 退货数量可能很大。 值得庆幸的是,有一种简单的方法可以避免这种情况(并为以后使用成熟的身份验证系统铺平道路):Firebase匿名身份验证。
匿名登录 (Signing in Anonymously)
Firebase Anonymous Authentication lets you sign in your application’s users without asking them to provide any information about themselves — hence anonymous. The whole process is completely transparent, which eliminates any sign-up speedbump that your users would face otherwise.
通过Firebase匿名身份验证 ,您可以登录应用程序的用户,而无需要求他们提供有关其自身的任何信息-因此为匿名 。 整个过程是完全透明的,从而消除了用户否则将面临的任何注册速度提升。
You can later provide opportunities for them to create a full user account (e.g. by signing in with Google, Facebook, Twitter, or Sign in with Apple), enabling more advanced functionality such as sharing data with other users. Firebase Authentication makes upgrading anonymous users to a full user very easy — we will take a look at how this works in the next episode of this series.
您以后可以为他们提供创建完整用户帐户的机会(例如,通过使用Google,Facebook,Twitter或使用Apple登录),从而启用更多高级功能,例如与其他用户共享数据。 Firebase身份验证使将匿名用户升级为完整用户非常容易-我们将在本系列的下一集中介绍其工作方式。
Like any Firebase user, anonymous users have a unique user ID, which allows us to uniquely identify them and store user-specific data, keeping it safe from other users’ eyes. Firebase Security Rules provide a powerful way to protect user data, making sure only the owner of the data can see it and perform operations on it.
像任何Firebase用户一样,匿名用户具有唯一的用户ID,这使我们能够唯一地标识他们并存储特定于用户的数据,从而使其免受其他用户的伤害。 Firebase安全规则提供了一种保护用户数据的强大方法,可确保只有数据所有者才能看到它并对其执行操作。
To support Firebase Anonymous Authentication in your application, you need to follow these steps:
要在您的应用程序中支持Firebase匿名身份验证,您需要执行以下步骤:
- Turn on support for Anonymous Auth in the Firebase Console 在Firebase控制台中启用对匿名身份验证的支持
- Add the Firebase Auth pod to your project 将Firebase身份验证窗格添加到您的项目
- Perform an anonymous sign in at application start-up 在应用程序启动时执行匿名登录
- Use the anonymous user’s ID to store/retrieve data 使用匿名用户的ID来存储/检索数据
If you’re following along, check out the tag
stage_3/implement_anonymous_auth/startand openMakeItSo.xcworkspacein thefinalfolder.如果要继续,请签出标签
stage_3/implement_anonymous_auth/start并 在final文件夹中 打开MakeItSo.xcworkspace。
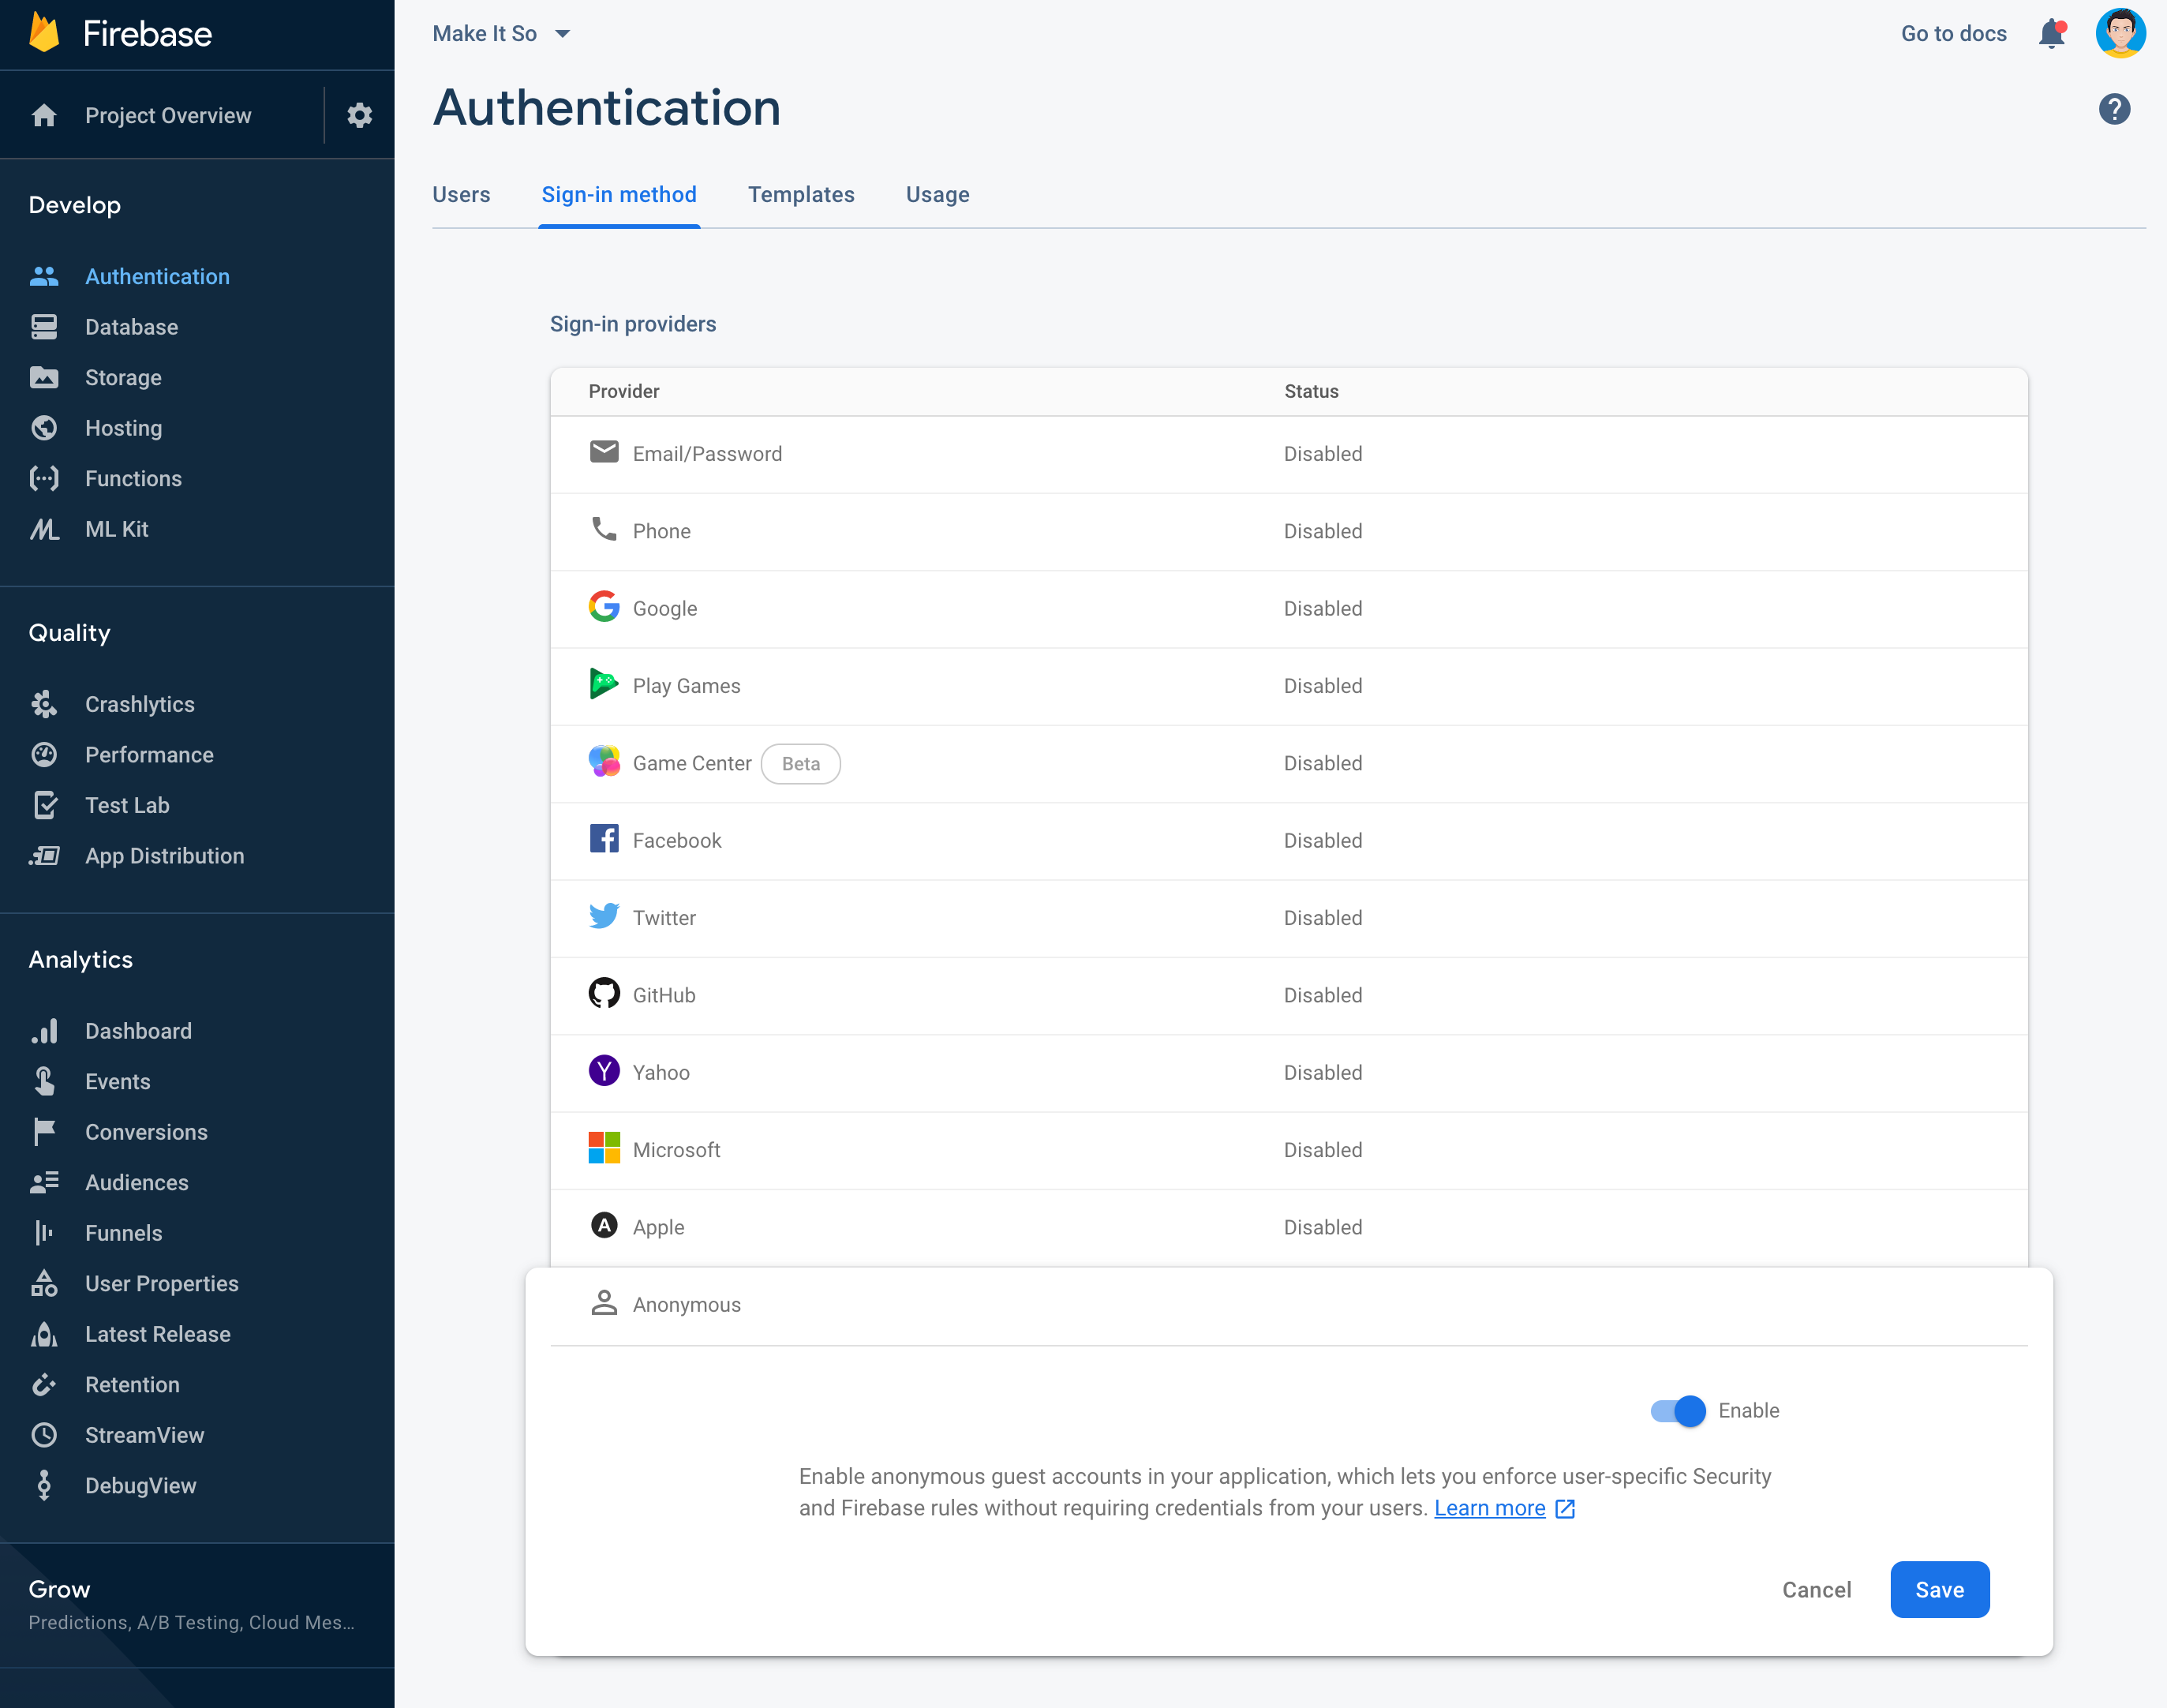
To enable support for Anonymous Authentication, navigate to the Authentication section in the sidebar of your Firebase project, and open the Sign-in method tab. Turn on Anonymous, and click the Save button.
要启用对匿名身份验证的支持,请导航至Firebase项目侧栏中的“ 身份验证”部分,然后打开“ 登录方法”选项卡。 打开匿名 ,然后单击保存按钮。
Before we can use Anonymous Auth in our app, we’ll have to add Firebase/Auth to our CocoaPods file:
在我们的应用中使用匿名身份验证之前,我们必须将Firebase / Auth添加到我们的CocoaPods文件中:
Next, let’s build a simple authentication service to encapsulate handling signing in, signing out, and providing access to the currently signed-in user. By encapsulating all of this in a dedicated service, we’ll later be able to add other authentication mechanisms (such as Sign in with Apple) more easily.
接下来,让我们构建一个简单的身份验证服务,以封装处理登录,注销以及提供对当前登录用户的访问权限。 通过将所有这些封装在专用服务中,以后我们将能够更轻松地添加其他身份验证机制(例如,使用Apple登录 )。
The service’s user property (1) provides access to the currently signed in Firebase user. By annotating this as a @Published property, we can later use Combine to react to any changes (such as when the user signs in or out) more easily.
该服务的user属性(1)提供对当前登录的Firebase用户的访问权限。 通过将其注释为@Published属性,我们以后可以使用Combine来更轻松地响应任何更改(例如,用户@Published或注销时)。
When the service’s signIn() method is called, we will register (2) a state listener (4), which is called whenever the user signs in or out. Finally, we ask Firebase Auth to sign in anonymously (3).
调用服务的signIn()方法时,我们将注册(2)状态监听器(4),每当用户登录或注销时都会调用该状态监听器。 最后,我们要求Firebase Auth匿名登录(3)。
As before, we need to register the service with our dependency injection framework in AppDelegate+Injection.swift:
和以前一样,我们需要在AppDelegate+Injection.swift依赖项注入框架中注册服务:
AppDelegate+Injection.swift
AppDelegate+Injection.swift
To initiate the sign-in process, we inject the service into our AppDelegate, and call the signIn method after Firebase has been initialised:
为了启动登录过程,我们将服务注入AppDelegate ,并在Firebase初始化后调用signIn方法:
App/AppDelegate.swif
App/AppDelegate.swif
使任务存储库具有用户意识 (Making the Task Repository User-Aware)
Now that we’ve successfully and anonymously signed in our user, we can store the user’s ID in the tasks they create to indicate their “ownership”.
现在我们已经成功匿名登录了用户,我们可以将用户的ID存储在他们创建的任务中以表明其“所有权”。
To this end, we first need to add a userId field to the Task struct:
为此,我们首先需要向Task结构添加一个userId字段:
Then, we’ll have to make a couple of changes to the FirestoreTaskRepository:
然后,我们必须对FirestoreTaskRepository进行一些更改:
Let’s look at what this code does:
让我们看看这段代码的作用:
We use Resolver to inject an instance of
AuthenticationService(1)我们使用解析器注入
AuthenticationService的实例(1)All tasks are contained in the
taskscollection, so we define a constant (2) to keep things DRY.所有任务都包含在
tasks集合中,因此我们定义了一个常量(2)以使事物保持干燥。In the initialiser, we subscribe (3) and (6) to the
userpublisher on theAuthenticationServiceto be informed whenever theuserproperty changes.在初始化程序中,我们将(3)和(6)订阅
AuthenticationService上的user发布者,以便在user属性更改时得到通知。The first Combine pipeline (3) extracts the user’s ID (4), and assigns it to the
userIdproperty (5)第一个Combine管道(3)提取用户的ID(4),并将其分配给
userId属性(5)The second pipeline (6) also kicks in whenever the
userproperty on the authentication service changes. It then invokes theloadData()method (8) to (re)load the current user's tasks.每当身份验证服务上的
user属性更改时,第二个管道(6)也会启动。 然后,它调用loadData()方法(8)来(重新)加载当前用户的任务。It is essential to make sure any update to the UI is executed on the main thread. This can be achieved by using the
.receive(on:)operator (7) - this tells Combine to run the rest of the pipeline from here on on the specified thread/queue.确保在主线程上执行对UI的任何更新是至关重要的。 这可以通过使用
.receive(on:)运算符(7)来实现-告诉Combine从此处在指定线程/队列上运行其余管道。To make sure we only fetch tasks that belong to the current user, we add a
whereFieldclause, specifying the current user id (9).为确保仅获取属于当前用户的任务,我们添加了
whereField子句,指定了当前用户ID(9)。- When adding a new task, we need to make sure to provide the current user ID — otherwise, the task wouldn’t be in the result set of the query above (9). 添加新任务时,我们需要确保提供当前的用户ID-否则,该任务将不在上面(9)的查询的结果集中。
When you run the app now, you will see that any tasks you add via the UI disappear from the list view immediately. You might also notice an error message in the Xcode console, indicating that the snapshot listener didn’t yield any results and that you should create an index.
现在运行应用程序时,您会看到通过UI添加的所有任务都会立即从列表视图中消失。 您可能还会在Xcode控制台中注意到一条错误消息,指示快照侦听器未产生任何结果,您应该创建一个索引。
[Firebase/Firestore][I-FST000001] Listen for query at tasks failed: The query requires an index. You can create it here: https://console.firebase.com/v1/r/project/<your-project-id>/firestore/indexes?create_composite=some-random-looking-idThis is due to the fact that we’re now using a compound query: we ask Firestore to query the userId field and sort by the createdTime field. To fulfil the promise that no query is a slow query, Firestore demands that you set up an index for this compound query. By following the link in the error message, you can create this index very easily. In fact, this is the recommended way to create indexes for Firestore!
这是由于我们现在正在使用复合查询 :我们要求Firestore查询userId字段并按createdTime字段排序。 为了兑现没有查询是慢查询的承诺,Firestore要求您为此复合查询设置索引。 通过错误消息中的链接,您可以非常轻松地创建此索引。 实际上,这是为Firestore创建索引的推荐方法!
最后 (Finally)
If you’re following along, check out the tag
stage_3/finish_lineand openMakeItSo.xcworkspacein thefinalfolder]如果要继续,请检查标签
stage_3/finish_line并 在final文件夹中 打开MakeItSo.xcworkspace]。
To verify your implementation, launch the application on a Simulator. When the UI comes up, the task list should be empty, and the Xcode console should indicate the user ID of the anonymous user you just signed in with.
要验证您的实现,请在模拟器上启动应用程序。 当出现UI时,任务列表应该为空,并且Xcode控制台应指示您刚刚登录的匿名用户的用户ID。
Open the Firebase console side-by-side with the Simulator, and navigate to the Firestore database browser so you can observe the database updating as you add new items to the task list (you might need to reload the browser window once): any new items will be inserted as child documents under the tasks collection of your user ID.
与模拟器并排打开Firebase控制台,并导航到Firestore数据库浏览器,以便在将新项目添加到任务列表时可以观察到数据库的更新(您可能需要重新加载浏览器窗口一次):这些项目将作为子文档插入到您的用户ID的任务集合下。
If you start the application on another device (Simulator or physical phone), you will notice that this will result in a new user document being created under the users collection. Both users can change their data independently of each other - just like we wanted.
如果在其他设备(模拟器或物理电话)上启动应用程序,则会注意到这将导致在users集合下创建新的用户文档。 就像我们想要的那样,两个用户都可以彼此独立地更改其数据。
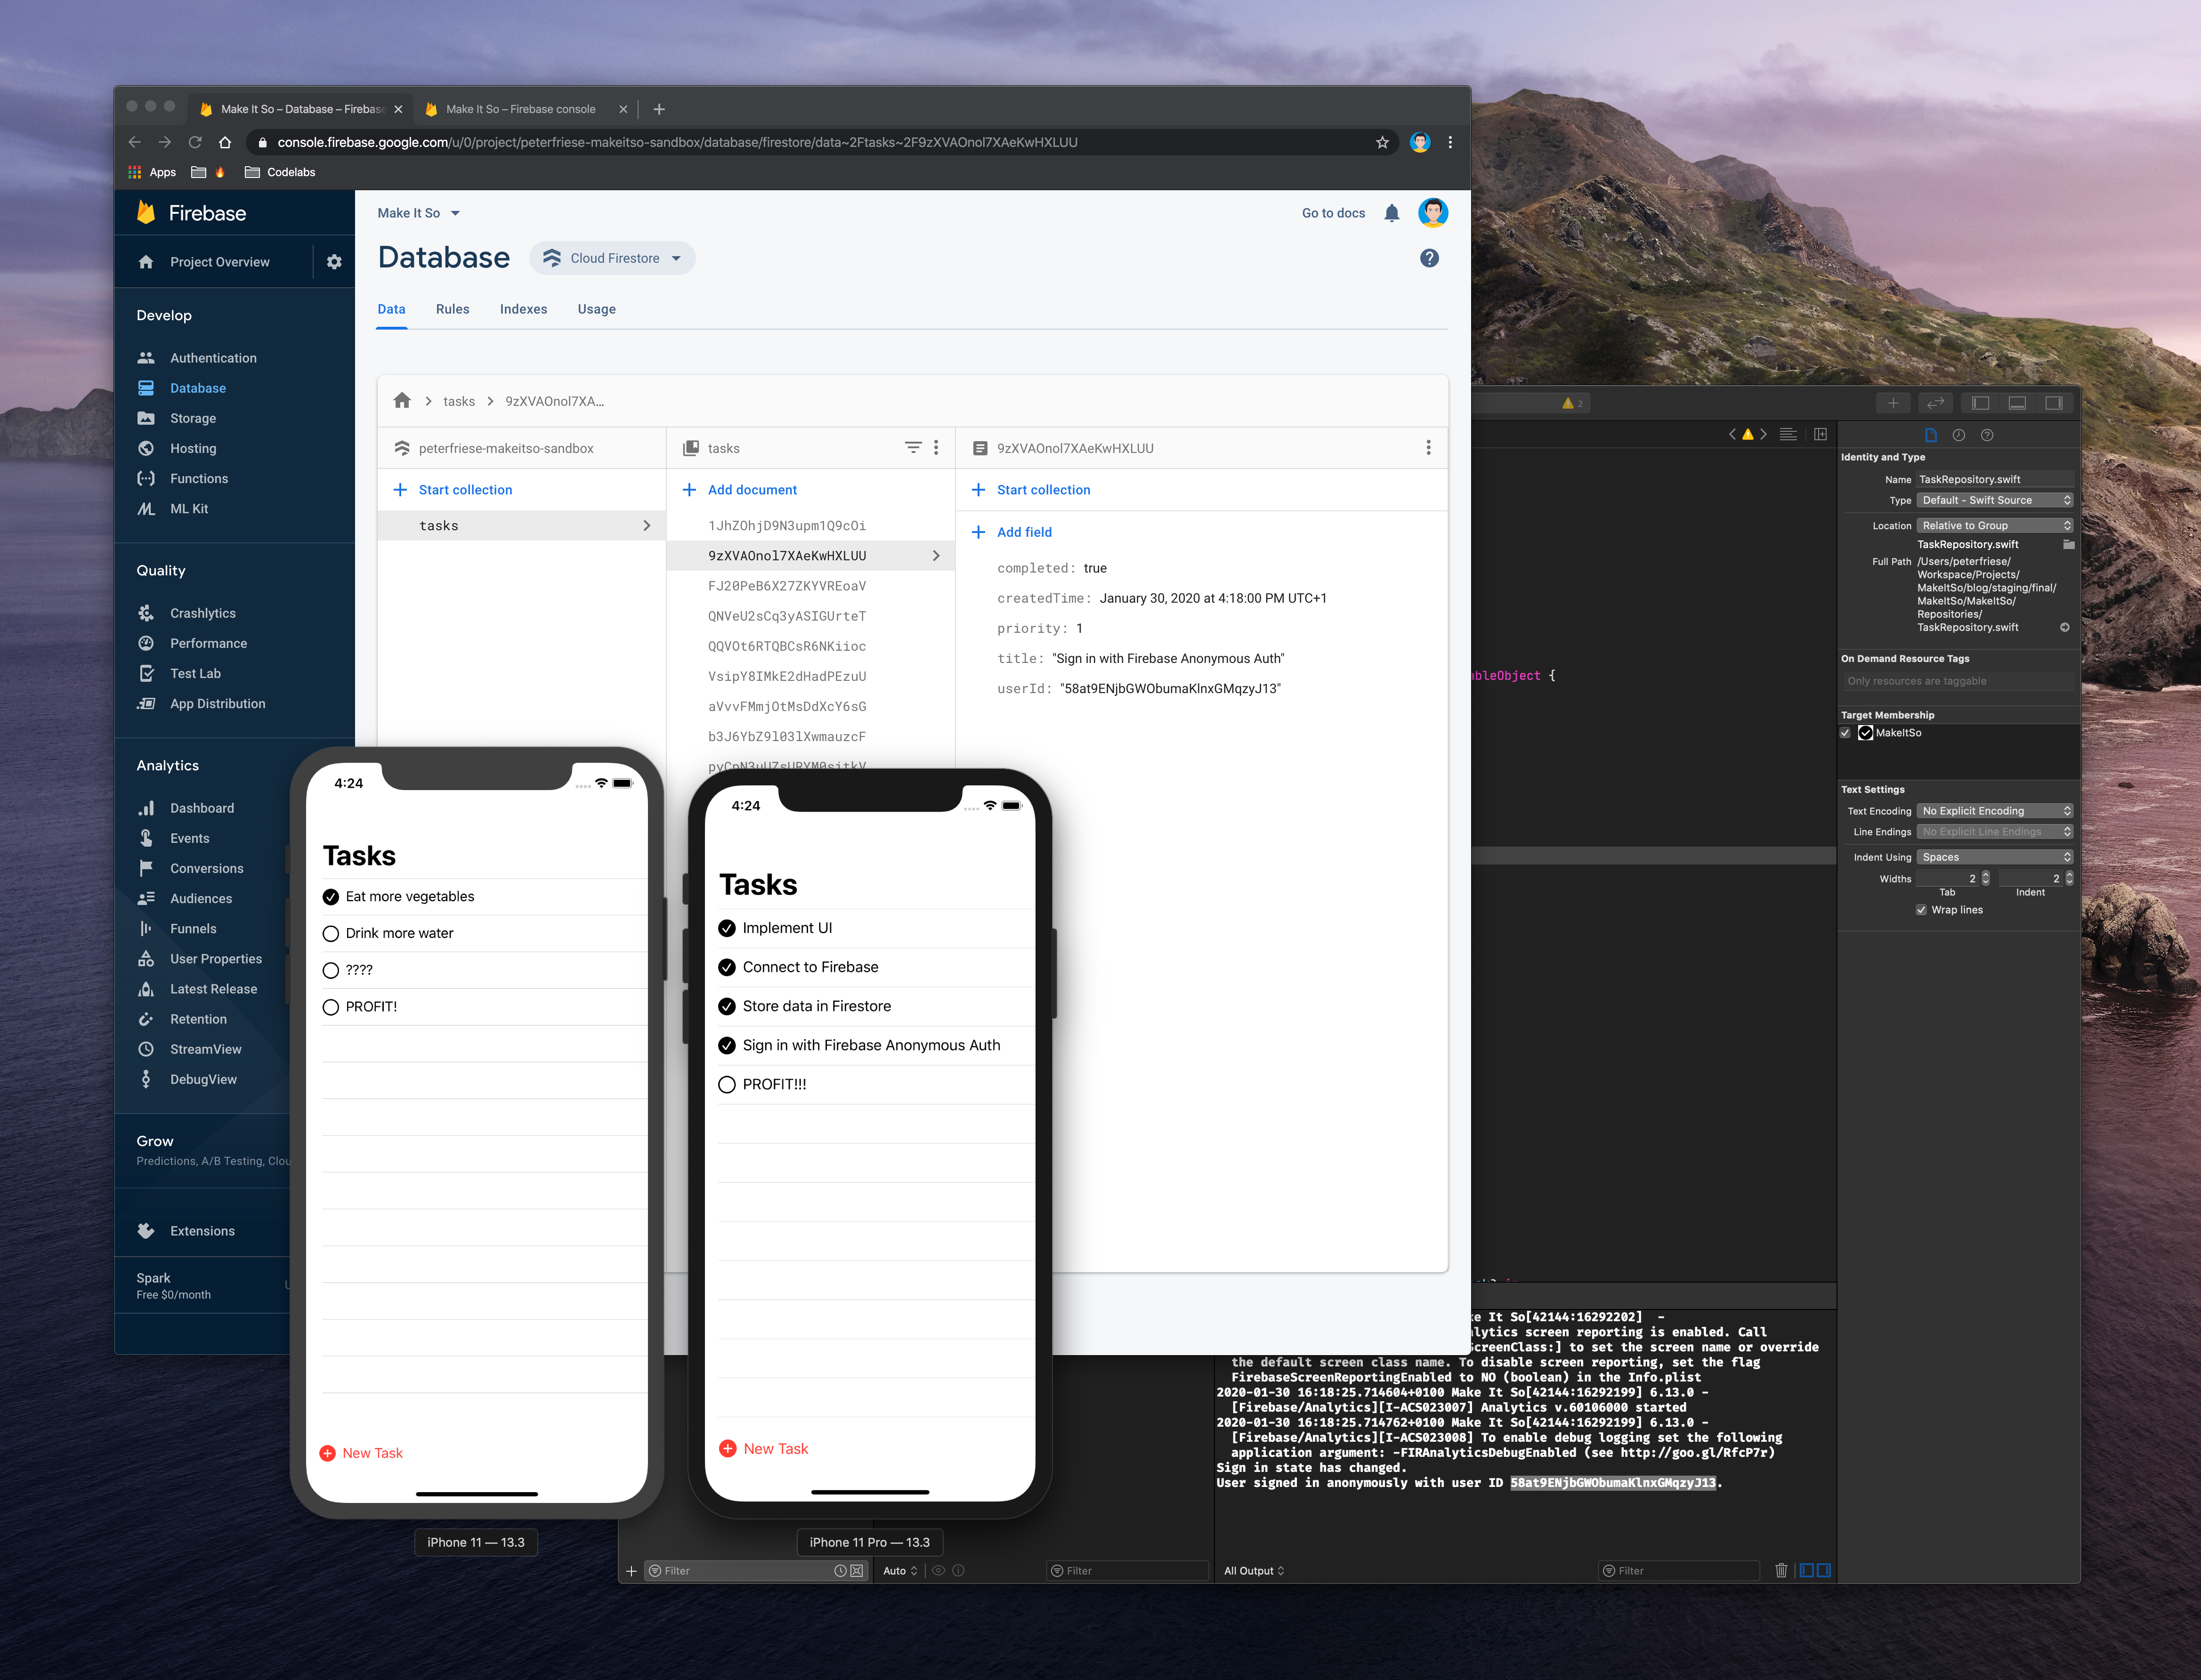
In the screenshot below, you can see that each of the simulators has been assigned a different user ID, and if you look closely, you will see that the user ID 58at9ENjbGWObumaKlnxGMqzyJ13 (displayed in the Xcode console) makes an appearance in the Firestore data browser as well.
在下面的屏幕截图中,您可以看到每个模拟器都分配了不同的用户ID,如果仔细观察,您会看到用户ID 58at9ENjbGWObumaKlnxGMqzyJ13 (显示在Xcode控制台中)在Firestore数据浏览器中显示也一样
我们需要谈谈安全性 (We need to talk about security)
No article about Cloud Firestore would be complete without mentioning Security Rules! Earlier, when setting up the Firestore database for your project, I told you to choose the development settings. This made it easy to get started, because our clients could read and write data from and to the database. However, there is a huge issue: anyone can access your database — they just have to guess your project ID. To prevent malicious people on the internet from tampering with your users’ data, we need to set up some security rules. You can add security rules to your Cloud Firestore database by navigating to the Rules tab in the Cloud Firestore database browser in the Firebase Console.
如果不提及安全规则,那么关于Cloud Firestore的任何文章都是不完整的! 之前,在为您的项目设置Firestore数据库时,我告诉您选择开发设置。 这使上手变得容易,因为我们的客户可以在数据库中读写数据。 但是,存在一个巨大的问题:任何人都可以访问您的数据库-他们只需要猜测您的项目ID。 为了防止Internet上的恶意人篡改用户数据,我们需要设置一些安全规则。 您可以通过在Firebase控制台的Cloud Firestore数据库浏览器中导航到“规则”选项卡,将安全规则添加到Cloud Firestore数据库。
Without further ado, here are some initial security rules that might start to secure our database:
事不宜迟,这里有一些初始安全规则可能会开始保护我们的数据库:
To secure our database, we need to make sure that only registered users can create new tasks, and that users can only read the tasks they own (i.e. the ones they created).
为了保护我们的数据库,我们需要确保只有注册用户才能创建新任务,并且用户只能读取他们拥有的任务(即他们创建的任务)。
By demanding that a write request must contain a valid authentication object (1), we ensure only signed in users can create new tasks.
通过要求写请求必须包含有效的身份验证对象(1),我们确保只有登录用户才能创建新任务。
The second requirement can be met by comparing the userId field of the task that is being requested with the user ID of the incoming read request. Only if they match up, the read request is permitted.
通过将请求的任务的userId字段与传入的读取请求的用户ID进行比较,可以满足第二个要求。 仅当它们匹配时,才允许读取请求。
And with that, our database on its way to being more secure.
这样一来,我们的数据库将变得更加安全。
结论 (Conclusion)
In this article, you saw how easy it is to
在本文中,您看到了轻松实现
- Add Firebase to your existing iOS project 将Firebase添加到您现有的iOS项目
- Store user data in Cloud Firestore 将用户数据存储在Cloud Firestore中
- Use Firebase Anonymous Authentication to transparently sign in your users 使用Firebase匿名身份验证透明登录用户
Thanks to implementing MVVM and using a dependency injection framework like Resolver, we’ve established a flexible architecture that has already made it easy to change some of the app’s components without massive refactorings.
由于实现了MVVM并使用了诸如Resolver之类的依赖项注入框架,我们建立了灵活的体系结构,该体系结构使得无需大量重构即可轻松更改应用程序的某些组件。
In the next episode, we’re going to look at Sign in with Apple, how to add a sign-up flow to the app without disrupting the user experience, and how Firebase can make this easier for us.
在下一个情节中,我们将研究使用Apple登录 ,如何在不中断用户体验的情况下向应用程序添加注册流程,以及Firebase如何使我们更轻松。
Thanks for reading!
谢谢阅读!
Originally published at https://peterfriese.dev.
最初发布在 https://peterfriese.dev 。
翻译自: https://medium.com/firebase-developers/replicating-the-ios-reminders-app-part2-bfe904465944
为ios复制应用程序


 574
574


 被折叠的 条评论
为什么被折叠?
被折叠的 条评论
为什么被折叠?
 到【灌水乐园】发言


