


 本文详细介绍了如何从零开始使用NestJS构建RESTful API,包括NestJS的介绍、安装、创建新项目、入门步骤、应用控制器、应用模块、主文件等内容,涉及MongoDB集成、Mongoose模型、依赖注入和日志服务的使用。
什么是NestJS?(What is NestJS?)
As mentioned at NestJS Documentation, Nest (NestJS) is a framework for building efficient, scalable Node.js server-side applications. It uses progressive JavaScript, is built with and fully supports TypeScript (yet still enables developers to code in pure JavaScript) and combines elements of OOP (Object Oriented Programming), FP (Functional Programming), and FRP (Functional Reactive Programming).
如NestJS文档中所述,Nest(NestJS)是用于构建高效,可扩展的Node.js服务器端应用程序的框架。 它使用渐进式JavaScript,并已构建并完全支持TypeScript (但仍使开发人员能够使用纯JavaScript进行编码),并结合了OOP(面向对象编程),FP(功能编程)和FRP(功能React性编程)的元素。
Under the hood, Nest makes use of robust HTTP Server frameworks like Express (the default) and optionally can be configured to use Fastify as well!
在后台,Nest利用了诸如Express (默认)之类的健壮的HTTP Server框架,并且可以选择配置为也使用Fastify !
Nest provides a level of abstraction above these common Node.js frameworks (Express/Fastify), but also exposes their APIs directly to the developer. This gives developers the freedom to use the myriad of third-party modules which are available for the underlying platform.
Nest在这些常见的Node.js框架(Express / Fastify)之上提供了一个抽象级别,但也直接向开发人员公开了它们的API。 这使开发人员可以自由使用底层平台可用的大量第三方模块。
安装NestJS (Installing NestJS)
To install NestJS we simple use npm and run:
要安装NestJS,我们只需使用npm并运行:
npm i -g @nestjs/cliThis will install Nest in a global way on our machine.
这将以全局方式在我们的计算机上安装Nest。
创建一个新项目 (Create a new project)
To start a new project we simply run:
要开始一个新项目,我们只需运行:
nest new project-nameIt is also possible to install the TypeScript starter project with Git:
也可以使用Git安装TypeScript入门项目:
git clone https://github.com/nestjs/typescript-starter.git project
cd project
npm install
You can also manually create a new project from scratch by installing the core and supporting files with npm (or yarn). In this case, of course, you’ll be responsible for creating the project boilerplate files yourself.
您还可以通过使用npm(或yarn)安装核心和支持文件来从头开始手动创建新项目。 当然,在这种情况下,您将负责自己创建项目样板文件。
npm i --save @nestjs/core @nestjs/common rxjs reflect-metadata入门 (Getting Started)
The project directory will be created, node modules and a few other boilerplate files will be installed, and a src/ directory will be created and populated with several core files.
将创建project目录,安装节点模块和其他一些样板文件,并创建src/目录,并填充几个核心文件。
应用控制器 (App Controller)
Basic controller sample with a single route
单一路径的基本控制器样本
应用模块(App Module)
The root of the application
应用程序的根
主要(Main)
The entry file of the application which uses the core function NestFactory to create a Nest application instance.
使用核心功能NestFactory创建Nest应用程序实例的应用程序的入口文件。
让我们编码 (Let’s Code)
In our example we will start by deleting app.controller.ts and generate a new controller using Nest Cli:
在我们的示例中,我们将首先删除app.controller.ts并使用Nest Cli生成一个新的控制器:
nest g controller itemsThis command will generate src/items/items.controller.ts , our items controller. In order to create endpoints on our controller we use decorators such as @Get, @Post, @Put, @Delete.
此命令将生成src/items/items.controller.ts (我们的项目控制器)。 为了在我们的控制器上创建端点,我们使用装饰器,例如@Get, @Post, @Put, @Delete.
查找所有项目 (Find all items)
Let’s start by creating a simple findAll()method and findById() :
让我们从创建一个简单的findAll()方法和findById() :
import {
Controller,
Get,
Param
} from '@nestjs/common';
@Controller('items')
export class ItemsController {
@Get()
findAll(): string {
return 'All Items';
}
@Get(':id')
findById(@Param() param): string {
return param.id;
}
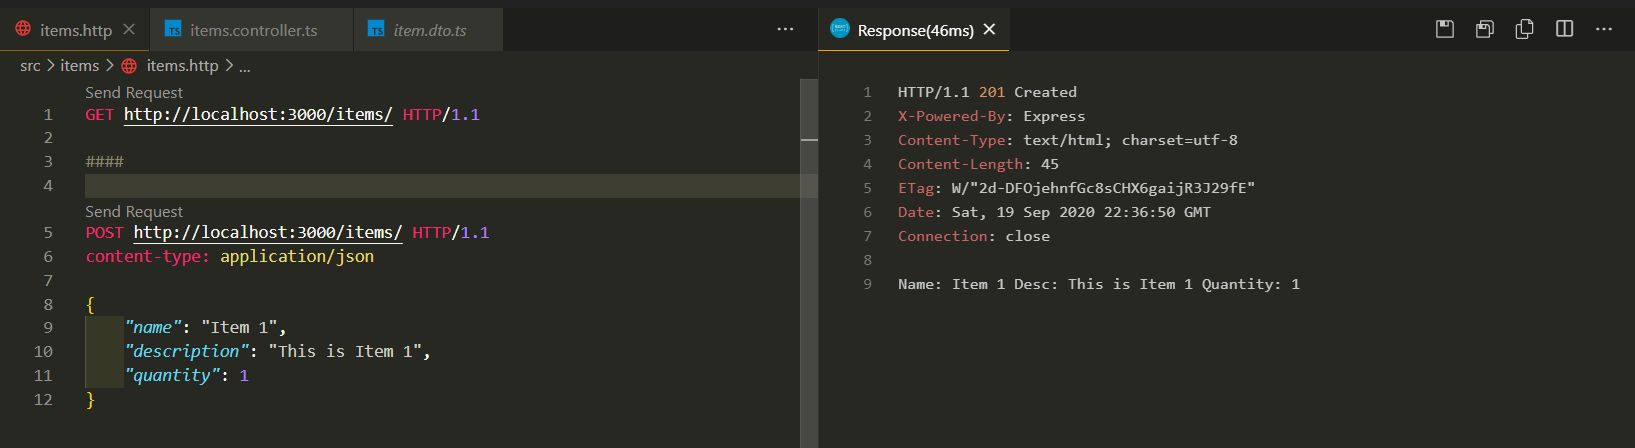
}We will be back to this methods later, we want this endpoint to return real data using an database and not an hardcoded string. Now if test our endpoint we will be able to check the hardcoded return.
稍后我们将回到此方法,我们希望该端点使用数据库而不是硬编码字符串返回真实数据。 现在,如果测试我们的端点,我们将能够检查硬编码的回报。


There are several ways to run our application:
有几种方法可以运行我们的应用程序:
npm start
npm run start:dev
Throughout this article we will use the second option since the server listens for new changes and automatically restarts our application without any interference on our part.
在本文中,我们将使用第二个选项,因为服务器将侦听新的更改并自动重新启动应用程序,而不会造成任何干扰。
创建项目 (Create Items)
The POST request is a bit more complex, to add an item we must create a DTO (Data Transfer Object) class with the fields we want. Let’s create our DTO file into scr/items/dto/item.dto.ts
POST请求稍微复杂一点,要添加项目,我们必须使用所需字段创建DTO(数据传输对象)类。 让我们将DTO文件创建到scr/items/dto/item.dto.ts
export class ItemDTO {
  readonly name: string;
  readonly description: string;
  readonly quantity: number;
}
Now let’s import out DTO into our Controller and start write our POST endpoint:
现在,让我们将DTO导入到Controller中,并开始编写POST端点:
import {
  Body,
  Controller,
  Post,
} from '@nestjs/common';
import { ItemDTO } from './dto/item.dto';
import { ItemsService } from './items.service';
import { Item } from './interfaces/item.interface';


@Controller('items')
export class ItemsController {


  @Post()
  create(@Body() itemDTO: ItemDTO): string {
    return `Name: ${itemDTO.name} Desc: ${itemDTO.description} Quantity: {itemDTO.quantity]`;
  }


}
For now we will just return our input from json body, later we will be back to insert data on MongoDB.
现在,我们只是从json主体返回输入,稍后我们将返回在MongoDB上插入数据。
创建提供者(Create Providers)
As mentioned in NestJS Documentation, “providers are a fundamental concept in Nest. Many of the basic Nest classes may be treated as a provider — services, repositories, factories, helpers, and so on. The main idea of a provider is that it can inject dependencies; this means objects can create various relationships with each other, and the function of “wiring up” instances of objects can largely be delegated to the Nest runtime system. A provider is simply a class annotated with an @Injectable() decorator.”
如NestJS文档中所述,“提供者是Nest中的基本概念。 许多基本的Nest类都可以被视为提供程序-服务,存储库,工厂,帮助程序等。 提供程序的主要思想是它可以注入依赖项。 这意味着对象可以彼此创建各种关系,并且“连接”对象实例的功能可以在很大程度上委派给Nest运行时系统。 提供者只是一个用@Injectable()装饰器注释的类。”
Let’s start by creting a simple Items Service using NestJS scaffold mechanism by typing on the console:
首先,通过在控制台上键入以下内容,使用NestJS支架机制创建一个简单的Items Service:
nest g service itemsOur ItemsService is a basic class with one property and two methods. The only new feature is that it uses the @Injectable() decorator. The @Injectable() decorator attaches metadata, which tells Nest that this class is a Nest provider.
我们的ItemsService是具有一个属性和两个方法的基本类。 唯一的新功能是它使用@Injectable()装饰器。 @Injectable()装饰器附加元数据,该元数据告诉Nest此类是Nest提供程序。
import { Injectable } from '@nestjs/common';
import { Item } from './interfaces/item.interface';


@Injectable()
export class ItemsService {
  private readonly items: Items[] = [];


  create(item: Item) {
    this.items.push(item);
  }


  findAll(): Item[] {
    return this.items;
  }
}
Our service uses a Item interface, we can define our interface in a very simple way:
我们的服务使用Item接口,我们可以通过非常简单的方式定义接口:
export interface Item {
  id?: string;
  name: string;
  description?: string;
  quantity: number;
}将所有内容包装在模块中(Wrap everything in a Module)
Before we go any further this is the ideal time to create a module where we will wrap all the code related to the items. This is very simple to do, we just need to create a file called src/items/items.module.ts
在继续之前,这是创建模块的理想时机,在该模块中,我们将包装与项目相关的所有代码。 这很简单,我们只需要创建一个名为src/items/items.module.ts的文件
import { Module } from '@nestjs/common';
import { ItemsController } from './items.controller';
import { ItemsService } from './items.service';


@Module({
  imports: [],
  controllers: [ItemsController],
  providers: [ItemsService],
})
export class ItemsModule {}
Don’t forget to add the ItemsModule to src/app.module.ts on @Module({imports:[ItemsModule], controllers: [], providers:[]}) .
不要忘记将ItemsModule添加到@Module({imports:[ItemsModule], controllers: [], providers:[]})上的src/app.module.ts 。

部署MongoDB实例 (Deploy MongoDB Instance)
To deploy our MongoDB we will use Docker, although other tools like Mongo can be used.
为了部署我们的MongoDB,我们将使用Docker,尽管可以使用其他工具,例如Mongo。
docker pull mongo
docker run -p 27017:27017 --name mongodb -d mongo
This instance is not password protected and can be accessed directly through localhost.
该实例不受密码保护,可以直接通过localhost访问。
设置猫鼬 (Setup Mongoose)
Nest supports two methods for integrating with the MongoDB database. You can either use the built-in TypeORM module described here, which has a connector for MongoDB, or use Mongoose, the most popular MongoDB object modeling tool. In this chapter we’ll describe the latter, using the dedicated @nestjs/mongoose package.
Nest支持两种与MongoDB数据库集成的方法。 您可以使用此处描述的内置TypeORM模块(该模块具有用于MongoDB的连接器),也可以使用Mongoose (最受欢迎的MongoDB对象建模工具)。 在本章中,我们将使用专用的@nestjs/mongoose包来描述后者。
Start by installing the required dependencies:
首先安装所需的依赖项:
npm install --save @nestjs/mongoose mongoose
npm install --save-dev @types/mongoose
npm install --save @nestjs/config
Once the installation process is complete, we can import the MongooseModule into the root AppModule :
安装过程完成后,我们可以将MongooseModule导入到根AppModule :
import { ItemsModule } from './items/items.module';
import { Module } from '@nestjs/common';
import { MongooseModule } from '@nestjs/mongoose';
import { ConfigModule, ConfigService } from '@nestjs/config';
import configuration from './config/configuration';


@Module({
  imports: [
    ItemsModule,
    ConfigModule.forRoot({
      isGlobal: true,
      load: [configuration],
    }),
    MongooseModule.forRootAsync({
      imports: [ConfigModule],
      useFactory: (configService: ConfigService) => ({
        uri: `${configService.get('database.uri')}`,
      }),
      inject: [ConfigService],
    }),
  ],
  controllers: [],
  providers: [],
})
export class AppModule {}
Since we don’t want to put our hardcoded connection string, we also have to add our Config Service to imports. After that we need to create a .env file on our root. The .env should look like this:
由于我们不想放置我们的硬编码连接字符串,因此我们还必须将Config Service添加到导入中。 之后,我们需要在根目录上创建一个.env文件。 .env应该如下所示:
MONGOURI=mongodb://localhost:27017
PORT=3000
Let’s load a configuration file that loads our environment variables (src/config/configuration.ts):
让我们加载一个配置文件,该文件加载我们的环境变量( src/config/configuration.ts ):
export default () => ({
  port: parseInt(process.env.PORT, 10) || 3000,
  database: {
    uri: process.env.MONGOURI,
  },
});
So we have our connection to the Mongo database configured.
因此,我们已配置到Mongo数据库的连接。
加载端口配置 (Load Port Configuration)
Once we have created a configuration service, we will then load the port we want our application to be listening on. To achieve this we just have to change our src/main.ts file:
创建配置服务后,我们将加载希望应用程序监听的端口。 为此,我们只需要更改src/main.ts文件:
import { ConfigService } from '@nestjs/config';
import { NestFactory } from '@nestjs/core';
import { AppModule } from './app.module';


async function bootstrap() {
  const app = await NestFactory.create(AppModule);
  const configService: ConfigService = app.get(ConfigService);
  await app.listen(configService.get('port'));
}
bootstrap();楷模(Models)
With Mongoose, everything is derived from a Schema. Each schema maps to a MongoDB collection and defines the shape of the documents within that collection. Schemas are used to define Models. Models are responsible for creating and reading documents from the underlying MongoDB database.
对于Mongoose,一切都源自Schema 。 每个模式都映射到MongoDB集合,并定义该集合中文档的形状。 模式用于定义模型。 模型负责从底层MongoDB数据库创建和读取文档。
Schemas can be created with NestJS decorators, or with Mongoose itself manually. Using decorators to create schemas greatly reduces boilerplate and improves overall code readability.
可以使用NestJS装饰器创建模式,也可以手动使用Mongoose自身创建模式。 使用装饰器创建模式可以大大减少样板并提高整体代码的可读性。
Let’s define ItemSchema :
让我们定义ItemSchema :
import { Prop, Schema, SchemaFactory } from '@nestjs/mongoose';
import { Document } from 'mongoose';


@Schema()
export class Item extends Document {
  @Prop({ type: String, required: true })
  name: string;


  @Prop({ type: Number, required: true })
  quantity: number;


  @Prop({ type: String, required: false })
  description: string;
}


export const ItemSchema = SchemaFactory.createForClass(Item);
The @Schema() decorator marks a class as a schema definition. It maps our Item class to a MongoDB collection of the same name, but with an additional “s” at the end - so the final mongo collection name will be items.
@Schema()装饰器将类标记为架构定义。 它将我们的Item类映射到同名的MongoDB集合,但末尾带有一个额外的“ s”-因此最终的mongo集合名称将为items 。
The @Prop() decorator defines a property in the document. For example, in the schema definition above, we defined three properties: name, description , and quantity. The schema types for these properties are automatically inferred thanks to TypeScript metadata (and reflection) capabilities.
@Prop()装饰器在文档中定义一个属性。 例如,在上面的架构定义中,我们定义了三个属性: name , description和quantity 。 借助TypeScript元数据(和反射)功能,可以自动推断这些属性的模式类型。
Now let’s add our Schema to Items Module(src/items/items.module.ts):
现在,将我们的架构添加到Items Module( src/items/items.module.ts ):
import { Module } from '@nestjs/common';
import { MongooseModule } from '@nestjs/mongoose';
import { ItemsController } from './items.controller';
import { ItemsService } from './items.service';
import { ItemSchema } from './schemas/item.schema';


@Module({
  imports: [
    MongooseModule.forFeature([{ name: 'Item', schema: ItemSchema }]),
  ],
  controllers: [ItemsController],
  providers: [ItemsService],
})
export class ItemsModule {}注入模型(Inject Models)
Since we are using Dependency Injection, our service has to inject our models. The injection is done in the constructor as follows:
由于我们使用的是依赖注入,因此我们的服务必须注入我们的模型。 注入是在构造函数中完成的,如下所示:
import { Injectable } from '@nestjs/common';
import { Item } from './schemas/item.schema';
import { Model } from 'mongoose';
import { InjectModel } from '@nestjs/mongoose';
import { ItemDTO } from './dto/item.dto';


@Injectable()
export class ItemsService {
  constructor(@InjectModel('Item') private readonly itemModel: Model<Item>) {}
}使用模型(Using Models)
Now we have to replace everything we have hardcoded with our models using mongoose. In our service once the mongoose returns a promise our type of return will be a promise of items.
现在,我们必须使用猫鼬用模型替换我们已硬编码的所有内容。 在我们的服务中,一旦猫鼬返还承诺,我们的返还类型即为商品承诺。
import { Injectable } from '@nestjs/common';
import { Item } from './schemas/item.schema';
import { Model } from 'mongoose';
import { InjectModel } from '@nestjs/mongoose';
import { ItemDTO } from './dto/item.dto';


@Injectable()
export class ItemsService {
  constructor(@InjectModel('Item') private readonly itemModel: Model<Item>) {}


  async findAll(): Promise<Item[]> {
    return this.itemModel.find().exec();
  }


  async findById(id: string): Promise<Item> {
   return id.match(/^[0-9a-fA-F]{24}$/)
      ? await this.itemModel.findOne({ _id: id })
      : null; if (id.match(/^[0-9a-fA-F]{24}$/)) {
      return await this.itemModel.findOne({ _id: id });
    }
  }

  async create(item: ItemDTO) {
    const newItem = new this.itemModel(item);
    return newItem.save();
  }
}
We also have to update our controller by calling our service now and returning the correct promises. Don’t forget to make the controller asynchronous.
我们还必须通过立即致电我们的服务并返回正确的承诺来更新控制器。 不要忘记使控制器异步。
import {
Body,
Controller,
Get,
Param,
Post
} from '@nestjs/common';
import { ItemDTO } from './dto/item.dto';
import { ItemsService } from './items.service';
import { Item } from './interfaces/item.interface';
@Controller('items')
export class ItemsController {
@Get()
async findAll(): Promise<Item[]> {
return this.itemsService.findAll();
}
@Get(':id')
async findById(@Param() param): Promise<Item> {
return this.itemsService.findById(param.id);
}
@Post()
async create(@Body() itemDTO: ItemDTO): Promise<Item> {
return this.itemsService.create(itemDTO);
}
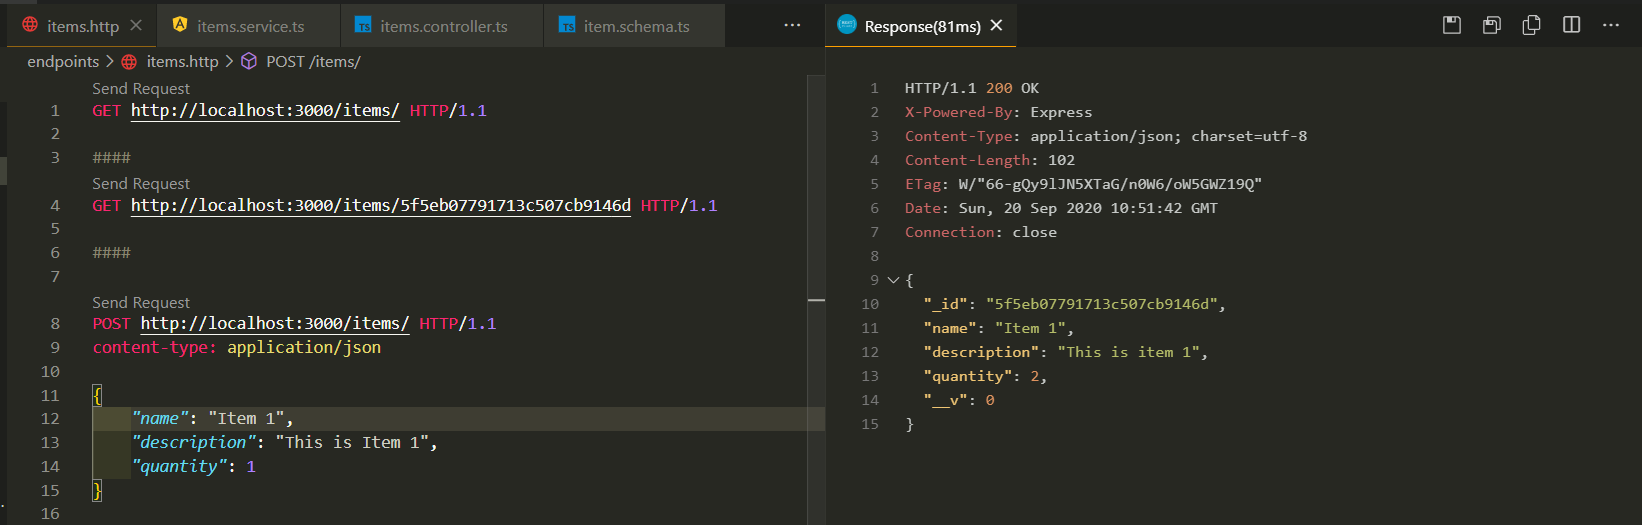
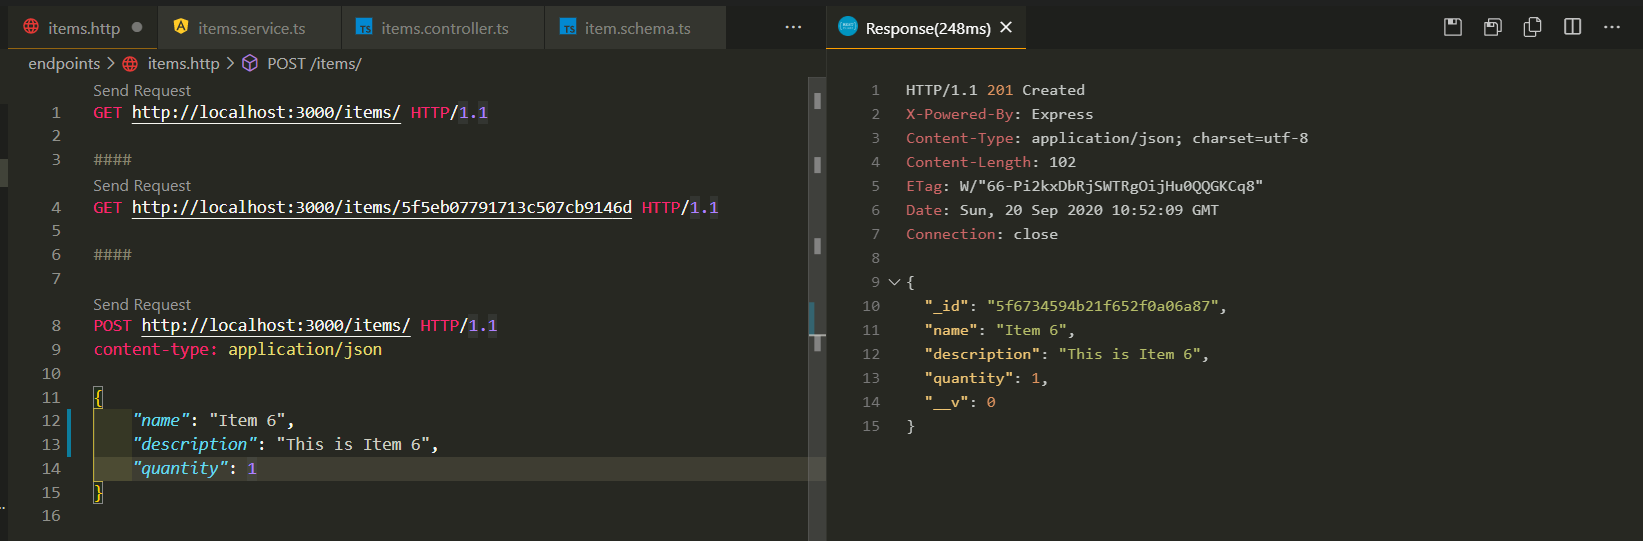
}Now we can test our API and check that everything is working:
现在我们可以测试我们的API并检查一切是否正常:

We can also create methods for deleting and changing information, for that we have to add to our controller:
我们还可以创建删除和更改信息的方法,为此我们必须将其添加到控制器中:
import {
  Body,
  Controller,
  Delete,
  Param,
  Put
} from '@nestjs/common';
import { ItemDTO } from './dto/item.dto';
import { ItemsService } from './items.service';
import { Item } from './interfaces/item.interface';


@Controller('items')
export class ItemsController {


  @Put(':id')
  async update(@Param() param, @Body() itemDTO: ItemDTO): Promise<Item> {
    return this.itemsService.update(param.id, itemDTO);
  }


  @Delete(':id')
  async delete(@Param() param): Promise<Item> {
    return this.itemsService.delete(param.id);
  }
}
In our Items Service we have to add the methods corresponding to these actions:
在我们的项目服务中,我们必须添加与这些操作相对应的方法:
import { Injectable } from '@nestjs/common';
import { Item } from './schemas/item.schema';
import { Model } from 'mongoose';
import { InjectModel } from '@nestjs/mongoose';
import { ItemDTO } from './dto/item.dto';
@Injectable()
export class ItemsService {
constructor(@InjectModel('Item') private readonly itemModel: Model<Item>) {}
async delete(id: string): Promise<Item> {
return this.itemModel.findByIdAndRemove(id);
}
async update(id: string, item: ItemDTO): Promise<Item> {
return await this.itemModel.findByIdAndUpdate(id, item, { new: true });
}
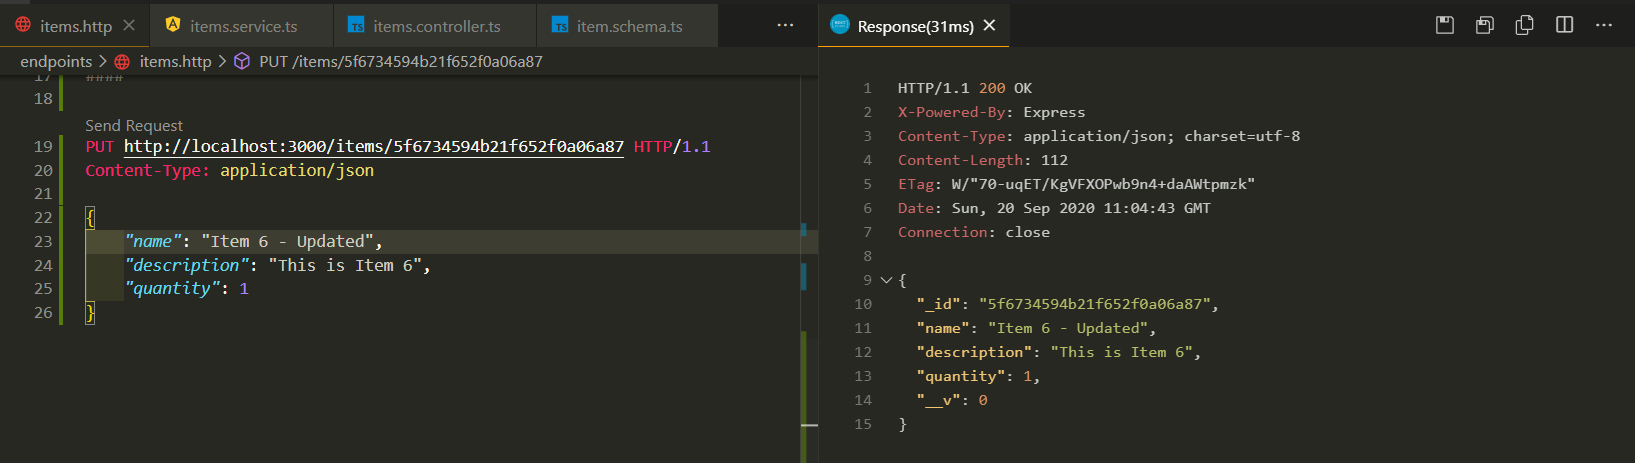
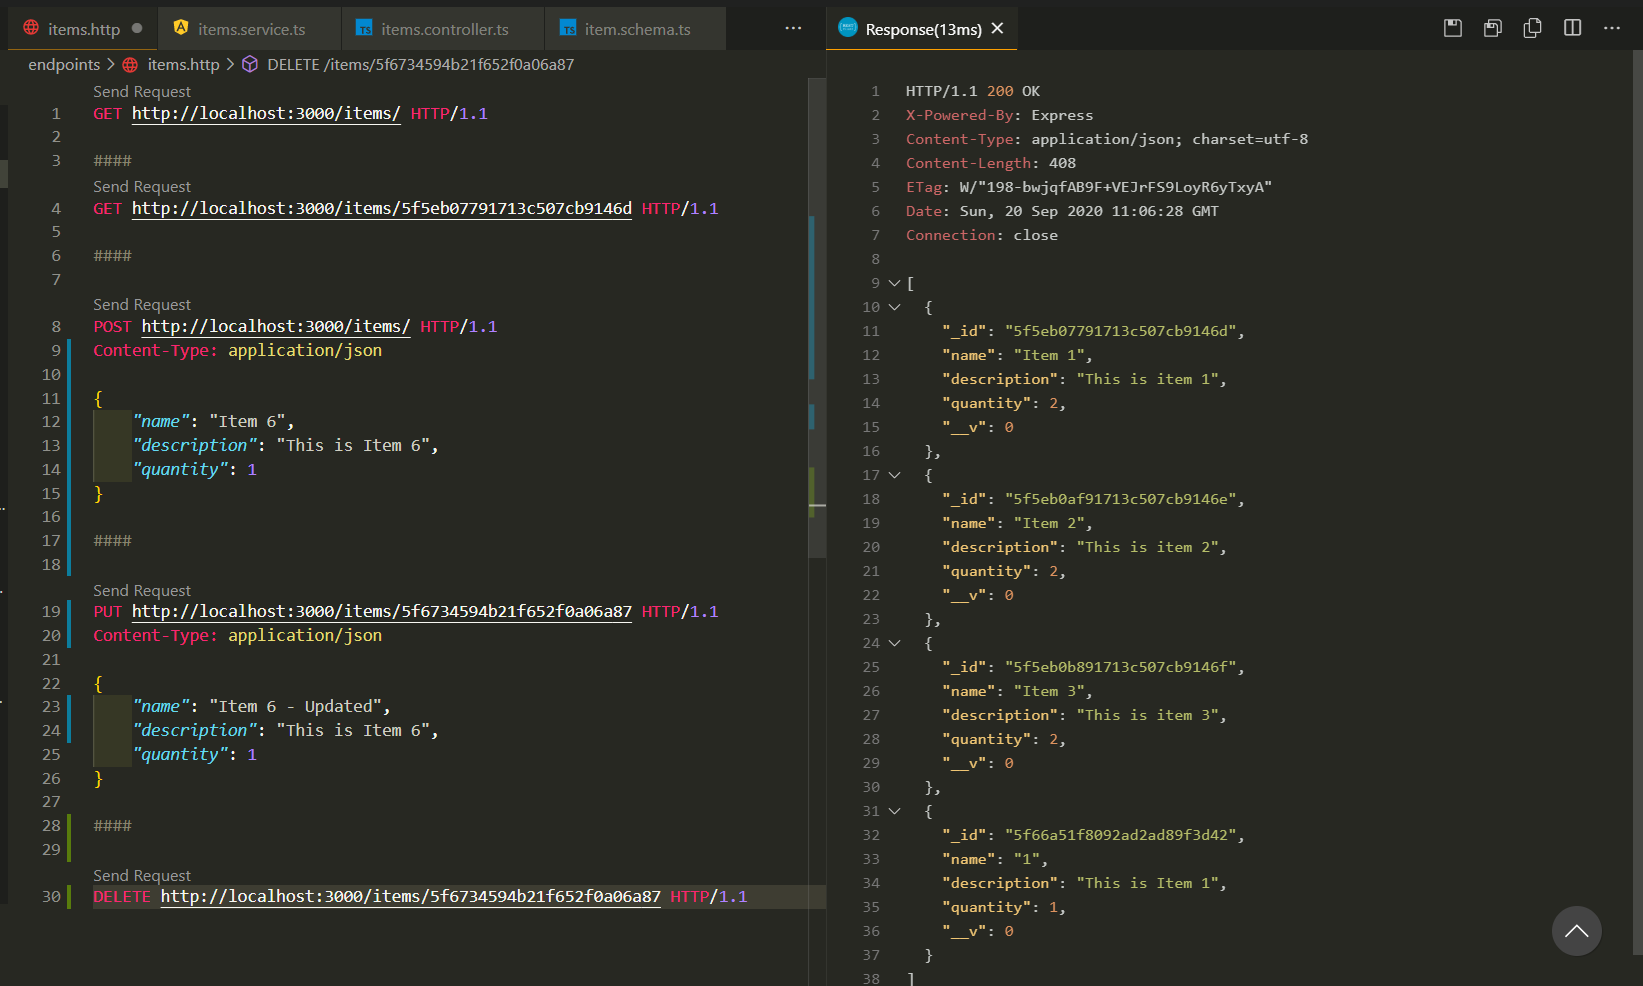
}We can now test our new endpoints:
现在,我们可以测试新的端点了:
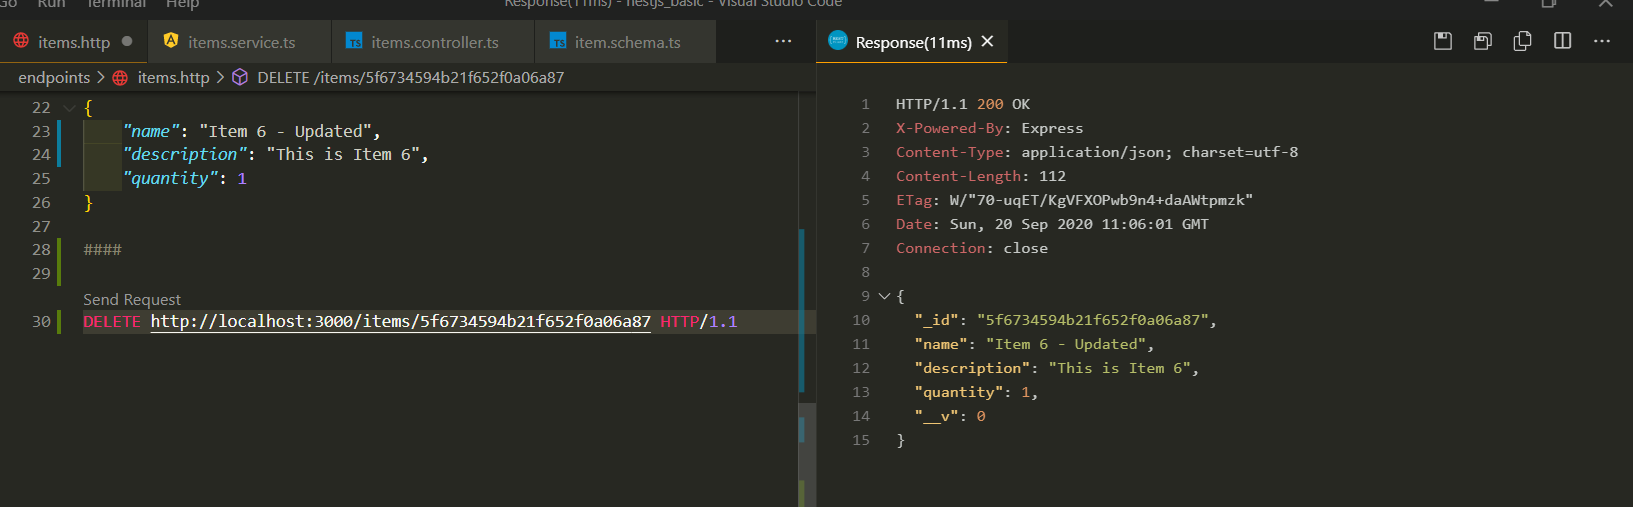
If you are not sure that the item has been deleted we can always invoke the endpoint that returns us the list of all items:
如果您不确定该项目已被删除,我们可以随时调用向我们返回所有项目列表的端点:
记录仪服务(Logger Service)
Nest comes with a built-in text-based logger which is used during application bootstrapping and several other circumstances such as displaying caught exceptions (i.e., system logging). This functionality is provided via the Logger class in the @nestjs/common package. You can find more information in the official documentation.
Nest带有一个内置的基于文本的记录器,该记录器可在应用程序引导和其他几种情况下使用,例如显示捕获的异常(即,系统日志记录)。 该功能通过@nestjs/common包中的Logger类提供。 您可以在官方文档中找到更多信息。
To implement the Logger we will start by creating a service with NestCLI:
为了实现Logger,我们将从使用NestCLI创建服务开始:
nest g service loggerAfter that we just have to add the scope to our logger service and we are finished with this component.
之后,我们只需要将范围添加到我们的记录器服务中就可以完成此组件。
import { Injectable, Scope, Logger } from '@nestjs/common';


@Injectable({ scope: Scope.TRANSIENT })
export class LoggerService extends Logger {}
Transient providers are not shared across consumers. Each consumer that injects a transient provider will receive a new, dedicated instance.
瞬态提供程序不跨消费者共享。 每个注入临时提供程序的使用者都将收到一个新的专用实例。
We wrap everything in a module like we did with our item module:
我们将所有内容包装在模块中,就像处理item模块一样:
import { Module } from '@nestjs/common';
import { LoggerService } from './logger.service';


@Module({
  imports: [],
  controllers: [],
  providers: [LoggerService],
  exports: [LoggerService],
})
export class LoggerModule {}
So we have finished configuring the logger, we now have to add the LoggerModule to our imports in src/app.module.ts , something like @Module({imports:[LoggerModule, ...], controllers:[...], providers:[...]}) . Finally, we just have to add to the modules where we belong to use our logger, in the case of our example we just want to use in the endpoints related to the items:
至此,我们完成了记录器的配置,现在我们必须将LoggerModule添加到src/app.module.ts导入中,类似于@Module({imports:[LoggerModule, ...], controllers:[...], providers:[...]}) 。 最后,我们只需要在使用记录器的模块中添加属于我们的模块,就我们的示例而言,我们只想在与项目相关的端点中使用:
@Module({
  imports: [
    MongooseModule.forFeature([{ name: 'Item', schema: ItemSchema }]),
    LoggerModule,
  ],
  controllers: [ItemsController],
  providers: [ItemsService, LoggerService],
})
export class ItemsModule {}
In order to be able to use the logger, we have to use dependency injection as in our Item Service:
为了能够使用记录器,我们必须像在Item Service中那样使用依赖项注入:
import {
Controller,
Get
} from '@nestjs/common';
import { ItemDTO } from './dto/item.dto';
import { ItemsService } from './items.service';
import { Item } from './interfaces/item.interface';
import { LoggerService } from 'src/logger/logger.service';
@Controller('items')
export class ItemsController {
constructor(
private readonly itemsService: ItemsService,
private logger: LoggerService,
) {}
@Get()
async findAll(): Promise<Item[]> {
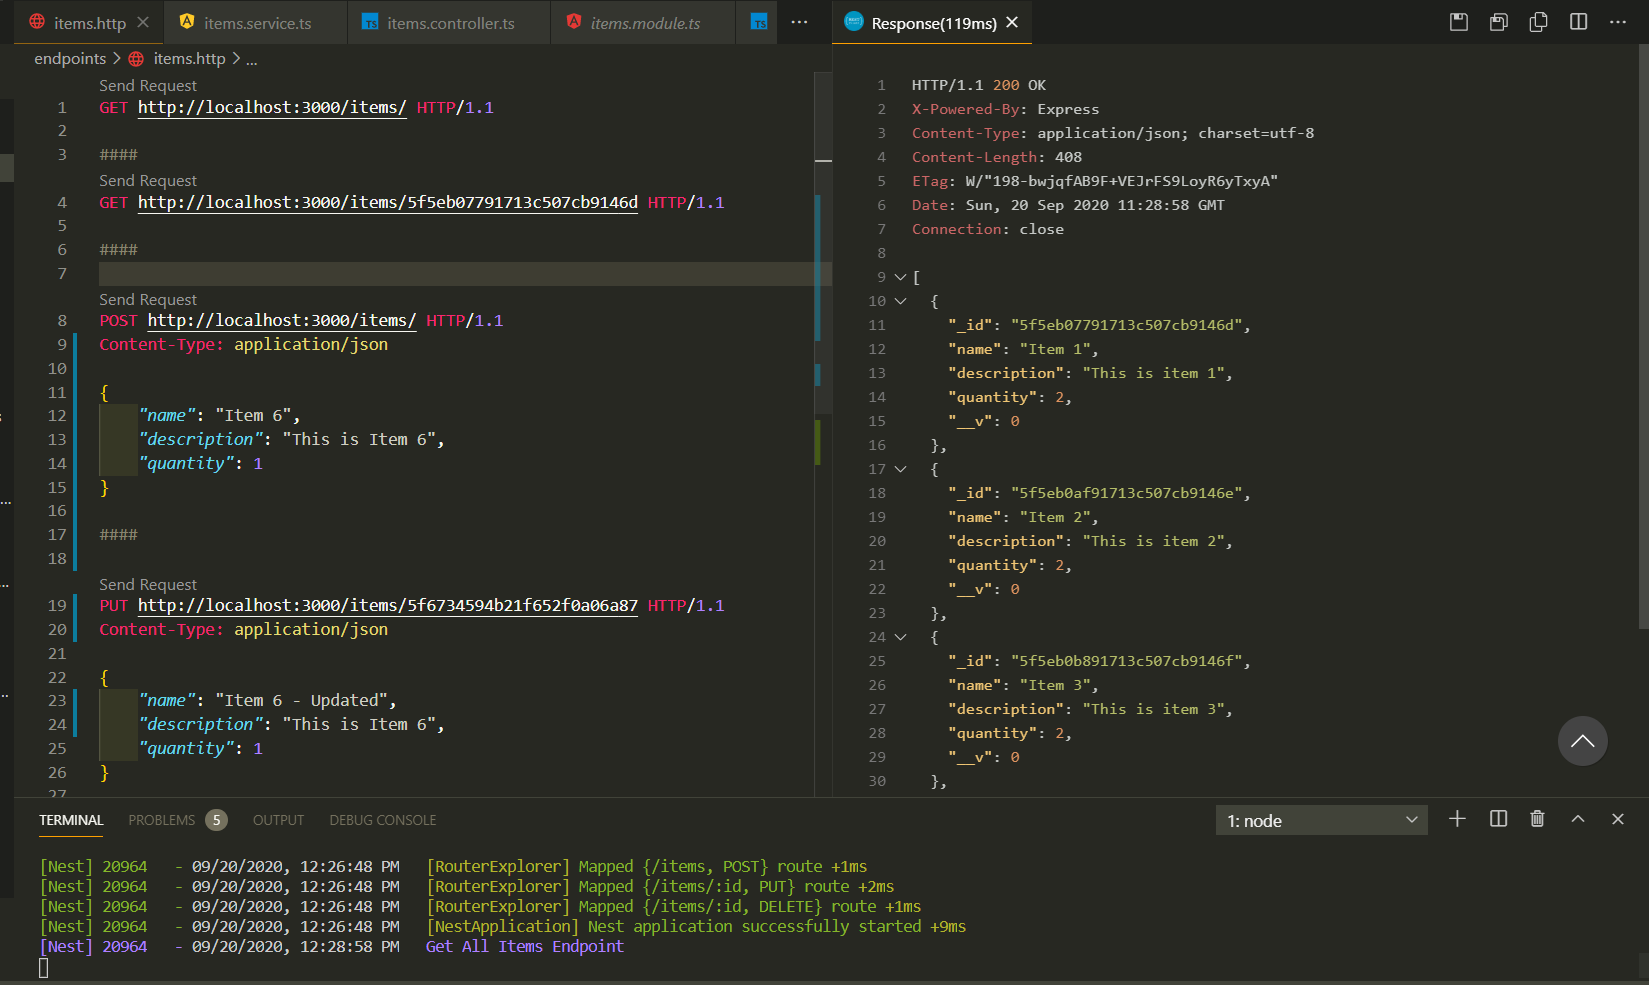
this.logger.debug('Get All Items Endpoint');
return this.itemsService.findAll();
}
}We can now test and verify that everything is working:
现在,我们可以测试并验证一切正常:
And so we arrived at the basic functioning of a REST API using NestJS.
因此,我们使用NestJS来了解REST API的基本功能。
结论 (Conclusions)
NestJS is a good working tool that allows us to use concepts like Dependency Injection on ExpressJS without having to install directly from other frameworks like InversifyJS.The development using this framework is simple and intuitive and, in addition, its documentation is very well defined and allows easy learning.
NestJS是一个很好的工作工具,它使我们可以在ExpressJS上使用诸如依赖注入之类的概念,而不必直接从InversifyJS之类的其他框架中进行安装。使用此框架进行的开发非常简单直观,此外,其文档定义得非常好并且允许容易学习。
源代码 (Source Code)
The code for the entire project is available on my github.
整个项目的代码可在我的github上找到。
翻译自: https://medium.com/@mrrmoc/build-a-rest-api-from-scratch-using-nestjs-37bfcf81cc5f


 548
548

 被折叠的 条评论
为什么被折叠?
被折叠的 条评论
为什么被折叠?
 到【灌水乐园】发言


