


django react
介绍 (Introduction)
Have you ever wanted to create an app in which the users would have to pay some one-time fees and periodic subscriptions as well? On the one hand, you would like to keep as much information as needed to have control over your customers and their payments but, on the other, credit cards data are really sensitive and storing them in your database would be very risky.
您是否曾经想过创建一个用户必须支付一些一次性费用和定期订阅的应用程序? 一方面,您希望保留尽可能多的信息以控制您的客户及其付款,但另一方面,信用卡数据确实很敏感,因此将其存储在数据库中会带来很大的风险。
Fortunately, there is a very interesting solution. Integrating your app with Stripe will save your time and provide really clean and safe payments process. With its extensive API you will be able to implement any type of money transaction you can imagine and, moreover, all sensitive data will be secure in Stripe cloud.
幸运的是,有一个非常有趣的解决方案。 将您的应用程序与Stripe集成将节省您的时间,并提供真正干净安全的付款流程。 凭借其广泛的API,您将能够实现您可以想象的任何类型的货币交易,此外,所有敏感数据将在Stripe云中是安全的。
我们的目标 (Our goal)
For purpose of this article, we will create a simple app using Django Rest Framework for our API backend and ReactJS for frontend side.
出于本文的目的,我们将使用Django Rest Framework作为API后端,并使用ReactJS作为前端来创建一个简单的应用程序。
Main flow of our app:
我们的应用程序的主要流程 :
- The user provides his email and credit/debit card data. 用户提供他的电子邮件和信用卡/借记卡数据。
- We create a new Stripe customer based on the data the user provided. 我们根据用户提供的数据创建一个新的Stripe客户。
- The user will be charged with one-time fee for creating an account. 将向用户收取创建帐户的一次性费用。
- The user will be also signed up for the monthly subscription to keep his account active. 用户还将注册每月订阅,以保持其帐户处于活动状态。
Seems quite simple, isn’t it? So let’s start!
看起来很简单,不是吗? 因此,让我们开始吧!

设置Django API (Set up Django API)
Assume we have already created Django project called StripeApp with Django Rest Framework library installed.
假设我们已经创建了安装了Django Rest Framework库的名为StripeApp的Django项目。
Let’s create new app in our
StripeAppproject root:让我们在
StripeApp项目根目录中 创建新应用程序 :
python manage.py startapp paymentsOur project structure should look like that (make sure you have the files with bolded names, create missing ones if needed):
我们的项目结构应如下所示(确保您的文件具有加粗名称,并在需要时创建丢失的文件):
- StripeApp/
  - payments
    - migrations/
    - __init.py__
    - admin.py
    - apps.py
    - models.py
    - tests.py
    - urls.py
    - views.py
  - stripeapp/
    - __init.py__- settings.py
    - urls.py
Install Stripe library
安装Stripe库
pip install --upgrade stripeSign up to Stripe Dashboard and get your test keys. Create your Stripe Account and get your test keys (Publishable and Secret) from Dashboard.
注册Stripe Dashboard并获取测试密钥。 创建您的Stripe帐户 ,并从Dashboard获取测试密钥(可发布和秘密)。
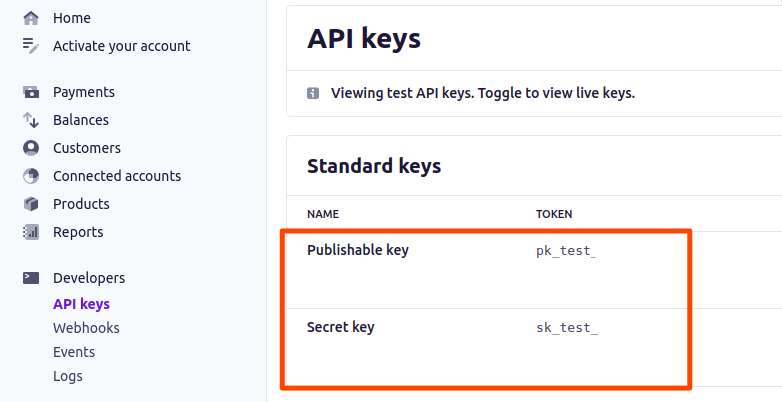
Copy your secret key to Django project.
将您的密钥复制到Django项目。
# payments/views.pystripe.api_key = ‘sk_test_’ # your real key will be much longerMake test request to Stripe APICreate a simple view making Stripe payment to check if your key is valid:
向Stripe API发出测试请求创建一个进行Stripe付款的简单视图,以检查您的密钥是否有效:
NOTE: Right now just copy the code and don’t try to understand what’s going on in this function. Everything will be explained a bit later ;)
注意 :现在只复制代码,不要试图了解此函数的功能。 一切将在稍后解释;)
# payments/views.py@api_view(['POST'])
def test_payment(request):test_payment_intent = stripe.PaymentIntent.create(amount=1000, currency='pln', payment_method_types=['card'],receipt_email='test@example.com')return Response(status=status.HTTP_200_OK, data=test_payment_intent)
Connect the view with url in payments/urls.py:
将视图与payments/urls.py: url连接起来payments/urls.py:
# payments/urls.pyfrom django.conf.urls import url
from payments import viewsurlpatterns = [
    url(r'^test-payment/$', views.test_payment),
]
And define payments url prefix in stripeapp/urls.py:
并在stripeapp/urls.py:定义payments网址前缀stripeapp/urls.py:
# stripeapp/urls.pyurlpatterns = [
    path('admin/', admin.site.urls),    # add this line    path('payments/', include('payments.urls'))
]
Send new request (http://localhost:8000/payments/test-payment) using Postman. If you will get a JSON object similar to the one below, it means you have just successfully sent your first request to Stripe :)
使用Postman发送新请求( http://localhost:8000/payments/test-payment )。 如果您将获得与以下对象相似的JSON对象,则意味着您已成功将第一个请求发送到Stripe :)
{
  "id": "pi_123", #you will have a unique id every time
  "object": "payment_intent",
  "amount": 1000,
  "amount_capturable": 0,
  "amount_received": 0,
  "application": null,
  "application_fee_amount": null,
...
}
设置前端项目 (Set up frontend project)
Assume we have already created ReactJS project called StripeAppFront.
假设我们已经创建了名为StripeAppFront的ReactJS项目。
Install ReactStripeJs
安装ReactStripeJs
npm install @stripe/react-stripe-js @stripe/stripe-jsCreate CheckoutFormCreate a new React component that will be displaying form like that:
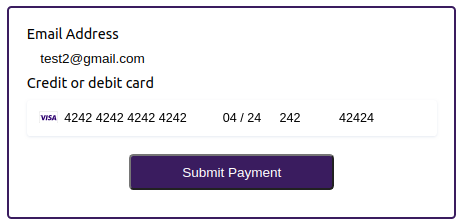
创建CheckoutForm创建一个新的React组件,该组件将显示如下形式:
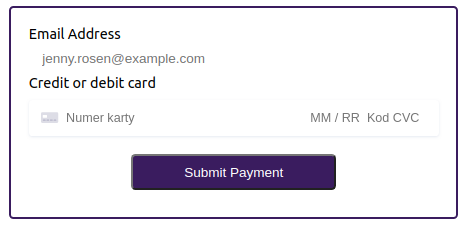
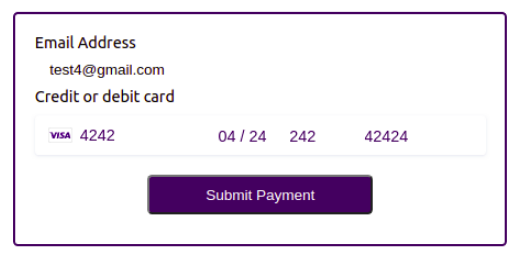
We want the user to provide his email and credit/debit card data. Although an email will be send to our API, the sensitive card’s data will be processed by Stripe’s CardElement, so that we won’t store them anywhere insecurely. According to Stripe documentation:
我们希望用户提供他的电子邮件和信用卡/借记卡数据。 尽管将电子邮件发送到我们的API,但是敏感数据卡的数据将由Stripe的CardElement ,因此我们不会将它们存储在不安全的地方。 根据Stripe 文档 :
“Stripe Elements make collecting payment details more secure and help prevent malicious actors from stealing any sensitive information. We generate a secure iframe and isolate sensitive information from your site — eliminating entire classes of attacks — while still giving you full visual control.”
“条带元素使收集付款细节更加安全,并有助于防止恶意行为者窃取任何敏感信息。 我们会生成安全的iframe,并从您的网站中隔离敏感信息,从而消除了所有类型的攻击,同时仍为您提供完全的视觉控制。
So let’s write some code:
因此,让我们编写一些代码:
In App.js load you Stripe’s Publishable Key and import Elements.
在App.js加载Stripe的Publishable Key并导入Elements。
// App.js
import React from 'react';
import './App.css';
import {Elements} from '@stripe/react-stripe-js';
import {loadStripe} from "@stripe/stripe-js/pure";
import CheckoutForm from "./components/CheckoutForm";const stripePromise = loadStripe('pk_test_');const App = () => (
  <Elements stripe={stripePromise}>
    <CheckoutForm />
  </Elements>
);export default App;
Create a new folder calledcomponents and inside it create fileCheckoutForm.js . It will be the most important component in the frontend project.
创建一个名为components的新文件夹,并在其中创建文件CheckoutForm.js 。 这将是前端项目中最重要的组件。
# components/CheckoutForm.jsimport {CardElement, useElements, useStripe} from "@stripe/react-stripe-js";
import React, {useState} from "react";
import ApiService from "../api";const CheckoutForm = () => {
  const [error, setError] = useState(null);
  const [email, setEmail] = useState('');
  const stripe = useStripe();
  const elements = useElements();// Handle real-time validation errors from the CardElement.const handleChange = (event) => {
  if (event.error) {
    setError(event.error.message);
  } else {
    setError(null);
  }
}// Handle form submission.const handleSubmit = async (event) => {event.preventDefault();
};
return (
  <form onSubmit={handleSubmit} className="stripe-form">
    <div className="form-row">
      <label htmlFor="email">Email Address</label>
      <input className="form-input" id="email" name="name"    type="email" placeholder="jenny.rosen@example.com" required
value={email} onChange={(event) => { setEmail(event.target.value)}} />
    </div>
    <div className="form-row">
      <label for="card-element">Credit or debit card</label>
      <CardElement id="card-element" onChange={handleChange}/>
      <div className="card-errors" role="alert">{error}</div>
    </div>
    <button type="submit" className="submit-btn">
      Submit Payment
    </button>
  </form>
 );
};export default CheckoutForm;
Create PaymentMethodNext we will use Stripe API to create the
PaymentMethodobject and send its id to our API. Once again let’s take a quick look to Stripe documentation and check the definition ofPaymentMethod:创建PaymentMethod接下来,我们将使用Stripe API创建
PaymentMethod对象,并将其ID发送给我们的API。 再次让我们快速浏览Stripe文档并检查PaymentMethod:的定义PaymentMethod:
“PaymentMethod objects represent your customer’s payment instruments. They can be used with PaymentIntents to collect payments or saved to Customer objects to store instrument details for future payments.”
“ PaymentMethod对象代表您客户的付款方式。 它们可以与PaymentIntents一起使用以收集付款,也可以将其保存到Customer对象以存储工具详细信息以备将来付款。”
It means that PaymentMethod stores user’s card data to use them in payments transactions.
这意味着PaymentMethod存储用户的卡数据以在支付交易中使用它们。
So let’s add a few lines to handleSubmit method:
因此,让我们在handleSubmit方法中添加几行:
const handleSubmit = async (event) => {event.preventDefault();
  const card = elements.getElement(CardElement);
 // add these lines  const {paymentMethod, error} = await stripe.createPaymentMethod({
     type: 'card',
     card: card
});
}NOTE: You can check in the documentation what different types of
PaymentMethodStripe offers.
We also addedconsole.log operation to check how the PaymentMethod object really looks like. So open your page (http://localhost:3000) and pass test data to the form.
我们还添加了console.log操作,以检查PaymentMethod对象的真实外观。 因此,打开您的页面( http://localhost:3000)并将测试数据传递给表单。
NOTE: As a card number you can use one of the testing cards provided by Stripe, (e.g. 4242 4242 4242 4242). Cvc and zip code can be any numbers and expiration date can be any future date.
注意:作为卡号,您可以使用Stripe提供的测试卡之一(例如4242 4242 4242 4242)。 Cvc和邮政编码可以是任何数字,并且到期日期可以是任何将来的日期。
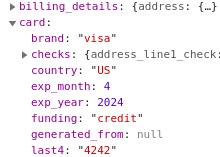
Hit the Submit Paymentbutton and take a look into the browser console. You can see an object containing quite a lot of data, but the most important is the card property (shown on the image below). We can see it doesn’t store the full card number, only the last 4 numbers. Now we are sure that nobody will be able to capture user’s card details.
点击“ Submit Payment按钮,然后浏览浏览器控制台。 您可以看到一个包含大量数据的对象,但最重要的是card属性(如下图所示)。 我们可以看到它不存储完整的卡号,仅存储最后4个数字。 现在,我们确定没有人能够捕获用户的卡详细信息。
Send PaymentMethod.id to Django API
发送PaymentMethod.id到Django API
Firstly, install axios package to handle sending requests on frontend side.
首先,安装axios软件包以处理前端的发送请求。
npm install axios --saveThen in the project root create file api.jsand createApiService class. Inside the newly created class define static method saveStripeInfosending POST request to our API (we will handle this request in a while):
然后在项目根目录中创建文件api.js并创建ApiService类。 在新创建的类中,定义将POST请求发送到我们的API的静态方法saveStripeInfo (我们将在一段时间内处理此请求):
// api.jsimport axios from "axios";
export const API_URL ='http://localhost:8000'export const api = axios.create({
  baseURL: API_URL,
  headers: {
    "Content-type": "application/json"
  }
});export default class ApiService{
  static saveStripeInfo(data={}){
    return api.post(`${API_URL}/payments/save-stripe-info/`, data)
  }
}
Finally, call the method in CheckoutForm component:
最后,调用CheckoutForm组件中的方法:
// CheckoutForm.jsconst handleSubmit = async (event) => {[...]const {paymentMethod, error} = await stripe.createPaymentMethod({
    type: 'card',
    card: card
  });  //add these lines  ApiService.saveStripeInfo({
    email, payment_method_id: paymentMethod.id})
  .then(response => {
    console.log(response.data);
  }).catch(error => {
    console.log(error)
  })  };}
实现与Stripe连接的API请求 (Implement API request connecting with Stripe)
Now it’s time to create API view that will reach our main goals. In this view we’re going to create a new Stripe Customer, then charge his card with one-time fee (PaymentIntent) and set up his monthly subscription (Subscription). Before we start coding, let’s take a look into Stripe documentation and read about mentioned objects.
现在该创建可以实现我们主要目标的API视图了。 在这种视图下,我们将创建一个新的Stripe Customer ,然后向他的卡收取一次性费用( PaymentIntent )并设置他的每月订阅( Subscription )。 在开始编码之前,让我们看一下Stripe文档并阅读所提到的对象。
“
Customerobjects allow you to perform recurring charges, and to track multiple charges, that are associated with the same customer.”“
Customer对象使您可以执行与同一客户相关的经常性费用并跟踪多个费用。”“A
PaymentIntentguides you through the process of collecting a payment from your customer. We recommend that you create exactly one PaymentIntent for each order or customer session in your system.”“
PaymentIntent指导您完成从客户收取款项的过程。 我们建议您为系统中的每个订单或客户会话都完全创建一个PaymentIntent。”“
Subscriptionsallow you to charge a customer on a recurring basis.”“通过
Subscriptions您可以重复向客户收费。”
Ok, now we know much more, aren’t we? So let’s code it…
好吧,现在我们知道更多了,不是吗? 所以让我们编码吧…
Create Customer
建立客户
In payments/views.py create new method save_stripe_info. We will pass email and payment_method_id to Stripe, so that the user will be linked with the provided card data.
在payments/views.py创建新方法save_stripe_info. 我们会将email和payment_method_id传递给Stripe,以便将用户与提供的卡数据链接。
def save_stripe_info(request):
    data = request.data
    email = data['email']
    payment_method_id = data['payment_method_id']# creating customercustomer = stripe.Customer.create(email=email, payment_method=payment_method_id)
    return Response(status=status.HTTP_200_OK, data={
        'message': 'Success',
        'data': {'customer_id': customer.id}
    )
And add it to payments/urls.py:
并将其添加到payments/urls.py:
urlpatterns = [
    url(r'^test-payment/$', views.test_payment),    url(r'^save-stripe-info/$', views.save_stripe_info),
Now you can refresh our webpage and test it. Open you browser console, fill the form with test@gmail.com email and any test card number and submit it.
现在,您可以刷新我们的网页并进行测试。 打开浏览器控制台,在表单中填写test@gmail.com电子邮件和任何测试卡号,然后提交。
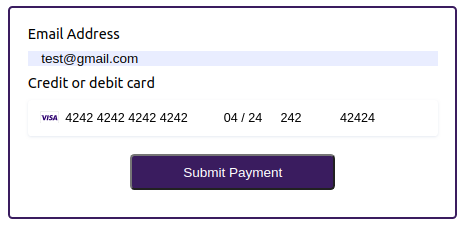
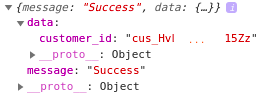
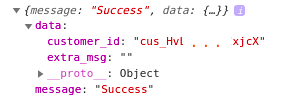
In the console you should seeSuccess status message along with the newly created customer id.
在控制台中,您应该看到Success状态消息以及新创建的客户ID。
Let’s check something else. Log into your Stripe Dashboard and open Customers tab. Here you can see new customer with an email we provided in the form. If you click on it and open CustomerDetails, you will see the same id that was printed in the console.
让我们检查一下其他内容。 登录您的Stripe仪表板并打开客户 标签。 在这里,您可以通过表格中提供的电子邮件看到新客户。 如果单击它并打开CustomerDetails ,您将看到与控制台中打印的ID相同的ID。


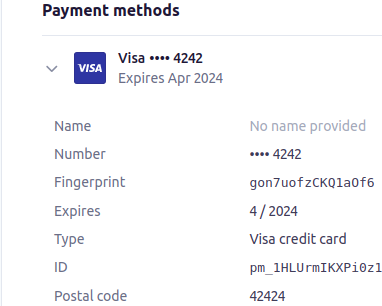
If you scroll down the CustomerDetails page, you will find out that his PaymentMethods contain card data provided in the form.
如果向下滚动到CustomerDetails页面,您将发现他的PaymentMethods包含表格中提供的卡数据。
It means we’ve just created our first Stripe Customer :)
这意味着我们刚刚创建了第一个Stripe客户:)
Check if Customer already exists
检查客户是否已经存在
Ok, let’s slightly recap our app flow. The user is passing their email and credit card data and, based on it, we are creating new Stripe Customer. In a moment we will charge him but what if the same person would fill the form for the second time? We definitely don’t want to have duplicated accounts in Stripe, so we need to validate if provided email hasn’t already been used.
好的,让我们简要回顾一下我们的应用程序流程。 用户正在传递其电子邮件和信用卡数据,并基于此数据创建新的Stripe客户。 稍后我们将向他收费,但是如果同一个人第二次填写该表格怎么办? 我们绝对不希望在Stripe中有重复的帐户,因此我们需要验证是否尚未使用提供的电子邮件。
Stripe API shares a method list that is listing our customers. With an email parameter we can fetch a filtered list and check if the email hasn’t been already linked to other customer. Let’s check it out:
Stripe API共享一个列出我们的客户的方法list 。 使用email参数,我们可以获取过滤列表,并检查电子邮件是否尚未链接到其他客户。 让我们来看看:
# payments/views.py@api_view(['POST'])
def save_stripe_info(request):
  data = request.data
  email = data['email']
  payment_method_id = data['payment_method_id']  extra_msg = '' # add new variable to response message  # checking if customer with provided email already exists  customer_data = stripe.Customer.list(email=email).data
  # if the array is empty it means the email has not been used yet    if len(customer_data) == 0:    # creating customercustomer = stripe.Customer.create(email=email, payment_method=payment_method_id)  else:
    customer = customer_data[0]
    extra_msg = "Customer already existed."  return Response(status=status.HTTP_200_OK, data={'message': 'Success', 'data': {
      'customer_id': customer.id, 'extra_msg': extra_msg}
   })
We’ve just added fetching list of users with provided email and checking if returned array is empty or not. In the first case it means no user has been found and we can create a new one. In the second case we are taking the first element of the array and returning it as our existing customer.
我们刚刚添加了提供的电子邮件来获取用户列表,并检查返回的数组是否为空。 在第一种情况下,这意味着找不到用户,我们可以创建一个新用户。 在第二种情况下,我们将数组的第一个元素作为现有客户返回。
NOTE: Of course the array returned from
stripe.Customer.listmay have more than 1 element but for purpose of this article we assume that customers emails must be unique.注意 :当然,从
stripe.Customer.list返回的数组可能具有多个元素,但是出于本文的目的,我们假设客户的电子邮件必须唯一。
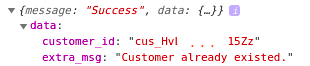
Let’s quickly check the current code. Refresh the browser and send the same email again. You should see in the console that response contains extra_msg key and the customer_id is the same as the previous one. Stripe Dashboard also hasn’t change and there’s still only one customer.
让我们快速检查一下当前代码。 刷新浏览器,然后再次发送相同的电子邮件。 您应该在控制台中看到响应包含extra_msg键,而customer_id与上一个相同。 Stripe仪表板也没有变化,仍然只有一个客户。
Let’s run one more test and send data with an email test2@gmail.com.
让我们再运行一个测试,并通过电子邮件test2@gmail.com.发送数据test2@gmail.com.
What happened this time?
这次发生了什么事?
The console showed us different customer_id and empty extra_msg. Now in Stripe Dashboard we can see a new customer with test2@gmail.com email address.
控制台向我们显示了不同的customer_id和空的extra_msg 。 现在,在Stripe Dashboard中,我们可以看到具有test2@gmail.com电子邮件地址的新客户。

Our validation is working!
我们的验证有效!
NOTE: Normally you should somehow handle emails validation and show users some message or do anything else to keep the flow of your app. But in our case we won’t focus on it and all the operations will be just applied to existing or newly created customers.
注意:通常,您应该以某种方式处理电子邮件验证,并向用户显示一些消息或执行其他任何操作以保持应用程序的正常运行。 但是在我们的案例中,我们将不专注于此,并且所有操作都将仅应用于现有或新创建的客户。
Create PaymentIntent — charge Customer with one-time fee
创建PaymentIntent —向客户收取一次性费用
Let’s achieve our third goal and charge the customer with one-time fee. As it was mentioned before, we will use PaymentIntentobject for that.
让我们实现我们的第三个目标,并向客户收取一次性费用。 如前所述,我们将PaymentIntent使用PaymentIntent对象。
# payments/views.py@api_view(['POST'])
def save_stripe_info(request):  [...]
  else:
    customer = customer_data[0]
    extra_msg = "Customer already existed."  # add these linesstripe.PaymentIntent.create(
    customer=customer,
    payment_method=payment_method_id,
    currency='pln', # you can provide any currency you want
    amount=999)     # it equals 9.99 PLN
We passed to stripe.PaymentIntent.create method our customerobject, payment_method_id, currency and amount of the fee. Let’s send the form again and check what will happen in Stripe Dashboard. When you open Payments tab you should see something like that:
我们将customer对象, payment_method_id, currency和费用amount传递给stripe.PaymentIntent.create方法。 让我们再次发送表单,并检查Stripe Dashboard中将发生的情况。 当您打开“ 付款”标签时,您应该会看到以下内容:

It looks like the payment has been created but not completed. What happened? Let’s open the Payment Details and scroll down to see Events and logs.
似乎付款已创建但尚未完成。 发生了什么? 让我们打开“付款明细”并向下滚动以查看事件和日志。
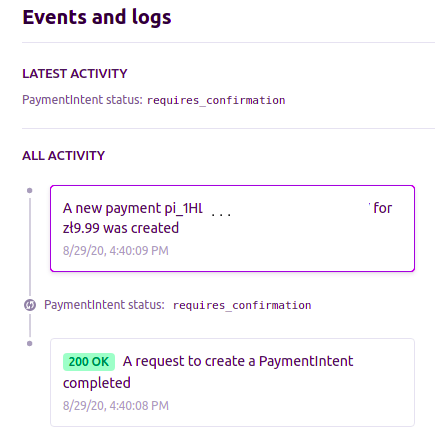
It seems like the payment requires confirmation. Let’s get back to documentation and read once again about creating PaymentIntents:
这笔款项似乎需要确认。 让我们回到文档中并再次阅读有关创建PaymentIntents :
“After the PaymentIntent is created, attach a payment method and confirm to continue the payment. (…) When
confirm=trueis used during creation, it is equivalent to creating and confirming the PaymentIntent in the same call (...) This parameter defaults tofalse.”“创建PaymentIntent后,请附上付款方式并确认继续付款。 (…)在创建过程中使用
confirm=true时,等效于在同一调用中创建并确认PaymentIntent(...),此参数默认为false。”
It means that we have 2 possibilities: (1) call method stripe.PaymentIntent.confirm to confirm the payment or (2) set parameter confirm=True in the stripe.PaymentIntent.create method. Let’s choose the second option and modify our code a little bit:
这意味着我们有两种可能性:(1)调用方法stripe.PaymentIntent.confirm确认付款,或(2)在stripe.PaymentIntent.create方法中设置参数stripe.PaymentIntent.create confirm=True 。 让我们选择第二个选项并稍微修改一下代码:
# payments/views.pystripe.PaymentIntent.create(customer=customer, payment_method=payment_method_id,  currency='pln', # you can provide any currency you wantamount=1500, # I modified amount to distinguish payments
    confirm=True)
Send the form once again and refresh Stripe Dashboard. You should see a new payment with Succeeded status:
再次发送表单并刷新Stripe Dashboard。 您应该会看到状态为成功的新付款:
And what about logs?
那日志呢?
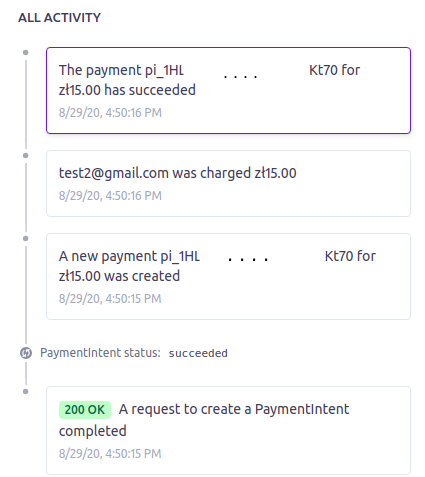
Everything worked fine. The payment has been created and confirmed at one go. We’ve just accomplished out third goal. :)
一切正常。 付款已创建并一次性确认。 我们刚刚完成了第三个目标。 :)
创建订阅 (Create Subscription)
Finally, we can set up our user’s subscription. According to Stripe documentation Subscription needs to be linked with a Price object, and the Price is usually assigned to some Product. To explain it better, let’s imagine different types of cinema tickets: regular, half-price and free one. In this case our Product would be the Ticket object with three different Prices, just take a look at the the image below:
最后,我们可以设置用户的订阅。 根据Stripe文档,需要将“订购”与“价格”对象链接,并且通常将“价格”分配给某些产品。 为了更好地解释它,让我们想象一下不同类型的电影票:普通票,半价票和免费票。 在这种情况下,我们的产品就是票 具有三个不同Price的对象,请看下面的图片:

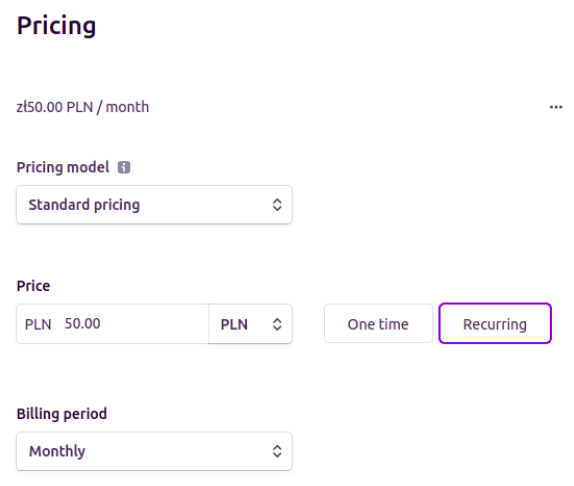
In our project we will just create a Product called “Monthly Subscription” for our app with a Price 50.00 PLN payed monthly.
在我们的项目,我们将只创建一个名为“包月制”为我们的应用程序与价格50.00 PLN 每月所许的产品。
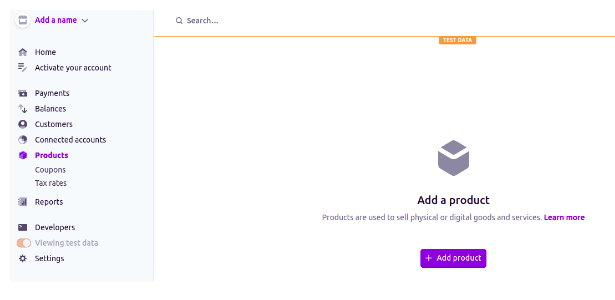
Stripe shares API requests to create all mentioned objects in code. But there’s also another option, much more faster and easier: using Dashboard. So let’s open Products tab and click Add Product button.
Stripe共享API请求以在代码中创建所有提到的对象。 但是还有另一种选择,更快,更轻松:使用仪表板。 因此,我们打开“ 产品”选项卡,然后单击“ 添加产品”按钮。
Then fill Name and (optionally) Description fields:
然后填写名称和(可选) 描述字段:
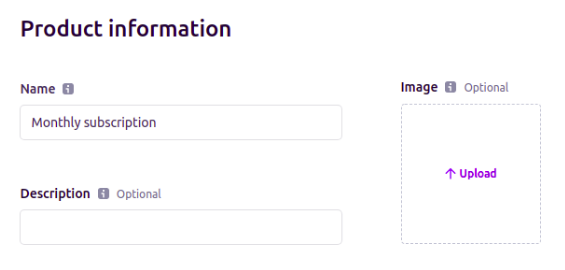
And create a Price with Recurring (monthly) billing period:
并创建一个具有周期性 ( 每月)计费期的价格:
Great! Now you should see the new Product in your Dashboard. Copy its price’s id (starting with price_ ) and edit our save_stripe_info.
大! 现在,您应该在控制台中看到新产品。 复制其价格的ID(以price_ ),然后编辑我们的save_stripe_info 。
# payments/views.py@api_view(['POST'])
def save_stripe_info(request):  [...]stripe.Subscription.create(
    customer=customer,
    items=[
      {
       'price': 'price_' #here paste your price id
      }
    ]
  )
Everything seems fine, it should be working, shouldn’t it? Let’s check…
一切似乎都很好,应该可以,不是吗? 让我们检查…

Oh no… have you just got an error similar to the one below?
哦,不……您刚刚遇到与以下错误类似的错误吗?
stripe.error.InvalidRequestError: Request req_123:
This customer has no attached payment source or default payment method.
What does it mean? Let’s get back to the documentation where you will find very important information:
这是什么意思? 让我们回到文档中 ,您将找到非常重要的信息:
Customer.invoice_settings.default_payment_method (optional)
Customer.invoice_settings.default_payment_method (optional)“ID of a payment method that’s attached to the customer, to be used as the customer’s default payment method for subscriptions and invoices.”
“附加到客户的付款方式的ID,将用作客户用于订阅和发票的默认付款方式。”
It means that when you want to charge your customer with recurring subscriptions, you have to assign him default_payment_method first.
这意味着,当您要向客户收取定期订阅费用时,必须首先为其分配default_payment_method 。
Ok, let’s do it! Modify stripe.Customer.create method:
好的,让我们一起做! 修改stripe.Customer.create方法:
customer = stripe.Customer.create(email=email,payment_method=payment_method_id,invoice_settings={
    'default_payment_method': payment_method_id
  }
)
And try again with a new email:
然后使用新电子邮件重试:
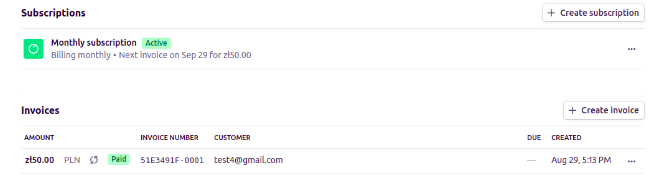
You should see Success message in your console and when you refresh Stripe Dashboard there should be a new Payment:
您应该在控制台中看到“ Success消息,并且当刷新Stripe Dashboard时,应该有一个新的付款:

And when you click on it, you will even see the next payment date:
当您单击它时,您甚至会看到下一个付款日期:
Great! You have just finished the app :) Congratulations!
大! 您刚刚完成了该应用程序:)恭喜!

I hope you will befriend Stripe as it is very powerful library that can handle any “payments nightmares” in your developer’s career ;)
我希望您成为Stripe的朋友,因为它是一个功能强大的库,可以处理开发人员职业中的任何“付款噩梦”;)
I also recommend you to read carefully through Stripe documentation, while there is a lot of useful information that will help you avoid bugs and make your life easier :)
我也建议您仔细阅读Stripe文档,同时有很多有用的信息可帮助您避免错误并简化生活:)
django react


 2347
2347


 被折叠的 条评论
为什么被折叠?
被折叠的 条评论
为什么被折叠?
 到【灌水乐园】发言


