


 本文介绍了如何在Kubernetes环境中利用K6工具对API进行负载测试,探讨了负载均衡的重要性,并提供了相关测试的入门指导。
k8s负载均衡测试
I am a software developer for quite a while now and I found that one aspect that is often neglected is load testing. As developers, we are usually first and foremost interested to “make it work”. Sure, we will come up with all the well-known design patterns that have proved themselves efficient countless times. We think that everything will work just fine and most often than not, it does. However, you should always know how your application will behave under stress. And that is why you need Load and/or stress testing. I witnessed this situation where a performance expert comes into play and run some one-time Jmeter scripts on your application to evaluate whether or not it is performing well.
我是软件开发人员已经有一段时间了,我发现经常被忽略的一个方面是负载测试。 作为开发人员,我们通常首先要“使之工作”。 当然,我们将提出所有无数次证明自己有效的著名设计模式。 我们认为,一切都会很好,而且通常不会。 但是,您应该始终知道您的应用程序在压力下的行为。 这就是为什么您需要负载和/或压力测试。 我目睹了这种情况,性能专家在其中发挥了作用,并在您的应用程序上运行了一些一次性的Jmeter脚本,以评估其性能是否良好。
Well, In a cloud world, let me tell you that shouldn’t fly anymore. You need self-sufficient teams that can take care of every aspect of the application. Needless to say that the performance aspect should be considered from the beginning. Anyone wants to use applications that are fastly responding, no matter the load it is under. And who better than the development team to take care of this. They know the application best, it’s just so hard to find an attractive enough tool to get a developer engaged. That’s where K6 revealed himself as a great option:
好吧,在云世界中,让我告诉你,该不再飞了。 您需要能够解决应用程序各个方面的自给自足的团队。 不用说,应该从一开始就考虑性能方面。 任何人都想使用快速响应的应用程序,而不管它承受的负载如何。 和谁比开发团队更好地照顾这一点。 他们最了解应用程序,很难找到足够吸引人的工具来吸引开发人员。 这就是K6展现自己的绝佳选择的地方:
- Open-source 开源的
- Runs on a local environment 在本地环境上运行
- Everything as code 一切都像代码
- Automation 自动化
- Results visualization 结果可视化
- CLI tool CLI工具
情境 (Scenario)
To illustrate a load testing scenario, I will reuse the chatbot project from my previous post. It is the most simple chatbot you can make with DialogFlow and we will enhance it just a bit to come up with an example that will cover a conversation with the chatbot.
为了说明负载测试场景,我将重用上一篇文章中的chatbot项目。 这是您可以使用DialogFlow制作的最简单的聊天机器人,我们将对其进行一些增强,以提供一个涵盖与聊天机器人对话的示例。
Go to your chatbot and add the following 2 intents:
转到您的聊天机器人并添加以下2个意图:
- ask-joke 开玩笑

- reaction React

With these 2 new intents, we can now build our scenario that will consist of a conversation when the users say:
有了这两个新的意图,我们现在可以构建我们的方案,该方案将由用户说出以下内容时的对话组成:
- “Hi” “嗨”
- “Tell me a joke” “给我说个笑话”
- “Good one” “好人”
Each time, the bot should answer the corresponding intent. We are going to load test this scenario as if 60 users were running the same scenario at the same time.
每次,机器人应回答相应的意图。 我们将对该场景进行负载测试,就像60个用户同时在运行同一场景一样。
在邮递员中建立方案 (Build up the scenario in Postman)
K6 is offering a tool to generate a script from a Postman collection. This is how I decided to start even if you could build your script yourself from scratch.
K6提供了一种从Postman集合生成脚本的工具。 即使您可以从头开始构建脚本,这也是我决定开始的方式。
In Postman, you need to create each call individually. Remember to use the “COPY CURL” from the trying area to get the necessary information:
在Postman中,您需要单独创建每个呼叫。 请记住使用尝试区域中的“ COPY CURL”来获取必要的信息:
- URL 网址
- body request 身体要求
- bearer token 不记名令牌
You should also add tests to verify the response you are receiving (Beware that the second test differs according to the intent you are expecting):
您还应该添加测试以验证您收到的响应(请注意,第二个测试根据您的意图而有所不同):
pm.test("Status code is 200", function () {pm.response.to.have.status(200);});pm.test("intent is Default Welcome Intent", function () {JSON.parse(responseBody).queryResult.intent.displayName === "Default Welcome Intent";});Once you have your 3 calls ready, you can export your collection. We will use the JSON as input later on.
准备好3个通话后,即可导出您的收藏集。 稍后,我们将使用JSON作为输入。
从K6开始 (Start with K6)
First of all, you should install K6. Then, because we want to generate the script from our previously built collection, you will need postman-to-k6.
首先,您应该安装K6 。 然后,由于我们要从先前构建的集合中生成脚本,因此需要postman-to-k6 。
Clone the repository and from there, run the npm or yarn command indicated in the documentation.
克隆存储库,然后从那里运行文档中指示的npm或yarn命令。
You will then be able to run the conversion script by giving the exported JSON from Postman and specifying an output script file:
然后,您可以通过提供从Postman导出的JSON并指定输出脚本文件来运行转换脚本:
postman-to-k6 ../K6.postman_collection.json -o ./k6-DF-script.jsYou should now be able to run the generated script (if you encounter an error at this step, it might be that your token expired. You can replace it in the script):
现在,您应该能够运行生成的脚本(如果在此步骤遇到错误,则可能是您的令牌已过期。您可以在脚本中替换它):
k6 run k6-DF-script.js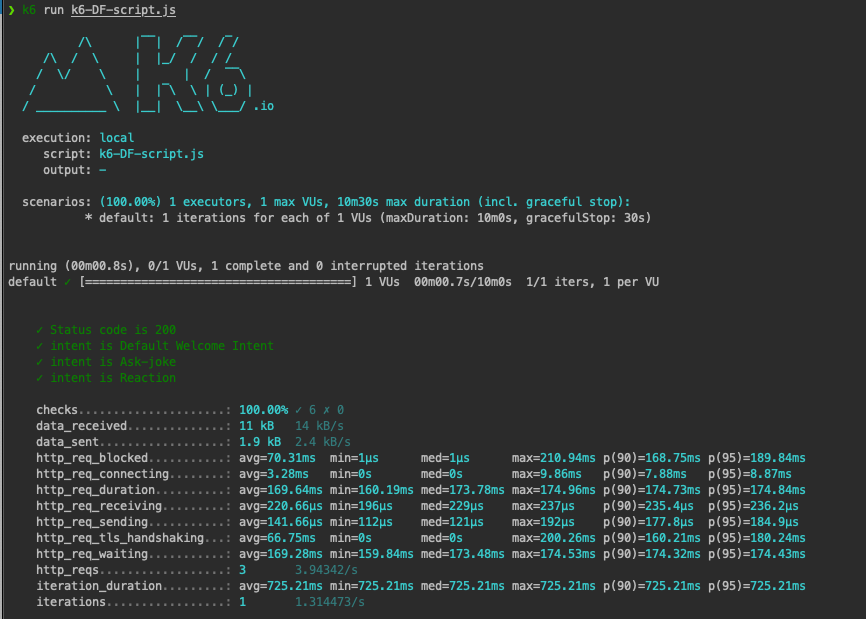
This is a fine unit test that ran with one virtual user. But we need to simulate 60 users running the same scenario at the same time. While you can pass the arguments to the command line, I prefer to set them in the script itself. Go ahead and open the k6-DF-script.js file and update the options as follow:
这是一个虚拟用户进行的精细单元测试。 但是我们需要模拟60个同时运行相同方案的用户。 虽然您可以将参数传递给命令行,但我更喜欢在脚本本身中进行设置。 继续并打开k6-DF-script.js文件,并如下更新选项:
export let options = {maxRedirects: 4,duration: "1m",vus: 60,iterations: 60};By doing this, we are telling the test that we want 60 different virtual users. The test will run for a maximum of one minute. The “iterations” option is set as 60 as well because we want one scenario iteration per virtual user. Otherwise, it will run multiple iterations of the same scenario.
通过这样做,我们告诉测试我们需要60个不同的虚拟用户。 该测试将最多运行一分钟。 “迭代次数”选项也设置为60,因为我们希望每个虚拟用户进行一次方案迭代。 否则,它将运行同一场景的多个迭代。
For more consistency with a real-world scenario, we also want to pause between each call as the user is taking the time to read the response from the chatbot. So we will simulate this by adding a sleeping time in between the calls.
为了与现实世界中的场景保持更高的一致性,我们还希望在每次通话之间都暂停一下,因为用户需要花一些时间从聊天机器人中读取响应。 因此,我们将通过在两次调用之间添加睡眠时间来模拟这一点。
import { sleep } from 'k6';const SLEEP_DURATION = 1;...export default function() {postman[Request]({
...
});
sleep(SLEEP_DURATION);postman[Request]({
...
});
sleep(SLEEP_DURATION);postman[Request]({
...
});
sleep(SLEEP_DURATION);}
The generated script is a great starting point but you should know that you can make it better by using the collection and environment variables in order to avoid URL or token repetition for example. There is also a lot more available options that you can leverage for your test. You can also look at the main source I used to start my investigations.
生成的脚本是一个很好的起点,但是您应该知道,可以通过使用collection和environment变量来使其更好,以避免例如URL或令牌重复。 您还可以利用更多可用选项进行测试。 您还可以查看我用来开始调查的主要资源 。
Now that we have updated the options and improved a bit the script to be closer to reality, we can run the test again:
现在我们已经更新了选项,并对脚本进行了一些改进以使其更接近实际,我们可以再次运行测试:

Everything had passed and you can get some information about how much time on average an HTTP request takes (120.81ms) or the maximum time the full scenario is taking to get processed (3.82s) as well as the confirmation of how many virtual users have been used, the total number of iterations and the total number of HTTP requests.
一切都过去了,您可以获得有关HTTP请求平均花费多少时间(120.81ms)或处理整个方案所需的最长时间(3.82s)以及有关确认有多少虚拟用户的信息。使用,迭代的总数和HTTP请求的总数。
But now, let’s see what happens when the system stops responding. DialogFlow, with the free version, allows up to 180 requests per minute. That why we have been using 60 virtual users. Each of them executing 3 requests. Let’s go ahead and increase the number of virtual users to 70 in the script so that we end up exceeding the quota.
现在,让我们看看系统停止响应时会发生什么。 带有免费版本的DialogFlow每分钟最多允许180个请求。 这就是为什么我们一直使用60个虚拟用户的原因。 他们每个人都执行3个请求。 让我们继续,将脚本中的虚拟用户数增加到70,这样我们最终将超过配额。

As we can see, we don’t have 100% success in our test but only 97.14%. According to your tolerance to errors in your application, you should take action in order to fix such a gap.
如我们所见,测试没有100%成功,只有97.14%。 根据您对应用程序中的错误的容忍度,您应该采取措施来纠正这种差距。
下一步 (Next steps)
In any project where you want to continuously track the performance of your APIs, you would need to integrate K6 script execution to your pipeline. Since K6 is everything about code, it is very flexible and allows you to do so.
在任何要持续跟踪API性能的项目中,都需要将K6脚本执行集成到管道中。 由于K6涉及代码的所有内容,因此它非常灵活,可让您这样做。
You can also visualize the results in an external application. Whether you choose DataDog, Grafana, Kafka, or simply JSON.
您还可以在外部应用程序中可视化结果。 无论您选择DataDog,Grafana,Kafka还是仅仅是JSON。
Extend your tests. K6 allows you to run various types of tests:
扩展您的测试。 K6允许您运行各种类型的测试:
- unit tests 单元测试
- integration tests 整合测试
- Smoke tests 烟雾测试
- Load tests 负载测试
- Stress tests 压力测试
- Soak tests 浸泡测试
They might not all be relevant for every use case but they will all give you relevant information about your application behavior under certain circumstances.
它们可能并不都与每个用例都相关,但是它们都会在某些情况下为您提供有关您的应用程序行为的相关信息。
摘要 (Summary)
K6 is pretty recent (2017), written in Go, and offers a lot of possibilities. This is a first time experience for me and I am really happy with the outcome you can get pretty fast. The possibilities on the automation side are also worth investigating in my opinion. A fully integrated performance testing solution is something of great value that again, I didn’t see in place in any of the projects I worked on. Will definitely keep this tool in mind and look forward to using it and to contribute if necessary.
K6是最近(2017年)用Go语言编写的,并提供了很多可能性。 这对我来说是第一次体验,我对您能很快得到的结果感到非常满意。 在我看来,自动化方面的可能性也值得研究。 完全集成的性能测试解决方案具有很大的价值,在我从事的任何项目中我都没有看到它。 一定会牢记此工具,并期待使用它,并在必要时做出贡献。
翻译自: https://medium.com/swlh/introduction-to-k6-load-testing-your-apis-2e26163cc703
k8s负载均衡测试


 994
994

 被折叠的 条评论
为什么被折叠?
被折叠的 条评论
为什么被折叠?
 到【灌水乐园】发言


