


aws wordpress
A Website is a face, the front-end of your business. The website is made as creative as possible because all the clients/users explore the site all the time. But as important as the front-end, the back-end is equally important. The back-end consists of all the important data such as login credentials, search information, etc. of the client. If the database gets compromised all the data will be mishandled and the reputation of your business goes down.
网站是面Kong,是您业务的前端。 该网站尽可能具有创意,因为所有客户/用户都一直在浏览该网站。 但是和前端一样重要,后端也同样重要。 后端由所有重要数据组成,例如客户端的登录凭据,搜索信息等。 如果数据库遭到破坏,所有数据将被错误处理,并且企业声誉将下降。
因此,针对此类基础架构的更准确的设置将是: (So a more accurate setup for such an infrastructure would be:)
- WordPress site launched in the Public world where anyone can access it. WordPress网站在公共世界中启动,任何人都可以访问它。
- MySQL Database launched in the Private world where only the members of the “Storage Team” can access it. MySQL数据库是在私有世界中启动的,只有“存储团队”的成员才能访问它。
- Also with all the instances launched, proper Firewall rules need to be set so that clients can hit only on specified ports and services and no malicious activities can be done. 同样,在启动所有实例的同时,需要设置适当的防火墙规则,以便客户端只能攻击指定的端口和服务,并且不能进行恶意活动。
I have created this setup on AWS Cloud. The steps followed are listed below:
我已经在AWS Cloud上创建了此设置。 下面列出了步骤:
- Set the provider. 设置提供者。
Create a Virtual Private Cloud (VPC).
创建虚拟私有云 (VPC)。
Create 2 Subnets in this VPC:
在此VPC中创建2个子网 :
Public Subnet [Accessible to the Public World]
公共子网[可访问公共世界]
Public Subnet [Accessible to the Public World]
公共子网[可访问公共世界]
Set the Public Subnet Firewall rules so that client can only hit on port 80 only. This will improve security.
设置“ 公共子网防火墙”规则,以便客户端只能在第80页上命中。 这将提高安全性。
A private Subnet where a Database is created should have these particular Firewall rules:
创建数据库的专用子网应具有以下特定的防火墙规则:
Allow entry in the Database from the Website only to store data.
仅允许从网站进入数据库以存储数据。
The database can go to the Internet for any updates/security patch update.
该数据库可以访问Internet以获取任何更新/安全补丁更新。
Then finally check whether the data is going in our Database or not i.e. whether or not WordPress connected to our Database.
然后,最后检查数据是否在我们的数据库中传输, 即WordPress是否已连接到我们的数据库。
让我们从构建代码开始。 (Let’s start by building the code.)
第1步-设置提供商 (Step 1 — Setting the Provider)
First, we set up the provider for downloading the plugins required for the AWS Cloud Platform.
首先,我们设置提供程序来下载AWS Cloud Platform所需的插件。
provider "aws" {
   profile = "daksh"
   region  = "ap-south-1"
}
Profile is set so that the Terraform code automatically picks up credentials from the local system without passing it through code.
设置配置文件是为了使Terraform代码自动从本地系统获取凭据,而无需通过代码传递凭据。

The profile can be set using the following command:
可以使用以下命令来设置配置文件 :
aws configure --profile profilename步骤2 — VPC,子网,网关,路由,规则 (Step 2 — VPC, Subnets, Gateway, Routes, Rules)
resource "aws_vpc" "tf_vpc" {
  cidr_block           = "192.168.0.0/16"
  enable_dns_support   = true
  enable_dns_hostnames = true
  tags= {
     Name = "tf-vpc"
  }
}
I have created a VPC with the Private IP CIDR Block 192.168.0.0/16.Then enabling the DNS Support and Hostname is important so that auto Public IP Allocation for the instance can be done.
我已经使用专用IP CIDR块192.168.0.0/16创建了一个VPC 。 然后启用DNS支持和主机名很重要,这样就可以为实例执行自动的公共IP分配。
公共子网 (Public Subnet)
resource "aws_subnet" "pub_subnet1" {


  vpc_id            = aws_vpc.tf_vpc.id
  availability_zone = "ap-south-1a"
  cidr_block        = "192.168.1.0/24"
  map_public_ip_on_launch = true
  tags= {
     Name = "pub-subnet1"
  }
}
This is the Public Subnet I have created in Availability Zone ap-south-1a. I have set the value of map_public_ip_on_launch as true so that when an instance is launched in this subnet a Public IP is associated with it. Using this IP, clients will be able to hit the instance to see the Web Page. Also, I have set the CIDR Block value according to the one specified while creating the VPC.
这是我在可用区 ap-south-1a创建的公共子网。 我已将map_public_ip_on_launch的值设置为true以便在该子网中启动实例时, map_public_ip_on_launch一个Public IP与之关联 。 使用此IP,客户端将能够访问实例以查看网页。 另外,我已经根据创建VPC时指定的值设置了CIDR块值。
Internet网关,路由表和路由关联 (Internet Gateway, Route Table and Route Association)
# Internet Gateway
resource "aws_internet_gateway" "tf_ig" {


  vpc_id = aws_vpc.tf_vpc.id
  tags = {
    Name = "tf-ig"
  }
}


# IGW Route Table
 resource "aws_route_table" "tf_ig_route" {


  vpc_id = aws_vpc.tf_vpc.id
  route {
    cidr_block = "0.0.0.0/0"
    gateway_id = aws_internet_gateway.tf_ig.id
  }
  tags = {
    Name = "tf-ig-route"
  }
}


# IGW Route Association
resource "aws_route_table_association" "tf_ig_assoc" {


  subnet_id      = aws_subnet.pub_subnet1.id
  route_table_id = aws_route_table.tf_ig_route.id
}
First I have created an Internet Gateway. This will be the common gateway through which traffic would come into the Instance i.e. Public world to the Private world. Internet Gateway provides DNAT: Destination Network Address Translation. But by default, the Internet Gateway also provides service for SNAT. This means that the instance can also go to the Internet i.e. Private to Public world
首先,我创建了一个Internet网关。 这将是流量进入实例的公共网关,即从公共世界到私有世界。 Internet网关提供DNAT:目标网络地址转换。 但是默认情况下,Internet网关还提供SNAT服务。 这意味着该实例也可以访问Internet,即私有到公共世界
Then I have created a Route Table with the common gateway as the above created “Internet Gateway”.
然后,我创建了带有公用网关的路由表 ,就像上面创建的“ Internet网关”一样。
Then finally associate the Route Table with the Public Subnet using its ID. After associating we have fixed the subnet to use only a particular Route Table.
然后最后使用其ID 将路由表与公共子网相关联 。 关联后,我们将子网固定为仅使用特定的路由表。
专用子网 (Private Subnet)
resource "aws_subnet" "pvt_subnet2" {


  vpc_id            = aws_vpc.tf_vpc.id
  availability_zone = "ap-south-1b"
  cidr_block        = "192.168.2.0/24"
  map_public_ip_on_launch = false
  tags= {
     Name = "pvt-subnet2"
  }
}
This is the Private Subnet I have created in Availability Zone ap-south-1b. I have set the value of map_public_ip_on_launch as false so that when an instance is launched in this subnet a Public IP is not associated with it. I have done this on purpose because in this subnet I will be launching the MySQL Database and I don’t want anyone can get into my Database and compromise the data. This is done to keep the MySQL Database in the Private world.
这是我在可用区 ap-south-1b创建的专用子网。 我已将map_public_ip_on_launch的值设置为false以便在该子网中启动实例时, 不会将公共IP与之关联 。 我这样做是有目的的,因为在此子网中,我将启动MySQL数据库,并且我不希望任何人都可以进入我的数据库并破坏数据。 这样做是为了将MySQL数据库保留在私有世界中。
NAT网关,路由表和路由关联 (NAT Gateway, Route Table and Route Association)
# EIP
resource "aws_eip" "tf-eip" {
  tags = {
    "Name" = "vpc-eip"
  }
}


# NAT Gateway
resource "aws_nat_gateway" "tf_ngw" {


  allocation_id = aws_eip.tf-eip.id
  subnet_id     = aws_subnet.pub_subnet1.id
  tags = {
    "Name" = "tf-ng"
  }
}


# NGW Route Table
resource "aws_default_route_table" "tf_ng_route" {
  depends_on = [
    aws_nat_gateway.tf_ngw
  ]
  default_route_table_id = aws_vpc.tf_vpc.default_route_table_id

  route {
    cidr_block = "0.0.0.0/0"
    gateway_id = aws_nat_gateway.tf_ngw.id
  }
  tags = {
    Name = "tf-ng-route"
  }
}


# NGW route association
resource "aws_route_table_association" "tf_ng_assoc" {


  subnet_id      = aws_subnet.pvt_subnet2.id
  route_table_id = aws_default_route_table.tf_ng_route.id
}
First I created an Elastic IP. An EIP address is a reserved public IP address that can be assigned to an EC2 instance in a particular region until you choose to release it.
首先,我创建了一个弹性IP 。 EIP地址是保留的公用IP地址,可以将其分配给特定区域中的EC2实例,直到您选择释放它为止。
This will be used in NAT Gateway. A NAT Gateway is a special case where we only want the instance to go to the internet. We don’t want to allow outside traffic from the Public world into the instance. NAT Gateway provides SNAT: Source Network Address Translation.
这将在NAT网关中使用。 NAT网关是一种特殊情况,我们只希望实例连接到互联网。 我们不想允许来自公共世界的外部流量进入实例。 NAT网关提供SNAT:源网络地址转换。
To create the NAT Gateway I have specified the EIP ID and the ID of the Public Subnet. This means I have launched the NAT Gateway in the Public Subnet.
要创建NAT网关,我已经指定了EIP ID和公共子网的ID。 这意味着我已经在公共子网中启动了NAT网关。
NAT Gateway takes the instance out to the Public World and only Public Subnet has this ability. So NAT Gateway is always launched in the Public Subnet.
NAT网关将实例带到公共世界,只有公共子网具有此功能。 因此,NAT网关始终在公共子网中启动。
Then I have created the Route Table, with the destination as 0.0.0.0/0, which means anywhere in the world and the Gateway is the NTA Gateway.
然后,我创建了路由表 ,目的地为0.0.0.0/0,这意味着世界上任何地方,并且网关是NTA网关。
Then finally associated the Route Table with the Private Subnet so that when I launch the instance (Database) in this subnet it has connectivity to the Public World and also at the same time no one can come into this instance, because it is isolated.
然后,最后将路由表与专用子网相关联,这样,当我在该子网中启动实例(数据库)时,它就可以与公共世界建立连接,并且同时由于该实例是隔离的,因此没有人可以进入该实例。
步骤3 —创建EC2实例:WordPress (Step 3 — Create the EC2 Instance: WordPress)
First, create the Security Group for the WordPress EC2 Instance.
首先,为WordPress EC2实例创建安全组 。
resource "aws_security_group" "tf_wp_sg" {


  name        = "tf_wp_sg"
  description = "wordpress inbound"
  vpc_id      = aws_vpc.tf_vpc.id
  ingress {
    description = "http"
    from_port   = 80
    to_port     = 80
    protocol    = "tcp"
    cidr_blocks = ["0.0.0.0/0"]
  }


  # ingress {
  #   description = "ping"
  #   from_port   = -1
  #   to_port     = -1
  #   protocol    = "icmp"
  #   cidr_blocks = ["0.0.0.0/0"]
  # }


  ingress {
    description = "ssh"
    from_port   = 22
    to_port     = 22
    protocol    = "tcp"
    cidr_blocks = ["0.0.0.0/0"]
  }
  egress {
    from_port   = 0
    to_port     = 0
    protocol    = "-1"
    cidr_blocks = ["0.0.0.0/0"]
  }
  tags = {
    Name = "tf-wp-sg"
  }
}
In the security group mainly 2 things have to be set: Ingress and Egress.
在安全组中,主要必须设置两件事: 入口和出口。
Ingress means the traffic that is coming into our website. We need to specify this, keeping in mind what ports we want to keep open. I have kept open 2 ports: SSH, and HTTP.
入口是指进入我们网站的流量。 我们需要指定此名称,同时要记住要保持打开状态的端口。 我一直打开2个端口:SSH和HTTP。
SSH for connecting to the remote instance so that we can configure the instance for use as WordPress.
SSH,用于连接到远程实例,以便我们可以将该实例配置为用作WordPress。
HTTP so that traffic can hit on the website.
HTTP,这样流量就可以访问网站。
Egress has been set to all ports so that outbound traffic originating from within a network can go outside to the Public World.
已将出口设置为所有端口,以便来自网络内部的出站流量可以到达公共世界之外。
EC2实例启动:WordPress (EC2 Instance Launch: WordPress)
resource "aws_instance" "wordpress" {


  ami           = "ami-0732b62d310b80e97"
  instance_type = "t2.micro"
  subnet_id = aws_subnet.pub_subnet1.id
  security_groups = [aws_security_group.tf_wp_sg.id]
  key_name = "key1"
  tags = {
    Name = "wordpress"
  }
}
resource "null_resource" "wp-sql-connection" {
  depends_on = [
    aws_instance.mysql
  ]
  connection {
    type     = "ssh"
    user     = "ec2-user"
    private_key = file("C:/Users/Daksh jain/Desktop/IIEC_VIMAL DAGA/6. HYBRID CLOUD/key1.pem")
    host     = aws_instance.wordpress.public_ip
  }


  provisioner "remote-exec" {
    inline = [
      "sudo su <<END",
      "yum install docker httpd -y",
      "systemctl enable docker",
      "systemctl start docker",
      "docker pull wordpress:5.1.1-php7.3-apache",
      "sleep 30",
      "docker run -dit  -e WORDPRESS_DB_HOST=${aws_instance.mysql.private_ip} -e WORDPRESS_DB_USER=wpuser -e WORDPRESS_DB_PASSWORD=wppass -e WORDPRESS_DB_NAME=wpdb -p 80:80 wordpress:5.1.1-php7.3-apache",
      "END",
    ]
  }

}
This is the most important part. Here I have created the WordPress Instance. The following are some points to be kept in mind:
这是最重要的部分。 在这里,我创建了WordPress实例。 以下是需要牢记的几点:
I have specified an AMI ID and an instance_type to be used for the instance.
我已指定要用于实例的AMI ID和instance_type。
Then the ID of the Security Group and the Subnet are specified to be used in the instance. A key is also provided for SSH to be done on the remote system.
然后,指定要在实例中使用的安全组和子网的ID。 还提供了用于在远程系统上完成SSH的密钥。
Then a null resource is created for doing a “remote-exec” on the instance to configure it as a WordPress instance.
然后,创建一个空资源以对实例执行 “ remote-exec ”,以将其配置为WordPress实例。
I have created a docker setup of WordPress inside the EC2 Instance.
我在EC2实例中创建了WordPress的docker设置 。
步骤4 —创建EC2实例:MySQL数据库 (Step 4 — Create the EC2 Instance: MySQL Database)
I have created the Security Group for MySQL EC2 instance.
我已经为MySQL EC2实例创建了安全组 。
resource "aws_security_group" "tf_sql_sg" {
  depends_on = [
    aws_route_table_association.tf_ng_assoc
  ]


  name        = "tf_sql_sg"
  description = "mysql inbound"
  vpc_id      = aws_vpc.tf_vpc.id
  ingress {
    description = "mysql"
    from_port   = 3306
    to_port     = 3306
    protocol    = "tcp"
    security_groups = [aws_security_group.tf_wp_sg.id]


  }


  # ingress {
  #   description = "ping"
  #   from_port   = -1
  #   to_port     = -1
  #   protocol    = "icmp"
  #   cidr_blocks = ["0.0.0.0/0"]
  # }


  # ingress {
  #   description = "ssh"
  #   from_port   = 22
  #   to_port     = 22
  #   protocol    = "tcp"
  #   cidr_blocks = ["0.0.0.0/0"]
  # }

  egress {
    from_port   = 0
    to_port     = 0
    protocol    = "-1"
    cidr_blocks = ["0.0.0.0/0"]
  }
  tags = {
    Name = "tf_sql_sg"
  }
}
In Ingress, I have just opened the port 3306, and that too only for the WordPress instances. This is done by specifying the Security Group ID of the WordPress Instance. By this, I am telling MySQL Instance to allow the instances that are using the Security Group whose ID is specified.
在Ingress中,我刚刚打开了端口3306,也仅对WordPress实例开放了。 这是通过指定WordPress实例的安全组ID来完成的。 这样,我告诉MySQL实例允许使用使用其ID已指定的安全组的实例。
For egress, I have set as 0.0.0.0/0 as the destination which means that the SQL Instance can go anywhere in the world in the Public World (using NAT Gateway).
对于出口 ,我将目标设置为0.0.0.0/0,这意味着SQL实例可以在公共世界中的任何地方(使用NAT网关)使用。
EC2实例启动:MySQL (EC2 Instance Launch: MySQL)
resource "aws_instance" "mysql" {
  depends_on = [
    aws_instance.wordpress
  ]
  ami           = "ami-0732b62d310b80e97"
  instance_type = "t2.micro"
  subnet_id = aws_subnet.pvt_subnet2.id
  security_groups = [aws_security_group.tf_sql_sg.id]
  # key_name = "key1"
  user_data = <<END
  #!/bin/bash
  sudo yum install mariadb-server mysql -y
  sudo systemctl enable mariadb.service
  sudo systemctl start mariadb.service
  mysql -u root <<EOF
  create user 'wpuser'@'${aws_instance.wordpress.private_ip}' identified by 'wppass';
  create database wpdb;
  grant all privileges on wpdb.* to 'wpuser'@'${aws_instance.wordpress.private_ip}';
  exit
  EOF
  END

  tags = {
    Name = "sql"
  }
}
Now finally I have created the MySQL Instance. The following are some points to be kept in mind:
现在终于我创建了MySQL实例。 以下是需要牢记的几点:
I have specified the same AMI ID and an instance_type to be used for the instance.
我指定了相同的AMI ID和用于实例的instance_type。
Then the ID of the Security Group and the Subnet are specified to be used in the instance.
然后,指定要在实例中使用的安全组和子网的ID。
Then I am passing the data in “user_data”. I am not doing remote exec here because for that I will have to open port 22 for SSH which will be unsafe for the Database Instance.
然后,我将数据传递到“ user_data ”中。 我不是在这里执行远程执行 ,因为为此,我必须为SSH打开端口22,这对于数据库实例是不安全的。
现在,我将说明安装流程如何进行: (Now I will explain how the flow of the setup goes:)

- First, the VPC, Subnet, and Routes are created. 首先,创建VPC,子网和路由。
Next, only the WordPress Instance setup is created.
接下来,仅创建WordPress实例设置 。
Then the MySQL Setup is created and also the user_data is passed. This makes the MySQL Database active and has an IP, Hostname, and Database name.
然后创建MySQL安装程序,并传递user_data 。 这使MySQL数据库处于活动状态,并具有IP,主机名和数据库名称。
Finally, the WordPress remote-exec is done which uses the MySQL Database details.
最后,完成了使用MySQL数据库详细信息的WordPress remote-exec 。
奖励:设置基础架构后,Chrome上会自动打开 (Bonus: Opens on Chrome automatically when infrastructure is setup)
resource "null_resource" "openwordpress"  {
depends_on = [
    null_resource.wp-sql-connection
  ]
	provisioner "local-exec" {
	    command = "start chrome  http://${aws_instance.wordpress.public_ip}/"
  	}
}
This part depends on the “WordPress — MySQL Connection”, after the connection is made it will launch the site on chrome.
这部分取决于“ WordPress – MySQL连接”,建立连接后,它将在chrome上启动网站。
(PS. To launch chrome from Command Prompt on Windows, you have to set the Environment Variable PATH for Chrome Application.)
(PS。要从Windows上的命令提示符启动chrome,必须为Chrome应用程序设置环境变量PATH。)
输出: (Output:)
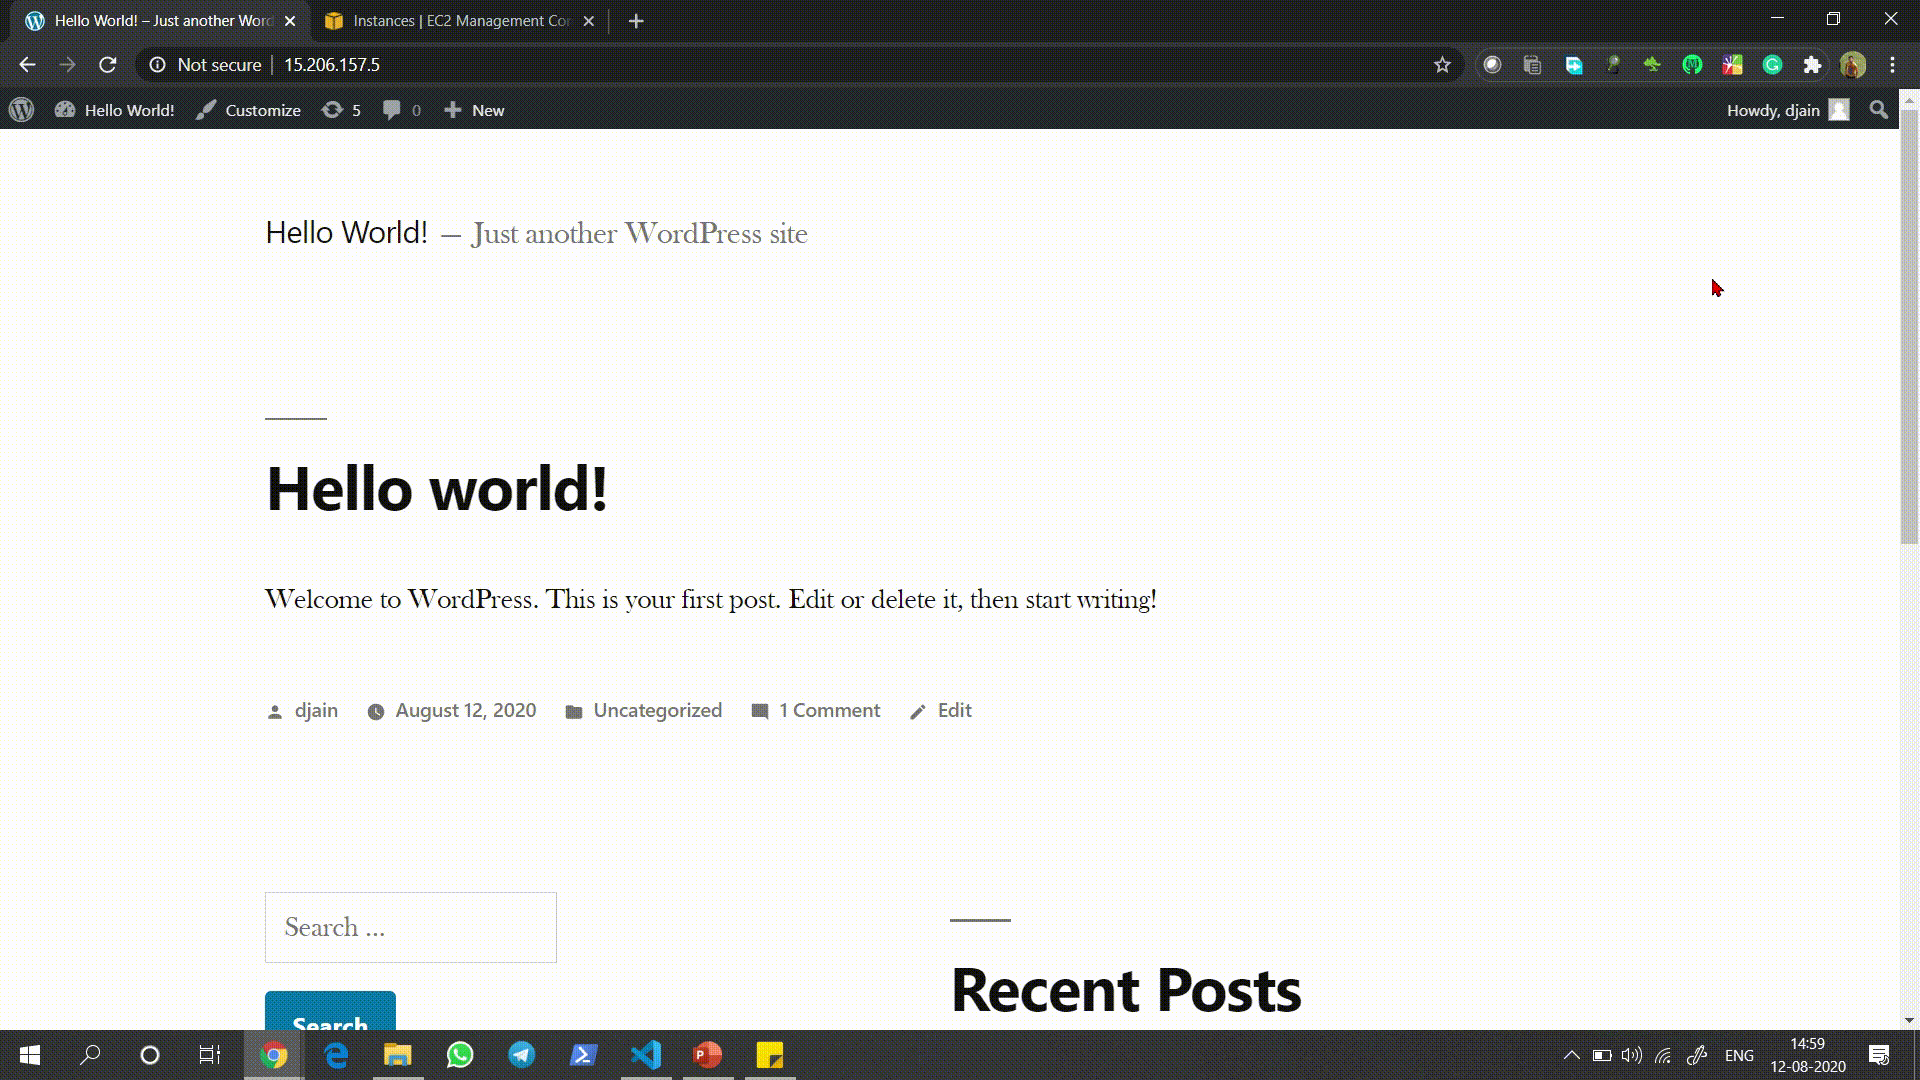
This is just how the WordPress site gets deployed and is successfully opened.
这就是WordPress网站被部署并成功打开的方式。
由于我已经部署了自己MySQL数据库,因此检查WordPress是否正在使用我的数据库非常重要。 (Since I have deployed my own MySQL Database, it is important to check whether or not WordPress is using my database or not.)
为了证明这一点,有多种方法: (To prove this there are multiple ways:)
Go inside the MySQL Database and check if the WordPress site has created some tables or not.
进入MySQL数据库并检查WordPress网站是否已创建一些表。
This can’t be done because there is no way to go inside the MySQL Database. This can be done only if either SSH is allowed on the instance and it is in the Public Subnet. But for Security, I have closed port 22 — SSH.
由于无法进入MySQL数据库,因此无法完成此操作。 只有在实例上允许使用任一SSH,并且该SSH在公共子网中时,才能完成此操作。 但是为了安全起见,我关闭了端口22-SSH。
Check the settings of WordPress Site and match the Private IP of the database it is using with the EC2 Instance I launched.
检查WordPress网站的设置,并将其使用的数据库的私有IP与我启动的EC2实例进行匹配。

与Ashish Kumar合作。 (Worked in collaboration with Ashish Kumar.)
翻译自: https://medium.com/@daksh.jain00/public-wordpress-and-private-database-on-aws-ec2-3b65c93b756a
aws wordpress


 1983
1983

 被折叠的 条评论
为什么被折叠?
被折叠的 条评论
为什么被折叠?
 到【灌水乐园】发言


