


aws terraform
什么是Terraform? (What is Terraform?)

Hashicorp Terraform is an extremely useful and flexible tool for building, changing, and versioning infrastructure safely and efficiently. It builds on the concept of Infrastructure-as-Code — managing entire infrastructures using machine-readable configuration files rather than interactive commands and configuration tools.
Hashicorp Terraform是一种非常有用且灵活的工具,可用于安全有效地构建,更改和版本化基础结构。 它建立在“基础结构即代码”的概念之上—使用机器可读的配置文件而不是交互式命令和配置工具来管理整个基础结构。
Terraform is one of Hashicorp’s offerings dedicated for automation. An open-source command-line version of Terraform is available for everyone through GitHub.
Terraform是Hashicorp致力于自动化的产品之一。 每个人都可以通过GitHub获得Terraform的开源命令行版本。
Terraform works well with a wide array of private cloud providers such as VMWare vSphere as well as public cloud providers such as Google Cloud Platform (GCP), Microsoft Azure, and Amazon AWS. The full list of supported providers can be found here.
Terraform可与VMWare vSphere等各种私有云提供商以及Google Cloud Platform(GCP),Microsoft Azure和Amazon AWS等公共云提供商良好配合。 可以在此处找到受支持的提供程序的完整列表。
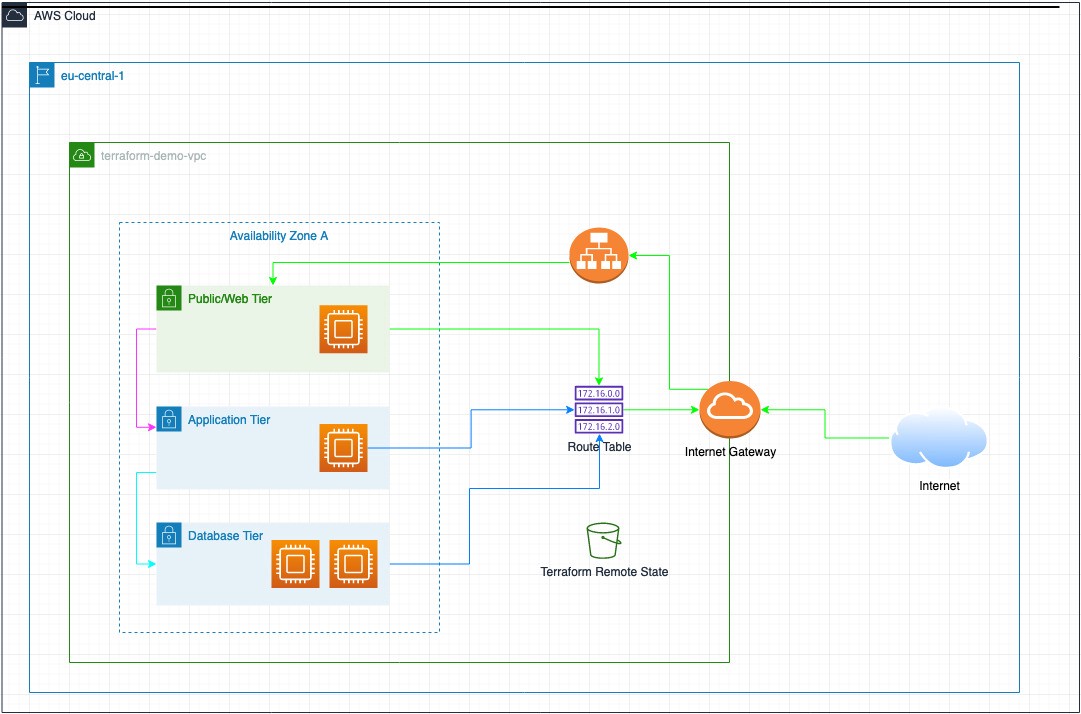
In this detailed tutorial, I will walk you through the steps to start managing an AWS infrastructure using Terraform from scratch. This is how our AWS architecture would look like:
在本详细教程中,我将引导您完成从头开始使用Terraform管理AWS基础架构的步骤。 这就是我们的AWS架构的样子:
先决条件 (Prerequisites)
Before we can start using Terraform to manage an AWS infrastructure, we need to set up the following:
在开始使用Terraform管理AWS基础架构之前,我们需要进行以下设置:
IAM用户 (IAM user)
As an AWS best-practice, create an IAM user with programmatic access and the following policies attached to them via Identity and Access Management (IAM) in the AWS console:
作为AWS的最佳实践,创建一个具有编程访问权限的IAM用户,并通过AWS控制台中的身份和访问管理(IAM)为其附加以下策略 :
- NetworkAdministrator- AmazonEC2FullAccess- AmazonS3FullAccess
-网络管理员-AmazonEC2FullAccess-AmazonS3FullAccess
If you have not created an IAM user before, here is a useful guide you can use. At the end of the IAM user creation process, you should be presented with the following page showing the access key ID and the secret access key. Please copy these values and save them somewhere (private) because we will be using them at a later step.
如果您以前从未创建过IAM用户,则可以使用这里的有用指南。 在IAM用户创建过程结束时,应该显示以下页面,其中显示了访问密钥ID和秘密访问密钥 。 请复制这些值并将其保存在某个地方(私有),因为我们将在以后的步骤中使用它们。
For this tutorial, I have created a user called terraform-user:
在本教程中,我创建了一个名为terraform-user的用户 :

Remember: always keep these credentials confidential! Don’t worry about me, these credentials will no longer work once I publish this tutorial!
请记住:请始终对这些凭据保密 ! 不用担心我,一旦我发布了本教程,这些凭据将不再起作用!
S3水桶 (S3 Bucket)
Create an S3 Bucket which will hold our terraform.tfstate file. Terraform state files are explained in a later step in this guide.
创建一个S3存储桶,它将保存我们的terraform.tfstate文件。 Terraform状态文件将在本指南的后续步骤中进行说明。
If you have not create an S3 bucket before, here is a useful guide you can use. For this tutorial, I have created an S3 bucket called terraform-s3-bucket-testing:
如果您以前从未创建过S3存储桶,则可以使用这里的有用指南。 在本教程中,我创建了一个名为terraform-s3-bucket-testing的S3存储桶 :

Remember: Please block ALL public access to the bucket and to all the objects within the bucket.
切记:请禁止对桶和桶中所有对象的所有公共访问。
安装 (Installation)
Now, we’re ready to install Terraform!
现在,我们准备安装Terraform!
First, open a terminal window and create a working directory for our Terraform project. Please note that for this tutorial, I am using a macOS so you might need to use other commands which correspond to your workstation.
首先,打开一个终端窗口,并为Terraform项目创建一个工作目录。 请注意,对于本教程,我使用的是macOS,因此您可能需要使用与您的工作站相对应的其他命令。
mkdir ~/terraform-aws
cd ~/terraform-aws
As of writing, the latest version of Terraform command-line is 0.12.29. Installing Terraform on the following platforms are supported:
在撰写本文时,Terraform命令行的最新版本是0.12.29。 支持在以下平台上安装Terraform:
- macOS (64-bit) macOS(64位)
- FreeBSD (32-bit, 64-bit, and ARM) FreeBSD(32位,64位和ARM)
- Linux (32-bit, 64-bit, and ARM) Linux(32位,64位和ARM)
- OpenBSD (32-bit and 64-bit) OpenBSD(32位和64位)
- Solaris (64-bit) Solaris(64位)
- Windows (32-bit and 64-bit) Windows(32位和64位)
For this tutorial, I am using a macOS, so I need to download the corresponding Zip file:
对于本教程,我使用的是macOS,因此需要下载相应的Zip文件:
wget https://releases.hashicorp.com/terraform/0.12.29/terraform_0.12.29_darwin_amd64.zipAlternatively, you can visit the download page where you can find the latest executables for your respective platform.
或者,您可以访问下载页面 ,在该页面中可以找到各自平台的最新可执行文件。
Next, unzip the executable and show the terraform binary.
接下来,解压缩可执行文件并显示terraform二进制文件。
unzip terraform_0.12.29_darwin_amd64.zip
ls -l terraform
Move the binary to a location in your $PATH. I would suggest moving terraform to /usr/local/bin:
将二进制文件移到$ PATH中的某个位置。 我建议将terraform移至/ usr / local / bin:
mv terraform /usr/local/binVerify that the terraform binary is available in the current $PATH:
验证当前$ PATH中是否可用terraform二进制文件:
which terraformIf /usr/local/bin/terraform is displayed in the output, then we’re all set! Run this last command to check the Terraform version:
如果/ usr / local / bin / terraform显示在输出中,那么我们一切就绪! 运行最后一个命令以检查Terraform版本:
santino:terraform-aws santino$ terraform - version
Terraform v0.12.29
santino:terraform-aws santino$
地形状态 (Terraform state)
Terraform keeps a mapping between the real-world resources in the provider (in our case, Amazon AWS) with our local configuration. It does this by maintaining a terraform.tfstate file which by default is stored in the local working directory.
Terraform会在提供程序(在我们的示例中为Amazon AWS)中的实际资源与我们的本地配置之间保持映射。 它通过维护一个terraform.tfstate文件(默认情况下存储在本地工作目录中)来完成此操作。
This works well if you were alone in maintaining our AWS infrastructure using Terraform. However, when working with groups, everyone who needs to execute terraform must also have a copy of the terraform.tfstate file on their local working directory.
如果您独自一个人使用Terraform维护我们的AWS基础架构,则此方法很好用。 但是,在与组一起工作时,需要执行terraform的每个人还必须在其本地工作目录上拥有terraform.tfstate文件的副本。
An approach to solve this problem would be to commit the terraform.tfstate file to a Git repository so that everyone can work on the same file. However, this approach insecure, given that the state file contains a lot of valuable information about your AWS infrastructure. In fact, the .gitignore files in Terraform’s official git repository prevents the file from being managed by Git:
解决此问题的一种方法是将terraform.tfstate文件提交到Git存储库,以便每个人都可以使用同一文件。 但是,考虑到状态文件包含有关您的AWS基础架构的许多有价值的信息 ,这种方法并不安全。 实际上,Terraform官方git存储库中的.gitignore文件可防止文件由Git管理:
terraform.tfstate
terraform.tfstate.backup
.terraform/*
The best approach to this problem is to make use of a remote terraform state repository. This can be achieved in a few ways, but for this tutorial, we will be using an S3 bucket to store our terraform.tfstate file.
解决此问题的最佳方法是利用远程地形状态存储库。 这可以通过几种方式实现,但是在本教程中,我们将使用S3存储桶来存储terraform.tfstate文件。
定义提供者和远程状态位置 (Define the provider and remote state location)
Create our first .tf file using your favorite editor, which will contain details about of provider (AWS) and the S3 bucket which will store our remote state.
使用您喜欢的编辑器创建我们的第一个.tf文件,该文件将包含有关提供者(AWS)的详细信息以及将存储我们的远程状态的S3存储桶。
provider.tf
provider.tf
# Define AWS as our provider
provider "aws" {
     region        = "eu-central-1"
}# Terraform remote state
terraform {
     backend "s3" {
         bucket    = "terraform-s3-bucket-testing"
         key       = "terraform-s3-bucket-testing/terraform.tfstate"
         region    = "eu-central-1"
     }
}
The next step is to define 2 environment variables which will contain the access key ID and the secret access key from an earlier section.
下一步是定义2个环境变量,其中将包含前面部分中的访问密钥ID和秘密访问密钥 。
export AWS_ACCESS_KEY_ID="AKIAUN57B3YGREQNABE4"
export AWS_SECRET_ACCESS_KEY="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"
After defining our provider, the location of our S3 bucket, and the login credentials to our AWS account, we can now initialize our Terraform project using the terraform init command.
定义了提供程序,S3存储桶的位置以及AWS账户的登录凭证之后,我们现在可以使用terraform init命令初始化Terraform项目。
Here is a sample output:
这是一个示例输出:
santino:terraform-aws santino$ terraform initInitializing the backend...Successfully configured the backend "s3"! Terraform will automatically
use this backend unless the backend configuration changes.Initializing provider plugins...
- Checking for available provider plugins...
- Downloading plugin for provider "aws" (hashicorp/aws) 2.70.0...The following providers do not have any version constraints in configuration,
so the latest version was installed.To prevent automatic upgrades to new major versions that may contain breaking
changes, it is recommended to add version = "..." constraints to the
corresponding provider blocks in configuration, with the constraint strings
suggested below.* provider.aws: version = "~> 2.70"Terraform has been successfully initialized!You may now begin working with Terraform. Try running "terraform plan" to see
any changes that are required for your infrastructure. All Terraform commands
should now work.If you ever set or change modules or backend configuration for Terraform,
rerun this command to reinitialize your working directory. If you forget, other
commands will detect it and remind you to do so if necessary.
santino:terraform-aws santino$
管理网络 (Managing the network)
After successfully initializing our Terraform project, we can now go ahead and create resources in our AWS account.
成功初始化Terraform项目之后,我们现在可以继续在AWS账户中创建资源。
We start with the network. We have to create a few network objects:
我们从网络开始。 我们必须创建一些网络对象:
- VPC VPC
- Subnets 子网路
- Internet Gateway 互联网网关
- Route Table 路线表
vpc.tf
vpc.tf
## Demo VPC
resource "aws_vpc" "terraform-demo-vpc" {
     cidr_block              = "10.0.0.0/16"
     instance_tenancy        = "default"
     enable_dns_support      = "true"
     enable_dns_hostnames    = "true"
     enable_classiclink      = "false"
     tags = {
          Name = "terraform-demo-vpc"
     }
}
subnets.tf
子网
## Demo subnets# Web tier subnet
resource "aws_subnet" "terraform-demo-snet-web" {
     vpc_id                  = aws_vpc.terraform-demo-vpc.id
     cidr_block              = "10.0.0.0/21"
     map_public_ip_on_launch = "true"
     availability_zone       = "eu-central-1a"
     tags = {
          Name = "terraform-demo-snet-web"
     }
}# Application tier subnet
resource "aws_subnet" "terraform-demo-snet-app" {
     vpc_id                  = aws_vpc.terraform-demo-vpc.id
     cidr_block              = "10.0.8.0/21"
     map_public_ip_on_launch = "false"
     availability_zone       = "eu-central-1a"
     tags = {
          Name = "terraform-demo-snet-app"
     }
}# Database tier subnet
resource "aws_subnet" "terraform-demo-snet-db" {
     vpc_id                  = aws_vpc.terraform-demo-vpc.id
     cidr_block              = "10.0.16.0/21"
     map_public_ip_on_launch = "false"
     availability_zone       = "eu-central-1a"
     tags = {
          Name = "terraform-demo-snet-db"
     }
}
igw.tf
igw.tf
## Internet Gateway
resource "aws_internet_gateway" "terraform-demo-igw" {
     vpc_id = aws_vpc.terraform-demo-vpc.id
     tags = {
          Name  = "terraform-demo-igw"
     }
}
route-table.tf
路由表
## Route table
resource "aws_route_table" "terraform-demo-rtable" {
     vpc_id = aws_vpc.terraform-demo-vpc.id
     route {
          cidr_block = "0.0.0.0/0"
          gateway_id = aws_internet_gateway.terraform-demo-igw.id
     }
     tags = {
          Name = "terraform-demo-rtable"
     }
}# Route table associations
resource "aws_route_table_association" "terraform-demo-rtassoc1" {
     subnet_id      = aws_subnet.terraform-demo-snet-web.id
     route_table_id = aws_route_table.terraform-demo-rtable.id
}
resource "aws_route_table_association" "terraform-demo-rtassoc2" {
     subnet_id      = aws_subnet.terraform-demo-snet-app.id
     route_table_id = aws_route_table.terraform-demo-rtable.id
}
resource "aws_route_table_association" "terraform-demo-rtassoc3" {
     subnet_id      = aws_subnet.terraform-demo-snet-db.id
     route_table_id = aws_route_table.terraform-demo-rtable.id
}
快速说明! (Quick explanation!)
Notice that the syntax for defining a resource is as follows:
请注意,定义资源的语法如下:
resource "<resource type>" "<resource name>"We can then refer to this resource when creating other resources using the <resource type>.<resource name>.<property> syntax.
然后,当使用<资源类型>。<资源名称>。<属性>语法创建其他资源时,可以引用该资源。
For example, we defined our VPC as:
例如,我们将VPC定义为:
## Demo VPC
resource "aws_vpc" "terraform-demo-vpc" {
...
When creating a subnet, we need to assocate it with the VPC where it should be located in. Thus, we define this association with the vpc_id parameter and the ID of the VPC:
创建子网时,我们需要将其与应该位于其中的VPC关联。因此,我们可以通过vpc_id参数和VPC的ID定义此关联:
resource "aws_subnet" "terraform-demo-snet-web" {
     vpc_id                  = aws_vpc.terraform-demo-vpc.id
...
应用我们的更改 (Applying our changes)
Use the terraform plan command to review the changes that Terraform would perform on our AWS infrastructure before applying them.
在应用它们之前,请使用terraform plan命令查看Terraform将在我们的AWS基础设施上执行的更改。
Sample output:
样本输出:
santino:terraform-aws santino$ terraform plan
Refreshing Terraform state in-memory prior to plan...
The refreshed state will be used to calculate this plan, but will not be
persisted to local or remote state storage.------------------------------------------------------------------------An execution plan has been generated and is shown below.
Resource actions are indicated with the following symbols:
  + createTerraform will perform the following actions:# aws_internet_gateway.terraform-demo-igw will be created
  + resource "aws_internet_gateway" "terraform-demo-igw" {
      + arn      = (known after apply)
      + id       = (known after apply)
      + owner_id = (known after apply)
      + tags     = {
          + "Name" = "terraform-demo-igw"
        }
      + vpc_id   = (known after apply)
    }<CUT># aws_vpc.terraform-demo-vpc will be created
  + resource "aws_vpc" "terraform-demo-vpc" {
      + arn                              = (known after apply)
      + assign_generated_ipv6_cidr_block = false
      + cidr_block                       = "10.0.0.0/16"
      + default_network_acl_id           = (known after apply)
      + default_route_table_id           = (known after apply)
      + default_security_group_id        = (known after apply)
      + dhcp_options_id                  = (known after apply)
      + enable_classiclink               = false
      + enable_classiclink_dns_support   = (known after apply)
      + enable_dns_hostnames             = true
      + enable_dns_support               = true
      + id                               = (known after apply)
      + instance_tenancy                 = "default"
      + ipv6_association_id              = (known after apply)
      + ipv6_cidr_block                  = (known after apply)
      + main_route_table_id              = (known after apply)
      + owner_id                         = (known after apply)
      + tags                             = {
          + "Name" = "terraform-demo-vpc"
        }
    }Plan: 9 to add, 0 to change, 0 to destroy.------------------------------------------------------------------------Note: You didn't specify an "-out" parameter to save this plan, so Terraform
can't guarantee that exactly these actions will be performed if
"terraform apply" is subsequently run.santino:terraform-aws santino$
Since we are objects from scratch, the output of the terraform plan command shows that it would create 9 objects (1 VPC, 3 subnets, 1 internet gateway, 1 route table, and 3 route table associations).
由于我们是从头开始的对象,因此terraform plan命令的输出显示它将创建9个对象(1个VPC,3个子网,1个Internet网关,1个路由表和3个路由表关联)。
To finally create the objects in AWS, run the terraform apply command. You will be given a final chance to review the changes and will be prompted whether or not you would like to proceed. After responding with yes, Terraform would then modify AWS to reflect your desired state.
要最终在AWS中创建对象,请运行terraform apply命令。 您将有最后机会查看所做的更改,并会提示您是否要继续。 用yes响应后,Terraform将修改AWS以反映您所需的状态。
Sample output:
样本输出:
santino:terraform-aws santino$ terraform applyAn execution plan has been generated and is shown below.
Resource actions are indicated with the following symbols:
+ createTerraform will perform the following actions:# aws_internet_gateway.terraform-demo-igw will be created
+ resource "aws_internet_gateway" "terraform-demo-igw" {
+ arn = (known after apply)
+ id = (known after apply)
+ owner_id = (known after apply)
+ tags = {
+ "Name" = "terraform-demo-igw"
}
+ vpc_id = (known after apply)
}<CUT># aws_vpc.terraform-demo-vpc will be created
+ resource "aws_vpc" "terraform-demo-vpc" {
+ arn = (known after apply)
+ assign_generated_ipv6_cidr_block = false
+ cidr_block = "10.0.0.0/16"
+ default_network_acl_id = (known after apply)
+ default_route_table_id = (known after apply)
+ default_security_group_id = (known after apply)
+ dhcp_options_id = (known after apply)
+ enable_classiclink = false
+ enable_classiclink_dns_support = (known after apply)
+ enable_dns_hostnames = true
+ enable_dns_support = true
+ id = (known after apply)
+ instance_tenancy = "default"
+ ipv6_association_id = (known after apply)
+ ipv6_cidr_block = (known after apply)
+ main_route_table_id = (known after apply)
+ owner_id = (known after apply)
+ tags = {
+ "Name" = "terraform-demo-vpc"
}
}Plan: 9 to add, 0 to change, 0 to destroy.Do you want to perform these actions?
Terraform will perform the actions described above.
Only 'yes' will be accepted to approve.Enter a value: yesaws_vpc.terraform-demo-vpc: Creating...
aws_vpc.terraform-demo-vpc: Creation complete after 2s [id=vpc-03ae143c2a8e3284c]
aws_internet_gateway.terraform-demo-igw: Creating...
aws_subnet.terraform-demo-snet-app: Creating...
aws_subnet.terraform-demo-snet-db: Creating...
aws_subnet.terraform-demo-snet-web: Creating...
aws_subnet.terraform-demo-snet-app: Creation complete after 1s [id=subnet-0b6474b59034abcb0]
aws_subnet.terraform-demo-snet-db: Creation complete after 1s [id=subnet-0c5f28652ff57e71b]
aws_internet_gateway.terraform-demo-igw: Creation complete after 1s [id=igw-05519819650e3f727]
aws_route_table.terraform-demo-rtable: Creating...
aws_subnet.terraform-demo-snet-web: Creation complete after 2s [id=subnet-06bd93be3e1b13772]
aws_route_table.terraform-demo-rtable: Creation complete after 1s [id=rtb-08a56a903445b0c7c]
aws_route_table_association.terraform-demo-rtassoc3: Creating...
aws_route_table_association.terraform-demo-rtassoc2: Creating...
aws_route_table_association.terraform-demo-rtassoc1: Creating...
aws_route_table_association.terraform-demo-rtassoc1: Creation complete after 1s [id=rtbassoc-0d9d2fe02770cf4fd]
aws_route_table_association.terraform-demo-rtassoc2: Creation complete after 1s [id=rtbassoc-04e0a5bdcddd03f22]
aws_route_table_association.terraform-demo-rtassoc3: Creation complete after 1s [id=rtbassoc-0daec5cb8a9545d2a]Apply complete! Resources: 9 added, 0 changed, 0 destroyed.
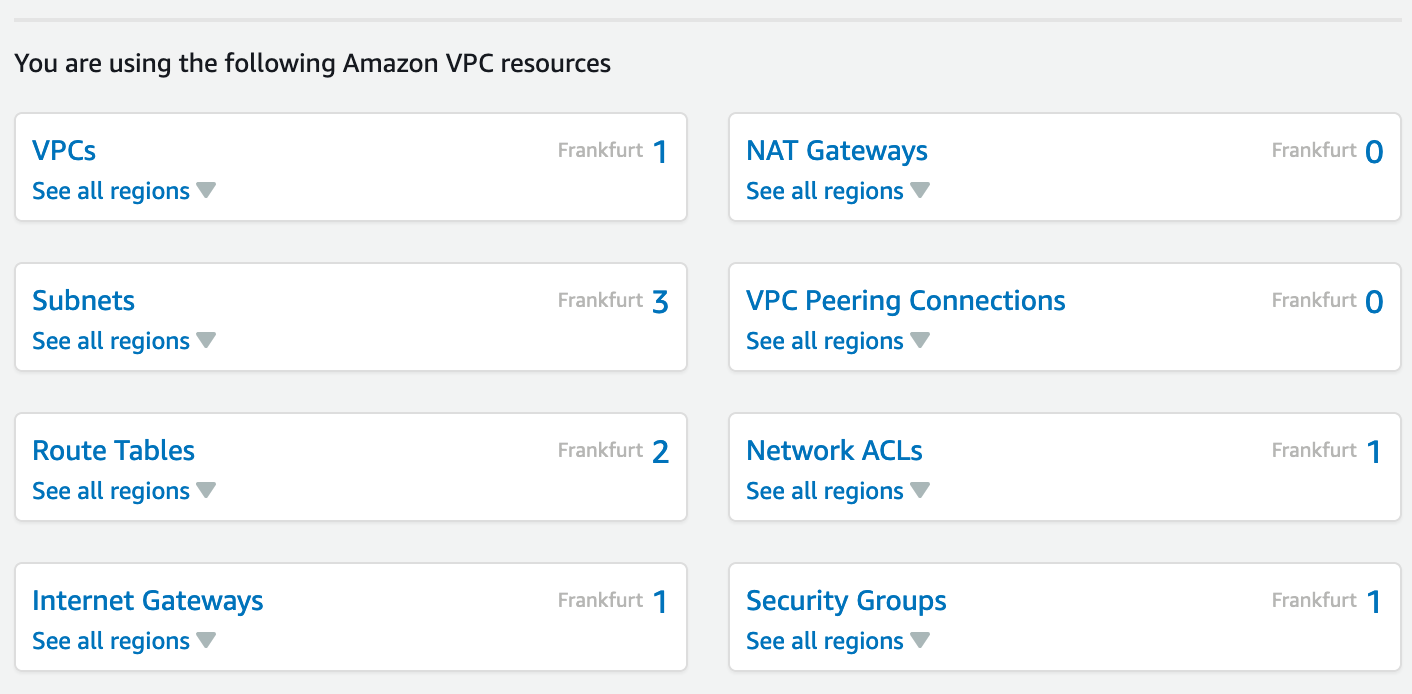
santino:terraform-aws santino$You can now login to the AWS console to verify the objects created. Here is how my dashboard now looks like:
现在,您可以登录到AWS控制台以验证创建的对象。 这是我的仪表板现在的样子:
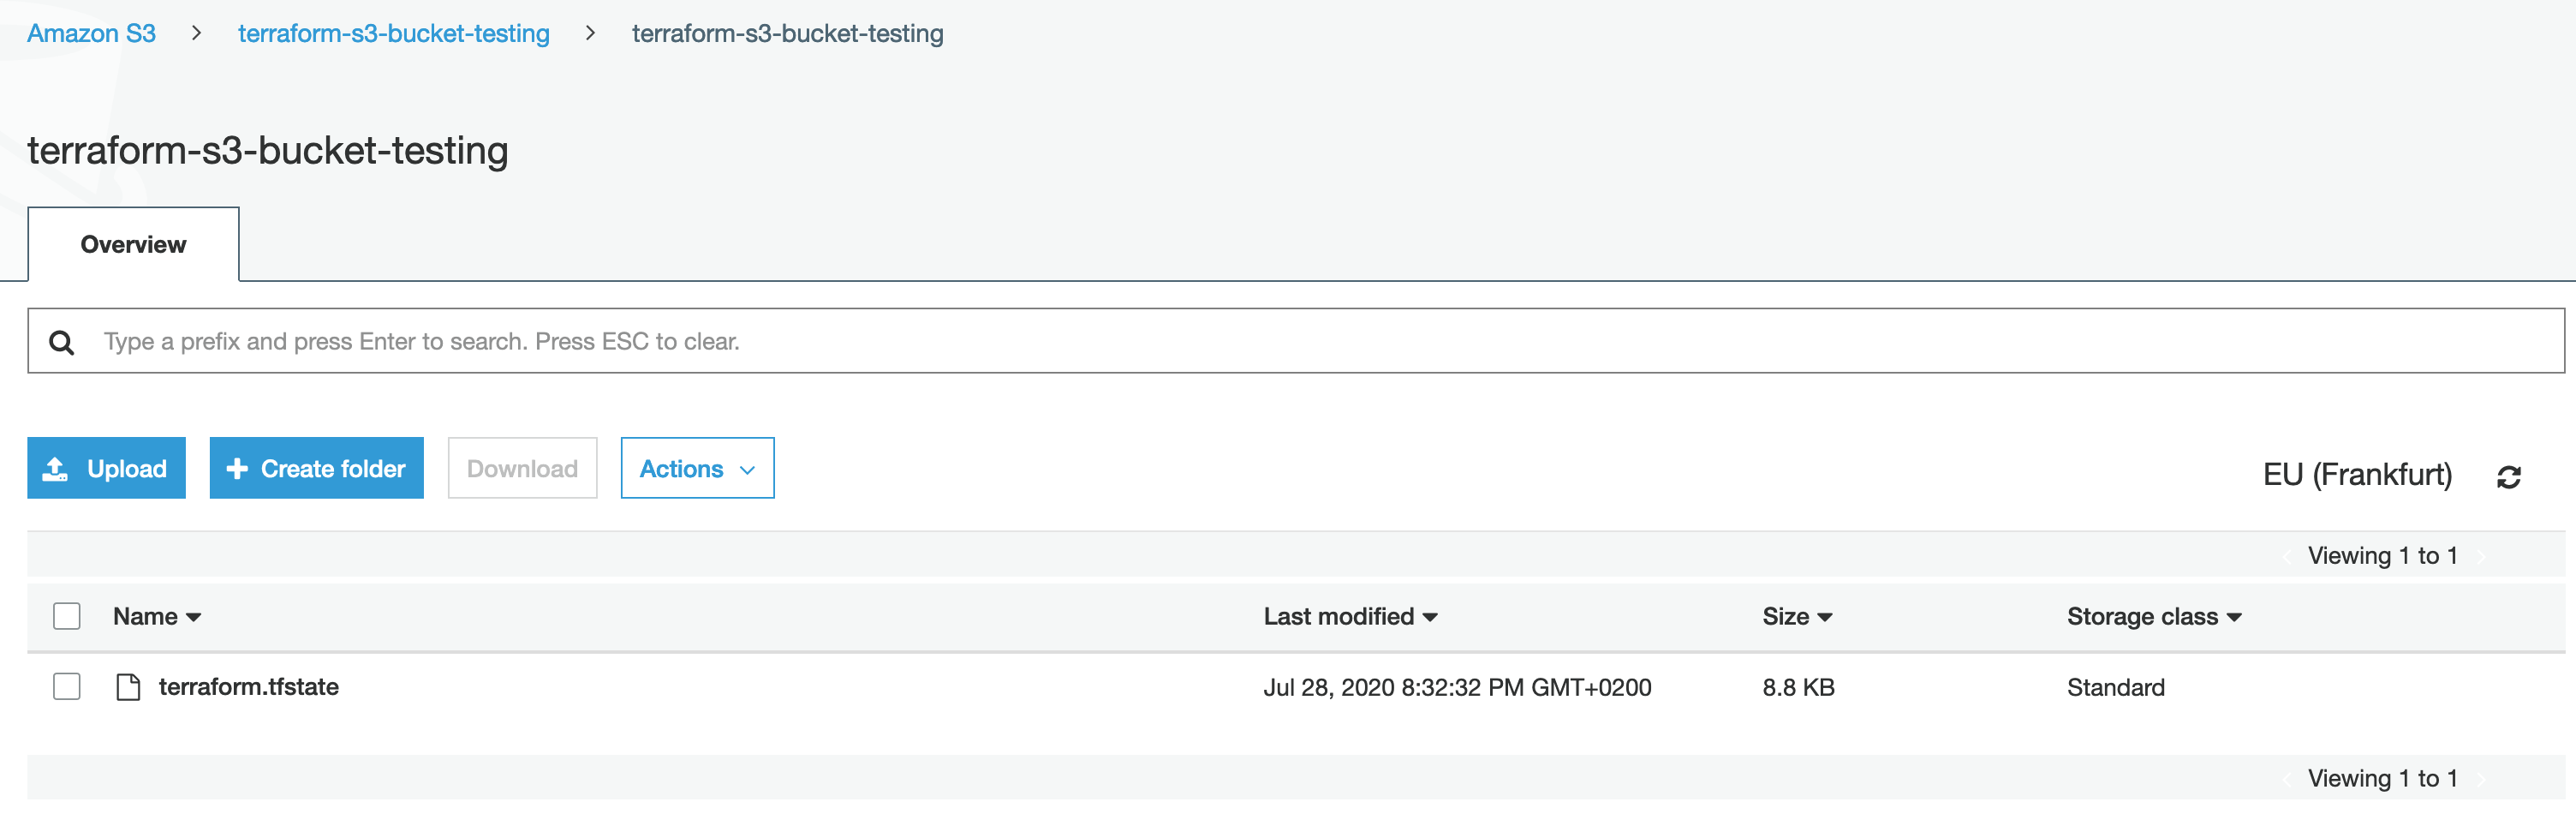
The terraform.tfstate file would also be created in the S3 bucket which we have defined earlier:
terraform.tfstate文件也将在我们之前定义的S3存储桶中创建:
部署服务器 (Deploying servers)
Now that our VPC is ready, we can now deploy servers.
现在,我们的VPC已准备就绪,我们现在可以部署服务器了。
安全组 (Security groups)
First, let us define 3 security groups:
首先,让我们定义3个安全组:
Security group that would allow inbound access to our web servers in the terraform-demo-snet-web subnet from the internet.
安全组,该安全组允许从Internet入站访问terraform-demo-snet-web子网中的Web服务器。
Security group that would allow access to our application servers in the terraform-demo-snet-app subnet from the terraform-demo-snet-web subnet.
安全组,该安全组允许从terraform-demo-snet-web子网访问terraform-demo-snet-app子网中的应用程序服务器。
Security group that would allow access to our database servers in the terraform-demo-snet-db subnet from the terraform-demo-snet-app subnet.
安全组,该安全组允许从terraform-demo-snet-app子网访问terraform-demo-snet-db子网中的数据库服务器。
secgroups.tf
secgroups.tf
## Security groups# Web tier security group
resource "aws_security_group" "terraform-demo-secgrp-webpub" {
        vpc_id              = aws_vpc.terraform-demo-vpc.id
        name                = "terraform-demo-secgrp-webpub"
        description         = "Allow web traffic from the internet"
        ingress {
                from_port       = 80
                to_port         = 80
                protocol        = "tcp"
                cidr_blocks     = ["0.0.0.0/0"]
                description     = "Plain HTTP"
        }
        ingress{
                from_port       = 443
                to_port         = 443
                protocol        = "tcp"
                cidr_blocks     = ["0.0.0.0/0"]
                description     = "Secure HTTP"
        }
        egress {
                from_port       = 0
                to_port         = 0
                protocol        = "-1"
                cidr_blocks     = ["0.0.0.0/0"]
        }
        tags = {
                Name = "terraform-demo-secgrp-webpub"
        }
}# Application tier security group
resource "aws_security_group" "terraform-demo-secgrp-app" {
        vpc_id              = aws_vpc.terraform-demo-vpc.id
        name                = "terraform-demo-secgrp-app"
        description         = "Allow traffic from the web tier"
        ingress{
                from_port       = 8080
                to_port         = 8080
                protocol        = "tcp"
                cidr_blocks     = ["10.0.0.0/21"]
                description     = "Plain HTTP"
        }
        ingress{
                from_port       = 8443
                to_port         = 8443
                protocol        = "tcp"
                cidr_blocks     = ["10.0.0.0/21"]
                description     = "Secure HTTP"
        }
        egress {
                from_port       = 0
                to_port         = 0
                protocol        = "-1"
                cidr_blocks     = ["0.0.0.0/0"]
        }
        tags = {
                Name = "terraform-demo-secgrp-app"
        }
}# Database tier security group
resource "aws_security_group" "terraform-demo-secgrp-db" {
        vpc_id              = aws_vpc.terraform-demo-vpc.id
        name                = "terraform-demo-secgrp-db"
        description         = "Allow traffic from the app tier"
        ingress{
                from_port       = 5432
                to_port         = 5432
                protocol        = "tcp"
                cidr_blocks     = ["10.0.8.0/21"]
                description     = "PostgreSQL"
        }
        ingress{
                from_port       = 3306
                to_port         = 3306
                protocol        = "tcp"
                cidr_blocks     = ["10.0.8.0/21"]
                description     = "MySQL"
        }
        ingress{
                from_port       = 27017
                to_port         = 27017
                protocol        = "tcp"
                cidr_blocks     = ["10.0.8.0/21"]
                description     = "mongodb"
        }
        egress {
                from_port       = 0
                to_port         = 0
                protocol        = "-1"
                cidr_blocks     = ["0.0.0.0/0"]
        }
        tags = {
                Name = "terraform-demo-secgrp-db"
        }
}
Again, run the same terraform plan command earlier and review the proposed changes, then run terraform apply and respond with yes to the prompt.
再次,较早运行相同的terraform plan命令并查看建议的更改,然后运行terraform apply并对提示做出肯定答复。
Sample output:
样本输出:
santino:terraform-aws santino$ terraform apply
aws_vpc.terraform-demo-vpc: Refreshing state... [id=vpc-03ae143c2a8e3284c]
<CUT>
aws_route_table_association.terraform-demo-rtassoc3: Refreshing state... [id=rtbassoc-0daec5cb8a9545d2a]An execution plan has been generated and is shown below.
Resource actions are indicated with the following symbols:
  + createTerraform will perform the following actions:<CUT># aws_security_group.terraform-demo-secgrp-webpub will be created
  + resource "aws_security_group" "terraform-demo-secgrp-webpub" {
      + arn                    = (known after apply)
      + description            = "Allow web traffic from the internet"
      + egress                 = [
          + {
              + cidr_blocks      = [
                  + "0.0.0.0/0",
                ]
              + description      = ""
              + from_port        = 0
              + ipv6_cidr_blocks = []
              + prefix_list_ids  = []
              + protocol         = "-1"
              + security_groups  = []
              + self             = false
              + to_port          = 0
            },
        ]
      + id                     = (known after apply)
      + ingress                = [
          + {
              + cidr_blocks      = [
                  + "0.0.0.0/0",
                ]
              + description      = "Plain HTTP"
              + from_port        = 80
              + ipv6_cidr_blocks = []
              + prefix_list_ids  = []
              + protocol         = "tcp"
              + security_groups  = []
              + self             = false
              + to_port          = 80
            },
          + {
              + cidr_blocks      = [
                  + "0.0.0.0/0",
                ]
              + description      = "Secure HTTP"
              + from_port        = 443
              + ipv6_cidr_blocks = []
              + prefix_list_ids  = []
              + protocol         = "tcp"
              + security_groups  = []
              + self             = false
              + to_port          = 443
            },
        ]
      + name                   = "terraform-demo-secgrp-webpub"
      + owner_id               = (known after apply)
      + revoke_rules_on_delete = false
      + tags                   = {
          + "Name" = "terraform-demo-secgrp-webpub"
        }
      + vpc_id                 = "vpc-03ae143c2a8e3284c"
    }Plan: 3 to add, 0 to change, 0 to destroy.Do you want to perform these actions?
  Terraform will perform the actions described above.
  Only 'yes' will be accepted to approve.Enter a value: yesaws_security_group.terraform-demo-secgrp-db: Creating...
aws_security_group.terraform-demo-secgrp-app: Creating...
aws_security_group.terraform-demo-secgrp-webpub: Creating...
aws_security_group.terraform-demo-secgrp-app: Creation complete after 2s [id=sg-0d920e06fa8dd370f]
aws_security_group.terraform-demo-secgrp-webpub: Creation complete after 2s [id=sg-029d4f9c83b6fed54]
aws_security_group.terraform-demo-secgrp-db: Creation complete after 2s [id=sg-049704a710b385483]Apply complete! Resources: 3 added, 0 changed, 0 destroyed.
santino:terraform-aws santino$
服务器定义 (Server definitions)
Finally, we can now deploy our servers!
最后,我们现在可以部署服务器了!
First, we will query for the ID of the latest official Centos 7 AMI. Next, we will create an SSH key resource based on our own public key in ~/.ssh/id_rsa.pub. Lastly, we will create our web server, our application server, and 2 database servers, all in their respective subnets. We would also associate each server with the corresponding security group created earlier.
首先,我们将查询最新的官方Centos 7 AMI的ID。 接下来,我们将基于〜/ .ssh / id_rsa.pub中我们自己的公共密钥创建SSH密钥资源。 最后,我们将在各自的子网中创建Web服务器,应用程序服务器和2个数据库服务器。 我们还将每个服务器与之前创建的相应安全组相关联。
servers.tf:
servers.tf :
## Query the  latest AMI for Centos 7
data "aws_ami" "centos7" {
    owners      = ["679593333241"]
    most_recent = true
    filter {
        name   = "name"
        values = ["CentOS Linux 7 x86_64 HVM EBS *"]
    }
    filter {
        name   = "architecture"
        values = ["x86_64"]
    }
    filter {
        name   = "root-device-type"
        values = ["ebs"]
    }
}## SSH Key pair
resource "aws_key_pair" "terraform-demo-sshkey-santino" {
    key_name   = "terraform-demo-sshkey-santino"
    public_key = file("~/.ssh/id_rsa.pub")
        tags = {
             Name = "terraform-demo-sshkey-santino"
        }
}### Server definitions
# Web server
resource "aws_instance" "terraform-demo-web" {
  ami                    = data.aws_ami.centos7.id
  instance_type          = "t2.micro"
  key_name               = aws_key_pair.terraform-demo-sshkey-santino.key_name
  subnet_id              = aws_subnet.terraform-demo-snet-web.id
  vpc_security_group_ids = [aws_security_group.terraform-demo-secgrp-webpub.id]
        tags = {
             Name = "terraform-demo-web"
        }
}
# Application server
resource "aws_instance" "terraform-demo-app" {
  ami                    = data.aws_ami.centos7.id
  instance_type          = "t2.micro"
  key_name               = aws_key_pair.terraform-demo-sshkey-santino.key_name
  subnet_id              = aws_subnet.terraform-demo-snet-app.id
  vpc_security_group_ids = [aws_security_group.terraform-demo-secgrp-app.id]
        tags = {
             Name = "terraform-demo-app"
        }
}
# Database server - Postgresql
resource "aws_instance" "terraform-demo-postgres" {
  ami                    = data.aws_ami.centos7.id
  instance_type          = "t3a.medium"
  key_name               = aws_key_pair.terraform-demo-sshkey-santino.key_name
  subnet_id              = aws_subnet.terraform-demo-snet-db.id
  vpc_security_group_ids = [aws_security_group.terraform-demo-secgrp-db.id]
        tags = {
             Name = "terraform-demo-postgres"
        }
}
# Database server - MySQL
resource "aws_instance" "terraform-demo-mysql" {
  ami                    = data.aws_ami.centos7.id
  instance_type          = "t3a.medium"
  key_name               = aws_key_pair.terraform-demo-sshkey-santino.key_name
  subnet_id              = aws_subnet.terraform-demo-snet-db.id
  vpc_security_group_ids = [aws_security_group.terraform-demo-secgrp-db.id]
        tags = {
             Name = "terraform-demo-mysql"
        }
}
Again, run the same terraform plan command earlier and review the proposed changes, then run terraform apply and respond with yes to the prompt.
再次,较早运行相同的terraform plan命令并查看建议的更改,然后运行terraform apply并对提示做出肯定答复。
santino:terraform-aws santino$ terraform apply
data.aws_ami.centos7: Refreshing state...
aws_vpc.terraform-demo-vpc: Refreshing state... [id=vpc-03ae143c2a8e3284c]
aws_subnet.terraform-demo-snet-app: Refreshing state... [id=subnet-0b6474b59034abcb0]
aws_internet_gateway.terraform-demo-igw: Refreshing state... [id=igw-05519819650e3f727]
aws_subnet.terraform-demo-snet-web: Refreshing state... [id=subnet-06bd93be3e1b13772]
aws_subnet.terraform-demo-snet-db: Refreshing state... [id=subnet-0c5f28652ff57e71b]
aws_security_group.terraform-demo-secgrp-db: Refreshing state... [id=sg-049704a710b385483]
aws_security_group.terraform-demo-secgrp-app: Refreshing state... [id=sg-0d920e06fa8dd370f]
aws_security_group.terraform-demo-secgrp-webpub: Refreshing state... [id=sg-029d4f9c83b6fed54]
aws_route_table.terraform-demo-rtable: Refreshing state... [id=rtb-08a56a903445b0c7c]
aws_route_table_association.terraform-demo-rtassoc3: Refreshing state... [id=rtbassoc-0daec5cb8a9545d2a]
aws_route_table_association.terraform-demo-rtassoc1: Refreshing state... [id=rtbassoc-0d9d2fe02770cf4fd]
aws_route_table_association.terraform-demo-rtassoc2: Refreshing state... [id=rtbassoc-04e0a5bdcddd03f22]An execution plan has been generated and is shown below.
Resource actions are indicated with the following symbols:
  + create
-/+ destroy and then create replacementTerraform will perform the following actions:# aws_instance.terraform-demo-app will be created
  + resource "aws_instance" "terraform-demo-app" {
      + ami                          = "ami-0e8286b71b81c3cc1"
      + arn                          = (known after apply)
      + associate_public_ip_address  = (known after apply)
      + availability_zone            = (known after apply)
      + cpu_core_count               = (known after apply)
      + cpu_threads_per_core         = (known after apply)
      + get_password_data            = false
      + host_id                      = (known after apply)
      + id                           = (known after apply)
      + instance_state               = (known after apply)
      + instance_type                = "t2.micro"
      + ipv6_address_count           = (known after apply)
      + ipv6_addresses               = (known after apply)
      + key_name                     = "terraform-demo-sshkey-santino"
      + network_interface_id         = (known after apply)
      + outpost_arn                  = (known after apply)
      + password_data                = (known after apply)
      + placement_group              = (known after apply)
      + primary_network_interface_id = (known after apply)
      + private_dns                  = (known after apply)
      + private_ip                   = (known after apply)
      + public_dns                   = (known after apply)
      + public_ip                    = (known after apply)
      + security_groups              = (known after apply)
      + source_dest_check            = true
      + subnet_id                    = "subnet-0b6474b59034abcb0"
      + tags                         = {
          + "Name" = "terraform-demo-app"
        }
      + tenancy                      = (known after apply)
      + volume_tags                  = (known after apply)
      + vpc_security_group_ids       = (known after apply)+ ebs_block_device {
          + delete_on_termination = (known after apply)
          + device_name           = (known after apply)
          + encrypted             = (known after apply)
          + iops                  = (known after apply)
          + kms_key_id            = (known after apply)
          + snapshot_id           = (known after apply)
          + volume_id             = (known after apply)
          + volume_size           = (known after apply)
          + volume_type           = (known after apply)
        }+ ephemeral_block_device {
          + device_name  = (known after apply)
          + no_device    = (known after apply)
          + virtual_name = (known after apply)
        }+ metadata_options {
          + http_endpoint               = (known after apply)
          + http_put_response_hop_limit = (known after apply)
          + http_tokens                 = (known after apply)
        }+ network_interface {
          + delete_on_termination = (known after apply)
          + device_index          = (known after apply)
          + network_interface_id  = (known after apply)
        }+ root_block_device {
          + delete_on_termination = (known after apply)
          + device_name           = (known after apply)
          + encrypted             = (known after apply)
          + iops                  = (known after apply)
          + kms_key_id            = (known after apply)
          + volume_id             = (known after apply)
          + volume_size           = (known after apply)
          + volume_type           = (known after apply)
        }
    }<CUT>Plan: 7 to add, 0 to change, 0 to destroy.Do you want to perform these actions?
  Terraform will perform the actions described above.
  Only 'yes' will be accepted to approve.Enter a value: yes<CUT>
aws_instance.terraform-demo-mysql: Creation complete after 13s [id=i-029c67de608e848b5]
aws_instance.terraform-demo-web: Still creating... [20s elapsed]
aws_instance.terraform-demo-app: Still creating... [20s elapsed]
aws_instance.terraform-demo-app: Creation complete after 22s [id=i-01363d0b335a46378]
aws_instance.terraform-demo-web: Still creating... [30s elapsed]
aws_instance.terraform-demo-web: Creation complete after 32s [id=i-059f9773402b1eb34]Apply complete! Resources: 7 added, 0 changed, 0destroyed.
santino:terraform-aws santino$
Login to the EC2 Dashboard and navigate to Instances to verify the servers created:
登录到EC2仪表板,然后导航到“实例”以验证创建的服务器:

Congratulations! You have just implemented your AWS infrastructure using Terraform!
恭喜你! 您刚刚使用Terraform实施了AWS基础设施!
摘要 (Summary)
In this tutorial, we have learned about:
在本教程中,我们了解了:
- What Terraform is 什么是地形
- Prerequisites to using Terraform 使用Terraform的先决条件
- How to install Terraform 如何安装Terraform
- Remote Terraform state 远程地形状态
- Defining our network objects 定义我们的网络对象
- Deploying our servers 部署我们的服务器
下一个 (Up next)
To learn more about all possible parameters you can configure for an AWS resource (such as aws_instance), refer to the official Terraform documentation: https://registry.terraform.io/providers/hashicorp/aws/latest
要了解有关您可以为AWS资源配置的所有可能参数的更多信息(例如aws_instance ),请参阅官方Terraform文档: https : //registry.terraform.io/providers/hashicorp/aws/latest
All code used in this project have been published to GitHub: https://github.com/guerzon/terraform-aws-demo. Comments and pull requests are very welcome!
该项目中使用的所有代码均已发布到GitHub: https : //github.com/guerzon/terraform-aws-demo 。 欢迎评论和请求请求!
翻译自: https://medium.com/swlh/how-to-manage-your-aws-infrastructure-with-terraform-3581b631fd9d
aws terraform


 1871
1871

 被折叠的 条评论
为什么被折叠?
被折叠的 条评论
为什么被折叠?
 到【灌水乐园】发言


