


熊猫烧香分析报告
Importing data is the first step in any data science project. Often, you’ll work with data in CSV files and run into problems at the very beginning. In this article, you’ll see how to use the Pandas read_csv() function to deal with the following common problems.
导入数据是任何数据科学项目的第一步。 通常,您将使用CSV文件中的数据,并在一开始就遇到问题。 在本文中,您将看到如何使用熊猫的read_csv()函数来解决以下常见问题。
- Dealing with different character encodings 处理不同的字符编码
- Dealing with headers 处理标题
- Dealing with columns 处理列
- Parsing date columns 解析日期列
- Setting data type for columns 设置列的数据类型
- Finding and locating invalid value 查找和定位无效值
- Appending data to an existing CSV file 将数据追加到现有的CSV文件
Loading a huge CSV file with
chunksize加载一个巨大的CSV文件
chunksize
Please check out my Github repo for the source code.
请查看我的Github存储库以获取源代码。
1.处理不同的字符编码 (1. Dealing with different character encodings)
Character encodings are specific sets of rules for mapping from raw binary byte strings to characters that make up the human-readable text [1]. Python has built-in support for a list of standard encodings.
字符编码是从原始二进制字节字符串到构成人类可读文本的字符[1]映射的特定规则集。 Python内置了对标准编码列表的支持。
Character encoding mismatches are less common today as UTF-8 is the standard text encoding in most of the programming languages including Python. However, it is definitely still a problem if you are trying to read a file with a different encoding than the one it was originally written. You are most likely to end up with something like below or DecodeError when that happens:
由于UTF-8是大多数编程语言(包括Python)中的标准文本编码,因此字符编码不匹配如今已不那么普遍。 但是,如果您尝试读取的文件编码与最初写入的编码不同,则绝对仍然是一个问题。 发生这种情况时,您最有可能遇到如下所示或DecodeError的错误 :

The Pandas read_csv() function has an argument call encoding that allows you to specify an encoding to use when reading a file.
熊猫的read_csv()函数具有参数调用encoding ,该参数允许您指定在读取文件时使用的编码。
Let’s take a look at an example below:
让我们看下面的例子:
First, we create a DataFrame with some Chinese characters and save it with encoding='gb2312' .
首先,我们创建一个带有一些中文字符的DataFrame并将其保存为encoding='gb2312' 。
df = pd.DataFrame({'name': '一 二 三 四'.split(), 'n': [2, 0, 2, 3]})df.to_csv('data/data_1.csv', encoding='gb2312', index=False)Then, you should get an UnicodeDecodeError when trying to read the file with the default utf8 encoding.
然后,当您尝试使用默认的utf8编码读取文件时,应该收到UnicodeDecodeError 。
# Read it with default encoding='utf8'
# You should get an error
pd.read_csv('data/data_1.csv')
In order to read it correctly, you should pass the encoding that the file was written.
为了正确读取它,您应该传递写入文件的编码。
pd.read_csv('data/data_1.csv', encoding='gb2312')
2.处理标题 (2. Dealing with headers)
Headers refer to the column names. For some datasets, the headers may be completely missing, or you might want to consider a different row as headers. The read_csv() function has an argument called header that allows you to specify the headers to use.
标题指的是列名。 对于某些数据集,标题可能会完全丢失,或者您可能希望将其他行视为标题。 read_csv()函数具有一个称为header的参数,可让您指定要使用的标题。
没有标题 (No headers)
If your CSV file does not have headers, then you need to set the argument header to None and the Pandas will generate some integer values as headers
如果您的CSV文件没有标题,则需要将参数header设置为None ,而Pandas将生成一些整数值作为标题
For example to import data_2_no_headers.csv
例如导入data_2_no_headers.csv
pd.read_csv('data/data_2_no_headers.csv', header=None)
将不同的行视为标题 (Consider different row as headers)
Let’s take a look at data_2.csv
让我们看一下data_2.csv
x1,       x2,      x3,     x4product,  price,   cost,   profit
a,        10,      5,      1
b,        20,      12,     2
c,        30,      20,     3
d,        40,      30,     4
It seems like more sensible columns name would be product, price, … profit, but they are not in the first row. The argument header also allows you to specify the row number to use as the column names and the start of data. In this case, we would like to skip the first row and use the 2nd row as headers:
似乎更明智的列名称应该是product , price ,… profit ,但它们不在第一行。 参数header还允许您指定要用作列名称和数据开头的行号。 在这种情况下,我们想跳过第一行并将第二行用作标题:
pd.read_csv('data/data_2.csv', header=1)3.处理专栏 (3. Dealing with columns)
When your input dataset contains a large number of columns, and you want to load a subset of those columns into a DataFrame, then usecols will be very useful.
当输入数据集包含大量列,并且您要将这些列的子集加载到DataFrame中时, usecols将非常有用。
Performance-wise, it is better because instead of loading an entire DataFrame into memory and then deleting the spare columns, we can select the columns we need while loading the dataset.
从性能角度来看,这是更好的选择,因为我们可以在加载数据集时选择所需的列,而不是将整个DataFrame加载到内存中然后删除备用列。
Let’s use the same dataset data_2.csv and select the product and cost columns.
让我们使用相同的数据集data_2.csv并选择产品和成本列。
pd.read_csv('data/data_2.csv',
            header=1,
            usecols=['product', 'cost'])
We can also pass the column index to usecols:
我们还可以将列索引传递给usecols :
pd.read_csv('data/data_2.csv',
            header=1,
            usecols=[0, 1])
4.解析日期列 (4. Parsing date columns)
Date columns are represented as objects by default when loading data from a CSV file.
从CSV文件加载数据时,默认情况下,日期列表示为对象 。
df = pd.read_csv('data/data_3.csv')
df.info()RangeIndex: 4 entries, 0 to 3
Data columns (total 5 columns):
 #   Column   Non-Null Count  Dtype
---  ------   --------------  -----
 0   date     4 non-null      object
 1   product  4 non-null      object
 2   price    4 non-null      int64
 3   cost     4 non-null      int64
 4   profit   4 non-null      int64
dtypes: int64(3), object(2)
memory usage: 288.0+ bytes
To read the date column correctly, we can use the argument parse_dates to specify a list of date columns.
为了正确读取日期列,我们可以使用参数parse_dates指定日期列的列表。
df = pd.read_csv('data/data_3.csv', parse_dates=['date'])
df.info()<class 'pandas.core.frame.DataFrame'>
RangeIndex: 4 entries, 0 to 3
Data columns (total 5 columns):
 #   Column   Non-Null Count  Dtype
---  ------   --------------  -----
 0   date     4 non-null      datetime64[ns]
 1   product  4 non-null      object
 2   price    4 non-null      int64
 3   cost     4 non-null      int64
 4   profit   4 non-null      int64
dtypes: datetime64[ns](1), int64(3), object(1)
memory usage: 288.0+ bytes
Sometime date is split up into multiple columns, for example, year, month, and day. To combine them into a datetime, we can pass a nested list to parse_dates.
有时,日期会分为多个列,例如year , month和day 。 要将它们合并为日期时间,我们可以将嵌套列表传递给parse_dates 。
df = pd.read_csv('data/data_4.csv',
                 parse_dates=[['year', 'month', 'day']])
df.info()RangeIndex: 4 entries, 0 to 3
Data columns (total 5 columns):
 #   Column          Non-Null Count  Dtype
---  ------          --------------  -----
 0   year_month_day  4 non-null      datetime64[ns]
 1   product         4 non-null      object
 2   price           4 non-null      int64
 3   cost            4 non-null      int64
 4   profit          4 non-null      int64
dtypes: datetime64[ns](1), int64(3), object(1)
memory usage: 288.0+ bytes
To specify a custom column name instead of the auto-generated year_month_day, we can pass a dictionary instead.
要指定自定义列名称而不是自动生成的year_month_day ,我们可以改为传递字典。
df = pd.read_csv('data/data_4.csv',
                 parse_dates={ 'date': ['year', 'month', 'day'] })
df.info()
If your date column is in a different format, then you can customize a date parser and pass it to the argument date_parser:
如果日期列的格式不同,则可以自定义日期解析器并将其传递给参数date_parser :
from datetime import datetimecustom_date_parser = lambda x: datetime.strptime(x, "%Y %m %d %H:%M:%S")pd.read_csv('data/data_6.csv',
             parse_dates=['date'],
             date_parser=custom_date_parser)
For more about parsing date columns, please check out this article
有关解析日期列的更多信息,请查看本文
5.设置数据类型 (5. Setting data type)
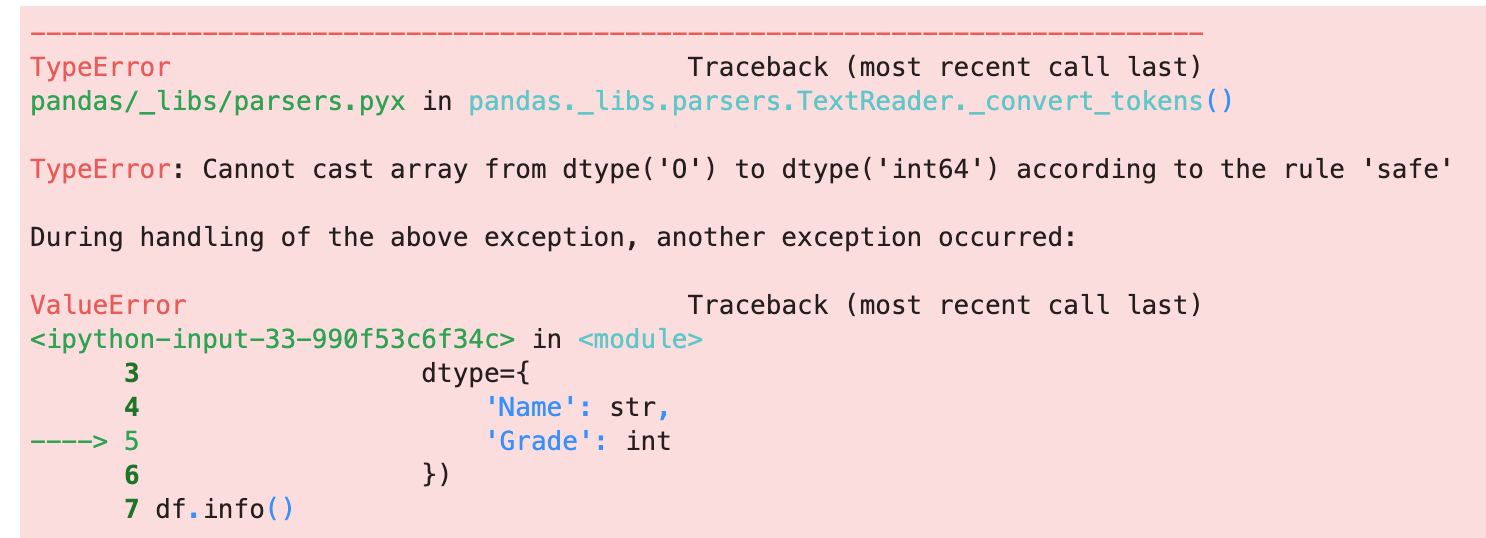
If you want to set the data type for the DataFrame columns, you can use the argument dtype , for example
如果要设置DataFrame列的数据类型,则可以使用参数dtype ,例如
pd.read_csv('data/data_7.csv',
                 dtype={
                     'Name': str,
                     'Grade': int
                 })
6.查找和定位无效值 (6. Finding and locating invalid values)
You might get the TypeError when setting data type using the argument dtype
使用参数dtype设置数据类型时,您可能会遇到TypeError
It is always useful to find and locate the invalid values when this error happens. Here is how you can find them:
发生此错误时,查找和定位无效值始终很有用。 您可以通过以下方式找到它们:
df = pd.read_csv('data/data_8.csv')is_error = pd.to_numeric(df['Grade'], errors='coerce').isna()df[is_error]
7.将数据追加到现有的CSV文件中 (7. Appending data to an existing CSV file)
You can specify a Python write mode in the Pandas to_csv() function. For appending data to an existing CSV file, we can use mode='a':
您可以在Pandas to_csv()函数中指定Python写入模式。 要将数据附加到现有的CSV文件中,我们可以使用mode='a' :
new_record = pd.DataFrame([['New name', pd.to_datetime('today')]],
                      columns=['Name', 'Date'])new_record.to_csv('data/existing_data.csv',
              mode='a',
              header=None,
index=False) 8.加载一个带有chunksize的巨大CSV文件 (8. Loading a huge CSV file with chunksize)
By default, Pandas read_csv() function will load the entire dataset into memory, and this could be a memory and performance issue when importing a huge CSV file.
默认情况下,Pandas的read_csv()函数会将整个数据集加载到内存中,并且在导入巨大的CSV文件时这可能是内存和性能问题。
read_csv() has an argument called chunksize that allows you to retrieve the data in a same-sized chunk. This is especially useful when reading a huge dataset as part of your data science project.
read_csv()有一个称为chunksize的参数,它允许您检索相同大小的块中的数据。 当读取庞大的数据集作为数据科学项目的一部分时,这特别有用。
Let’s take a look at an example below:
让我们看下面的例子:
First, let’s make a huge dataset with 400,000 rows and save it to big_file.csv
首先,让我们制作一个具有40万行的巨大数据集并将其保存到big_file.csv
# Make up a huge datasetnums = 100_000for name in 'a b c d'.split():
    df = pd.DataFrame({
        'col_1': [1]*nums,
        'col_2': np.random.randint(100, 2000, size=nums)
    })    df['name'] = name
    df.to_csv('data/big_file.csv',
              mode='a',
              index=False,
              header= name=='a')
Next, let’s specify a chucksize of 50,000 when loading data with read_csv()
接下来,让我们在使用read_csv()加载数据时指定chucksize为50,000
dfs = pd.read_csv('data/big_file.csv',
                  chunksize=50_000,
                  dtype={
                      'col_1': int,
                      'col_2': int,
                      'name': str
                  })
Let’s perform some aggregations on each chunk and then concatenate the result into a single DataFrame.
让我们对每个块执行一些聚合,然后将结果连接到单个DataFrame中。
res_dfs = []for chunk in dfs:
    res = chunk.groupby('name').col_2.agg(['count', 'sum'])
    res_dfs.append(res)pd.concat(res_dfs).groupby(level=0).sum()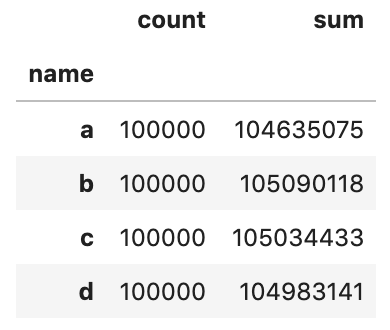
Let’s validate the result against a solution without chunksize
让我们来验证对无解的结果chunksize
pd.read_csv('data/big_file.csv',
              dtype={
                  'col_1': int,
                  'col_2': int,
                  'name': str
              }).groupby('name').col_2.agg(['count', 'sum'])
And you should get the same output.
并且您应该获得相同的输出。
而已 (That’s it)
Thanks for reading.
谢谢阅读。
Please checkout the notebook on my Github for the source code.
请在我的Github上查看笔记本中的源代码。
Stay tuned if you are interested in the practical aspect of machine learning.
如果您对机器学习的实用方面感兴趣,请继续关注。
Here are some related articles
这是一些相关的文章
熊猫烧香分析报告


 4222
4222

 被折叠的 条评论
为什么被折叠?
被折叠的 条评论
为什么被折叠?
 到【灌水乐园】发言


