


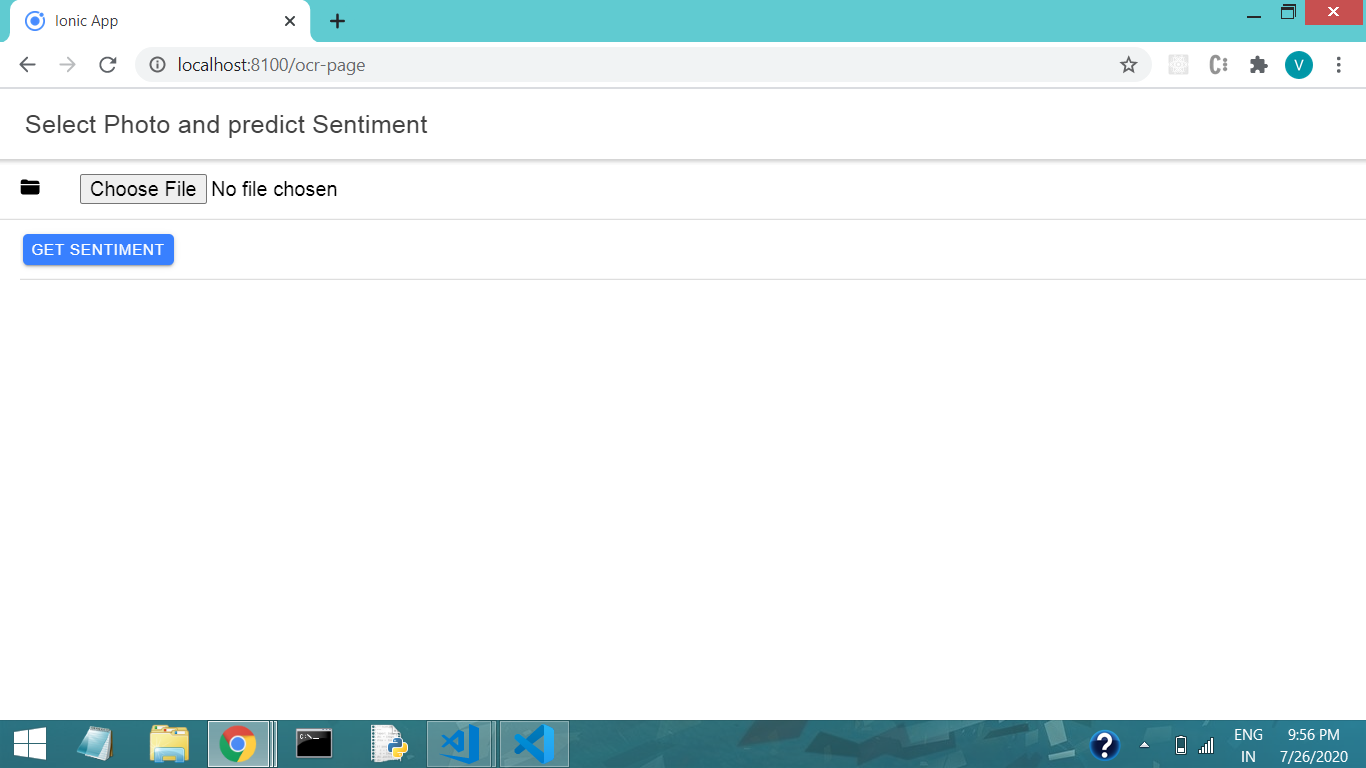
ocr应用
In this basic application we take the input image from the local machine and extract the text out of the image and then predict whether the extracted text is positive or negative or neutral. It contains two approaches -
在此基本应用程序中,我们从本地计算机获取输入图像,然后从图像中提取文本,然后预测提取的文本是正数还是负数或中性。 它包含两种方法-
- Extraction of text from image (OCR) using PyTesseract. 使用PyTesseract从图像(OCR)中提取文本。
- Sentiment prediction of text using NLP (nltk NaiveBayesClassifier) 使用NLP(nltk NaiveBayesClassifier)进行文本的情感预测
So in this we will build Angular based (Ionic) web app for user interface and flask server to interact with PyTesseract and model training using nltk.
因此,在此我们将为用户界面和烧瓶服务器构建基于Angular(离子)的Web应用程序,以与PyTesseract进行交互并使用nltk进行模型训练。
要遵循的步骤- (Steps to be followed —)
1)初始化网络应用并设置基本用户界面- (1) Initialize the web app and setup the basic user interface —)
2)安装和实施PyTesseract — (2) Installing and implementing of PyTesseract —)
3)安装nltk并将其用于情感分析— (3) Installing and using nltk for Sentiment Analysis —)
We
我们
第1步-初始化Web应用并设置基本用户界面 (Step 1 — Initialize the web app and setup the basic user interface)
we can initialize the ionic web application using -
我们可以使用-来初始化离子网络应用程序
ionic start OCR-sentiment blankNow we will setup basic UI for the app and code for calling the flask server using the REST API using HttpClient module of Angular
现在,我们将为应用设置基本的用户界面,并使用Angular的HttpClient模块使用REST API调用烧瓶服务器的代码
Here we use this choose button to use the image file and send it to the flask server using the following code.
在这里,我们使用此选择按钮来使用图像文件,并使用以下代码将其发送到flask服务器。
goToSelectfile(event: any) {
    this.fileObj = event.target.files[0];
  }
  sendName() {
    const uploadData = new FormData();
    uploadData.append('file', this.fileObj);
    this.http.post('http://127.0.0.1:5000/getText', uploadData).subscribe((res: any) => {
      this.show = true;
      this.line = res.outputText;
      this.sentiment = res.predSentiment;
    })
  }
Here we get the image file in this.fileObj and append it to the form data and use HttpClient for making a POST request to a flask server by passing the form data or the image data.
在这里,我们在this.fileObj中获取图像文件,并将其附加到表单数据中,并使用HttpClient通过传递表单数据或图像数据向Flask服务器发出POST请求。
We make a route name /getText which is defined in flask server and respond with the extracted text and predicted sentiment.
我们创建一个在烧瓶服务器中定义的路由名称/ getText ,并以提取的文本和预测的情绪作为响应。
第2步-安装和实施PyTesseract (Step 2 — Installing and implementing the PyTesseract)
In this we will go through a short installation and rest of the server coding
在此,我们将进行简短的安装和其余的服务器编码
A)安装PyTesseract (A) Installing PyTesseract)
pip install pytesseractAnd for further installation you can download the installer for HERE
对于进一步的安装,您可以在此处下载安装程序
B)实施OCR(从图像中提取文本) (B) Implementing the OCR ( Extraction of text from image ))
So in this part we will extract the text out of the image using following piece of code
因此,在这一部分中,我们将使用以下代码从图像中提取文本
try:
    from PIL import Image
except ImportError:
    import Image
import pytesseract


def ocr_extraction(filename):
    pytesseract.pytesseract.tesseract_cmd = r'C:/Users/intel/AppData/Local/Tesseract-OCR/tesseract.exe'
    text=pytesseract.image_to_string(Image.open(filename))
    return(text)
In this we take a image file as a input and use the function image_to_string to extract the text out of the image.
在此,我们以图像文件为输入,并使用函数image_to_string从图像中提取文本。
There can be various other operations to be perform for the better performance of the OCR that is we can use Open CV thresholding of the input image for better result this tutorial do not focus on that.
为了使OCR的性能更好,还可以执行其他各种操作,也就是说,我们可以使用输入图像的Open CV阈值处理来获得更好的结果,本教程不在此重点。
We have used the Pillow python library for the taking image file and opening it for processing.We will later on tutorial include the file in the main server code.
我们已经使用Pillow python库来获取图像文件并将其打开进行处理,稍后我们将在教程中将该文件包含在主服务器代码中。
步骤3 —安装和培训nltk NaiveBayesClassifier进行情感分析 (Step 3 — Installing and training nltk NaiveBayesClassifier for the sentiment Analysis)
This will installation and training of the machine learning model-
这将安装和训练机器学习模型-
1)安装nltk(自然语言处理工具包) (1) Installing nltk ( Natural language processing toolkit))
python -m nltk.downloader allThis will install all the necessary datasets and the library that we will be using in this tutorial
这将安装所有必需的数据集和我们将在本教程中使用的库
2)机器学习模型的训练 (2) Training of the machine learning model)
Now we will train the NaiveBayesClassifier using the movie_review dataset present in the nltk and the will we following the below code for training the model till dumping the model using pickle library
现在,我们将使用存在于NLTK的movie_review数据集训练NaiveBayesClassifier和将我们下面的下面的代码用于训练模型,直到用咸菜库倾销模型
positive_fileids = movie_reviews.fileids('pos')
negative_fileids = movie_reviews.fileids('neg')
Here we are separating the positive and negative class in the movie_review dataset and further we will get the positive and negative feature out of the dataset
在这里,我们将movie_review数据集中的正负类分开,然后进一步从数据集中得到正负特征
features_positive = [(extract_features(movie_reviews.words(fileids=[f])),'Positive') for f in positive_fileids]
features_negative = [(extract_features(movie_reviews.words(fileids=[f])),'Negative') for f in negative_fileids]
Now we do some splitting of data for the train and test of by deciding the threshold of 0.8
现在我们通过确定0.8的阈值对火车进行数据分割和测试
threshold_factor = 0.8
threshold_positive = int(threshold_factor * len(features_positive))
threshold_negative = int(threshold_factor * len(features_negative))


features_train = features_positive[:threshold_positive]+features_negative[:threshold_negative]
features_test = features_positive[threshold_positive:]+features_negative[threshold_negative:]
So the final step comes where we train the model and dump it (Serialize the model object) using pickle
所以最后一步是我们训练模型并使用pickle将其转储(序列化模型对象)的地方
classifier = NaiveBayesClassifier.train(features_train)
pickle.dump(classifier,open('classifier.pkl','wb'))
It will create a serialized binary file which will save our classifier object and later on we will use it for the predicting out extracted text
它将创建一个序列化的二进制文件,该文件将保存我们的分类器对象,稍后我们将使用它来预测提取的文本
最后一步-使用烧瓶并调用ORC函数并预测情绪来进行路由 (Final Step — Make a route using the flask and calling ORC function and predicting sentiment)
Now in this section we will be integrating all of our python and machine learning code and make a flask server
现在,在本节中,我们将集成所有python和机器学习代码,并创建一个flask服务器
We will make route /getText using python
我们将使用python创建路线/ getText
@app.route('/getText',methods=['POST'])
def getText():
    file=request.files['file']
    text = ocr_extraction(file)
    # print(type(text))
    sentiment = predictSentiment(text)
    print(sentiment)
    return jsonify(outputText=text,predSentiment=sentiment)
Above we have called this REST API from our front end client and get the predicted sentiment and extracted text
上面我们从前端客户端调用了此REST API,并获得了预期的情绪和提取的文本
In the above code this ocr_extraction function that we had defined earlier we can import that function and use it get the text.
在上面的代码中,我们先前定义的ocr_extraction函数可以导入该函数并使用它获取文本。
An further we pass the function in the predictSentiment function and we will define it below
再进一步,我们在predictSentiment函数中传递该函数,并将在下面对其进行定义
classifier=pickle.load(open('classifier.pkl','rb'))


def extract_features(word_list):
    return dict([(word, True) for word in word_list])


def predictSentiment(text):
    print('predict Sentiement',text)
    probdist = classifier.prob_classify(extract_features(text.split()))
    pred_sentiment = probdist.max()
    print("Predicted sentiment: ", pred_sentiment)
    return pred_sentiment
Here we load the above described nltk NaiveBayesClassifier which will then predict the sentiment of the class of the text that is if it is positive, negative or the neutral text.
在这里,我们加载上述nltk NaiveBayesClassifier,它将预测文本类别的情绪,即是肯定,否定还是中性的文本。
Then we will return the extracted text and predicted text using jsonify.
然后,我们将使用jsonify返回提取的文本和预测的文本。
演示应用程序— (Demonstration of the application —)
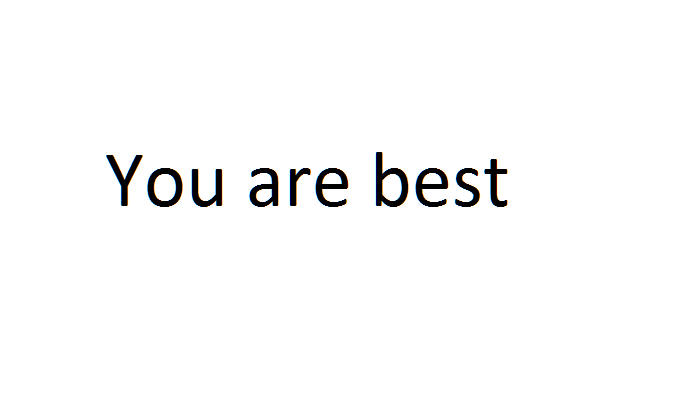
At first we will give the image containing the positive sentence in it
首先,我们将给出其中包含肯定句的图像
Now we pass this image using our front end and click on the get sentiment button and see the following output.
现在,我们使用前端传递此图像,然后单击“获取情感”按钮,然后看到以下输出。
Now we will see the following output after hitting the get sentiment button
现在,在点击“获取情感”按钮后,我们将看到以下输出
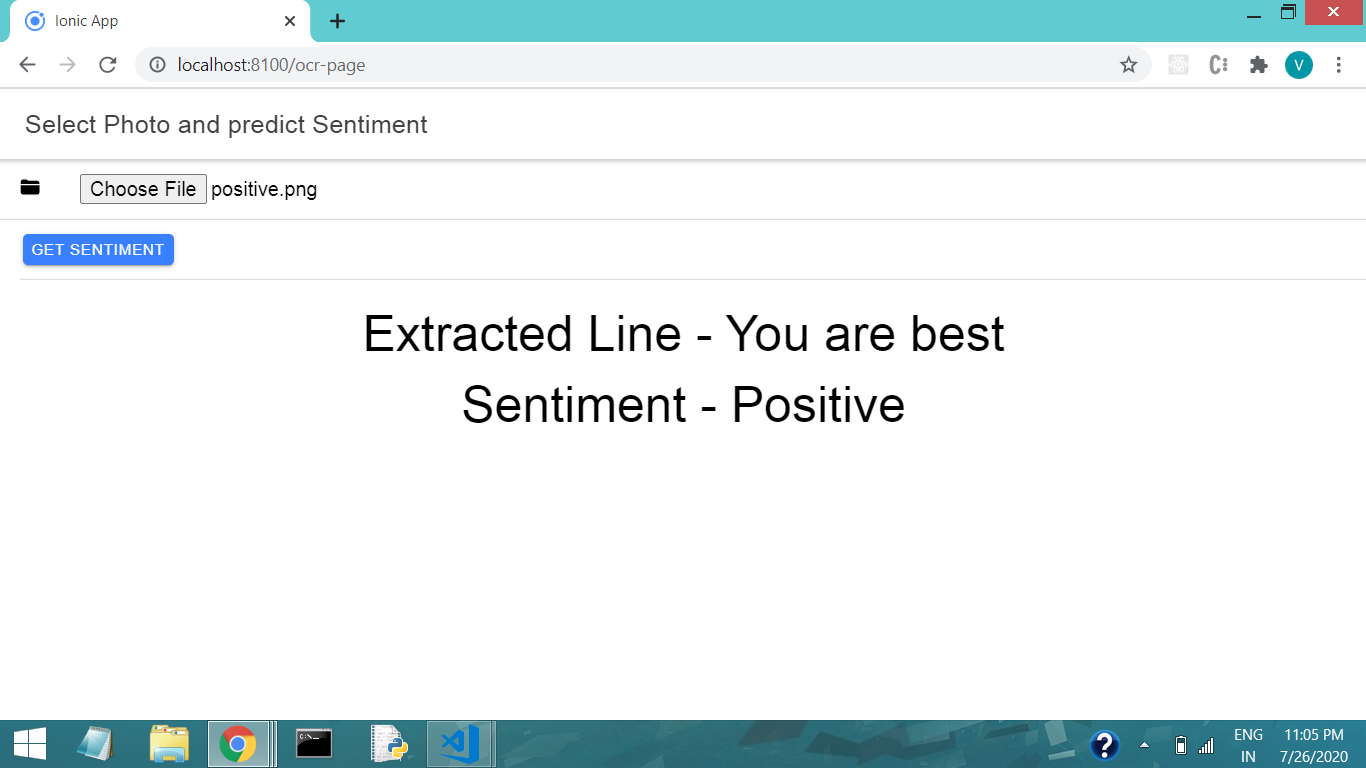
Here we can see the extracted text is as it was in the image and the predicted sentiment is also correct as the best word represents the positive sentiment.
在这里,我们可以看到提取的文本与图像中的文本一样,并且预测的情感也是正确的,因为最佳单词代表了积极的情感。

Now we can try on with some negative sentences here which will help to know the classifiers accuracy.
现在我们可以在这里尝试一些否定的句子,这将有助于了解分类器的准确性。
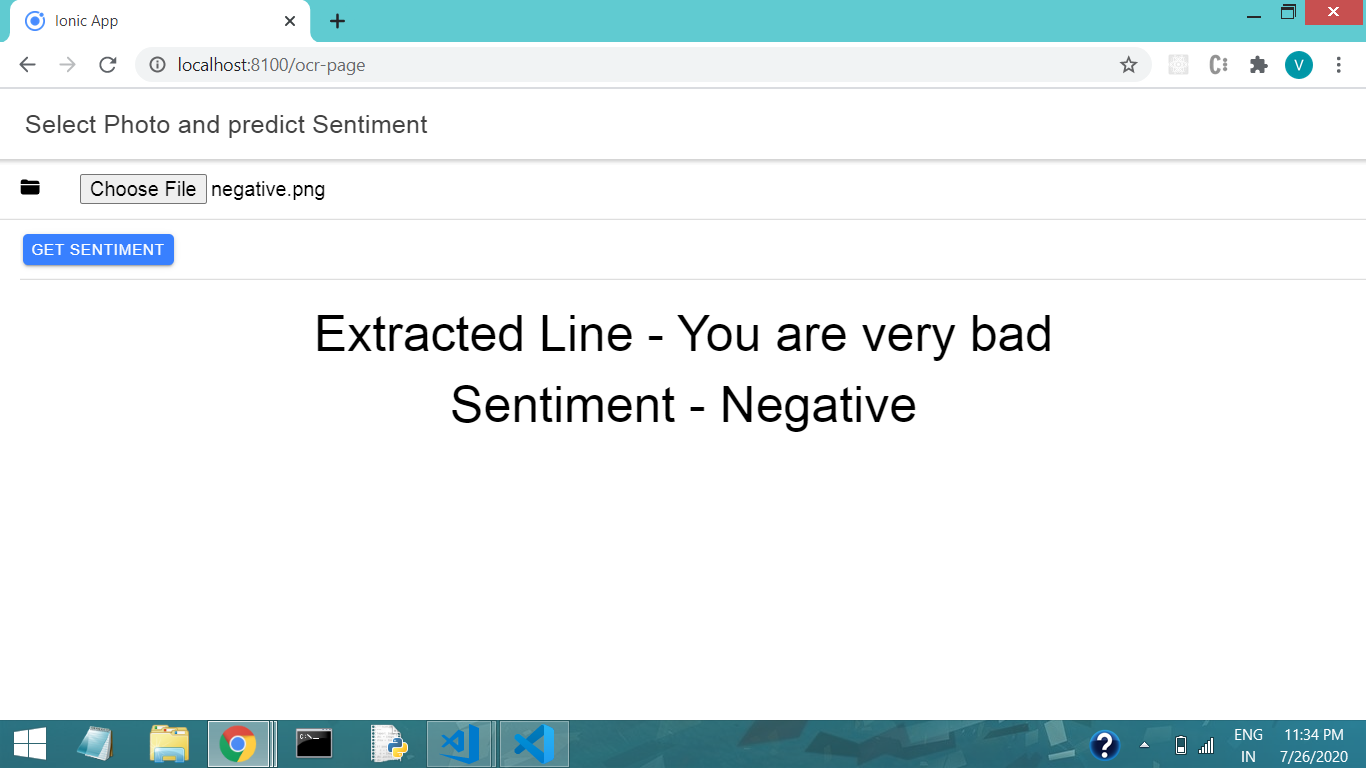
Now here We can see the extracted document is also fine and the predicted sentiment is also correct as the bad word represent the negative sentiment
现在在这里我们可以看到提取的文档也很好,并且预测的情绪也很正确,因为它是坏单词 代表负面情绪
You can get the UI code HERE and the flask server code HERE.
结论 (Conclusion)
In this tutorial we have learn about the extraction of text from the image using PyTesseract and sentiment analysis using the nltk package in python and we have also learnt the basics of the flask server and to make the routes for calling from the front end client.
在本教程中,我们了解了如何使用PyTesseract从图像中提取文本以及如何使用python中的nltk软件包进行情感分析,并且还了解了flask服务器的基础知识以及如何从前端客户端进行调用。
翻译自: https://medium.com/analytics-vidhya/basic-ocr-and-sentiment-analysis-web-app-eda969d7c344
ocr应用


 1314
1314


 被折叠的 条评论
为什么被折叠?
被折叠的 条评论
为什么被折叠?
 到【灌水乐园】发言


