


桌面应用程序 azure
Nowadays there are so many ways to build and deploy Next.js apps such as Next.js with Java, Next.js with Nodejs, serverless, etc. Building with Azure Static Web apps service is one of them and Microsoft Azure recently released it and it’s in the preview mode. With this service, you can develop modern apps fast with global reach and scale.
如今,构建和部署Next.js应用程序的方法有很多,例如使用Java的Next.js,使用Nodejs的Next.js,无服务器等。使用Azure静态Web应用程序服务的构建就是其中之一,Microsoft Azure最近发布了该方法,并且它处于预览模式。 借助此服务,您可以快速开发具有全球影响力和规模的现代应用程序。
You can accelerate your app development with a static front end and dynamic back end powered by serverless APIs. Experience high productivity with tailored local development experience, GitHub native workflows to build and deploy your app, and unified hosting and management in the cloud.
您可以通过无服务器API提供支持的静态前端和动态后端来加速应用程序开发。 通过量身定制的本地开发经验,用于构建和部署您的应用程序的GitHub本地工作流以及在云中的统一托管和管理,体验高生产率。
In this post, We will see how we can develop a Next.js app with this service with an example frontend and backend NodeJS API calls.
在本文中,我们将看到如何使用示例服务前端和后端NodeJS API调用来开发具有此服务的Next.js应用程序。
Benefits of Azure Static Web Apps
Azure静态Web应用的好处
With Other Frameworks
与其他框架
Prerequisites
先决条件
Example Project
示例项目
Create a GitHub Project
创建一个GitHub项目
Configure an Azure Static Webapp In Azure
在Azure中配置Azure静态Webapp
Folder Structure and Configuration
文件夹结构和配置
NEXT.js Development
NEXT.js开发
Azure Functions Development
Azure功能开发
How To Run the Whole Setup Locally
如何在本地运行整个安装程序
Publish the App to Azure
将应用发布到Azure
Demo
演示版
Summary
摘要
Conclusion
结论
Azure静态Web应用的好处 (Benefits of Azure Static Web Apps)
There are a lot of benefits to using Azure static web apps. If you are looking for a faster development and deployment process with just a git commit you would definitely check this out. Here are some of the benefits according to their website.
使用Azure静态Web应用程序有很多好处。 如果您仅通过git commit寻求更快的开发和部署过程,那么您肯定会检查出来的。 根据他们的网站,这里有一些好处。
- Productivity from local development to GitHub native workflows for CI/CD 从本地开发到CI / CD的GitHub本地工作流程的生产力
- Managed global availability for static content 托管的全球静态内容可用性
- Dynamic scale for serverless APIs 无服务器API的动态扩展
- Streamlined management including custom domain configuration and authentication and authorization 简化的管理,包括自定义域配置以及身份验证和授权
与其他框架 (With Other Frameworks)
You can build Azure static web apps with any frontend framework. Check out the same article with other frameworks.
您可以使用任何前端框架来构建Azure静态Web应用。 查看其他框架的同一文章。
先决条件 (Prerequisites)
You need to know a lot of things as prerequisites if you want to understand the Azure Static web apps service. First, you need to create two accounts: Github account to store the source code and Microsoft Account to deploy that code using Azure static web app service. Let’s create these accounts by following the below links. You can start both for free.
如果要了解Azure Static Web应用程序服务,则需要了解很多先决条件。 首先,您需要创建两个帐户:Github帐户(用于存储源代码)和Microsoft帐户(用于使用Azure静态Web应用程序服务部署该代码)。 让我们通过以下链接创建这些帐户。 您可以免费开始。
Since we are building NEXT.js application you need to be familiar with Next.js CLI, nodejs, and typescript. First, you need to install NodeJS, Next.js CLI and then you can create an application with CLI.
由于我们正在构建NEXT.js应用程序,因此您需要熟悉Next.js CLI,nodejs和Typescript。 首先,您需要安装NodeJS,Next.js CLI,然后可以使用CLI创建应用程序。
All the API code that you develop for the application will be converted to Azure functions at the time of deployment. You need to be familiar with these following. When you make an API calls form your app you need to proxy those calls to API you need a Live Server extension for that.
您为应用程序开发的所有API代码都将在部署时转换为Azure函数。 您需要熟悉以下内容。 从应用程序进行API调用时,您需要将这些调用代理到API,为此需要Live Server扩展。
Azure Functions extension for Visual Studio Code
Visual Studio Code的Azure Functions扩展
Live Server extension for Visual Studio Code
Visual Studio Code的Live Server扩展
示例项目 (Example Project)
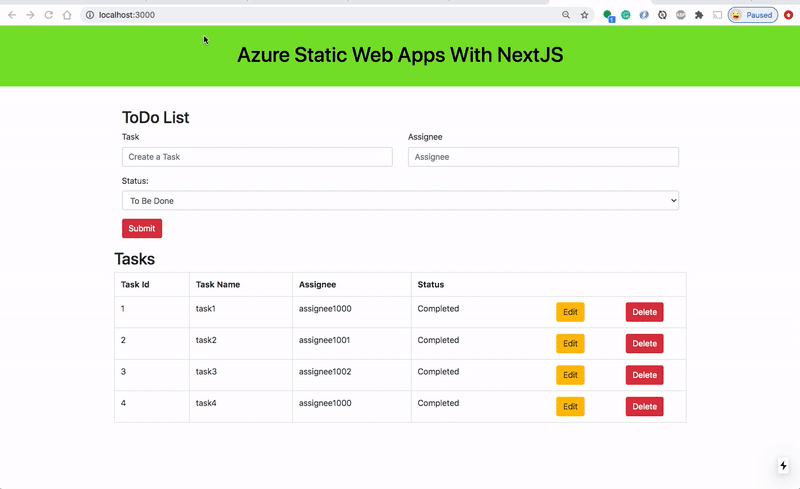
Here is an example of a simple todo application that creates, retrieves, edits, and deletes tasks. In a normal way, we actually run the API on the NodeJS server and you can use MongoDB to save all these tasks.
这是一个创建,检索,编辑和删除任务的简单待办应用程序的示例。 通常,我们实际上是在NodeJS服务器上运行API,您可以使用MongoDB保存所有这些任务。
When it comes to Azure Static web apps you have to run the API with Azure Functions. We need to go through some series of steps to set it up. Let’s dive into those steps in the following sections.
对于Azure静态Web应用程序,您必须使用Azure Functions运行API。 我们需要执行一些步骤来进行设置。 让我们在以下部分中深入研究这些步骤。
创建一个GitHub项目 (Create a GitHub Project)
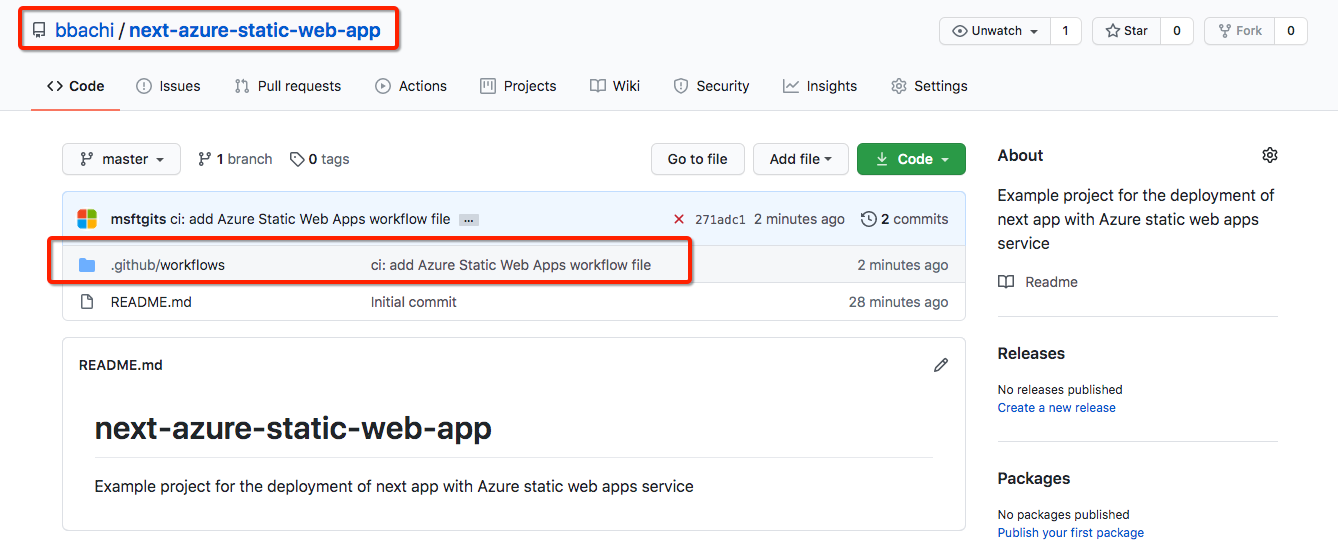
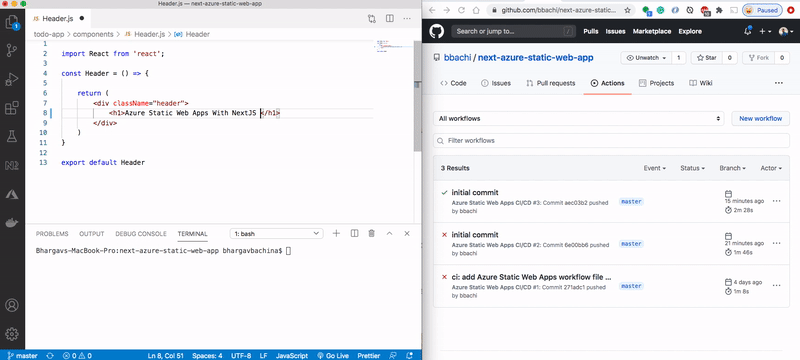
Azure Static Web Apps publishes websites to a production environment by building apps from a GitHub repository. If you don’t have a Github account its time to create one. I created a repository for the project called next-azure-static-web-app.
Azure静态Web应用程序通过从GitHub存储库中构建应用程序,将网站发布到生产环境。 如果您没有Github帐户,那就该创建一个帐户了。 我为该项目创建了一个名为next-azure-static-web-app的存储库。

在Azure中配置Azure静态Webapp (Configure an Azure Static Webapp In Azure)
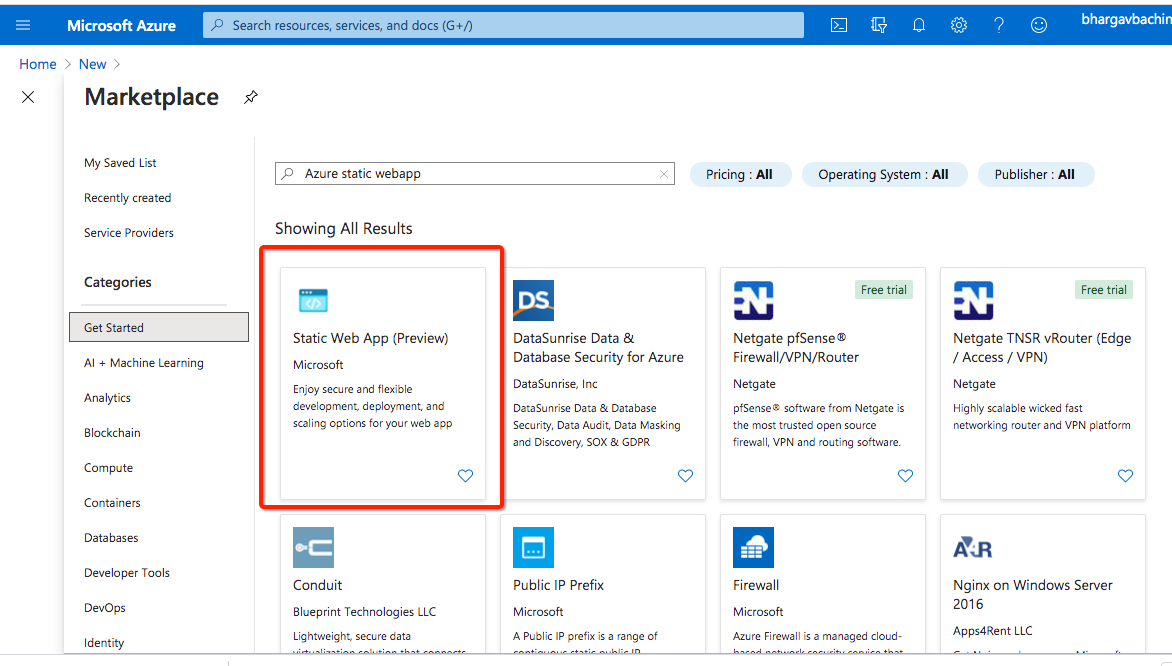
You need to create a Microsoft Azure account before you do anything. Once you log in and you can click on create a resource and select Static Web App
在执行任何操作之前,您需要创建一个Microsoft Azure帐户。 登录后,您可以单击创建资源并选择静态Web应用程序。
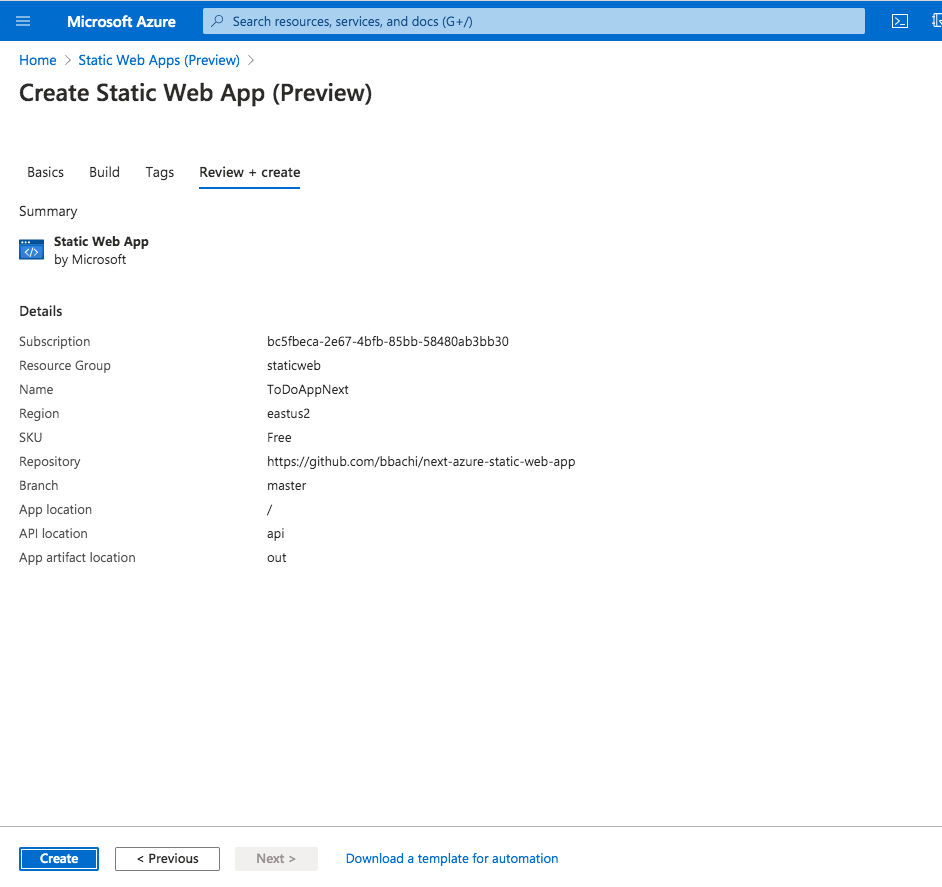
You can go to this below page gives all the necessary details such as Resource Group, name, region, etc. You should log in to your Github account under the source Control Details section and select appropriate details such as the repo, branch to trigger the action, etc.
您可以转到下面的页面,其中提供了所有必要的详细信息,例如资源组,名称,区域等。您应该在“源代码控制详细信息”部分下登录到Github帐户,并选择适当的详细信息,例如回购,分支来触发动作等
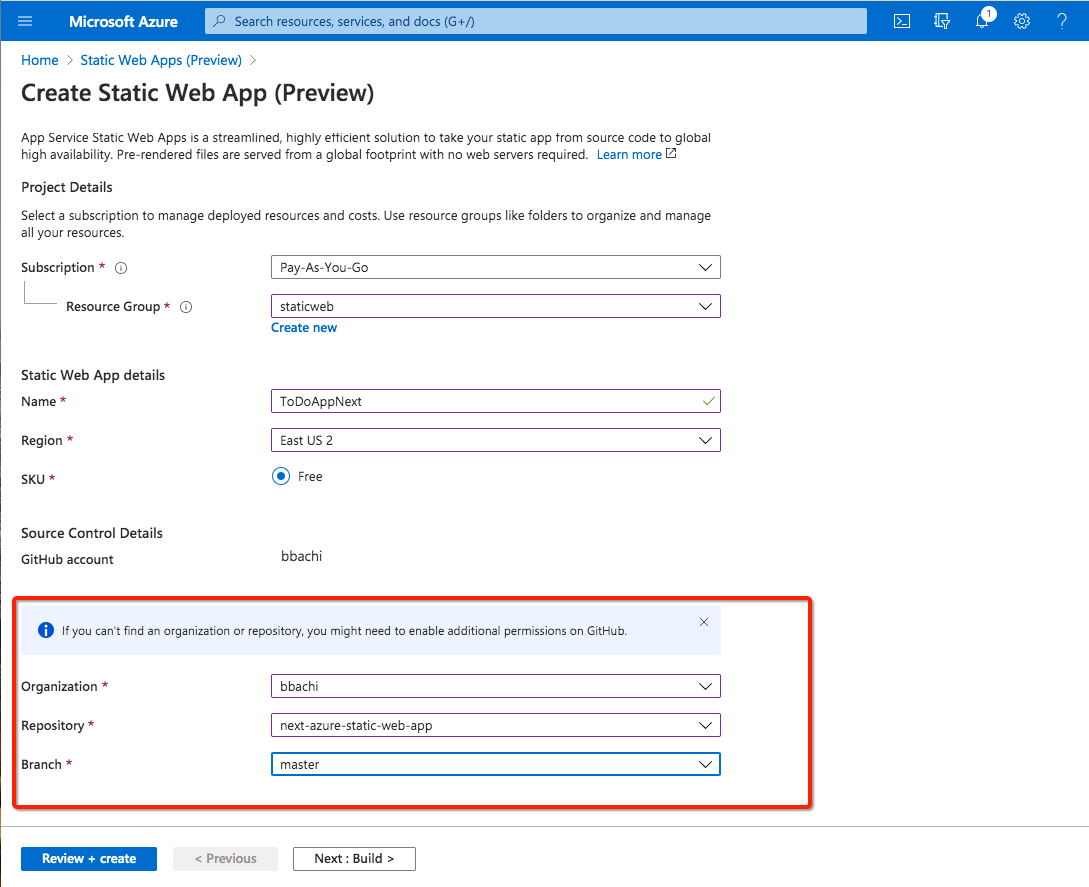
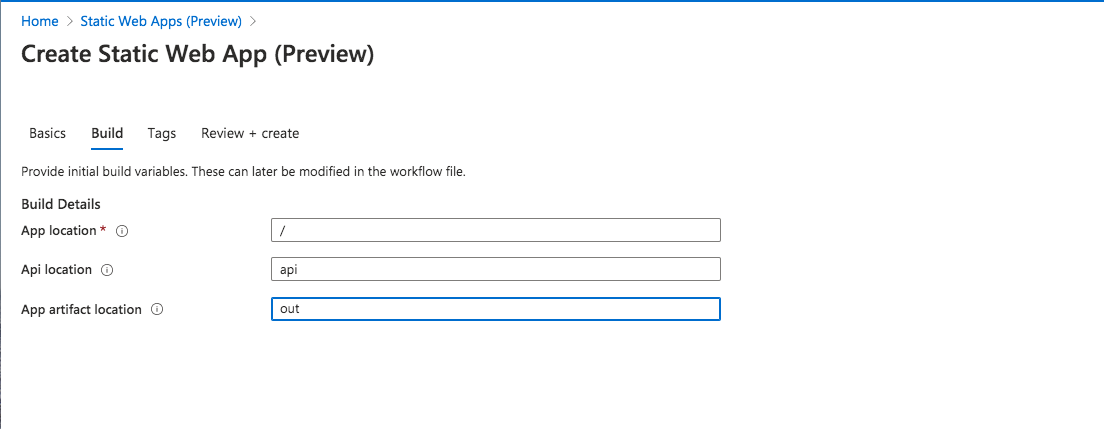
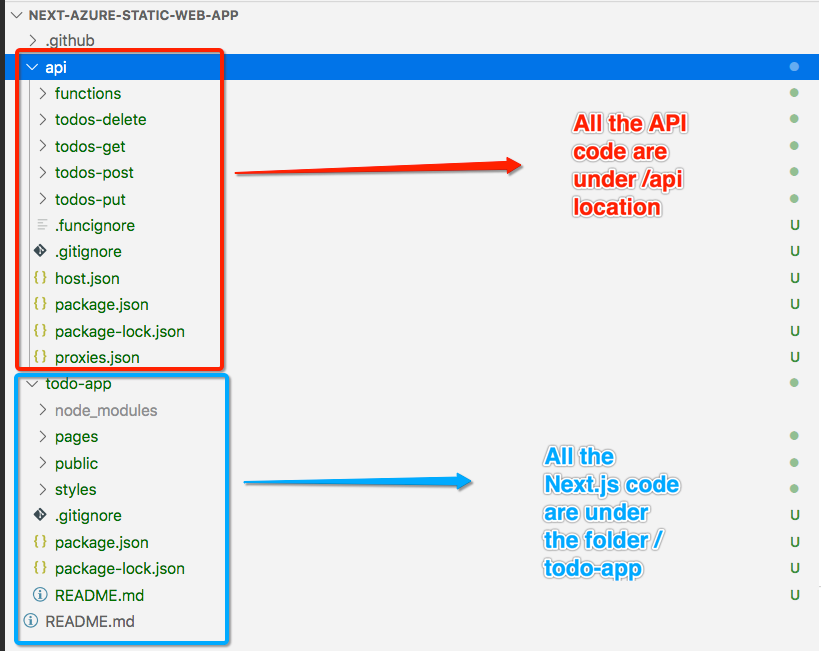
You can notice that I gave the same project that I created above in the Github Account. You need to give the details such as App location, API location, and artifact location. All the API code is under the folder api, and when I build the Next.js application all the built files are placed under the folder out.
您会注意到,我给了与我在Github帐户中创建的相同项目。 您需要提供详细信息,例如应用程序位置,API位置和工件位置。 所有的API代码都在文件夹api下,当我构建Next.js应用程序时,所有构建的文件都放在文件夹out下 。
Once the deployment is completed you can go to the overview page of the resource.
部署完成后,您可以转到资源的概述页面。

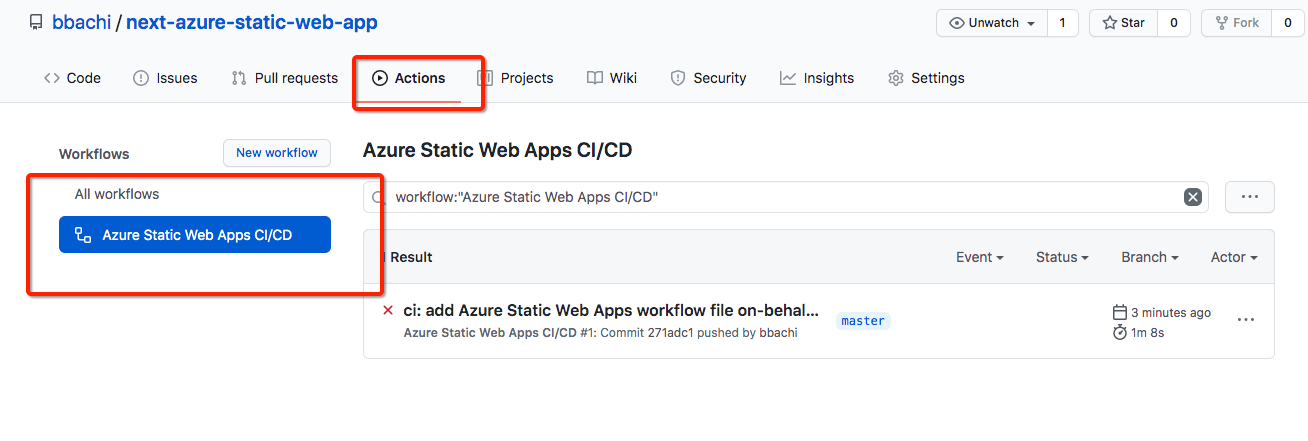
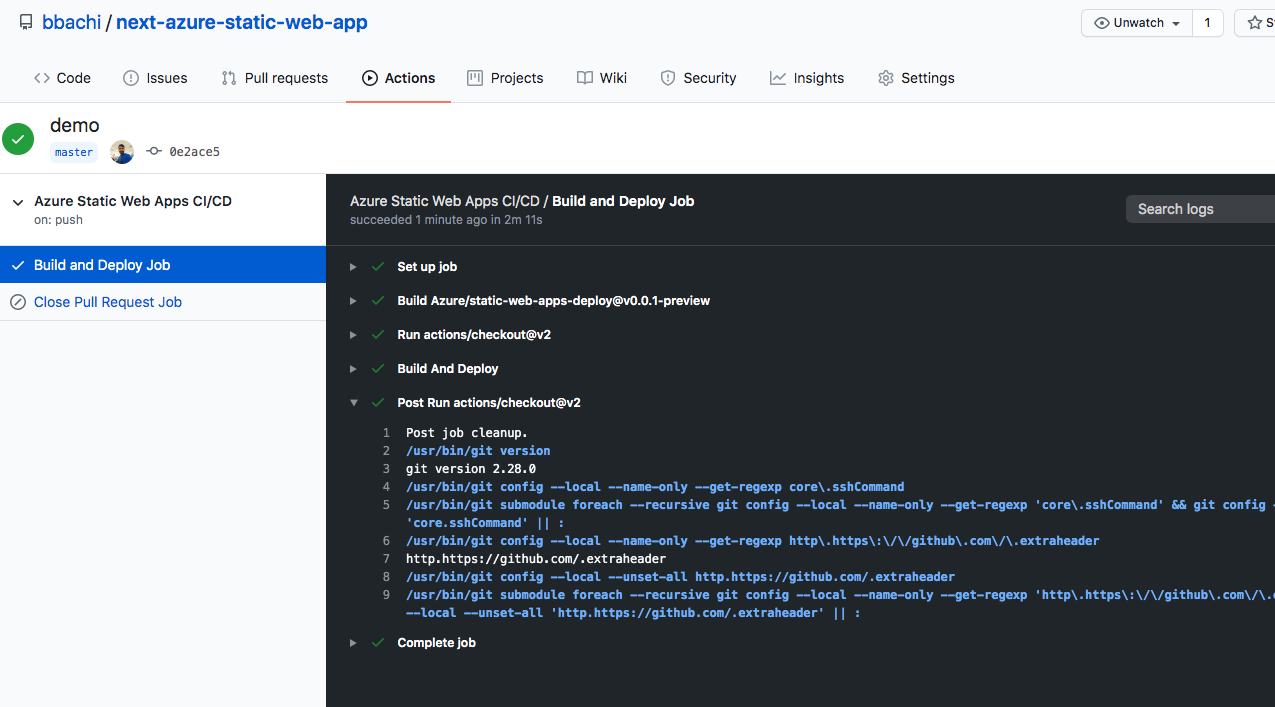
After the deployment is completed the deployment automatically creates the workflow action and CI/CD pipeline like below.
部署完成后,部署会自动创建工作流操作和CI / CD管道,如下所示。
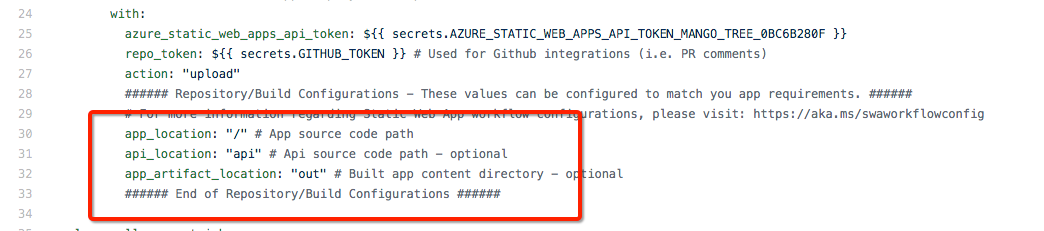
Here is the complete YAML file generated by Azure static web app service. You can notice all the details which are given in the resource creation process.
这是由Azure静态Web应用程序服务生成的完整YAML文件。 您可以注意到资源创建过程中提供的所有详细信息。
https://github.com/bbachi/next-azure-static-web-app/blob/master/.github/workflows/azure-static-web-apps-mango-tree-0bc6b280f.yml文件夹结构和配置 (Folder Structure and Configuration)
The App’s folder structure is very important, and I would recommend you maintain a separate folder for Next.js and Azure Functions as below.
该应用程序的文件夹结构非常重要,我建议您为Next.js和Azure Functions维护一个单独的文件夹,如下所示。
Once you decide on the folder structure, you need to configure and let the workflow knows where are the App code and API code in the Azure static web apps YAML file like below. Notice the app_location, api_location, and app_artifact_location in the below YAML file. Since when I build the Angular code, it will be in the folder called /out/ so we need to give this location as app_artifact_location.
确定文件夹结构后,需要进行配置,并让工作流知道Azure静态Web应用程序YAML文件中的应用程序代码和API代码在哪里,如下所示。 请注意以下YAML文件中的app_location,api_location和app_artifact_location 。 由于构建Angular代码时,它将位于/ out /文件夹中,因此我们需要将此位置指定为app_artifact_location。
You need to run the command next export to put all the compiled code under out folder. Here is the package.json to add that command for the build script.
您需要运行next export命令将所有已编译的代码放在out文件夹下。 这是package.json,用于为构建脚本添加该命令。
{
  "name": "todo-app",
  "version": "0.1.0",
  "private": true,
  "scripts": {
    "dev": "next dev",
    "build": "next build && next export",
    "start": "next start"
  },
  "dependencies": {
    "next": "9.5.1",
    "react": "16.13.1",
    "react-dom": "16.13.1"
  }
}
name: Azure Static Web Apps CI/CD
on:
push:
branches:
- master
pull_request:
types: [opened, synchronize, reopened, closed]
branches:
- master
jobs:
build_and_deploy_job:
if: github.event_name == 'push' || (github.event_name == 'pull_request' && github.event.action != 'closed')
runs-on: ubuntu-latest
name: Build and Deploy Job
steps:
- uses: actions/checkout@v2
with:
submodules: true
- name: Build And Deploy
id: builddeploy
uses: Azure/static-web-apps-deploy@v0.0.1-preview
with:
azure_static_web_apps_api_token: ${{ secrets.AZURE_STATIC_WEB_APPS_API_TOKEN_MANGO_TREE_0BC6B280F }}
repo_token: ${{ secrets.GITHUB_TOKEN }} # Used for Github integrations (i.e. PR comments)
action: "upload"
###### Repository/Build Configurations - These values can be configured to match you app requirements. ######
# For more information regarding Static Web App workflow configurations, please visit: https://aka.ms/swaworkflowconfig
app_location: "todo-app" # App source code path
api_location: "api" # Api source code path - optional
app_artifact_location: "out" # Built app content directory - optional
###### End of Repository/Build Configurations ######
close_pull_request_job:
if: github.event_name == 'pull_request' && github.event.action == 'closed'
runs-on: ubuntu-latest
name: Close Pull Request Job
steps:
- name: Close Pull Request
id: closepullrequest
uses: Azure/static-web-apps-deploy@v0.0.1-preview
with:
azure_static_web_apps_api_token: ${{ secrets.AZURE_STATIC_WEB_APPS_API_TOKEN_MANGO_TREE_0BC6B280F }}
action: "close"NEXT.js开发 (NEXT.js Development)
Once you create the separate folder for the Next code you need to start with the following command to scaffold the Next.js structure with the help of Next CLI. We will not build the entire app here instead we will go through important points here. You can clone the entire GitHub Repo and check the whole app.
为Next代码创建单独的文件夹后,您需要从以下命令开始,以在Next CLI的帮助下搭建Next.js结构。 我们不会在这里构建整个应用程序,而是会在这里进行重点介绍。 您可以克隆整个GitHub Repo并检查整个应用程序。
npx create-next-app todo-appHere are the index.js and _app.js file for the app as the bootstrap components that means this is the first component that loads in the browser. You can import all the CSS related files in the _app.js file.
这是应用程序的index.js和_app.js文件,它们是引导程序组件,这意味着这是在浏览器中加载的第一个组件。 您可以将所有与CSS相关的文件导入_app.js文件中。
import '../styles/globals.css'
import "bootstrap/dist/css/bootstrap.min.css";


function MyApp({ Component, pageProps }) {
  return <Component {...pageProps} />
}


export default MyApp
The Dashboard component is the first component that loads since it is defined in the index.js file. Here is the dashboard component. This is a simple application where you add, update, delete tasks. You can go through the GitHub repo to check the rest of the files. We are using two hooks here one is for maintaining the local state and another is for fetching the data from the API.
仪表板组件是第一个加载的组件,因为它是在index.js文件中定义的。 这是仪表板组件。 这是一个简单的应用程序,您可以在其中添加,更新,删除任务。 您可以浏览GitHub存储库以检查其余文件。 我们在这里使用了两个钩子,一个用于维护本地状态,另一个用于从API获取数据。
import React, { useState, useEffect } from 'react';
import Header from './Header'
import { Tasks } from './Tasks'
import CreateTask from './CreateTask'
import { getAllTasks, deleteTask } from '../services/ToDoService'


function Dashboard() {


  const [tasks, setTasks] = useState([])
  const [numberOfTasks, setNumberOfTasks] = useState([])
  const [isTaskEdited, setTaskEdited] = useState(false)


  useEffect(() => {
    getAllTasks().then(tasks => {
        console.log(tasks)
        setTasks(tasks)
      });
  }, [numberOfTasks, isTaskEdited])


  function delTask(taskId) {
      deleteTask(taskId).then(response => {
        console.log(response)
        setNumberOfTasks(numberOfTasks - 1)
      });
  }


  function taskCreated() {
    setNumberOfTasks(numberOfTasks + 1)
  }


  function taskEdited(res) {
     setTaskEdited(res)
  }

  return (
    <div className="App">
      <Header></Header>
      <div className="container mrgnbtm">
        <div className="row">
          <div className="col-md-12">
              <CreateTask taskCreated={taskCreated}></CreateTask>
          </div>
        </div>
      </div>
      <div className="row mrgnbtm">
        <Tasks tasks={tasks} deleteTask={delTask} taskEdited={taskEdited}></Tasks>
      </div>
    </div>
  );
}


export default Dashboard;
We have another two important components here one is for the createTask Form component and another is for the Tasks table.
我们还有另外两个重要的组件,一个是createTask Form组件,另一个是Tasks表。
import React from 'react'
import { useForm } from "react-hook-form";
import { createTask } from '../services/TodoService'


export default function CreateTask(props) {


    const { register, handleSubmit } = useForm();
    const onSubmit = (data, e) => {
        createTask(data).then(response => {
            props.taskCreated();
            e.target.reset();
        });
    };


    return(
        <div className="container">
            <div className="row">
                <div className="col-md-12 mrgnbtm">
                <h2>ToDo List</h2>
                <form onSubmit={handleSubmit(onSubmit)}>
                    <div className="row">
                        <div className="form-group col-md-6">
                            <label htmlFor="exampleInputEmail1">Task</label>
                            <input type="text" className="form-control" name="task" id="task" aria-describedby="emailHelp" ref={register} placeholder="Create a Task" />
                        </div>
                        <div className="form-group col-md-6">
                            <label htmlFor="exampleInputPassword1">Assignee</label>
                            <input type="text" className="form-control" name="assignee" id="assignee" ref={register} placeholder="Assignee" />
                        </div>
                    </div>
                    <div className="row">
                        <div className="form-group col-md-12">
                            <label htmlFor="exampleInputEmail1">Status:</label>
                            <select className="form-control" name="status" ref={register} id="sel1">
                                <option>To Be Done</option>
                                <option>In Progress</option>
                                <option>Completed</option>
                            </select>
                        </div>
                    </div>
                    <input type="submit" className="btn btn-danger" />
                </form>
                </div>
            </div>
        </div>
    )
}
Here is the service file which calls the API, in this case, Azure Functions. We have four API operations to get, add, edit, and delete tasks with root path /api.
这是调用API(在本例中为Azure Functions)的服务文件。 我们有四个API操作可使用根路径/ api获取,添加,编辑和删除任务。
export async function getAllTasks() {


    const response = await fetch('/api/todos');
    return await response.json();
}


export async function createTask(data) {
    const response = await fetch(`/api/todos`, {
        method: 'POST',
        headers: {'Content-Type': 'application/json'},
        body: JSON.stringify({task: data})
    })
    return await response.json();
}


export async function deleteTask(taskId) {
    const response = await fetch(`/api/todo/${taskId}`, {method: 'DELETE'})
    return await response.json();
}


export async function editTask(data) {
    const response = await fetch(`/api/todo`, {
        method: 'PUT',
        headers: {'Content-Type': 'application/json'},
        body: JSON.stringify({task: data})
    })
    return await response.json();
}
Run the React code in local with the following command which runs on the port 3000 on localhost. Make sure you are in the root folder of React code which is todo-app here.
使用以下命令在本地运行React代码,该命令在localhost的端口3000上运行。 确保您位于此处的todo-app的React代码的根文件夹中。
cd todo-app
npm start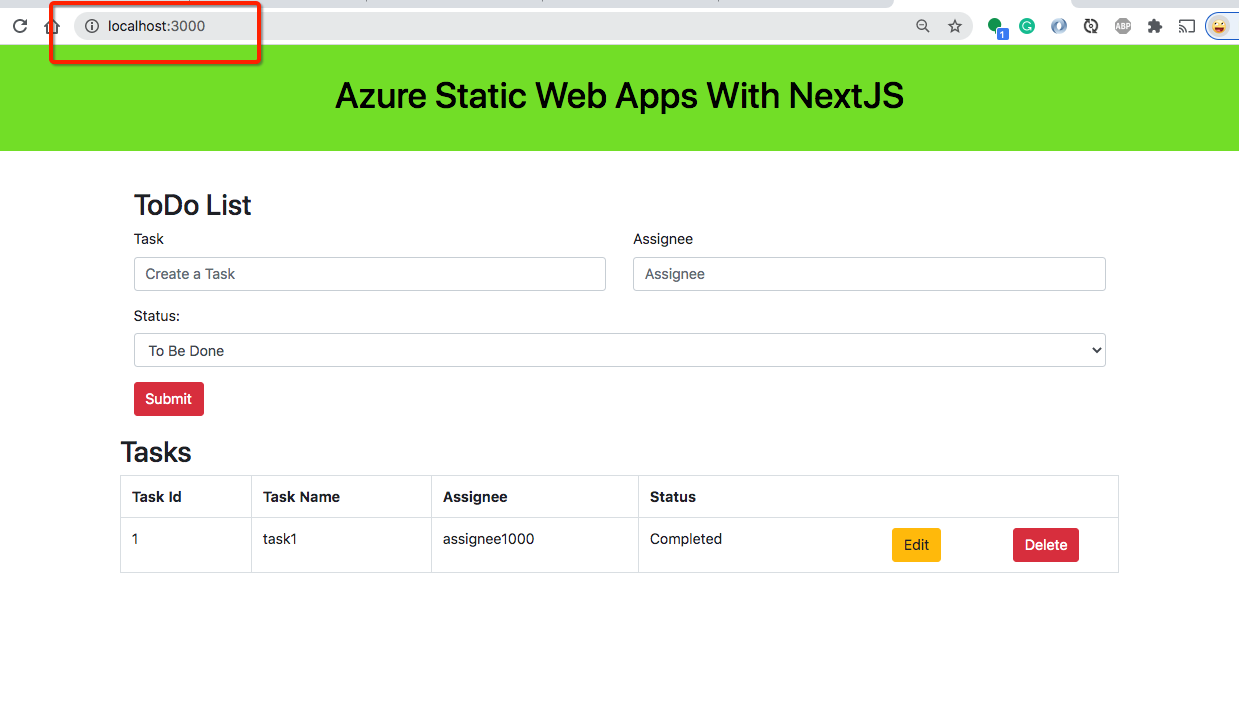
Azure功能开发 (Azure Functions Development)
Make sure you install VSCode extensions as I mentioned in the prerequisites section. Let me go through the whole creation process for one function here. Once you install those extensions.
确保按照先决条件部分中所述安装VSCode扩展。 让我在这里完成一个功能的整个创建过程。 一旦安装了这些扩展。
First, you need to create a project with Azure Functions extension in the VSCode and click on the folder icon on the top to create an Azure Functions project.
首先,您需要在VSCode中创建一个具有Azure Functions扩展名的项目,然后单击顶部的文件夹图标以创建一个Azure Functions项目。
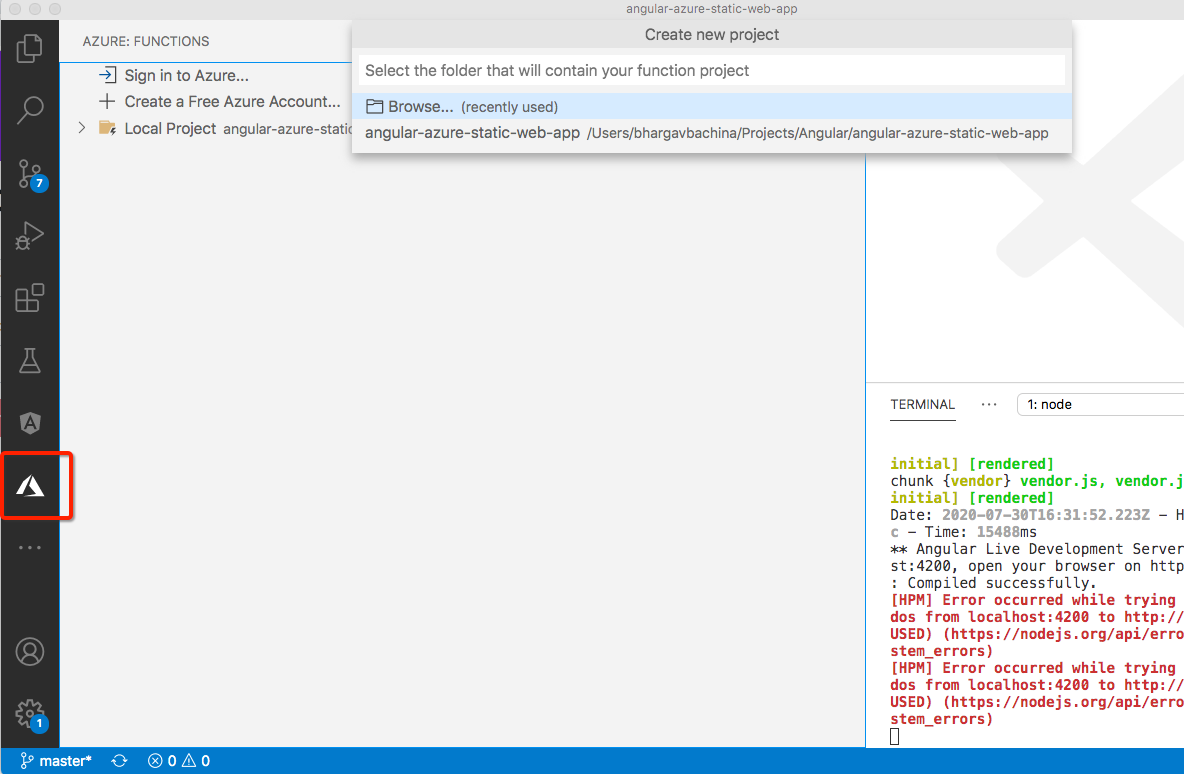
浏览文件夹 (Browse the folder)
You can select the api folder where all the Azure Functions code goes
您可以选择所有Azure Functions代码所在的api文件夹
选择一种语言 (Select a language)
You need to select the language that you need to write functions with. In our case, select the Javascript.
您需要选择编写函数所需的语言。 在我们的例子中,选择Javascript。
选择项目的第一个功能的模板 (Select a template for your project’s first function)
Select a template HTTP trigger since we are writing an API for our angular code.
选择模板HTTP触发器,因为我们正在为角度代码编写API。
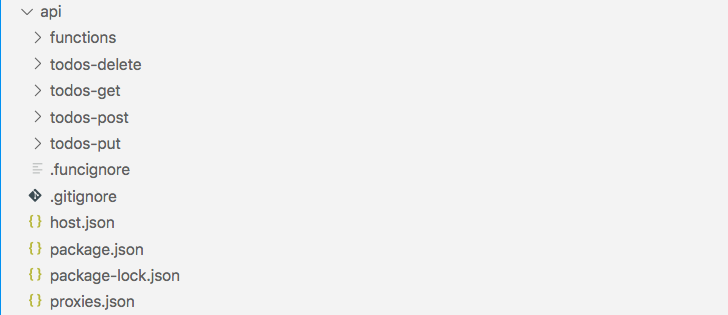
The whole process creates an Azure functions project with the following structure. It contains a package.json where you can run the project with this command npm start
整个过程将创建具有以下结构的Azure功能项目。 它包含一个package.json,您可以在其中使用此命令npm start运行项目
This is a package.json file where start command is defined in the scripts section.
这是一个package.json文件,其中在脚本部分中定义了启动命令。
{
  "name": "api",
  "version": "1.0.0",
  "description": "",
  "scripts": {
    "start": "func start",
    "test": "echo \"No tests yet...\""
  },
  "dependencies": {
    "azure-function-express": "^2.0.0",
    "express": "^4.17.1"
  },
  "devDependencies": {}
}
We have four functions defined for the four API routes. Let’s have a look at the todos-get function. We have two files for each function: index.js and function.json.
我们为四个API路由定义了四个函数。 让我们看一下todos-get函数。 每个功能都有两个文件: index.js和function.json 。
index.js (index.js)
Every function has an index.js file as the starting point and receives HTTP request and context objects and sends an HTTP response back. You can access the HTTP request and response through context object. You can import other files into this for the processing, database access layer, etc.
每个函数都有一个index.js文件作为起点,并接收HTTP请求和上下文对象,并将HTTP响应发送回去。 您可以通过上下文对象访问HTTP请求和响应。 您可以将其他文件导入其中以进行处理,数据库访问层等。
const todoService = require('../functions/services/todo');


module.exports = async function (context, req) {
    context.log('JavaScript HTTP trigger function processed a request.');


    context.res = {
        status: 200,
        body: todoService.getTodos(context)
    };
};
function.json (function.json)
Every function has a function.json file which defines the route, type of HTTP method, directions of the request, and response objects. For example, This is the get request and the direction is in with the req object. The object is res for the direction out.
每个函数都有一个function.json文件,该文件定义路由,HTTP方法的类型,请求的方向以及响应对象。 例如,这是get请求,并且方向与req对象有关。 该对象是用于定向的res。
{
  "bindings": [
    {
      "authLevel": "anonymous",
      "type": "httpTrigger",
      "direction": "in",
      "name": "req",
      "methods": ["get"],
      "route": "todos"
    },
    {
      "type": "http",
      "direction": "out",
      "name": "res"
    }
  ]
}
You have the route called todos in the JSON file that means when you start the Azure Functions with this command func start you can access on http://localhost:7071/api/todos
您在JSON文件中具有称为todos的路由,这意味着当您使用此命令func start Azure Functions时,可以在http:// localhost:7071 / api / todos上进行访问
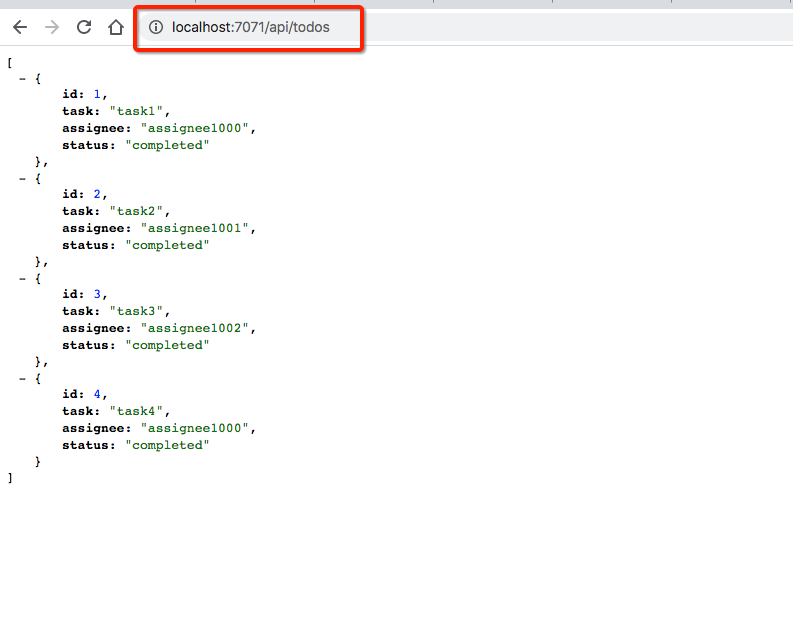
Here are the helper files that act as a database and can be used with all the functions.
这是充当数据库的辅助文件,可以与所有功能一起使用。
const data = {
    todos: [
      {
        id: 1,
        task: 'task1',
        assignee: 'assignee1000',
        status: 'completed'
      },
      {
        id: 2,
        task: 'task2',
        assignee: 'assignee1001',
        status: 'completed'
      },
      {
        id: 3,
        task: 'task3',
        assignee: 'assignee1002',
        status: 'completed'
      },
      {
        id: 4,
        task: 'task4',
        assignee: 'assignee1000',
        status: 'completed'
      },

    ]
  };


  module.exports = {
    getToDos: function() {
        return data.todos;
    },
    addToDo: function(task) {
        task.id = data.todos.length + 1;
        data.todos.push(task);
        return {
            message: "task added",
            tasks: data.todos.length
        }
    },
    deleteToDos: function(id) {
        data.todos = data.todos.filter(todo => todo.id != id)
        return {
            message: "task deleted",
            tasks: data.todos.length
        }
    },
    editTodos: function(task) {
        data.todos = data.todos.map(todo => {
            if (todo.id === task.id) todo = task;
            return todo;
        });
        return {
            message: "task edited",
            tasks: data.todos.length
        }
    }
  }
Once you have all the functions in place and you can just start and test all the functions. You can see all the functions ready when you run the command npm start
一旦具备所有功能,就可以启动和测试所有功能。 运行命令npm start时,您可以看到所有功能就绪。
如何在本地运行整个安装程序 (How To Run the Whole Setup Locally)
Now you have the React app running on the port 3000 and the Azure functions running on the port 7071. We have to run a custom server instead of just running the default server provided by Next.js.
现在,您已在端口3000上运行React应用程序,并在端口7071上运行了Azure函数。 我们必须运行自定义服务器,而不是仅运行Next.js提供的默认服务器。
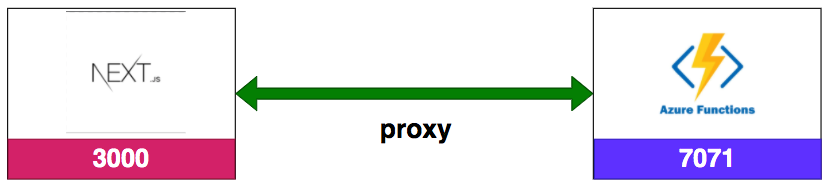
Here is the custom server.js file where we are using http-proxy-middleware to proxy all the calls with context path /api. We are proxying only if it is a development environment and all other requests will be redirected to Next.js router.
这是我们使用http-proxy-middleware的自定义server.js文件,用于使用上下文路径/api.代理所有调用/api. 仅当它是开发环境并且所有其他请求将被重定向到Next.js路由器时,我们才进行代理。
const express = require('express')
const next = require('next')
const { createProxyMiddleware } = require("http-proxy-middleware")


const port = process.env.PORT || 3000
const dev = process.env.NODE_ENV !== 'production'
const app = next({ dev })
const handle = app.getRequestHandler()


const apiPaths = {
    '/api': {
        target: 'http://localhost:7071',
        pathRewrite: {
            '^/api': '/api'
        },
        changeOrigin: true
    }
}


const isDevelopment = process.env.NODE_ENV !== 'production'


app.prepare().then(() => {
  const server = express()

  if (isDevelopment) {
    server.use('/api', createProxyMiddleware(apiPaths['/api']));
  }


  server.all('*', (req, res) => {
    return handle(req, res)
  })


  server.listen(port, (err) => {
    if (err) throw err
    console.log(`> Ready on http://localhost:${port}`)
  })
}).catch(err => {
    console.log('Error:::::', err)
})
Here is the package.json file of Next.js App and we are using server.js with the command npm run dev.
这是Next.js App的package.json文件,我们正在将server.js与命令npm run dev.
{
  "name": "todo-app",
  "version": "0.1.0",
  "private": true,
  "scripts": {
    "dev": "NODE_ENV='development' node server.js",
    "build": "next build && next export",
    "start": "next start"
  },
  "dependencies": {
    "bootstrap": "^4.5.2",
    "next": "9.5.1",
    "react": "16.13.1",
    "react-bootstrap": "^1.3.0",
    "react-dom": "16.13.1",
    "react-hook-form": "^6.3.3"
  },
  "devDependencies": {
    "express": "^4.17.1",
    "http-proxy-middleware": "^1.0.5"
  }
}
Here are the instructions to run the app in the local environment.
以下是在本地环境中运行该应用程序的说明。
// on Terminal 1cd todo-app
npm run dev// on Terminal 2cd api
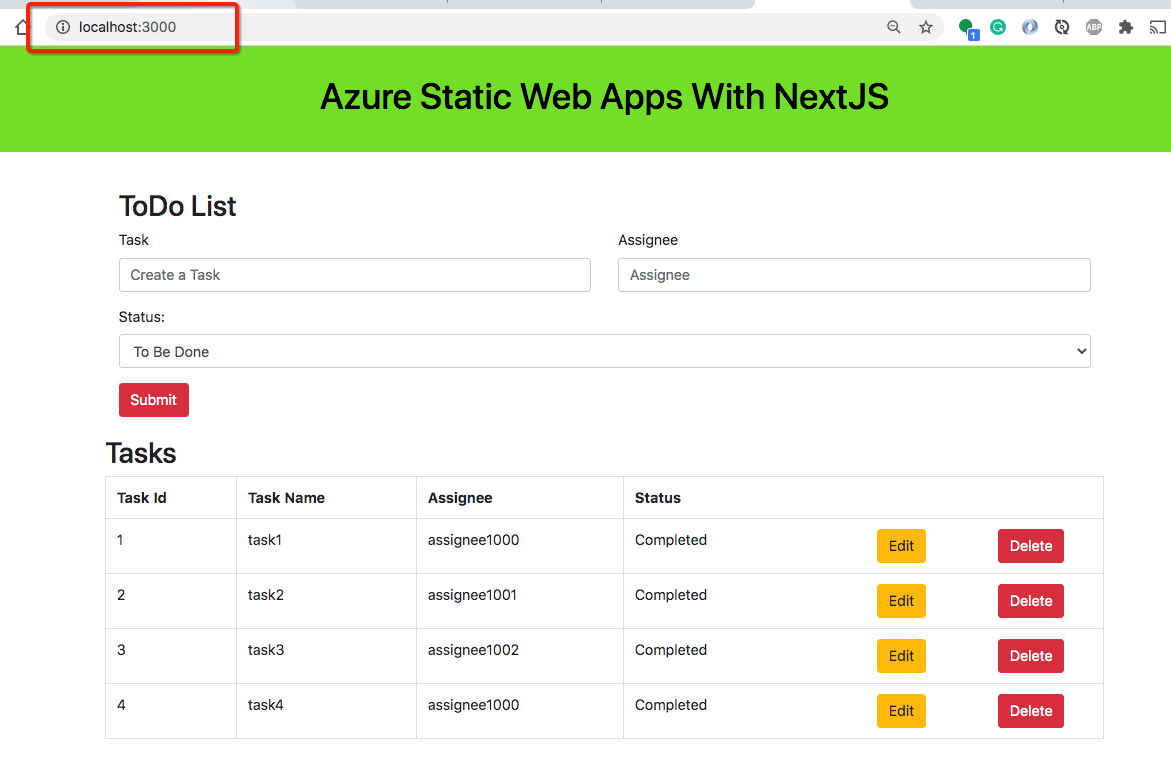
npm startHere is the App running on the port 3000 and all the API calls are proxying to the port 7071.
这是在端口3000上运行的应用程序,所有API调用都代理到端口7071。
将应用发布到Azure (Publish the App to Azure)
Once everything is working as expected in the local environment. It’s time to push it to Azure and test it out.
一旦一切都在本地环境中按预期工作。 现在是将其推送到Azure并进行测试的时候了。
Since everything is configured already when you create the Github project all you need to push the code into your master branch. As soon as you push the code into master branch Github actions trigger the build and deploy your Next.js App into Azure Static web apps service. All the code under api will be converted into Azure Functions. Let’s see that in action.
由于创建Github项目时已经配置好所有内容,因此需要将代码推送到master分支中。 将代码推送到主分支后,Github操作将立即触发生成并将Next.js应用部署到Azure静态Web应用服务中。 api下的所有代码都将转换为Azure函数。 让我们看看实际情况。
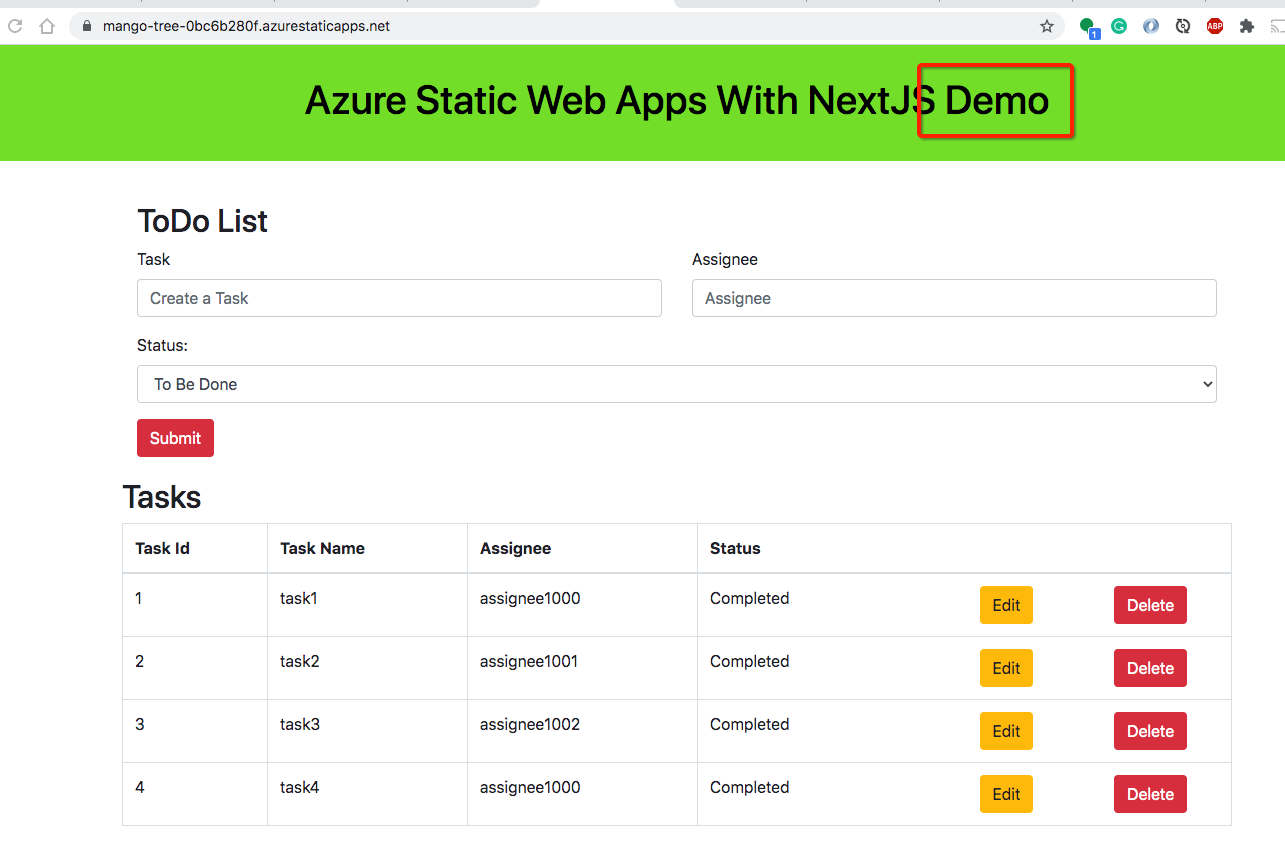
演示版 (Demo)
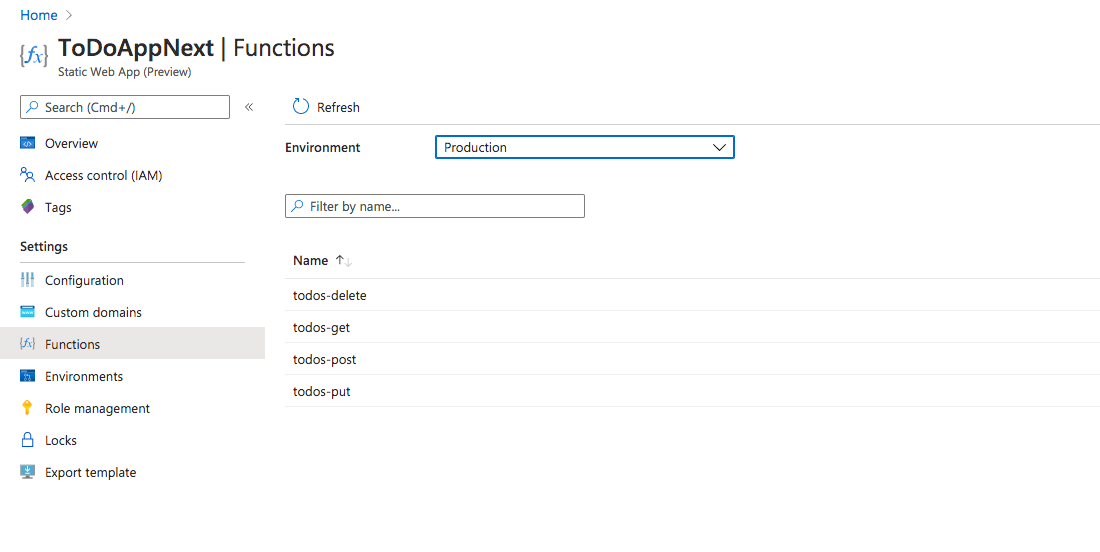
As soon as your job is successfully done You can explore the recent deployment in the Azure portal. You can see the APIs are converted into Azure Functions.
成功完成工作后,您可以在Azure门户中浏览最近的部署。 您可以看到API转换为Azure函数。
All the API functions are converted into Azure functions you can see that in the below screen.
所有API函数都将转换为Azure函数,您可以在下面的屏幕中看到。
摘要 (Summary)
- Building with Azure Static Web apps service is one of the deployment strategies and it is recently released by Microsoft Azure and it’s in the preview mode. With this service, you can develop modern apps fast with global reach and scale. 使用Azure静态Web应用程序服务进行构建是部署策略之一,它最近由Microsoft Azure发布,处于预览模式。 借助此服务,您可以快速开发具有全球影响力和规模的现代应用程序。
- You can accelerate your app development with a static front end and dynamic back end powered by serverless APIs. 您可以通过无服务器API提供支持的静态前端和动态后端来加速应用程序开发。
- You need to create two accounts: Github account to store the source code and Microsoft Account to deploy that code using Azure static web app service. 您需要创建两个帐户:Github帐户(用于存储源代码)和Microsoft帐户(用于使用Azure静态Web应用程序服务部署该代码)。
- Azure Static Web Apps publishes websites to a production environment by building apps from a GitHub repository. If you don’t have a Github account its time to create one. Azure静态Web应用程序通过从GitHub存储库中构建应用程序,将网站发布到生产环境中。 如果您没有Github帐户,那就该创建一个帐户了。
- You need to create a Microsoft Azure account before you do anything. Azure static web apps service is in preview mode at the time of writing. 在执行任何操作之前,您需要创建一个Microsoft Azure帐户。 在撰写本文时,Azure静态Web应用程序服务处于预览模式。
- It’s better to create a separate folder for Next.JS and API development. 最好为Next.JS和API开发创建一个单独的文件夹。
Once you decide on the folder structure you need to configure and let the workflow knows where are the App code and API code in the Azure static web apps YAML file especially, the app_location, api_location, and app_artifact_location.
一旦确定了文件夹结构,就需要配置并让工作流知道Azure静态Web应用程序YAML文件中的应用程序代码和API代码在哪里,尤其是app_location,api_location和app_artifact_location。
We need to write the API with Azure functions. Make sure you install Azure Functions extension for Visual Studio Code, Live Server extension for Visual Studio Code, and go through this Azure Functions if you are not familiar.
我们需要使用Azure函数编写API。 确保您安装了Visual Studio Code的Azure Functions扩展 ,Visual Studio Code的Live Server扩展 ,并且如果您不熟悉,请仔细阅读此Azure Functions 。
By default, Next.js runs on the port 3000 and Azure functions run on the port 7071 in the local development.
默认情况下,Next.js在本地开发中的端口3000上运行,Azure函数在端口7071上运行。
You can use custom server.js to facilitate communication between Next.js and Azure functions in the local environment.
您可以使用自定义server.js来促进Next.js与本地环境中的Azure函数之间的通信。
- As soon as you push the code into master branch Github actions trigger the build and deploy your Next.js App into Azure Static web apps service. All the code under api will be converted into Azure Functions. 将代码推送到主分支后,Github操作将立即触发生成并将Next.js应用部署到Azure静态Web应用服务中。 api下的所有代码都将转换为Azure函数。
结论 (Conclusion)
Azure static Web Apps service is a great service introduced by Microsoft Azure. This is in preview mode right now. If you want to build a web app and go from local development to production environment within minutes and take advantage of all the production-grade features out of the box. You should definitely try this service.
Azure静态Web Apps服务是Microsoft Azure推出的一项出色服务。 目前处于预览模式。 如果您想构建一个Web应用程序,并在几分钟之内从本地开发转到生产环境,并立即使用所有生产级功能。 您绝对应该尝试此服务。
桌面应用程序 azure


 被折叠的 条评论
为什么被折叠?
被折叠的 条评论
为什么被折叠?
 到【灌水乐园】发言


